353 | Understanding Brake System Hydraulics
Summary
The primary braking system of every modern performance vehicle uses hydraulics to transfer force from the pedal to the brake calipers. Unfortunately the principles of these hydraulics is commonly misunderstood, resulting in poor brake function, balance and pedal feel. In this webinar we'll dive into how the hydraulics system works as a whole and the effect of each component.
| 00:00 | Hey team, Conny here from High Performance Academy and welcome to this week's webinar. |
| 00:04 | So, this week we're gonna be talking about brake system hydraulics. |
| 00:08 | So, in particular the relationship between force, pressure and the area of our master cylinders and our brake caliper pistons. |
| 00:18 | And then we're gonna talk about how this pressure is transferred through the braking system and used at the other end in the brake calipers to create our brake force. |
| 00:28 | We're also gonna have a little bit of a discussion about master cylinder and caliper piston area changes, so changing the size of our master cylinder and changing the size of our calipers as well. |
| 00:41 | And what that means for the vehicle as a whole, things like bias and pedal feel and things like that. |
| 00:49 | So, we'll get into it by first jumping onto the overhead camera. |
| 00:56 | And then we'll just cover a few things. |
| 00:59 | So, the first thing we need to do is discuss, might just zoom in a little bit. |
| 01:05 | So that's a bit clearer. |
| 01:08 | This equation here, which is pressure equals force divided by area. |
| 01:24 | So, if we draw this out in a little triangle like this, and we have pressure, force and area, if we have a formula like this and we know two of the values then we can basically find the other one. |
| 01:41 | So, in the same way, pressure equals force over area, this can just be arranged to force equals pressure times area or if we have the pressure in the area, the force and the pressure, we can also find the area of the piston used to make that. |
| 01:59 | So, the other one we need to know here is force equals pressure times area. |
| 02:04 | And these basically, if we can go back and forward between these to understand the force or the pressure, then we'll be able to answer a lot of the questions we have about our braking hydraulics. |
| 02:17 | Before we move on, so this force can be either expressed in newtons or it can be given in like kilogram force or pounds as well. |
| 02:35 | So kilogram or pounds. |
| 02:38 | But the pressure, the common units that's used in automotive applications or brake systems anyway tends to be psi, which is pounds per square inch or also in SI units it would be pascals, which equals newtons per metre squared. |
| 03:05 | And this is typically in kind of a value range where it's given in kilopascals as well so that's 1000 newtons per metre squared. |
| 03:15 | So, those are the units that we're gonna be working in today and although I typically being here in New Zealand work in SI metric units, we will be using psi and yeah pounds, force and inches in today's discussion just because that's kind of the standard for working with brake systems. |
| 03:38 | So, we'll just move on. |
| 03:40 | So, basically in a hydraulic system, a simple one anyway, we have a master cylinder and the slave cylinder. |
| 03:52 | So, the master cylinder which we'll just draw here, this is the cylinder with the piston in it and the force is applied to this piston and the piston travels along the cylinder here. |
| 04:04 | And this here is filled with fluid. |
| 04:07 | So, that is our master cylinder and the master cylinder is the cylinder that we do the work on so in this case that's connected to our brake pedal. |
| 04:16 | And then we also have our slave cylinder and the slave cylinder is the cylinder that does the work for us and in this case this is also referred to as our caliper pistons. |
| 04:29 | So, if we put a force in here and then we compress this fluid, or try to compress this fluid anyway, we'll get to that in a moment, and this is connected with our brake line, then this pressure is transferred over to the slave cylinder and then that is then converted through the piston as a force out here. |
| 04:49 | So, that's our force, force, force one, force two, because these aren't necessarily the same. |
| 04:57 | So, brake fluid is incompressible so that means when we apply a force here to compress this, it doesn't compress, we just build up a pressure in it and then because it doesn't compress, as we displace the cylinder in here, the same displacement is transferred out there. |
| 05:16 | Well, not the same displacement, we'll get to that in a moment, but some displacement. |
| 05:21 | So, this is our master cylinder and this is our caliper pistons. |
| 05:28 | So, we'll talk about the relationship between the forces and the pressures and then that'll give you a better understanding as we progress forward about how changing each of these, the effect that that has over our braking system. |
| 05:44 | So, let's say we have our brake pedal, we'll just draw a little picture here of our brake pedal with a bearing there, pivot bearing, so it pivots around this point here, our foot applies a force to the pedal there. |
| 06:02 | So, this is the mounting point and then this point here has our master cylinder on it. |
| 06:11 | So, if the distance from here to here, let's say is 200 and then the distance here is 40 mm, then we have a pedal ratio of 5 to 1. |
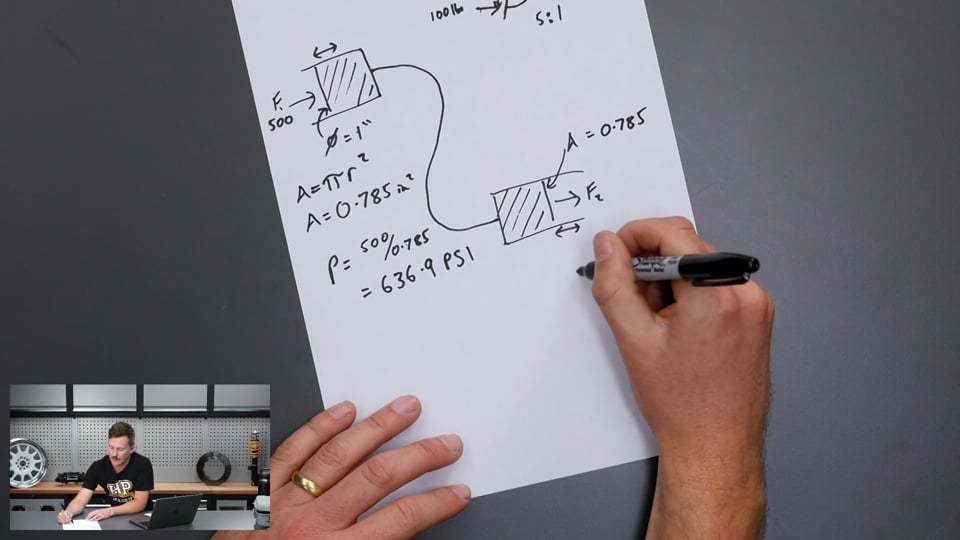
| 06:27 | So, if we apply 100 pounds of force here which is kind of considered like quite a high maximum braking effort from the driver, so 100 pounds of force here, then that means that at this point here, this is multiplied by 5 and we have 500 pounds of force into the master cylinder. |
| 06:54 | So, this force here equals 500 pounds. |
| 06:59 | So, the next thing that we need to consider from our equation of pressure equals force over area to calculate the pressure in this is to understand the area of the master cylinder. |
| 07:13 | So, master cylinder sizes are generally given with a diameter. |
| 07:18 | So, the diameter of this let's say equals 1 inch. |
| 07:24 | So, the area of a circle, the equation for that is pi times the radius squared, radius being half of the diameter and pi being the constant of 3.14159 and so on. |
| 07:47 | So, that allows us to figure out the area of this and then we can work towards pressure. |
| 07:53 | So, for a 1 inch diameter master cylinder, the area is pi times 1 squared, sorry, pi times 0.5 squared being the radius and that gives us an area of the master cylinder at 0.785 inches squared for the area. |
| 08:15 | And then from there we can find the pressure in the system. |
| 08:20 | The pressure is 500 divided by 0.785 and that equals 636.9 or so psi, because that's pounds on the top, square inches on the bottom, so pounds per square inch. |
| 08:38 | So, now that is the pressure in the system and since our fluid is incompressible, that is converted through our brake line and that is the pressure that we'll also see here. |
| 08:49 | So, all we need to do is understand the area here and then we can work out the force at the other end. |
| 08:58 | So, if the area of this one here is the same, so let's say we use our brake caliper pistons are 1 inches and we have just a sliding piston with one single 1 inch diameter caliper piston or if we have a fixed piston, a two pot with one piston each side, that'll also be the same. |
| 09:25 | 1 inch cylinder on each side, the area will be the same. |
| 09:31 | So, the area here is 0.785 and we can clearly see that if we rearrange this then the force that we're going to get out here is 500 pounds. |
| 09:44 | So, what happens if we change the size of either of these here? So, let's just look at changing the area of this one here. |
| 09:55 | So, let's say this isn't the case and the diameter down here of this one is actually now 2 inches diameter, then that means that the, so that's double the diameter, but the area is not double the area, because of this formula here. |
| 10:16 | The area in this case is actually essentially pi, 3.14 and so on, inches squared, which is actually about 4 times the diameter, sorry, 4 times the area before. |
| 10:32 | So, when we put all this in our equation again and find out the force equals pressure times by the area, we end up with 2000 pounds of force. |
| 10:45 | So, we've gone from 500 pounds of force up here with a 1 inch diameter master cylinder to 2000 pounds of force down here with a 2 inch diameter caliper piston. |
| 10:59 | So, it seems like we've just basically got 4 times our force for nothing and that's great, that seems great, so what's the downside that happens here? And that really comes down to this displacement here. |
| 11:13 | So, in this case if we have a 1 inch master cylinder and let's say we displace this here so there's 1 inch of travel, so we press down on the brake pedal however much and then we get 1 inch of travel here. |
| 11:36 | So, this is 1 inch. |
| 11:40 | So how much, by the time that gets to here we're not going to, if this was the same size, so this area was the same as this one here with a 1 inch diameter, we would also get 1 inch of travel at this end, but because we've changed this to 2 inches and the area changes so therefore the volume displaced changes, the force changes as well, but we end up with essentially the displacement, we'll just call that d in this case, being so the displaced fluid, sorry we'll just jump back over here, the displaced fluid in this case is this area times by the travel of 1 inch, so in this case it displaces 0.785 and that is in inches cubed of fluid, so that area times the displacement and then the same displaced fluid comes through here and then we just need to rearrange this to get that travel, so we'll call that displacement equals area times travel, so in this case if we rearrange that the travel equals the displacement divided by the area, so the displaced fluid is 0.785 inches cubed, and divide that by this area, 3.14 inches squared and then that will give us the travel of 0.25 inches, so we can see that we've got 1 inch of travel in the master cylinder and we only have a quarter of that of travel in the caliper pistons, so we've multiplied the force by 4 but we've divided the travel by 4 as well and that's kind of the downside here and the opposite would also be true if we had made the caliper piston smaller, then we would get less force, but more travel and the same thing happens up here, if we make this smaller it'll generate more pressure, but it'll need to travel more to displace the same amount of fluid, so that's what we need to remember moving on; and just a little bit of a note on sliding calipers like the factory ones that we'll usually see on a vehicle, two piece caliper, it'll have one piston on one side and then that will react, the caliper body holding the pad on the other side will react that so it'll have one piston, say that is a 1 inch diameter on one side, so how do we compare that to let's say a two piston caliper, but a fixed caliper where it has a piston on both sides? Basically, they're equivalent as long as the area of the pistons on one side are the same. |
| 14:58 | So basically, we can either, how a manufacturer would usually spec a fixed caliper is by giving the piston area just on that one side. |
| 15:08 | So we can do that and then as we progress through then we need to multiply that force on each side as we progress through further calculations. |
| 15:20 | But if we're comparing that sliding to the fixed caliper then we just need to consider either that area on one side or we need to take the area on one side of the sliding caliper and double that to be the equivalent of the total area of the fixed two piston caliper. |
| 15:40 | So, I'll just make the note that if you have any questions as we progress through this then just feel free to ask that in the chat and I'll do my best to kind of mention that note at the end, or answer those questions rather. |
| 15:59 | So, let's talk a little bit more about motorsport systems. |
| 16:04 | In a motorsport system we'll typically have a setup where we have two master cylinders, so one for the front brake circuit and one for the rear. |
| 16:13 | And what that does is it allows us to adjust the pressure, or yeah the pressure in each system separate of one another to make changes to the brake bias. |
| 16:25 | And this will make a little bit more sense in a moment. |
| 16:28 | So, if we look at the top view of our pedal box, we'll have one master cylinder there, those brake lines will go off to let's say the front circuit, and then we'll have another one here for the rear and that'll go off to the rear circuit and then there'll be a pushrod on each of those and they'll be connected and we'll have the bearing here that our pedal force acts on. |
| 16:51 | And where this bearing is relative to these two will change the force that's distributed into each of the master cylinders. |
| 17:01 | The same kind of goes for if we have a tandem setup, so if we look at a tandem master cylinder is what we'd typically see in a normal factory car rather than a motorsport application, and the force will be applied and then we will have basically two cylinders in there with fluid. |
| 17:29 | And then that force will be transmitted through a pushrod in that to both of the cylinders and then that'll come off to the front circuit and this will come out to the rear. |
| 17:40 | And in some cases these are actually plumbed to be diagonal as well, so it's not always like that. |
| 17:46 | But basically what you need to understand is it doesn't matter in which case we're talking about, the ideas are basically the same, where we just need to understand what force goes into each master cylinder, each cylinder and that will allow us to calculate the pressure and then how that's transferred through to our brake calipers. |
| 18:11 | So basically, what we need to understand for the master cylinder size, so if we have a master cylinder here and let's assume that we're keeping our caliper piston area down here, this is going to remain the same. |
| 18:33 | What can we do to the area of this to change the force out at the other end? So, if the caliper area here reduces, what that's going to mean is that less pressure is generated in here because pressure equals force over area. |
| 19:01 | So sorry, if we reduce the area then the pressure is going to increase. |
| 19:06 | But if we increase this area then the pressure is going to decrease. |
| 19:12 | But at the same time if we reduce this area, then more displacement is required to displace the same amount of fluid. |
| 19:20 | But if we increase this area then less fluid, sorry less travel is required to displace the same amount of fluid at the other end. |
| 19:31 | So, what that means is if we look back at a motorsport style system where we have two different ones, two individual dual master cylinders for example, if we reduce the size, let's call this one here the front one and this one here the rear, so if we reduce the size of the rear master cylinder or if we increase the size of the front, as long as we're making a change of one relative to the other, if we decrease the size of the rear master cylinder relative to the front, that means that we'll get more pressure in the rear circuit and that will move the bias rearward. |
| 20:09 | So, the rear brakes will have more pressure and then that'll be transmitted into more force given everything else remains the same. |
| 20:18 | The same thing can be done to increase the rear bias by increasing the size of the front master cylinder. |
| 20:25 | So, if we make the front master cylinder bigger, that'll decrease the pressure in the front brake circuit and that will mean that the front brakes will generate less force, so the bias will be shifted rearward. |
| 20:38 | And then the same thing also goes where if we increase the size of the rear master cylinder, decreases the pressure in the rear system, and then that means that it shifts the bias forward and then for the front circuit, if we decrease the size, that'll increase the pressure in that circuit and we'll get more force in the front shifting the bias forward again. |
| 21:04 | So, understanding that relationship between the master cylinder area size and the pressure that's generated can allow us to make bias changes if we have a dual master cylinder setup like that. |
| 21:22 | But what we need to remember is that if we make these changes, that'll also have an influence over the pedal feel. |
| 21:29 | So, if we reduce the size of the master cylinder in the rear for example, then more fluid is gonna need to be displaced to take up the brake pads on the disc essentially, and then what we need to understand for that is that the pedal feel will get longer. |
| 21:48 | Because in this case where we have a dual system, the pedal feel is somewhat of an average between the travel of these two. |
| 21:56 | So, if you imagine if this moves a certain amount and this moves a certain amount, then this is kind of going to move an average of that travel. |
| 22:04 | So, that's something that we need to consider if we're making these bias changes, that it will affect the pedal travel as well. |
| 22:13 | So, we'll move on to the other end of things where we're talking about the brake caliper area. |
| 22:19 | So, one of the common kind of misconceptions here is that if we have more pistons in our brake caliper then that means more force. |
| 22:29 | And that's not the case. |
| 22:31 | If we look at say the cross section of a brake caliper and it has one big piston in the middle, if we compare that to another brake caliper that maybe has two smaller pistons, if the area of this is the same as the area of these two, then in terms of the force that's generated it's exactly the same. |
| 22:54 | So, the thing that you need to consider is that the real benefit of having multiple pistons is it distributes that force better on the brake pad. |
| 23:04 | And that allows us to run a bigger brake pad or reduce the pad taper, so we're able to control the wear on the brake pad better and running a better brake pad also helps with the thermal mass of the system and the brakes ability to manage heat, which is basically one of their primary function is converting heat energy into, sorry converting kinetic energy into heat energy, dissipating that energy. |
| 23:32 | So, if we do increase the size of the brake caliper pistons then we will get more, so if the area goes up then we know that force equals the pressure so we've got the same pressure because we haven't changed any of the master cylinder stuff times the area so if the area increases then the force also increases because it's directly proportional. |
| 24:04 | So, the downside here as we discussed before is if we increase this area then we need more travel from the master cylinder to get the same displacement down here. |
| 24:19 | And what that can do is prompt a move to a bigger master cylinder, because if we need too much travel then the pedal gets really long and we need to move to a bigger master cylinder and then the downside there is if we move to a bigger master cylinder then the pressure generated for the same force is less. |
| 24:39 | So, basically what that means is we've kind of negated the increase in force at the other end, because we've just lowered the pressure again so the force at the other end is gonna be less. |
| 24:51 | So, as you can understand it's a real balancing act when it comes to brake systems and this is typically why just moving to a brake caliper with bigger pistons isn't necessarily the best move for getting more brake force or more brake torque and this is typically better done with increasing the size of the disc or moving to a brake pad with a higher coefficient of friction, because yeah changing this hydraulic relationship can kind of cause bigger issues than it's worth with the pedal feel for example. |
| 25:30 | But having understood this you should be able to then make adjustments if you have issues with your pedal feel or your bias, you should be able to make changes to your hydraulic system to help change that. |
| 25:44 | The other things to consider here or maybe one of the key points of why this displacement down here is required, is because as the disc is spinning, it's knocking the pads back in the caliper pistons and also the brake caliper piston seals are pulling the pistons back as well. |
| 26:07 | So, there's a distance between the pad to the spinning disc and as we press the brake pedal then we need to take up that distance so the pads take up on the disc surface and as we said if the caliper pistons are bigger then we're gonna need more fluid displaced to take up that same travel. |
| 26:27 | The other thing to consider is also compliance in the system. |
| 26:32 | So, if we just look back at this, if you imagine this brake line here isn't, or is able to swell, so let's say this is a rubber hose and as we apply pressure in the system this just swells and expands, essentially what that's doing is acting like the brake fluid is compressible and that's taking away some of our displacement, so we end up with less displacement at this end. |
| 27:00 | And basically what's required is more pedal effort to take up that compliance. |
| 27:06 | So, it's never going to be a completely perfect system like we talked about at the start where if we put in a force here in this area, it's the same as this area, we're gonna get the exact same force out, there's always going to be somewhat of a decrease on the other end there. |
| 27:24 | So, this is all things that need to be considered when you are speccing brake systems. |
| 27:30 | But hopefully that little relationship in terms of the pressure in the area it goes, helps you a little bit to understand that it's quite a common misunderstanding that moving to a larger diameter master cylinder actually decreases the pressure and you end up with a longer but lighter pedal feel; and going the other way, so decreasing the master cylinder size gives you more pressure so you'll end up with a longer but a lighter pedal feel, and if you're increasing the size of the master cylinder, you'll get less pressure, which will basically make the brakes feel heavier but shorter, a shorter brake pedal as well. |
| 28:16 | And in the end we're trying to work towards a system that has good balance, so basically you can feel and modulate the brakes the best, you don't wanna be putting, have to put in too much effort that you can't achieve the target amount of brake torque, so you don't want it to be too heavy, but you don't want it to be also too light that it's really easy to lock the brakes. |
| 28:43 | Similar thing goes for the travel of the brake pedal as well. |
| 28:47 | A really short brake pedal can be really touchy if it's light, but a really long brake pedal can be too vague and not give you any feedback as well, so as with brakes it's all a bit of a balancing act and if you're interested in learning more about that then we have our Motorsport Braking System course live on the website as well, and we go into a lot more detail on that in a more kind of standard format with the help of graphics and things like that as well. |
| 29:20 | We talk a lot about all the different aspects of motorsport braking system design to show you how to modify, improve or optimise your system or design a system completely from scratch. |
| 29:32 | So, I'd recommend checking out that course if you're interested in learning more about brake systems. |
| 29:39 | I'll just jump on and see if there's any questions I can answer. |
| 29:44 | Alright we do have some questions, sorry about that, my page just wasn't refreshing. |
| 29:49 | So, initial DIY mods has asked, "I'm currently interested in building a hydraulic handbrake and the pros and cons versus the cable caliper connection via the parking brake. |
| 30:01 | Car is primarily a rally car and mild street use. |
| 30:04 | ABS isn't functioning and I likely won't bother making it work with the engine swap due to the swapped hubs. |
| 30:11 | The car is all wheel drive with a viscous LSD centre diff. |
| 30:16 | Any info that might help decide the pros and cons to choose either.". |
| 30:21 | So, generally speaking, if you can make a cable style system work effectively and you don't want to make too many modifications, and it depends on where you are in the world as well, whether a hydraulic handbrake will be legal for street use, like you said, will be mild street use, that's something to consider, sticking with the original system. |
| 30:43 | Sometimes, you just need to use a specific brake pad or brake shoes in that original handbrake system to increase the friction to help it lock a little bit easier. |
| 30:57 | But generally speaking a proper hydraulic handbrake will use that basically hydraulic leverage advantage to be able to kind of amplify that force out, the clamping force and give you more power. |
| 31:14 | So, it's always going to be possible to get an advantage with the hydraulic system over the standard system. |
| 31:21 | Things to consider for that would be, for the hydraulic system, if you're going to use an inline system, which is where the master cylinder is then plumbed into the rear brake circuit, or if you're going to use a dual rear caliper setup. |
| 31:38 | So, in that case it's obviously extra cost for the dual setup and then also you're adding extra unsprung weight to the rear, but it is a completely standalone system. |
| 31:52 | That generally provides more power and it doesn't interfere like an inline system would with the rear braking feel. |
| 32:00 | So, if you're thinking about being on the brakes in your vehicle and then also pulling the handbrake at the same time, naturally with the clutch in as well, the handbrake will be interfering with your foot brake if you're using an inline system, if it's all just plumbed into the same system. |
| 32:17 | So, that's something to consider there. |
| 32:21 | It's extra cost, extra complication to use the dual setup, but generally that's going to provide the best results, albeit with an unsprung weight penalty. |
| 32:32 | And yeah if you're using the vehicle for street use as well, depending on where you are in the world, like here in New Zealand we'd have to get that certified or have a Motorsport Authority card or something in that case so just something to consider there. |
| 32:49 | Same one from Initial DIY Mods. |
| 32:53 | "If we can talk about brake proportioning valves, I was going to install a valve on the front brakes to allow for more rear bias, but when the handbrake route, but when the handbrake route due to the engine bay packaging constraints for mounting the valve, did I make a mistake and should I go for a valve method versus handbrake? This is the same rally car from the previous question, thanks.". |
| 33:19 | So yeah, don't install a brake proportioning valve on the front circuit. |
| 33:24 | They're always used pretty much, solely used on the rear circuit to change the pressure to the rear braking system with varying input pressure onto the brake pedal. |
| 33:42 | So basically, what it does is it proportions the brake pressure to the rear brakes as you transfer more and more load onto the front wheels. |
| 33:51 | Yeah you don't want to, that definitely would be a roundabout way of doing it, to install a proportioning valve on the front circuit. |
| 34:00 | A better way of doing that would be if you're trying to change the bias like that and shift the bias more rearward, if you have a dual master cylinder setup and you want to increase the rear bias then making the master cylinder smaller for the rear circuit or increasing the master cylinder size on the front will shift the bias rearward. |
| 34:24 | If you don't have a dual master cylinder setup like that in a motorsport style pedal box, then you'd probably want to increase the bias to the rear if you're trying to get the brakes to lock up on the rear earlier to get the vehicle to rotate which is pretty common in a rally setup. |
| 34:41 | Just using a brake pad with higher initial bite is a good way to go for that, or changing to a different disc, perhaps a larger diameter as well will help increase the rear bias. |
| 34:57 | I was talking to, I mentioned I was discussing some of the different features of carbon ceramic brakes with the drilled holes with Steve from Elcon over the last few weeks and something that he did mention was it's not uncommon in rally vehicles to use a different design for the rear disc in terms of grooves. |
| 35:23 | So, you have a higher initial bite in the rear or using a pad that has a higher initial bite in the rear, so before that weight is shifted off the rear wheels, you get more brake torque in the rear or more bias to help the car kind of rotate into a corner better. |
| 35:40 | So, things that you need to consider when you're choosing brake pads for a vehicle for the front and rear, generally it's good to start with the system with the same brake pad on the front and the rear. |
| 35:55 | So, as the brake temperature changes throughout a stop, the bias doesn't shift too much in either direction. |
| 36:03 | But at some point it can actually be beneficial to use a pad with a higher coefficient of friction from a lower temperature in the rear, so that initial bite is really strong and that kind of tapers off as the temperature comes into it and then the weight shifts forward as well. |
| 36:23 | So that is another option you can look at for getting that kind of rotation and yeah, commonly used in rally cars to help with that and the effect is somewhat similar to pulling the handbrake and getting the car to rotate. |
| 36:39 | So, hopefully that helps shed some light and something that you can look a little bit further into as well there. |
| 36:45 | So, that looks like the end of our questions. |
| 36:47 | As I said, if you're interested in learning more about braking systems, check out our Motorsport Braking System course, there's a lot more details there. |
| 36:55 | So yeah, hopefully that'll help. |
| 36:57 | But thanks for watching this week's webinar and we'll be back next week with a different topic. |
| 37:01 | Cheers. |


