154 | Measuring Deck Clearance
Summary
The deck clearance is a critical measurement that will affect the engine’s compression ratio, piston to head clearance, and piston to valve clearance. While the deck clearance may seem like a simple measurement, there’s a lot of confusion about exactly how this should be measured. In this webinar we’ll discuss the measurement technique and see how it can be applied.
| 00:00 | - It's Andre from the High Performance Academy and welcome along to another webinar. |
| 00:04 | In this webinar we're going to be looking at the topic of piston deck clearance. |
| 00:09 | We're gonna find out what exactly that is, what it means, how much we need, and then we're going to talk about some of the techniques that we can use in order to actually find out what our piston deck clearance is. |
| 00:22 | So when we're talking about deck clearance, what we're talking about is the clearance between the crown of the piston and the deck surface of the engine block when the piston is at top dead centre or TDC for short. |
| 00:36 | Now this has some important implications depending on exactly what that clearance is. |
| 00:41 | We can have a negative clearance where the piston is actually protruding slightly from the deck surface of the block at top dead centre, or alternatively the piston may sit some way down the bore when it's a top dead centre. |
| 00:55 | There's no right or wrong here but we do need to understand and know what we've got, 'cause as I've said that's got some implications on how the engine will operate. |
| 01:06 | Now of course as usual with this webinar, we will be having some questions and answers at the end of it so if you do have anything that you'd like to ask or anything that I talk about that you'd like me to explain in more detail, or elaborate on, please ask that in the comments or in the chat and the guys will transfer those through to me, we'll deal with them at the end of the lesson. |
| 01:25 | So the implications of our deck clearance, this comes down to first of all, it's going to affect the clearance between the crown of the piston and the underside of the cylinder head. |
| 01:37 | It's going to depend on our deck clearance, along with the thickness of our head gasket. |
| 01:43 | This in turn also has some knock on effect because it will also result in a change to our piston to valve clearance. |
| 01:52 | So those are two really common or really imortant aspects that we need to take note of. |
| 01:57 | Of course if we don't have sufficient piston to cylinder head clearance or piston to valve clearance, then we do risk doing a lot of mechanical damage to our engine so clearly something we want to avoid at all costs. |
| 02:11 | The other aspect here is that this is a key aspect or key parameter that we need to know or measure in order to be able to accurately calculate the compression ratio of our engine. |
| 02:23 | So all things being considered, it is a subtle but important aspect of our engine. |
| 02:28 | Now I know that a lot of engine builders out there will be using off the shelf componentry from known name brand manufacturers and probably putting the engines together with little consideration to what the piston deck clearance actually is. |
| 02:44 | And often that's going to be just fine if you're using a lot of the off the shelf componentry you may get away with that. |
| 02:50 | Where you can come unstuck though, is in a situation where you're rebuilding an engine that's already been rebuilt or machined several times previously. |
| 03:01 | And in this case particularly if the deck surface of the engine block has been machined a number of times, this is going to end up affecting the deck clearance. |
| 03:10 | And we can end up with insufficient clearance between the piston and the cylinder head. |
| 03:16 | So really this is just one of the key points with engine building anyway, we always need to make sure that we measure everything, check everything, and don't make any assumptions. |
| 03:27 | It's when we make assumptions and just assume that everything is going to be alright with these brand new components that we've purchased, this is when we can come unstuck, and when we do come unstuck with engine building, normally it ends up a pretty expensive and ugly mess. |
| 03:43 | OK so in terms of our deck clearance, if we forget about our compression ratio implications for a moment and we just look at the mechanical side of piston to cylinder head clearance, piston valve clearance, how much clearance do we actually need? Well there are going to be some aspects that are going to affect this. |
| 04:04 | So there isn't an overall line in the sand that we must use. |
| 04:08 | however we do have some rough guides or rules of thumb. |
| 04:11 | And generally it's assumed that a safe piston to cylinder head clearance would be in the order of about 40 thousandths of an inch or one millimetre. |
| 04:22 | And that's probably actually a little bit conservative. |
| 04:24 | We certainly can run down a little bit tighter than that. |
| 04:28 | And in some engines particularly small bore engines, we can run a lot tighter than that. |
| 04:35 | A lot of it's going to come down to, in terms of what we can get away with, is going to come down to the amount of piston rock in the bores. |
| 04:42 | This is an aspect of our bore diameter. |
| 04:45 | Also the mass of the components in the engine, the rev limit and the stroke of the crankshaft as well will all have some impact in terms of what we actually need. |
| 04:57 | And really what it comes down to here is when we're assembling the engine and it's sitting here on our work bench, everything's nice and strong and it's not going to move around a lot, but what we do need to understand is that at very high RPM, there will be some flex or give in these components which can affect what we actually end up with in terms of our clearances. |
| 05:20 | OK so how do we find our deck clearance? So there is a couple of ways here. |
| 05:25 | What we can do is calculate the deck clearance. |
| 05:29 | And we can do that as long as we have the stroke of the crankshaft, the conrod length, the compression height of the piston, compression height of the piston is the distance between the centre of the wrist pin and the top of the crown. |
| 05:45 | And the deck height of the block. |
| 05:47 | So that will allow us to calculate the theoretical deck clearance in our engine. |
| 05:54 | However this does allow us to come unstuck in the situation I mentioned earlier if that particular engine block that we are working with has been decked a number of times, then the deck height isn't going to be what the manufacturer initially produced and this is going to alter our deck clearance. |
| 06:15 | Likewise there's tolerance with the manufacturer of all components so what we can get into a situation with is the tolerance stacking can ultimately affect our final deck clearance. |
| 06:28 | So this is why measuring is a superior technique to simply calculating. |
| 06:35 | Particularly if you're dealing with a situation where you want to be very accurate with your final deck clearance, or if your deck clearance and piston to cylinder head clearance are going to be quite tight, you do want to be very sure that it is exactly where you expected it to be, otherwise potentially we could have catastrophic problems with that engine in operation. |
| 07:02 | OK so we've talked about calculating it, now we're going to look at how we can go about measuring the deck clearance instead of calculating it. |
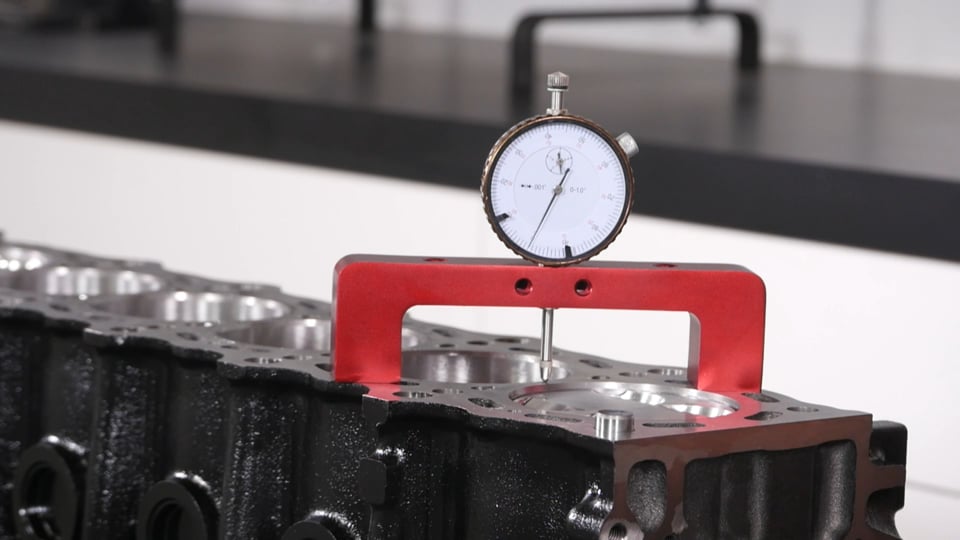
| 07:11 | And to do that, what we're going to need is a product called a deck bridge. |
| 07:16 | This particular one comes from Proform. |
| 07:19 | They're available from a range of manufacturers pretty cheap, they do come normally without a dial gauge so you're also going to need a dial gauge additionally to go into the deck bridge. |
| 07:32 | Most of these deck bridges are magnetic as well, so this makes it really easy for you to use them providing obviously you're dealing with a cast iron block. |
| 07:42 | There's also generally three locations in the deck bridge, or multiple locations in the deck bridge, that allow you to offset your dial gauge depending on exactly where abouts on the piston you want to measure. |
| 07:55 | Probably the only other thing you do need to keep in mind is that the span of the deck bridge is going to need to be selected based on the bore diameters of the engines that you're predominantly working with. |
| 08:07 | So this one here is what we're going to be using today and for our demonstration we're going to have a look at using this on a Toyota 2JZ. |
| 08:17 | One of the reasons I wanted to run this webinar, is that there is a lot of confusion, misinformation out there, about the correct techniques for measuring our deck clearance. |
| 08:30 | We're going to talk and look at both techniques, talk about and look at both techniques here today, but broadly one technique is to measure the deck clearance in line with the wrist pin at top dead centre. |
| 08:46 | And the other technique that a lot of engine builders will prefer is to measure at the side of the piston and then rock the piston back and forth and what that does is it actually affects our reading. |
| 08:59 | So we're going to talk about those two techniques and which I prefer. |
| 09:03 | Let's talk for a start about the technique where we're going to be measuring the deck cleranace at the edge of the piston, we're going to be rocking it backwards and forwards. |
| 09:14 | Now the reason that this is touted as technique, or the best technique, is because what we're really looking for, or most interested in, is the minimum clearance between the piston and the cylinder head. |
| 09:28 | Obviously that's the only part that matters, because if that minimum clearance is insufficient, that's when we're going to end up with contact. |
| 09:36 | And of course as the piston goes past top dead centre, we're going to end up with the piston rocking over in the bore. |
| 09:44 | So this is going to end up with one side of the piston slightly high and one side of the piston slightly low. |
| 09:50 | So the people who advocate using this technique, and it does make a lot of sense if you think about it like this, want to really focus on where that clearance is minimal. |
| 10:03 | However there's a couple of things we need to take into consideration there. |
| 10:07 | First of all when we're measuring everything with the engine block at room temperature here, particularly if we're dealing with a forged piston, we're going to have quite a large amount of piston to cylinder wall clearance. |
| 10:21 | Now that's not going to be what we're actually gonna see when the engine's at operating temperature. |
| 10:26 | When the engine's at operating temperature, that piston will have expanded, and our piston to cylinder wall clearance will be much tighter than what we have at room temperature. |
| 10:35 | So the upshot of this is the sort of rocking motion that we're likely to see when the piston is at top dead centre and it's stone cold, is going to be quite dramatic. |
| 10:46 | To demonstrate this let's just jump across to our remote camera here. |
| 10:52 | And what I'll do is I'll just rock this. |
| 10:54 | This is a CP forged piston in our Toyota 2JZ. |
| 10:57 | And if I can move this, we actually get quite a large amount of movement, and what we can actually see as well is it looks like the clearance around the top of the piston is really excessive. |
| 11:10 | And this is because the way the piston is manufactured is that the top of the piston is slightly smaller in diameter than the skirt. |
| 11:18 | And this is because the crown of the piston is going to be exposed to a lot more temperature in the combustion chamber than the skirt. |
| 11:26 | So the idea behind the shape of the piston skirt, it's a barrel shape, so the top is narrower, then our skirt comes out. |
| 11:35 | The idea is that when the piston is at operating temperature essentially we end up with a parallel shape to the side of the piston. |
| 11:43 | So essentially though what we're seeing here at room temperature is not really a good indicator of what we're going to get and how much that piston is actually likely to rock when we have the engine operating at normal temperature. |
| 11:59 | So that's why my own preference is to simply measure the deck clearance in line with the wrist pin. |
| 12:08 | So if we're measuring in line with the wrist pin, this is going to mean that the clearance that we're measuring is not going to be affected by rock because essentially the piston is rocking in line with the wrist pin so it's not going to be affected there. |
| 12:22 | Now there's arguments for and against both techniques. |
| 12:26 | And really like with a lot of things with engine building, there's not necessarily a right or a wrong answer. |
| 12:33 | What you do need to understand is the implications of each technique, decide what you particularly prefer or what makes sense to you, but more importantly what it's going to do is it's going to affect the sort of piston to cylinder head clearance tolerance that you're going to be happy with. |
| 12:53 | So what I mean by this is if we're using the technique that I'm going to advocate here, we're measuring the deck clearance in line, or directly above the wrist pin on the piston, then we do need to take into account that there will be some amount of rock with that piston as it goes past TDC. |
| 13:11 | Even at operating temperature, while yes, the piston to wall clearance will close up a lot at operating temperature, there is inevitably still going to be some amount of rock there. |
| 13:21 | So what this does mean is we're going to take that into account with our piston to cylinder head clearance and we're probably going to be a little bit more conservative on that front. |
| 13:34 | If on the other hand we're going to be measuring at each edge of the piston, and looking at the absolute minimum value there, the minimum clearance that we've got, then we can reduce our piston to cylinder head clearance in accordance with that. |
| 13:51 | OK so let's now have a look at the technique of actually using our deck bridge. |
| 13:59 | So what we're going to do, hopefully this is going to be easy enough to see with our remote camera. |
| 14:04 | So what we're going to do is first of all zero the deck bridge. |
| 14:09 | What I'll do, I'll just place it gently on the engine and I'm going to just move the piston down from top dead centre. |
| 14:16 | At the moment we're going to be measuring number one bore, number one piston. |
| 14:21 | So what we wanna do is just gently place the deck bridge onto the block. |
| 14:27 | And at the moment I've got the pointer for our dial indicator actually located on the deck surface of the block. |
| 14:34 | And we're going to be using this to zero the dial indicator. |
| 14:38 | So hopefully you'll be able to see in there, let me just point out, that our dial indicator is currently sitting on zero. |
| 14:46 | So I've already, before we started this webinar, I've zeroed the deck bridge already. |
| 14:52 | We can also check this in a couple of locations just to make sure that there is no variation there. |
| 14:58 | Let's see if I can get another spot here that you guys will be able to see, should work. |
| 15:04 | OK so we're still right on zero. |
| 15:06 | So now that we've done this, in this case we are going to be checking directly on top of the wrist pin, so we're going to be checking in the centre of the piston. |
| 15:17 | We do need to give some consideration to our piston design here. |
| 15:21 | The CP pistons fitted to this 2JZ are a flat top design so this makes it really nice and easy. |
| 15:33 | What we can do here is just take our deck bridge off and roll it into the centre. |
| 15:40 | Now you will notice, hopefully you'll notice that when I locate the deck bridge here, I'm not just plonking it straight down. |
| 15:47 | Because it does use quite strong magnets, if you just locate it directly straight down, this can actually affect the reading from our dial indicator so what I prefer to do is just roll that deck bridge into location, we'll feel that magnet grip, and we've got our deck bridge located now over the centre of the piston. |
| 16:09 | Now before we use that and make a measurement, I just mentioned the different types of piston, the fact that these are a flat top. |
| 16:15 | We'll just have a look now at another piston that I've got here. |
| 16:19 | So this is a domed piston which is also relatively common and this does add a little bit of complexity to the measurements we're going to be taking. |
| 16:29 | Obviously if we are going to be measuring this piston in the centre, the dome height is going to affect the piston clearance that we're measuring, it's basically going to throw everything out the window. |
| 16:42 | So what we can do in this situation, there is a small lip running around the outside of the crown and we would want to locate our dial gauge on that lip. |
| 16:52 | So what we're actually trying to do is find out where the crown of the piston is coming out to in relation to the deck surface of the block. |
| 17:00 | So it will depend as I've said on the actual piston design that you've got. |
| 17:06 | OK so now that we've got our deck bridge located, what we're going to do is just gently and smoothly rotate the crankshaft and we're going to bring that piston up towards top dead centre. |
| 17:17 | And what we wanna do is take note of where abouts the dial indicator stops as we rock past top dead centre. |
| 17:25 | So we wanna do this quite slowly as well, and that's the point there where we've just dwelled and we've gone back past TDC. |
| 17:32 | So what I'll do is I'll come back up the other way and we'll get to the point where we are at our minimum reading. |
| 17:39 | Just coming up to that now. |
| 17:42 | OK so not sure if you guys will be able to see the actual numbers on our dial gauge, but in this case we're sitting around about a thou down from the deck surface of the block. |
| 17:55 | So in this case that's our deck clearance. |
| 17:58 | Now I've also talked about the technique of measuring the rock. |
| 18:02 | So just to try and give you an indication of how that would look, let's relocate our deck bridge across so that we're on the edge of the piston. |
| 18:12 | And now if I rock the piston, hopefully you'll be able to see how much the dial gauge is swinging there. |
| 18:23 | So the options we've got if we want to use this technique, are going to depend on your own preference. |
| 18:30 | One way we can do this is to locate the dial gauge on one edge of the piston, measure the maximum and the minimum protrusions, so basically we're going to rock the piston to its maximum and its minimum, and we're going to then average that value. |
| 18:48 | So we're looking at the maximum value, the minimum value, dividing that by two, and then we're going to move to the other side of the piston and do exactly the same. |
| 18:58 | We're going to rock the piston backwards and forwards. |
| 19:03 | Divide that by two, and then we've got two measurements from each side of the piston, we can then divide those by two to get an average of the deck clearance. |
| 19:13 | So it can get a little bit messy. |
| 19:15 | And then the other way that I've talked about as well, a lot of people will solely focus on the minimum clearance when we've got that piston rocked over. |
| 19:22 | Like I've said though, this isn't very realistic simply because we're not going to see that amount of rock when the piston is at operating temperature. |
| 19:32 | So if you do really want to use the measurements at the edge of the piston, I would be advocating that you look at the minimum and the maximum values and average those. |
| 19:44 | But in my personal opinion, much much cleaner, much much easier, to simply measure directly above the wrist pin. |
| 19:51 | You're not going to have the effect of that rock, it's going to make it much easier to get consistent and repeatable results, and we're simply going to be taking that into account when we choose our piston to cylinder head clearance. |
| 20:05 | So currently we've only looked at measuring one piston's deck clearance. |
| 20:11 | And the other aspect we want to do here, is also check the other end of the engine, so what we would do is check in this case number one, and also number six. |
| 20:21 | Obviously we can do every piston if we want, but by measuring number one and number six, what it's going to do is give us some indication if the centreline of the crankshaft is maybe not perfectly parallel with the deck surface of our block. |
| 20:34 | In a V8 configuration it would be normal to check the pistons at each corner of the block, so again this allows us to just check that everything is in alignment, that our deck surface is parallel with the centreline of our crankshaft. |
| 20:51 | And again this is important to check, rather than just checking one piston. |
| 20:56 | Because if we assume that everything is parallel like that and we find out that maybe our number six piston in this case is protruding four or five thou from the top of the block, then this could end up affected our engine reliability. |
| 21:12 | OK we will be moving into some questions and answers shortly so if you do have any questions, please ask those in the comments in the chat and I'll get to those really soon. |
| 21:24 | So basically once we've gone through and we've actually made our measurements for our deck clearance, obviously if the deck clearance isn't where we need it to be, the next question that's going to come up is what can we do about it? So there are a few options here. |
| 21:41 | Firstly if we've got a problem where we don't have the same deck clearance from one end of the block to the other, then this indicates we've got a machining problem or alignment problem with the block itself and that's going to need to be corrected. |
| 21:56 | So this is quite a common situation, particularly if you're dealing with a machinist that maybe isn't quite up to the level that you need them to be or maybe they're dealing with older equipment that isn't quite as good as it potentially could be. |
| 22:12 | So if you've got a situation where that deck surface isn't parallel to the centreline of the crankshaft, you're going to definitely need some corrective machine work to be performed on that engine block. |
| 22:25 | Assuming that everything is OK in that respect, but our piston deck clearance isn't quite where we need it to be, one option is to adjust this, essentially we're not actually adjusting the deck clearance, what we're doing is adjusting the piston to cylinder head clearance. |
| 22:43 | We can do this by adjusting the thickness of the head gasket. |
| 22:46 | So particularly with a lot of aftermarket head gaskets for popular performance engines, we have the option of buying these in a range of different thicknesses. |
| 22:55 | So this gives us the ability to really accurately set and adjust our piston to cylinder head clearance and get it exactly where we want it to be. |
| 23:04 | Of course if our piston to deck clearance isn't quite sufficient, maybe our piston is protruding out the top of the bore, reducing our piston to cylinder head clearance below where we want it to be, and we don't have the luxury of a range of different thickness head gaskets to correct that, then what we may look at doing in that case, is removing the pistons and having some material removed off the crown. |
| 23:31 | Now when we're talking about this as well, we're not generally talking about large amounts of material, I'm generally going to be expecting to make changes of maybe a few thousandths of an inch, maybe 10 thousandths of an inch at the most. |
| 23:45 | So we're not making large dramatic changes there. |
| 23:49 | We do of course need to consider if you're going to end up decking the top of the piston, this is not going to affect our piston to valve clearance. |
| 24:01 | So if our piston to cylinder head clearance is insufficient, we also really wanna be careful with our piston to valve clearance, it may also require that the valve pockets in the piston are machined deeper as well. |
| 24:14 | We do also have the option of maybe moving to a different piston design with a different compression height or going to a custom piston design if something off the shelf isn't available. |
| 24:25 | Obviously this starts to get a little bit more complex in terms of expense. |
| 24:34 | You're going to actually need to be replacing the set of pistons so that can be a little bit of a problem there. |
| 24:40 | And then we've got the option as well, if we want to reduce that clearance, we want to reduce the piston deck clearance, we can actually have the block machined again. |
| 24:51 | Obviously that's going to have the complexity of requiring the entire engine block to be disassembled, sent out to the machine shop as well. |
| 24:58 | So often checking the deck clearance like this can reveal a bunch of answers that maybe you didn't want to know about. |
| 25:08 | But of course knowing these things is always going to be preferable to making some assumptions that everything's right and finding out later once the engine is actually up and running that maybe your clearances aren't exactly where you needed them to be. |
| 25:23 | OK we'll move into some questions now. |
| 25:26 | So our first question comes from Andy who's asked, is there a way to estimate rod stretch at high RPM? OK interesting that you've asked that because this is something we were discussing with the guys at GRP Conrods at PRI. |
| 25:41 | Now GRP's a manufacturer of aluminium conrods so definitely a difference there between an alloy rod and a steel rod. |
| 25:48 | However there's a common belief that an aluminium conrod does stretch at high RPM and hence it requires additional clearance. |
| 26:00 | It's quite well known, quite well documented that when we're building an engine with an alloy rod, we do need to provide additional piston to cylinder head, piston to valve clearance, than we would with a steel rod. |
| 26:11 | However in talking to the guys at GRP, it actually became evident that the rods themselves really don't stretch, that's actually an urban myth, or tuning myth, engine building myth if you like. |
| 26:21 | Instead the problem is, or why we need that additional clearance is the aluminium material has a higher rate of thermal expansion than a steel rod. |
| 26:31 | So physically the rod grows when it gets up to operating temperature, and this is why we need that additional clearance. |
| 26:37 | So with the steel rod, I don't have a way of estimating the rod stretch at high RPM. |
| 26:43 | My general rule of thumb as I mentioned, I'm going to be aiming for somewhere around about the 30 to 40 thou piston to cylinder head clearance and in the applications that I deal with, I know that is going to be safe. |
| 26:58 | But the rod again with a steel rod, probably a little unlikely that we are actually going to get stretch in the rod, there will be some very minor amount of growth due to thermal expansion of the rod. |
| 27:10 | And then what we end up with as well is some movement in the rod between the oil clearances in the journals moving around. |
| 27:18 | So for example if we have maybe two thou oil clearance, we're not likely to have that clearance remain equal, so in other words one thou per side of the journal, at very high RPM, that rod's going to be struggling really hard to move the piston back past TDC, slow it down and pull it back down, and what we're likely to see is the conrod will become slightly offset in the journal. |
| 27:44 | Likewise we may also see the crankshaft slightly moving around or flexing in the main bearing journal. |
| 27:50 | So that's where we do see some of that change. |
| 27:54 | Rob Charles has asked, a 4G63 with the pistons protruding five thou of an inch, is that an issue? Look it's not necessarily an issue. |
| 28:02 | There's no absolute golden rule for what you must have here in terms of a deck clearance with your piston. |
| 28:11 | 4G63 is probably one of the engines I've built the most of, so what I would generally expect to see there, if you're using an off the shelf piston from the likes of JE, CP, Wiseco, one of those mainstream piston manufacturers, almost always in a block that hasn't been machined previously, you're going to find that those pistons will actually sit slightly down the bore. |
| 28:35 | So rather than protruding five thou like you're seeing, I'd generally expect to see those pistons sit down the bore by about the same amount, by perhaps five thou. |
| 28:44 | So while what you've got there is not indicating to me it's a problem, what it may suggest is that that block has already been decked a number of times. |
| 28:54 | What you do need to take into account though, is ultimately that's going to affect your piston to cylinder head clearance. |
| 29:02 | One of the gaskets that I use a lot on the 4G63 is the HKS 1.2 millimetre stopper type gasket though. |
| 29:10 | And even with five thou protrusion, that's going to still give you absolutely ample piston to cylinder head clearance. |
| 29:18 | Tristan Earle's asked, what's the best was to measure the block's height. |
| 29:23 | So I think what you're talking about there is deck height. |
| 29:26 | That's probably something that is a little bit tricky for us to really accurately do in the workshop. |
| 29:33 | So it's probably something that you need to have your machinist do if you have a suspicion that there is an issue with your deck height. |
| 29:42 | The reason for this is the deck height measurement goes from the centreline of the crankshaft to the deck surface of the engine block. |
| 29:50 | And obviously we need to be able to measure that, if the value that we're using is going to be of any value at all, we need to be able to measure that accurately within a thousandth of an inch, and it's difficult to really do that with the sort of equipment that we have generally for a home enthusiast engine builder. |
| 30:10 | Tweed has asked, in these small measurements, how big of an effect are they to the compression ratio? Look a thou here or there is probably going to make almost no discernible difference to your compression ratio. |
| 30:23 | But when we are trying to get a specific target compression ratio, we do need to know all of those measurements accurately and be able to account for them. |
| 30:35 | So when we're talking about that, we could have a piston that sits maybe five thou proud of the block or maybe 10 thou down from the block. |
| 30:44 | Those sort of differences there are going to definitely stack up to have some impact. |
| 30:50 | If we're talking a difference of a few thou alone, that's probably not that big an issue. |
| 30:57 | Coster has asked, what are your thoughts on the ideal quench or squish measurement on the popular Japanese sixes eg the 2JZ and RB? OK interestingly enough we had a chat to the guys from MazWorx about the squish or quench areas. |
| 31:16 | This will be related to the Nissan SR20 specifically, however this also does obviously cross over to the 2JZ. |
| 31:28 | And it's quite common in a performance application to actually machine away those squish pads or quench areas from the cylinder head. |
| 31:37 | And what we can find is that in a very high performance application we can end up with fuel and air mixture trapped in those areas. |
| 31:47 | The idea behind the quench area, or those squish pads, is that as the piston comes up towards top dead centre, it helps push the fuel air charge centrally in towards the spark plug. |
| 31:58 | However in performance applications we can actually see it be a source of, beginnings for detonation and preignition, so can be quite damaging. |
| 32:08 | So generally it is an accepted technique to actually remove or to at least a large degree remove the squish area from the cylinder head, or machine it in such a way, it's called slant squish where those squish pads are sort of machined up on a slight angle and that's quite common but what it will do is it will also reduce your compression ratio slightly so you do need to factor that in as well. |
| 32:36 | Tweed has asked what are some typical tolerances in the 2JZ platform for deck clearance? Look I mean if you're dealing with a factory engine, and factory components then those will be specified in your workshop manual. |
| 32:50 | At this point I have yet to put together a 2JZ engine that is using factory componentry. |
| 32:55 | However in the aftermarket piston world, as I've sort of mentioned earlier in reference to the 4G63 example, generally what we find is that the off the shelf pistons will end up sitting slightly down from the bore and this obviously provides a little bit of flexibility for engine blocks that have been decked or will need to be decked in the future. |
| 33:18 | So really it doesn't necessarily matter whether your piston is sitting proud of the block, at zero deck where it's flush with the deck surface of the block, or slightly down the bore, the important thing is to know what that measurement is so that you can decide on how that's going to affect your piston to cylinder head and piston to valve clearance. |
| 33:38 | Rocketworks has asked how do you know how much to remove off the deck height before assembly? Or do you leave that until after this check? Yeah if you are in a situation where you think that the deck surface is going to need to be adjusted, or machined, then what I would be doing is performing a dummy assembly of the engine just to actually get some measurements. |
| 34:02 | So again this is something that if you know this is going to need to be done, if you're dealing with something quite specific, rather than double up on the work, you can have your engine machinist perform that dummy assembly. |
| 34:13 | Of course if you are going to be doing that, you definitely need to be dealing with an engine machinist that you know you can trust, they do turn out quality work. |
| 34:21 | So if you're in any doubt at all, it does pay to go through the somewhat laborious task of doing a full dummy assembly so you can find out exactly what you've got and make decisions on what you do need to be adjusting. |
| 34:37 | Wittlebeast has asked, is this all done before block machining and then again right before final assembly? OK so it really depends on exactly what you're doing and what sort of build you're going through. |
| 34:48 | So if you are dealing with a brand new engine or you're dealing with a block that has never previously been apart or machined before, you're dealing with stock off the shelf components, then you're almost certainly going to be OK. |
| 35:03 | This is what I was getting at earlier, a lot of engine builders will never ever check these measurements and simply put everything together and send it out the door, and nine times out of 10 that'll work just fine. |
| 35:15 | So this would be a measurement that I would be making during the final assembly. |
| 35:21 | However it's more a case of if you're doing something quite specialised, or you're dealing with an engine block that has been machined a number of times, and particularly if you're aiming for a very specific compression ratio or most importantly if you're starting to get really tight and really quite marginal on your piston to cylinder head clearance, this is where you get much less room for error, and this is where checking and making adjustments to this start to become much more critical. |
| 35:51 | OK guys that's brought us to the end of our questions. |
| 35:53 | So hopefully that's given you a little bit more understanding on that particular topic, on the topic of deck clearance, how to measure it, and particularly between those two techniques that we can use, measuring the rock on either side of the piston or directly above the wrist pin. |
| 36:10 | Now as usual, if you do have any further questions after this webinar, please ask those in the forum and I'll be happy to answer them there. |
| 36:18 | Thanks for joining us, and I'll look forward to seeing you all next time. |
| 36:22 | Now for those of you who have been watching on Facebook, this is just a little bit of an insight into what we put on every week for our High Performance Academy members. |
| 36:31 | As High Performance Academy members, they can also rewatch these webinars as many times as they like in our archive, along with over 150 hours of existing webinar content. |
| 36:41 | If you do want to join up, you can purchase gold membership which will give you access to our live webinars and our archive as well as our private members only forum for USD$19 a month, or alternatively you'll also get three months of free access to our online community with the purchase of any of our courses. |
| 37:00 | Alright thanks guys and we'll see you online again soon. |


