200 | Configuring Paddle Shift Control
Summary
Paddle shifted sequential gearboxes are becoming more common in professional and semi professional motorsport. These provide significant advantages to the driver, however they also require a careful calibration from the tuner in order to provide the best possible results and seamless upshifting and down shifting. In this webinar we’ll look at the configuration of a paddle shifted Holinger 6 speed gearbox controlled by a MoTeC M150 ECU.
| 00:00 | - It's Andre from High Performance Academy, welcome along to another webinar. |
| 00:03 | Now this time we're going to be delving into paddle shifted gearboxes and we're going to be looking at how these paddle shifted gearboxes function, and what tuning considerations you need to keep in mind if you're going to be using the Motec M1 range of ECUs using their GPRP or general purpose race paddle shift package. |
| 00:26 | In this instance for our demonstration we are actually using a Toyota 86 that has been fitted with a Holinger paddle shifted gear box and obviously all of the hardware to make that work using the Motec M150 ECU. |
| 00:40 | While this will be specific to the paddle shifted system and the Motec ECU, there's still gonna be a lot of takeaways that are gonna be applicable to both other systems as well as a conventional sequential gearbox that is shifted manually with a gear lever so there's gonna be plenty of information in this webinar. |
| 00:58 | At the end we'll also have a bit of a demonstration seeing how exactly the paddle shifted system works in the real world on our dyno here. |
| 01:06 | As usual with all of our webinars, at the end of the webinar we will be having a question and answer session. |
| 01:12 | So if you do have anything that crops up during the webinar that you'd like me to go into in a little bit more detail or anything related to the topic in general, please ask those in the comments and we'll deal with those at the end. |
| 01:23 | I think it's probably a pretty good place to start by actually finding out what the internals of a proper motorsport gearbox look like because this is really the key or the crux to how the whole system works. |
| 01:37 | So with a conventional road car gearbox, this is more commonly going to be what's referred to as a synchro mesh gearbox. |
| 01:46 | And the, I'm not gonna get into too much detail but the synchro mesh essentially is the method that's used inside the gearbox when we shift from one gear to the next, in order to synchronise the speed of the gears and allow our shifts to take place nice and smoothly. |
| 02:03 | Now the great thing for a road car gearbox is that this system is nice and quiet, it's nice and smooth and that's obviously what we want. |
| 02:11 | The problem however is because it uses friction to syncrhonise the speeds, it tends to be quite a slow shift for our purposes in a race application. |
| 02:21 | And this is why in professional motorsport, we're more likely to be using what is referred to as a dog engagement gearbox. |
| 02:29 | So we need to understand that term, and dog engagement gearboxes are a type of gearbox, these can be manually shifted with an h pattern, they can be manually shifted with a sequential style system, or they can be paddle shifted so it's actually the term dog engagement, simply refers to how the gears inside the gearbox are selected. |
| 02:49 | So let's head across to my laptop screen for a start. |
| 02:52 | And what we've got here is a couple of gears, and the term dog engagement is related to these little humps or lumps that we can see on the gear itself. |
| 03:02 | And these are referred to as drive dogs. |
| 03:06 | So all of our gears have these little dogs on them. |
| 03:09 | A subtle aspect that's a little bit hard to see here is that these dogs actually have a bit of a back cut or a bit of an angle backwards on them. |
| 03:17 | And that's really important for our selector to stay engaged in the gear. |
| 03:21 | Now I've got another shot here which shows how these are lined up. |
| 03:25 | And what we've got here again is our dogs that are attached to our gear, this is a slightly different gear than what we just looked at but the principle's still the same. |
| 03:36 | And we've got our matching dog on the opposite side. |
| 03:39 | So when we are selecting gears, what we are manually doing or automatically doing, depending on our gearboxes, we are moving this selector inside of the gearbox. |
| 03:49 | And that selector also drives a dog ring which has matching little lumps on it. |
| 03:56 | We can't quite see them in here, it's a little bit hard to see. |
| 03:59 | But what happens is we are moving that selector from one gear to the next, and those dogs lock in together. |
| 04:07 | If you just give me a moment we'll grab another photo here and we'll just get across to that. |
| 04:14 | Right let's have a quick look at my laptop screen again and this is another shot, a different gearbox again but just to really show the principle. |
| 04:22 | So on the right hand side here we've got one of those selector rings or dog rings, and this is splined onto the shaft, as we can see, those internal splines. |
| 04:32 | We've got those little drive dogs around the outside which will engage with the dogs on our gears. |
| 04:39 | And around the outside here this is our selector fork. |
| 04:42 | So this is what we're actually moving. |
| 04:44 | So again if we look across to the left hand side here of this picture, we've got that same selector fork and our dog, or our selector ring, sitting there, and all we're doing is moving that from one gear to the next. |
| 04:57 | So the advantage of a dog engagement system is that it is very very fast to shift, there's no friction involved and basically we can shift the gear just about as fast as we can physically move the lever. |
| 05:10 | So that's a big advantage. |
| 05:12 | The downside with it is that it's noisy, you'll quite often hear a dog engagement gearbox clunking as it goes through the gears. |
| 05:20 | And that is because those drive dogs will lock into each other. |
| 05:24 | And that causes the clunk, you'll physically feel this when you're driving the car as well. |
| 05:28 | So not ideal for smoothness, not ideal for our road cars, but really well suited to a motorsport application because the shifts can be so fast. |
| 05:39 | Now on the downshift, the other aspect with a dog engagement gearbox is that we do need to manually match the revs with a blip of the throttle. |
| 05:48 | Not really a big issue because in a racing application, most drivers are going to be trained to do this, the heel and toe downshift used to match revs, regardless whether you've got a factory style synchro mesh box or a sequential or paddle shifted box, that becomes a second nature to the driver. |
| 06:08 | Alright so now we've got a bit of an understanding of the internal workings of these gearboxes, and remembering at this stage, that dog engagement system is applicable to manually shifted gearboxes, h pattern sequentials and paddle shifts, it's just the actuation method. |
| 06:22 | What we need to now understand is the rest of the system components that we need in order to go to a full paddle shift system. |
| 06:30 | So clearly we've got the gearbox and in the Toyota 86 that we're in at the moment, this is a Holinger paddle shifted gearbox and this actually is designed from the outset to be paddle shifted. |
| 06:42 | So it is air actuated, it uses air pressure to actuate the shifts, there is no lever on this gearbox at all and the shift actuators are actually built into the gearbox, so when you order one of these gearboxes from Holinger, you have the option of ordering with a manual lever or with paddle shift with the air actuators built into the gearbox. |
| 07:03 | This just sort of simplifies I guess, the installation, everything is built into the gearbox. |
| 07:10 | Of course depending on the manufacturer you're dealing with, often the paddle shifting will be an external air solenoid that actually connects up to your shift lever. |
| 07:19 | So you've then got the option of a manually shifted gearbox or a paddle shifted gearbox. |
| 07:24 | It can actually be an advantage if there's a failure in your paddle shifted system, you've still got a physical lever that you can pull to change gears. |
| 07:32 | Clearly you're also going to need some paddles, no big surprise here. |
| 07:36 | I'll just grab the steering wheel here and this is a quick release hub for our steering wheel, we've got a up paddle on the right hand side and a down paddle on the left, and this particular system just uses a simple micro switch underneath both of those paddles. |
| 07:51 | This gives a digital input that goes into the ECU, telling the ECU that the driver is requesting a shift. |
| 07:57 | And as I've kind of mentioned here, this particular system is air shifted. |
| 08:02 | So what this also requires is a compressor, now we've got a little compressor that's actually a V air compressor that's commonly used for air ride suspension and a little accumulator that's sitting behind the passenger seat there and the ECU will also control that system. |
| 08:19 | So this is the kind of hardware that you need. |
| 08:23 | And I'll just mention here that it is possible to convert a conventional sequential gearbox to paddle shifting. |
| 08:30 | You can make your own kit using an air ram and basically attaching that to your shift lever so really the sky's the limit there on what you wanna do, depending on how involved you wanna get with it. |
| 08:44 | Alright so the next thing I wanna talk about here which is something that we've seen really become a lot more prominent over the last five to eight years perhaps, is the way the ECUs control the shift. |
| 08:57 | And this again is irrespective of whether we're talking paddle shifted here or whether we're talking about a manual lever with a shift cut knob on it. |
| 09:08 | So what we need to understand here is that with a dog engagement gearbox, we'll get into this in a bit more detail, one of the advantages is that particularly for an upshift, we don't need to lift off the throttle and we don't need to use the clutch. |
| 09:25 | We can shift it full throttle but in order to allow that shift to complete, the ECU needs to provide a way of reducing engine torque. |
| 09:34 | Again, don't worry, we're gonna deal with this in detail really shortly. |
| 09:37 | Traditionally this is going to be done with either an ignition cut, a fuel cut, or sometimes both. |
| 09:43 | So what's going to happen is that the driver will request the shift, the ECU will reduce the torque to allow those dogs to unlock from each other and allow the selector to move into the next gear. |
| 09:54 | However we also don't know exactly how long the shift is going to take. |
| 09:59 | Now traditionally it was quite common to use a timed cut. |
| 10:03 | So basically from the time the driver requested the shift, the ECU would just cut the fuel or the ignition for a designated period of time. |
| 10:11 | Maybe this was 50 milliseconds, maybe it was 80 milliseconds. |
| 10:15 | The problem with this is twofold. |
| 10:18 | First of all if the shift completes faster than the cut time, then we're wasting a little bit of time. |
| 10:25 | Let's say we've got an 80 millisecond cut but the shift is actually completed and finished and the next gear is engaged in only 40 milliseconds. |
| 10:31 | What that means is that we're wasting 40 milliseconds where the car could be accelerating. |
| 10:36 | Of course that doesn't sound like very much but when you may be completing 20, 30, 40 shifts for a full lap of a race track, this does tend to add up. |
| 10:45 | Particularly for turbocharged vehicles, the longer the cut is active, this allows the turbocharger more time to fall off boost, so then when the next gear is active, the torque reduction is reintroduced, then we need to build up boost again. |
| 10:58 | So the whole thing really adds up to slow down our performance. |
| 11:01 | So more recent, probably the more damaging aspect though is if the torque is, or cut is removed before the shift is completed, and this is a very easy way of quickly destroying or rounding the drive dogs on the selector ring as well as the gear itself so we definitely don't want to be doing that. |
| 11:21 | So these days the majority of high level ECUs will provide what is referred to as closed loop gear cut control. |
| 11:30 | And what this does is it's really particularly important on the upshift, is that it uses a gear position sensor. |
| 11:38 | So this tells the ECU directly where abouts the gear barrel is, or in other words, which gear is engaged at any particular point. |
| 11:45 | And what it does is it allows the cut to be active only for as long as it needs to be. |
| 11:50 | So basically it will cut the fuel or ignition or whatever you're telling it to cut until it has detected that the next gear has been correctly engaged, and then it will reintroduce torque. |
| 12:02 | So the advantage of this is the cut is as quick as it can be. |
| 12:07 | It's as fast, the shift will be as fast as the gearbox can physically change gear, and the other advantage is that over the life of the gearbox, the gear, the drive dogs tend to live a lot longer. |
| 12:21 | With conventional manually shifted dog engagement gearboxes it's really easy for a clumsy driver to actually do a lot of damage even in just one or two races and round all of those dogs, requiring replacement parts. |
| 12:35 | So with this closed loop control, the dogs actually live a long and healthy life, so that's really important to understand. |
| 12:42 | Alright so that's open loop versus closed loop shifting, today we're dealing with closed loop shifting. |
| 12:48 | The next aspect that we wanna talk about and we've just kind of touched on it a little bit, is the way the gearbox shifts. |
| 12:54 | So as I've said, the dogs have a back cut on them. |
| 12:58 | And what this means is that when those dogs are engaged together, the torque of the engine, the torque being transferred through the gearbox actually locks those dogs into location. |
| 13:09 | And particularly if any of you out there have ever driven a manual h pattern dog engagement gearbox, if you're accelerating even under part throttle, basically no amount of force being applied manually to the gear lever will change gear or pull that gearbox out of gear, it's just not possible. |
| 13:27 | That's because of that back cut of the dogs, basically the torque is holding those gears and the selector in synchronisation. |
| 13:34 | So what we need in order to allow a shift to occur is some kind of torque reduction. |
| 13:42 | And this is gonna depend, the type of torque reduction we need will depend on the type of shift. |
| 13:47 | So for example let's start by talking about our upshift, we've just touched on that. |
| 13:51 | Here's where our torque is being driven through the gearbox, we're under high load, there's a lot of torque being transferred through the gearbox and those dogs are locked together solid. |
| 14:01 | In order to allow the dogs to disengage and allow the next gear to be selected, what we need is a way of reducing the engine torque. |
| 14:10 | So traditionally with a manual dog engagement gearbox, this was often done by the driver just barely lifting a little bit off the throttle. |
| 14:18 | So what they would do is hold onto the gear lever, apply a little bit of a force to it and then just momentarily lift off the throttle and get back on it, and that's all it needed, just to allow the dogs to disengage and the next gear to be engaged. |
| 14:30 | These days with computer control of course we can stay at full throttle and this is where our ignition cut, fuel cut, or both are used to momentarily disrupt that engine torque and allow the dogs to disengage. |
| 14:43 | So that's what we use for an upshift. |
| 14:45 | On the other hand when we are downshifting there's still basically a torque being applied those dogs are still locked in when we are on over run, we're essentially engine braking when we're braking hard, and it's still quite hard, although not as difficult to get the dogs disengaged and select the next lowest gear. |
| 15:08 | So to reduce the torque there what we actually need to do is reverse the torque essentially and a small blip on the throttle will do that. |
| 15:17 | We're reducing that torque and we are unlocking those dogs and allowing the next lowest gear to shift. |
| 15:24 | That also has the added bonus that of course as we go onto the next lower gear we need to blip the throttle anyway to match revs so that's what we need in order for our shift to be completed. |
| 15:35 | And there are different types of shift, depending on how the car is being driven at the time. |
| 15:43 | So first of all we have our upshift. |
| 15:45 | Of course we can have what we refer to in the Motec lingo as a power on upshift. |
| 15:51 | So this is where we are applying positive torque to the gearbox. |
| 15:56 | So we're at moderate to high throttle openings and this is where we need to reduce that engine torque. |
| 16:02 | However it is still possible to request a upshift when we're completely off the throttle. |
| 16:08 | And when we're completely off the throttle, we're on the over run side of the dogs, so that's where our torque reversal actually needs to be slightly different. |
| 16:16 | Instead of cutting the ignition or fuel, a small throttle blip will actually help reverse the torque under those conditions. |
| 16:23 | Then we have our downshift, and again we have our downshift under power on and power off conditions. |
| 16:31 | Pretty unlikely under most conditions that we're going to be shifting down with our foot on the throttle. |
| 16:37 | Most of our downshifts will be where we're completely off the throttle and braking, which is as we've discussed we again need that throttle blip to reverse the engine torque. |
| 16:45 | Alright so now we've got a bit of an understanding of what's going on in here, we're going to jump into our software and what we'll do, while I'm doing this, is we'll get our engine up and running, just so it's a little bit warmed up. |
| 16:58 | I'll just close our window here. |
| 17:02 | And we're going to go through a few of the set up sheets here in the Motec software. |
| 17:09 | So what we'll do is basically go through the step by step process of setting everything up in here. |
| 17:18 | And what we're going to do is start with our paddle input. |
| 17:22 | So the easiest place to go to this, we're just gonna go out of our race functions worksheet here and we're going to go into our all calibrate, and what we want to do here is go across to gear paddle. |
| 17:35 | So this is where we're setting up essentially the paddle inputs to the ECU and telling the ECU which input is going to achieve what. |
| 17:46 | So what I've done here is I've just entered gear paddle in our all calibrate tab. |
| 17:51 | So you can see on the right hand side we're on the all calibrate worksheet. |
| 17:54 | And we've got our paddle, so for a start here we've got our upswitch, and we can see that that is defined as being driver switch one. |
| 18:03 | And if we just watch the state of that at the moment, so at the moment you can see, oh try not to block it out, we can see we're on position zero. |
| 18:12 | I'll just put my foot on the clutch there and we see that that changes from zero to one as I request a gear shift. |
| 18:21 | That's our little compressor running in the background, we'll just get back into neutral here. |
| 18:28 | OK then we have our downshift, which is pretty simply just our driver switch two. |
| 18:35 | So we can basically go through here and define for our two switches what situation for that switch is going to result in the upshift or the downshift request, and we can also define the resource that is being used for that particular input under our driver switch setup. |
| 18:53 | So that's all done now, the ECU now knows when we are requesting our shift and whether it's an upshift or a downshift. |
| 19:01 | The next aspect we need is the physical actuators that are going to request those shifts. |
| 19:09 | So this is the air shifted solenoids inside the gearbox as I've said, these are internal on our Holinger gearbox but equally this could be an external solenoid and we could be using a three port solenoid to supply air pressure to those solenoids. |
| 19:24 | So what we need to do here is we'll go through to our vehicle workbook, and we're going to go through to our shift actuator worksheet which we can see we're on here. |
| 19:38 | So there's a few things that we need to look at here. |
| 19:42 | First of all we have the shift timing. |
| 19:47 | Actually before we look at that, we'll go a little bit out of order here and we'll look at our shift resources. |
| 19:53 | So here we've got our gearshift actuator up output resource. |
| 19:57 | So basically when we're requesting an upshift what resource will the ECU use to provide that signal? And you can see at the moment this is set up as our half bridge output eight. |
| 20:09 | Likewise if we move down in our little pieces of information here, we've got our down output resource which is half bridge output nine. |
| 20:18 | So that sets up which of the outputs on the ECU will be actuating the shift actuators. |
| 20:25 | Then on top of that we've got with it the actuator will be driven as a low side or a high side so we can see that's our option here. |
| 20:35 | And this is basically whether or not the actuator will drive to ground. |
| 20:39 | Sorry whether the ECU will drive the output to ground or to 12 volts when it's signalled. |
| 20:44 | So in this case that's driving to ground and the other side of that actuator will be wired up to 12 volts. |
| 20:52 | So that's the physical setup of our two actuators there. |
| 20:55 | Pretty straightforward. |
| 20:57 | We do have our actuator timing which I just went to show you before. |
| 21:01 | So this is the timing that will be applied for our actuator, let's just open that up in a little bit more detail. |
| 21:09 | So we've got four states for our actuator. |
| 21:13 | So we've got our preload power on, we've got our preload power off, a re arm and a retry wait. |
| 21:20 | So this is basically what's happening to our actuator. |
| 21:23 | So particularly for our preload power on, what this will do, these values are in milliseconds here, it will preload the actuator before it actually cuts the ignition or fuel to reverse torque. |
| 21:36 | And what this allows it to do is just basically energise that actuator, get it ready to perform the shift, so that when the cut occurs, it's already primed and ready to go straight away. |
| 21:46 | We've got that state for power on or power off. |
| 21:50 | Then there's a re arm state as well. |
| 21:53 | So after the shift is completed, it will rearm, and this just allows the solenoid, the actuator to stabilise again before the next shift. |
| 22:00 | And if the shift isn't completed for any reason, so if the dogs mash together and it won't go into the next gear, we can select the system to automatically retry, and it's gonna wait 50 milliseconds just to allow everything a better chance of remeshing before it'll retry. |
| 22:19 | So we can see, we'll just close that back down, we can see that also works in conjunction with this parameter here. |
| 22:25 | Our gear shift, retry, maximum value. |
| 22:28 | So basically if the shift doesn't complete for any reason, the system is automatically going to retry that shift four times before it throws its hands up in the air and decides for any reason that something is just beyond its control and the shift is not gonna complete. |
| 22:43 | Alright so the other aspect here if we move down is our actuator pressure control. |
| 22:51 | So this system, as I've said, is air pressure actuated. |
| 22:55 | And we've got our air pressure currently sitting at 850 kPa so we've got a pressure sensor that is fitted to our reservoir. |
| 23:05 | And, I'll just try and find my way around here. |
| 23:08 | We've got our calibration for our pressure sensor as well, that's our calibration here, as well as the resource which is listed here. |
| 23:21 | So our pressure sensor is fitted to analog voltage input nine. |
| 23:24 | So that's telling the ECU what the current air pressure in our reservoir is. |
| 23:30 | We can also set up our target and our output. |
| 23:33 | So in this case the output controlling the air compressor is on half bridge output 10. |
| 23:41 | So this system, once it's set up will basically close loop control itself to set our air pressure and hold it at our target. |
| 23:48 | If I can just come up here, we can see that our gear shift actuator pressure threshold, so this is what we're aiming for, is a pressure of 800 kPa. |
| 23:57 | The shift isn't super sensitive to the air pressure, as long as we're within realms, so we've also got a threshold here. |
| 24:06 | So basically we're going to allow it to go up to 850 kPa before it shuts off. |
| 24:11 | So that's just going to stop our compressor from running continuously. |
| 24:16 | So there we've got our paddle set up, we've got our actuator set up so the ECU knows how to actually ask for the shift, and it's controlling our air pressure source now so we've actually got our air pressure primed and ready. |
| 24:26 | So there is a little bit more to do here though and the next thing we need to understand is the actual gear position. |
| 24:34 | So remember this is a closed loop control system, in order for that closed loop control system to work properly, the ECU needs to properly understand what the voltage from the gearbox position sensor is in relation to each of the gears. |
| 24:49 | So we're still on our vehicle workbook. |
| 24:51 | We're going to head across now to our gear worksheet here. |
| 24:55 | Few things to take into account for a start. |
| 24:59 | We've got our gear type, so in this case we've got a sequential system. |
| 25:04 | If we click on that we can choose sequential or h pattern. |
| 25:07 | It's important to understand here this obviously doesn't relate to a paddle shifted system, this is if we're using a manual lever but it is still possible to have a gear cut on an h pattern box, but it won't be able to distinguish between an upshift and a downshift. |
| 25:22 | So it can't apply a gear cut for an upshift and a throttle blip for a downshift. |
| 25:27 | So we are sequential. |
| 25:29 | We've got our gear minimum and maximum so we've got a six speed box here. |
| 25:33 | So six speeds plus reverse, so we set our minimum and maximum. |
| 25:37 | Next thing that's really important here is to correctly set our gear ratios. |
| 25:43 | So this is our gear ratio table. |
| 25:45 | And this is really critical to a lot of the operation of the closed loop control system. |
| 25:52 | In particular if we don't have this set correctly, or sorry I should say the ECU will use this to calculate what the expected engine RPM will be in the next gear, higher or lower, and it's used as part of the gear, sorry the RPM matching, particularly for downshifts. |
| 26:09 | So this will come obviously from the gearbox manufacturer. |
| 26:12 | We need to make sure that that is all entered correctly. |
| 26:15 | Little bit more information in there that I'm not going to go into but essentially the key part of the system that we need to talk about here is down below, which is our gear sensor setup. |
| 26:26 | So for a start we've got our voltage input that we're using for our gear position sensor, we can see that this is set up on analog voltage input 10. |
| 26:36 | And then we have our voltages for each of the gears. |
| 26:39 | Now this is simply a case of putting the gearbox into each gear independently and then measuring the voltage and this actually has the quick tune function here so we can go straight into a gear and then press Q on the keyboard and that will lock in the voltage for that particular gear. |
| 26:57 | It's worth mentioning here that on the later GPRP packages, this is actually done in terms of a percentage rather than an absolute voltage. |
| 27:07 | I'm not sure why Motec changed that but they did. |
| 27:10 | However the basis for setting this up is still essentially exactly the same. |
| 27:14 | So all we're doing here is really telling the ECU what the gearbox, what the voltage is in each gear, so it knows. |
| 27:24 | We also have a tolerance here. |
| 27:27 | So there's a tolerance on each of the gears, we're obviously not always going to see exactly the same voltage from the gearbox position sensor. |
| 27:35 | It may vary a little bit. |
| 27:36 | So we can set a tolerance for each of the gears. |
| 27:38 | In this case we've got a tolerance of 50 millivolts. |
| 27:41 | And what we wanna do here is set a tolerance that's reasonably tight, because otherwise we can instigate, bring that power back in while the shift is still being completed. |
| 27:52 | But with a tolerance that's wide enough to allow the small variations that we're likely to see without upsetting the system. |
| 27:59 | Alright so at this point we've got our gear position sensor set up and the ECU knows what gear it's in, we're getting pretty close here but there is a little bit more to do. |
| 28:11 | I'll also just mention here, if we head across to our wheel speed tab, wheel speed worksheet I should say, we can set up all of our wheel speeds here. |
| 28:20 | Now this is actually an area where we're gonna break the rules a little bit because this car has just been fitted with a pedal box. |
| 28:30 | So the factory ABS system, ABS computer has been removed. |
| 28:33 | And in the Toyota 86, this is where the Motec system gets its wheel speed information, makes it nice and easy, all of that information is coming in via CAN and we can see out across here on the right hand side, we've got a whole bunch of error messages telling us we're not getting that data. |
| 28:49 | Now the reason that this is worthwhile setting up is that this allows a safety backstop here. |
| 28:57 | Basically from wheel speed and engine RPM and the gear ratio table, the ECU can automatically calculate what the estimated gear ratio is and what the estimated gear is. |
| 29:08 | And this means that if there is a failure in the gear position sensor, the ECU can revert to using the estimate instead of the measured values. |
| 29:17 | So unfortunately in our situation right now, this isn't working. |
| 29:20 | But for a variety of reasons, not just our shift. |
| 29:24 | If you are running a Motec M1 system, it is a really good idea to at least have some wheel speed data coming into it and correctly calculated. |
| 29:33 | Alright so I think we're getting pretty close here, we've got our wheel speed set up so now we can actually look at our shift itself. |
| 29:40 | So here we're gonna go down to our race functions workbook. |
| 29:44 | And we've got a couple of worksheets that we need to look at. |
| 29:47 | The first one that we're going to go to is our shift request worksheet. |
| 29:51 | So this is where we can actually tell the ECU, or set up the ECU for our shift request coming in from our paddles. |
| 30:02 | So, let me just get back to the top of this, and what we're going to do for a start is we're going to look at our gear shift down, engine speed limit. |
| 30:13 | So basically here we can limit the engine RPM when we're requesting a downshift. |
| 30:19 | So this is just a safety aspect here. |
| 30:21 | What it means is that if we request a downshift at a point where it would end up exceeding our engine rev limit, we can prevent that shift from taking place. |
| 30:31 | So you can be as fussy with this as you want. |
| 30:33 | As you can see at the moment this table is set to just the same value, 6000 RPM everywhere. |
| 30:40 | We've got our gear shift power on throttle position. |
| 30:45 | So you'll remember I said that there are four types of shifts, we've got a power on up shift, a power off up shift, we've got a power on downshift, and a power off downshift. |
| 30:56 | And this essentially just gives the ECU the information it needs to decide whether we are under power on or power off conditions. |
| 31:05 | And we can see we've got that set to 10% throttle. |
| 31:08 | What we're trying to do here is find the sort of throttle setting when we're out on the road or on the dyno here where we're basically at about neutral torque. |
| 31:16 | So below that throttle position we'd be considered to be power off, and above that throttle position we're applying positive torque and we're considered to be power on. |
| 31:25 | So it's important to get that right there. |
| 31:29 | I should also mention here that the M1 ECU can be set up in either manual or automatic shifting. |
| 31:35 | So if you're feeling lazy obviously this is replicating a lot of the later model DTC or DSG style gearboxes, do have a full automatic mode for shifting, and the M1 can replicate that. |
| 31:47 | We're in a race application here so the driver's actually gonna have to do a little bit of work so we are in a manual setup. |
| 31:55 | We also have down here, this is important as well, we've got our reverse request delay. |
| 32:04 | So this is just a little bit of a safety buffer here so that with the paddles, you're using the downshift paddle to request both a downshift as well as ultimately if you're in neutral, this is going to have you go into reverse. |
| 32:17 | So this just means that you're not going to accidentally bump from neutral into reverse without actually meaning to. |
| 32:23 | What it means is that we actually have to hold the downshift paddle for 6/10ths of a second, in order to go from neutral into reverse. |
| 32:32 | So that's just an important aspect to make sure that you're not gonna end up in reverse while you're still rolling forwards. |
| 32:37 | I also mentioned here that there is a clutch override for this whole system so it's not going to shift out of neutral while our clutch is disengaged. |
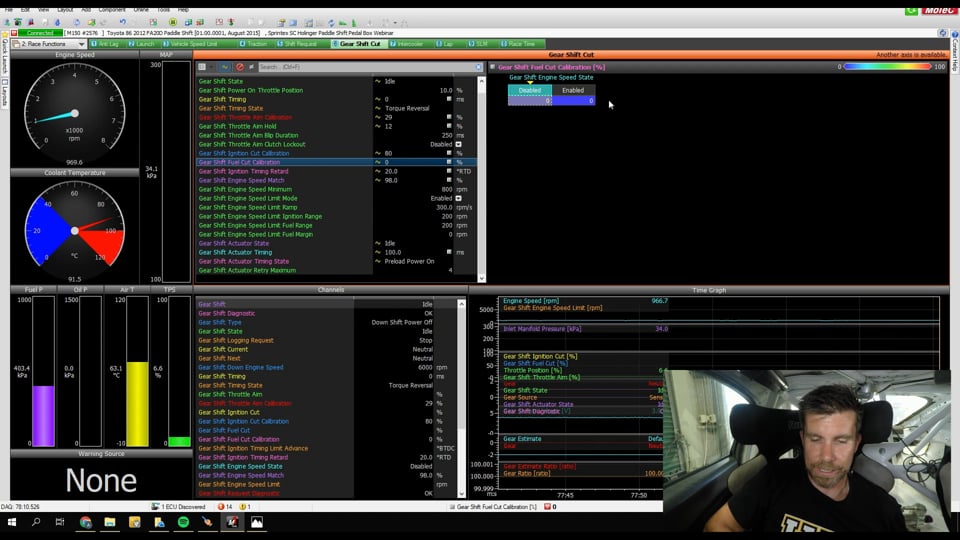
| 32:49 | Alright so we'll move over, there's a few more aspects there but I don't wanna get too tied down, what we're going to do is get into the actual meat of this which is on our gearshift cut worksheet. |
| 33:00 | So let's head across to that now. |
| 33:02 | And there's quite a lot of information on here that we need to take in. |
| 33:07 | So what we'll do is we'll start with probably some of the easier aspects, which is our throttle aim calibration. |
| 33:15 | So we're gonna come down to this little line here which is our throttle aim calibration. |
| 33:22 | And this is for the auto blip of our throttle on the downshift. |
| 33:26 | So this uses the drive by wire throttle body and allows the ECU to do some of the heavy lifting here on a downshift. |
| 33:33 | We've already talked the fact we need to match revs so that we don't end up compression locking when we get into the next lower gear. |
| 33:40 | Definitely not what we want while we are hard under brakes. |
| 33:43 | So traditionally this is something that the driver has needed to do by manually blipping the throttle with the heel of his foot or her foot for that matter, let's not be sexist, while braking hard. |
| 33:55 | Nothing wrong with that, it is a bit of a skill to get it right but it is actually really satisfying when you do get that all nicely lined up. |
| 34:02 | However what we do know is that even with professional drivers who are doing this every day for a living and getting paid for it, it's all but impossible for the driver to maintain maximum braking force while simultaneously matching revs by blipping the throttle with their heel. |
| 34:18 | What we almost always are going to see is some reductiion in the brake pressure while that blip is taking place. |
| 34:24 | So no matter how good the driver is, you're essentially going to get some reduction or handicap in your braking performance so that the driver can manually blip the throttle. |
| 34:33 | So with the auto blip functionality in the ECU, this means the driver doesn't need to worry about it, they can concentrate solely on getting their braking just right, being right on the edge of adhesion there and the drive by wire system is gonna blip the throttle and match revs. |
| 34:50 | That requires a bit of work from us though which is where our gear shift throttle aim calibration table comes in. |
| 34:56 | Now this is just crudely set up at the moment but the principle is pretty straightforward. |
| 35:00 | We've got a two dimensional table here, versus RPM and this just shows us our throttle target when the downshift is requested. |
| 35:08 | Now the numbers from, in this table, need to be decided on and tested to find the correct numbers for your particular engine. |
| 35:17 | And it's really going to come down in a large part to the amount of inertia in the engine. |
| 35:23 | So basically the more inertia we've got in the engine, the harder it is for the engine to quickly change speed, and the more aggressive we need to be with the throttle blip in order to match RPM quickly. |
| 35:34 | So the amount of throttle blip that we need also will be relative to the engine RPM so we're not going to be able to necessarily get the best results possible with a single value for this table. |
| 35:46 | So it's important to go and find the correct values for your particular application. |
| 35:51 | We've also got our throttle aim hold value here. |
| 35:55 | So this just, after a downshift, or after an upshift I think it is sorry, will hold a fixed amount of throttle position so this just basically smooths the upshift and I think this only works, from memory, if you're in a power off upshift, so just again to smooth things out. |
| 36:14 | And obviously there's a lot of parameters in here that we have the ability to adjust. |
| 36:18 | And when we get them right we can really get quite close to replicating sort of a synchromesh style box in terms of smoothness. |
| 36:26 | It's never gonna be quite perfect but we can get pretty close. |
| 36:29 | Now we're gonna come down to our cuts. |
| 36:33 | So this is what we're going to be using to control the torque reversal, particularly for our upshift here. |
| 36:39 | And we've got a few pieces of information to look at. |
| 36:42 | So first of all we've got our gear shift ignition cut calibration. |
| 36:48 | So we can see that that's set to 80%. |
| 36:51 | Whoops get rid of that, that one's what I was after. |
| 36:55 | Straight below that we've got our gear shift fuel cut calibration. |
| 36:59 | So this is really where it's your own option as to how you're going to set this up. |
| 37:05 | We can choose to use a ignition cut for our torque reversal or we can use a fuel cut for our fuel reversal. |
| 37:11 | Of course you could use both of these together. |
| 37:14 | Personal preference, there are some disadvantages to ignition cut on some engines, it can result in, particularly on turbocharged engines, explosions occurring in the exhaust manifold, and this can upset the valve train on some engines. |
| 37:29 | So you do need to be a little bit careful for a nice smooth quiet cut without the pops and bangs associated, with paddle shift, generally it's a good idea to use fuel cut or a combination of fuel and ignition cut. |
| 37:42 | Now at the moment this cut is set at 80% and it's a single value here. |
| 37:46 | But we can get a little bit fancier if we want. |
| 37:49 | If we press A to bring up our axis set up, we can set up the cut to be relative to engine speed, we can also bring in our engine load and our gearshift engine speed state as well so we can control that cut. |
| 38:02 | And it's worth just mentioning here that one of the common errors I see when setting up either a paddle shift system or a manual lever with a gear cut knob, is that the tuner will assume that we need a 100% cut in order to allow the shift to complete. |
| 38:24 | And while this will work and it will give us our shift, everything will work quite nicely, it's much more aggressive than it needs to be. |
| 38:31 | And we only need to go back to my previous example with a manually shifted dog engagement gearbox before electronic controls came into it, and you'll remember that I said that the shift method was to apply a little bit of load to the gear lever and then just back out of the throttle momentarily and back into it. |
| 38:50 | And that would allow the dogs to disengage and the shift to complete. |
| 38:53 | If you've actually driven a car and done that, you actually find that you don't need to back all the way out of the throttle, probably only need to get down to maybe 50% throttle or even less before the shift will begin. |
| 39:05 | So this just gives you an indication that a 100% cut is not actually necessary. |
| 39:10 | And we can get away with much less than that. |
| 39:12 | Even in this case 80% is probably pretty conservative. |
| 39:16 | In most instances now, particularly with turbocharged engines, I've been running somewhere in the region of about a 60% to 70% cut and then I've been using a lot of ignition retard to help smooth the reintroduction of the engine torque. |
| 39:31 | So that's ignition and our fuel cut, so obviously a lot of control in there and we can see that from our fuel cut, I'm currently not using, I'll see if this will work, I'm not using any fuel cut at all, it's solely ignition cut on this particular engine. |
| 39:47 | Next we've got our shift, gearshift ignition timing retard. |
| 39:52 | So you'll note I've just mention there that I've been using quite a bit of retard to smooth the shift, this occurs after our cut and helps to smooth the reintroduction of engine torque. |
| 40:05 | So you can set this up again however you want. |
| 40:07 | But I've got this set up as a three dimensional table, relative to engine RPM and our engine load. |
| 40:13 | Next we've got our engine speed match, so this defines for the four gearshift types, our upshift power on, upshift power off, downshift power on and downshift power off, what percentage of our engine RPM for the next gear, the cut will be targeting. |
| 40:33 | Now this is a little bit complex here and the easiest way to understand that, if you are on one of these parameters and you press F1, there is a nice handy little help file, I still to this day have to go through this each time I go to set it up just to get my head around it again, but the key here is a value of 100% will target the speed of the engine in the next gear and a value of 0% will target the speed of the current gear. |
| 40:59 | So this is used for the rev matching. |
| 41:01 | And what it says also, if we go a little further is for upshift power on and downshift power on, it is recommended to set the target slightly above 100% in order to ensure positive torque is restored as soon as the gear has engaged. |
| 41:18 | However for upshift power off or downshift power off, set slightly below 100%. |
| 41:25 | So this does sound complicated but in all honesty it really isn't, if you just follow the recommendations in there. |
| 41:33 | And I'm normally within about 5% or 10% of 100 as we can kind of see with those values in there. |
| 41:41 | That's going to get you something that's going to shift pretty well. |
| 41:45 | Our next parameter that I needed to talk about is our gear shift timing. |
| 41:52 | This is where a lot of that heavy lifting is done with the system here. |
| 41:56 | So this basically defines the timing for our shift. |
| 42:00 | So again there's our four different gear shift types. |
| 42:05 | So this is actually a four dimensional table here. |
| 42:09 | So at the moment we're on our upshift power on and the axis here is our gear shift so we're looking at the actual gear that we're in and then the vertical axis here is the different types, sorry the different timing states. |
| 42:28 | So we start, in this case, with pre blip then our torque reversal. |
| 42:32 | So the torque reversal, that's the key one, this is where the shift is actually occurring. |
| 42:36 | Then we've got post blip recovery and our rearm time. |
| 42:41 | Now the numbers in this table will depend on the type of shift. |
| 42:45 | So for example, here for an upshift power on, so this is where we're at full throttle, and we aren't going to be blipping the throttle, our torque reversal is our cut, so we can see we've got nothing for our pre blip. |
| 42:57 | And we've got a value in here of 150 milliseconds for our torque reversal. |
| 43:01 | Now that might sound like a really show shift and it certainly would be. |
| 43:06 | It's important to mention here that this is a maximum value. |
| 43:08 | Remember it is closed loop so the shift will actually, the cut will be removed as soon as the next gear is deemed to be active. |
| 43:17 | Then we've got our recovery and our rearm time, so you'll remember the recovery, that's where our little solenoids get an opportunity to basically stabilise again for the next shift and the rearm time will prevent another shift occurring for another 250 milliseconds so just stops the gearbox from constantly upshifting. |
| 43:37 | So if you bump the lever momentarily or something like that during a shift, it's not going to request multiple upshifts straight away. |
| 43:45 | If we look at our downshift power off for example, here we've got our post blip, our recovery time, so you can see there they're slightly different from the numbers that we saw for our upshift power on. |
| 44:00 | So this is where we do need to spend a lot of time getting everything right if we wanna really get a nice smooth shift that is nice and crisp, is not going to be jerky or horrible and it's going to do a good job of matching revs on the downshift and it's going to do a good job of cutting the power and torque smoothly on our upshift. |
| 44:26 | Now we're going to go into a quick demonstration shortly and then after that we'll jump into some questions and answers so if you do have any questions about anything I've talked about so far, please ask those in the comments and we'll get into those really shortly. |
| 44:42 | So what I'm gonna do here is we'll just get our fan running and we're going to do a little bit of driving here on our dyno. |
| 44:50 | Just give me a second here to get everything working, if our dyno will work, it will. |
| 44:56 | And we're probably also gonna need to get our steering wheel back on so I can actually make some shifts. |
| 45:04 | So the first thing, obviously you're not gonna be able to see the steering wheel, but right now with my foot off the clutch we've got that clutch lock out. |
| 45:10 | So it doesn't matter what I do on the paddles, we're not actually able to select a gear. |
| 45:17 | What we can do now is put our foot on the clutch and we can select first gear. |
| 45:21 | This is another area that is important to understand with a dog engagement gearbox. |
| 45:25 | It's always a good idea, even with paddle shift where it it's ECU controlled to be quite aggressive with everything. |
| 45:32 | And what I mean by this is where we wanna do into from neutral into first gear, what we wanna do is put our foot on the clutch but very quickly after that we wanna actually initiate that shift into first. |
| 45:43 | The reason for this is the gearbox will be rotating when our foot is off the clutch, so the input shaft is spinning at engine RPM. |
| 45:53 | When we put our foot on the clutch, the input shaft is now gonna slow down. |
| 45:56 | Particularly when the gearbox oil is quite cold, it'll slow down very quickly. |
| 45:59 | And if we allow it to stop, then when we ask for the shift, it's quite likely that the dogs will allign so that when we select the shift, they actually butt together and it won't be able to shift. |
| 46:10 | So if we instead shift while the input shaft is still moving, we've got a much better chance of the dogs engaging, so let's do that now. |
| 46:16 | So there's the, I don't know if you actually could have heard that from the other side of this webinar, but we got that clunk which lets us know that our gear is engaged. |
| 46:28 | Alright so what we're going to do now is I'm just gonna let the clutch out, I'm not gonna do any high powered shifting here just because it is a little bit jerky on our dyno. |
| 46:36 | But we're in first gear so we're just gonna bring the revs up to 3000. |
| 46:42 | We're just going to do a couple of shifts there and what we'll do is then have a look at our data so let's just pause everything now, we'll go back down through our gears. |
| 46:58 | And we're back in neutral, so let's have a quick look at our time graph here. |
| 47:01 | Now this is really one of the key aspects of setting up our paddle shift as well, is that we do need to spend the time in order to properly datalog everything, and make sure that everything is doing what it should be doing. |
| 47:16 | There's a really useful, and this is where the high speed datalogging that Motec provide with their level two and level three logging is quite useful. |
| 47:23 | Logging some of these aspects such as the gear position sensor voltage, at very high speeds, maybe 200 hertz is quite useful. |
| 47:33 | Alright so what we're looking at here is our RPM up the top here. |
| 47:37 | So obviously I wasn't at very high speed and we've got our shifts. |
| 47:43 | So if we look at our sensor voltage here, we can see that we're sitting at 3.343 volts we've got our gear, don't know why our, let me just set that up properly. |
| 48:03 | Right that might look a little bit better. |
| 48:06 | We've got our gear down below here in red showing we're in first gear. |
| 48:11 | So we request the shift and we can see here our gear shift state, which is this green blip here, that's going to move. |
| 48:21 | Let's just zoom in a little bit as well. |
| 48:24 | And we'll go through the actual shift process. |
| 48:28 | Let's also add in here, we'll add a group and we'll add a channel and we will add our up paddle. |
| 48:42 | Helps if you spell it correctly I've found. |
| 48:46 | Paddle up switch, so we can actually see exactly when we're requesting that shift. |
| 48:52 | And it's not. |
| 48:54 | Let's not go too deep into that now. |
| 48:57 | The process is still going to be the same. |
| 49:00 | So actually what you can't see there is I've requested that shift around about here. |
| 49:06 | And the reason we know this is that the gearshift actuator state has moved to active. |
| 49:12 | So this is basically our pre arm and this is where that actuator is pre loading the shift. |
| 49:17 | At the moment torque is still being applied so the gearbox can't actually change gear. |
| 49:21 | But what we do see is that the barrel position does move slightly. |
| 49:26 | So just prior to that we see that our gear position sensor voltage is sitting at 3.343. |
| 49:31 | During that prearm where the actuator is active, we can see that that moves to 3.186 volts that's showing here. |
| 49:40 | So that means that the gear barrel position has started to move. |
| 49:45 | Now we continue over here though, we'll move through, and we can see that our shift has now completed. |
| 49:54 | We got down to 2.703 volts. |
| 49:57 | And we've got, because we're not under very much power here, we can see this little yellow spike in our log file, this shows the gear cut, our ignition cut being applied and then being reduced over time. |
| 50:11 | So that's our shift there, so that's our first to second shift. |
| 50:14 | We'll come across here, and we'll see exactly the same in our, this one's probably a little bit better here, our second to third shift, where I had a little bit more load on. |
| 50:23 | So let's just go through that again. |
| 50:25 | So we are in third gear here. |
| 50:28 | We can see our gear position voltage sitting a 2.127 volts. |
| 50:33 | We start to move into the shift, we can see that our gearshift actuator state has moved to active. |
| 50:40 | And we can see that that has resulted in our gear barrel starting to move. |
| 50:44 | It still can't move however because we don't have that ignition cut active. |
| 50:49 | We get over to this point here, we can see that our cut has now become active, you can see that we've got that 80% cut being applied. |
| 50:58 | As soon as that cut's applied, this allows that shift to complete, so we see our gear position move now down into our next gear. |
| 51:07 | Our next gear, fourth, is now active, our cut is removed and the system goes into recovery. |
| 51:14 | So this is the process during our upshift, let's have a look and see if we can get some more data from a downshift. |
| 51:21 | So this will be a little bit harder for us to get on the dyno but we'll see what we can do here. |
| 51:27 | So what I'm going to do here, is we'll go into fifth gear and we'll bring up our road speed a little bit as well. |
| 51:55 | Alright so we just went into sixth in the end there and just rode down through the gears. |
| 52:01 | I'll just let this logging move along a little bit and we'll pause it. |
| 52:06 | Shut everything down now and we'll have a look at the results that we got. |
| 52:16 | Alright so we've got essentially the same situation going on here. |
| 52:20 | We got up to about 4800 RPM and we are in sixth gear which shows here in red. |
| 52:27 | I came off the throttle and now when we request the downshift, let's have a look at a couple here in the middle. |
| 52:37 | We can see that when we request the downshift, this is our throttle blip here. |
| 52:42 | So my throttle position, my pedal position hasn't changed here. |
| 52:47 | This is the throttle position being measured at the throttle body, so that's actually what counts. |
| 52:52 | So that's our throttle being blipped. |
| 52:55 | Now another important aspect here is that if we over blip the throttle, we don't want that, because that's gonna end up with our RPM exceeding our target. |
| 53:04 | So the Motec will also provide a cut if the RPM exceeds the RPM that's calculated with the next lowest gear. |
| 53:13 | So this will just help us, we don't need to be quite so perfect with our blip tuning. |
| 53:19 | However what we do need to understand is that if we are instigating an ignition cut on that downshift, on that throttle blip, that can end up being quite harsh as well, so we can use this to help tune our downshifting. |
| 53:34 | But we don't really wanna be relying on it, the best is if we're just applying the correct amount of blip just to match RPM without exceeding it, that's gonna result in a nice smooth downshift. |
| 53:45 | We actually had one of the cars that we were involved with tuning on very early on with the downshift throttle blip, we were a little bit aggressive on that blip and because of the ignition cut being applied at the local track on one particular corner, it was resulting in quite a sharp crack out the exhaust with that cut being active. |
| 54:05 | And this was actually putting it over the noise limit for that particular track. |
| 54:09 | Just so happened that the noise detection was occurring right on that particular corner so it was pretty much the perfect storm but of course we don't wanna rely on the cut to prevent an over rev, we really wanna be doing this manually with our blip so that's just a case of getting our blip mount correct. |
| 54:30 | So one of the questions we quite often get is how do you go about tuning this blip? And really a lot of it comes down to using your datalogging but also using a feel for the car. |
| 54:42 | So it's a case of doing as much as we can on the dyno here. |
| 54:45 | With a rolling road dyno you can do a reasonable job because there is a reasonable amount of inertia. |
| 54:53 | So what we wanna do is get the car up into a high gear, pretty much exactly what I just did in that demonstration, and then shift down through the gears while you're on over run. |
| 55:03 | And what you should be getting is a relatively smooth shift. |
| 55:06 | But the car isn't bouncing around on the dyno. |
| 55:08 | That's probably gonna get you pretty close but the inertia on the dyno is not going to perfectly match what you end up with out on the racetrack. |
| 55:14 | So there's always some requirement for testing and this becomes as much a case of looking at our data for our wheel speeds and our engine RPM on these downshifts as it does a case of driver feel. |
| 55:29 | And when you get it right the shifts are really really seemless, both up and down for that matter. |
| 55:36 | What you also do need to be a little bit mindful of is what you're actually expecting and whether that's realistic. |
| 55:43 | And this comes down to what I was mentioning before where the engine does have a certain amount of inertia. |
| 55:50 | And particularly with an engine that uses heavy components inside of it, particularly one with a very heavy flywheel. |
| 55:57 | It can be very difficult to match revs on the downshift instantaneously and these gearboxes can obviously change gears very very fast. |
| 56:05 | So this can be problematic and if you don't get that right, what you're going to find is particularly with an engine that is quite lethargic and quite slow to change RPM, you can end up with compression locking under heavy braking so obviously not what you want. |
| 56:22 | So on one end, if you don't have enough throttle blip, you're going to end up potentially with compression locking under hard braking, upsetting the balance of the car, on the other hand if you are over blipping the throttle, you can end up hitting the ignition cut or fuel cut and we don't really want that, although it's probably the lesser of the two evils. |
| 56:40 | Alright so let's move into some questions and answers now. |
| 56:44 | Again if you've got some more questions, please ask those and we'll get to those as quickly as we can. |
| 56:50 | Ben has asked, is there a driving advantage to having the paddles fixed to either the steering column such as paddles that don't move with the steering wheel to paddles that move? I personally, the cars that I have been involved with with paddle shift have inevitably always had the paddles attached to the steering wheel. |
| 57:10 | And this means that regardless what you're actually doing on the steering wheel, you're always going to have the paddles right there. |
| 57:16 | This can be a little bit tricky so I think a little bit of it come down to personal preference. |
| 57:22 | Particularly for a rally car where you're likely to be using a lot of opposite lock from time to time, this could get a little bit messy, and what you may not have been able to see on this particular steering wheel is the paddles are actually marked in red and green for down and upshift. |
| 57:36 | I'm not entirely sure if a bit of red and green tape is gonna be enough in the heat of battle to make that really clear, but we do see some cars where the paddles are mounted off the column. |
| 57:47 | So for me, generally because I am more involved in circuit racing, I'd probably prefer to have them on the steering wheel. |
| 57:57 | Ben has also asked, is any of this also applicable to automatic transmission tuning? No no, automatic transmission tuning for a late model electronically controlled automatic transmission, very very different thing. |
| 58:10 | And yeah a lot more to it that what we've gone through today. |
| 58:16 | Michael has asked, can a standalone ECU such as an AEM series two on my '05 STi have the ability to control a sequential gearbox system or is there some other piggy back system that allows it to communicate between the two? At this point I actually haven't been involved with the AEM series two. |
| 58:35 | So I don't wanna speak out of turn, it's not an ECU that I've had anything to do with so I don't know about its specific capabilities. |
| 58:45 | We've been more involved with the AEM Infinity. |
| 58:47 | So a couple of things to take into account here. |
| 58:50 | There are standalone paddle shift systems that have their own integrated gearbox controllers, Geartronics I think is one such system, you can Google that if you wanna have a better look. |
| 59:03 | And these will often output what is a much simplified request to the ECU. |
| 59:07 | Basically doing a lot of the heavy lifting and just asking the ECU for an ignition cut or a fuel cut for example. |
| 59:15 | Sometimes these may not be capable of doing a downshift throttle blip. |
| 59:19 | Although for cable throttle systems there are a number of these systems that use an external blipper for the cable throttle so a little bit of research on that might help you out there but yeah I can't answer specifically for the AEM series two. |
| 59:33 | Michael's also asked, among the sequential gearboxes on the market, are there certain features that you'd want to look for or things to avoid. |
| 59:41 | Would hate to make a poor choice at this price point. |
| 59:44 | Yeah it is a tough one, it's a situation we've found ourselves in just recently with a couple of our own cars. |
| 59:50 | So I think probably one of the biggest drivers is going to be the amount of money that you're prepared to spend and even the sequential gearboxes on the market from mainstream players such as Holinger, Albins, maybe Quaife for example, do vary quite dramatically on price. |
| 01:00:05 | I'd probably be definitely looking at what others have experienced with your sort of power and torque level on a similar gearbox. |
| 01:00:14 | So while most of the main players there days are fairly reliable, we have seen problems over the years from certain manufacturer's gearboxes. |
| 01:00:24 | You don't really wanna be a guinea pig on a new product or find that you're really asking a little bit too much from that particular gearbox. |
| 01:00:31 | Beyond that really all of the gearboxes are going to work. |
| 01:00:35 | Another really big driver, and this is what made our decision for us, is getting the gearbox serviced. |
| 01:00:41 | So we were on the fence between a Holinger gearbox for one of our cars and a locally manufactured TTI gearbox. |
| 01:00:49 | And the clincher, other than the fact the TTI was considerably chearper than the Holinger was that we could have it serviced locally inside of New Zealand. |
| 01:00:58 | And this is a factor you do need to consider because even when you aren't damaging dogs regularly, you're gonna find that a straight cut dog box may require maintenance, it will require inspections from time to time and perhaps some remedial work and it's a good idea if you don't necessarily have to send that a long distance in order to get that to happen. |
| 01:01:21 | Or if you've got someone locally who can at least work on that sort of gearbox. |
| 01:01:25 | Michael has also asked, on turbocharged vehicles, when you set up for auto blip, do you try and avoid an RPM where the engine is on boost or it doesn't matter? No generally, particularly for a circuit application, you're almost always going to be working with a close ratio sequential gearbox. |
| 01:01:41 | You're almost always going to be working in the rev range of the engine where it is on boost. |
| 01:01:48 | You don't really wanna be dropping out of that rev range. |
| 01:01:50 | So yeah that's not really a consideration. |
| 01:01:53 | Alright guys that has taken us to the end of our webinar. |
| 01:01:55 | So hopefully that's given everyone a little bit more insight into what is quite a complex setup. |
| 01:02:00 | We definitely haven't touched on everything but hopefully that's given you a little bit more understanding of the fundamentals of paddle shifted gearboxes, how they work and what we need to understand in order to set them up inside the M1 software. |
| 01:02:12 | As usual, if you've got any further questions, please feel free to ask those in the webinar archive, sorry in our forum, and I'll be happy to answer them there. |
| 01:02:21 | Alright thanks guys and I'll look forward to seeing you all next time. |
| 01:02:25 | Now for those who are watching today on Facebook, this is just some insight into what we put on every week for our HPA gold members. |
| 01:02:32 | Our gold members get the opportunity to review these webinars in our archive after they have been performed live and they can also watch our other webinars, we've got over 199 hours of existing webinar content in there right now so this is a great way to expand your knowledge on a wide range of tuning, engine building and wiring topics. |
| 01:02:53 | Becoming a gold member will also give you access to our private member's only forum which is a great place to get fast, reliable answers to your specific questions. |
| 01:03:01 | If you're interested in learning more, you can purchase gold membership on its own for USD$19 a month however you will get three months of free access with the purchase of any of our courses. |
| 01:03:13 | Alright guys again, thanks for watching and look forward to seeing you online again soon, thank you. |
Timestamps
0:00 - Introduction
1:20 - System overview
8:45 - Closed loop vs open loop shifting
12:40 - What is required to shift?
15:35 - Different types of shift
16:45 - Paddle input
19:00 - Actuator output
22:40 - Actuator pressure control and pump
24:30 - Gear position sensor
27:55 - Wheel speed
29:30 - Shift request
32:50 - Gear shift cut
44:40 - Demo
56:50 - Questions


