203 | Ideal Knock Sensor Placement
Summary
Knock is one of the most common causes for engine damage, and as such it’s critical to monitor for knock when we’re tuning any engine. One of the key considerations when fitting audio knock detection equipment is the location of the knock sensor. In this webinar we’ll investigate our options and discuss how the sensor placement will affect knock detection.
| 00:00 | - Hey guys it's Andre from High Performance Academy, welcome along to another one of our webinars. |
| 00:05 | This time we're going to be talking about the subject of knock sensors and knock sensor placement. |
| 00:11 | And this is really really important if you want to accurately monitor for detonation, and this doesn't really matter whether you are using a factory or standalone ECU, where you're using built in knock control. |
| 00:25 | Or perhaps you're using a aftermarket standalone knock detection system, in this case we've got here our Plex Knock Monitor here as well as our Link G4 Plus Knock Block, two of the products that we use regularly when we are dyno tuning. |
| 00:39 | So regardless what technique you are using, it really is important to start by making sure you've got that knock sensor installed in a place where it's going to be able to correctly identify knock and that's gonna give you the best chance of success. |
| 00:54 | As with all of our webinars, we will be having a question and answer session at the end. |
| 00:58 | This webinar is a pretty short concise topic so chances are it's not gonna take us too long to get through the nitty gritty of this webinar, so if you have got any questions, I would urge you to get in there reasonably quickly with them. |
| 01:11 | Alright so I think we should probably start by just a refreesher on what exactly knock is, and in my opinion this is the number one killer of performance engines. |
| 01:21 | So knock is a type of abnormal combustion and it is very different to pre ignition which is something it's often confused with. |
| 01:32 | We also hear the term pre detonation, not a thing. |
| 01:35 | We've got pre ignition and we've got knock or detonation as it's also known as. |
| 01:40 | And the defining or differentiating aspect with these two types of abnormal combustion is that knock or detonation begins after the combustion process has started. |
| 01:51 | So what we end up with is our spark plug initiating the combustion process, and as the flame front propagates out through the combustion chamber from the spark plug, what we end up with is an increasing pressure inside the combustion chamber, and with that pressure also comes increasing temperature. |
| 02:08 | It's the temperature that is the key aspect that actually initiates detonation or knock occurring. |
| 02:14 | What happens is at some point, the temperature inside the combustion chamber can become so great that it causes unburned pockets of fuel and air to spontaneously combust. |
| 02:24 | So this means that they combust before the flame front actually reaches them and ignites them. |
| 02:30 | Now unlike normal control combustion when we get a smooth increase in our pressure inside the combustion chamber, when we get knock occurring, those pockets of unburned fuel and air spontaneously combust, releasing all of their energy at the same time. |
| 02:43 | So we get a very very fast moving flame front, this causes a large spike in pressure inside our combustion chamber and it's that pressure that is the problem with detonation. |
| 02:54 | You really could liken it to someone slamming down on the crown of our piston with a sledgehammer and it is just as damaging as it sounds. |
| 03:02 | Now what it can do is it can strip away the boundary layer of gases that protect the combustion chamber as well as our cylinder head, from the full heat of combustion. |
| 03:14 | And of course when we're dealing with a forged aluminium piston, the melting point of the alloy used for those pistons is much lower than the full heat of combustion so they are really requiring or relying on that boundary layer of gases to protect them and when that boundary layer is stripped away, you're going to end up with the piston melting. |
| 03:33 | So you quite often will see signs of detonation where it's just been light detonation, the piston will have a slightly sand blasted appearance to it. |
| 03:40 | Doesn't take very long for that damage to become much more serious though, and it can easily melt the side out of the piston, and it only takes a few seconds or less for that to occur. |
| 03:51 | The other aspect as well, particularly if we are dealing with a factory cast piston, where the material tends to be a little bit more brittle than an aftermarket forging, is we quite often see the pressure spikes will actually break the ring lands. |
| 04:05 | So that's quite a common issue with a factory cast piston. |
| 04:09 | So that's a quick refresher on what knock is. |
| 04:13 | Now the key point there though is that the knock creates those sharp pressure spikes in the combustion chamber. |
| 04:21 | And this is an advantage for us because those pressure spikes will actually create essentially a resonance inside the engine block and that is what we're trying to detect when we are picking up detonation. |
| 04:32 | We're using a knock sensor, which we'll get into in a second to pick up the resonant frequency in the engine block associated with knock. |
| 04:40 | We can monitor that and when we do see that, then we can use our ECU to do something about it. |
| 04:45 | Now I will just briefly touch on alternatives for knock detection. |
| 04:49 | There are some other ways of detecting knock, although currently in the OE world as well as the aftermarket, I haven't really seen much adoption of those. |
| 05:00 | At the top end, if we really had the money, the ultimate way is to monitor the in cylinder combustion pressure. |
| 05:08 | So we use some very expensive equipment to monitor the combustion pressure happening inside the cylinder and we can log this at a very very high frequency and then we can actually see the spikes associated with knock occurring. |
| 05:21 | So that's the most accurate way. |
| 05:23 | There are some other techniques where basically the ECU measures the resistance across the plug gap and can detect detonation from changes in this. |
| 05:34 | This is a technique that I haven't personally used and again I am not seeing that used in the aftermarket and at least with the vehicle's we're tuning, we aren't seeing this as an OE technique. |
| 05:44 | So despite the fact the technology of a piezoelectric knock sensor is pretty old now, it is still the predominant way we are going to detect detonation. |
| 05:53 | Alright so let's have a look at what a knock sensor is. |
| 05:57 | And I'll just grab a piece of paper so you can get a little bit of distinction so we'll go to our overhead camera and this is our generic donut style knock sensor and while they do come in a couple of different varieties, I've got another one here that I'll just bring over as well. |
| 06:15 | Basically the difference with this is in the connector style but they essentially work on the same principle. |
| 06:23 | And what we do is we run a bolt through the centre of the knock sensor and we bolt it somewhere on the engine block and this sensor is what is referred to as a piezoelectric sensor. |
| 06:32 | What it does is it measures vibration or it detects vibration in the engine block and it converts that vibration into an electrical voltage which is then sent out to our ECU. |
| 06:44 | Our ECU or our knock detection equipment then needs to do some signal processing on that, basically in the ultimate form, what we're trying to do is zero in on the frequency that knock occurs at in a specific engine. |
| 06:59 | So that that way we can strip away or ignore some of that background noise that's always happening. |
| 07:04 | Obviously the engine is a really noisy place, there's a lot going on, there's a lot of background mechanical noise that is completely normal. |
| 07:10 | So we wanna be able to detect the frequencies associated with knock really really accurately. |
| 07:16 | So that's our sensor there. |
| 07:19 | They, as I say they haven't changed a lot in the time that I've been involved in the tuning industry and you'll be able to pick up one of these Bosch style donut knock sensors for somewhere in the region of probably USD$50 to USD$100 depending on your supplier. |
| 07:37 | What I wanna do is just quickly show you as well, what the processed signal tends to look like inside our ECU. |
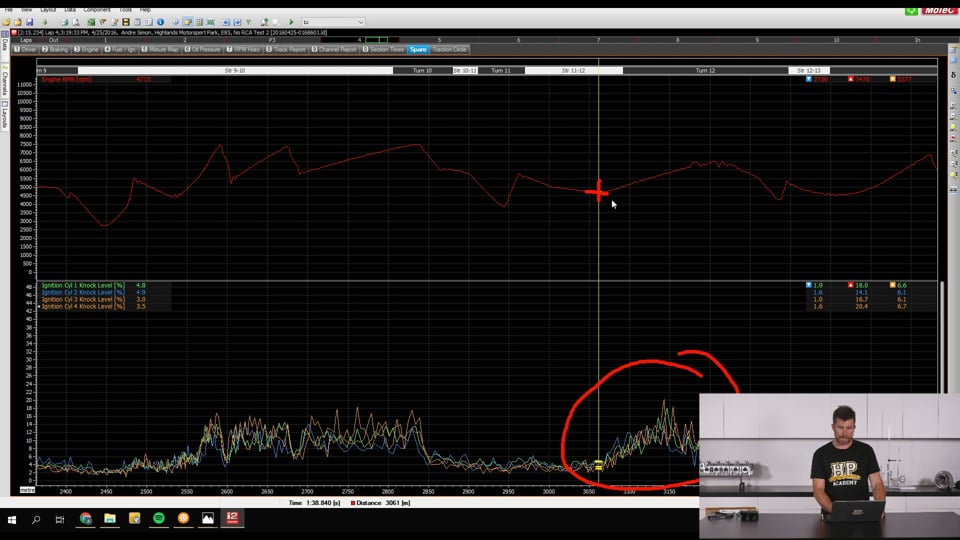
| 07:44 | So we'll just across to my laptop screen and this is just a little bit of data from our Subaru FA20 engine in our Motec M1 ECU. |
| 07:52 | So at the top here we've got our engine RPM, I'm not really showing a huge amount of detail here but what we'll just do is zoom in a little bit. |
| 08:00 | And we can see at the bottom here, we've got our knock data coming in for each cylinder so despite the fact that this particular engine only runs two knock sensors on a horizontally opposed four cylinder engine, we can actually look at the information from the knock sensor based on a specific window of crankshaft rotation, when we know a particular cylinder is firing, and this allows us to do individual cylinder knock detection. |
| 08:26 | So what we're looking at here is the noise signal coming out of that sensor. |
| 08:32 | And if we look in particular over here on the right hand side, we're looking at our RPM and we're starting at this particular point here. |
| 08:41 | We are somewhere around about 4700 RPM and then of course we're accelerating so you see the RPM climb. |
| 08:48 | And you can also see exactly the same trend in our knock noise levels. |
| 08:54 | So we see that the knock noise or the output from our knock sensor is relative to our engine RPM and that's really important there to understand as well. |
| 09:04 | As our engine RPM increases, there's physically more noise going on inside our engine so we can't just set a single level for our knock detection and say if the output from the knock sensor goes above this, then knock is occurring and we need to do something about it. |
| 09:19 | We actually need to get a little bit more tricky with that and we need to look at a threshold for our knock detection. |
| 09:25 | Now for our HPA members as well, if you do want to learn a little bit more about this, on this particular webinar, we're really focusing on our knock sensor placement, but we do have a number of webinars in our archive that you can check out that cover in more detail the aspects of actually setting up and configuring our knock detection strategies in our ECU. |
| 09:45 | But this is just a little snipper so you have a better idea of what you're actually looking at or what exactly is coming out of that knock sensor. |
| 09:55 | Now it's also worth mentioning here that the two knock sensors that I just showed you are a generic aftermarket sensor, generic sensor that is produced by Bosch and used widely in the aftermarket. |
| 10:07 | And this is referred to as a wideband knock sensor. |
| 10:11 | So these are usable on basically any engine, so they're great for us in the aftermarket where we are working on a lot of modified engines. |
| 10:20 | However when we're dealing with a factory engine, we're quite often going to end up with that engine fitted with what's known as a factory narrow band sensor which is tuned or designed to work specifically at a single frequency. |
| 10:36 | So what it does is it essentially does a better job of detecting noise at a given frequency. |
| 10:41 | And this allows the factory to select a sensor that's going to give a better signal to noise ratio. |
| 10:47 | And in particular when we are looking at knock voltages or knock noise coming into the ECU, quite often what we'll end up doing is looking at what's referred to as the second harmonic of the knock frequency. |
| 11:02 | So this gets a little bit complex but just bear with me. |
| 11:06 | I'll talk about how we can find our knock sensor, knock frequency for a start. |
| 11:12 | So what we need to do is first of all have a good idea of what our base frequency is likely to be. |
| 11:19 | So the frequency that knock is likely to occur at. |
| 11:21 | While there are a few factors that will influence this, we can get a pretty good idea of this, if we go through a really simple calculation, and the only input we need to know is our bore diameter. |
| 11:34 | So the calculation that we're going to be using is 1800 divided by pi, multiplied by our bore diameter. |
| 11:44 | So let's just go through that, we'll head back across to my laptop screen. |
| 11:47 | And what we'll do here is we'll go first of all pi, so 3.142 multiplied by our bore diameter, let's say, it's important to mention here that this does need to be in metric units. |
| 12:01 | So 86 millimetres here, let's just take for example, so that gives us a value of 270. |
| 12:05 | Now we want to type in 1800 divided by 270 and that gives us our frequency in kilohertz. |
| 12:16 | So in other words for our, let's try and get that working again. |
| 12:19 | For our, no it's not gonna work. |
| 12:22 | For our 86 millimetre bore, we know that our base frequency for knock is likely to be somewhere around about 6.6 kilohertz. |
| 12:29 | Now that's not always going to be exactly where our knock is going to occur. |
| 12:33 | But it's going to be a pretty good place to start looking. |
| 12:36 | Now with a second harmonic, what we're looking at is the double that base frequency so in other words if we multiply our 6.6 by two, we're going to have our second harmonic frequency occurring at about 13 kilohertz. |
| 12:52 | So some of these factory sensors are designed to work at the second or even the third harmonic of our base knock frequency. |
| 13:00 | Now why that's important to understand is that while that sensor is probably going to do a really good job on the stock standard factory engine, if we take that factory sensor and fit it to a different engine, we may get much worse results and likewise if we heavily modified the factory engine, and we find that our knock frequency moves a fair way from stock, then that's also going to influence our results. |
| 13:23 | So just a couple of factors to keep in mind there. |
| 13:27 | OK so where are factory sensors mounted? So we're really talking about our mounting locations here and what we'll generally find is that the ideal location, what we want to do is mount our sensor somewhere on the engine block, not the cylinder head and we ideally want to mount the sensor quite high on the engine block because when knock occurs the piston is relatively close to TDC so the knock frequency is, or the knock pressure waves will begin when the piston is quite close to top dead centre and that's where we're going to get that resonance beginning in our engine block so high on the engine block is the ideal location. |
| 14:10 | The other aspect here is if we've got a V configuration engine, in the perfect world we'd like to have one sensor per bank of cylinders. |
| 14:19 | So on a V configuration engine we'd like to have one on each side of the engine, on a horizontally opposed boxer style engine like our Subaru FA20, again we have one sensor on both sides of the engine block. |
| 14:31 | That's gonna give us the best chance of being able to equally detect or accurately detect knock on all of the cylinders on the engine. |
| 14:39 | Now if we've got a long in line engine, maybe a six cylinder in line engine like a Toyota 2JZ then again we can get an advantage here from fitting two sensors, one near the front three cylinders and one near to the rear three cylinders. |
| 14:57 | So it's just a case of common sense here. |
| 14:59 | Obviously the further we get away from the particular cylinder that is knocking, the intensity or values of that knock input will start to become a little diminished and you're going to be able to pick up knock more readily on the sensor, on the cylinders that the sensor is closest to. |
| 15:19 | That being said, this is all perfect world stuff and we're still going to find that just about irrespective of where we fit the sensor, we're still going to pick up that vibration that's occurring in the block. |
| 15:33 | When that resonance begins in the block, when that vibration begins in the block, it is being transferred very quickly through the entire engine block. |
| 15:40 | So while yes it would be ideal to have the sensor fitted near to the top of the block, it isn't always necessary and we can do a reasonably good job in a lot of other locations. |
| 15:52 | And the reason why this is important is because particularly on our late model engines, sometimes we don't have the option of fitting the sensor in the ideal spot. |
| 16:02 | So what we'll talk about is some of those spots and some of the considerations you need to keep in mind with the sensor location. |
| 16:09 | The first one I'm gonna talk about because I get asked about this a lot is can we share the signals with a factory knock sensor? And my answer to this is I definitely don't advise it. |
| 16:20 | Particularly if you're dealing with a factory ECU then the knock control strategy is very finely tuned to the amplitude of the signal coming out of that knock sensor. |
| 16:31 | So if we start trying to share that signal, it's almost certainly going to affect the amplitude and accuracy of the signal that the ECU is receiving and we're likely to get a diminishing result, or diminishing effectiveness of the knock detection. |
| 16:45 | In a lot of instances you're probably likely to see that this is going to end up triggering a check engine fault or something of that nature so when we are tuning on a dyno and we're adding a audio knock detection system such as the ones I've shown you here, something that is only fitted for the purposes of tuning and then it's removed after the vehicle is tuned on the dyno, then you're going to need to add an additional sensor over and above any sensors that are wired into the factory ECU or your standalone ECU. |
| 17:15 | Now I'll just mention as well, while I'm talking about that, we quite often get asked about why we need to do this, why we need to add audio knock detection if the factory ECU or the standalone we're tuning already has knock detection and knock control strategies built in. |
| 17:30 | The reason for this is that factory knock control doesn't always work perfectly, particularly on a modified engine and we need to validate that the knock detection strategy is working properly. |
| 17:42 | In other words we need to validate that the factory ECU is able to correctly detect knock and respond to that. |
| 17:47 | Likewise if we're tuning an aftermarket standalone with knock control, we need to validate that the ECU is picking up knock and properly tune the frequency and the amplitude or noise threshold so that again the knock control strategy is working. |
| 18:01 | So even when we're got knock control, we still need to add an additional sensor quite often when we are tuning while we're getting that all dialled in. |
| 18:10 | Alright so what we've got is a range of locations that we need to consider. |
| 18:14 | And what I'm going to do is basically go through my preference in order of where I would like to fit the sensor. |
| 18:21 | So obviously the first place we're going to want to try and fit that sensor is somewhere near to the top of the block exactly like the factory will do or the OE engineers will do. |
| 18:31 | The problem with this of course is we're going to be limited on where we have available empty bosses that we can physically thread our sensor into. |
| 18:39 | And most often, particularly on late model engines, you're gonna really struggle to find any empty bosses in the ideal locations. |
| 18:47 | So from here I basically will look anywhere on the engine block and often I'm going to end up mounting the sensor somewhere nearer to the sump rails down at the bottom of the block. |
| 18:59 | And in my personal experience that still works perfectly fine. |
| 19:02 | Now if we can't find any locations on the block at all, we do still have some options. |
| 19:07 | Obviously off the side of the block we're going to have engine mounts bolted in. |
| 19:11 | So sometimes what we can do is remove temporarily one of the engine mount bolts and we can then utilise that boss for our sensor fitment. |
| 19:20 | And obviously then replace our engine mount once the car comes off the dyno. |
| 19:24 | We are a little bit limited on what we can do here because again if we jump across to our overhead camera, I'll just grab our piece of paper so we can see this. |
| 19:33 | We'll see that on the underside of our sensor we've got quite a large diameter. |
| 19:38 | It's got a brass centre here and what we really want for accuracy of picking up our knock signal is this entire base needs to be mounted on something relatively flat. |
| 19:50 | So we are gonna struggle if we've got a really tight mounting bracket to have room to mount that sensor on without it actually interferring with the mounting bracket itself. |
| 20:01 | So it's important to understand that. |
| 20:03 | Likewise we can't end up having that sensor mounted on an angle or anything like that, it's not gonna do its job properly so it has to be nice and flat on our engine block. |
| 20:12 | Now if we've exhausted any of our options there on the side of our engine block, then the next place I would look at is either somewhere on the front cover or perhaps even on the sump if we've got a cast alloy sump. |
| 20:27 | That's still gonna be a really good way of transmitting that vibration out of the engine block into the sump and we can still get a really good signal off our sump. |
| 20:36 | So it's not ideal but again sometimes we are restricted in the aftermarket in what we can actually do and where we can fit it. |
| 20:43 | Likewise I've just mentioned there the front cover of the engine. |
| 20:46 | So if we've got a cast alloy front cover, again this is gonna do a pretty good job of transmitting that vibration from the block and we'll still pick up a lot of that vibration with our sensor. |
| 20:57 | Now I just wanted to show you a couple of applications here on just some of the cars we have in the shop at the moment, just so you can get a bit of an idea on this. |
| 21:05 | So on the screen at the moment we've got our Subaru STi, this is a GRB version 11 STi and this is a little bit tricky because obviously as we can see here, getting to just about any part of our engine is pretty difficult being a horizontally opposed boxer engine. |
| 21:25 | So one of the places that quite often we see people mounting these sensors are to these little bosses on the front of the engine. |
| 21:33 | I've tried this in the past and honestly I haven't had really good results with it. |
| 21:39 | It is however incredibly quick and easy to mount our sensor, we don't need to take anything off the engine but I simply don't find it works that well. |
| 21:47 | This is just my own experience. |
| 21:50 | So in preference to that, what I actually do is I remove the intercooler, it's a little bit of a hassle but on an STi it really only takes a few minutes. |
| 21:58 | And then we end up getting access to, this is basically looking straight down on the top of the engine. |
| 22:05 | We have an M8 threaded boss right here, in this particular model we temporarily need to remove a bracket so that we can get our sensor fitted up. |
| 22:13 | But it really only takes a couple of moments to do that. |
| 22:16 | We've got our sensor in a nice location on the top of the engine block and it's gonna do a really really good job. |
| 22:22 | Of course we then need to remove it after we've finished our tuning. |
| 22:25 | Only thing I would mention here that is a consideration and this sort of goes for any engine, obviously right here we're on the interface between the engine block and our transmission. |
| 22:36 | And quite often if we've got a twin plate clutch or something of that nature fitted to the car, we will get a lot of noise from that clutch being transferred back into the engine block when we are mounting the sensor right on that interface between the block and the, oop sorry I'm missing a couple of photos there, the block and the gearbox itself, so just a consideration there to make anyway. |
| 23:01 | But this is the sort of work we're going to need to go through. |
| 23:03 | Often we do need to actually get a little bit creative. |
| 23:07 | We do need to perhaps temporarily remove a bracket or something, maybe remove an intercooler to gain access. |
| 23:14 | And this is just a time consuming process that we need to go through when we are tuning to make sure that we've got our sensor located in a position that's gonna give us the best chance of getting a good result. |
| 23:26 | Alright I'm just gonna see if I've got, for some reason my other photos have not come through. |
| 23:35 | Never mind, I was gonna show you a couple more examples but unfortunately I'm not gonna be able to do that. |
| 23:40 | Alright so from there my least favourite place to mount the sensor is somewhere up on the cylinder head. |
| 23:47 | And this can be tempting again because it can just be a nice accessible spot. |
| 23:51 | Often we've got easy access to bolt holes on the engine, sorry the cylinder head, that are easy to access, we don't need to take anything off the enigne to access them. |
| 24:03 | But the problem with this is we are then prone to getting a lot of additional noise being transferred from our valve train. |
| 24:10 | Now that's not to say this is always a bad idea. |
| 24:12 | Particularly if we are dealing with a valve train that uses hydraulic lash adjustment and everything is in good condition, generally this can still give us acceptable results, it's not my favourite and I would much prefer to get onto the engine block, the sump, or the front cover before I worried about the cylinder head. |
| 24:31 | But in a worst case scenario we can get good results there. |
| 24:34 | If you're dealing with a race engine, particularly one that uses solid lifters, then this can be problematic, you're going to get a lot of additional noise from solid lifters as the engine is in operation, particularly at high RPM. |
| 24:45 | And it can make it really really difficult to get good detection of knock. |
| 24:49 | Then the last location that I would consider is on the inlet manifold and this really only works if you've got a cast aluminium inlet manifold. |
| 24:58 | But worst case scenario if there's absolutely no other option available to you then the inlet manifold then the inlet manifold can sometimes work. |
| 25:07 | Now the caveat here is that we can't apply one technique to every engine we tune so it really comes down to gaining a little bit of experience with the particular engines you're seeing most often and figuring out where that particular engine gives you the best results with the knock sensor location. |
| 25:25 | So I'd definitely also recommend trying a couple of different locations on an engine. |
| 25:30 | So get the engine up and running and if you're getting good detection of knock and it's really crisp and clear then obviously that's great and you can carry on. |
| 25:38 | If on the other hand you're finding that the knock detection is a little bit difficult and you're struggling to really define the difference between detonation occurring and just background engine noise. |
| 25:48 | Then that's a good time to stop and maybe try a different location and see if that gives you a better result. |
| 25:55 | OK so we're going to move into questions and answers shortly, I'm just going to go through a couple more aspects here with our knock sensor placement before we get into that though. |
| 26:06 | And the first one of these is the bolt holes for the knock sensor. |
| 26:10 | So this is probably the most common issue we get or get asked about is how do I mount the knock sensor when it has an eight mil hole through it on a boss on the engine block which may be 3/8th or M10 which seems to be unfortunately the most common. |
| 26:28 | So again let's just head to our overhead shot here. |
| 26:31 | So we've got our stock unmodified sensor here with our M8 hole or eight millimeter hole through the middle of it. |
| 26:40 | Obviously that's gonna work great if you are going into an M6 or an M8 threaded hole. |
| 26:44 | However won't work on an M10. |
| 26:46 | Now there's a couple of ways of dealing with this. |
| 26:48 | One of my preferences which I'll show you now is to actually drill the centre of our sensor out to 10 millimetres. |
| 26:56 | So side by side, pretty clear the difference there. |
| 26:59 | Just opens up your options to use either M10 or 3/8th threaded bosses on the engine block. |
| 27:07 | Now straight away you're going to think of course that drilling the sensor like this is going to destroy it and it's not gonna give you a valid reading. |
| 27:15 | And in my own experience, having done this now for about 16 years, I can say that it works perfectly, I have never seen it degrade the performance of the sensor and it's very quick and easy to do. |
| 27:26 | The only thing you do need to keep in mind though, if you are gonna drill out the centre of your sensor, it's really important that you drill it concentric with the existing hole. |
| 27:35 | So you don't wanna be trying to hold the sensor in a vice and use a hand drill, it really needs to be done with the sensor supported properly in a vice and using a drill press to get the best possible results. |
| 27:48 | OK so if you don't want to drill out your sensor though, you do have another option. |
| 27:54 | If we can head across to my laptop screen. |
| 27:56 | This is a boss that Toyota actually make as a factory part so if you're quick there you'll actually be able to write down that part number and you can order it. |
| 28:07 | They're only a few dollars from your local Toyota dealership so it is actually a pretty cost effective way of doing this and what you can see here is we've just got a stepped stud here. |
| 28:17 | We've got M10 at the bottom and then we've got M8 at the top so we'd just thread that into our block and the sensor goes on the top, put a nut on the top, happy days, we're all done. |
| 28:27 | Now while this is still a pretty cost effective way of doing this, and I have done this in the past, the reason my preference is to simply drill the sensor is because it is quick and easy, and what I've found with these studs is that unless you're pretty thorough with cleaning out the threads in the engine block, when it comes to undoing these and removing the sensor, quite often that stud is going to end up locked back in the block. |
| 28:52 | And if your access to the location that you're bolting the sensor to is tight or tricky to get to, often it can be difficult or impossible to extract that stud. |
| 29:01 | Not a big deal, if you're tuning just your own car and that sensor's gonna be permanently installed, but for a professional tuner, tuning maybe five or eight cars a week, you're gonna be going through a lot of studs if you're gonna lose one on every second or every third car that you tune. |
| 29:16 | So of course your options are really up to your own personal preference. |
| 29:22 | The other way you can go about this is have a local machine shop turn you up a stepped stud like this. |
| 29:28 | It should be pretty cost effective to have any machinist do that. |
| 29:32 | The next aspect that should go without saying but often doesn't is we need to be mindful of heat where we're locating our sensor. |
| 29:43 | Quite often we're gonna be limited to a location on the engine block where it's going to be prone to heat from the exhaust manifold and of course we want to protect our sensor and make sure that it's not going to end up melted. |
| 29:54 | So just keep that in mind and you'd be surprised, particularly when the engine is on the dyno with relatively limited air flow, exactly how much heat will be radiated from that turbo and exhaust manifold. |
| 30:06 | If we can, it's always a better idea to try and find a location on the cold side of the engine block. |
| 30:13 | The last aspect to consider here is the way this sensor needs to be wired. |
| 30:20 | And it is always a good idea here to be using a proper shielded cable. |
| 30:25 | So in this case I've got some two core shielded cable, have a quick look at that under our overhead there. |
| 30:32 | Pretty common motorsport style shielded wiring, we use this sort of wiring for all of our ref and sync sensors so at one end here we've got our connector that's gonna go onto our knock sensor. |
| 30:44 | And at the other end we've got a three pin DTM connector that's going to terminate on our knock detection unit or our ECU. |
| 30:50 | It is important to mention, when we are using a shielded cable like this, that we only want to terminate that shield at one end and generally with a knock sensor, it's nice and easy, we're going to be terminating that shield at the ECU ground, we're gonna be basically draining any EMI that makes its way into that shield straight back to ground, making sure that the signal that's actually reaching the ECU is nice and clean. |
| 31:16 | Alright we will check out and see what sort of questions we've got, if you've got any more please feel free to ask them now. |
| 31:22 | Biswater has asked, on a V configuration motor I guess we need two sensors? What is the best telemetry to read these, will most read more than one? OK so I did talk about the two sensors and the fact that OE manufacturers will generally fit two sensors. |
| 31:44 | What I should have probably elaborated on is that while yes that is the perfect solution, we actually find that one sensor even on a V configuration engine actually still can do a pretty admirable job. |
| 31:55 | Particularly if we are using that sensor for audio knock detection. |
| 31:59 | There's a little bit of a discrepancy here. |
| 32:01 | When we're using audio knock detection, really all we're listening for is any knock occurring at all. |
| 32:07 | We obviously can't audibly listen to knock and decide which cylinder that's occurring on so audio knock detection we can actually get away and do a pretty good job with just a single sensor, even though some of these units, such as this one here from Link, do have to inputs for V configuration engines, likewise our Plex knock monitor also has dual inputs. |
| 32:28 | But we can get a pretty good signal from just one. |
| 32:31 | if on the other hand though we are using the knock sensor for closed loop knock control where we are doing individual cylinder knock detection, then we can still do a reasonable job but we're going to end up needing to do quite a bit of work in our individual cylinder knock gains, so this basically adjusts the overall level for individual cylinders based on where abouts the sensor is located versus the cylinder. |
| 32:56 | I've sort of mentioned earlier the fact that you're going to end up with a higher amplitude signal on the cylinders that are closer to the sensor. |
| 33:05 | The second part of your question there, just talking about telemetry, I'm assuming what you're talking about there is scanning or data logging software. |
| 33:13 | That's really gonna be very dependent on the particular system that you are working with. |
| 33:19 | So there aren't really universal logging systems, we generally will find that for a particular tuning package, if we're reflashing a factory vehicle, we're gonna have a specific data logging or scanning system that goes along with that. |
| 33:33 | In general though most of these packages will also be able to log the knock inputs or the knock parameters that the ECU is using for its closed loop knock control. |
| 33:44 | In a aftermarket ECU of course then you can log whatever you want and you'll have all of those parameters available. |
| 33:52 | Matt has asked, have we come across problems in cheaper aftermarket sensors where the signal ground is electrically connected to the sensor body where it contacts the block, thus picking up ignition system noise. |
| 34:04 | This is something I've seen other people talk about. |
| 34:07 | How much of a problem is this in practice? The Bosch sensors that came with my Plex are electrically isolated from the block. |
| 34:14 | OK so I mean I generally in most of my installations I will only be working with an aftermarket Bosch style donut knock sensor so the only one I will mention is that our 1UZFE in our Toyota V8 86 actually still uses the factory Toyota sensors which are grounded through the body so they're only a one wire sensor. |
| 34:38 | What I can say is that on that particular application, they were terrible. |
| 34:42 | There was a huge amount of noise and to get any kind of accurate knock detection at all, we were only able to use the second harmonic frequency, there was just too much background noise on the first harmonic frequency. |
| 34:57 | And even then we switched them out for an aftermarket sensor just because I wasn't comfortable or happy with the results. |
| 35:03 | i can't say that that would be the case for every example but as I've said, most of the time I am using an aftermarket two wire sensor. |
| 35:12 | Matt's also asked, what do I need to be mindful of when drilling out an eight millimetre Bosch sensor to 10 millimetre sensor boss. |
| 35:18 | So hopefully I covered it, don't try doing it in your vice with a hand drill. |
| 35:23 | It's also a really good idea to move up in small increments with your drill size. |
| 35:28 | So don't go from eight to 10. |
| 35:30 | I would actually suggest that to get the best possible results, while it's gonna take you a little bit longer, jump up in half mil drill bit sizes. |
| 35:38 | And the other thing that's a good idea is to make sure that you are using plenty of lubricant on that drill bit. |
| 35:45 | There are specific drilling or machining lubricants which will give you a nice clean cut. |
| 35:51 | The other aspect with that as well is that generally you're gonna get a better finish if you don't use a super high speed for your drill there. |
| 36:00 | Matt's got all of the questions today, another one from Matt is since the speed of sound in ideal gas is based on the temperature of the gas, does the EGT influence the knock frequency? That's a pretty good question Matt, you're really throwing a curveball in there. |
| 36:17 | I can't give you a specific answer on that right here in this webinar. |
| 36:24 | What I can tell you is that in all of the engines that I tune where basically I use knock control in all of them now, the knock frequency doesn't tend to change based on the operating conditions. |
| 36:38 | So basically what I'm getting at here is once we've decided on the knock frequency or found that knock frequency, we can do this at light load and 3000 RPM where obviously we're not creating a huge amount of exhaust gas temperature. |
| 36:50 | And that same knock frequency is going to then be applicable right through our rev range. |
| 36:57 | What I will say though is that the background noise threshold that needs to be tuned so that we can accurately pick up knock, that will vary with both engine RPM as well as load. |
| 37:09 | So what I'm getting at here is we've got a turbocharged engine and we're running on a minimum boost pressure of lets say 10 psi. |
| 37:15 | The knock threshold that is effective at 10 psi may be marginally different that what we'll see at 20 or 25 psi. |
| 37:22 | Generally I put this down to the fact that the engine is physically noisier when it is making more power, we've got more pressure in the combustion chamber obviously so I'd put that down to that aspect, not too sure about the EGT versus knock frequency. |
| 37:37 | WRX Fanatic has asked, you mentioned the FA20 engines have dual knock sensors, the older EJ have only one. |
| 37:43 | If I was using an ECU that could support a second knock sensor, would it be advisable to run a second sensor or do you find the single EJ sensor to be sufficient? Look in all honesty I've always found the single sensor on the EJ series engines to be perfectly adequate. |
| 37:58 | In the perfect world, yes we may see a slight improvement in accuracy from using two sensors, one per bank. |
| 38:06 | But in the real world it's probably not actually worth the effort. |
| 38:11 | The reason for this is particularly on the EJ series blocks, you're gonna be quite limited on locations for a second sensor as well. |
| 38:19 | You'll also notice that the stock location on the EJ series engines, you're already relatively close to the crank case centre line. |
| 38:26 | So it does a pretty good job of detecting knock even on the adjacent cylinders. |
| 38:30 | Nate has asked, how can you tell the difference between clutch trans noise and knock? OK this is a little bit tricky, I mean generally with a twin plate clutch which is the reference I gave earlier in the webinar, it's pretty obvious because you can get a very distinct rattle from a twin plate clutch and you can also get a lot of other noise that's gonna be transferred through such as if you've got a noisy release bearing, you can sometimes hear that, even the spigot bearing in the back of the crankshaft, in the back of the flywheel as well, sometimes you can hear that. |
| 39:03 | So there's a lot going on there and a lot of this comes down to building up your own sort of knowledge of what is normal and what isn't. |
| 39:11 | And I always recommend as well, while it might sound a little bit scary, when we are making sure that we can clearly detect knock, I would always recommend just purposefully inducing a little bit of light detonation under light load and low RPM conditions where it's not gonna do any damage, just so you can physically hear what that knock sounds like on your particular engine. |
| 39:33 | Once you're comfortable that you are clearly distinguishing knock from background engine noise then you can continue with your tuning. |
| 39:40 | Some engines though are really problematic. |
| 39:43 | Particularly some race engines with very loose tolerances between piston and cylinder wall and also with solid lifter valve trains, they can really really be tricky and it really is challenging for the tuner. |
| 40:01 | Damien has asked, is the knock sensor for the FA on the left? So the sensors that I've got here, these are just a generic aftermarket sensor from Bosch. |
| 40:12 | Pretty confident in saying that those ones aren't the FA20 specific ones. |
| 40:16 | Pretty sure from memory the FA has a slightly different connector on it, which is pretty typical with factory knock sensors. |
| 40:25 | Matt has asked, when knock is detected what's a safe margin to retard the timing by, is it two to three degrees seems to be the rule of thumb, is this correct? So it really does depend a little bit on the application. |
| 40:37 | So generally for a road car I would say two to three degrees is more than enough. |
| 40:44 | And the reason for this is that road cars, it's generally pretty difficult unless the car is also being regularly raced on the track or you live in an area where you're on the autobahn and you've got no speed restrictions, it's really difficult to really run the engine under sustained high load, high RPM operation for extended periods of time. |
| 41:03 | So this kind of artificially limits the amount of load on the engine and the amount of heat being placed in the combustion chamber. |
| 41:09 | So if we have found knock and we've left a margin of two to three degrees, then generally that's going to be pretty damn reliable and of course hopefully we've got knock detection to back that up if something does go awry. |
| 41:21 | With a race engine, sometimes, particularly if the engine is very prone to detonation, it is a good idea to leave a slightly wider safety margin. |
| 41:29 | It all comes down to a balance between how much safety margin you need and how much power you're prepared to give away. |
| 41:36 | Because if you're tuning a knock limited engine and you're pulling out more than four or five degrees, chances are you're actually gonna start really hurting the engine performance. |
| 41:45 | And that starts to come down to a bit of a situation where you need to make a conscience call on what's more important, the reliability of the engine or the performance of the engine and sometimes this is gonna be very specific to the particular customer. |
| 41:59 | Some customers or car owners will be quite happy to sacrifice 20 horsepower if their engine is going to last the next three years. |
| 42:08 | However some people want every last horsepower and they don't mind if they're going to be rebuilding the engine once a season, so I can't give an answer that's gonna work for everyone there. |
| 42:18 | One Bad Audi has asked, if knock is occurring when cylinder temps are higher, wouldn't running a richer air fuel ratio prevent this from happening. |
| 42:25 | Would I need to adjust the engine timing as well? So there are a variety of ways of dealing with detonation or knock which is a little bit beyond the specific scope of today's webinar but yeah absolutely you're right, basically the driver behind knock occurring is anything that's gonna increase our combustion charge temperature. |
| 42:45 | So inlet air temperature, engine coolant temperature, if those climb then our charge temperature can get hotter, we can end up with our engine more prone to detonation. |
| 42:54 | There are a few ways of dealing with this, as you've mentioned there, a richer air fuel ratio tends to cool and control our combustion charge temperature, that's one way of addressing it. |
| 43:02 | The other way as well, if you only wanna deal with this under high temperature operation, we could bring in a compensation table, specifically aroud that particular element that you're trying to control, maybe engine coolant temperature, and trim some timing out. |
| 43:17 | So this way you're not giving away power all of the time. |
| 43:20 | So a few ways of dealing with that there. |
| 43:22 | Robert has asked, how would you tune around knock on a motor that doesn't have a knock sensor, say a snow mobile? OK this is a little bit challenging, if you've got an engine that hasn't got a knock sensor fitted to it then you really are gonna struggle to detect knock. |
| 43:39 | In a lot of small capacity high RPM engines, this is pretty common, I'm gonna say your snow mobile application there also very common in motorcycles. |
| 43:50 | Then knock almost is impossible to reach unless you're running on a very very low octane of fuel, which is why a lot of OE manufacturers for those particular engines don't use knock sensors. |
| 44:03 | It's just not an issue. |
| 44:05 | However for me in the aftermarket, whenever I'm tuning I find a way to physically fit a knock sensor, gives me the peace of mind that I know that my tuning is safe and I'm tuning outside of knock. |
| 44:20 | Craig has asked, could you have the machine shop tap a spot on the block? Yeah quite possibly, if you're dealing with this at the point where your engine block is at the machinists and you know there's gonna be a location that's gonna suit your knock sensor fitment, then yeah it's quite possible you could do that. |
| 44:36 | You would need to be quite careful though and make sure clearly that you are not tapping into an area of the block that's going to end up weakening it. |
| 44:43 | Last thing you obviously want is to end up breaking through into an oil gallery or a water jacket. |
| 44:49 | The other thing you'll probably need to do if you're going to do that is have the machine shop face the surface of the block where that sensor is going to fit so that you've got a nice flat smooth surface that the knock sensor can butt up against. |
| 45:00 | In most instances we're going to end up with a rough cast finish and that's not gonna do a good job of transferring the vibration of knock through into that sensor. |
| 45:11 | Suvic has asked, can I explain the knock frequency equation again? Yeah absolutely so basically we know that the knock frequency is going to be very closely tied to the bore diameter. |
| 45:25 | There are a number of other parameters that will affect it but this is the main driver, so basically as our bore diameter changes, the knock frequency changes. |
| 45:34 | And the equation that I gave you there, you want to divide, or you take 1800 divided by pi multiplied by our bore diameter in millimetres. |
| 45:45 | So the example I gave you in the lesson there, in the webinar, if we had a bore diameter of 86 millimetres, pi multiplied by 86 gives us a total of 270, and then we divide 1800 by 270, gave us our frequency of 6.6 and that's in kilohertz as well, it's important to mention. |
| 46:05 | Bis Four has asked, would you rather put a sensor on a cylinder or the actual block? Motorcycle cylinders are very thin walled. |
| 46:14 | So I mean really it's a case of where you've got a location to actually mount them to. |
| 46:20 | On a motorcycle block where the cylinder's maybe very thin, you may be limited by where you've actually got a bolt hole that you can fit it to. |
| 46:30 | So I can't really answer this for every situation. |
| 46:33 | The driving factor is where you actually have a spare empty bolt hole that you can fit that sensor to. |
| 46:41 | Tony has asked, is that a piezoelectric knock sensor? Generates its own voltage with no driver or supporting circuitry needed? Yeah it is a piezoelectric sensor, it does generate its own voltage but in order to actually make much sense of this, we generally need to run this through some type of digital signal processing. |
| 46:59 | So that's gonna either be our audio knock detection equipment or inside of our ECU itself. |
| 47:04 | And Damien has asked, do you have a lot of experience with the knock sensors on the FA motor, are they really prone to having issues with water or dirt contamination? Recently had a check engine light for the sensor. |
| 47:14 | Tested the resistance which came out good, seems that cleaning it and reinstalling did the trick but is this a common thing I see? To be perfectly honest, no. |
| 47:22 | We have had a Toyota 86 since they were brand new so our first one is a 2012 and it's been beaten up on pretty heavily and driven really hard over the, what's that, eight years now, six years, can't do maths, seven years, yeah that's it, that we've had that car and I have had absolutely no problems with the knock sensors on it. |
| 47:46 | They are also sealed pretty well from moisture and dirt once the connector is on it so certainly not something I've seen myself and I haven't heard of that being an issue with the FA20 in the wider Toyota community sorry. |
| 48:00 | Alright that has brought us to the end of our webinar. |
| 48:02 | So hopefully everyone's got a better idea on some of those basics around knock sensor location. |
| 48:08 | Hopefully that's gonna help you out when it comes to setting up knock sensors on your next engine ready for tuning. |
| 48:13 | As usual if you do have questions that crop up after this webinar has aired, please ask those in the forum and I'll be happy to answer them there. |
| 48:21 | Thanks everyone for joining us and I look forward to seeing you all next week. |
Timestamps
0:00 - Introduction
1:10 - What is knock?
4:45 - Alternative ways of monitoring knock
5:50 - What is a knock sensor?
7:35 - What does the signal look like in your ECU?
9:55 - Factory tuned frequency sensor vs wideband
13:25 - Sensor mounting location
15:50 - Considerations for placement
30:10 - Wiring
31:25 - Questions


