229 | Engine Break in Myths Dispelled
Summary
Correct break in procedure can have a big impact on the performance of your freshly built engine. When it comes to the correct techniques and the ‘do’s and dont's’ however, there’s a lot of confusion and misinformation in the industry. In this webinar we’ll discuss what we’re actually trying to achieve with this procedure and what we can do to get the best results every time.
Timestamps
1:25 - Common myths
7:35 - What are we trying to achieve?
16:45 - Considerations
19:35 - Camshaft break in issues
25:05 - ZDDP
27:30 - HPA break in process
39:00 - Questions
| 00:00 | - Hey team, it's Andre from High Performance, welcome along to, High Performance Academy even, welcome along to another one of our webinars. |
| 00:08 | Now this time we're going to be talking about engine break in myths and what you actually need to do when you're trying to break in your freshly built engine. |
| 00:18 | Now there's so much misinformation out there, particularly around this topic. |
| 00:23 | There's huge numbers of forum posts and there's a lot of confusion and I know that when people are reading a lot of these posts, it's really difficult to basically pick fact from fiction and know what to believe and what not to. |
| 00:35 | So what we're going to do is draw here on my own personal experience over somewhere in the region of about 20 years in the industry now building and breaking in literally hundreds of engines over that time. |
| 00:47 | And the techniques that I've developed, the ones we're going to talk about in today's lesson, they've worked for me reliably over every engine that we've built. |
| 00:55 | I've never had trouble with them and I think that engine builders tend to become a little bit superstitious, once you've got something that you've dialled in and you know that it works, you tend to stick to that, you don't really tend to veer away from what you know works because if you do and it doesn't work, you can end up with an expensive mess on your hands. |
| 01:15 | Now as usual, we will be having questions and answers at the end of today's webinar so if there's anything that I talk about or anything related to this topic, please feel free to ask them in the chat and we'll get into those. |
| 01:27 | I think the first thing I want to start with is these myths or some of the myths that I've heard and will debunk these as we go along. |
| 01:37 | Probably the first one and the most common and I hear this being reported from a number of quality reliable engine builders as well, as well as tuners all around the world is that once you've got your freshly built engine, you're going to need to do around about 5000 km of gentle driving just to break that engine in before you can tune it or before you can actually unleash to full power, run the engine through a wider open throttle all the way out to the engine rev limit. |
| 02:05 | Now I'll just briefly touch on this because we're going to get into this particular one really deeply as we go further on but honestly nothing could be further from the truth. |
| 02:13 | And while decades ago when honing technologies and ring production wasn't quite as advanced as it is now, yes the break in procedure could take a lot longer than it does these days, but with our modern honing techniques, modern ring construction techniques and materials, the running in process is normally completed within around about maybe 80-100 km of use. |
| 02:39 | After that, your engine is as run in as it's every going to be. |
| 02:42 | From here, unfortunately it's all downhill, it's running out, so you may as well start enjoying it, there's absolutely no need at all to baby your engine for 5000 km before you actually start leaning on it hard. |
| 02:55 | And the other thing I see with a lot of tuners is that they offer a run in tune service where they'll bring the engine in, freshly built, start it up, put a basic tune on it, maybe even with a rev limiter so that the owner of the car can't do any damage inadvertently, then send the customer back out with the car and tell them to go and do 1000, 2000, 5000 km of driving before they do a further tune. |
| 03:18 | So again we'll find out that that's not actually the case. |
| 03:22 | So that's probably myth number one, probably the biggest one I hear. |
| 03:26 | The next one is that the bedding in, running in, breaking in process, regardless what you want to call it, it's all the same thing, part of that, a really important part of that is that we're going to be bedding in the bearings. |
| 03:39 | Now this is absolute nonsense and nothing could be further from the truth again. |
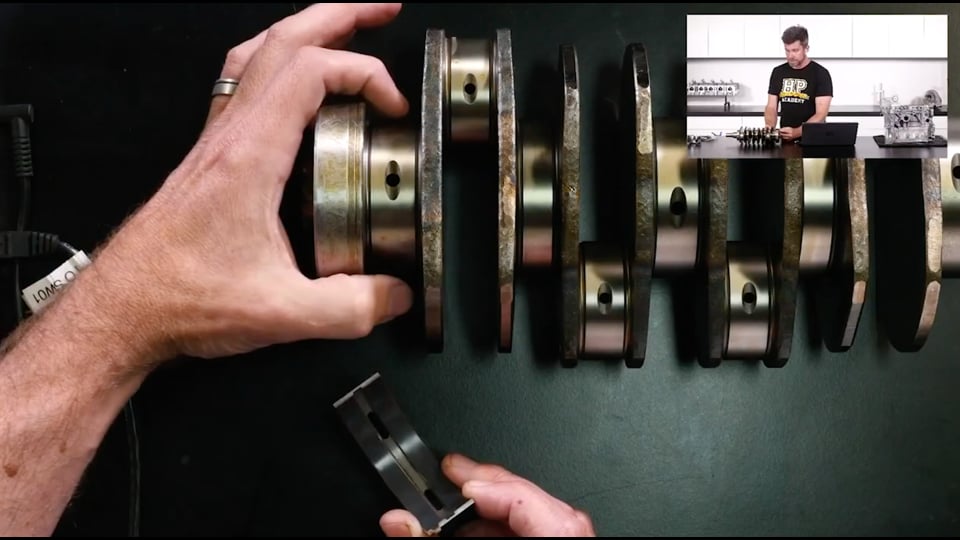
| 03:43 | And what we need to understand is that in our properly built engine, provided that we've got the correct clearances for all of our bearings, there is going to be no metal to metal contact so what we'll do quickly is just grab our crankshaft here and get that under our overhead camera along with one of our bearings. |
| 04:03 | So these are the components we're talking about here. |
| 04:05 | We've got our, in this case the main bearing journal for our Subaru FA20 crankshaft and this actually isn't an FA20 bearing but you'll get the idea. |
| 04:15 | So this particular part of the bearing here will sit in the engine block. |
| 04:18 | Now the problem is that if we have any metal to metal contact between these two components, we're very very quickly going to end up with a pretty catastrophic engine failure and no amount of gentle running is going to help our cause there. |
| 04:33 | In a properly built engine, we're going to end up with a film of oil protecting the crankshaft journals on our crankshaft and the bearing material so we don't get that metal to metal contact. |
| 04:47 | So again if you've got metal to metal contact in your engine, in your freshly built engine, something has gone horribly wrong and you're going to end up sooner or later with a failure, no amount of gentle running in is going to fix that problem. |
| 05:01 | You've got a fundamental issue that's been created during the engine assembly process or at least when the parts have been specified so that's our second issue there, we aren't doing anything to actually bed in our bearings. |
| 05:15 | The third one, this is probably a little less common but I still hear it, is that we need to heat treat the components or heat cycle the components in our engine. |
| 05:26 | And I think there's a little bit of misunderstading here about the terminology because some of the components in our engine will have gone through a heat treatment process. |
| 05:37 | I think this kind of gets confused with the heat cycling. |
| 05:40 | I've even heard some people say that the bedding in process should be a case of starting the engine, allowing it to come up to temperature and then shutting it down and repeating this several times in a row in order to heat cycle the engine. |
| 05:54 | So the reality is, the heat treatment aspect, that's done in a very very particular business called a heat treatment process and that's done at much higher temperatures than we're ever likely to end up getting in our engines. |
| 06:08 | It also requires not only controlled heating, it also requires controlled cooling of those components back down. |
| 06:15 | So no heat treating the components, that's something that should have been done before we purchase the components that we are fitting to the engine, it's not something that we are doing during the bedding in or breaking in process. |
| 06:25 | One area that we may see some aspect of truth in this is that with some multi layer steel head gaskets, we will find that after the engine has been heated and cooled the first time, we may find that there can be some necessity to retorque the head in order to make sure that we're getting the best possible seal from that head gasket. |
| 06:50 | The other aspect is some misunderstanding over the process of bedding in our rings. |
| 06:58 | And that's really what we're going to get into as we go through this. |
| 07:01 | The last of those myths we hear is we need to start our engine and before we apply any load to it, we need to allow it to idle for an extended period of time. |
| 07:13 | Depends who you talk to or where you're reading this information, I've seen some people recommend that the engine is allowed to idle for 30 minutes, I've seen sometimes where it's been recommended that the engine is allowed to idle for an hour or more before it is driven. |
| 07:28 | So again we're going to see as we go through today's lesson that that's actually going to be the worst possible thing we could do and is really detrimental to the operation of our engine. |
| 07:39 | Now we've got some of those myths out of the way, what we're going to talk about is what we're actually trying to achieve when we are going through this engine break in process. |
| 07:47 | I think, as usual, if we have a solid understanding of what we're trying to achieve, we're going to have a better idea of what we need to do in order to achieve it and once you understand the process and you understand what we're trying to achieve, it makes it much easier for you to dispel some of these myths yourself because they just simply won't make any sense. |
| 08:06 | Now the key thing that we are trying to achieve when we are breaking in a fresh engine is we are trying to bed the rings against the fresh hone pattern on our engine block. |
| 08:19 | So if we just jump across to my laptop screen here for a moment. |
| 08:22 | What we can see here is a shot of the block or the bore, the hone pattern on the bore of our Subaru FA20. |
| 08:29 | It might be a little bit hard to see but essentially what we've got is a criss cross pattern in our bore which is achieved during the honing process, I've done a really shoddy job of drawing in those two red lines but hopefully you can get enough detail to figure out what that actually is. |
| 08:47 | So that hone pattern is really really important to us in order to allow us to get the rings to bed in with our freshly built engine. |
| 08:55 | That hone pattern is designed to provide a certain amount of roughness, very much like a metal file if you consider it like that, which allows the rings to bed in against that surface. |
| 09:09 | They also, because of the roughness of that hone pattern, it also traps oil in the valley of those scratches or the scores in the bore that we see with the hone pattern for lubrication. |
| 09:22 | The problem with our hone pattern though is that it's going to end up getting broken down relatively quickly as our rings slide up and down the bore against that hone pattern. |
| 09:32 | So when we are trying to bed in the rings, we only have a relatively small window for this to occur before that hone pattern is worn down. |
| 09:40 | If we get to that point and we still haven't got our rings bedding in properly, then basically there's no solution to that other than to pull the engine back down and rehone the block which obviously is expensive, we don't want to be doing that. |
| 09:55 | So this is the key part, really when it comes to breaking in the engine, the one thing we're really trying to do here is to bed in the rings, get them to seal properly against the cylinder walls. |
| 10:07 | And if we do our job correctly here and we get a really good seal it's going to give us several advantages. |
| 10:13 | First of all because the rings are sealing better, we're going to end up with more of that combustion pressure trapped above the piston and it's that combustion pressure acting on the top of the piston that of course creates torque at the crankshaft. |
| 10:25 | So a properly broken in engine with rings that are sealing really well is likely to show a small improvement in power over one where the rings aren't sealing properly. |
| 10:36 | The other advantage is that we're going to end up with less blow by so less of that combustion pressure, exactly the same thing really, less of that combustion pressure is going to end up escaping past the rings and making its way into the crankcase. |
| 10:47 | This in turn means that the breather system on the engine is not going to be needing to work so hard and particularly if we've got a lot of blow by, particularly with engines that are fitted with factory breather systems, what we can find is that the high levels of blow by drag a lot of oil vapour with them out of the crankcase and this can get into a situation where we fill our oil catch can. |
| 11:09 | So makes a hell of a mess, it's not something that we really want to be doing, we don't want to be emptying our catch cans after every couple of laps around the racetrack either. |
| 11:19 | And along with this, a proper seal from our rings will also reduce our oil consumption so those are all of the advantages there of getting it right, should be pretty self explanatory that that's what we're trying to achieve. |
| 11:34 | So we also need to understand what we can do that is going to help with this situation. |
| 11:41 | So a lot of people think that it is the radial tension of our piston rings that does the sealing. |
| 11:49 | So we've got a piston ring here and what we can see, let's have a look at it under our overhead camera. |
| 11:54 | We can see that our piston ring has an end gap here and of course when it is installed in the bore it's actually going to be slightly compressed so what that means is it's providing a small amount of radial force outwards against the bore. |
| 12:07 | However it's not really enough to do much in the way of sealing and really what we actually want to do in order to achieve a good ring seal is allow the combustion pressure to get in behind the ring and help force it out. |
| 12:22 | So that's what's happening when the engine is running. |
| 12:24 | What we've got is our piston here, we're going to end up with our combustion pressure from above the piston making its way down and get in behind particularly our top compression ring and it's that combustion pressure getting in behind that ring that forces it out against the piston wall. |
| 12:40 | Now we want to force that piston ring out against the wall because when we do that, when we apply a little bit of force, we force it out against that rough hone pattern, this is when the ring will bed in against that fresh hone pattern. |
| 12:53 | So hopefully here there's a couple of things that should now start clicking into place. |
| 12:57 | First of all, if we allow the engine to idle with absolutely no load on it, while yes we still have combustion occurring, the amount of cylinder pressure understandably at idle is relatively low compared to when we're using a little bit of RPM and a little bit of throttle. |
| 13:13 | So at idle, the rings aren't really being forced out against the cylinder wall so our chances of allowing the rings to bed in properly, if we allow our engine to idle for extended periods of time is really really low and at the same time, the hone pattern is still being worn down so it's going to end up losing that roughness and we start losing that window where we can get our rings to bed in. |
| 13:38 | Now we do need to temper this a little bit though because if we just leave, just get our engine up and running and we hit the dyno and we hold it at 7000 RPM and wide open throttle and we sit there for 15, 20 minutes in order to bed our engine in, that's also not going to work, so some common sense needs to be applied here. |
| 14:00 | Now again, understandably with our fresh hone pattern, because it is relatively rough, when we do force the rings out against the cylinder wall, this creates a lot of friction and in turn this creates a lot of heat. |
| 14:12 | So if we apply extended periods of high load, this can actually end up damaging the rings, it can end up overheating them. |
| 14:19 | So we need to basically use a little bit of common sense here and vary the operation of the engine between using periods of light to moderate load and then bringing that load back off and allowing everything to cool back down. |
| 14:32 | So it's basically a process of varying between light load, light to moderate load and then reducing that load and we also can get an advantage here by varying the engine RPM that we're using. |
| 14:44 | So that's the process, we'll talk about it in a little bit more detail, I'll go through and actually detail the steps of that process that we use but that's the main thing we're trying to do here. |
| 14:54 | So again you'll note I've said nothing here about bedding in our engine bearings, that's not something that we're going to be able to do. |
| 15:01 | I will just touch on the fact though that in order to protect our engine bearings, particularly during our initial startup, it's obviously important that at least to start with we have got the correct clearances there, we're not going to have a chance of getting the right results if our clearances aren't correct or aren't sufficient. |
| 15:19 | And we also want to protect those bearings with a proper high quality engine assembly lubricant or if you're not using an engine assembly lubricant, a clean mineral based engine oil is another alternative that does a really good job. |
| 15:33 | It's also important during our initial startup, because we're not going to have any oil pressure initially, our oil pump will have been drained of oil, we've fitted a new oil pump, hopefully you've primed that, but it's going to take some amount of time for that oil pump to initially suck the oil up out of the sump and then distribute it out through all of the oil galleries which are currently completely empty. |
| 15:57 | So when we are going through this process as well, we don't want to just fit our spark plugs, get everything up and running, get everything up and ready to go and then start the engine. |
| 16:06 | Instead it's always a good idea to remove the spark plugs, make sure that we're not going to be getting spark or fuel, disconnecting the ECU or whatever you've got controlling that is a good way to start here. |
| 16:17 | And then crank the engine over until we've got a sustained good oil pressure showing on a gauge. |
| 16:23 | And if you don't have an oil pressure gauge, it's always advisable to fit one before we start the engine up there. |
| 16:30 | That way you know that you've got that oil pumped all around all of the components of the engine and everything is coated in, that oil, you've got high pressure oil available to the bearings so that when you do start the engine for the first time, all of those components are going to be protected. |
| 16:45 | Now there are a couple of considerations here that are important to keep in mind as well, particularly around the oil that you're going to be using. |
| 16:54 | Now I just mentioned there about using an assembly lubricant or a high quality mineral based oil in order to protect the bearings. |
| 17:03 | And it is important when we are getting our fresh engine up and running for the first time, to consider the oil that you're going to use. |
| 17:10 | What we want to do is stay away from using a full synthetic oil. |
| 17:16 | Now these are common these days, particularly for a performance application, it's very common for most people to be running any number of different brands of high quality fully synthetic oil and there are some real advantages with those full synthetic oils, particularly in terms of they are generally able to provide a lot more slipperiness than a mineral based oil. |
| 17:37 | Without getting too technical into the chemistry behind oils. |
| 17:41 | That actually also can be their downfall when it comes to breaking in your fresh engine. |
| 17:46 | The problem with those synthetic oils is because they are so slippery compared to a mineral based oil, they can actually hamper the ability to bed those rings in. |
| 17:56 | So one thing I have always done is I've made sure that I've used a good quality mineral based oil during my engine break in. |
| 18:04 | Now this also brings us to another tricky topic, is that there are specialist running in oils available. |
| 18:12 | And I have used a few of these, I wouldn't say that I have extensively tested all of the brands available however what I found, the couple of brands that I did try, they weren't based around racing or performance engines, they were just a run of the mill running in oil for garden variety road car engines. |
| 18:33 | And what you generally find with these running in oils is that they are quite thin in terms of their viscosity, some of them basically have the viscosity similar to water. |
| 18:45 | And while this might not be a problem for your garden variety street car engine, particularly some of our race engines, even during the running in process, they're still producing relatively high horsepower levels and I wasn't particularly confident that those running in oils were going to provide the level of protection necessary. |
| 19:03 | Now I will mention that yes there are some running in oils designed purely for racing engines so those are definitely something that are worth considering if you want to run a specific running in oil. |
| 19:16 | For me, I actually ended up just using a high quality mineral based engine oil. |
| 19:21 | Something that I knew was going to be able to give the correct viscosity and the sort of protection of all of those components needed during the break in process. |
| 19:30 | And once the engine was broken in correctly, I'd then swap that out for a full synthetic oil. |
| 19:37 | Now there are also some considerations here during the break in process that can be a little bit at odds with the HPA run in process that we're going to detail shortly. |
| 19:48 | Specifically this comes down to camshaft break in issues. |
| 19:53 | And I think that there is again a lot of misinformation around this, particularly a lot of the cam manufacturers will give you some information on the correct process for breaking in the cam and the lifters or followers. |
| 20:07 | And these can sound quite dramatic and a lot of people get scared off by them. |
| 20:12 | Again, particularly because it can be a little bit at odds with what I'm going to recommend as we go through it. |
| 20:18 | The important point to mention here is that most of these break in issues with cams really relate to a very narrow range of camshaft and engine types. |
| 20:28 | In particular and one of the biggest issues we see is with a flat tappet style camshaft operation and just to show you what that looks like, this is a flat tappet style lifter here on my screen. |
| 20:42 | We'll jump across to my laptop screen. |
| 20:44 | So essentially this is for a overhead valve pushrod engine. |
| 20:49 | So we end up with our pushrod going into the top of that lifter. |
| 20:53 | We can see here the bottom of the lifter here, as its name implies, is just a flat surface and this runs directly against the camshaft lobe. |
| 21:02 | It's really important with this style of engine, without getting too deep into it, that when you are fitting a new cam it's always advisable to fit new lifters as well because these will wear quite quickly to the cam lobe. |
| 21:15 | So you can't swap them around so they need to either be replaced with new lifters or alternatively you can also potentially have then refaced. |
| 21:24 | So obviously there is a potential there because you've got a metal to metal surface, still protected by oil but there's a situation where the cam lobe is rubbing across that particular surface, we can end up with wear in these lifters and cams if you don't follow some basic precautions. |
| 21:42 | This is made worse as well because with a performance cam, we're also going to almost certainly be running a much heavier spring pressure so there's a lot more force being placed on those lifters down onto the cam. |
| 21:56 | Probably the only other engine where this is, or another engine, maybe not the only other engine, another style of lifter which this can give us problems with is in the SR20 DE and DET cylinder heads. |
| 22:10 | And they run a rocker arm arrangement which we can see here. |
| 22:14 | I'm sorry for the poor quality of the photo but basically that's our rocker arm there and it has a pad here that the cam lobe wipes across. |
| 22:23 | And again there is going to be an oil film protecting those surfaces but you've got quite a large pad there that that cam lobe is wiping across and here at the end of our rocker, this will go down, in this case these rockers actuate two valves simultaneously. |
| 22:40 | Again with the SR20 we see problems where heavier duty valve springs are fitted. |
| 22:46 | So with both of these engines, predominantly though the issue is really around that flat tappet style push rod engine with a very heavy valve spring. |
| 22:54 | There are some precautions that we need to go through. |
| 22:56 | It's really about making sure that initially the engine is assembled using a high quality moly based assembly lubricant, a lot of the camshaft manufacturers provide their own. |
| 23:09 | And that needs to be put over all of the components so that they are protected and then after startup it's important to bring the engine RPM immediately up to about 2500 RPM. |
| 23:20 | They'll need about a 20 minute bedding in process where the RPM needs to be varied up and down as well. |
| 23:25 | What this does is it allows, that higher RPM allows that lifter to actually rotate in the lifter bore and this allows the lifter and the cam lobe to essentially bed to each other. |
| 23:36 | If that doesn't happen, we can get very very bad problems with wear on the lifter and also the cam lobe and basically you're going to end up with significant engine damage very very quickly. |
| 23:50 | So don't get scared off though because as I've mentioned this really is only related to those styles of engine and it's more of an issue with the pushrod style engine because you've got such heavy valve springs. |
| 24:02 | The SR20 style, even in those instances, less of an issue because you've got much smaller valves, much lighter valves and you're also going to be running much less spring pressure than a big overhead valve V8 just for example so it's much less of an issue, definitely not something that we need to worry about at all if you've got a roller rocker system, regardless whether that's a pushrod style engine or an overhead cam, double overhead cam engine where we've got pushrods. |
| 24:32 | Likewise another type, overhead cam sorry with a rocker mechanism, another type of engine that we see a, cylinder head valve actuation that we see a lot of, particularly in Japanese cars is where we have a cam running against a bucket. |
| 24:49 | Again there is the potential there for that same situation where the cam lobe is wiping across the bucket. |
| 24:55 | With those, again because you've only got one cam lobe per bucket, relatively low spring pressures, again not such an issue. |
| 25:03 | So hopefully that explains that. |
| 25:06 | The last aspect that I want to mention here is that we do need to give some consideration to some of the additives that I know a lot of people want to run in their oils when they are breaking in an engine. |
| 25:18 | Specifically we are, there is an additive that's basically been removed from modern motoring oils which is called ZDDP, which is a compound that includes both zinc and phosphate. |
| 25:32 | And this is an additive that's been in engine oils for decades and basically those components do a really good job of preventing engine wear. |
| 25:42 | So obviously it's a good thing and particularly a lot of the break in oils, or running in oils, were high in ZDDP, particularly again around that flat tappet style cam, that can help prevent wear during that initial startup phase as well. |
| 25:57 | So a lot of people are worried, well what if I can't get ZDDP now and a lot of the general oils that we will find have no ZDDP, there are problems with that additive in terms of toxicity which is why it has been removed. |
| 26:14 | So you've got a couple of options there. |
| 26:17 | First of all, if you aren't running on of those types of engine that I talked about, primarily the flat tappet style lifter, then you've probably got little to worry about. |
| 26:26 | A good quality, either running in oil or mineral based engine oil is going to suffice even without ZDDP in it. |
| 26:34 | If you are running that flat tappet style then yes, in this situation it would be worthwhile considering either finding a running in oil that does contain it or alternatively you can buy it as an additive and add it into your oil. |
| 26:49 | I'm normally not a fan of adding additives into oil, I'm generally of the opinion that I'm going to trust the chemists who make up the oil to get the job done properly in the first place but this ZDDP for very specific applications, is probably one of those areas where I would say that's a little bit different. |
| 27:07 | There is a Penrite running in oil that I am aware of that does have quite a high ZDDP content in it so if you Google that, find that, if you are in that situation, that's probably a pretty good option to go with. |
| 27:24 | Right we are going to move into our questions and answers really shortly, but before we do that, oh it's a good time to mention if you do have questions, please ask them and we'll get into those shortly, before we do that, I'll go through the process that I recommend, the process that I've been using for all of our engines. |
| 27:41 | So first of all, what we want to do is essentially get the engine to a point where as soon as we've got it running, we can actually start applying load to it. |
| 27:51 | Now if you do have the benefit of access to a dyno then I'll actually get the car on the dyno, or the engine onto the engine dyno, prior to startup. |
| 28:00 | So essentially as soon as I've got the engine fired up, I can immediately go and apply a small amount of load to it. |
| 28:06 | What we want to do here in order to do this though is we want to start by making sure that we've got all of our ducks in a row, we've got our fluids topped up, we've got our oil level adjusted, we've got our coolant levels set up there. |
| 28:21 | Also a good point here, if you are running an engine with a multi layer steel head gasket, it can be advisable for your initial startup and the first few times that the engine is heat cycled, to actually run just plain water rather than a glycol based antifreeze. |
| 28:39 | Essentially the glycol based antifreeze has a habit of finding any potential path to leak so what we can find in some instances with a multi layer steel head gasket, if you fill up the cooling system with glycol based antifreeze, we may actually find that we can see some signs of leakage. |
| 28:57 | If you run plain water and then swap out to glycol once the engine has heat cycled, that's normally not an issue. |
| 29:05 | As I've already mentioned as well, we want to start the process by getting the engine oil pressure gained. |
| 29:14 | So it's always a good idea to do this with the spark plugs removed from the engine. |
| 29:17 | This means that we don't have that compression load forcing down on the piston and even that compression load is going to be transferred down through the connecting rod and into our bearings. |
| 29:26 | So removing the spark plugs just allows the engine to turn over freely, it also allows the engine to turn over at a higher RPM so that can make it easier to gain oil pressure. |
| 29:37 | And if you haven't done this before, you can be surprised how long it does take to gain oil pressure for the first time. |
| 29:43 | It can take as much as 30 to 45 seconds or even slightly longer. |
| 29:48 | You are potentially going to have a problem if the oil pump hasn't been properly primed because often the oil pump for our initial startup, if the oil pump hasn't been primed with either an assembly lubricant or maybe something like vaseline packing the gears of the pump, it can be very hard for it to suck the oil out of the sump so it can actually in some instances make it impossible for us to gain oil pressure. |
| 30:15 | One of the reasons we want to make sure that we get that oil pump primed when it is being assembled. |
| 30:23 | So once we've got everything ready to go here we want to start the engine and immediately as soon as we've got that engine started, we want to apply a small amount of load. |
| 30:31 | So this is where we are going to deviate. |
| 30:33 | So if you are running a flat tappet cam there then it is advisable that you follow your cam manufacturer's recommendations. |
| 30:42 | Normally that's going to be a process that takes about 20 minutes as I've mentioned. |
| 30:45 | Normally it's going to be a process of starting the engine, getting it up to 2500-3000 RPM pretty quickly, holding it there and then varying the RPM up and down over the first 20 minutes of operation. |
| 30:56 | It is slightly at odds with our ideal process for bedding in our rings however it's not all bad and it's certainly a necessary evil. |
| 31:08 | There's no point getting your rings bedded in perfectly and finding that you need to replace your cam and your lifters plus you've just pumped debris from your cam lobes all around the engine so you definitely need to watch that. |
| 31:22 | Now it can also help here if you've got a fresh build, you've got absolutely no data on anything here, to actually make sure that you've got aspects such as your base ignition timing at least dialled in approximately just during cranking before we go to start the engine. |
| 31:37 | While yes we can come back and zero in on this a little bit more accurately later on, we want to at least know that our timing is in the ballpark so that we're not trying to make dramatic changes to our timing during that first startup while we've got the enigne running. |
| 31:51 | So when I say apply a small amount of load here, what I'm generally going to do is just get the engine running almost instantly on the dyno, get the engine into maybe, or the car into maybe fourth gear, get the engine RPM up to maybe 2000, 2500 RPM and just apply a little bit of load, basically just the amount of load that we need in order to get the dyno to hold that RPM. |
| 32:16 | So what that's going to do is immediately start applying a little bit of cylinder pressure to help get our rings to seat against the bore walls and at the same time we can use this period, because the engine is only going to be running at a relatively low RPM, we can use this time to check that we haven't got any issues with oil, water leaks, fuel leaks, basically making sure that everything mechanically is sound. |
| 32:37 | You're also probably going to need to do some work here, topping up the cooling system as the engine comes up to operating temperature there. |
| 32:46 | So that'll allow you to top that off and get your cooling system bled up. |
| 32:51 | Once you're comfortable the engine is up to operating temperature and you've got your cooling system bled up, all of your systems are working properly, we're going to start running the engine between 2000 and 3000 RPM at initially about 10-30% throttle. |
| 33:06 | And what we're going to do here is use periods of load, so let's say we're using up to 30% throttle initially, we might go to 30% throttle, 3000 RPM for a period of 10 seconds and remembering that pressure during those 10 seconds is forcing those rings out against that fresh hone pattern, and then what we'll do is we'll back off into vacuum. |
| 33:27 | And that will basically remove that force from the rings, allowing them to come off that rough hone pattern and cool down. |
| 33:34 | And by going into vacuum as well, this also has the tendency to draw oil up the bore walls and that can help flush away any of the debris that we're going to see, it's natural that we're going to end up with some metal filings or metal debris in the oil initially as the sharp peaks of our hone pattern are worn down by the rings. |
| 33:57 | So we'll probably do that first session between sort of 2000 and 3000 RPM, 10% and 30% throttle, that'll last for somewhere in the region of maybe 15 to 20 minutes. |
| 34:07 | Over the next hour we're gradually going to increase both the RPM and load. |
| 34:11 | By the end of that hour, I want to be up to somewhere around about ⅔ of my engine rev limit, so let's say that might be somewhere around the 4000-4500 RPM mark. |
| 34:21 | And I'll be using up to 60-70% of my throttle, so applying more and more load. |
| 34:27 | So we're just going to build up to that gradually. |
| 34:30 | And essentially after I've done about an hour of running like this on the dyno, I'm going to be comfortable that my rings are broken in properly and we're going to be ready to move on with the tuning. |
| 34:42 | Now there are a couple of caveats that I just want to mention here. |
| 34:44 | Obviously when you are bedding in the engine, we do want to take special note of how the engine is operating, particularly it's a good idea and this is why I like doing this on a dyno, it's a good idea to keep an eye on any fluid leaks that are developing. |
| 35:00 | So it's always a good idea to have a helper just basically watching over the engine while we are running it in, they don't have to stare at it for the whole hour but if someone pops their head into the dyno cell once every 10 or 15 minutes and just has a quick look and makes sure that everything is still sound, it's also a good idea to monitor our oil pressure. |
| 35:19 | And it's also a good idea to monitor our engine coolant temperature a little bit more carefully. |
| 35:25 | Particularly during the breaking in process, we've got a lot more friction going on, particularly between the rings and the hone pattern, that can create a lot more heat so we can find that during that running in process, the engine will run a little bit hotter than normal and obviously we want to monitor that oil pressure because this can be a sign, if we start seeing our oil pressure drop, or it's getting lower than we'd expect to see, this can be a sign that something's not right. |
| 35:49 | It's always a good idea to stop and investigate that further, rather than waiting until you've actually got some mechanical damage that needs to be fixed. |
| 35:58 | Alright so at this point, we've essentially got an engine that has been run in, we haven't done 5000 km of driving, we've probably done less than 100 km at this point. |
| 36:09 | And at this point, our rings will probably be 80-90% bedded in. |
| 36:13 | But what we've done here is we've also created a lot of debris that's going to make its way into the oil, again as I mentioned, the peaks of those hone patterns that will be worn down. |
| 36:24 | I don't really like having that in my oil so this is where we've done the most work and we've got all of the debris into the oil so at this point I will also drain the oil and I'll replace the oil filter and I'll refill the engine with fresh oil and a new filter. |
| 36:41 | If you want to get a little bit further in depth as well, just to get some insight into how your engine is holding up, it's also a good idea at this point to cut the oil filter open so you can inspect the filter element and this will give you some insight into if there's some sign there that you've got copper inside of the oil filter, then that suggests that you've got some bearing problems and again, always a good idea to stop and address that before it gets a lot more serious. |
| 37:09 | Once you've got that oil changed, at this point, you've got an engine that's essentially as run is as it's going to get and straight away here I move onto the process of full power tuning. |
| 37:20 | Now even as we're going through that process of tuning, I mentioned that our rings at this point are probably bedded in somewhere in the region of 85-90%, pretty hard to tell exactly where we're at here but the actual process of tuning actually is a pretty good way of continuing that running in process. |
| 37:36 | We don't generally run straight to doing wide open throttle ramp runs and we don't generally, on the dyno, hold our engine at wide open throttle, 7000 RPM for extended periods of time. |
| 37:47 | When we're doing our steady state tuning, what we're doing is inevitably varying the load as we go from closed throttle to wide open throttle and we step up the fuel and ignition cells. |
| 37:57 | And likewise we're varying our RPM. |
| 37:59 | Once we get into the situation of doing ramp runs at full throttle, the ramp runs are also relatively quick, a ramp run might take anywhere from sort of 8-12 seconds and under that period of time of course, yes the rings are heavily loaded but as soon as we back off the throttle we're generally coming back to idle and we're allowing the rings to cool down, everything to come back to normal operating temperature while we're making changes and assessing the tune and then we go and repeat that process. |
| 38:28 | It's actually a good way of continuing that bedding in process. |
| 38:31 | So by following that relatively basic strategy of bedding the engine in, you're going to get good results in a minimum amount of time and hopefully as well, at a much lower cost compared to sending your car in for two separate tuning sessions as well. |
| 38:49 | Alright we'll move into our questions and answers, so if you do have any more, please feel free to keep asking them. |
| 39:02 | Simon has asked, do piston and ring manufacturers have a recommended break in process? Actually that's a good point, I haven't really talked about the piston itself, we've obviously talked about the rings. |
| 39:14 | That's awkward, let's wait for our compressor to stop. |
| 39:18 | I'll go turn that off. |
| 39:31 | So far I haven't really talked about the piston itself and that's something probably a lot of you might be wondering about. |
| 39:37 | We've got our piston here, obviously this is running in the bores. |
| 39:40 | And again just like our crankshaft and our bearings, we aren't actually going to end up with metal to metal contact between the skirt of the piston and the bore wall, or at least we shouldn't. |
| 39:54 | We've still got a protective film of oil that's going to protect those components. |
| 39:58 | So again the piston itself is not a component that we are bedding in. |
| 40:02 | In terms of whether manufacturers provide break in instructions, I'm sure some of them do but it's actually probably not as common as you'd expect. |
| 40:12 | Regardless of the particular piston or ring set that you are using though, that break in process that I've gone through is still applicable. |
| 40:20 | Maveric has asked, does break in oil really do anything? So I think I've probably covered this really. |
| 40:31 | In my own personal preference, I stick to a mineral based oil. |
| 40:34 | Some of the break in oils that do include that ZDDP additive, definitely can be beneficial, particularly if you are dealing with a flat tappet style lifter. |
| 40:45 | But outside of that, there's really no strict need to use a running in oil, there's nothing wrong with breaking in your engine using a good quality mineral based engine oil. |
| 40:56 | The key is, must be a mineral based oil, don't go with a full synthetic when you are doing that. |
| 41:03 | KronicKatz has asked, can I do a safe break in by enabling closed loop fuel trim through a broader throttle range via Link G4+ and CAN lambda? I want to reduce the chances of cylinder wall wash. |
| 41:13 | OK good questions you've asked there and I want to actually address one of those aspects you've just mentioned. |
| 41:20 | So first, to answer your specific question, yeah there's absolutely no reason why you can't do that. |
| 41:26 | By extending that range of closed loop control, that means if your fuelling is a little bit off, then the closed loop control can bring that back in. |
| 41:33 | I just want to address here that the closed loop control is not a back stop or a bandaid for doing a proper job of tuning the fuel. |
| 41:42 | And it's really there to pick up any variations day to day that we may see if maybe some of our compensations aren't on point. |
| 41:51 | For the purposes of the break in process though, yeah nothing wrong with what you're suggesting. |
| 41:56 | Now talking about the cylinder wall wash, now this is an area that again I think has become one of those urban engine building myths. |
| 42:03 | I hear a lot of people talk about bore wash where the theory is that if we run the engine excessively rich, the additional fuel basically is going to wash the lubricant off the bore walls. |
| 42:15 | Also makes its way into the sump and then goes further to doing damage by diluting the oil in the sump. |
| 42:21 | So yes, this can happen. |
| 42:24 | In 20 odd years of building and tuning engines, I'll be honest, it's something I have never personally witnessed. |
| 42:30 | And the reality is that particularly with modern EFI, you'd have to have the engine running so excessively rich for such a long period of time to realistically do this sort of damage that it's almost incomprehensible that someone could get to that point. |
| 42:45 | More often by that point, you're going to be fouling spark plugs and the engine's not going to be starting properly and all sorts of nasty things like that. |
| 42:53 | So normally it's not related to a tuning issue. |
| 42:56 | Normally that sort of damage actually comes from a leaking injector or something where liquid fuel is actually pooling and puddling into the cylinder. |
| 43:03 | So as long as your fuelling is at least in the ballpark, you're very unlikely to realistically see damage from that. |
| 43:12 | Cory has asked, a myth I've heard is that synthetic oil will cause rings not to seat or wear in correctly, is this something that's well known or just a myth? So obviously a question Cory's asked earlier, hopefully I've explained that yeah that is an issue. |
| 43:25 | I will mention here that this is probably something that was more of an issue back a few decades ago when our ring materials weren't so good and our honing technologies weren't quite so good. |
| 43:39 | These days, we're probably going to have to try pretty hard to screw up the break in process and it is possible that you could possibly still get a reasonable result with a full synthetic oil. |
| 43:52 | My personal opinion though is why take the risk, it's a relatively cheap and quick process to go through, breaking the engine in on a mineral baesd oil so that's what I've always done and again kind of comes down to what I was saying at the start of the webinar where engine builders tend to be a little bit superstitious, once we've got something that we know is working, we don't tend to try and mess with it. |
| 44:17 | Barry has asked, can you rehone cylinders that have a Nikasil plating? Tricky question there Barry, yes you can but the problem is, I'll actually go back one step for those who aren't aware of what Nikasil is, this is a technique that's being used more and more these days where instead of inserting a sleeve that the rings can run in into an aluminium block, the rings are allowed to run directly on the aluminium. |
| 44:43 | Of course with aluminium being so soft, that would quickly result in excessive wear so instead what is done is a coating called Nikasil is applied to the bores and that's a hard surface that the rings can run on without causing damage. |
| 44:57 | So this becomes problematic if you are dealing with one of these blocks that run a Nikasil plated bore. |
| 45:04 | There are a few specialist companies, probably all around the world I would imagine. |
| 45:09 | I think we've got one or two here in New Zealand, I know there's a few of them in the U.S. that specialise in applying that Nikasil plating. |
| 45:15 | So basically you can have your block bored and then the bore surface can be reinstated by replating it. |
| 45:23 | Not quite sure, because I haven't personally gone down that path myself, how well that replicates the factory NIkasil coating. |
| 45:30 | Whether it's as reliable or whether you're going to have problems with ring seal afterwards, but it is possible to do it. |
| 45:42 | James Beall has asked, any recommendations or tips for priming the engine with oil after a fresh rebuild, is assembly lubricant sufficient for a few minutes of cranking prior to oil pump generated oil pressure? So really the first part here James is that the components inside the engine need to be thoroughly lubricated during the assembly process. |
| 46:01 | And then from here I've really already touched on it, the idea is to allow the engine to gain oil pressure with the pump. |
| 46:08 | This is actually a really nice area, if you are running an external dry sump oiling system, what we can actually do is slip the drive belt off the dry sump pump. |
| 46:17 | Most of them have a fixture in the front of the dry sump pulley where we can get a rattle gun or an impact driver onto that or a drill and actually turn the pump over without the engine running. |
| 46:30 | So we can actually gain oil pressure using a drill without the engine ever starting so you can know the very first time the engine is cranked over, you've got oil pressure there. |
| 46:39 | For our purposes though, remove the spark plugs, crank the engine over until you've got that oil pressure showing reliably on the gauge. |
| 46:50 | Barry has asked, do I have any experience with the Total Seal dry film cylinder wall assembly lubricant? No Barry sorry that is a product that I haven't used. |
| 47:03 | ManitouBlack has asked, is there a tangible benefit to transient throttle fuel film modelling as used by the Adaptronic/MoTeC/Life ECUs versus the multiple compensation tables? OK probably a question a little bit outside of the realm of today's webinar. |
| 47:19 | Seeing as you've asked it, I'll really briefly deal with this, there are actually webinars in our archive that deal with this which would probably be worthwhile looking at. |
| 47:27 | If you search in our archive for acceleration enrichment, that'll bring that up. |
| 47:31 | So yeah basically the fuel film modelling does a better job of replicating what's actually happening with the fuel film or puddle inside of the engine during transient situations. |
| 47:41 | By modelling that better, it's possible to do a better job of getting the transient enrichment sorted out or dialled in. |
| 47:47 | However for most enthusiasts, I find it's actually a pretty complex topic and quite tricky to dial in the different parameters for a proper fuel film model so in most instances, tangible gains, probably not really. |
| 48:02 | ManitouBlack has also asked, is it worth using a high pressure oil feed into the oil pressure sender or turbo oil feed location to prelube the engine versus turning it over? No not really, if you've done your job properly and you've protected all of the components with assembly lubricant or oil during the assembly process, and you've taken the spark plugs out so you don't have that compression load against the pistons, really there is no chance of damage just by turning the engine over in order to gain oil pressure. |
| 48:34 | Mitcho has asked, would you always recommend starting up a fully new built engine on the dyno or is this something that can be done at home? Look it definitely can be done at home. |
| 48:44 | I have run in numerous or broken in numerous engines out on the street, particularly before I had access to a dyno so don't think that it's an essential, don't think that you absolutely have to do this. |
| 48:56 | If you have access to a dyno then it makes a lot of sense, particularly if you are going to have your engine tuned after the run in process, then at some point it's probably going to end up going on a dyno. |
| 49:07 | If you are doing this process on the road then there actually are some advantages as well. |
| 49:13 | Now I mentioned that we use variations between a light amount of load and then we want to basically go into overrun. |
| 49:20 | So on the road we've got the engine, basically we can go into overrun completely, we can get completely off the throttle and the engine is essentially then being motored by the drive train because the car still has inertia rolling along the road. |
| 49:34 | On the dyno, we can't actually reduce our load that much because if we reduce our throttle setting to zero, there's no load on they dyno anymore and the dyno simply slows down so there are some advantages in terms of that. |
| 49:47 | Remembering that when we're completely off the throttle, when we are on overrun, this is where we can get that oil mist being drawn back up the bores to lubricate the cylinder walls and also draw away heat and cool those rings as well. |
| 50:02 | So advantage there, can be a little bit trickier to do on the road as well. |
| 50:06 | Obviously really difficult to monitor if you've got any oil leaks or fuel leaks in the engine bay so you want to basically make sure that everything is in good condition before you head out on your running in trip. |
| 50:20 | ManitouBlack has asked, in engines with an oil pump driven off the crank snout such as the SR20, RB etc, where you can't simply spin the oil pump like a small block Chev, oh OK so that's, sorry got two parts to his question there. |
| 50:34 | So same answer anyway. |
| 50:36 | Mr D has asked, suitable break in oil, Mobil Racing 1 10W40, this oil will require more frequent changes. |
| 50:44 | So he's also given the zinc and phosphate ratings there in parts per million. |
| 50:50 | So some of the break in oils, the Mobil 1 Racing isn't an oil that I've used so I can't speak from personal experience. |
| 50:57 | A lot of these running in oils will have that quite high ZPPD content but they also will be low in detergent so this is why they really are useful only for the running in process and you don't want to actually leave them in the engine once it has been broken in. |
| 51:19 | 1000HP-XR6 has asked, how often should the oil be changed after the initial run in oil has been dumped, given the assembly lube will still be in the engine? Also is a semi synthetic blend such as Brad Penn better than a full synthetic such as Mobil 1 in your opinion? My engine builder spins his Barra to 12,000 RPM making 2200 horsepower running a semi synthetic oil. |
| 51:39 | OK a couple of questions in there. |
| 51:41 | First of all, how often should the oil be changed after the initial run in oil? So generally what I'll do is run the engine for that 100 km or hour on the dyno, whatever that happens to be, get rid of that oil and then I will use the next lot of oil that goes into the engine and dump that after about another 200 km of use. |
| 52:01 | If it's a racecar I'll run that for a competition weekend and then dump it because you will still end up with some bore scrapings making their way into the oil there. |
| 52:11 | The bedding in process isn't going to be absolutely complete at the end of our run in process. |
| 52:17 | So after that I'd go to normal oil change distances, whatever you prefer for whatever your engine is doing. |
| 52:27 | Now in terms of semi synthetic such as a full synthetic, look everyone has their own pet oil that they like, their own preference and that's absolutely fine. |
| 52:38 | There's nothing specifically wrong with a semi synthetic oil, there's some good quality semi synthetic oils out there. |
| 52:45 | Personally, my preference and again this has just come from seeing how well it performed in my own drag engines, I tend to stick to Motul 300V which is a ester based full synthetic. |
| 52:57 | I can't speak for Mobil 1 or the Brad Penn simply as I haven't used either. |
| 53:02 | But that's nothing to say that you can't get away with 12,000 RPM and 2200 horsepower with a semi synthetic, obviously as your engine builder has proven. |
| 53:15 | Thismarks has asked, is there a different process for forced induction engines versus naturally aspirated engines? No not really, we actually have an advantage with forced induction engines because we can generate positive boost pressure which obviously goes a long way to creating cylinder pressure which helps our rings bed against the cylinder wall. |
| 53:34 | What we will want to do is make sure that we're running as low a boost pressure as possible during that break in process, so generally we will want to set the engine up to run on the wastegate spring pressure, beyond this it's exactly the same process that I'd use for a naturally aspirated engine. |
| 53:49 | The only caveate would be that considering we can create more cylinder pressure, we might end up pulling down our throttle position targets during that break in process so I might be targeting a throttle position that initially gets me maybe 1-2 psi of boost and then as I move through the break in process, we might step that up to sort of 3-5 psi, we'd do a really good job of bedding in our rings. |
| 54:18 | Supersevenn has asked, I've always used three heat cycles bedding in the rings gradually, bringing up the RPM on each cycle, what are your thoughts on several heat cycles as opposed to just one running cycle to bed them in? The process I've talked about is exactly what I've used where we have done everything in one single run and again, no issues with that at all, I don't see any advantage or any need to heat cycle the rings, it's just not something that I can see is going to give us any benefits. |
| 54:52 | Jeff has asked, will you need to keep tuning as you increase the load when you only have a very basic map in the ECU? Especially when the car is a bit of a Frankenstein so won't be able to use the factory base map. |
| 55:03 | Yeah absolutely Jeff you will have to tune as you go but the benefit of the break in process is it actually lends itself really well to tuning as you go. |
| 55:11 | You're doing most of the break in process under steady state conditions, varying the RPM and load so this actually helps you build up the map for fuel and ignition as you go. |
| 55:26 | Another questions we've got there, 25aspooner has asked, are there any special things to do when breaking in a diesel engine? No, regardless whether you're running petrol or diesel, the engine components that we're trying to break in are exactly the same and the break in process is the same. |
| 55:45 | iZR0, I think it is, has asked, if bedding in the rings creates extra heat, does using ethanol help keep the rings cool? Does richening the engine out a little also help keep the rings cool? So not specifically enough to really help us and it's not necessarily a problem. |
| 56:02 | The fact that the rings will generate heat is not an issue, it's all about just managing that heat and that's where we're going to be cycling between periods of light load and getting off the throttle, running into overrun. |
| 56:14 | Ethanol will help our engine run cooler during the break in process through which as I've already highlighted, can be problematic in some instances. |
| 56:22 | Mitcho has asked, would you recommend running an engine without oil coolers installed so that you can drain the oil all out sufficiently? If you want to be pedantic then I wouldn't say running the engine without an oil cooler is a good idea because again, you're going to be creating more heat during that break in process but if you want to be pedantic, it's definitely not a bad idea when we move from a running in oil to a normal oil to actually also drain the oil out of the oil coolers. |
| 56:50 | Depending on the application you can find that there's going to be quite a volume of oil trapped in the lines and the oil cooler. |
| 56:56 | However over time that's going to be obviously flushed out and diluted with the rest of the oil. |
| 57:02 | So it's not necessarily a deal breaker but for the small amount of effort it takes with an expensive race engine, certainly something that I would consider doing. |
| 57:13 | James has asked, I'm building a high compression Honda B series engine with new everything including very high pressure valve springs. |
| 57:18 | Is it worth separating the break in by breaking the cams in on a stock engine, then swap them into a high compression system for ring break in? All camshaft material says to maintain 2000-2500 RPM for 20-30 minutes immediately after first start. |
| 57:35 | OK so the reason that that's not necessarily strictly on the Honda B series is again what we got down to with the type of valve train there. |
| 57:46 | There's also the fact that even with a heavy valve spring, you are still spreading the load there across two valves and they're quite small valves compared to our large single valve in a pushrod engine running a flat tappet style. |
| 58:00 | So that shouldn't be strictly necessary for your B series engine, you shouldn't have issues there with that particular engine. |
| 58:09 | It would be an advantage with that particular engine though to consider running the zinc and phosphate additive or a run in oil that has that phosphate additive. |
| 58:21 | Igor has asked, if I reuse rings, do I have to break anything in? No absolutely not, you don't, if you are reusing the existing rings then you've got no break in work to do so you basically can put the engine together. |
| 58:33 | It's still a good idea to run the engine for a period of time and then drain the oil because you're naturally going to have some assembly lubricant that is going to make its way into the engine so you want to flush that out as well. |
| 58:47 | Right I'm going to actually call it there because we are out of time. |
| 58:51 | There's been some really good questions there, some really good discussion. |
| 58:54 | So hopefully at this point, everyone's got a pretty good idea of the myths to do with engine break in and a pretty good idea of what's actually involved with that break in process and what you can do. |
| 59:06 | If you do have any other questions after this webinar has aired, please feel free to ask those questions in the forum and I'll be happy to answer them there. |
| 59:13 | Thanks for joining us and look forward to seeing you all next time. |
| 59:17 | Now for those who are watching on YouTube today, this is just some insight into what we put on every week for our HPA gold members. |
| 59:24 | Our gold members get to review these webinars at their leisure in our archive where we've currently got over 220 hours of existing webinar content. |
| 59:33 | As well as this, our gold members also get access to our private member's only forum which is the best place to get reliable answers to your specific engine building, tuning and wiring questions. |
| 59:43 | If you are interested in becoming a gold member or learning more, you can purchase gold membership from our website for $19 USD a month. |
| 59:50 | However you'll also get three months of free access with the purchase of any of our courses. |
| 59:56 | You can check those out at hpacademy.com/courses Alright thanks for joining us everyone and hopefully we'll see you all in the new year, cheers. |


