231 | MegaSquirt Tuner Studio Software Tutorial Plus Tips and Tricks
Summary
The MegaSquirt MS3Pro ECU is a popular choice for enthusiasts across the world, however getting familiar with the TunerStudio software can take some time. In this webinar we’ll discuss the software and look at some tips and tricks to get the best out of your tuning session.
| 00:00 | - Hey guys, Andre from High Performance Academy here, welcome to another one of our webinars. |
| 00:05 | Today we're going to be having a look in a little bit of depth at the MegaSquirt TunerStudio software. |
| 00:12 | We introduced a worked example on the MS3 Pro a little while ago, it's available in our Practical Standalone Tuning course worked example library if you want a little bit more in depth. |
| 00:22 | But of course any time you're transitioning across to a new tuning platform, there's going to be a reasonably steep learning curve. |
| 00:30 | And it's no different for us either. |
| 00:32 | Every time we are transitioning onto those new platforms, we have to go through the process of learning from scratch and learning all those little tricks and tips. |
| 00:40 | Wouldn't even say that at this point we know all of the tricks and tips but this webinar is designed to get you up to speed a little bit quicker if you are fresh to the MS3 Pro and TunerStudio software package. |
| 00:52 | Giving you a few insights into what we've learned so far and a better idea on some of the operational aspects of the MegaSquirt software. |
| 01:02 | So we're going to be demonstrating today using the Mazda MX5, NA MX5 or Mazda Miata depending on what market you're from. |
| 01:11 | Relatively simple engine tuning platform, not a lot of technology involved in this particular engine but of course the techniques of tuning it are basically the same regardless what you're tuning, how many cylinders it's got or whether it's naturally aspirated or supercharged. |
| 01:29 | Alright as usual as well I should mention we will be having questions and answers at the end of this webinar so if there's anything that I cover off that you'd like me to go into more detail on or anything just generally related to the topic of today's lesson, please feel free to ask those in the chat, we'll get into those at the end of the webinar. |
| 01:47 | But for now, let's start by heading across to my laptop screen and we'll give you a quick look at what you can expect with the TunerStudio MS Ultra software version. |
| 01:58 | So at the moment we are on our gauge cluster tab here. |
| 02:03 | So we can see a range of our gauges, we've got for example our engine speed, throttle position, injector pulse width, coolant temperature, we've got ignition advance, fuel load, lambda and our battery voltage. |
| 02:15 | So this is a very very basic way of viewing some of the aspects of the MS3 Pro operation. |
| 02:22 | It's not going to be the most helpful way. |
| 02:25 | Of course you can alter the gauge display if you want to change what's being displayed, maybe you want to bring in a different parameter that you're interested in viewing, that's relatively straightforward but it's still going to be reasonably limiting. |
| 02:40 | Now I know that a lot of people will run with a fairly peered down view of what's going on in the TunerStudio software like this. |
| 02:48 | And then if for example we want to go and make some changes to our fuel table, what we can do is just access this by going to our fuel settings tab here. |
| 03:00 | I've got all of the available parameters and tables that we've got access to at the moment. |
| 03:05 | You'll see that there are a number of them greyed out. |
| 03:08 | And what we want to do is come down here until we can see we've got our fuel VE table one and if we click on that, that's going to open our volumetric efficiency table here, we can see we've got a relatively conventional volumetric efficiency table or fuel table. |
| 03:23 | I've called it VE table, it is labelled VE table. |
| 03:27 | We're going to talk in a little bit more detail about that in a second. |
| 03:30 | Now while I was talking there, I just highlighted, we've got our fuel load. |
| 03:33 | So this is called fuel load in the TunerStudio software. |
| 03:36 | Essentially it's the load axis for our fuel table, we can see that we've got that configured as manifold absolute pressure which is going to be pretty typical. |
| 03:46 | Not necessarily the only way, you may want to have this set up as throttle position for Alpha-N but here we've got that set conventionally at manifold pressure and then of course we've got our RPM axis on the horizontal axis. |
| 03:59 | So we can see while I've been talking here, we've got the engine idling, so we've got this little blue circle that's showing us where abouts we're accessing while the engine is running which makes it pretty easy for you to highlight the particular cell that needs adjustment and make suitable changes. |
| 04:18 | One of the frustrations for me, and it's just a familiarity thing here is that if you are going to tune in this way where we've just opened up our fuel VE table across the top of our gauges, one of the functions that I tend to often use, just because of the other platforms that I'm familiar with, I tend to keep pressing the escape key which in most systems that I deal with basically will eliminate the last change that I'm about to make before I store it. |
| 04:47 | As we can see that as I press the escape key, our VE table just disappears and what I found initially is I was spending a lot of time doing exactly that. |
| 04:54 | Getting frustrated, cursing and then that table disappearing. |
| 04:58 | Don't worry, there's some other ways that we can view this that's not going to have that problem which I'll show you in a second. |
| 05:04 | Now one of the key things we're obviously going to do when we are setting up our ECU for the first time prior to startup is we're going to go through and make some base configuration to our fuel tables, to our ignition tables, get some numbers in there that we are going to be comfortable with getting our tune up and running and started from. |
| 05:24 | Now for those of you who have gone through our Practical Standalone Tuning course, you'll know that my preference or my recommendation, particularly when you're a novice just getting started, if you are on a dyno, is to just start by setting the entire volumetric efficiency table to a flat number, let's say somewhere in the region of 50-60%. |
| 05:42 | it doesn't really matter specifically, 50-60% should be enough for every engine to get it up and running provided you've got your other parameters set correctly. |
| 05:52 | And actually just to highlight that that's the exact case, we can see that in the idle area that we're running in at the moment, we are sitting between 47.5% and 48.6% so understandably if I'd gone with 50% there, we're going to be there ore thereabouts with our air/fuel ratio. |
| 06:09 | Particularly during our first start up we don't have to have perfect air/fuel ratio, it's not that critical. |
| 06:15 | We can easily make adjustments, coarse adjustments by highlighting a block of the cells and let's just do that now. |
| 06:21 | So we can use the shift key and our arrow keys to highlight a block of cells. |
| 06:25 | So generally when I'm getting the engine up and running for the first time, I might end up highlighting a block of cells up to maybe 1800 or 2000 RPM like this. |
| 06:33 | I'll be watching my air/fuel ratio which at the moment you can actually see is going to be pretty tricky because we don't have our air/fuel ratio being displayed visibly. |
| 06:43 | It is there but it's behind our VE table. |
| 06:45 | Don't worry I'lll show you some other tabs where we can display information in another way shortly. |
| 06:51 | But then what we can do is initially get our engine running, watch our air/fuel ratio and then we can make coarse adjustments to the table numbers in order to get onto our target. |
| 07:01 | Now all of the adjustments or options for making our adjustments are shown here. |
| 07:06 | And we can use those little buttons. |
| 07:08 | However we can also just hover over those and it will show us what key we can press on the keyboard to make these adjustments. |
| 07:16 | So for example here to increment the numbers that we've just highlighted, we can use the full stop key. |
| 07:23 | So if I do that at the moment, if we just watch the numbers in the table, we can see that every time I press that full stop key it increments by 0.1 So that's going to be helpful but it's going to be a pretty painfully slow process in order to make dramatic changes. |
| 07:38 | Now fortunately if we hold down the ctrl and press the full stop key, we're going to make a change of 0.5% at a time. |
| 07:46 | Which is obviously going to get us into the ballpark a little bit quicker. |
| 07:49 | Likewise if we use the comma key or the ctrl comma key, that's going to make a coarser change. |
| 07:55 | So during our initial startup, that's going to be enough to get us up and running. |
| 07:58 | Now I've just mentioned there that my recommendation is that we start by making these changes with our fuel table set to a flat number. |
| 08:09 | That works pretty well and it gets you up and running but the reason that I recommend that is that it kind of saves you the effort of trying to guess at the shape of the fuel table, the VE table that we're going to end up with and it takes a lot of the work out of it. |
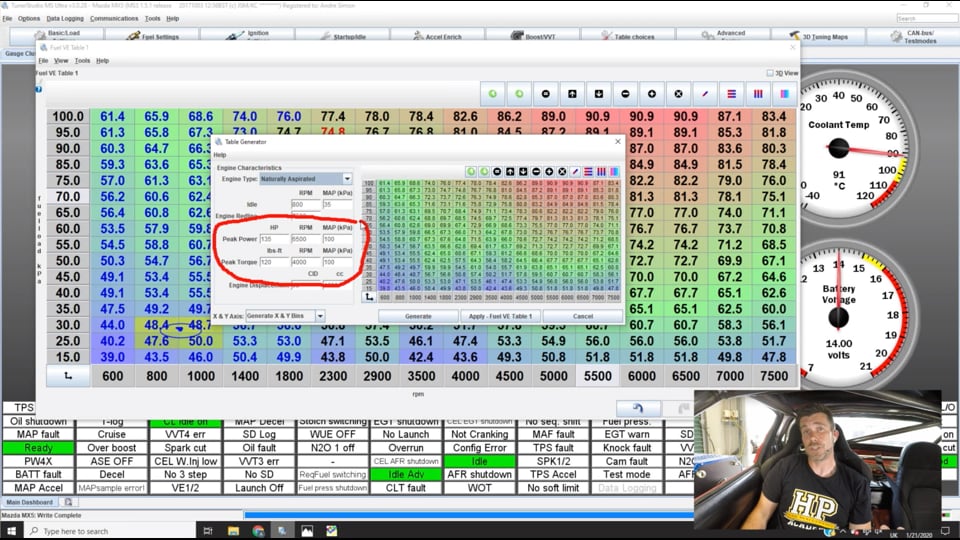
| 08:25 | Now interestingly enough the TunerStudio software actually provides us some options to generate a starting VE table, So we can do this by clicking on the tools tab there and we can click on VE table generator. |
| 08:40 | So there are some parameters that we need to enter in here. |
| 08:43 | So we can see that we've got our engine type, obviously at the moment we are naturally aspirated but we could choose a variety of different engine combinations there. |
| 08:52 | So you're obviously going to want to choose whatever suits your particular engine. |
| 08:55 | We've got our engine RPM at idle as well as the manifold vacuum at idle. |
| 09:01 | Actually a little bit conservative there at 35 kPa compared to what we've actually got. |
| 09:05 | Our engine redline in this case, 7500 RPM. |
| 09:07 | And then we've got some assumptions about our peak power, let's just draw that so we can actually see. |
| 09:14 | Our peak power and our peak torque including the RPM and the manifold pressure we're likely to see these at. |
| 09:21 | You don't have to be super accurate here. |
| 09:23 | Just an approximate guess and even if you're entering just factory numbers for the engine, it's going to be enough to get you into the ballpark and we're not expecting that this VE table is going to be perfect, it's just going to give us a starting point with a bit of shape to it that we can begin our tuning from. |
| 09:39 | And then, oh not that one, and then finally we've got our engine displacement in cubic inches or cc's. |
| 09:46 | What we can then do is generate our X and Y bins or our X and Y break points for the table and we can then choose, if we click generate, what that's going to do is then generate a volumetric efficiency table based on the parameters that we've given it. |
| 10:03 | And if we're happy with that we can then click apply that fuel, that to the VE table one, that will actually apply those changes and that will get us up and running. |
| 10:11 | Now of course we've done some tuning on this particular engine so I'm not going to go backwards and do that, we don't need to. |
| 10:18 | Now one other aspect, and this is again important to know if you are moving across to the TunerStudio, MegaSquirt platform is that in order to make your changes permanent, you need to burn these. |
| 10:31 | So we can see that because I have made some changes, first of all in the background, this little red status tab comes up saying that the ECU needs a burn and we now have this little button here which says burn so we can make those changes that I've just made active. |
| 10:48 | You can see now the burn button has greyed out, we can't press that anymore. |
| 10:52 | And our need burn status has turned off. |
| 10:56 | So really important to understand otherwise you can end up in a situation where you've made some pretty dramatic changes to any of your parameters and end up basically disconnecting, keying the ECU off and actually losing those changes when you think that they have become active. |
| 11:13 | Alright so we've talked about bringing up our fuel table there over the top of our gauges but using the MS Ultra TunerStudio software, we've got the ability to basically display a range of tabs and these are displayed here across the top of our screen. |
| 11:31 | So at the moment we've been on gauge cluster, not generally that useful when it comes to actually tuning. |
| 11:39 | One of the tabs that I'm going to be using a lot here is our tuning and dyno views tab. |
| 11:44 | And then also our graphing and logging tab. |
| 11:48 | So particularly here the graphing and logging, really really useful for looking at what's actually happening during a wide open throttle ramp run. |
| 11:57 | Obviously during the wide open throttle ramp runs there's a lot of things going on and we can use this to come back and review in a little bit more detail exactly what did happen. |
| 12:08 | So let's go back to our tuning and dyno views. |
| 12:10 | So we've got a range of different tabs within this tab itself. |
| 12:15 | So at the moment you can see down the bottom I am currently on the fuel tab. |
| 12:18 | In a way I think some of these basic layouts can actually be perhaps a touch confusing and could be a little bit simplified. |
| 12:28 | That's OK though because of course you've got complete flexibility to make up your own tabs or adjust the information that is relevant to the task that you're completing. |
| 12:38 | So what I'm going to do, I'll just get our fan up and running here and I'll just close our driver's window so that I can actually still talk and what we're going to do here is we're going to go across to our dyno tab. |
| 12:50 | So this is a tab that's set up pretty well for allowing us to perform some steady state fuel tuning. |
| 13:00 | So in particular we've got here on the right hand side, we've got a nice big graphical display of our current measured lambda. |
| 13:08 | So we've got a CAN based wideband lambda controller coming directly into the MS3 Pro here so that's giving us nice accurate air/fuel ratio data while the engine's running. |
| 13:20 | You can see at idle there I'm sitting at 0.95 lambda. |
| 13:26 | Now that on its own is not a huge amount of use so in order to decide what changes are going to be necessary when we are making our fuelling changes, we're also going to need to know what our target is. |
| 13:38 | There's a variety of ways of showing that but our target is currently being displayed down here, you can see our AFR target one is showing 0.95. |
| 13:48 | Don't worry I'm going to show you exactly where that number comes from in a moment. |
| 13:52 | Now the other aspect that's important here is right now I am actually using the exhaust gas oxygen correction. |
| 14:00 | So essentially closed loop air/fuel ratio control. |
| 14:03 | So if you don't keep that in mind, if you don't understand that, you can end up thinking that everything's fine. |
| 14:09 | If we currently look at our measured air/fuel ratio, 0.95 lambda, we compare that to our target, 0.95 lambda, happy days, we're right on our target and that's also demonstrated by this other parameter here which shows our air/fuel ratio error. |
| 14:25 | So basically how far away we are from our target. |
| 14:28 | So ideally we'd like that always to be zero so again looking at this, on face value, everything is where we want it to be. |
| 14:35 | Not so fast though. |
| 14:37 | What we do need to have a look at here is that our EGO correction is actually sitting at the moment at about 103, 104%, it's obviously moving around a little bit. |
| 14:46 | So basically how this works is numbers of 100 mean that the closed loop air/fuel ratio control is doing nothing, there's no feedback active there. |
| 14:56 | Numbers greater than 100 mean that we are adding fuel in the background to get onto our target. |
| 15:02 | So right now as I speak, of course it is a moving target, we're sitting at about 104% which means that the closed loop control is adding 4% to get us onto our target. |
| 15:10 | What this would mean is that the cells that we're currently operating in here are probably a little bit on the lean side. |
| 15:20 | So we technically should be adding a little bit of fuel. |
| 15:22 | Let's see how we can do that and I'll just show you broadly. |
| 15:25 | We're obviously interpolating at the moment almost perfectly between the four cells which is a little bit awkward. |
| 15:30 | For this demonstration what I've done there is just using the shift and arrow keys, highlighted all four of those cells. |
| 15:36 | Now what we want to do here is just use a math function to essentially add 5%. |
| 15:41 | So what we can do here is use our little multiply symbol up here in our toolbox or we can also achieve that by using the asterisk key. |
| 15:54 | It's always a good idea to familiarise yourself with the keyboard shortcuts because you're going to be doing this a lot and it's going to really speed up your tuning. |
| 16:03 | So the shift and 8 key, the asterisk key there, it's going to bring up the multiply. |
| 16:07 | So what we want to do is just understand the way we want to enter numbers here. |
| 16:13 | And they make it really easy for us by actually showing us exactly that. |
| 16:17 | So we can see here it says to multiply the selected cells by. |
| 16:21 | So for example in this case 1.2 is going to raise the numbers by 20%. |
| 16:27 | So what we want to do, a number of 1.0 is going to make no change, if we want to reduce the number by a certain percentage, we're going to be going with a number less than one. |
| 16:38 | So to reduce the number in the table by 5%, we would enter a value of 0.95. |
| 16:44 | In this case of course we, yeah we're still about 5% so let's enter 1.05, we're going to click OK, that's going to make those changes and what we're going to do is just have a look at what our EGO correction does. |
| 16:58 | So it should technically come back to zero, always great when a demonstration works exactly how it should and you can see that's exactly what it's achieved there. |
| 17:07 | We've ended up with our exhaust gas oxygen sitting on zero, our correction I should say, our closed loop's doing nothing and we are back on our target. |
| 17:16 | Now for those of you who don't know how that works as well, just because this is a really powerful aspect of speeding up your fuel tuning, this is one of the key takeaways from our EFI Tuning Fundamentals course. |
| 17:29 | But I'm just going to demonstrate this here. |
| 17:32 | So if we have a measured air/fuel ratio and we have a desired air/fuel ratio, we can really easily calculate a correction factor to apply. |
| 17:42 | So to do that, let's just bring up our calculator here and what we're going to do is, wait for our calculator to open, everything seems to be going a little bit slow today. |
| 17:53 | But let's say for example we've just done a ramp run on our dyno which we're going to demonstrate in a second, and let's say we've ended up with a measured air/fuel ratio of let's say 0.95. |
| 18:05 | So what we want to do, first of all let's enter our measured value. |
| 18:08 | So 0.95, and what we want to do is divide that by our desired or target air/fuel ratio. |
| 18:14 | Let's say for example that our target air/fuel ratio in this case was actually 0.88. |
| 18:19 | So we're a little bit lean. |
| 18:21 | What that then gives us is a correction factor to apply. |
| 18:25 | So we can actually enter this number directly in in that exact same style into the TunerStudio software. |
| 18:32 | Basically what it means is that to get to our desired or target lambda value of 0.88, we need to add 8% fuelling. |
| 18:40 | So that's a really really key tip to take away for you. |
| 18:44 | It doesn't just apply here to the MegaSquirt product, that should work on any ECU provided things such as your injector characterisation and dead time data is all entered correctly. |
| 18:57 | So as we've been talking here, our EGO correction has stayed sitting on zero so let's just get ourselves up and running here and we'll have a look at doing a little bit of steady state tuning. |
| 19:08 | What we're going to do is just use our dyno here to get us up to, in this case 2300 RPM. |
| 19:16 | Actually let's come up a little bit to a place where I haven't done any tuning, just so we've hopefully got a little bit of work to do. |
| 19:24 | What I'm doing here is just using the dyno in order to get us right into the middle of our cell. |
| 19:30 | So you can see that little circle that shows us how close we are to the centre of the cell. |
| 19:37 | We want to make sure that we are as close to the centre of the cell as we can get before we make any tuning changes because otherwise we're going to end up with interpolation affecting our results. |
| 19:48 | Now awkwardly our tune is actually pretty good here so what I'm going to do is just introduce a little bit of error here. |
| 19:56 | So what we'll do is we'll just add a couple of percent so we've got a little bit of error. |
| 20:01 | So what we've got now is we're running at 75 kPa, we've got a value of 77.4% in our VE table and again we can see that our lambda is sitting at 0.99, our target, we can look at, also 0.99 for that particular cell. |
| 20:22 | So our air/fuel ratio error is zero. |
| 20:26 | But again at the moment I am running in closed loop control mode so we want to take note of our EGO correction value. |
| 20:32 | Of course at the moment we can see that's sitting at about 0.96. |
| 20:36 | So that means that it's pulling around about 4% fuel. |
| 20:39 | So what we can do there is we can use our multiplication factor there. |
| 20:44 | So we enter the asterisk symbol. |
| 20:47 | Now remember to remove 4% fuel, what we want to do is enter a value of 0.96, we'll enter that value. |
| 20:54 | So instantaneously we actually saw the lambda jump a little bit lean, it went to 1.01 and then the EGO correction jumped in, you can see that's now sitting really close to 100%, basically saying that it's not doing anything. |
| 21:08 | That cell's now tuned, what we can do is open our throttle, we'll come up to our next cell here. |
| 21:14 | And we can see that again our EGO correction has done its job. |
| 21:18 | We're sitting on our target, we've got 0.98 lambda measured, 0.98 target, but we can see our EGO correction, we can look at it here this time, pulling 3%. |
| 21:30 | So again we can do exactly the same, shift and the 8 key brings up our multiply sign, 0.97 will remove 3%. |
| 21:39 | Wait for our correction to work its way out, it's gone back to 100% and we're back on our target. |
| 21:48 | So that's just one of the options there of making tuning changes while the engine is running in steady state conditions. |
| 21:55 | Other option is we can directly enter values, we can also use the plus and minus functions. |
| 22:02 | So again if we're looking at those, we've got those here, we can add or subtract from the block of numbers that we have highlighted, or the single number we have highlighted. |
| 22:12 | Or once we get quite close to our target, we can then make finer tuning changes by using the comma and full stop key or ctrl comma and ctrl full stop key to make 0.5% changes. |
| 22:25 | So those are the general techniques that I use when I am making fuelling changes. |
| 22:31 | And this is a pretty good setup for viewing those parameters that are important to you during that. |
| 22:39 | One parameter that I would recommend that you just keep an eye on when you are tuning, either in steady state or under ramp run conditions is our coolant temperature. |
| 22:48 | Now we can see that here and in an interesting little idiosyncrasy with this software, and despite the fact that I have actually selected to display values in degrees celsius, °C, we can see that that's actually what we've got, the true engine coolant temperature is 88°C but it's actually showing in °F so just a little bug there. |
| 23:11 | I'm guessing more people in the U.S. market of course will be using Fahrenheit for their temperature so not necessarily an issue. |
| 23:20 | Likewise I should mention that if you are more familiar or used to working in units of air/fuel ratio, you absolutely can do that as well. |
| 23:29 | Alright so we've looked at our fuel table, one thing that I haven't mentioned yet as well is how to configure the break points on your fuel table. |
| 23:38 | So what we can do here, we've got our break points that we already looked at, what we can do is click on each of those and independently change them. |
| 23:46 | So as I click on the 100 kPa cell, I did that without highlighting, the 100 kPa cell, we see a little box open up and I can adjust that to whatever I want. |
| 23:56 | It's a good coarse way of making adjustments, the problem is that the actual table numbers aren't going to interpolate to track those changes. |
| 24:05 | So that's not particularly useful, particularly if you want to maybe move a site a little bit or maybe add a site in there that doesn't exist, that's going to give you a lot of work if you're going to go about doing that that way. |
| 24:16 | Instead though if you click down here in the bottom left corner of the table, on those little two arrows, what that's going to do is bring up the ability to make changes to your cells and then what you can do, once you've made those changes, you can click here, apply new X and Y values and interpolate Z. |
| 24:38 | The Z axis, the Z axis is the number that's inside of the table. |
| 24:42 | So this will automatically readjust your table numbers so that you can make break point changes without messing up your entire table. |
| 24:51 | So really important when you get to that point where you've got a pretty well set up fuel table or ignition table for that matter and you decide that you just want to add or manipulate one of the break points, you don't have to go do a huge amount of work to do that. |
| 25:05 | So we'll close that down, we're not going to make any break point changes there. |
| 25:09 | Now the other aspect to understand here is how to, how you can configure this ECU and how it works. |
| 25:20 | So what we're going to do here is go back a little bit and go to one of the more basic settings so we're going to go to our basic/load settings, we'll click on that and what we're going to do is come down to our engine and sequential settings. |
| 25:32 | Oh actually no we're not but while we are on this, I'll just mention that there's two parameters in here that are important. |
| 25:40 | We've got our engine capacity in cc's and we've also got our injector size. |
| 25:45 | So it's important to have those parameters entered accurately. |
| 25:50 | While I am talking about the fuelling as well, the injector size, we also want to make sure that we've got our injector information accurately entered. |
| 26:00 | So we've got our injector size there but that's obviously a very basic parameter. |
| 26:03 | If we come across for a moment here to our fuel settings tab and we can see here we've got our injector dead time so we can enter that and we can enter the injector dead time for whatever injectors we are using. |
| 26:17 | We also, if you do have the correct data from your manufacturer, your injector manufacturer, there also is the ability to use short pulse width offsets. |
| 26:27 | So what we'll find is if we open these up, you can see at the moment it's turned off. |
| 26:31 | Don't have the data, you really, there's no way of entering these numbers or calibrating them yourself, it does require some pretty specific data from on the injectors that allows you to characterise the injectors for the non linear area of operating. |
| 26:47 | And what this can do is end up removing some of the baked in errors that you have to put into your VE table in order to get the fuelling correct down in that very short pulse width area, typically down in idle, the idle area and at very light cruise. |
| 27:04 | So if you've got that information, I know for one example Injector Dynamics offer short pulse width adder information for all of their injectors. |
| 27:13 | You can enter that there. |
| 27:15 | However getting back to what I wanted to show you, come back to our basic load and settings and what we want to do is come down this time to our general settings. |
| 27:23 | Now there's a lot of information in here and I should actually mention we do have another webinar which was a brief introduction to MegaSquirt and the TunerStudio software, you can check that out because I talk about a number of these other parameters. |
| 27:35 | What I want to talk about here though today is our two functions over here which is incorporate our air/fuel ratio target and the stoichiometric air/fuel ratio. |
| 27:45 | So you can see here you've got a choice from this drop down menu to either include or not include our AFR target. |
| 27:52 | A little bit ambiguous and probably not that meaningful to a lot of people. |
| 27:57 | Albeit there is a little question mark that you can click on that'll give you a little bit more information about this. |
| 28:03 | Essentially what this does is if you choose to include your air/fuel ratio target table. |
| 28:08 | Basically incorporates the AFR target values as part of the main fuel calculation. |
| 28:13 | And in essence then has the ECU operating like a true volumetric efficiency table. |
| 28:20 | When we do this and we've got our air/fuel ratio target table set, provided we tune our VE table to the air/fuel ratio target values, so we accurately tune it, then our VE table should in fact be a relatively accurate representation of the engine's true volumetric efficiency. |
| 28:40 | And the other key aspect with this is when we've done this properly, if we want to make a change to our air fuel ratio that the engine's running at, we don't need to go back into our VE table and retune that. |
| 28:51 | Instead we can do it directly from our air/fuel ratio target table. |
| 28:54 | So it's also important as part of this to make sure that you have correctly set the stoichiometric air/fuel ratio. |
| 29:02 | 14.7:1 in our case for pump gas. |
| 29:05 | So with those two parameters set, as I've mentioned, we are going to be operating essentially like a volumetric efficiency ECU and we also need to make sure in this instance that if we go back to our fuel settings drop down tab here, we want to make sure that we come down to our AFR target table one, click on that and we can see we've got our air/fuel ratio targets set up. |
| 29:30 | Again obviously in this case, lambda values, you can choose to use units of air fuel ratio if you prefer. |
| 29:37 | Not that important to be as fussy with your break points in this particular table because of course the ECU is interpolating as we go through this table. |
| 29:47 | So we can see here that particularly up in the 100 kPa zone, we're starting there with a target of about 0.92, around about 13:1 air/fuel ratio. |
| 29:57 | At higher RPM, I've just dropped that just a touch richer to basically 0.90. |
| 30:04 | We can see that in the idle areas which is where we are right now, I've chosen 0.95, I just find that this particular engine idles a little bit smoother at 0.95, just a touch richer than stoich. |
| 30:16 | We can see though because this car is still daily driven that I have elected to keep the cruise areas of the map relatively lean with a lambda 1.0 target there. |
| 30:30 | Now this is another area where you can choose to let the TunerStudio software do some of the heavy lifting for you. |
| 30:36 | So again if we come up to our tools tab here we can click on AFR target generator. |
| 30:43 | And basically we can allow the software to generate some target lambda or target air/fuel ratio numbers for a particular application. |
| 30:53 | Again we've got naturally aspirated, turbo, supercharger et cetera. |
| 30:57 | So you can go ahead and set that up. |
| 31:00 | Up to you, personally I prefer to have a little bit more control over my air/fuel ratio targets and I'm going to be doing that manually myself. |
| 31:10 | But of course once you've set this table, that doesn't mean that you can't adjust those air/fuel ratio targets as you go through your tuning maybe testing to see how the engine responds to leaner or richer air/fuel ratio targets. |
| 31:23 | Alright so that's some of the basics of getting our fuelling dialled in. |
| 31:27 | What I want to do now is show you some of the more useful aspects when we are doing some ramp runs. |
| 31:34 | So what we're going to do here is we're going to head over to our graphing and logging tab. |
| 31:40 | This is what I'd be suggesting you use when you are doing some ramp runs on the dyno so I've actually got some data already loaded up there but just for the sake of completeness what I'll do is we will perform another ramp run here. |
| 31:54 | So what I'm going to do first of all is we're going to click on start datalogging over here on the left hand side. |
| 32:02 | You can give it a specific name or it'll automatically be given a time stamp which for my purposes here is basically all I'm going to need. |
| 32:10 | We click save and that's going to basically start our datalog running. |
| 32:14 | So you can see that right now if I give the engine a rev, we've got that datalog running. |
| 32:19 | We can also see in real time there's a bit of a trace there showing where we're accessing in the table. |
| 32:25 | So what I'm going to do, we'll head across to our dyno, we'll get up and running here in fourth gear, go through to full throttle, just allowing our temperatures to stabilise for a few seconds and we'll get a run underway here. |
| 32:39 | And you can see it's overlaying on top of an existing run. |
| 32:54 | Alright so we can see there we've produced 99.3 horsepower at the wheels. |
| 32:59 | I'm pretty sure that's not exactly what Mainline were expecting people to use their Prohub dynos to measure given our dyno can measure somewhere in the region of 2000 to 2500 horsepower. |
| 33:13 | Although it does show you that the dyno actually has a fairly wide range where it can operate across. |
| 33:19 | Anyway, 99.3 horsepower, that's not really so much what we're interested in here, what we want to do though is go back into our laptop software here and we can see we've got our datalog file saved. |
| 33:33 | So this is nice because we don't need to use a third party piece of software for our analysis. |
| 33:40 | If you are familiar with MegaLogViewer HD, which we're going to have a look at in a second, then you'll already be very familiar with working your way through this but using the up and down arrow keys I can kind of get myself into the centre of the area that I'm interested in. |
| 33:52 | Obviously we've got our ramp run here to here. |
| 33:55 | We can click and see what our RPM was, so we started our run at about 1641 RPM and at the end of our run here we went all the way through to about 7100 RPM. |
| 34:09 | So particularly when we are doing any tuning under wide open throttle conditions, one of the first things we're probably going to want to do is to check our air/fuel ratio and see how we're looking there. |
| 34:22 | So we can on the left hand side here select exactly which parameters are going to be displayed on each of the graphs. |
| 34:29 | We've got a very basic setup here where in the top graph we've obviously got RPM. |
| 34:33 | The next graph I've got my lambda one target and my measured lambda values. |
| 34:38 | And then also showing in the third graph in red here, our EGO correction. |
| 34:43 | Now I want to show you, we're going to have a little dive into our EGO correction in a second but I just want to show you that at the moment, I've basically got this set up so that under wide open throttle ramp run conditions, you can see that the value is sitting at 100%, zero correction. |
| 34:59 | So every time we go over, off the top of my mind I think I've set this at 70% throttle right now. |
| 35:05 | Basically it will disable the EGO correction, just eliminating that. |
| 35:09 | Comes down to personal preference, again we'll talk about this in a second but just to show you that right now we don't have any closed loop control trying to fix any of the errors we've got. |
| 35:19 | So what we want to do is have a look at our measured versus our target lambda. |
| 35:24 | Target there is in purple, our measured is in green. |
| 35:28 | Now this is one of my pet peeves with this particular logger is that unless I'm missing something, I have not been able to find a way within the TunerStudio software of actually setting the minimum/maximum scaling for any of our channels. |
| 35:47 | So the problem with this is that it's going to auto scale to the minimum and maximum values from each of the channels during the log, while the log was operating. |
| 35:56 | So what we can see here is that our max values shown here, 1.0 for our target, 1.52 for our measured lambda, probably where I got off the throttle, our minimum is set at 0.78 for our measured, and 0.90 for our target. |
| 36:13 | Why this is important is it means that in an area like here which at a glance looks like we're really closely matched to our target, that's actually not necessarily the case. |
| 36:25 | We can see that at that particular point the cursor's at at the moment, our target is 0.93 lambda, our measured is 0.966, let's call it 0.97. |
| 36:33 | So we're actually a little bit lean. |
| 36:35 | So it can be a little bit deceptive and you need to keep that in mind. |
| 36:38 | As we move through this log file we can see that our target obviously where I just showed you in our AFR target table, 0.91 until we're right up in the rev range, drops to 0.90. |
| 36:54 | We can see that we're actually consistently a touch lean there, about 0.97 at the start of the run and 0.93 at the end of the run. |
| 37:02 | So this shows us that we've got some work to do. |
| 37:05 | One of the key features with using this built in logging is that every time I click somewhere, we can see that the cursor in the VE table across to the right, jumps to that particular active cell. |
| 37:17 | So it makes it really easy for us to be quite specific and accurate when we are making tuning changes like this. |
| 37:24 | We know exactly what combination of RPM and load the engine was operating at when we saw that lean or rich spot that we're trying to correct, making it very easy for us to do exactly that. |
| 37:38 | Now another aspect that's important with this is just making sure that you are aware of where abouts you're operating in the load and this really goes for any ECU. |
| 37:47 | Particularly with a naturally aspirated engine it can be easy to make the assumption that at wide open throttle and out at 7000 RPM, we're operating at 100 kPa. |
| 37:58 | That's not always the case so let's actually have a look at that. |
| 38:01 | ...we are sitting out here, we are actually interpolating down to about 0.93 lambda, we can obviously look at our actual load to see what that was but you can see where we're operating we're actually interpolating down between 95 kPa and 90 kPa. |
| 38:25 | So if we were making our changes at 100 kPa, it's going to have no affect, we're not even there. |
| 38:33 | First of all, where we are here in Queenstown we are at about 1000 or 1500 feet altitude above sea level so naturally this provides us with a slightly lower barometric air pressure, even if you take weather patterns out of the equation there. |
| 38:48 | So on a good day we might only see 97 kPa whereas our standard sea level atmospheric pressure is 101.3 kPa. |
| 38:58 | The other aspect here is that quite often, surprisingly often, you'll actually find that ...track of your engine which is piping up to the throttle body. |
| 39:07 | The throttle body itself, the air filter, et cetera will actually provide some restriction to air flow. |
| 39:13 | So generally what we will see in an exaggerated form, if we jump back into this screen, even if we are starting up at 100 kPa, at low RPM what we're going to find is we'll track through and then as the RPM comes up we're going to find that that restriction ends up with our manifold vacuum dropping down. |
| 39:31 | So really important to just pay attention to where abouts you are. |
| 39:34 | Now the other aspect with this is that this particular logger is great for some really basic analysis and of course it gives you the ability to click and find out where you're operating in directly in the table. |
| 39:50 | However if you want to do some more involved analysis, you can click right here and that will actually open your log file in MegaLogViewer HD. |
| 39:58 | So we'll do exactly that, i think I've actually already got it up and running but that's OK. |
| 40:03 | And we can see that we've got our data shown there. |
| 40:07 | I will update that later, no one wants to go through that during the webinar. |
| 40:11 | So again I'm not showing a lot of information here, we've got our RPM up the top here, we've got our lambda and our lambda target being displayed here in our second plot. |
| 40:22 | Now in this instance we can actually set our scaling for our graphs which is important. |
| 40:29 | So if we click here on these little three lines off to the right here, we can see I've got a factor for field smoothing just to smooth those numbers a little bit and then we've got our lambda minimum and maximum set to 0.8 and 1.0. |
| 40:43 | So by making sure that both of those plots have the same minimum and maximum values set, it means that we do know now that if we've got these lines sitting on top of each other, like we've got right here, it means that we do know that we are at the target air/fuel ratio so what we can see here straight away, not very difficult to tell that the whole way through that ramp run we were a little bit leaner than our target. |
| 41:08 | So once we know that, regardless whether you're doing your analysis in MegaLogViewer HD or back in TunerStudio, we can use that same measured over desired or measured over target correction factor that I've already talked about in order to work out a correction factor to apply. |
| 41:26 | Let's just take this particular point that we're operating in here. |
| 41:30 | So we see our measured is 0.95, so let's bring up our calculator again. |
| 41:34 | We will enter 0.95 and then we'll awkwardly move our calculator out of the way so we can actually see. |
| 41:44 | We can see that our target is 0.90 so we divide by 0.90, that gives us a correction factor, we need to add basically 6% fuel to that particular cell, in other words we're 6% leaner than our target so that little trick there, again this can be used for any system, very very powerful for quickly dialling in your fuelling, a lot of tuners will use the trial and error method where they'll go, ah I'm a little bit lean here, let's add two more numbers to our fuel table, I'll run the car again and see what we've got and this can be three, four, five iterations of making these tiny little adjustments and essentially guessing at the result. |
| 42:26 | When you know what's actually happening there, when you understand the math behind the operation of the ECU, you should be able to get there in one to two iterations using the calculation that I've just gone through, that correction factor. |
| 42:37 | OK so I want to briefly touch on a couple more aspects here, we're going to have a very quick look at the autotune aspect. |
| 42:48 | So we're going to come over here to tune analyse live, so I'll click on that tab and see what we've got. |
| 42:56 | And this is an aspect where we can allow the ECU to tune the volumetric efficiency table automatically for us. |
| 43:04 | Now this is a selling point of a huge number of ECUs and I know that when used sensibly it can be quite powerful. |
| 43:12 | Personally I'm not a huge fan of it, for two reasons. |
| 43:15 | First of all, autotune, no matter what platform you're operating on, it is really a case of garbage in garbage out. |
| 43:23 | So it's not a bandaid for tuning the engine properly and it's not a bandaid for having a good idea of what you're trying to achieve. |
| 43:29 | If you don't operate the engine correctly, while you're going through the autotune process, you're going to end up with some really poor results. |
| 43:38 | But essentially what the autotune functionality is doing is exactly what we do manually. |
| 43:44 | It's comparing the measured air/fuel ratio to the target and it's making corrections to get us onto that target. |
| 43:50 | You can see I've actually done a little bit of autotuning here prior to this webinar. |
| 43:54 | In particular we did some of this here at 2300 RPM and it's shown in red there that it's made some changes and the cell weighting here, we can see that when we're green essentially we are on our target air/fuel ratio. |
| 44:09 | If you can click on here the advanced settings tab as well, you've got a little bit more control over exactly how this works. |
| 44:17 | In particular one of the powerful aspects here is the ability to filter. |
| 44:21 | So you can make sure that that autotune is not going to operate when you don't want it to. |
| 44:27 | So for example here you could choose to lock out the idle areas of the map, you could also choose to lock it out when the engine coolant temperature is low. |
| 44:36 | And if you're wanting to get a little bit cleverer with it, you can also perform a custom filter. |
| 44:43 | One of the key problems I see with autotune functionality is where whoever's driving the car, and this is particularly difficult to do smoothly out on the road compared to the dyno, they're going to be using quite sharp throttle application and what this does is naturally brings in acceleration enrichment and that can really mess up the momentary air/fuel ratio measurements from our wideband which of course in turn plays havoc with our closed loop control. |
| 45:10 | So when we are driving the car, we always want to be nice and smooth on the throttle, making sure that we aren't bringing in any undue acceleration enrichment, or alternatively you can filter that out if you choose so. |
| 45:22 | And the two parameters that are scrolling through here on this log at the bottom, we've got our actual measured lambda and our exhaust gas oxygen correction as well. |
| 45:36 | Alright so I'm not going to go through a live demonstration of that particular aspect. |
| 45:40 | We are going to move into questions and answers really shortly so this is a good time to mention that if you've got any questions on this particular webinar, anything I've talked about then please ask those in the chat. |
| 45:53 | The last aspect that I just wanted to touch on here, I want to go through briefly the exhaust gas oxygen correction or closed loop fuelling functionality. |
| 46:03 | So what we can do here in order to get to that is we'll go back to our fuel settings tab and we want to cycle down here to our AFR/EGO control, so we're going to click on that. |
| 46:16 | So by default this will be turned off and obviously if you want this to work you're going to need a wideband sensor wired up or installed. |
| 46:26 | So in this case we can see we've selected the EGO sensor type as wideband, that's what we're running. |
| 46:33 | We have one sensor. |
| 46:35 | And in particular in this case our EGO input is coming in via CAN. |
| 46:40 | And for those who have been following us for a while now, you'll know that I'm a massive advocate for CAN based wideband controllers, it just takes out of the equation any potential problems with ground offsets that can really affect the accuracy of the signal being received into your ECU. |
| 46:58 | So in this case the integrity of that signal is guaranteed because it's being transmitted via CAN. |
| 47:04 | It is immune to any ground offsets so that's our CAN input or out wideband input. |
| 47:08 | Of course you could bring this in over an analog voltage input if you so desire. |
| 47:12 | Alright so we've got our control algorithm so if we click here we've got simple, we've got PID and we've got no correction. |
| 47:23 | So I have chosen PID here which uses a proportional, integral and derivative control algorithm for basically deciding on the magnitude of correction required based on the error and how long that error's been present. |
| 47:38 | We also have the use EGO delay table option so in this case we are using the delay table, we have the option there to instead use the number of ignition events. |
| 47:50 | So what this is basically doing is defining the latency in terms of the signal from the wideband sensor in response to an actual change in air/fuel ratio. |
| 48:00 | So obviously if we make a fuelling change, there is some latency in the combustion process occurring, the exhaust gas then making its way to the sensor and that being detected. |
| 48:11 | Now that latency at idle could be maybe as much as 500 to 800 milliseconds. |
| 48:16 | At very high RPM it might only be 50 to 100 milliseconds. |
| 48:20 | The important factor here is that if we aren't accounting for this, we can make the system very unstable because it's going to make a correction, immediately look at the wideband input to see if that correction has actually done the job and of course immediately we're going to see no response so it's going to see no change, it's going to go further in that direction and then once the change actually starts taking place, we're going to get the opposite effect. |
| 48:45 | So we get this weird awkward oscillation in our fuelling, both rich and lean about our set point. |
| 48:51 | So it's really important to get that right. |
| 48:53 | We've also got our EGO sensor response time here. |
| 48:56 | Now another factor that's quite important is we can choose the authority which is just a flash way of saying how much control we're going to allow the wideband control system to have. |
| 49:09 | So we can choose to use a table for this which I'm obviously using, we've got that turned on, or if you turn this off then what you can do is just set an overall control percentage here using this parameter which I've just drawn through the middle of, but this parameter that is obviously for the moment greyed out. |
| 49:25 | We can then choose some parameters as to when the control will work. |
| 49:32 | So in other words here we've got only correct above a certain lambda and correct below a certain lambda so we have to be within a certain set point for the system to work. |
| 49:43 | This is particularly useful for example for ignoring out of bounds ranges which we're quite often going to see when we are on overrun for example. |
| 49:52 | And then of course we've got active above coolant temperature, we can eliminate the exhaust gas oxygen correction working during warmup. |
| 50:01 | I'm actually a fan of incorporating some of that, maybe not when we are completely cold starting the car but as long as the sensor is up to temperature and operating, and we've got a correction table for our air/fuel ratio targets versus coolant temperature, this will actually help it track those changes as well. |
| 50:19 | Now the factor that I mentioned before is you can see at the moment I've got this set to only work below 60% throttle. |
| 50:26 | Up to you how you use that of course. |
| 50:29 | We've got a delay here for our exhaust gas oxygen correction that it won't start working until 30 seconds after the engine is started, just allowing the controller to get up to temperature and operating, giving valid data before it starts working. |
| 50:44 | Now we've got our P, our I and our D gains there. |
| 50:50 | So this essentially just tunes how aggressively the closed loop control will chase a change in target, change in, or an error in our air/fuel ratio. |
| 51:02 | Now I actually started with the default values that are given in the TunerStudio software and I found that it was actually terrible and I spent quite a bit of time getting this dialled in. |
| 51:14 | Now I can't say that those numbers that I've got there are going to work for every case but more along the lines of the takeaway here is don't expect necessarily that the default values are going to be perfect for you. |
| 51:25 | In particular I found that we needed a relatively low amount of proportional gain which is a response to the instantaneous error. |
| 51:32 | And instead used quite a large amount of integral gain which is a response in terms of error over time. |
| 51:38 | And very little derivative, it was very sensitive to derivative which adds a braking effect to the change so stops, or helps to prevent oscillation. |
| 51:47 | So with that all set up, and obviously it's working pretty well for us at the moment, there's some other parameters that go hand in hand with that so we'll go back to our fuel settings tab here. |
| 51:58 | And if we come down here we've got the two tables that I've activated here. |
| 52:02 | So we'll have a look at these individually, let's start with our EGO delay table. |
| 52:07 | So again this is just the delay in terms of the latency of the system, how long it takes for a change to actually be registered by our wideband sensor. |
| 52:21 | So you can see down here, I've actually made this pretty straightforward, it's really for me, a two dimensional table. |
| 52:27 | At idle, very low RPM, we've got 1000 millisecond, so one second delay. |
| 52:33 | As we move to higher RPM you can see out about 5000 RPM essentially we're using a 50 millisecond delay. |
| 52:40 | So a little bit of common sense is required there and that can really help dial in your closed loop control, making the system basically chase a change that it's capable of measuring. |
| 52:50 | We're back to our fuel settings and we'll have a look here at our authority table. |
| 52:55 | So as I showed you, we can choose to use a fixed value and interestingly here that's exactly what I've done but normally what I'd do is set this up so that down in the idle areas where we are going to potentially be quite prone to heat changes with our fuelling, what we can do is just highlight that area and we'll enter, press the equals key there to directly enter a value and we'll set that to 20%. |
| 53:27 | So that gives us a lot of control down there in that region. |
| 53:31 | Then what we might choose to do here is maybe in through the main region of our cruise area, we might allow 15% error. |
| 53:40 | And then what we might want to do, oops, what we might want to do there is just a demonstration of how pressing the escape key which I mentioned before is not what we want to be doing here, we'll bring that table back up. |
| 53:54 | What we might want to do is only allow maybe 5% authority under wide open throttle conditions if you choose to allow this to work all the way through to wide open throttle. |
| 54:06 | So basically you can dictate how much fuelling change is going to be allowed. |
| 54:11 | Particularly we understandably need to be a little bit careful up in this high load area. |
| 54:15 | Probably going to be pretty difficult to break our 1.6 litre naturally aspirated engine that's only making 100 horsepower at the hubs but particularly as you're dealing with more powerful engines, if something goes wrong with your wideband and it's starting to pull fuel because it thinks it's too rich then that obviously can do a lot of damage. |
| 54:35 | Some general guides here, again this closed loop control is not a bandaid for doing your job properly, we still want to make sure that our fuelling is dialled in correctly from the get go but this can just be a bit of a safety backstop there if maybe some of your air temperature or coolant temperature corrections aren't working quite as well as they should, or maybe you're seeing some large changes in barometric air pressure, just basically picking up the pieces for day to day variation, generally what I would try and do is initially tune your VE table so that you're within about plus or minus 2-3% of your target anyway and then there should be very little for the exhaust gas oxygen correction table to do. |
| 55:18 | Alright that's brought us to the end of our webinar there so let's jump into our questions and we'll see what you've got. |
| 55:25 | If you've got any more questions, please feel free to continue asking them. |
| 55:38 | Mitsubishi Cordia has asked, what are your thoughts on the high resolution crank angle sensor discs, are they worth it for a street application? It's a really good question and I do see a lot of debate on this. |
| 55:48 | For those who aren't aware what we're talking about here, looking at a sensor or pickup that's got a high number of teeth or slots so that the ECU's getting a lot of information about the engine position. |
| 56:00 | Now the reality is that in most instances it's actually not that critical and the area that you will see an improvement in having a high resolution pickup is normally down at low engine speeds, mainly around idle and just off idle. |
| 56:16 | So if we compare something that might have 60 minus two teeth versus maybe a really basic four tooth pickup, obviously the ECU is seeing a lot more information as the crankshaft rotates so it can pick up changes in the engine RPM throughout a particular engine cycle allowing it to more accurately trigger the ignition timing at the correct point. |
| 56:42 | With a four tooth pickup obviously we only get a snippet of information every 90 degrees of crankshaft rotation and the crankshaft speed can end up changing quite dramatically through that 90 degrees. |
| 56:52 | OF course once we're up above maybe 2000 to 3000 RPM, there is less issue with this, the ECU's still getting plenty of information and while I wouldn't maybe be an advocate of a four tooth pickup, to give you some perspective on our own drag engines, we were using a 12 tooth pickup on the crankshaft, revving these engines to 10,000, 10,500, 11,000 RPM with engines that are two litres in capacity making 1200 to 1300 horsepower at very high boost pressure where obviously we want everything working perfectly. |
| 57:26 | Those are rock solid. |
| 57:27 | So yeah I think sometimes a little bit more emphasis on the importance of those high resolution crank triggers is placed than is actually necessary. |
| 57:35 | It's all about understanding the implications though. |
| 57:40 | Hayden has asked, it seems like MegaSquirt is mostly used by MX5 users, is there a lack of support outside of that, couldn't see much info on getting this up and running for RB engines when I looked? No, while yes they are really popular in the MX5 or Miata network, that's far from the only application for them. |
| 57:59 | It just so happens that this is a nice easy plug and play but you'll see all manner of engines running on these including some very very powerful twin turbo V8 drag cars making use of some of the sophisticated functionality such as individual cylinder closed loop air/fuel ratio control, traction control strategies as well. |
| 58:18 | So despite, I think the MegaSquirt product, how would I put it, maybe has a following out there or, people have a view on the MegaSquirt platform that it is a low price point entry level ECU. |
| 58:34 | The reality is it's actually an incredibly powerful platform with a lot of functionality that we don't see on some of the much more expensive ECUs and it's definitely not relegated to just the MX5 platform. |
| 58:48 | Josh has asked, what percentage load are you using during steady state? Really depends on what cell I'm trying to get through to there. |
| 58:56 | I mean I just showed you a very very small section of the steady state tuning and we were looking, off the top of my head there, between about 70 and 90 kPa, maybe 70 and 80 kPa. |
| 59:09 | At that point to get to that particular load cell, I was probably only using about 40, maybe 45, 50% throttle opening as well. |
| 59:16 | Obviously if I wanted to get up to the 9500 kPa sites, we would be at wide open throttle there. |
| 59:25 | Juan has asked, are you going to cover any timing tuning? Not in this particular webinar and the reason for this is that while this is an introduction or a MegaSquirt TunerStudio tricks and tips video, the reality is that manipulating the timing values in the ignition table are exactly the same as what you saw me do there in the fuel table. |
| 59:46 | So the reality of course is that we're going to be tuning the ignition table exactly the same in TunerStudio as we would on any platform, we're going to be looking at our torque on our dyno and we're going to be advancing the timing until we either find MBT or we encounter the knock threshold, at which point if we encounter knock, we obviously need to retard the timing a little bit to provide a bit of a safety margin or buffer there. |
| 01:00:14 | Our next question comes from SWF Autoworks who's asked, I get a lot of pops and bangs on decel using the MS2, do I have any advice on where to look for any particular parameters in the TunerStudio software that may be causing this? So pops and bangs generally are a result of incorrect fuelling on overrun. |
| 01:00:31 | So one of the easiest ways of getting around this is simply to use an overrun fuel cutoff where basically when you are off the throttle, the fuelling is completely tuned off, the injectors are disabled. |
| 01:00:45 | So that's going to eliminate any pops and bangs on overrun. |
| 01:00:48 | Alternatively the other way you can do that is be a little bit more mindful of your tuning of your fuelling, making sure that you're accurate down to the lowest load cells you can get to in the fuel table, the VE table and then extrapolate the trends down into the areas you can't get to. |
| 01:01:04 | You can also incorporate this with some logging to see exactly what's happening out on the road as you approach those overrun areas of the table. |
| 01:01:16 | Alphonso has asked, I like the autotune features, helps a lot with the cruise and light throttle areas. |
| 01:01:21 | Yeah look Alphonso, don't get me wrong here, I'm not saying that autotune is a bad idea, that's definitely not the case. |
| 01:01:29 | There's a couple of things I'll say here. |
| 01:01:32 | First of all I think for most competent and experienced tuners, we can normally get the same results in similar time or less without bringing any errors into the VE table by doing it manually. |
| 01:01:46 | However I do appreciate, particularly if you are road tuning, the autotune functionality does a great job of going through and making small changes to your VE table so that you can concentrate on the job of driving without needing to share your attention between driving and watching the laptop screen. |
| 01:02:04 | So definitely not a bad idea there. |
| 01:02:07 | I'll also mention, or something we'll probably touch on in another webinar, this can be done via logging after the fact as well so that really simplifies things even more, making sure that you don't need to try and split your attention, obviously it's very very important when we are road tuning to make sure that your number one priority is maintaining control of the car and making sure that you're watching where you go. |
| 01:02:30 | Watching the laptop is something that can get you in a lot of trouble so doing that from logging is pretty valuable. |
| 01:02:39 | Right our next question is, any thoughts on when in the engine cycle the injectors should be pulsed? I've head pros and cons of pulsing at a closed valve versus an open valve. |
| 01:02:51 | Yeah absolutely, probably a little bit off topic for this particular webinar. |
| 01:02:53 | If you are one of our HPA gold members though, I would check in our webinar archive, there's actually a handful of webinars already in there which go into the detail on open valve versus closed valve injection and injection timing in general in a lot more detail than I'm going to be able to do it here. |
| 01:03:14 | The key answer really is you need to test and find out what works best. |
| 01:03:18 | For most OE manufacturers, despite what you'd think, they actually choose to inject against a closed intake valve. |
| 01:03:28 | Now the reason for that is while it might sound strange is no matter how well our injectors atomise fuel, they're actually still quite big droplets of fuel entering the cylinder which makes it quite hard to burn. |
| 01:03:38 | Once the engine's up to temperature, by injecting on the back of that intake valve, the fuel tends to vaporise off the hot intake valve and the hot port wall and actually is ingested into the cylinder as a vapour which is much easier to combust. |
| 01:03:50 | So there are pros and cons as you mentioned, it really is a case of finding out what works best for you. |
| 01:03:56 | OE manufacturers, their key driver, particularly with modern engines is emission, so where we may be chasing power and torque, their requirements are often at odds to our own. |
| 01:04:08 | So just because an OE does it one way, doesn't mean it is correct. |
| 01:04:17 | Next question comes from, I don't actually know what this name is here. |
| 01:04:21 | CD Sedova I think it is, any tips for getting the manifold air temperature coolant temperature correction curve set up correctly for fuelling correction? OK so for those who aren't aware, this is a reasonably advanced function so while a lot of the fuelling will be done on manifold air temperature alone, and this is how we always used to do it, the reality is that what we're trying to do is correct for the combustion charge temperature as it goes past the intake valve into the cylinder. |
| 01:04:51 | Sadly for us it's actually not that easy to measure that in real time. |
| 01:04:54 | So the problem we've got is if we are measuring the air temperature in the inlet manifold or maybe in the intake pipe pre throttle body, there's going to be a discrepancy between the temperature that the sensor is reporting and the temperature that's actually entering the cylinder. |
| 01:05:10 | What I mean by this is particularly at low RPM, the air speed is quite low so the air after it's gone past the air temperature sensor and has been measured and reported to the ECU, then can pick up a lot more heat from the intake port, the manifold walls et cetera, so it's a lot hotter when it actually goes through the intake valve into the cylinder so we get fuelling discrepancies. |
| 01:05:38 | So a lot of ECUs including the MegaSquirt now provide a three dimensional table where we can define for various RPM and loads whether we're going to be biasing towards the manifold air temperature sensor or the coolant temperature sensor. |
| 01:05:51 | Generally, rule of thumb is that at low air speeds, idle and very light throttle cruise, we'll be biasing more towards the coolant temperature sensor because of the low air speed. |
| 01:06:02 | At higher RPM where we've got very high speed, we'll be biasing much more towards the intake air temperature sensor. |
| 01:06:08 | It's a very complex topic and I can't go into that in detail here. |
| 01:06:13 | However we do have a webinar, albeit it is presented on the Link G4+ system, that goes into how that system works and a strategy for tuning it correctly. |
| 01:06:24 | The other question there, which again I'm not going to be able to answer in here, is about the enhanced acceleration enrichment strategy which is a fuel film strategy, again pretty big topic in and of itself which we'll deal with separately in another webinar. |
| 01:06:42 | All Wheels has asked, can you give us some information about wideband knock sensors? Not 100% sure exactly what information you'd like to know. |
| 01:06:49 | Pretty typical now in the tuning market, a wideband knock sensor is just a piezoelectric sensor that converts vibration that it senses in the block into an electrical voltage, we can then run that voltage through a digital signal processor or the signal I should say, from the sensor through a digital signal processor, looking for information in the frequency range where we know knock is going to occur and then assuming that that is properly calibrated inside of the system, it can detect detonation or knock in the cylinder and we can use safety strategies such as retarding ignition timing or adding fuel to combat that. |
| 01:07:29 | Masoud has asked, can you please tell us about tips and tricks to adjusting the acceleration enrichment tables, it's different than other platforms and I can't adjust it. |
| 01:07:39 | OK unfortunately at this point I'm not going to be able to, as I mentioned in a previous question, that's a relatively large topic in and of itself. |
| 01:07:47 | And what I would prefer to do, which we will, is address that in a separate webinar where I can approach this and give it the detail that it actually requires. |
| 01:07:59 | In general terms though, there's a basic acceleration enrichment which is relative to change in throttle position which is not too much different to how a lot of ECUs do it, or you can get into the enhanced acceleration enrichment which is where you're modelling that fuel film. |
| 01:08:14 | So again I'll detail that at a later point. |
| 01:08:17 | Martin has asked, what is the model of CAN wideband we're using? And I might have to ask for Taz to hopefully drop a comment in there. |
| 01:08:28 | I think it is the Spartan wideband, I think it's actually a DIYAutoTune product off the top of my head. |
| 01:08:37 | So hopefully he can fill that in there but Spartan and wideband probably you'll be able to figure that out anyway. |
| 01:08:44 | IShiftSlow has asked, I'm not completely familiar with many standalone ECUs but does the MegaSquirt support KOEO adjustments, being able to change certain parameters with the engine off but power to the ECU on? Yeah so if you're talking about the difference between the ability to reflash live while the engine's running and this sort of system, yeah we can make all of our tuning changes with the engine running and burn then in real time, it's not a problem. |
| 01:09:16 | Dennis has asked, will there be any road tuning demonstrating the autotune functionality be available in future webinars? It's not something I've thought of but that's a great idea and it is something that we can consider adding in in the near future. |
| 01:09:32 | It might be a little bit tricky obviously presenting a webinar while driving around on the streets, it's going to present a few issues so we'll probably have to present that using some screen capture or maybe some datalog instead. |
| 01:09:45 | Taz has added in there that the unit itself I'm pretty sure is Spartan but as with most of these units they use a Bosch LSU sensor. |
| 01:09:54 | He's said LSU 4.2, I was reasonably sure it was 4.9 so all we're doing is serve to confuse there. |
| 01:10:02 | Search for Spartan and CAN wideband I think you'll find out all of the information there. |
| 01:10:11 | Cory has asked, warm up enrichment tuning, any tips on that? Probably no different to the warmup enrichment tuning strategy that we see in just about any ECU. |
| 01:10:22 | Again I'll probably deal with this in a separate webinar because it's probably a little bit too complex to get into here and now. |
| 01:10:30 | But essentially the warmup enrichment tables need to be tuned after we've got our main VE table dialled in because they are corrections that work over on top of the main numbers in that VE table so that's the first place to start, get our tune dialled in. |
| 01:10:45 | It makes it a little bit complex because of course we do need to come back and perform our tune in two stages. |
| 01:10:53 | Get the main fuel and ignition dialled in and then let the engine cool down generally overnight and come back and assess our warmup enrichment. |
| 01:11:02 | And particularly if you're living in an area where there's quite wide swings in temperature between summer and winter, Queenstown's a great example, right now we are probably only getting down to maybe 15 or 16°C in the morning, probably in the high 20s to low 30s during the day. |
| 01:11:19 | In winter we could easily be -5 to -10°C in the mornings and snow on the ground. |
| 01:11:27 | So obviously that would present a problem if we're tuning in the middle of the summer, we'll have to come back and reassess that in the winter when those temperatures are a little bit colder. |
| 01:11:35 | The last question comes from Cory who's asked are the flex fuel settings worth using? Not a question I can really answer at this stage Cory on account of we are not running flex fuel on this vehicle. |
| 01:11:46 | What I can do is basically draw on my own experience with flex fuel and the answer there is yes the system, if you are running flex fuel or ethanol blends, very very powerful, allowing you to essentially just fill up with any blend of fuel from pure pump gas through to pure E100 if you've got it available, and the ECU will scale the fuelling, ignition, boost if you want, based on your percentage ethanol in the tank. |
| 01:12:13 | So really makes it nice because you don't have to worry about what particular blend of ethanol is in your tank. |
| 01:12:22 | A couple more questions as I said last question. |
| 01:12:24 | Edgar has asked, is it possible to get a good tune with just a narrowband O2 sensor? Good question there Edgar, unfortunately the answer is no. |
| 01:12:32 | The narrowband sensor is really only useful at or very close to the stoichiometric air/fuel ratio. |
| 01:12:40 | The reason they're incorporated is that most OEs use narrowband sensors in closed loop conditions to basically cycle the air/fuel ratio gradually backwards and forwards across the stoich air/fuel ratio and this is important for the operation in the catalytic converter. |
| 01:12:55 | For our purposes though, particularly under wide open throttle conditions, they're absolutely useless because they can't read or give an accurate depiction of the air/fuel ratios that we want to target under those conditions. |
| 01:13:06 | So really useless except under the idle and potentially cruise conditions. |
| 01:13:13 | RealRacerX has asked, can you touch on table blending and switching using pump and E85? Sorry I can't at this stage, it would be pretty much a webinar in and of itself. |
| 01:13:27 | So it may well be that at some point in the future we will add flex fuel capability into this particular car so that we can do some flex fuel tuning. |
| 01:13:37 | Obviously we've had a couple of questions there already on it. |
| 01:13:40 | But no I can't do justice to that inside the Q&A here on today's webinar. |
| 01:13:45 | Alright guys that has brought us to the end there so for our members if you do have any questions that crop up after this webinar has aired live, please ask those questions in the forum and I'll be happy to answer them there. |
| 01:13:57 | Thanks for joining us and I look forward to seeing you all next time. |
| 01:14:01 | Now for those who are watching today on out YouTube channel, this is just some insight into what we put on every week for our HPA gold members. |
| 01:14:08 | Our gold members get the ability to go and review these archives at their leisure in our webinar archive where we have currently got over 230 hours of existing webinar content. |
| 01:14:20 | I've already talked in today's webinar about a few of the webinars in there that are relevant to today's topic. |
| 01:14:26 | There really is a gold mine of information in there covering topics on engine building, tuning and wiring. |
| 01:14:32 | It's a great way also to stay up to date with the latest tools, techniques and trends out in the tuning, engine building and wiring industries. |
| 01:14:38 | Gold members also get access to our private member's only forum which is the best place to get reliable answers to your specific tuning questions. |
| 01:14:46 | If you are interested in learning more, you can purchase gold membership on its own for $19 USD a month. |
| 01:14:52 | However the best way to get gold membership is with the purchase of any of our courses, where you'll get three months of complimentary gold membership and you can check out our courses at hpacademy.com/courses. |
| 01:15:04 | Thanks for joining us and hopefully we'll see you online again soon, cheers. |


