| 00:00 |
- So we're going to start rolling now and dyno test the tune with the timing bump and the torque bump.
|
| 00:06 |
So we've modified both those tables and we're doing to do the dyno run.
|
| 00:28 |
Wow that felt a lot stronger on the top end.
|
| 00:31 |
Before I could feel the peak power and then after the peak power I could feel it fall off.
|
| 00:35 |
On that run it just kept pulling until I ended the run eventually manually.
|
| 00:39 |
Alright so first thing I'm going to do, just like before I want to go into the log file and I want to see what changed as far as the fuel rate.
|
| 00:44 |
So just a refresher on the previous run, I'm going to draw your attention to the orange line, remember the orange line is the fuel rate, fuel rate starts at 127, peaks up at 145, around 2750, 2850 and then falls off quickly after that.
|
| 00:59 |
I'm going to go ahead and open the next file, now this is the timing and the torque bump.
|
| 01:04 |
OK so where that previous orange line for fuelling had a slope to it, this line now is a plateau, meaning the truck is at full fuel the whole time we're during the run.
|
| 01:15 |
So we can see early on at full throttle, holding RPM, that whole time we're at full fuel rate and the truck is climbing in RPM, it's at full fuel rate the whole time.
|
| 01:25 |
So really everything the truck can give, it's giving right now, very cool.
|
| 01:30 |
Let's take a look at the dyno graph and see what that translates too.
|
| 01:34 |
Wow, big difference here.
|
| 01:35 |
So at the start we do get a little more fuel, remember we went from 127 to about 145 and that does show as a larger torque number and a little bit of variance in horsepower as well, so any time we see a difference in torque we're going to see a difference in horsepower.
|
| 01:46 |
That variance converges, it's kind of a suspicious convergence right there.
|
| 01:49 |
Must be some other limiting factor right there.
|
| 01:51 |
As we have that limiting factor at full fuel still and those torque numbers hang out very close from that low 2000s up to that 2850 around peak.
|
| 02:02 |
But then where the previous tune file, the one with the torque limiter in place peaked and then fell off, this new tune with the torque limiter up top removed just holds on and it continues to gain.
|
| 02:12 |
Torque stays plateaued and as a result as RPM climbs horsepower climbs dramatically.
|
| 02:16 |
So where previously the tune file peaked at 517 horsepower at 2850, 2900, this new tune continues to pull through that and peaks at 3300 just about 3211, I think it would have gone higher if I would have let it, it probably would have peaked higher than I ran the test out to.
|
| 02:32 |
It feels really really happy up there, I'm sure 565 was not the limit of this tune file.
|
| 02:37 |
It's probably going to continue to pull all the way to the shift point so we may have the option to raise the shift point or change the shift strategy if we need to.
|
| 02:44 |
Really with this turbocharger we shouldn't need to change the operating range of the engine very much, we should be able to just bump the tune up in general and continue to get more power out of it.
|
| 02:52 |
So very interesting, we saw a major major bump in power on the top end, a little bit of bump in the bottom end, it's kind of suspicious so in the bottom end, why are those two lines converging? So we have more fuel, we have 145 mm³ in the bottom end compared to 127 but we still have the same torque numbers, the same horsepower numbers in that 2350, 2400 RPM range.
|
| 03:13 |
OK so why are those horsepower numbers converging in the 2200, 2500 range? My suspicion is, and we'd be easily able to verify this if we had a wideband O2 on the truck is that we're out of air.
|
| 03:25 |
So you can see we have about 33 pounds of boost, green line and the pink line, wastegate duty cycle 43, boost right in there around 32, 33 pounds.
|
| 03:34 |
This turbocharger's capable of delivering way more boost.
|
| 03:37 |
We could easily raise the minimum duty cycle and what that would do would kind of dampen the signal to the wastegate.
|
| 03:42 |
So hold the wastegate shut a little more and with the wastegate shut a little bit more we'd be able to get more boost, more air and see if we can bump up that torque number down low a little bit.
|
| 03:52 |
So you gas guys are probably drooling thinking when are we going to add boost to this thing? Well adding boost isn't always the ticket.
|
| 03:58 |
Alright we need to look and see what the air/fuel ratio is or at least infer what the air/fuel ratio is and we can kind of guess OK is the truck happy where it is right now, do we want to try adding fuel, do we want to try adding air? Remember you can never go lean on a diesel, you can only go overly rich.
|
| 04:11 |
And when I say overly rich, I mean we're getting into the area where EGTs are going to get hot or where the turbocharger's going to be unhappy.
|
| 04:18 |
We don't have the EGT gauge hooked up on this truck, again we're in the flying blind, we're in the demo mode here.
|
| 04:23 |
So pretend we don't know but if I had to guess, I would say the EGTs are getting warm and we're getting into the limit of the factory turbocharger right there.
|
| 04:31 |
Easy way to find out on the dyno, add a little boost to it and let's see what happens.
|
| 04:36 |
So how are we going to do that? I'm going to pull up the tune file and this is a very archaic way of adjusting boost pressure on this truck but what we're going to do is just raise the minimum so I'm going to say, wastegate I know you want to go to zero to dump all the boost and give the pulse width modulator full reins and give the wastegate diaphragm full reins but I'm not going to let you do that, I'm going to set the minimum, I'm going to draw your attention down into the turbocharger section of the tune file under parameters and I have two wastegate duty cycle options, I have wastegate duty cycle max 100 so that would be as much boost as possible and I have wastegate minimum duty duty cycle zero so that would be as little boost as possible.
|
| 05:12 |
I want to change this from that zero number and we'll try 55, so 55 should really keep that wastegate quite a bit more shut, should give us a lot more boost on the bottom end and we should get a really good idea of what more boost is going to do for this setup.
|
| 05:29 |
Why did I pick 55, I see at the start of the run we're at 49 and then we start to taper down towards 21, 31 and then to zero.
|
| 05:36 |
55 should add a lot of boost to this setup and should really give us an idea of how much more this truck is going to make with more air.
|
| 05:43 |
OK so let's put that 55 number in, I'll save this tune file.
|
| 05:47 |
Remember when you're saving tune files, try and make it make sense.
|
| 05:50 |
So I have stockish CSP5 version 2.52, remember we already ran two revisions, timing, torque, I'll add boost to this one, boost OK saved and I'm going to go through and flash this one and we'll run it on the dyno again.
|
| 06:04 |
Alright now as we get the truck up to speed and go to test our our higher boost tune, I want to talk to you a little bit, if you do have a dyno and you do have access to an AFR or to a wideband sensor, what to look for.
|
| 06:14 |
So what I'd be looking for is anything with lambda below 1.15 is really going to be your clue that hey some more boost here is going to help or this is probably a pretty smokey part of the tune.
|
| 06:24 |
When you see that in the rev range as far as the lambda dropping below that 1.15, if you can affect boost in that area only, great, do it, on this truck unfortunately don't have that control, it's not a variable geometry turbocharger, it's only an electronic wastegate.
|
| 06:55 |
We've got that run done and I've got the dyno run puled up right now, instead of just looking right at the power number, let's take a look at the log and check and see how things changed.
|
| 07:02 |
So I'll draw your attention to the beginning of the last run.
|
| 07:05 |
Just to refresh your memory, boost was 30 psi at the start of the run and then you can see as the run progresses towards redline, we get to about 48 pounds of boost.
|
| 07:13 |
Remember the truck was especially lazy in that midrange like right off the start of the run and you can see it right here in the green line, you can see where you've got kind of a lazy spot where the wastegate's really doing its best to control things and then when the wastegate runs out of control and the truck just pushes past the turbocharger.
|
| 07:29 |
OK so let's compare that boost line with our newest log.
|
| 07:33 |
OK so again full throttle, RPM right here start of the run you can see the truck lurches right off, it felt a lot stronger on the brake, I could tell there was extra air down there.
|
| 07:43 |
It was really happy and I can see that in the boost number as well so where my cursor is there you can see boost was 31 at the start of the run, heading up to 48 well now at the start of the run we have 10 more pounds of boost, 41 psi.
|
| 07:57 |
And that's on account of the wastegate duty cycle hanging out at 55 instead of in the 40s somewhere.
|
| 08:04 |
And you can see it stays at 55 through the duration of the run.
|
| 08:06 |
Now as we get towards the end of the run, 3375, higher RPM where I shut it down, where we ended up at 41 pounds of boost at the end of the last run, now we're at 49 pounds of boost so we're carrying 10 more pounds of boost through the whole run and I can tell you, you can feel it in the seat of the pants.
|
| 08:23 |
So let's take a look at that dyno number and see how that translates, how does 10 more pounds of boost on a truck with no more fuelling, no other adjustments translate on the dyno.
|
| 08:33 |
Let's jump over to the dyno graph and see what the differences are there.
|
| 08:35 |
The story really starts at the beginning of the graph and we have big differences in torque at the onset.
|
| 08:40 |
We can see our peak torque here, we're on 1080, compared to in the 920s, 1080 compared to 926, that's a huge difference down low, that really confirms that suspicion that I had that the truck was running rich down low and now with that extra 10 pounds of boost we can lean it out and we can really get the thing happy and make big power and big torque down low.
|
| 09:02 |
I love to see those lines come apart like that with the extra boost.
|
| 09:05 |
And that carries all the way through the mid range, all the way up to 3100 RPM and at 3100 RPM, which you remember on the previous log file, the truck came up to about 41 pounds of boost so it's interesting as these lines converge it tells me that we're converging on an area that was previously not overly rich.
|
| 09:24 |
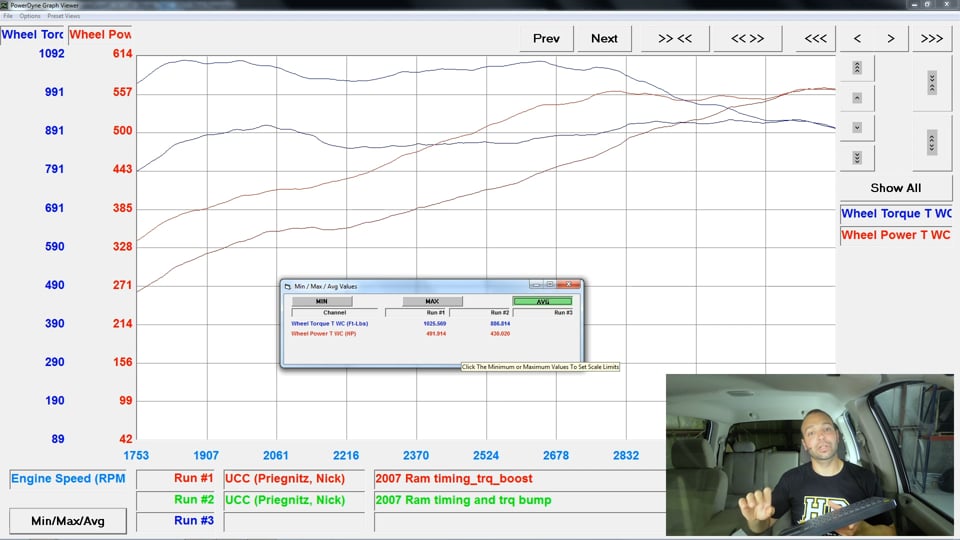
So the truck was probably happy with that 41 pounds of boost which explains why the max power numbers are 565, 567 so really we didn't gain any max power, two horsepower.
|
| 09:33 |
The big story is earlier in the rev range but I can tell you by looking at the averages, the driver's going to feel it.
|
| 09:39 |
Going from an average horsepower of 491 and 1025 torque compared to 430 and 886 on the previous file, that's going to make a world of difference in drivability, the truck's really going to appreciate it, the driver's going to appreciate it, it's going to really perform all through the shift extension so as you go to the shift point, come back, it's going to show on your quarter mile time, it's going to show behind a sled, any type of competition use or any type of high performance use it's going to really appreciate that extra boost.
|
| 10:04 |
OK so so far we've seen what changing timing does, we've seen kind of how to do that a little bit, very basic but I demoed it for you.
|
| 10:12 |
We've seen what changing the torque curve looks like, so how the torque curve looks factory, how to change it and what changes those make.
|
| 10:18 |
We saw how it really extended the power up top, gave us a little bump down low.
|
| 10:21 |
And then we talked about how the fuel ratio really impacts the torque production, impacts the power, we saw that, the truck was previously running rich down low, we added that 10 pounds of boost and boom it picked up 150, 200 foot pounds of torque down low.
|
| 10:36 |
We saw how that didn't, how adding too much boost up top, so going from 41 to 49 pounds of boost, didn't gain us any extra horsepower up top so that's very interesting.
|
| 10:45 |
So it really drives that point home that I want to make that it's important to know your ratios, or at least have an understanding of how the ratios work.
|
| 10:54 |
If you're at that 16.5:1 AFR, that 1.15 lambda, that 1.2 lambda, the truck's probably pretty happy.
|
| 11:02 |
If you go from 1.2 to 1.5 lambda you add a tonne more air, remember that air comes at a cost, so it costs you horsepower to drive that turbine, it costs you horsepower to run that turbocharger, all that extra air is probably not going to help you as you go past that 1.2 lambda number.
|
| 11:17 |
OK so we've seen all those things, what about adding more fuel, 565 horsepower's great but this is an 800 horsepower truck, how do we start to get there? Let's jump into that.
|
| 11:27 |
So remember this is a non variable geometry turbocharger, fixed vane turbocharger.
|
| 11:32 |
So as we add fuel, it's going to pick up boost, it's going to compensate by driving the turbine harder, it's going to add more air so what we need to do is figure out a way to get more fuel into the truck.
|
| 11:42 |
We know we're already at the limit of the mm³ so the truck can't call for any more fuel.
|
| 11:46 |
I'm going to show you the main injection pulse width table which is how the injectors are calibrated and kind of how that 145 mm³ plays out.
|
| 11:54 |
So 140 mm³ at 160 mPa so that's the fuel pressure, it's going to hold the injector on for 2005 microseconds and that 2005 microseconds determines how much fuel we're going to get on that powerstroke.
|
| 12:07 |
So three elements impact fuel delivery.
|
| 12:10 |
The pressure, the size of the orifice and how long the injector stays on.
|
| 12:14 |
We have control over two of those, can't control nozzle size but we can control pressure and we can control on time.
|
| 12:20 |
The easiest way to get more power out of the truck is to add more on time.
|
| 12:23 |
This only works up to a certain point but I can tell you right now we're in the meat of that option and we can add more on time and we'll likely pick up more power.
|
| 12:30 |
So what goes more on time get us? Well if we add 10% more on time, we're going to get 12 or 13% more fuel so let me show you how to do that.
|
| 12:39 |
So in this injector cal, I can highlight these cells which define how long the injector stays on at 120 and 140 mm³ and at any given fuel pressure.
|
| 12:48 |
So if I want the injector to stay on longer I have to tell it to do so.
|
| 12:51 |
I can do that by highlighting those cells and adding 10%.
|
| 12:59 |
So now instead of the injector staying on for 2000 microseconds it's going to stay on for 2206 microseconds.
|
| 13:07 |
I may want to smooth that in a little bit, similar to how I did with the timing.
|
| 13:10 |
Now that I've added that fuel let's see how it impacts the power production.
|
| 13:13 |
So we had a hunch on the last dyno pull that the truck was lean.
|
| 13:16 |
So I went from 41 pounds of boost to 49 pounds of boost and didn't pick up any power.
|
| 13:21 |
So what should happen if we add more fuel, well we should fatten it back up, we should get that lambda down there.
|
| 13:25 |
As we bring lambda down, we should really pick up some power so let's get this tune flashed in the truck and see what it does.
|
| 13:59 |
We finished the dyno pull, now let's take a look at the log file.
|
| 14:02 |
First, the old log file, now we talked about pulse width, that's injector on time and there's a specific PID that I have pulled up for that.
|
| 14:09 |
So let's look at it.
|
| 14:10 |
At around 3000 RPM you can see this blue line here, it's called main injection duty, MAININJD_F, in microseconds.
|
| 14:18 |
So what is that, injector on time, the number, 1945 microseconds.
|
| 14:23 |
OK it hangs out, it'll move, it'll fluctuate a little bit, it's not going to be a perfect line.
|
| 14:26 |
It'll fluctuate with actual rail pressure so as rail pressure fluctuates the truck will try to mitigate that fluctuation by change in the injector on time.
|
| 14:36 |
So we added 10% injector on time, we would expect to see the pulse width jump up, somewhere in the low twos, 2100, 2070, somewhere around there.
|
| 14:46 |
So let's open the next file.
|
| 14:47 |
So we're going to go to 3000 RPM and we'll look and we see 2144 microseconds.
|
| 14:52 |
So there's validation, we've got our extra fuel, now when you're doing this I want you to be really aware of pressure.
|
| 14:59 |
So if you lose injection pressure but your pulse width goes up, that's a problem.
|
| 15:03 |
So can't lose one element and gain another and expect the volume to gain.
|
| 15:07 |
You need to make sure that your pressure stays the same while your injection pulse width goes up and that way you know you're getting more fuel into the engine.
|
| 15:14 |
I'll show you that down here at the bottom, 23321 actual, 23208 desired so that's perfect.
|
| 15:20 |
There is some movement, little bit of fluctuation, we're good on that front, we haven't changed boost, we haven't changed timing, we haven't changed anything else other than the pulse width.
|
| 15:27 |
OK now as we look over at the dyno, we can see we've picked up horsepower and torque across the entire rev range just as we added fuel rate across the entire rev range, going from 562 on horsepower to about 575 horsepower and similarly on torque.
|
| 15:41 |
Now this isn't the huge improvement that we were hoping for, we added 10% of fuel, hopefully we're going to make a whole bunch more power, 10% more horsepower, 50 horsepower.
|
| 15:49 |
Well we didn't make 50 more horsepower, what does that tell me? I need to revisit my timing numbers, I need to revisit my boost numbers, tuning is an iterative process.
|
| 16:00 |
Hopefully what we were able to show you in this module is how to make those changes, what increments to work those changes and some of the considerations that you should have in your mind while you're making those changes.
|
| 16:09 |
I'm Nick, hope you enjoyed this one, catch you next time.
|