116 | Modelled Multi-Fuel / Flex Fuel Tuning Link G4+
Summary
Ethanol is a great way of increasing the potential for engine power, particularly on turbocharged engines that would traditionally be heavily knock limited on pump fuel. In this webinar we investigate Link’s Modelled Multi-Fuel system and see how this can be applied and correctly tuned to achieve seamless flex fuel integration with the addition of an ethanol content sensor.
For this webinar we will be using a VW Corrado fitted with a plug & play Link G4+ ECU
| 00:00 | 1 It's Andre from the High Performance Academy and in this webinar we're going to be having an introductory look to the modeled multi-fuel mode in the Link G4-Plus range of ECUs. |
| 00:12 | This is a mode that was introduced with the G4-Plus and it works on the volumetric efficiency fuel model. |
| 00:20 | So what we're actually doing here is modeling essentially airflow into the engine and the modeled multi-fuel mode is a device to allow us to run on multiple different fuels. |
| 00:33 | Now while one of the clear and obvious uses for the modeled multi-fuel is for flex fuel tuning, so when we're ethanol blended fuels, that's what we're going to be discussing today. |
| 00:46 | The reason that Link have chosen to use the terminology multi-fuel as opposed to flex fuel is because we can use the modeled multi-fuel mode for any two fuels. |
| 00:59 | So this, for example, could be for 91 and 98 octane pump fuel. |
| 01:06 | You could also do a tune in the multi-fuel mode using a 98 octane pump fuel perhaps and then Q16 or C16 race fuels. |
| 01:17 | Now, if you're using that sort of mode, we're not that sort of fuel, we're not going to be discussing that in detail. |
| 01:25 | There is help in the help file that will go through the ways you can set that up, either via a digital input switch to select fuels or a potentiometer that will allow you to move from one fuel to the other. |
| 01:39 | The advantage obviously, if we are using ethanol blends of fuel, then we can include a fuel composition sensor, or flex fuel sensor, ethanol content sensor and then the ECU can essentially, seamlessly, blend from one fuel to another and provide the correct ignition time and the correct fuel length boost, et cetera., independent or respective I should say of the current ethanol blend. |
| 02:06 | So that's what we're going to be looking at today. |
| 02:08 | I just thought it was important to clear up, to start with, that the modeled multi-fuel mode in the G4-Plus ECUs is not solely locked down to being used just for flex fuel. |
| 02:23 | Okay, so what we're going to do is go through the process of creating a modeled multi-fuel tune. |
| 02:31 | And what we need to do is start by actually performing a complete tune in the modeled mode. |
| 02:39 | So let's just jump back into my laptop screen here and what we'll do is, I've got a tune loaded up here that I've done for this VW Corrado race car. |
| 02:49 | And we've started here with pump fuel, so what we need to do is start with our primary fuel. |
| 02:57 | And this doesn't really matter if it's going to be pump fuel or E85. |
| 03:02 | The recommendation from Link, which I tend to agree with, is that we choose the primary fuel, the main fuel that the engine is going to be operating on predominately as our primary fuel. |
| 03:14 | So in this case we've selected to use pump fuel for our primary fuel. |
| 03:20 | I'll just get rid of that. |
| 03:22 | And let's go into our fuel main set up and we'll see what we've got here. |
| 03:29 | So this is the fuel main set up is where we make our main configuration for our fuel system. |
| 03:35 | And in particular what we can see here is our fuel equation mode at the moment is set to modeled. |
| 03:43 | Now, what we need to do there is go through and form a complete tune on our primary fuel. |
| 03:48 | So at this stage we're essentially treating the engine like it is only going to be tuned on one particular fuel, not multi-fuel or flex fuel at all. |
| 03:58 | We need to go through and completely tune our fuel, our ignition, our boost if applicable. |
| 04:03 | And then, importantly, we also need to tune our cold start parameters, so our cranking enrichment, our post-start enrichment, and our warmup enrichment tables. |
| 04:14 | Once we've done that, so essentially we've got a complete tune on our primary fuel. |
| 04:18 | This is the point where we can then go through and enable our multi-fuel system. |
| 04:25 | Now before we do that, I'll just actually connect to our ECU here and I'll make sure that, now if I can get rid of that. |
| 04:36 | What we've got here on our digital inputs, you can see that on DI-7 we have an ethanol content sensor connected. |
| 04:46 | You can see here we've got our ethanol content being displayed at the moment. |
| 04:50 | We're sitting at 82% ethanol. |
| 04:53 | The other thing that's important to understand when we've got one of these ethanol content sensors. |
| 04:57 | If we just bring up our run-time values display and we cycle through to miscellaneous, we get two inputs from our ethanol content sensor. |
| 05:07 | We get ethanol content or percentage, but we also get fuel temperature. |
| 05:11 | This is an aspect of how the fuel composition sensors work. |
| 05:15 | They actually measure the capacitance of the fuel passing through them. |
| 05:21 | This is dependent on ethanol content, but it also varies quite dramatically with fuel temperature. |
| 05:27 | So that's why it's important that the sensor is also monitoring fuel temperature. |
| 05:32 | Because we've got that fuel temperature coming and this can be used as a compensation inside the ECU as well. |
| 05:38 | A common thing to just point out here is when we've got a ethanol content sensor connected to the ECU, it's very important to make sure that that fuel temperature is reading correctly. |
| 05:52 | It's very common to hook up the sensor and find that you've got a very high fuel temperature reading. |
| 05:59 | The case in example with this particular car was when I first connected the ECU we were getting 132 degrees Centigrade fuel temperature. |
| 06:07 | Now the reason for this is the way the fuel composition sensors work. |
| 06:11 | What they do is they provide a square wave form out of them and the two pieces of information are ethanol content and fuel temperature. |
| 06:20 | Ethanol content is transmitted in the frequency of that square wave. |
| 06:25 | The fuel temperature is transmitted in the pulse width of the wave. |
| 06:30 | So we've got these two veering parameters, the pulse width and the frequency. |
| 06:34 | And if your digital input is looking at the wrong edge for the pulse width, so if it's looking at the high edge versus the low edge for example, it's where you're going to end up with the wrong reading. |
| 06:46 | We'll move on and discuss what's actually happening when our ethanol content is changed. |
| 06:52 | Now, what I'm going to do for this is I'll just load back up our pump fuel base map, which we're going to be modifying here. |
| 07:01 | And we're going to go back into our fuel main. |
| 07:07 | And we've obviously, as discussed, we've completed our tune on our primary fuel and what we're going to do is enable our modeled multi-fuel mode. |
| 07:16 | And once we've done that, we end up with a lot more, a few more parameters that are available. |
| 07:22 | So if we go back into our menu structure, and we go back to fuel and now we can see we have this multi-fuel menu option available, which we didn't have before. |
| 07:33 | Let's have a look at that and see what we've got available. |
| 07:36 | So first of all we have some a parameter here relating to our injector flow. |
| 07:41 | And it's important to understand what this means here. |
| 07:46 | We've already set up our original tune and we've entered all of our injected data for our primary fuel, and that includes our injector flow. |
| 07:56 | So why would the injector flow need to be changed for our secondary fuel? The reason for this is, when we move particularly from gasoline to E85 or E100, the ethanol has a different viscosity than pump fuel and this tends to affect the volume flow for a given pulse width. |
| 08:17 | Now, of course, getting this data can be problematic. |
| 08:20 | Most of the injector suppliers are providing flow data on normal pump fuel, so it's going to be difficult, in most instances, to get data for E85. |
| 08:32 | If you don't have that data, my recommendation here is to set your injector flow to be the same as what you used on your primary fuel. |
| 08:41 | Moving on, we've got some parameters here that we need to consider. |
| 08:45 | Now these are to do with the characteristics of the fuel. |
| 08:48 | Now, what we're doing here is defining to the ECU these fuel characteristics, as well as how they change as the ethanol content changes. |
| 08:59 | And specifically here, we've got the fuel density, we've got the fuel density temperature coefficient, we'll talk about these two first. |
| 09:08 | So, remember when we're talking about the amount of fuel that we need to supply to the engine for a given mass of air, the air-fuel ratio is a mass ratio. |
| 09:19 | So when we talk about our fuel flow, in ccs per minute, that is a volume flow, so in order to convert from volume flow to mass flow, the ECU needs to know the density of the fuel. |
| 09:33 | And that's a really key point that is often overlooked. |
| 09:36 | When we're talking about an air-fuel ratio, we're talking about a mass of air and a mass of fuel being mixed, not volumes. |
| 09:43 | So, in order to do this, the ECU needs to know the density, and this comes from our fuel-density parameter here. |
| 09:50 | Now, don't worry too much, you don't have to come up with these numbers. |
| 09:53 | If you simply hover over that particular parameter, press F1, we're going to get in the Help File some suggestions, suggested values from Link. |
| 10:03 | So, for example, we can see here that 99% ethanol has a density of 0.789 grams per cc. |
| 10:13 | So that's our fuel density, we're just gonna simply take those numbers from that table. |
| 10:18 | I'll talk about the ethanol content I'm using here in a second, and then the second aspect is the fuel-density temperature coefficient and this simply defines how the density of the fuel varies with fuel temperature. |
| 10:32 | It's exactly the same as air. |
| 10:34 | We know that hot air is less dense. |
| 10:36 | Exactly the same situation happens with the fuel. |
| 10:39 | Its density changes as its temperature changes. |
| 10:42 | Conveniently, this can be accounted for with our fixed fuel sensor because we're measuring fuel temperature. |
| 10:48 | A really key and critical component here, though, is our stoichiometric air-fuel ratio. |
| 10:54 | So, there's a big difference in the stoichiometric air-fuel ratio between pump fuel and E85. |
| 11:02 | Pump fuel, as we should know, 14.7 to one. |
| 11:07 | E100 is nine to one, E85 is 9.8 to one. |
| 11:11 | So what this term here is used, this parameter is used in the ECU, with a modeled fuel mode, remember the fuel table is really an, a volumetric efficiency table, and what we're doing is defining how much air is entering the engine or what mass of air is entering the engine at each load and RPM point in that table. |
| 11:35 | So if the ECU knows the mass of air entering the engine, and also remember we've to find our injector size, so it knows what size injector is connected to it, and then, of course, we have our lambda target table and knows what our desired air-fuel ratio is, it becomes very easy for the ECU to then calculate what post-work to provide to the injector in order to achieve that. |
| 11:59 | So this is one area where the volumetric efficiency fuel model can have real significant advantages over a traditional millisecond based fuel model, because if everything is working absolutely perfectly, then the volumetric efficiency of the engine doesn't really change much as we go from pump fuel to E85, so our whole tuning process becomes a lot easier. |
| 12:27 | So, in round numbers, as we move from pump fuel through to E85, we find that we need to supply somewhere in the region of about 35 to 40% more fuel in order to achieve the same, or our target, air-fuel ratio. |
| 12:44 | Okay, before we we'll talk about our charge cooling coefficient and I'll talk about why I'm using these particular values here. |
| 12:52 | So our fuel charge cooling coefficient is a parameter that is used to define or help define how much additional cooling is produced by the fuel being injected, so. |
| 13:07 | The reason for this is we're measuring the inlet temperature somewhere in the intake system, in this case with the Corrado, the inlet temperature sensor is fitted into the inlet manifold, but really what we're actually interested in is the charge temperature as it goes past the intake valves and enters the cylinder. |
| 13:24 | And by virtue of injecting fuel into the inlet charge, we're going to end up with some amount of heat absorbed as that fuel goes through a phase change from liquid to vapor and draws heat out of the air. |
| 13:39 | So our fuel charge cooling coefficient helps define that. |
| 13:43 | There is another webinar in our archive already on how you go about tuning the fuel charge cooling coefficient, so if you haven't seen that and you don't understand, I suggest you do that after you've watched this webinar. |
| 13:57 | In short though, what we need to do is tune this very early on in our tuning process because if we tune the entire VE table, and then we make a change to our fuel charge cooling coefficient, it will affect our entire tune. |
| 14:12 | And what we're doing is adjusting that fuel charge cooling coefficient so that when we make a change to our target lambda table, the ECU does accurately track that change in our target. |
| 14:24 | Okay, so now that we understand these parameters and we understand the need for these parameters, the fuel characteristics are changing dramatically, the ECU needs to know how these fuel characteristics are changing in order to provide the correct amount of fuel to match the air entering the engine. |
| 14:42 | The numbers that I've chosen here are for E100. |
| 14:48 | Now, this actually goes a little bit against the guidelines laid out in the Link Help File and I just want to explain why I've made this decision. |
| 14:56 | The reason for this is while I am tuning for E85, or in the case when we're actually powered up the ECU we're at about E83 or E82, what we will find is that particularly if we're mixing our own fuel, it's likely that that ethanol content's going to fluctuate quite dramatically based on our blend and how accurately we're doing that. |
| 15:18 | So if we set our fuel parameters here to whatever we're using at E85, so in this case let's say, for example, our stoichiometric air-fuel ratio we would have set to 9.8 to one instead of nine to one, what would happen is that if we ended up with a blend of fuel that happened to be E90, for example, or E88, we're beyond that limit and our fuel characteristics aren't going to vary correctly. |
| 15:44 | So this is my own preference of how I would do this. |
| 15:47 | If we look at our multi-fuel blend table now, this will just explain this as well. |
| 15:53 | So, you see our multi-fuel blend is our table based on ethanol content as our X-axis. |
| 16:01 | We've got a zero to a hundred percent axis in there, and what this does is it defines to the ECU two things. |
| 16:09 | It defines how the fuel characteristics are dealt with, so for a start, I recommend using a linear interpolation for this table. |
| 16:18 | The fuel characteristics, theoretically, do vary in a linear fashion from E0 to E100, so, for example, stoichiometric air-fuel ratio is going to linearly change from 14.7 to one, at E0, through to 9.0 to one at E100. |
| 16:36 | So we're going to start with this table set linearly like this, and this way the ECU is going to be able to track those changing fuel characteristics as our ethanol content varies. |
| 16:48 | And that's a really key input to the ECU for it to be able to do the job of controlling the fueling as ethanol content varies. |
| 16:55 | So this is our first place to go and make sure that all of these parameters are correctly configured. |
| 17:03 | Now, when we start, when we set up our multi-fuel table, the other thing we're going to end up with is a second air-fuel ratio target table. |
| 17:14 | So we can see that that's being displayed. |
| 17:16 | We've now got two of these. |
| 17:18 | So, our multi-fuel introduces a second lambda target table. |
| 17:24 | Now, whether or not this is something you need or want really depends on what you're doing. |
| 17:31 | Personally, for me, when I'm tuning on E85, I almost always find that I'm tuning to the same lambda targets that I would on pump gasoline. |
| 17:42 | Obviously not always the case, there are exceptions to that. |
| 17:45 | So in general, I would typically use the same lambda target table irrespective of my ethanol content, but you may want to change your lambda target and you can do this using your AFR lambda target two table. |
| 18:00 | This becomes more important as well where we may be using the multi-fuel mode for a completely different type of fuel, let's say, pump fuel to methanol, pump fuel to perhaps Q16, where we may in fact be targeting dramatically different lambda values. |
| 18:18 | So, what do we do with this table? First of all, for my particular tuning here, what we're going to do is go to our lambda target one table, and I'm going to copy all of these values across to the lambda target two table. |
| 18:31 | It's really easy to do this. |
| 18:33 | All we need to do is go to the Lambda Target Table One, right click on it, and go to export to clipboard. |
| 18:39 | And then we can simply go back to our lambda target two table and we can right click and we can click on import from clipboard. |
| 18:48 | Now before I do that though, I just want to point out that any of these tables that are being introduced in the multi-fuel mode, you'll notice that they are filled out with values but they aren't necessarily good values or what we may want. |
| 19:03 | You can see here that just randomly, the lambda target under 220 KPA is set to 0.755 so, if you overlook this, if you don't realize you need to do this, you're going to have some really funny values in your VE table. |
| 19:19 | So let's go and import that now from our clipboard. |
| 19:23 | So now we've got the same value set in both tables, so we're good to move on from there. |
| 19:32 | Before we do, though, just another note if you are targeting different lambda values on E85 to what you would do on pump fuel, remember that as a virtue of our multi-fuel blend ratio, okay? Remember on E85 we're operating around about this point. |
| 19:53 | And you'll note that the blend ratio there is 80%, remember it was linear. |
| 19:58 | What this means is that we're biasing from the lambda target one table towards lambda target two table. |
| 20:06 | If we hit a value of zero we would be solely looking at the values from lambda target one. |
| 20:12 | If we were at a value of 100%, we would be looking solely at the values in lambda target two. |
| 20:19 | But when we're in between, a real obvious one is if we had a value of 50%, then the Lambda Target that the ECU would use would be the lambda target half way between the values in both tables. |
| 20:32 | So in this case, the point that I'm trying to get at here is because of the way I've configured this, we need to understand that we're actually only targeting around about 82% towards our, or blasting towards our lambda target two table. |
| 20:45 | And my instance, not an issue because I'm using the same lambda targets for pump fuel and E85, but it is important to understand the implications of the way that I have configured this. |
| 20:58 | Okay, so this has got our ECU capable of tracking and changing our fuel characteristics and our injector pulse width and the theory is here, that if everything was absolutely perfect, we should straight away be up and running and our air-fuel ratio on E85 should be exactly what we had on pump fuel. |
| 21:22 | That's the theory and unfortunately, often, reality is not quite that simple. |
| 21:28 | So we're quite likely to find that, in reality, we have variations of fluctuations creep into our fueling. |
| 21:36 | And we may find that in areas our fueling is a little bit rich or a little bit lean, and we need to address that. |
| 21:42 | So how do we do that? Well, what we can do is we can go back into our fuel set up, and we can go into, this time, our fuel corrections. |
| 21:52 | And we can go into duel fuel table. |
| 21:55 | And what we're going to do is introduce a second fuel table, or as I like to refer to it as a second volumetric efficiency table. |
| 22:03 | Now, in order to do this, we have a few options, but what we want to do here for our flex fuel tuning, or multi-fuel tuning, is select interpolate between, and what this is going to do is allow the ECU to interpolate between two tables. |
| 22:20 | What I'm just going to do is save this, as a different file, just so we can make sure that we can see everything. |
| 22:30 | No, that's not going to work. |
| 22:32 | Alright, nevermind. |
| 22:34 | What this does is now introduces a second VE table, or fuel table, and it also introduces a fuel table ratio table. |
| 22:44 | A bit of a mouthful but it's actually really simple what it does. |
| 22:48 | Let's have a look at this first. |
| 22:50 | So a fuel table ratio is essentially a how the ECU is going to move from one of the fuel tables to the second based on our multi-fuel blend. |
| 23:02 | Now, for the X-axis on this table, you'll see that it is listed as multi-fuel blend. |
| 23:07 | Again this is because we may not be using ethanol as our second fuel. |
| 23:13 | For simplicity what I'm going to do here is actually change that axis and my preference, when I'm tuning, flex fuel E85 is to set these blend tables to units of ethanol or an input of ethanol. |
| 23:27 | And, again, here we've got exactly the same aspect. |
| 23:31 | When we are 0% ethanol, and we have a value of zero in our table, the ECU is going to use all of the values from the first fuel table. |
| 23:42 | If we have a value of 100 in this table, the ECU is going to use all of the value from our second table. |
| 23:52 | Now what we've got at the moment is a linear interpolation between these two tables. |
| 23:57 | Now, what I'm going to do here is I'm going to actually set my values from 80% and above to 100. |
| 24:07 | Now what this is going to mean is that when I'm at E80 or above, we're going to be using all of that second VE table, second fuel table. |
| 24:16 | And then I'm going just to perform a linear interpolation back down. |
| 24:22 | Now, this is a table that we will be revisiting later in our tuning, once we get to a point where we've tuned on our secondary fuel and we're starting to look at different blends. |
| 24:32 | So this is simply a starting point. |
| 24:35 | Now, the reason that I've set the value at well, I had set the value at 80% to 100 is this is, remember this is where I'm expecting to be. |
| 24:47 | We're supposed to be at 85% ethanol. |
| 24:50 | Now what this means is that I am not biasing a percentage of this table when I'm actually tuning the engine. |
| 24:57 | We are solely operating on this table. |
| 25:01 | This still does introduce the potential for some fluctuation, if our ethanol content was to go above this, but of course we still have our fuel characteristics varying above E85, which we've already looked at. |
| 25:17 | And we're going to, as I said, we'll talk about how we can adjust this table, this blend table later on, once we start looking at blends in between E0 and E85. |
| 25:28 | Okay, so that's introduced our second fuel table, but we're going to want to do something with that table as well. |
| 25:35 | If we look at our second fuel table, you can see, again, it is already filled in with some numbers, but these numbers again are not necessarily going to be any use to us. |
| 25:45 | So, what we're going to do is start by copying the VE table from Fuel Table One into fuel table two, and remember, if everything is working perfectly, we should see little to no fluctuation as our ethanol content changes. |
| 25:59 | You could think of this, really, as a fudge-factor table to account for any fluctuations or variations that aren't completely dealt with in the injector characterization or the fuel model itself. |
| 26:15 | So, simply here, once we've got our second fuel table enabled, we can swap between Fuel Table One and Two by using the F key, and what I'm going to do here is go back to Fuel Table One. |
| 26:29 | I'm going to export this table, the entire table, to the clipboard, and we'll jump back over to our Fuel Table Two and we're going to import from clipboard. |
| 26:40 | So at this point, our Fuel Table One and Fuel Table Twos are identical. |
| 26:46 | Now we're going to look at what we actually want to do to take advantage of running our ethanol, our flex-fuel system and generally there's two aspects that we want to address and that's our ignition timing and also our boost pressure. |
| 27:03 | So let's have a look and see how we can do that. |
| 27:05 | Let's start by introducing a second ignition table. |
| 27:09 | We'll click on Ignition and Ignition Corrections, and we're going to go through the same process of adding a Dual Fuel Table. |
| 27:17 | Again, same as what we looked at with the fueling. |
| 27:20 | We're going to be using the interpolate between option. |
| 27:24 | Now, if we look at the ratio table here, again looks exactly the same as what we had on our two fuel tables. |
| 27:35 | What I'm going to do is just, again, change our axis to ethanol and then we'll talk about how we can use this particular table. |
| 27:44 | So at this point, we've got a linear interpolation, so again, when we have a value of zero, we're using completely the Ignition Table One value. |
| 27:53 | When we've got a value of 100, we're using completely the value from our second ignition table, and a value of 50 in the middle the ECU would be using a value between the two ignition table values. |
| 28:08 | Okay, so what we want to do here is going to really depend on the engine, what we're doing with our tune, and what our intentions are. |
| 28:16 | What we can choose to do is use a linear interpolation like this, which for all intents and purposes, should work quite well. |
| 28:24 | But in this case, with our VW Corrado race car, this ECU wallet is flex-fuel capable, we're really expecting the car to either operate on pump fuel or E85 and realistically not a lot in between. |
| 28:40 | So what I'm going to do here for safety is I'm going to set the table ratio to zero, all the way out to 20% ethanol. |
| 28:49 | Likewise, I'm going to set my table ratio to 100% from E70 and above, and then I'm simply going to use a linear interpolation between these points. |
| 29:00 | Now, the reason I'm doing this is I want to ensure that when I'm very low on ethanol, I'm using nice, safe, conservative ignition timing for my Ignition Table One. |
| 29:10 | Likewise, when I'm above 70% ethanol, I want to be using all of my second ignition table optimized for ethanol fuel. |
| 29:19 | Now, this isn't necessarily the only way we can set this table up. |
| 29:25 | If we understand the way ethanol affects the knock-sensitivity of the engine, what we actually find is that we see the biggest increase in knock-resistance as we move from E0 to around about E40. |
| 29:40 | So what we actually could do in this table if we really wanted optimal power everywhere, is we could quite sharply ramp the ignition into our second ignition table. |
| 29:51 | We might end up with something looking more like this. |
| 29:56 | Let's just extrapolate this out so we've got a better idea of what it looks like. |
| 30:01 | Okay, so what we've done here is at E30, we know that by the time we get to about E30, we've got most of the advantage from the ethanol properties and the knock-resistance, so we're now actually biasing 60% towards our second ignition table. |
| 30:18 | And then as we move from E30 up to E100, we've got a slightly slower increase in our bias toward our second ignition table. |
| 30:28 | Of course, we can come back and address this more accurately when we're looking at our individual blends and it really, it's going to depend what you're trying to achieve and how aggressively you want to optimize the power the engine is making. |
| 30:44 | Alright, so that's dealt with our ignition table blend. |
| 30:48 | We also need to look at our two ignition tables and if we bring in our Ignition Table One we'll also bring in our Ignition Table Two here. |
| 31:00 | Again, just like our VE table or our fuel table, the new ignition table is filled with numbers, which at a glance look somewhat sensible, but dramatically different to what we had, so what we're going to do here is we'll go to our Ignition Table One and we're going to, again, export that to the clipboard. |
| 31:19 | We'll go back to Ignition Table Two and we'll import that from our clipboard. |
| 31:25 | So this has got us starting with exactly the same ignition timing values that we were using in the pump fuel tune. |
| 31:34 | So at this point, on E85 should be very, very safe and we can then go about optimizing our ignition table values as we would normally see fit. |
| 31:46 | Okay, we talked about the ignition timing, now we're going to talk about how we can change our boost targets and there are a few ways we can do that. |
| 31:57 | We'll look at one of them here. |
| 31:59 | We're gonna go into our multiple boost table set up, and you can see, at the moment, we've only got one table active. |
| 32:05 | Again, we can use the Interpolate Between. |
| 32:08 | Another way we can do this I'll just talk about here is we could also use dual tables and we could switch between these using something such as a virtual auxiliary output that is switched at a certain ethanol content. |
| 32:23 | So if we wanted to stay on one, one boost target table until we're up to, say, E60, then we could set our virtual auxiliary output to switch when our ethanol content exceeds 60% and we could use that to switch between two tables. |
| 32:39 | Again, like a lot of our tuning, there's no specific, one way that we must do this, and really it comes down to how, what you're trying to achieve and the best way you can go about that. |
| 32:50 | Alright, so we've got, again, our boost, using the Interpolate Between we're going to be moving smoothly from one boost table to another, and to do that we've got our boost table-ratio table which we've got here, looks exactly the same as the other tables we've looked at. |
| 33:07 | Again, just for simplicity, re-label this as ethanol instead of multi-fuel blend. |
| 33:15 | Now, again, same deal here. |
| 33:17 | 0% in this table means we're solely on Wastegate Duty Cycle One Table, 100% solely on Wastegate Duty Cycle Two Table. |
| 33:26 | Again, for this particular configuration, I'm going to set this up much like our ignition table that we just discussed and I'm going to stay really conservative until we're up to above 20% ethanol and I'm going to be fully into my second boost target table by the time I get up to 70% ethanol and we've got that linear interpolation between. |
| 33:50 | Same process here. |
| 33:51 | We've now got two Wastegate Duty Cycle Tables and a good way to start is to copy Wastegate Duty Cycle One across to Wastegate Duty Cycle Two, just as we've already looked at. |
| 34:02 | Okay, so that's really covered the main set ups for our flex-fuel tuning but one of the biggest considerations for flex-fuel tuning is our cold-start parameters. |
| 34:14 | This is one of the areas where we need to make some quite dramatic changes to our tuning, and the modeled multi-fuel mode gives us the ability to have a lot of control over that, so let's have a look at that now. |
| 34:30 | Now, if we go into our fuel cold start, we've got our pre crank prime, our crank enrichment, post start, and then warm up. |
| 34:40 | Typically, I don't find the need to use our pre crank prime. |
| 34:45 | Crank enrichment, post start enrichment, and warm up enrichments are our main ones, and what we can do here with any of these tables is if we go into them, let's just have a look, for example, at our cranking enrichment. |
| 34:57 | So at the moment we've got a conventional let's have a look at our enrichment table, got a conventional, two-dimensional cranking enrichment table versus engine coolant temperature. |
| 35:07 | What we will find is typically on ethanol, E85, E100, particularly at low temperatures, we're going to need to have quite a dramatic increase in our cranking enrichment. |
| 35:19 | Ethanol is much less volatile than petrol, it's much harder to light off at cold temperatures. |
| 35:26 | So in order to do this, what we can do is go back to our set up and we can enable a 3D table instead of a 2D table. |
| 35:34 | Now, if we do that, let it set itself up. |
| 35:37 | Now we've got a 3D table that's set up versus engine coolant temperature and, this time, multi-fuel blend. |
| 35:45 | Of course, I could go back and change that to ethanol content but the process is exactly the same as what we've looked at. |
| 35:52 | One thing to note here is when we do set this up, we lose all of the value from our 2D table, so really quick tip there is to copy that out before you go to 3D table, and then you can paste that back in just in this 0% blend table here, blend row here. |
| 36:12 | So the process for our, if we're going to use our post-start enrichment, is exactly the same there. |
| 36:22 | We can select our 3D table and then make adjustments based on our ethanol content. |
| 36:29 | When it comes to our warm up enrichment table, quite often we're going to want to have a three-dimensional table for warm up enrichment anyway, because the requirements for warmup enrichment are based on air flow to a certain extent, so what we find is that at high loads, high throttle positions, for example, we don't need as much warm up enrichment as we would when the throttle is closed. |
| 36:53 | So this makes it a little bit trickier with our warm up enrichment. |
| 36:56 | In this case, what we're going to do, instead of choosing single for our warm up enrichment table, we can choose multi-fuel and then this introduces a second warm up enrichment table and the ECU will bias between these tables based on the values in the multi-fuel blend table. |
| 37:16 | Okay, so that deals with our warm up enrichment as well. |
| 37:20 | We've basically covered all of the set up parameters here. |
| 37:24 | Our process now is to go through and tune the engine completely on our second fuel. |
| 37:33 | Now, I'm going to move into some questions and answers shortly, so if you do have any questions, please ask those in the chat box and we'll address those when we get to the end of the webinar. |
| 37:45 | Before we move on, while I can't do a live demonstration on this car, thought it was worth just having a look at the sort of results that are possible. |
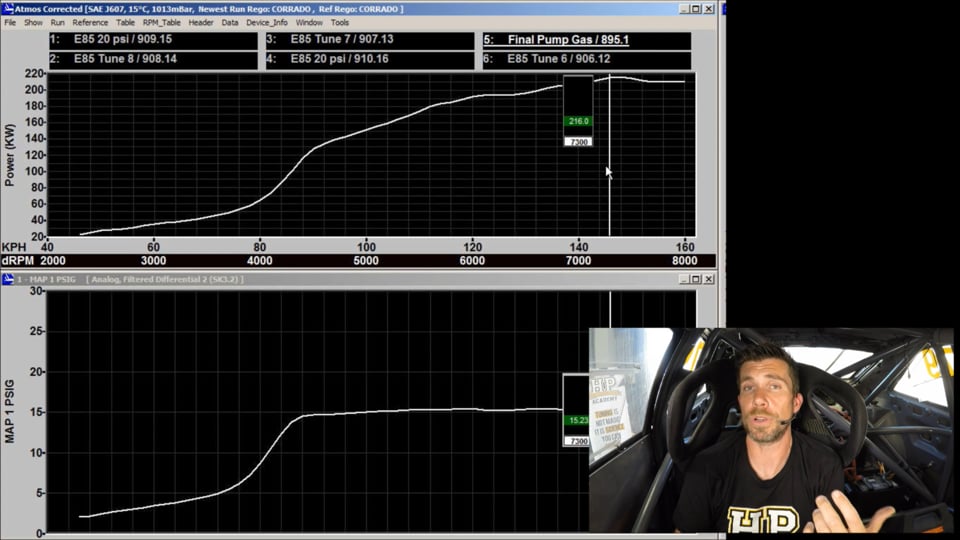
| 37:53 | So if we can jump across to the Dyno screen for a moment, this is the results that we had here on pump fuel, so running the engine out to 8,000 RPM and what I found is that because this is running at quite a high compression at 10 to one, we were very heavily knock-limited and basically, once I went past about 15 psi of boost the ignition timing needed to fall off a cliff and drop very sharply. |
| 38:21 | So as I went past 15 pound of boost, we ended up needing to remove timing quite dramatically, which meant that despite increasing the boost pressure, we were making no more power. |
| 38:33 | So, optimally, I found around about 15 to 16 psi was sort of where the engine was making good power without excessive stress and still maintaining reasonable ignition advance, and we ended up with 216 kilowatts at the wheels there. |
| 38:51 | Now straightaway, moving to E85, even at this 15 psi mark, this straightaway indicated to me, because we were heavily knock-limited on pump fuel, that there was going to be quite a lot of power potential moving to E85. |
| 39:06 | And even without changing the boost pressure, if we bring out the second run, we can see that we ended up with quite a significant gain. |
| 39:15 | We ended up around about 240 kilowatts at the wheels on the same boost pressure, and in fact, if we look at our boosts down below, we can see that our boost was actually slightly lower. |
| 39:27 | This isn't the final tune I did at 20 psi on E85, and I think I ended up at about 250 kilowatts at the same 20 psi boost pressure, so 15 psi boost pressure that we were running on pump gas. |
| 39:45 | So moving on from there, then, I started adding boost pressure and we increased the boost and the final tune we ended up with on E85 was yeah, 289 kilowatts at the wheels and at that point we were running a peak boost of about 22 psi and you can see it was tapering back to about 21 psi. |
| 40:08 | Now, at that sort of boost level, we still were in no way knock limited, so I could tune the engine at this boost pressure to achieve NBT timing quite safely. |
| 40:20 | The reason we've stopped there at this point is we had actually reached the limit of the injector dynamics ID1000 injectors, so at the moment we've actually just gone through and fitted some larger injectors, so we fitted some Bosch 1600 CC injectors and we'll be completing the tune on that. |
| 40:39 | The aim is here to get up to around about 26 psi of boost and we're expecting that we should end up with somewhere in the region of 340 kilowatts at the wheels, which should be plenty in a relatively light front-wheel drive car. |
| 40:54 | Okay, so we've seen the set up parameters we need to go through, but I think it's also just important to reiterate the tuning strategy that we're going to go through when we we're doing a modeled multi-fuel tune. |
| 41:08 | Now before I go into that, I just want to, again, cover off what we're trying to achieve here. |
| 41:15 | I know that there is a lot to do here with a modeled multi-fuel tune, and on the face of it it can be quite confusing, but if we can get to the fundamentals underlying what's happening and we understand those, then everything else starts to make sense. |
| 41:31 | So remember the key aspect here is our fuel characteristics change dramatically as we move from E0 to E100. |
| 41:40 | And what this means is that as we move from E0 to E100, the ECU needs to inject more fuel in order to maintain our target air fuel ratio. |
| 41:53 | So that's what we're trying to do with the fuel side of our flex-fuel or multi-fuel tuning; we're trying to maintain a consistent air-fuel ratio as the ethanol content changes. |
| 42:05 | So in order to do that, we have our dual VE tables and we also have our variable fuel characteristics and it's giving the ECU the information that it needs in order to do the job. |
| 42:17 | Then we've obviously got the parameters that we want to take account of, take into account in order to actually get the gains that are available from the E85 fuel and this is typically going to come from advancing the ignition timing, adding boost, or perhaps both. |
| 42:33 | And the key point here to remember with any of these blend tables is just that we have two tables. |
| 42:39 | One for our primary fuel, one for our secondary fuel and our blend table is simply defining how we're going to move from one table to the second table, as our ethanol content changes. |
| 42:51 | And we've looked at the examples of how we may choose to do that, during our webinar. |
| 42:58 | Lastly, we also need to consider that the cold start requirements for ethanol are quite dramatically different and we've looked at how we can set up our cranking enrichment, post start enrichment, and warm up enrichment tables to allow us to change those inputs or parameters as the ethanol content changes. |
| 43:17 | So, I'll just, again, before we move into questions and answers, touch on this tuning strategy. |
| 43:22 | So, our first step is to set up the ECU and tune it just on the model fuel mode, on our primary fuel. |
| 43:30 | So right now, all we're doing is treating the ECU as if we're tuning on a single fuel. |
| 43:35 | We're completely ignoring the second fuel for the moment. |
| 43:38 | So we need to do our tune as we normally would, completely tune the fuel and ignition tables. |
| 43:42 | We also need to make sure our cold start parameters are all correctly calibrated. |
| 43:47 | This is where tuning flex-fuel does get a little tricky, because for me, personally, I like to be very complete with my tunes, so once I've tuned on the Dyno, I'll also take the car out on the road or racetrack, where feasible, and just make sure that everything I saw on the Dyno matches up with what I'm seeing out in the real world. |
| 44:07 | Once we've completed our primary fuel tune, then we're going to change to our secondary fuel. |
| 44:13 | So we're physically going to drain the tank, put our secondary fuel into the tank. |
| 44:17 | We're going to enable our modeled multi-fuel mode and then we're going to set up all of the characteristics for our secondary fuel that we've looked at in today's webinar. |
| 44:26 | We're going to enable our second VE table, our secondary ignition tables and our secondary boost table and all of our cold start tables that we've looked at and we're going to start, typically, by setting all of those parameters, or at least fuel, and ignition, and boost, we're going to set those to our starting point from our primary fuel. |
| 44:46 | We can then go through and complete our tune on our secondary fuel. |
| 44:51 | And this again requires us to also optimize our cold start. |
| 44:55 | If we're going to road tune the car as well, we need to do that. |
| 45:00 | So at this point we've got two tunes. |
| 45:02 | We've got a primary fuel tune and we've got a secondary fuel tune. |
| 45:04 | For the best possible results on flex-fuel, though, it's really important to also test at a few blends in between. |
| 45:13 | And we don't necessarily have to test at every 10% ethanol content, obviously. |
| 45:18 | We need to be a little bit realistic about what we can, physically, achieve, particularly if we're doing this for a paying customer. |
| 45:25 | Obviously, the more time we spend tuning the bigger the bill is going to get, so we need to be a little bit sensible. |
| 45:31 | Fortunately, in my experience with flex-fuel tuning, what we do find is that the fueling is relatively linear between E0 and E100, so what this should mean is that our fueling tracks pretty accurately with our targets and we shouldn't have a lot to do there. |
| 45:53 | If we do need to make changes to our fueling, we can do this by adjusting the blend table, so bias more towards our second VE table or less, as opposed to actually changing our VE table. |
| 46:05 | Once our second VE table, or fuel table, is tuned, and remember that's optimized now for our second fuel, we don't want to change that, so we'll make adjustments by adjusting our blend table at the point we're testing. |
| 46:17 | Generally, I would like to test at least two, if not three, points between; perhaps somewhere around about E20, maybe around about E50 or 60, that would be the bare minimum. |
| 46:30 | If we can add an additional point in there and spend a little bit of extra time, that's going to be great. |
| 46:35 | And then the other aspect is depending, as I've discussed, how aggressively we want to optimize our ignition and our boost tables as we increase our ethanol content. |
| 46:46 | We can optimize those at these points as well. |
| 46:50 | Okay, lastly, let's just jump back into our laptop software here and I just thought it might be worthwhile seeing some real world results here from the tuning that we've gone through on the Corrado. |
| 47:05 | So let's start with our fuel tables. |
| 47:08 | So, if we look at our Fuel Table One, so this was our pump gas fuel table. |
| 47:13 | And, for example, let's look at the region that we're running in at the same boost pressure in both tables. |
| 47:20 | So let's say from about 4-1/2 thousand RPM and a hundred KPA. |
| 47:25 | We can see that at 7-1/2 thousand RPM, just picking out one particular zone, we've got a value of 92.7% efficiency. |
| 47:34 | If we jump across to our second fuel table we can see that that's jumped up to 109.4%, so we've got about a 17% variation between our two VE tables, which is quite dramatic. |
| 47:50 | Another thing we'll notice, as well, is that at in the lower load areas, this isn't quite so significant, so again, just picking out one particular value here and our second table, 6,000 RPM minus 40 KPA, we've got 78%. |
| 48:05 | If I jump back to our first table, we're in the region of about 76%, so. |
| 48:11 | It's much more dramatic, much more pronounced as we move onto, into positive boost pressure. |
| 48:17 | Let's jump across and have a look at our ignition tables. |
| 48:19 | And again, looking at our Ignition Table One here, which was tuned for our pump fuel, and again just looking at our point that's comparable between the two. |
| 48:30 | If we look at 200 KPA here, just noting that the load axis here is manifold absolute pressure, not manifold gauge pressure. |
| 48:38 | We can see that at 7-1/2 and 8,000 RPM, we're running 16 to 17 degrees of ignition timing. |
| 48:45 | We can see that that's jumped all the way to 22 and 23 degrees, and again that's allowed us to optimize the tune to MBT at this point and we're also up to the 22 on the psi that we've run. |
| 49:00 | Okay, we'll move into some questions, so if you do have any more, please ask those now and I'll do my best to address them. |
| 49:11 | Okay, one and only question at this point comes from Barry, who asks "Why is there a need for a second VE table? "I'd assume the engine's VE hasn't changed, so what factors "will force you to run a different VE table?" Absolute fair question and it is quite reasonable. |
| 49:24 | Now, first of all, despite despite what would appear obvious, we actually may see a very minor change in the engine's volumetric efficiency as we move from pump fuel to E85 and this simply by virtue of the cooling property of the E85 fuel. |
| 49:46 | What it tends to do is draw a lot of heat out of the inlet charge as it goes through that phase change from liquid to vapor. |
| 49:53 | So this can help increase the density of the inlet charge and this can show a very small improvement in our volumetric efficiency. |
| 50:01 | Of course, as we saw there with the example of our Corrado, we're talking 17% at one bar of positive boost pressure and that's definitely not as a result of the fuel characteristics changing the engine's volumetric efficiency. |
| 50:17 | But this is really a case of what we're dealing with here is an ECU that is a universal ECU. |
| 50:24 | It's designed to work on literally any of a thousand different engines and give us a good result. |
| 50:31 | The fuel model is a generic model. |
| 50:34 | It hasn't been optimized to the configuration of a particular engine and everything, understandably, here is based on the ideal gas law. |
| 50:44 | That's how the ECU is calculating mass air flow. |
| 50:47 | Remember, we're calculating mass air flow, we're not directly measuring it. |
| 50:51 | What this means is that on a real engine, with real air flow, there may end up being some discrepancies creep into that fuel model and it may not be 100% accurately representing the actual airflow into the engine. |
| 51:09 | So this is where that second VE table comes into play and as I mentioned in the body of the webinar, really, I'd sort of discuss this or call it a fudge factor table, if you like. |
| 51:20 | What we're using that table to do is really fix any inaccuracies in the main fuel model that aren't accurately tracking the air flow as our fuel characteristics are changing. |
| 51:31 | It would be nice if we didn't need that VE table, but I've yet to tune a flex-fuel system on any ECU where there wasn't a requirement for some kind of fudge factor to make everything work perfectly. |
| 51:46 | And what you'll find is that on some fuels sorry, some engines, we may find that those two fuel tables actually end up quite close, probably within, maybe, five or 6% and other instances, such as the Corrado here, we've got quite a dramatic change at 17%. |
| 52:06 | Second questions here's come from Lamonds, who's asked "Can you run dual fuel on the older, Link G4 using "traditional fuel tables?" Yes, you can, but this becomes a work around as in a dedicated flex-fuel option in the older Link G4, but just let me be very clear there. |
| 52:25 | Duel fuel versus flex fuel are very different. |
| 52:28 | Duel fuel is as simple as just enabling a duel fuel and ignition tables, and in that case you can use something like a digital switch to switch between them and then you would just change your switch position based on the current fuel that you're operating on. |
| 52:44 | So, that's very different to flex fuel, where we're actually wanting to continuously change the fueling based on the ethanol content. |
| 52:54 | So, in order to do a relatively good job of flex fuel on the older G4 ECU, we can use overlay tables with ethanol content as an axis there. |
| 53:07 | And it is a little bit of a work around. |
| 53:09 | It's definitely not going to give you as much control and functionality as we now have in the G4-Plus. |
| 53:17 | So, it's what we could do with the older ECU. |
| 53:21 | Our next question said, I mentioned "the engine wall "reached max knock resistance around E30, if this is true "would cooling be the main factor concerning "additional power that can be had with high ethanol blends?" No, I wouldn't say that we reach max knock resistance at E30. |
| 53:40 | What I should have said, if I didn't quite word it correctly, is that we see the largest increase in the knock resistance happens as we move between E0 and about E, it's actually about E40 typically. |
| 53:54 | Beyond that, there is still an improvement in knock resistance but it's nowhere near as dramatic, so if I was to put a number on it, let's say by the time we get to E40, we've probably got 80% or maybe 85% of the knock resistance or additional knock resistance that ethanol is able to provide and as we move from E40 through to E-hundred, we still get an improvement, but it is obviously much smaller, in the region of about 15%. |
| 54:23 | Now those numbers are just a gut feel based on my experience here. |
| 54:28 | There are some essay papers studying this effect if you really want to get involved and see exactly how those numbers vary. |
| 54:36 | So what this means though, of course, is if we are wanting to build a very aggressive flex-fuel strategy, we can ramp our boost and our ignition timing and quite aggressively over that first 40% ethanol content and get the gains down there. |
| 54:54 | Alright, that looks like it's brought us to the end of our questions, so as usual, if you do have any further questions, please ask those in the forum and I'll be happy to answer them there. |
| 55:06 | Hopefully this has given you a better understanding of what is a complex topic. |
| 55:10 | I've tried my very best to break it down and make it simple to understand, but ultimately it is still quite a complex task we're trying to achieve there and there is a lot that the ECU is doing. |
| 55:21 | Of course, as with all of our tuning concepts, if we understand the fundamental principals behind what's occurring, that's going to make it much easier for us to understand and that's what I've tried to present here today at our webinar. |
| 55:34 | Alright, thanks all for joining us and we'll see you all next week. |


