307 | PDM - Wiper Control
Summary
One of the common stumbling blocks for those adding a PDM to their vehicle is the control of a windscreen wiper motor. This is a seemingly simple task yet the wiring and control for a wiper motor is quite specific, particularly if you want it to function like stock. In this module we’ll look at how to wire and setup a wiper motor.
| 00:00 | - Hey team, Andre from High Performance Academy welcome along to another one of our webinars. |
| 00:03 | This time we're going to be diving into what's required in order to control a windscreen wiper motor using a MoTeC PDM. |
| 00:12 | And I know that on face value, this doesn't sound like the most challenging task but it is one that actually has a few subtle aspects that you'll need to understand. |
| 00:22 | And it is one of those areas that a lot of people dealing with power distribution modules, just about irrespective of what brand, do come unstuck. |
| 00:31 | So we're going to go through why it's a problem and how we can overcome that and then we'll have a look at a control strategy that we're using for our Toyota FJ40 project in order to get low speed, high speed and intermittent as well as making sure that the windscreen wiper parks in the correct position. |
| 00:49 | As usual, we'll have questions and answers at the end of the lesson so if there's anything that you want to know about this topic, please feel free to ask those as we go and we'll get into those at the end. |
| 01:01 | So first of all, just a rundown on the hardware that we are using. |
| 01:04 | So we've got the MoTeC PDM32, in fact we've actually got two of these which probably sounds like a little bit of overkill for a FJ40 given that it is a relatively basic vehicle but we've got quite a bit going on, particularly in terms of external and internal LED lights and I tried really hard to do this with a PDM32 and a PDM16 and I was really just coming up a little bit short so unfortunately the two 32s, little bit overkill but it's going to future proof us as well. |
| 01:35 | We'll just get this under our overhead. |
| 01:37 | This is of course a Autosport connector style version of the power distribution module but essentially everything that we are going to go through is going to be relevant irrespective of which MoTeC PDM you're using and most of what we're talking about kind of translates across to other brands of power distribution module as well. |
| 01:57 | Important to mention here, basically with the 4 connectors on the PDM, obviously we've got this large terminal here which is for our main power feed coming from the battery. |
| 02:07 | We've got a variety of different contact sizes from 16 to 20, down to 22 just depending on whether that's an input, digital inputs, CAN bus for example, there's no real current draw there so those are 22 gauge wires, size 22 contacts. |
| 02:24 | Then the 20 gauge contacts there, these will support up to around 7-8 amps of current flow. |
| 02:32 | Beyond that we sort of get beyond what a 20 gauge wire can support so we jump up to the 16 gauge. |
| 02:38 | Another consideration with the MoTeC PDMs, specifically around the wiper control is there are a variety of different hardware versions and the earlier versions cannot do the linked control which is what we're going to be demonstrating here today as we go. |
| 02:55 | So this is only going to be relevant for the later version two and onwards hardware but if you've bought one in the last few years, you'll be pretty safe to know that you have got the later hardware. |
| 03:07 | Now the other element that we've got here is we are doing this through a Gray Hill CAN bus keypad, nothing particularly new about these, they've been around for a fair while now. |
| 03:20 | It's just a really nice way of being able to control a wide variety of different inputs or outputs using just a 4 wire keypad that only requires a CAN high and low and also 12 volts and earth. |
| 03:35 | Nice feature with this as well is it's compatible with a range of different hardware so I can use this to control features in the MoTeC M1 ECU, the power distribution module as well as features on the dash, depending on what I want a button to do. |
| 03:50 | Alright so let's talk about the actual wiper motor and I'll just get this into our overhead shot here. |
| 03:57 | Please do take my apologies here for the condition of this wiper motor. |
| 04:02 | It is off a 1982 FJ40 so it's looking a little bit ratty and a little bit tired. |
| 04:08 | It's actually going to be replaced when it is finally installed, with a fresh one but it's been a perfect way of testing and demonstrating how everything works so yeah don't take too much notice of the way it looks, it's still going to be just fine for our demonstration here. |
| 04:26 | The other element really aside from our actual demonstration is just what I'm doing here with a bench harness. |
| 04:34 | We've got a 12V battery, car battery down out of shot here, we've got our PDM on our mounting plate there all set up and everything is just temporarily wired. |
| 04:43 | I don't think I'm going to be able to get that in shot very easily but just temporarily wired so that I can actually test a few functions and a few of the components that I want to control. |
| 04:56 | And this just allows us to basically play around and make sure that we're going to be able to function something the way we expect, there's no hidden surprises or problems that crop up. |
| 05:09 | We can do this as well in order to just confirm the current draw from a particular item so that basically when we've finished with our bench testing, we can commit to our wiring and know that we're not going to end up with any surprises once we've completed that wiring harness. |
| 05:26 | So it's a really good exercise to go through if there's anything that you're unsure of. |
| 05:31 | We've used this bench harness, first of all to test the wiper motor, which obviously we're going to have a look at today. |
| 05:38 | We've also used it to set up and test a electronic handbrake function which we're also going to add in as a module in our power distribution module installation and configuration course as well so that's actually in that course now if you've already purchased it, I do recommend you go and have a look at that. |
| 05:59 | There's a little bit more detail in some other areas from what we're going to cover off today. |
| 06:03 | Alright so what is included in a wiper motor and why does it cause some problems? Well essentially we've got a servo motor in here or DC motor in here with two sets of brushes. |
| 06:15 | There's a high speed and a low speed brush, we've got a common ground then it goes through a gearbox which is visible here. |
| 06:24 | Again, little bit manky but it still works. |
| 06:27 | And then we've got the actual arm that connects to our wiper. |
| 06:33 | As well as that, there is a park switch which is the key point because if we just power a servo motor like this, a DC motor like this, it's going to drive and then when we stop powering it, it's going to run on for a little bit and it's just going to stop in any old place which is probably going to be with your windscreen wipers back halfway up the windscreen so that's obviously not what we want. |
| 06:53 | We want to replicate the way the OE windscreen wipers work which is when we stop the windscreen wiper function, they're going to cycle through and they're going to return to the correct park position at the bottom of the screen so that's what the park switch includes. |
| 07:06 | Now why this is problematic is that when we are driving the wiper on the high speed control, the low speed actually becomes essentially a generator so it's actually going to generate voltage and if the power distribution module isn't set up to accommodate that, it can actually damage the power distribution module. |
| 07:29 | And for this reason and one other, you will find that just about every power distribution module that I've ever come across or used, has a dedicated pin or sometimes pins that are there for the use of a windscreen wiper. |
| 07:43 | And what that does is it's protected so that voltage that's generated when we're on the high speed winding, that low speed winding voltage that's generated, that's not going to damage the PDM, the PDM's protected and the other aspect as well is when the park switch trips, the low speed winding will short momentarily to earth which stops the wiper motor dead so that's why we need to first of all understand our power distribution module manual and understand which outputs are designated for the control of a wiper motor. |
| 08:16 | OK so pretty straightforward really, what it does come down to, as usual is read and understand the manual, if you understand the manual and you also understand how the wiper motor works you really can't go too far wrong but of course this is a problem and most people don't read the manual properly so that's why we are presenting this webinar. |
| 08:38 | Alright so what we'll do is we'll have a quick look through this setup in our PDM manager and just see how we've actually got this set up. |
| 08:48 | This will be a reasonably short webinar because it's not a particularly complex topic so I will urge you, as we get to the end, if you do have any questions, please bring those in so we don't miss them. |
| 09:01 | Alright so let's have a look at our PDM inputs first of all and we've got our input pins which is what we're on at the moment. |
| 09:07 | And we can see here we've got only one set up, again we're only testing this for our wiper control so our input 1 which is a digital input is this channel here, we've called it wiper.parked. |
| 09:20 | We can double click on that and we can see that we've set this so it's active when it's high. |
| 09:26 | So this is a digital input that will basically switch between a high voltage on our pull up resistor and ground when it is grounded. |
| 09:36 | So this is active when it's high and we can also set of course our voltages for when we're high and when we're low on that particular input so nothing particularly complex about that. |
| 09:48 | And if we have a look at our PDM monitor we can see that as we're sitting here the wiper parked is in state one, it's true, it is parked obviously it's sitting there stationary so it should be. |
| 10:03 | Alright so that's our first thing, so that's just simply a digital switch and actually I probably need to come back a step. |
| 10:09 | What we did find with the FJ40 wiper motor and this is where it's really important to just understand how the wiper motor works and be able to understand a wiring diagram, is that in most instances with late model wipers, they use a power feed to the high speed and the low speed brushes and a common ground. |
| 10:32 | The FJ40 actually reversed this and it used a common 12V feed and then grounded the individual brushes depending on whether it was high speed or low speed. |
| 10:43 | What that required was a little bit of a rewire in order to actually operate it as we wanted. |
| 10:51 | Doesn't matter which way we connect the polarity, the motor will just run in the opposite direction so no big deal there but again just important because the power distribution module, the output's only switched to 12V, we don't switch them to ground so that's not how that was going to work so a little bit of real basic rewiring around that and the way the park switch worked and we were good to go. |
| 11:14 | Alright so let's jump back into our software here for the PDM manager and we'll come over to our keypad and again I've got a very basic setup on this at the moment, we've only got the single channel setup, single button setup. |
| 11:25 | So first of all what we need to do is give that button channel a name and I've just called it wiper control. |
| 11:32 | This can get a little bit confusing as well as you go through this process just trying to remember what you've called a particular item and as we go through our functions, things change so trying to keep a really clean strategy for how you name all of your inputs and outputs will help you out, particularly when you come back to this in 6-12 months time and can't quite remember exactly how everything worked and you have to spend half an hour kind of figuring it all out again. |
| 12:01 | Now there are 3 LEDs on the Gray Hill keypads as well which just give us an indication of the operation so I am utilising those, you can do that using these little tick boxes here. |
| 12:14 | And they will be active when these channels are true, so I've got wiper.int, obviously for intermittent. |
| 12:20 | Wiper.slow and wiper.fast, all pretty self explanatory but at the moment those don't exist so we need to actually create those channels as well so let's click OK and we'll see how we've done that. |
| 12:34 | So we'll come up to our functions and these are the functions that I've set up here. |
| 12:38 | So first of all let's have a look at our wiper speed control. |
| 12:43 | We'll double click on that. |
| 12:45 | And this is a counter, so basically this is going to count between 0 and 3. |
| 12:52 | So it's 4 position, 0, 1, 2, 3 and 4. |
| 12:55 | And it's going to increment every time the channel wiper control, which you'll remember is our button there, every time that is pressed it's going to increment and then it's going to wrap around at the end. |
| 13:09 | So basically once we get to the value of 3, it's going to go back to 0. |
| 13:15 | We could also make it count back down, totally dependent on how you want that to work. |
| 13:19 | So that's the first point there, we've set up this counter function and called it wiper.speed.control and that's going to be a value between 0 and 3 based on the presses on our Gray Hill keypad. |
| 13:31 | OK so that's our first part there. |
| 13:34 | Click cancel there. |
| 13:36 | Once we've got that counting between 0 and 3, we can then set up our other functions here, wiper.int, slow and fast and I'll just open one of these, they're all pretty self explanatory once you understand them. |
| 13:48 | So we've got the name and this function is a condition so it's true or false and we've got the function that we can write here for this which is again very very simple, wiper.int is going to be true when wiper speed control is 1. |
| 14:06 | So when our counter is 1, then the intermittent function is going to be true. |
| 14:11 | Obviously we've got exactly the same for our slow and our fast, just incrementing those. |
| 14:16 | So now we've got this output that we can use in our output control function. |
| 14:21 | So let's jump across to our output pins here and we'll see how that all functions. |
| 14:28 | Alright so this is where the dedicated pin comes in. |
| 14:32 | So you can see at the moment I'm using 9 and 10 and that seems a little bit weird, why wouldn't we just start at one? Well the reason for this is that the low speed winding for our motor has to be on pin 9, this is the one that's allocated for wiper speed control and this is the one that's protected against the voltage that's going to be generated. |
| 14:52 | So let's have a look at this functionality. |
| 14:55 | So we can double click to have a look at the function. |
| 14:58 | First of all we've got our usual stuff on PDM channels so nothing specific here to the actual wiper but we've got our maximum current which is 8, we've got our retry delay and our number of retries. |
| 15:16 | Now obviously this is just a bench test, I haven't really got this set up and of course the wiper you would maybe consider is not a mission critical output anyway so at the moment, maximum current of 8 amps, it'll wait 1 second but it actually isn't set to do any retries at the moment, we can do whatever we want with this. |
| 15:36 | Nice feature here is we do have this little comment box up above so I mentioned before with some of these more complex functions, it can be quite easy to forget how you set it up and the interaction between different elements or channels. |
| 15:49 | So it can be helpful with those more complex aspects to just write some notes here, maybe a bit of a road map of how you actually wrote out that function and how you intend it to work. |
| 16:02 | Before we get into the condition for control here, up the top as well we've got our wiper control, click on that and this is enabled. |
| 16:11 | As you can see here, enable linked output control for dual speed windings and the linked output there we can choose, obviously that is output 10. |
| 16:20 | So that's the element that's essential for that linked control. |
| 16:25 | Alright so let's have a look back at our setup here and our condition that we're using here, which is a little bit, there's a bit going on here so our wiper speed low is going to be on when our wiper slow is true. |
| 16:40 | So when we're in slow, it's going to be functioning obviously what we'd expect. |
| 16:44 | It's also going to be active in wiper fast but because of that linked functionality, it actually disables it, this is more for the grounding for parking it. |
| 16:54 | And then we've also got this function here which says flash if wiper.int is true for a time of 1 second and then our false time is 3. |
| 17:04 | So that flash function is exactly what its name implies, it'll flash the output for a period of time then wait for a period of time. |
| 17:12 | So you might want to use this for indicators for example and maybe you want to turn them on for 0.5 seconds and off for 0.5 seconds. |
| 17:20 | In our case what we're doing there is when the wiper.int, so the intermittent function is true, what it's going to do is it's going to run the wiper motor slow winding for 1 second. |
| 17:31 | Realistically all that's enough to do or all that needs to be enough to do is just move it off the park switch because as soon as it's unparked, even if we stop, that condition becomes untrue, it's going to continue until the park switch is false so that's just to get it moving and then what's going to happen, the wiper will do one wipe at that slow speed and then it'll hit its park position, it'll turn off and then it's going to wait, in this case we can see our false time is 3 seconds, it's going to wait 3 seconds before it operates again. |
| 18:06 | Now if we double click on this we can see we can change the flash on and off times there but basically you can do as you please with this. |
| 18:16 | I've got low and intermittent low and high speed on this button but you can get a bit more granular with this if you want and have multiple off times so you can kind of replicate the intermittent function that you see on a lot of late model vehicles. |
| 18:30 | Then our final function as part of this condition here is wiper parked = false so it's going to continue running if our wiper parked is false. |
| 18:42 | So if our wiper is not considered to be parked, as soon as it's parked, that'll be true and obviously it will stop. |
| 18:47 | So that's our first function there. |
| 18:50 | Remember if that doesn't quite make sense, if you've got any questions, please ask those, we'll jump into those in a few moments. |
| 18:57 | Now let's have a look at our high speed here and we'll double click on that. |
| 19:01 | So again obviously pretty self explanatory, the naming strategy I've used. |
| 19:06 | Everything else here is pretty much the same and this one's much simpler. |
| 19:09 | Wiper speed fast is going to be active when our wiper.fast counter is true. |
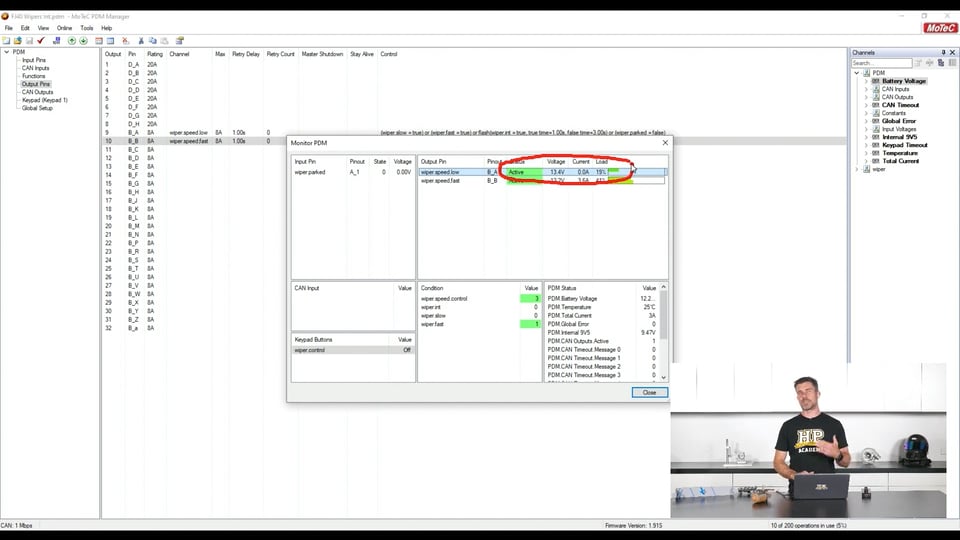
| 19:17 | Pretty easy so let's have a look and bring this all together so if we look at our monitor channel. |
| 19:23 | So we've got everything kind of we need to see here and the first of these is our wiper parked which we already looked at and we can also monitor the current battery voltage. |
| 19:33 | We can see here the output pins that we've got set up and we can see their status, we can also see the voltage on those pins and we can see the current and percentage of the load so obviously nothing's happening at the moment. |
| 19:47 | So it's all pretty quiet. |
| 19:49 | Our keypad buttons here, so we've got our wiper control, obviously that's off and that's going to turn to on every time I press that button and then we've got our conditions which we looked at, so our wiper speed control, remember that's our counter, 0 through to 3. |
| 20:04 | And then as that counts up we're going to see our wiper.int, our wiper.slow and then our wiper.fast increment so what I'll do is let's just see this in action, we'll talk about the wiper motor in a moment, at the moment I just want to concentrate on the screen. |
| 20:19 | So for the first part here, I'll just press this button and we're going to see our wiper control go from off to on. |
| 20:27 | And we can see every time I press that, I'll press it again, again, again. |
| 20:32 | And back to on. |
| 20:35 | So yeah that's just basically monitoring the output of that button, pretty simple stuff there. |
| 20:41 | Then we can see our wiper speed control here so our wiper speed control is that counter, remember 0 through to 3 so at the moment we're in that intermittent position. |
| 20:50 | The value for that counter is 1, of course you'll remember that our wiper.int, that will be true when the wiper speed control is 1. |
| 20:59 | Complex I know but when you break it down, it's actually pretty easy to understand. |
| 21:04 | So we'll press that button again, I'm going to see our wiper.speed control increment from 1 to 2, we're going to see our wiper.int function go back to 0 and of course our wiper.slow function, condition is going to go from 0 to 1 so let's do that now. |
| 21:19 | Alright then of course we do that one more time and our wiper speed control goes to 3 and we're going to end up with our wiper fast function on. |
| 21:28 | Alright so let's go back to our slow speed and let's have a look at what we can monitor up here. |
| 21:35 | First of all, wiper parked, so you can see that as it goes around, understandably every time it goes around, our state for our wiper.parked is going between 0 and 1 so we can straight away see where that parked position is, nice and easy. |
| 21:49 | Our wiper speed slow here we can see the status is currently active. |
| 21:53 | We can also see our voltage there, 12.2 volts and we can see the current draw that is on that channel so we're sitting at about 2.8-3 amps. |
| 22:04 | It is represented out here in a little bar graph as a percentage of our load as well. |
| 22:10 | So depending how we've got that channel set up so we're sitting nicely within the realms of what that channel will allow. |
| 22:16 | Alright so that's our low speed so let's click it into high speed now and probably before we do that if we just jump momentarily to our overhead camera, we can see our little wiper motor doing wiper motor things, pretty much as we'd expect. |
| 22:29 | Alright let's jump back to our laptop screen now, we'll go from our low speed to our high speed. |
| 22:35 | So what we can see here is our high speed is now active. |
| 22:40 | We can see that that particular winding is drawing a little bit more current, we're sitting at about 3.8-4.2 amps which is understandable given that it's going a bit faster. |
| 22:52 | We also can see though and this is what I wanted to mention here is that our wiper speed low, despite the fact is says active, this is a linked function so it's actually not powering. |
| 23:01 | We can see that by the fact that it is not using any current or not pulling any current. |
| 23:07 | But we can see that it's generating about 13 amps on that particular channel. |
| 23:11 | And that's the important part, so remember it acts as a generator so we want to make sure that we're using the correct terminal on the PDM so that that voltage doesn't cause any issues. |
| 23:22 | And again if we just jump to our overhead shot here, so we can see our parked position here. |
| 23:27 | I'll just click it back into intermittent and we can see that it comes to a stop in exactly the same place every time. |
| 23:35 | There's a little bit of torque on the wiper motor which is why I'm holding it there. |
| 23:39 | Same if we go to our high speed, when we click it back into low speed, click it back to off, it drops back to low speed momentarily, hits the park switch and then stops. |
| 23:50 | So it is a reasonably simple function but again it is one that I know a lot of people struggle with and we actually developed our power distribution module course, installation and configuration course, we basically talked to most of the manufacturers of the common aftermarket PDMs, PDUs, that are in use in our industry and resoundingly the two common failing points that they mentioned that their customers have is wiper control and CAN bus communication between different items so we've tried really hard to address both of those in that particular course but still wanted to give a little bit more in depth here in a webinar form. |
| 24:29 | Alright we'll jump into our questions now so if you do have any more, please keep them coming. |
| 24:36 | Gareth has asked, does the park switch have to have its own 12V feed or does it take it from the motor supply or does the switch just go to ground? Good question there Gareth. |
| 24:44 | The answer there is it depends on the particular wiper motor. |
| 24:48 | Which is why it's quite important to have an understanding of the wiring diagram for your particular motor. |
| 24:54 | In our case, the wiper park switch is actually a completely separate circuit so we've got a digital input and a sensor 0 volt running straight up to it. |
| 25:05 | In other instances, it will be integrated with the wiring so you're just going to need to have a look at that diagram in order to understand what the particular manufacturer has done. |
| 25:15 | Looks like that is all the questions we have so it is only a short webinar, relatively straightforward. |
| 25:22 | As usual if you do have any further questions, please feel free to ask those in the forum and I'll be more than happy to answer them there. |
| 25:30 | Thanks for watching and hopefully we can see you next time. |
| 25:34 | Now for those who are watching on our YouTube or Facebook today, this is just a little insight into what we put on every couple of weeks for our HPA gold members. |
| 25:42 | Our gold members get to review these webinars in our archive where we've currently got over 300 hours of existing webinar content. |
| 25:49 | This is an absolute gold mine of information and one of the fastest ways to expand your knowledge on a huge range of automotive performance topics. |
| 25:58 | Now gold members also get access to our private member's only forum and that's the best place to get reliable and trustworthy answers to your specific questions. |
| 26:06 | You can purchase gold membership on its own for $19 USD a month however you will also get 3 months of free gold membership with the purchase of any of our courses. |
| 26:18 | Particularly, because it's relevant to today's topic, if you are interested in learning more about power distribution modules, how they work, how to install them and how to program some of their more advanced functionality then check out out PDM installation and configuration course, you will find that at hpacademy.com/courses. |
| 26:38 | Alright thanks again for watching and hopefully we can see you again soon, cheers. |


