232 | Diagnosing Engine Failures
Summary
While nobody wants to experience an engine failure, unfortunately they do occur from time to time. While an engine failure is bad enough, often after a rebuild we see the freshly built engine also quickly fail. In this webinar we’ll discuss failure modes and how to work out what has caused your engine failure. Following this we’ll look at some of the considerations you need to keep in mind to prevent a similar failure happening again.
| 00:00 | - Hey guys it's Andre from High Performance Academy, welcome along to another one of our webinars where today we're going to be talking about analysis of engine failure. |
| 00:09 | Now engine failure is something that obviously no enthusiast wants to be living through but unfortunately it is kind of one of those things that sooner or later if you're dealing with performance cars for long enough, it is a reality of what we're dealing with, it is something that can end up happening. |
| 00:25 | And even if you don't actually end up having an engine that you've built or that you've had built fail, often you'll end up buying a project where there may already be an engine failure in that car that you need to deal with so everything we're going to be talking about today is still 100% relevant no matter what boat you end up in there. |
| 00:47 | It's important essentially to understand what's gone wrong so that we can address any issues that are there and most importantly of course make sure that they don't happen again. |
| 00:59 | And this is particularly important if for example you're really starting to push the boundaries, through a lot of my career I was pushing the boundaries with 4G63 import drag racing. |
| 01:12 | And while I've always said that if you're building relatively standard engines or moderately modified engines, as long as you are using the correct parts, you are assembling them correctly and then machine correctly and tune correctly, we should get a long and healthy service life out of these engines. |
| 01:30 | When we're starting to chase down world records and we're pushing engines to power levels that there's only a handful of people in the world maybe seeing, at that point unfortunately some failures are inevitable and this becomes part of the learning curve and the development curve, albeit a very expensive learning and development curve but this is part of pushing those boundaries. |
| 01:51 | So it's very different to what we can expect or should expect at more moderate power levels so it's also important to kind of make sure your expectations are in line with reality to avoid disappointment and a huge financial outlay. |
| 02:06 | Now as usual with this webinar we will be having questions and answers at the end so if there's anything that I talk about here that you'd like me to talk in more detail about or anything just generally related to this topic. please ask those questions in the chat and we'll get into them. |
| 02:22 | Good news is I've got a huge range, a reasonable range of damaged components here that we've collected over our time both with my old workshop STM and through High Performance Academy that we're going to be able to use to highlight some of the aspects that we are talking about. |
| 02:41 | Alright so let's get into it and basically what we want to do is go through a process that we can use regardless whether you've just been out on the racetrack like we have over the weekend just gone and had a catastrophic engine failure and you're starting to search around for answers, or you've purchased that project car with an engine that's in pieces, it's always important to go through a sensible process of diagnosing that failure so that you can figure out what's caused that and avoid it happening again. |
| 03:12 | And really this comes down to starting with what has broken. |
| 03:16 | Now that might sound easy enough to understand but often, and particularly in a catastrophic engine failure, particularly if an engine lets go and it's spinning at maybe 8000 or 9000 RPM it's going to take quite a going period of time to stop rotating and in that time it can end up doing a lot of other damage which can actually make it quite difficult to really highlight exactly what the first failure mode was. |
| 03:44 | So what went wrong initially, that's what we're really trying to find. |
| 03:46 | So once we've discussed that, once we've gone through and figured out what's broken, we need to of course work out why it's broken. |
| 03:54 | The most important thing from here is once we know what's broken, we've got a good idea or a good theory as to why it's broken, we want to ensure that it doesn't happen again. |
| 04:05 | So this is the part that I see so many people, even experienced people out there in the automotive industry, they've had an engine failure, they accept that the engine's failed, they pull it all apart, replace all of the broken parts, put it back together but they haven't actually highlighted the reason for that failure and that just leaves them open to having exactly the same thing happen again. |
| 04:27 | And these things, as I mentioned, they are very expensive so we need to be very mindful and make sure that we learn from these expensive mistakes, make sure that they don't happen again. |
| 04:39 | So as I mentioned, there are some grey areas, there's not a lot of black and white here and a lot of the problems that come up with engine failures, there can be cross overs between the different areas that we're going to be discuss between mechanical strength issues tuning issues, clearance issues, or assembly issues and that can be a little bit tricky so we need to be mindful of how we go through and diagnose those failures, excuse me. |
| 05:10 | So as if the racecar that we have here at High Performance Academy was trying to tell us something, knowing that this webinar was coming up, we have just had a fairly catastrophic failure of this car out on the racetrack. |
| 05:25 | So what I'll do is I'll just quickly, we'll head across to my laptop screen. |
| 05:30 | And we'll just quickly play a little clip of Ben driving the racecar here at Teretonga. |
| 05:36 | So you can see here, huge cloud of smoke out the back, flames out the side, which is pretty catastrophic, you know something seriously bad has gone wrong when you've got flames out the side and Ben manages to negotiate the final corner at Teretonga very sideways with oil under the rear tyres before coming to a stop on the side of the track. |
| 05:56 | Now this failure as well, just to be super clear, definitely nothing to do with Ben's driving, this was an imminent failure that was going to happen regardless of what Ben did behind the steering wheel or who was driving it, it's just one of those things unfortunately. |
| 06:10 | Now I will mention here as well this is a little off topic but just seeing as we're talking about this. |
| 06:16 | Something to keep in mind if you are racing your own cars, it's always a good idea to just try and think, it can be a little bit difficult to put this into action at the time, try and think that if you do have a catastrophic failure like this, try and get the engine shut off and clutched in straight away. |
| 06:33 | Obviously if you leave the clutch engaged and the car comes from high speed down to a stop, the transmission and the drive train's going to turn that engine over and what that can do is create a lot more damage that potentially you could avoid. |
| 06:47 | Albeit in this case it wouldn't have mattered what Ben did, the car was, the engine was going to be significantly damaged. |
| 06:55 | So basically when we got the car back off the track, there were a few clues that something wasn't quite right. |
| 07:04 | So we'll just have a look at these bits under our overhead shot here, I'll just get our connecting rods out of the way. |
| 07:10 | So we've got a big of engine casting, piece of the engine casting, a little bit of casting here as well, from the side of the block. |
| 07:18 | And then we've got here what I believe at this stage, and it's a bit worrying that I can't actually tell you for sure, I think this is actually what is left of the number one cylinder's piston. |
| 07:31 | So not a whole lot of good stuff coming, excuse me, coming out of that engine at that point. |
| 07:39 | And at this stage we haven't got the engine out of the car but again just jumping over to my laptop screen, this is a shot that I just took with my phone down underneath the headers, it's a little hard to see but normally when we've got a hole in the side of the block, one of the key causes for this would be a conrod or connecting rod that has broken or failed. |
| 07:59 | There's a variety of reasons why a connecting rod will fail which I'll talk about shortly as we go through this. |
| 08:05 | In this case you can actually see that that connecting rod is what appears to be completely intact to the point that it still has the wrist pin located through it. |
| 08:13 | So at this cursory point, the best guess that we can say is that we've suffered from a piston failure. |
| 08:23 | Can't really give you any more information on that until we've got the engine apart but I will mention that this engine is a basic stock car motor built by our local stock car engine builder and because of the relatively low power the engines make and the fact that they are restricted to a 10:1 compression, these engines actually are built with factory Toyota cast pistons so again giving some weight to the fact that it may in fact be the piston that has failed initially. |
| 08:51 | Alright so there you go, that's sort of a pretty good segway into diagnosing engine failures there given that we have just had a dramatic one of our own. |
| 09:02 | So what we're going to do here is just tick off some of the common causes, we've basically taken engine failure as a general topic and broken it down into the different areas that could result in those failures. |
| 09:14 | So in rough terms, we're going to deal with each one in a little bit more detail, but the first one that we'll talk about will be assembly errors. |
| 09:21 | So that's when we or whoever has built the engine has physically done something wrong. |
| 09:26 | So maybe that's leaving a connecting rod bolt or a fastener loose for example. |
| 09:31 | The next one we'll talk about is clearance issues, so this is quite broad, we'll talk about piston to cylinder wall, bearing clearances et cetera. |
| 09:39 | Probably in my experience with well built engines one of the most common reasons for failure, particularly on the racetrack is related to lubrication failures. |
| 09:48 | So where we have problems with lubrication getting its way to the bearings. |
| 09:54 | We also have the potential for issues just purely due to mechanical strength. |
| 10:01 | So the components simply aren't strong enough for what we're asking from them. |
| 10:05 | And then of course we have tuning related failures as well. |
| 10:10 | So that's where for example a tuner has run the engine too lean or with too much ignition timing, resulting in a catastrophic failure, detonation or the likes. |
| 10:22 | So that's where, if we jump to our overhead shot, we can see this sort of failure of our pistons. |
| 10:29 | Obviously not something we really want to be seeing with a massive hole melted through the side of it. |
| 10:34 | Now we'll talk about this particular failure as we get a little bit more through our webinar as well. |
| 10:40 | So those are our rough areas that we're going to discuss. |
| 10:44 | Just, I think that's the easiest way to break these down. |
| 10:46 | So what we're going to do is start by talking about our assembly related errors. |
| 10:51 | Now there are a potential range of these, this could come down as I mentioned, to someone not doing up a critical fastener like a connecting rod bolt properly. |
| 11:02 | It's very easy if you aren't paying attention to, and you're doing multiple stages of torque for main bearing caps or connecting rod bearing, connecting rod caps, to maybe miss out one cap or one individual bolt and particularly with the conrod bolts, these are probably the most stressed fastener in our engine. |
| 11:21 | So it doesn't take a lot for things to go horribly wrong. |
| 11:25 | And normally when things go horribly wrong like that, we actually get a situation where we end up with a hole in the side of our block. |
| 11:33 | So let's just have a quick look here over at my laptop screen. |
| 11:37 | So this is, actually it's another Toyota 3UZ-FE based race engine, this is a TRD built Grand Am engine that's running here locally in the NZ V8 TLX Toyota Camrys. |
| 11:50 | And this was a failure that occurred at Pukekohe Raceway a number of years ago. |
| 11:55 | So we can see that we've got a nice hole punched in a very expensive CNC machined billet aluminium dry sump. |
| 12:05 | This is something that you shouldn't really be seeing outside of the engine here. |
| 12:10 | This is the end of a Carrillo H beam connecting rod and we've also got a bit of a hole in the side of the block that we can see here. |
| 12:18 | So that's obviously not something we want to have and if you end up leaving a connecting bearing cap loose, that's possibly exactly what you're going to see. |
| 12:29 | It's not just this though, we could also have failed to check, or make sure that we've got sufficient clearance between our components. |
| 12:38 | So a classic example of this, the stroker GM LS1 that we've just built runs a K1 Technologies stroker crank there and as soon as we go to a stroker crankshaft, it's really important to check the clearance between the base of the cylinder bores and the connecting rods. |
| 12:57 | Just making sure that we have got enough room for everything to rotate there. |
| 13:01 | And of course it's not just enough to be able to rotate the crankshaft here at room temperature at the speed that we can turn the crankshaft by hand. |
| 13:12 | Obviously there's going to be some flex and movement in all of these components, particularly at high RPM. |
| 13:17 | So we can find that if we've only got barely maybe five or 10 thousandths of an inch clearance at room temperature, that is likely to end up with metal to metal contact when we actually have the engine at high RPM. |
| 13:33 | When it comes to an assembly related failure quite often we're going to find that these failures will become apparent almost instantly basically as soon as we start the engine up. |
| 13:46 | Particularly if we've got clearance related issues, these will become apparent very very quickly so often these assembly related issues are quite easy to diagnose, it's quite obvious when we pull everything apart and see what's going on to highlight exactly why that particular thing's happened so usually not a big issue. |
| 14:05 | There again are some gray areas here so for example if we're talking about leaving a rod bolt loose. |
| 14:13 | Now that failure at a glance could also look very similar to a conrod bolt that is physically not strong enough. |
| 14:22 | And those conrod bolts are put under immense tensile forces. |
| 14:26 | Particularly as the piston goes past top dead centre on the exhaust stroke and begins going back down the bore on the compression stroke. |
| 14:34 | There isn't that cylinder pressure to cushion and slow down the piston and it's the conrod's job to turn that piston around, slow it down, and then accelerate it away from top dead centre on the intake stroke again. |
| 14:47 | So we can see a failure from the rod just related to a rod bolt that's not strong enough and again that's going to look quite similar but there are some key things that we want to look at there that can help. |
| 15:02 | So what we'd be looking at, if we've got a rod bolt failure, not as a result of assembly error, we're probably going to find that the rod bolt itself will be elongated and necked down and there will be a failure point where its neck's stretched and broken. |
| 15:19 | That'll also generally show some fretting between the body of the conrod and the cap, basically where as that bolt has started to elongate and stretch, it's allowed the cap to move against the body so those are things that will give us a clue that it's actually, the rod bolt was initially tight and it's not an assembly issue, it's actually a problem with the strength of the material itself. |
| 15:47 | Now the assembly errors, these are, we're only going to deal with briefly because they should be 100% avoidable. |
| 15:54 | If you are using the right techniques, you understand the process that you're going through, particularly if you've gone through our practical engine building course and you're applying the practical skills in that course and using that 10 step process, these should be 100% avoidable so there really is no excuse for this. |
| 16:11 | Building an engine does require that you take care and you apply a certain amount of patience so it's not something we can rush through and if you follow a step by step process there really should be no reason that we will have problems with assembly errors. |
| 16:30 | Now moving on, the next issue that we're going to talk about is clearance issues. |
| 16:35 | So this is where we have insufficient clearance between some of our key components. |
| 16:41 | So there's a variety here, what we would probably see here is bearing failure and probably in my opinion, that's one of the most common reasons for failure, common areas for failure. |
| 16:55 | We could also see issues with piston to cylinder wall clearance being insufficient and that's where the pistons will start to nip up in the bores. |
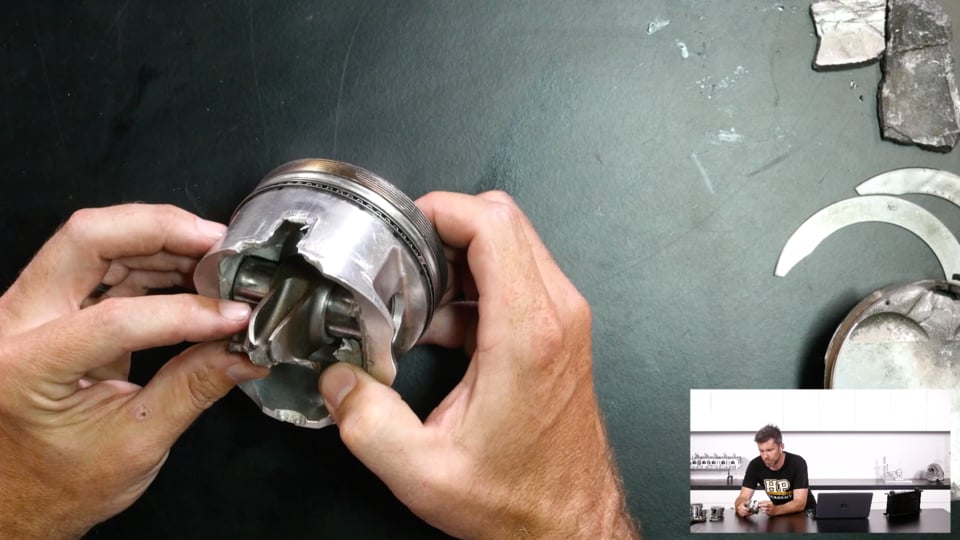
| 17:03 | Now while this isn't the exact scenario we've got here, let's have a quick look under our overhead camera at our piston here. |
| 17:12 | Now as I say, this is not a result of insufficient piston to cylinder wall clearance but what we can see is the extreme galling where the piston skirt has picked up and transferred material to the cylinder wall. |
| 17:28 | And this is essentially in a much less extreme circumstance, what we would also see if we have insufficient piston to cylinder wall clearance. |
| 17:37 | There's a reason why we've got his looking so bad, which we'll get into shortly. |
| 17:42 | But yeah, basically if we've got signs of that pickup and transfer, that would be indicative that we may have problems with piston to cylinder wall clearance. |
| 17:52 | Now this does need to be factored in because this can also be representative of our tune. |
| 17:58 | If we are running the engine too lean and putting too much heat into the piston crown, then that in turn will end up with the piston growing more than expected, so piston to cylinder wall clearance under running conditions, obviously will be reduced. |
| 18:14 | The other issue that we can see is where a piston ring has butted together because it has been set with insufficient clearance when the engine has been built. |
| 18:27 | So we've got some information in our webinar archive on the correct process of setting our piston ring end gaps so if you want to learn more about that, go through that. |
| 18:38 | Generally we're going to be somewhere between about four and maybe five, 5.5 thou per inch of bore for our top piston ring end gap. |
| 18:47 | Now if we've got that too tight, as the ring expands and under operating conditions, under the heat of combustion, it's going to expand and the two ends of that ring can but together. |
| 18:57 | And if that happens, basically the ring's got nowhere left to expand except outwards and that can have that ring under extreme circumstances, essentially seize in the bore. |
| 19:06 | Now when that happens, in extreme circumstances, what's going to happen next is it's going to basically rip the crown off the piston. |
| 19:15 | In a cast piston we'll end up seeing sections of the piston ring land break out as well. |
| 19:21 | So normally the next thing after that is that the rod is going to get punched out through the side of the block. |
| 19:28 | So obviously not what we want happening there. |
| 19:32 | Again this really sort of comes down in part to our assembly errors because we should be able to avoid that sort of problem. |
| 19:42 | The other issue we can end up with is valve to piston contact. |
| 19:46 | Again, crossover here to our assembly process, we want to check and make sure that we have sufficient piston to valve clearance. |
| 19:56 | There is a section in our camshaft degreeing course that covers checking our piston to valve clearance and some guidelines on where you want that clearance set to make sure that it's going to allow for the changes in condition when the engine is running under high RPM. |
| 20:14 | Now there are two aspects here though. |
| 20:16 | We obviously need to make sure that under static conditions we've got sufficient piston to valve clearance but we also need to factor in that at high RPM the valves don't always do exactly what we'd expect and we can end up with issues where the valves actually float off the cam lobes and of course then we get a situation where they can end up getting hit by the piston. |
| 20:41 | So again if we jump across to my laptop screen here. |
| 20:44 | We've got a very sorry looking Nissan VQ37 cylinder head I think from memory this was, this was out of one of the Pike's Peak racecars that was competing a few years ago when I was over there. |
| 20:59 | And you can see that we are currently missing one of the intake valves. |
| 21:02 | From memory that was stuck, imbedded in the top of one of the pistons. |
| 21:06 | So this is an issue that was the result of the cam chain basically allowing enough stretch that while under static conditions, there was sufficient piston to valve clearance, when the cam chain stretched, very slightly admittedly, it is a chain after all, but at high RPM that was enough to just end up with the valve contacting the piston. |
| 21:33 | Now what can happen there, depending on the severity of that is it can bend the valve which then can end up snapping the head off the valve and then we get a situation like this. |
| 21:44 | Particularly at high RPM, understandably when we lose the head off a valve, normally there's not a lot that is recoverable. |
| 21:50 | Great news here as well if you're running a turbocharged engine, generally the shrapnel and pieces of damaged valve will also destroy the turbine wheel of your turbocharger. |
| 22:00 | On top of that the piston obviously as well as usually the cylinder wall and the block. |
| 22:04 | If you're really lucky those parts will also end up going back through other cylinders, destroying even more of your engine so again, this just comes back to what I was saying, if you do experience a engine failure, it's really important to try to shut that engine down, clutch it in as quickly as you can to avoid potential problems. |
| 22:23 | Or I should say limit the amount of damage from these issues. |
| 22:29 | So in terms of valve train issues here, so that little photo that I just showed you is a situation where we have got a valve timing issue, so static conditions were OK, dynamic conditions not so much. |
| 22:45 | A lot of this really also comes down to making sure that you've got matched components in your valve train that are suitable. |
| 22:52 | So you want to make sure that the valves, the springs, the cam are all matched. |
| 22:57 | This should be really easy these days unless you're trying to do something pretty extreme, for most of the mainstream upgrades, most professional cam suppliers will be able to give you a cam and a recommendation for a valve spring that will suit and also be able to tell you what the installed height of that valve spring should be, or in other words what the seat pressure should be to ensure that the valve train will be controlled properly on that cam, you're not going to have issues with valve float at high RPM. |
| 23:27 | So it's really important to make sure that you've got that dialled in and you know what you're dealing with. |
| 23:33 | Now another issues that goes along with that as well, this is a piston out of a Honda K24, naturally aspirated K24 that I built a number of years ago. |
| 23:46 | And this is for one of our customers. |
| 23:47 | So we'll go to our overhead shot here. |
| 23:49 | And you can see it's a high compression domed piston and it is not looking as good as it used to. |
| 23:58 | So the issues with this is that the customer was running a set of individual throttle bodies, it was difficult in the DC5 Integra that this was fitted to to easily incorporate a inlet filter on those and we actually found that the filter the customer originally had was very restrictive to the tune of about 20 odd wheel horsepower. |
| 24:19 | So the customer chose not to run that. |
| 24:21 | The K24 and the engine they way it is set up, the trumpets face forward, the owner of the car took it for a road test and it ended up ingesting a small stone. |
| 24:34 | And what that actually did, from what we can tell, again really difficult when this happens at high RPM to be 100% certain, but what it did was it stuck between the valve, one of the valves and the valve seat and that essentially held the valve open enough that when the piston came back to TDC, it bent the valve and basically snapped off a head and it rattled around inside of the cylinder and made the mess that we see there. |
| 24:59 | So few problems that we can avoid, in that case by making sure that you've got good filtration of your intake air which really again should go without saying. |
| 25:11 | Alright so we've talked about our clearance issues there so probably the other key one would be piston to cylinder head clearance. |
| 25:20 | Again, really something we should be checking while we're assembling the engine. |
| 25:25 | So a few things to look at when we are pulling an engine apart. |
| 25:29 | If we've got piston to cylinder head clearance issues, what we're going to generally see is a sign on the crown of the piston, as well as the cylinder head where there has been contact. |
| 25:42 | So if there's basically a polished area, normally on the edges of the piston and a witness mark on the cylinder head, that would suggest that we don't have enough piston to cylinder head clearance. |
| 25:54 | Now with a steel rod we don't really expect any stretch in that rod. |
| 25:59 | This becomes more of a problem if you are dealing with aluminium conrods. |
| 26:04 | The aluminium conrods, contrary to popular belief, they don't actually stretch but what they do is they grow when the engine or the rod is at operating temperature so it's really important to allow additional clearance between your piston and cylinder head if you're building an engine with aluminium rods. |
| 26:22 | Where we can get into a problem with steel rods is where people are running very very thin head gaskets like this one I've got here, it's about 0.5 mm thick. |
| 26:32 | And those head gaskets can be used to help give a small bump in compression but we do need to factor in the deck height of the piston and make sure that we are still going to be safe with sufficient piston to cylinder head clearance with the thinner head gasket. |
| 26:50 | Now I'm going to come back here because one of those clearance issues that I talked about was a bearing failure. |
| 26:58 | And this again I've mentioned is probably one of the most common reasons I see for engine failure and this can be a variety of aspects here. |
| 27:08 | So what we can end up with is a situation where there isn't sufficient clearance from the get go and if that's the case, what we're going to do is see a very very fast failure of that bearing so basically the engine won't make it through the run in process normally, it's not a case of the engine isn't going to fail 1000 or 3000 miles down the track because there wasn't sufficient clearance. |
| 27:33 | If we haven't got sufficient clearance, we're going to see that straight away. |
| 27:36 | So we'll just jump across to my laptop screen again for a second. |
| 27:39 | Now these photos are just a couple that I found on the internet and they aren't specifically a really good example of insufficient clearance, these could be a variety of reasons here so we've got here a couple of bearings that are very badly worn and we are seeing here this copper colour which is the underlying material below the surface finish on the bearing. |
| 28:02 | So any time we've got that breaking through, we know that we've been suffering from metal to metal contact. |
| 28:10 | Now in this particular instance here we can actually see, which comes down to another area that I'm going to talk about, we can actually see that the bearing is worn more on one side than the other. |
| 28:24 | Now these are by the look of it, big end bearing shells so not necessarily going to be a good demonstration of my point but when we are seeing something like this, particularly if we're seeing this on the main bearing shells, this can actually be indicative that the crankshaft is flexing and under these conditions the flex we will see is normally at high RPM and high load where there's obviously a lot of force being placed into the crankshaft. |
| 28:50 | It can distort and flex more than you'd give it credit for. |
| 28:53 | And this is one of the reasons why the general trend when we are taking a stock standard engine and building it for a high power application is that we will generally build the engine with a slightly looser clearance on the bearings than stock. |
| 29:07 | It might be that we decide to add somewhere in the region of maybe half a thou clearance to both our big end and our main bearing clearances. |
| 29:15 | So the other aspect we're seeing here, these bearings, the damage not quite so bad, we haven't broken through to the copper. |
| 29:24 | This could be indicative here of debris passing through the oil. |
| 29:29 | We can see in particular there are lines that run in the direction of crankshaft rotation. |
| 29:36 | So this bad scoring that we see here, this can be a result of debris being passed through the oil or it can also be the very early signs of metal to metal contact between the crankshaft and the bearings. |
| 29:52 | Either way, not what we want to be experiencing here. |
| 29:56 | Now when this gets really bad we can, if we don't pick up on it, if we don't know that this is happening, so maybe we've managed to get through a dyno session and we've got the car out on the road or the racetrack, what will happen is that this damage will accelerate very very quickly. |
| 30:15 | Once we've got that metal to metal contact has started, it's only going to get worse and it can get very very serious very very quickly. |
| 30:22 | And what happens is that because we've got this metal to metal contact occurring it creates a huge amount of heat in that particular journal wherever that bearing shell is in the engine. |
| 30:34 | So in extreme circumstances, what this can result in, let's say we're talking about a big end bearing, the big end of the connecting rod can actually weld itself to the crankshaft, essentially heat welding itself to the crankshaft, it seizes solid. |
| 30:49 | Obviously the engine is still rotating normally at high RPM, this is a really quick way of snapping your conrod and the rest of the components exiting the block. |
| 30:59 | Now that, if we head back to my photo, again that's actually what the cause of this particular issue was here, that's why we've got a broken Carrillo conrod. |
| 31:10 | It was a bearing related issue and the rest of that particular conrod was seized onto the crankshaft so yeah definitely something that we want to avoid with bearing problems, they end up getting very expensive very very quickly. |
| 31:25 | Now that will also show up, these are generally pretty easy to diagnose, that will also show up though as some serious heat discolouration to the crankshaft and the connecting rod, or the block if it's happened on a main bearing. |
| 31:38 | We're going to end up with the components discoloured either blue or sometimes if it's really serious, black. |
| 31:47 | This will also almost certainly end up distorting the components. |
| 31:51 | So if you've ended up with a main bearing in your engine block that has been damaged like this, it's almost certainly going to distort the main bearing tunnel in the engine block. |
| 32:03 | Sometimes that can be recovered with line boring and line honing, sometimes it's not economical to actually try and recover it. |
| 32:09 | Now one of the issues, and this is why it's so important to diagnose these bearing problems, one of these issues when we have a bearing failure like this, is to make sure that the engine is properly cleaned before it is rebuilt. |
| 32:24 | Now this is something I see so often people overlook or don't really give too much thought to. |
| 32:31 | So obviously cleaning the engine itself, the block down, the head, all of the oil galleries, this should go without saying, this is one of our basic steps of engine building anyway. |
| 32:42 | Sometimes though it can be quite difficult to get to all of the oil galleries. |
| 32:46 | Quite often you'll actually have to drill out some of the oil gallery plugs which could be a solid aluminium plug and clean the gallery out and then physically replace it. |
| 32:56 | That's fine, we can get our engine machinist to do this, the part that a lot of people just don't give any consideration to though is the oil cooler. |
| 33:05 | So here I've got a conventional oil to air cooler, these are pretty common in the aftermarket. |
| 33:12 | The other option we may end up finding, if we jump across to my laptop screen here, a lot of engines are equipped with factory fitted oil to water heat exchangers which is what we've got here. |
| 33:23 | I think this particular one is off a Subaru EJ series engine. |
| 33:26 | The idea here, it is a matrix where this particular part bolts to, that's a horrible way of drawing that, this particular side here bolts to the engine block, we've got our oil comes down through the outside of this. |
| 33:41 | It is a matrix which water is passed through, the water goes in here, we've got another pipe out the back where the water comes out so this is just the normal engine coolant, it's not a separate system. |
| 33:52 | And then on the underside of this particular picture, that's where our oil filter will be placed. |
| 33:59 | So it doesn't do a bad job, there's actually some advantages with oil to water heat exchangers in some much as it does do a better job of managing the oil temperature under road car conditions, maybe around town where quite often if we've got an oil to air heat exchanger. |
| 34:19 | The oil temperature can actually run colder than is ideal. |
| 34:23 | So they're also nice and easy to package of course because they sit straight on the engine block. |
| 34:28 | The problem with these is that matrix ends up full of bearing material. |
| 34:31 | In my opinion it is impossible to clean with any real confidence. |
| 34:36 | Exactly the same as our oil to air heat exchanger, you can't guarantee that you're going to get all of that bearing material out of that medium, out of the oil cooler. |
| 34:49 | And of course you then freshly build your engine, spend a lot of money on it, get it started and running and quite often when the oil comes up to temperature it's going to free pieces of contaminant and debris that are stuck inside the oil cooler and it's going to pass it back through the engine and you're back to suffering from another bearing failure. |
| 35:07 | So while it might be expensive and a little bit difficult to justify replacing one of these oil coolers, some of these are several hundred USD for an oil cooler, it's a lot cheaper than rebuilding your engine so very important to make sure that you are thorough any time you've got a situation where you've had an engine failure. |
| 35:28 | Alright the next aspect we're going to talk about here is mechanical strength of our engine parts. |
| 35:33 | So this one should be relatively straightforward. |
| 35:37 | This is where we simply are asking too much of our engine components and the engine components simply can't handle it and calls enough and fails. |
| 35:49 | One of the first and most common issues we'll have is a failure of a connecting rod. |
| 35:56 | So for example here I've got two rods out of one of our Subaru FA20s and this was actually the result. |
| 36:04 | I will call it mechanical strength but I actually ended up causing this failure myself with a tuning related problem. |
| 36:12 | This was actually for one of our webinars just to make things a little bit more awkward. |
| 36:17 | We were doing a webinar on rolling anti lag or rolling launch control. |
| 36:23 | The Subaru FA20 engine has a sintered metal conrod which isn't particularly strong, we'd already proven that they weren't up to a rolling anti lag strategy so we tried to dial that back and make it much much more mild for our webinar. |
| 36:38 | Unfortunately didn't quite go far enough and when this happens in the Subaru FA20, because when the conrod bends it essentially becomes very slightly shorter, it becomes really apparent because the piston ends up contacting the bottom of the bore at bottom dead centre. |
| 36:54 | So what we'll do is we'll have a quick look at these two rods under our overhead here. |
| 36:58 | It's a little bit tricky to see but what we've got here is a bit of a bend in the beam of one of these rods. |
| 37:07 | Let's just see if we can see it around this way a little bit easier. |
| 37:10 | Oh yeah here we go, this one here, get it in the centre. |
| 37:13 | If you can see looks a little bit like a banana through the centre of that beam. |
| 37:18 | Now while this one is quite obvious, sometimes it's not that apparent and a really good trick for highlighting these sorts of problems is if you get two of these rods side by side and you slot one of the wrist pins through the rod, what we can do, we should be able to do this here. |
| 37:35 | We can actually essentially swing the rods together and, actually I'll do this in the front camera, it might be a little bit easier. |
| 37:45 | What I should be able to do here is basically swing the rods past each other but they're not, they're clashing. |
| 37:52 | If I go the other way they do rotate past each other, it's when I come back this way, because the rod is bent it's going to contact the other rod. |
| 38:00 | So that is a case where while in that case it was a particular circumstance that I managed to instigate, it is really still a case where those factory FA20 rods are quite weak, particularly if you want to put out any serious power. |
| 38:17 | So the obvious option there is to upgrade to an aftermarket rod, so we'll go to our overhead camera again. |
| 38:24 | And I mean it doesn't take a metallurgist or an engineer to just physically look at these two rods side by side and you can probably understand that this Brian Crower H beam rod has a lot more material through the beam and it is going to be a lot stronger. |
| 38:40 | Of course we do pay the price for that in that the Brian Crower aftermarket conrod for that particular engine is also a little bit heavier than the factory sintered material conrod. |
| 38:52 | So that's our connecting rods, those are going to make their failures apparent pretty quickly. |
| 38:57 | We're very lucky with that that we caught it because it happened at relatively low RPM and we knew what we were looking for. |
| 39:04 | If we had continued to drive that car, particularly under high load and high RPM, we would have had a situation where the rod would have broken in half very quickly and ended up with a catastrophic failure where we ended up with the engine block broken as well, we managed to stop that before it became a problem. |
| 39:26 | Alright so we've talked about our connecting rods there, the next one which is really common is piston failures. |
| 39:31 | Now this again is one of those gray areas because it can often be a result of a tuning issue. |
| 39:39 | The majority of factory pistons are a casting and as part of that casting, the casting process is cheap, it produces a relatively cheap piston, the cast piston is also quite stable thermally, allowing very tight piston to cylinder wall clearances which is great, reduces blow by, it makes it really easy for the rings to seal properly and also results in a nice quiet engine. |
| 40:07 | So all good things. |
| 40:08 | Unfortunately the downside with a cast piston is that that material is quite brittle. |
| 40:12 | So what we can find is that when our cylinder pressures rise dramatically, because we are making more power, that in its own can be enough for those cast pistons to fail. |
| 40:25 | Now that's not to say that every cast piston will fail. |
| 40:29 | Our Subaru FA20 engine at the moment is still running cast factory pistons. |
| 40:35 | Once we had gone to a set of aftermarket rods. |
| 40:38 | We hadn't had any issue with the factory pistons, so we decided to push them and see how far we could go with them. |
| 40:44 | So that's an engine that in stock form is naturally aspirated and is rated to 200 flywheel horsepower. |
| 40:51 | On our dyno, it puts out somewhere around about 175 wheel horsepower. |
| 40:56 | We have turbocharged that engine, we're running it on E85, we are currently sitting at around about 380 to 395 wheel horsepower. |
| 41:05 | The car is also beaten up on really hard, it's not a dyno queen, it gets a fair hiding at the racetrack and so far we've had no issue with piston reliability. |
| 41:16 | So we need to factor in that while yes a cast piston, if we continue to pile on cylinder pressure, at some point, even with the best tune in the world, those pistons will fail. |
| 41:26 | Quite often we can get a lot further with a cast piston than we think we can, or other people will tell you we can because we are more cautious with our tune. |
| 41:37 | The problem with cast pistons is that almost any level of detonation in a high powered engine will very quickly result in failures so we need to factor in, is it the piston or are we running an aggressive tune and maybe we've just encountered a little bit of detonation. |
| 41:55 | Often this will show up where a section of the ring land will have broken out. |
| 42:00 | So what I'm meaning here, let's have a quick look under our overhead shot. |
| 42:03 | Now I haven't actually got any piston rings, or I've got the oil control ring here, and we've got our top ring groove for our top compression ring, our second compression ring. |
| 42:11 | Quite often with a cast piston, we'll end up with a section of the ring land that will just break out and when we have that happen, it may not make any noise, what we're going to end up with is a situation where we're going to end up losing compression and we're going to end up with very high blow by and high oil usage as a result of the broken piston. |
| 42:34 | Now there are potentially a lot of other reasons for failure here in terms of mechanical strength. |
| 42:42 | Again, not something that you should have too much issue with in moderately powerful engines but in some of the 4G63 drag engines that I tune or one in particular, we put this down to a weakness in the factory casting, running the engine on the dyno we were running around about 900 wheel horsepower, around about 42 to 45 psi of boot on methanol fuel and about 9000 RPM on the dyno during a ramp run. |
| 43:08 | There was a loud bang and the engine just instantly stopped, literally didn't even turn over. Jumped out to diagnose that and noticed that the cam belt had come off which in itself seemed a little bit weird. |
| 43:21 | The reason, when we pulled the engine apart that the cam belt had come off is that the engine block had split horizontally in half, basically through the top of the main bearing cap so the whole block was basically two piece and when that happened it had physically stretched, probably most of you have seen engine blow up videos on YouTube of some of the really catastrophic diesel engine failures where the blocks have split in half. |
| 43:46 | Essentially that happened to this 4G63, although not quite as dramatic. |
| 43:50 | So that's what ended up resulting in the cam belt failing. |
| 43:53 | Now because I was really familiar at that stage with 4G63 engines, I'd probably tuned maybe eight or 10 engines at or above that power level, we weren't doing anything unique and certainly that's a failure mode that I'd never seen and have never seen since so we did just put that one down to a freak occurrence where we ended up with a weak casting, weak block right out of the gate. |
| 44:19 | Another issue that I've seen quite a lot in particularly the high powered, high RPM 4G63s, which comes down to mechanical strength is where the main bearing caps, or in this case the cradle in the 4G63 engine, let's just grab one here, this isn't 4G63 but it will do a good job of demonstrating the situation so let's just get this under our overhead here. |
| 44:46 | So this is the cradle off a Honda B18C. |
| 44:49 | And what we can find is that when we pulled the engine apart we'll end up with fretting on the base of these caps and you'll also see matching fret marks on the engine block. |
| 45:00 | So when I use that term fretting, essentially what's happening is under very high load and high RPM, those bearing caps are moving very slightly off the engine block, everything is flexing. |
| 45:09 | And when that happens essentially they are rubbing together and we sort of get a micro welding where material from the engine block is transferred to the bearing caps and vice versa. |
| 45:20 | So it ends up with a slightly rough surface finish, if you run your finger across the surface finish of the cap you will feel that fretting. |
| 45:28 | And it makes it difficult as well because unless we end up with the cap going back in exactly the same place, this can end up hampering or affecting our bearing clearance. |
| 45:36 | So if you're starting to see fretting like this, it means that you are pushing your limit and this is one of those areas where you do need to start considering something like an aftermarket stud kit instead of factory bolts, these are made out of a superior material, they are stronger, they can provide more clamping force. |
| 45:55 | So they hold the bearing caps onto the block tighter. |
| 45:59 | Also obviously available for the cylinder head too, exactly the same premise there. |
| 46:03 | There is a caveat with that though, particularly if you are going to put a main stud kit into an aluminium block, because of that additional clamping force, we quite often find with the aluminium blocks that it will actually distort the main bearing tunnel. |
| 46:18 | So we're fixing one problem, insufficient clamping force, but we're actually creating a whole new issue and that can result in problems with our bearing clearances so that requires a machining operation known as line honing to actually get that bearing tunnel back to factory size, making sure it is on the factory size and it is perfectly round. |
| 46:40 | OK obviously here I can't also talk about every potential failure mode, there are just simply so many. |
| 46:47 | But you're probably going to be starting to get the gist of what can happen here. |
| 46:53 | One more I will talk about when we're talking about mechanical strength here is head gasket failure and this is probably one of the limiting factors when we are talking about high powered turbocharged engines. |
| 47:04 | Again just like the main bearings, we're going to find that the cylinder head is actually flexing off the engine block and in extreme circumstances that can flex enough to allow combustion pressure to escape and when that happens we're going to end up with our head gasket leaking. |
| 47:23 | Now it's important to diagnose that aspect as well, generally with just about every engine that I build, we will have the machinist just do a light run across the surface of the block and the surface of the cylinder head with their surfacing machine. |
| 47:42 | So that's just essentially going to put a perfect flat finish on both of those components, making sure that there is no irregularities in those deck or cylinder head surfaces, giving us the best chance possible of the new head gasket sealing. |
| 47:58 | What we will often see, and I don't have one here to show you but if we just get this head gasket under our overhead. |
| 48:04 | It's black on black which doesn't really help but quite often, this is a Viton coating that's placed on these MLS style head gaskets, quite often what we will find is a sign where there is distortion or discolouration of that coating, maybe it's been burned away. |
| 48:22 | Often it'll be sort of a brown combustion style discolouration which shows leakage out generally into the water jacket. |
| 48:30 | So you'll quite often find that will be also between the stud holes. |
| 48:34 | So obviously that's where the cylinder head is most likely to flex off the engine block. |
| 48:39 | Now we'll just actually also head back to my laptop screen here, quite often that'll also show up, while this isn't the failure mode we've seen here, what we're looking for is any discolouration like we've got here. |
| 48:52 | Normally if we've got head gasket leaking, we'll see that that discolouration will come right through to the combustion chamber. |
| 49:00 | So we will be probably pretty clear, it'll be probably pretty clear and obvious that there is some issues with our head gasket leaking which is going to make us look a little bit further, particularly if we have had the head gasket leaking for some time, what we also want to do is make sure that we check the cylinder head for hardness. |
| 49:24 | If it has gone soft because it's been overheated, we will end up with real trouble making the head gasket seal again, no matter how flat and how true those surfaces are. |
| 49:37 | Alright we're going to move into tune related issues in a second so I'll just mention here that after that we will be getting into questions and answers, I've seen we've already got a few in there so just a point, if you've got anything that you want to ask there, this is a good time to ask them. |
| 49:55 | Actually just one last thing before we get into tune related issues, I will also talk in terms of mechanical strength about our wrist pins. |
| 50:05 | So the wrist pin, really stressed part of the engine components and it's again one of those aspects which we think that they're really strong and rigid so a lot of people don't give too much thought to them. |
| 50:18 | Of course we've got the connecting rod placing a lot of force into the middle of the wrist pin and it's supported at both ends by the pin bosses of the piston so it's constantly being flexed both ways as its being operated so quite often a good sign if you've got to pretty close to the limit of the strength of the wrist pin, you may find that when it comes time to disassemble the engine, it's actually quite difficult to get the wrist pin out of the pin bosses. |
| 50:43 | It's also a good idea in a fully floating wrist pin where the pin rotates and floats in both the pin bosses as well as the connecting rod, just to inspect your wrist pin bosses and quite often you will find there'll be a polished area on one side of the pin boss which indicates that the wrist pin is flexing. |
| 51:03 | So the other thing we can do, you can check the wrist pins, make sure that they are straight. |
| 51:10 | You can get your machinist to do this, you can run them in V blocks, but generally just rolling them on a perfectly flat surface will also highlight if you've got any issues there. |
| 51:18 | If we jump to our overhead camera here, while these two wrist pins aren't for the same exact application, what we can see here is that there is a vast difference in the wall thickness. |
| 51:31 | This particular pin here is one of JE's more advanced wrist pins, it is made from their 93C material and it is a thicker wall. |
| 51:41 | So basically it's a stronger material for a start and it's also a thicker wall so all of that adds up to a lot more rigidity in the pin, less flex and a longer lifespan. |
| 51:53 | The downside of course is the thicker wall will also make the wrist pin heavier. |
| 51:58 | So we do need to factor that in, making sure obviously you've got a component that is going to last but with minimal weight or as little weight as we can get away with. |
| 52:11 | OK so we'll jump into tune related issues. |
| 52:14 | So again this is something that there is a lot of grey area in. |
| 52:19 | Sometimes it's going to be pretty apparent if there has been a tune related failure. |
| 52:24 | Unfortunately I don't have a really good example of this here. |
| 52:28 | But if you have got an engine that's been tuned with too much ignition timing, this is probably the most common failure mode, you're going to end up with the engine suffering from detonation. |
| 52:40 | Now it does end up looking a little bit like this, I'll just grab this piston and get it under our overhead shot here. |
| 52:48 | So this is pretty extreme and this piston has actually suffered from pre ignition which is similar but quite different at the same time to detonation so that's why we can see that there is actually an indentation here, the top of the crown is actually melted to the point where it has been indented and then it's very quickly melted the side out of the piston. |
| 53:14 | Also damaging all of the rings, it's basically like running a gas torch through the rings. |
| 53:19 | Now under less extreme circumstances, what we're going to see is still some of the signs we've got here. |
| 53:27 | It can be a little bit difficult for you to tell on this overhead shot because we're not zoomed in quite enough but there is kind of a sand blasted appearance here on the edge of the piston that actually extends out into this indentation here. |
| 53:41 | So this is one of the classic signs of detonation, so even if you haven't actually got a complete failure like we've seen there, detonation, what it results in is essentially pockets of unburned fuel and air inside the combustion chamber will spontaneously combust. |
| 53:57 | When they do this it creates very sharp spikes in pressure and that pressure itself is damaging, it's essentially like someone slamming down on the top of the piston with a sledgehammer. |
| 54:07 | In a cast piston that alone can be enough to break out sections of your ring land. |
| 54:10 | That's what I was saying, a cast piston can be damaged by an incompetent tuner using too much timing very very quickly, while properly tuned they can support much much higher power levels. |
| 54:21 | But anyway, I digress, we've already kind of dealt with that. |
| 54:24 | Now when that sharp pressure spike occurs inside the cylinder as well, what it tends to do is it will strip through, there is a boundary layer of gases that protects the crown of the piston from the full heat of combustion, obviously aluminium is a material that has a relatively low melting point. |
| 54:42 | Depending on the alloy, maybe somewhere around about 700, 750°C, the full heat of combustion, much higher than that. |
| 54:50 | So when that boundary layer that protects the piston is stripped away, the piston can become very quickly damaged and melted and we start by getting that pitted appearance, the sand blasted appearance and generally that'll be on the outside edge of the crown. |
| 55:06 | Normally, interestingly alongside the intake valves, that's where we generally start to see that occur. |
| 55:14 | You may also see that pitting occur on the cylinder head as well, so those are the two places we want to be very careful to inspect and make sure that we've got no sign of detonation occurring. |
| 55:26 | Obviously again, this is an extreme circumstance but we want to be able to be mindful of just light detonation that's just started to show up without actually presenting itself as a mechanical failure. |
| 55:38 | Now the other issue that we want to look at at the same time with that as well, if we've got a piston that's showing light detonation, it's really important to just make sure, let's actually get one that has rings on it, we want to make sure that the rings actually are free in the ring grooves and can turn. |
| 55:53 | The reason for this is when detonation occurs, it's essentially again like someone slamming down on the crown of the piston with a sledgehammer, that can end up compressing the ring grooves and it can actually nip up the rings so if you don't notice that, you can end up assembling an engine that's going to be destined for poor results because the rings aren't free in the grooves, we don't get good ring seal. |
| 56:15 | OK so that's the first problem is a tuner that is using too much ignition timing, and this becomes a combination, too much timing, too much boost or a lean air/fuel ratio. |
| 56:26 | All of those aspects can add up to a catastrophic failure. |
| 56:29 | Now one of the common problems I hear about is people talking about engines that have been melted due to running a lean air/fuel ratio. |
| 56:40 | Now this kind of, borderline from my opinion is urban tuning myth. |
| 56:46 | While of course we don't want to run the engine too lean and yes a lean air/fuel ratio will actually put more heat into the combustion chamber, generally it's not the lean air/fuel ratio itself that does the damage, generally the damage in turn comes from a lean air/fuel ratio making an engine more susceptible to knock or detonation and it's the actual knock or detonation occurring that creates the significant damage. |
| 57:13 | So that's the biggest issue, the other issue that comes along with this as well is aspects such as running the engine beyond a safe rev limit and this really comes down to discussing with the tuner the capabilities of the engine components so that everyone is 100% clear on exactly what the expectations should be. |
| 57:32 | You should always be giving your tuner information on what your maximum safe rev limit is or what you want the engine to rev to, if you've got a boost limit that you don't want to go past, make sure that they understand that. |
| 57:44 | It's also a good idea as well, and I think this is where communication with your tuner is so important, to just be clear on what your expectations are. |
| 57:51 | A lot of people will want the absolute maximum, 110% possible power out of the engine and they don't care what the potential risks are. |
| 58:02 | Most people in my experience are a little bit less risk tolerant, they've probably just spent a lot of money building an engine and they probably want a reasonable life expectancy out of it. |
| 58:13 | This can be one of those situations where particularly if you are running on a low quality gas like pump fuel which will, particularly with a turbocharged engine or supercharged engine, be prone for detonation, can be sensible just to be a little conservative, leave a wider threshold between your knock threshold and the timing that you're actually running so that out on the street, out on the racetrack if the air temperature or the engine coolant temperature or maybe you get a bad batch of fuel that's not quite what you had on the dyno, just gives you that extra safety margin and most people would not be able to tell the difference of maybe five or 10 horsepower that you may lose for that conservative tune but most people will also be very happy with an engine that's going to last for several seasons of racing. |
| 58:59 | Now there's a couple of aspects before we get into these questions that I just want to talk about here, so this piston that we've already looked at, as I mentioned, this one has suffered from pre ignition. |
| 59:08 | So this is often confused with detonation and as its name implies, pre ignition is a type of abnormal combustion that occurs before the spark plug has ignited the air/fuel charge. |
| 59:24 | So under normal circumstances when detonation occurs, this occurs after the spark event, what we end up with is our combustion process beginning, a flame front propagates out through the combustion chamber, igniting the unburned fuel and air and as this occurs, the heat inside the combustion chamber continues to increase. |
| 59:42 | And at some point that heat inside the combustion chamber can become so great that unburned pockets of fuel and air will spontaneously combust, as I previously mentioned. |
| 59:52 | Now damaging in its own right, pre ignition on the other hand, will occur where something inside the combustion chamber, maybe you've got a carbon deposit that's glowing red or a spark plug that's too hot, there's a variety of different possibilities there, basically can ignite the fuel/air charge very very early in the engine cycle. |
| 01:00:14 | So this could be just as the piston is starting to come up the bore from bottom dead centre, just after the intake valves have closed. |
| 01:00:22 | So what we end up with here is a huge amount of heat and pressure inside the combustion chamber and that piston has to battle that heat and pressure the whole way through the compression stroke so it's fighting against it. |
| 01:00:35 | So it's got a lot of time to do a lot of damage and one of the key things we will see with pre ignition, the damage will be very quick, you can end up doing damage like this to a piston in no more than a handful of engine cycles where even very high specific power levels in a drag engine with detonation, the engine can last for a significant amount of time before it's damaged. |
| 01:00:58 | The other thing though is because of that heat, we will generally see a depression in the top of the piston crown and often that pressure will actually end up becoming a hole directly through the piston crown. |
| 01:01:08 | It's putting a lot of heat into the piston, which is why we end up also seeing that the piston has expanded out, we've got it starting to seize against the wall of the cylinder. |
| 01:01:17 | So not a lot of good things happen with pre ignition. |
| 01:01:20 | And I will mention here that I'm talking about pre ignition, this isn't generally something we can blame on the tuner, there are a variety of aspects that add up to cause pre ignition but it's not something as a result of the tuner setting the ignition timing incorrectly. |
| 01:01:37 | The other aspect which was quite novel that I experienced back through my old business was this failure here. |
| 01:01:44 | So we've got a piston from one of our 4G63 drag engines with what's left of our Tomei H beam conrods so we'll just get under our overhead shot here so we can get a better idea of what's happened here. |
| 01:01:57 | So this was an engine that was making around about, I think 850, maybe 900 wheel horsepower, 42 odd psi of boost on methanol fuel. |
| 01:02:08 | And it actually broke three conrods essentially simultaneously on the dyno. |
| 01:02:14 | And this was a pretty catastrophic failure here, you can see that the conrod has broken just below the wrist pin, it's actually splayed the H beam completely open here. |
| 01:02:23 | And while the Tomei rods, possibly not the highest end rod in the world, definitely a conrod that should have been more than capable of handling that sort of power. |
| 01:02:36 | So this one actually took us a while to diagnose and what we ended up figuring out was that we were getting interference on the ignition system of that car and we were getting essentially a random spark, so spark was occurring nowhere near the correct time. |
| 01:02:52 | So if you could imagine, if the spark occurs very very early in the cylinder, a little bit like pre ignition, we get a lot of combustion pressure acting on the top of the piston, at a point where the conrod is at quite a high level of angulation and this ends up bending the rod very quickly, the rod can't handle that level of pressure and of course if you continue to run the engine under high load and high RPM, it's not going to take very long before that rod actually breaks and makes its way out through the side of the block. |
| 01:03:23 | So why I talk about this is that we've been talking here about tuning related failures and while yes these are a real problem we do need to get ontop of these and understand them, make sure you're obviously using a quality tuner, sometimes the tuner gets blamed incorrectly for a mechanical failure or a failure of some other part of the system and it's really important to look really deeply into that and find out exactly what has been going on. |
| 01:03:50 | Alright so we've already gone probably about an hour here so probably one of our longer webinars, I am going to get into our questions now so we'll see how many of these we can get through. |
| 01:04:02 | Our first one is, what does the top of the piston look like if there is detonation happening consistently, what are some of the other signs of detonation. |
| 01:04:10 | So I think I've covered that probably. |
| 01:04:12 | Light detonation, is going to give you that sand blasted appearance to the crown of the piston as well as to the underside of the cylinder head, so that's from that pressure spiking stripping away the boundary layer of gasses there. |
| 01:04:27 | The other aspect is look out for compressed ring grooves where the rings are no longer free to move inside of the ring grooves. |
| 01:04:36 | Next question, if the piston to wall clearance is correct when it's measured at three thou by the piston manufacturer, can we end up with piston slap, I think that's the gist of that question. |
| 01:04:51 | OK so what we need to understand, it's quite a complex question surprisingly there that you've asked. |
| 01:04:58 | What we need to understand is that if we are running a 2618 forging, that particular alloy, due to the silicon content in the alloy, it does expand quite a lot more as it heats up compared to a cast piston or even a 4032 piston forging, so that's why we need to provide some additional clearance. |
| 01:05:16 | Three thou though, still reasonably tight so I would not expect with a 2618 forging that you should end up with piston slap or noisy operation when the engine is cold if you've got that clearance. |
| 01:05:30 | So if you have, a couple of things come to mind, either perhaps that clearance actually is a little looser than you think it would be. |
| 01:05:37 | I dealt with a couple of machinists over my time where I've given them specifications for what I want and instead of giving me what I want, they've given me what they think I want which I don't really know why they've done that, so they've given me an extra half a thou or one thou just to err on the side of caution because they think that's going to give me a better result. |
| 01:05:59 | And I mean in this instance, when I had that happen, I knew that my engine was going to run perfectly with the clearance I'd specified and instead I ended up with excessive clearance and a noisy engine so that's one of those situations. |
| 01:06:12 | The other thing of course is even if we do set that clearance correctly to start with, the engine is going to end up wearing over time so we can find that initially the engine is nice and quiet but over time can start producing a little bit of piston slap. |
| 01:06:28 | Claudius has asked, I'm currently rebuilding a 4G63 engine that spun the rod bearings and has badly worn pistons, what causes an engine to spin its bearings and how do you prevent it? Actually this is something I probably didn't dive into enough detail here. |
| 01:06:42 | So probably one, there's two issues that can cause a spun rod bearing, or bearing problems in general, so the first would be where we've got an issue with our clearance initially, so I've already covered off that. |
| 01:06:57 | The other one though with a lubrication related issue is where we're getting oil starvation. |
| 01:07:03 | So in order to keep those bearings alive, it's essential that we've got a nice consistent film of oil to prevent metal to metal contact. |
| 01:07:11 | So particularly if you've got a wet sump engine, you're cornering hard on a racetrack, often at high RPM it's possible to end up with the oil running away from the oil pickup, drawing in air and it doesn't take much interruption to that oil film to cause exactly that problem. |
| 01:07:25 | Now once the problem starts, as soon as we get metal to metal contact, it accelerates very very quickly, so it doesn't take a lot of that to cause that sort of problem. |
| 01:07:35 | So I can't say specifically but that's my guess. |
| 01:07:37 | One of the tips for looking at this is that often if you are having problems with oil control, you'll start to see problems at the last piston or the last connecting rod I should say and the last main bearing on the oil gallery. |
| 01:07:53 | So the first bearings still get a good supply of oil but sort of doesn't make its way all the way to the last bearings and so if you're starting to see that, that's a good sign that you could have problems with oil control. |
| 01:08:11 | I don't actually know what this name is but I'm going to answer the question anyway, is it better to run a 10W30 or a 20W50 oil? Planning on running 20-25 psi of boost on my Subaru EJ257 build, forged pistons and rods and the rod bearing clearance is two thou. |
| 01:08:27 | OK so first of all, couple of things there, the oil specification needs to be considered in conjunction with your use, with your bearing clearances, as well as what type of engine you're running. |
| 01:08:42 | So you've said an EJ257 there, I know that some of these EJ257s have variable cam control, so AVCS in Subaru lingo. |
| 01:08:52 | And if you are running a continuously variable cam control design then the oil viscosity is really important. |
| 01:08:59 | If you go to an oil that is too thick, the cam control will struggle, you'll get latency and control issues with your cam control. |
| 01:09:05 | So in that instance you can step a little bit heavier in your oil viscosity from manufacturer but I'd be very very careful about exactly how far you go there. |
| 01:09:14 | 20W50 is a pretty thick oil. |
| 01:09:18 | I don't imagine that that would be necessary for your application. |
| 01:09:23 | To give you some perspective on this, on our 4G63 drag engines that rev to 10500, 11000 RPM and made upwards of 1200 wheel horsepower, we were running a 15W50 so that was at the absolute extremes of what we could expect an engine to go through. |
| 01:09:41 | 15W50 or 20W50, it's a pretty thick oil and particularly at cold start you're going to have very very high oil pressures so I would probably be inclined to run a very good quality 10W30 or maybe a 10W40, somewhere in that region and that should work pretty well with your bearing clearances at two thou, although you haven't also mentioned your main bearing clearance. |
| 01:10:06 | Claudius has asked, what would be the result if you over torqued the head and crank cradle on a 4G63? So what you're going to end up with is that if you over tighten the fasteners for any of those, you're going to end up with the clamp load actually reducing. |
| 01:10:22 | So it's basically going to end up with the same result as if you didn't torque them up properly, so basically the clamp loading sort of increases and then it'll plateau and then it'll drop off quite sharply. |
| 01:10:33 | So yeah really important to make sure that your fasteners are tightened correctly. |
| 01:10:39 | Realracerx has asked, is an oil cooler a good alternative if you don't have oil squirters? OIl squirters and oil coolers, very very different aspects and you can't say one is a replacement for another. |
| 01:10:55 | So oil cooler is important to maintain a suitable oil temperature. |
| 01:11:01 | So if your oil temperature gets too hot, regardless whether you have oil squirters or not, you're going to find that the oil pressure will drop away and the oil will also not be able to do its job properly so there's generally a fairly narrow range of oil temperatures that we want to run, generally for our racecars I like to try and keep the oil around about 110-115°C, I try and prevent it going over about 130°C. |
| 01:11:28 | Oil squirters on the other hand, they're incorporated into a lot of engine designs to provide some cooling to the underside of the pistons. |
| 01:11:37 | I've run engines with and without oil squirters and I've had good results with both so I wouldn't necessarily say that they're an absolute essential but if I do have an engine that has them, I will retain them, I know a lot of engine builders do remove them. |
| 01:11:53 | Next question, what are some of the failure modes for hydraulic lifters and roller rockers? OK good question there, so hydraulic lifters, let's see, so one of the most common issues I guess with hydraulic lifters are where we've just got a lifter that is old, it's not doing its job properly and you've probably all heard the common ticking from a noisy hydraulic lifter. |
| 01:12:17 | So not necessarily life and death but certainly annoying at the very minimum. |
| 01:12:23 | The more serious issue with hydraulic lifters and not all of them suffer from this, they do seem to have improved over time, various engines that come out with hydraulic lifters are known to be very bad for lifter pump up, others not so much. |
| 01:12:37 | So that's basically where at high RPM our oil pressure is so great that the lifter physically pumps up and holds the valve open and that can be quite problematic, it can really limit what you can do in terms of running an engine to a higher rev limit. |
| 01:12:53 | Our drag 4G63s, again just to bring back that same example, we always converted those to solid lifters. |
| 01:13:00 | The other issue as well with hydraulic lifters and this is really quite a narrow focus problem, if you are running a two step style launch control where you're using a lot of ignition cut and ignition retard in order to build boost on the start line, what that does is it creates a lot of pressure pulsing in the exhaust system, if your valve springs aren't strong enough, you can end up with those pressure pulses basically pushing the valves, the exhaust valves momentarily back off their seats. |
| 01:13:28 | What will happen then is that the hydraulic lifter will instantly pump up to take up that clearance and then it holds the valve open and you lose all compression and the engine basically runs really poorly for a little while until the valves, the hydraulic lifter sort of stabilises again. |
| 01:13:43 | So hydraulic lifters there, roller rockers, I mean a good quality roller rocker, pretty reliable. |
| 01:13:51 | There are problems with some rockers, depending on how they are located, popping off and that really comes down to most often valve train control issues. |
| 01:14:02 | So if you aren't controlling the valve and it's floating, so this will normally be as a result of very aggressive cam profile with insufficient spring pressure to control that, you can end up with your rockers popping off and things like that. |
| 01:14:15 | But there are millions of different engines running roller rockers, I can't speak for all of them. |
| 01:14:23 | Realracerx has asked is there any way to find out what kind of limits your components have other than by breaking them? Fortunately, usually the answer there is yes. |
| 01:14:34 | If you're dealing with a popular engine that has a fairly well trodden path with upgrades, a bit of time on some enthusiast forums will usually give you some pretty accurate answers on what the pistons, the rods, et cetera are capable of handling. |
| 01:14:50 | This can take a little bit of fact finding and filtering fact from fiction as well, in order to sort of get an idea. |
| 01:14:59 | So you're likely to get at least a ballpark of what you can expect those parts to handle. |
| 01:15:06 | In some instances, if you are dealing with a brand new engine or you really are pushing the boundaries, unfortunately you are often on your own and you do need to experiment and find out for yourself. |
| 01:15:16 | Generally the factory components that we will be replacing such as pistons and rods though, we're going to be going aftermarket anyway and dealing with the component manufacturers should be able to give you pretty much guaranteed results that will handle the power and torque levels you're expecting. |
| 01:15:34 | Then it really comes down to things like block integrity as well that could become an issue. |
| 01:15:44 | Ktireman has asked, will the ring gap being set up for nitrous on a set of CP pistons with Eagle rods work for higher boost pressures than the recommended gap for boost? Looking to run 30 plus psi on an SR20DET. |
| 01:15:59 | Not 100% sure if you're looking at running 30 psi plus nitrous. |
| 01:16:04 | I don't personally really class nitrous and turbochargers and superchargers any differently. |
| 01:16:11 | Basically they're all power adders, all we're doing with nitrous is using a different way of getting the oxygen into the combustion chamber or doing it chemically, it's chemical supercharging. |
| 01:16:21 | What we do see with nitrous is we do have one advantage in that it does actually help massively cool our combustion charge temperature. |
| 01:16:29 | So if anything, nitrous you could consider to be a little bit easier on the piston, on the rings, it's probably not going to have the same level of combustion temperature. |
| 01:16:39 | What I would do is basically look at your worst case condition and gap your rings to suit that, then you could be pretty confident that you're going to get a reliable result. |
| 01:16:50 | James has asked, is running a secondary or auxiliary oil filter, for example pre turbo or pre oil filter, an acceptable practice, any reason not to do this? So it is quite common to run an external oil filter for your turbocharger and that's a great idea, particularly with some of these turbochargers we're running these days, ball bearing turbochargers, they're not cheap and you can find that particularly passing debris through the oil into the turbocharger can very quickly destroy it. |
| 01:17:21 | So yeah it's not a bad idea, what I do say though is a lot of people will fit these, they're quite a small filter so they don't have a lot of filter area and they will fit them and then forget about them. |
| 01:17:32 | So it's one of those things, if you are going to do this, you do need to consider checking and cleaning out that filter element at regular intervals, normally of course in line with when you're doing your oil changes would make sense. |
| 01:17:47 | Fred has asked, what do you think about adding oil squirters on an engine that doesn't come witih them? Yeah, I answered a question about this before, I've run engines with and without and I've never really got to a situation where I've said hey you know what, I have to have oil squirters on my next engine if I want any chance of reliability. |
| 01:18:06 | It's not, in my opinion, a make or break deal. |
| 01:18:11 | The other issue we need to consider is that often adding oil squirters to an engine that by design never had them, could be difficult, at best incredibly expensive and at worst probably just downright impossible. |
| 01:18:24 | The areas or the times when I would consider adding oil squirters is when we're dealing with an engine family where some of the engines came out with under piston oil squirters and others didn't. |
| 01:18:34 | Quite often, a good example of this would be 4G63 and 2JZ, the N/A 2JZ do not have oil squirters. |
| 01:18:42 | Some of the 4G63 variants don't have oil squirters, it's relatively easy to machine the block to take those factory oil squirters although it's going to add considerably to your expense. |
| 01:18:53 | I wouldn't say that adding an oil squirter could ever be a downside. |
| 01:18:56 | As I say that I also think that you are going to potentially see a very small reduction in your oil pressure for the bearing, so that is why I know a lot of engine builders remove oil squirters, as I said previously, I don't personally see a need to do that, I've never removed oil squirters from an engine that has them. |
| 01:19:20 | Digitalashley's asked, can sucking synthetic cloth into turbo cause major damage, if so what kind of damage, I assume piston oil rings? OK so sucking a piece of cloth into the engine, can that cause damage? Yeah, yeah it definitely can. |
| 01:19:43 | It's one of those things that can actually happen from time to time. |
| 01:19:48 | I've heard of it happening. |
| 01:19:50 | Depends on a range of factors, how big a piece of cloth, where did it manage to go to, a lot of this is going to come down to luck of the draw but yeah it definitely could cause damage. |
| 01:20:01 | One of those reasons why you really want to be ultra careful making sure everything is cleared out before you ever assemble and start your engine. |
| 01:20:10 | Johnbuleza, I think it is, has asked, if running a crankshaft that has had to have the journals machined extensively, of course running the correct bearings, will this increase the chance of crankshaft failure of any sort? That's actually a really good question John and it's one of those questions that I constantly see debate on. |
| 01:20:28 | So the answer is that yes it can actually reduce the life expectancy of the crankshaft. |
| 01:20:32 | The reason for this is that all factory crankshafts run a hardened surface. |
| 01:20:37 | Most current model crankshafts go through a process of what's referred to as induction hardening. |
| 01:20:44 | So this provides a very very hard surface on the journals of the crankshaft which helps reduce wear. |
| 01:20:50 | Now that induction hardened surface is generally only very thin so when we grind the crankshaft journals to undersize we grind through that surface hardening and we don't have the benefit of that. |
| 01:21:03 | Now it isn't the end of the world necessarily because of course we shouldn't be seeing metal to metal contact anyway between the bearing journal and the bearing surface. |
| 01:21:14 | But inevitably even if everything is going as it should, there's going to always be some level of debris that's passing through the oil and what we can see is that that can cause light scoring on the journal of the crankshaft. |
| 01:21:28 | So I need to probably put this in perspective, I have run ground crankshafts in our own race engines so that should say enough that I'm confident it's not going to result in a dramatic reduction in the life expectancy of the crankshaft but I need to add in that caveat that yes because we are removing that surface hardening it is possible. |
| 01:21:50 | Kelvin has asked, is checking the oil filter for metal contamination common practice, in aviation we cut the filter open and check for different metal particles, suggesting wear for different components of the engine, examples like brass for camshafts, steel for cylinder walls. |
| 01:22:03 | Yeah Kelvin, I think what I would say is it probably isn't that common but it should be. |
| 01:22:07 | It's something I've personally done on a lot of our race motors. |
| 01:22:10 | You can learn a lot by cutting those oil filters open. |
| 01:22:14 | Often you don't even need to look at the filter media, just cutting the bottom off the oil filter and looking at what is in the bottom of that, you'll get a pretty good idea straight away if you've got anything serious going on. |
| 01:22:28 | There is also locally here in New Zealand, a couple of companies that specialise in oil sample analysis and I know that they do it as you say for the aviation industry but you're not limited to that. |
| 01:22:40 | It's relatively cost effective and that'll give you a full report on exactly what is in your oil along with potential areas for concern as well so it's always a good idea to keep a bit of a history of your engine. |
| 01:22:53 | As it wears, particularly if you're getting regular oil samples done, you can start to see when things are maybe starting to go away and get on top of those before it results in a catastrophic failure. |
| 01:23:04 | Obviously very important in aviation, you don't get to pull across to the side of the road if you're in a plane or a helicopter. |
| 01:23:13 | Next question, what could have been done differently to save the Toyota V8 in the AE86, GT86 actually, or would you just be pulling the motor for a rebuild and just be saving the block by doing so? We've discussed this at length and we think that what we probably need to do is do shorter races. |
| 01:23:32 | That happened 52 minutes into a one hour long race so clearly if we'd been doing some 15 minute sprint races, happy days. |
| 01:23:41 | Likewise our last failure was about 54 minutes Into a one hour race where we broke an axle so obviously endurance racing is not for us. |
| 01:23:49 | However on a more serious note, I don't think that there's anything that we could have done to save the engine. |
| 01:23:56 | This is an engine, and I'm not blaming anyone here, this is an engine that we didn't personally build so I don't have the level of understanding that I normally would of the components inside, the clearances inside et cetera. |
| 01:24:09 | We still need to pull it down and find out what's actually failed before we really have a full understanding of that as well. |
| 01:24:15 | So yeah it's just one of these things. |
| 01:24:17 | We're certainly not angry about it and particularly for today it's made for some fairly timely content for us to talk about as well. |
| 01:24:25 | We had already intended to rebuild the engine and when I say rebuild what we're actually going to do is jump up to a 4.3 litre 3UZ-FE. |
| 01:24:35 | Looking at stroking that to get us up to five litres if possible, with the aims of getting a little bit more power out of that engine. |
| 01:24:43 | On that basis, not really too worried because we wouldn't have been using that 1UZ block anyway. |
| 01:24:48 | But probably chances are we have lost some pretty good cylinder heads in the meantime so bit of a shame but yeah that's motorsport. |
| 01:24:57 | The next question is how many degrees off can you run a camshaft before it becomes dangerous as a general rule if cams have not been degreed, if you don't have adjustable cam gears for aftermarket cams? I can't possibly answer that, it's just going to be so dependant on the cam profile that you're dealing with as well as the pocketing on your pistons so yeah it'd be very dangerous for me to make any recommendations, you really need to check these things so you know exactly how much you can move the cams without any contact problems. |
| 01:25:32 | Jack's asked, what's the explanation for the piston damage occurring mostly on the intake side? Is there a link with the oxygen and fuel coming from that side and the cold air density? There is an explanation for this and it's not going to be too helpful because I can't actually remember the thorough explanation of what actually happens. |
| 01:25:50 | But it's basically to do with the way the fuel and air move inside of the cylinder. |
| 01:25:55 | And if I remember correctly what we end up with is due to the way the air and fuel move in the cylinder, we can end up with pockets of fuel basically down the side of the piston over on the intake side. |
| 01:26:11 | The other issue there with pre ignition in particular on methanol fuels, while methanol fuels and ethanol fuels are very very resistant to detonation, they are actually much more prone to pre ignition which seems a little bit unusual. |
| 01:26:27 | The reason for this is that they are quite susceptible to basically dillution with oil affecting their ability to suffer pre ignition and that tends to happen more often down on that intake side. |
| 01:26:42 | So I'm sorry that's not a full and thorough understanding but yeah I can't quite give you that thorough understanding right here, right now. |
| 01:26:53 | Zach has asked, can you tell by looking at the valves if they have experienced bounce or float? There can be some signs depending on the way your valve train works. |
| 01:27:07 | So generally if it's experiencing significant valve control problems, you can end up with the valve seats getting pretty hammered out pretty quickly. |
| 01:27:18 | You can end up with also some wear marks on the tip of the valve as well where essentially it's been bouncing off whatever is actuating that. |
| 01:27:26 | When it gets bad of course you can start to see contact witness marks between the valve and the piston. |
| 01:27:34 | So particularly in a situation where you've gone through and you've checked all of your clearances and you know for example, let's say you've got 60 or 80 thou clearance between the valve and the piston pocket when you're doing a static degreeing of the cam, if you are just starting to see witness marks, obviously you know that it's taking up all of that clearance you had so you've got some valve control issues in there. |
| 01:28:02 | Damn, we've got a lot of questions today. |
| 01:28:07 | Wesley has asked, will ceramic coating titanium exhaust valves be able to hold up to the temperatures in a turbo application, if not would you recommend stainless steel valves? Titanium valves almost exclusively used in naturally aspirated engines, definitely not on the exhaust side of a turbocharged engine. |
| 01:28:23 | You would be wanting to run stainless steel or perhaps Inconel as a material. |
| 01:28:28 | I would recommend, this is really beyond the scope of today's lesson, I would recommend you get in touch with any of the aftermarket valve suppliers, they will be able to give you a thorough understanding of what will suit your application, Ferrea is a good example there. |
| 01:28:45 | Will has, oh no same question I think from Wesley, same person I should say. |
| 01:28:49 | Will ceramic coating OEM pistons affect piston to cylinder wall clearance negatively? OK so ceramic coating is only a coating that is applied to the crown so that in itself won't affect the piston to cylinder wall clearance. |
| 01:29:04 | There are skirt coatings that are anti friction and depending on the coating, some do and some don't affect the clearance so that's very much dependent on the particular coating you're dealing with. |
| 01:29:15 | Again, talk to your piston manufacturer or supplier, they will be able to tell you what to do there and how that will affects things. |
| 01:29:26 | Nuriddin has asked, would you recommend going to a stiffer valve spring if there is valve float or should I adjust it first? OK so if you are getting valve float then yeah chances are that you don't have enough valve spring pressure or seat pressure on your valve springs. |
| 01:29:42 | This is one of those things that is actually quite complex, there's a lot that goes into that and really you need to be talking to your cam supplier. |
| 01:29:51 | They will be able to advise on the correct valve spring, the correct seat pressure and the correct pressure over the nose of the cam that you'll require in order to control that particular camshaft in that particular valve. |
| 01:30:09 | Romulo has asked, any thought about metal conditioner oil additives? Yeah that is an area that I personally haven't delved into too much. |
| 01:30:20 | There are additives, I know ZDP I think it is, off the top of my head, that is a reasonably common additive. |
| 01:30:30 | This is used in some older engines in particular and engines that run a flat tappet style cam where the zinc in particular can help reduce engine wear. |
| 01:30:42 | It's not something I personally use we aren't in a situation where we are running engines with flat tappet valve trains so not a huge issue for us, everything we've got here is basically modern four valve overhead cam stuff. |
| 01:30:56 | And I'm wary of oil additives, that ZDP additive is probably one of the ones that I know is very popular but in general, aside from that I know that they're trying to get rid of zinc additives in oil for environmental reasons, other than that I tend to believe that the oil chemists probably know more about what should be going into the oil than me. |
| 01:31:20 | And I'm guessing that probably there's a good chance that you're going to make the oil worse, not better. |
| 01:31:29 | Wesley has asked, would you recommend deleting oil squiters? Ah I've already really covered that. |
| 01:31:34 | Next question, would you recommend re torquing ARP studs after a run in period? Yeah normally I do, even with an MLS gasket you're going to find that there will be some sort of settling of all of the components after the engine has been heat cycled a few times so it can be a good idea to re torque the cylinder head. |
| 01:31:56 | Mr32i has asked, how do you improve upon the crank walk issues with the 4G63? OK pretty complex topic here, I actually deal with this in another webinar in our archive on improving oil supply. |
| 01:32:13 | Basically the whole reason for the crank walk issue is due to a design problem with the centre main bearing in the Evo, the DSM and Evo 1-4 engine blocks. |
| 01:32:26 | There are some modifications that we make to the bearings in order to improve oil supply to the bearings as well as the thrust surface, if you do those we never have problems with crank walk with those engines. |
| 01:32:38 | Realracer has asked, is it a good idea to upgrade harmonic balancer or damper with higher power? Yeah it is, I'm a huge proponent of retaining a harmonic damper or balancer on engines, I know a lot of people go to a solid alloy pulley that doesn't do anything to remove those harmonics. |
| 01:32:57 | People think that having the engine balanced means that the job's done, it's not that simple. |
| 01:33:02 | When the engine is running, just by the forces being placed into the crankshaft, it creates harmonics, we can't get around that and that's what that damper is there for. |
| 01:33:12 | Particularly in high power applications, or more to the point, high RPM applications, sometimes the factory harmonic dampers can be unreliable. |
| 01:33:21 | When those fail it can be pretty catastrophic, people can get injured, so that's why we see particularly for some motorsport, drag racing for example, you actually must run an SFI specification damper which is guaranteed to be reliable. |
| 01:33:36 | So ATI, Fluidampr et cetera are good options there. |
| 01:33:44 | Alright I think we've pretty much got to the end here, we've got a couple of off topic questions but we've been going for about 35 minutes on questions so I think I'm going to leave it there. |
| 01:33:53 | A huge number of questions there so hopefully everyone's enjoyed today's webinar and hopefully that'll give you a little bit more insight into what you should be looking for if you've got an engine that has unfortunately, unceremoniously failed on you. |
| 01:34:07 | As usual, if you do have any other questions after this webinar has aired, please ask those in the forum and I'll be happy to answer them there. |
| 01:34:14 | Thanks for watching and look forward to seeing you all next time. |
| 01:34:18 | Now for those who are watching today on our YouTube channel, this is just a little insight into what we put on every week for our HPA gold members. |
| 01:34:26 | Our gold members get to rewatch these webinars whenever they like in our archive, along with about 230 hours of existing webinar content. |
| 01:34:34 | This is an absolute gold mine of information in keeping you up to date on the latest tools, trends and techniques out there in the engine building, engine tuning and wiring industries. |
| 01:34:46 | You can purchase gold membership for $19 USD a month if you want to get that on its own, however you can also get three months of free gold membership with the purchase of any of our courses. |
| 01:34:57 | You can find all of those at hpacademy.com/courses. |
| 01:35:00 | And that gold membership will also give you access to our private member's only forum which is the best place to get reliable answers to your specific questions. |
| 01:35:09 | Thanks again for joining us and look forward to seeing you online again soon, cheers. |
Timestamps
0:00 - Introduction
2:40 - Process of diagnosing a failure
5:05 - Our engine failure
9:00 - Reasons for failure
10:45 - Assembly error
16:25 - Clearance issues
32:10 - Make sure the engine is properly cleaned before being rebuilt
35:25 - Mechanical Strength
52:10 - Tuning related issues
1:04:00 - Questions


