237 | Air Intake Restrictions Explained
Summary
It goes without saying that in order to make maximum power from any engine we need to get as much air into the engine as we can. Most people can understand that a restrictive air filter can reduce airflow and sacrifice power, however it’s easy to overlook the other potential restrictions in the inlet system. In this webinar we’ll discuss the restrictions and see how you can quantify them in your data.
| 00:00 | - Hey guys it's Andre from High Performance Academy, welcome along to another one of our webinars. |
| 00:05 | Now this time we're going to be talking about intake restrictions and how these can basically rob you of power and we're going to be talking about what those restrictions are, what you should be looking for and also look at some of the ways you can actually get a little bit more scientific and start measuring your restrictions so you know exactly what components are causing problems in your intake system and what you should be doing about it. |
| 00:29 | And I think this is another one of those topics where most people who are modifying their cars probably have a reasonable idea that a freer flowing intake is going to perhaps result in some more power. |
| 00:42 | But at the same time I think a lot of people just go down the well worn path of taking out the factory air box, replacing it with a pod style air filter and calling the job done. |
| 00:53 | And as we'll see, often there's a little bit more to it and in fact quite often what we will find is that when we remove a factory air box, the one I've got here, just have a look at in a little bit more detail, is off an FD RX7. |
| 01:06 | When we remove that air box which is designed to duct cool air into the intake system and we replace it with a pod air filter just sitting in the hot engine bay, often what we gain in improved airflow, we're actually going to be throwing away because now what we're going to be doing is sucking hot air into the intake system, hot air of course is less dense, containing less oxygen so the net result is we can actually go backwards and end up making less power as a result. |
| 01:36 | So this is important for both naturally aspirated engines as well as turbocharged engines. |
| 01:43 | The turbocharged engine has a bit of an advantage because we can overcome some of those intake restrictions by essentially running more boost. |
| 01:51 | And people often look at the boost pressure number on their boost gauge, that's obviously being measured directly in the inlet manifold or plenum of the engine. |
| 02:02 | The problem is that it doesn't actually give us a full picture of what's going on and particularly if you've ever looked at a compressor map from a turbocharger, you'll notice that on the left hand side we have our pressure ratio. |
| 02:14 | So it's not just the boost pressure on the outlet of the turbocharger or more correctly in our plenum that we're measuring that's important. |
| 02:22 | What we need to understand is that if we've got a lot of inlet restrictions, what that's going to end up doing is causing a low pressure or vacuum at the inlet to the compressor and what that does artificially for the same boost pressure in our inlet manifold the turbocharger is essentially working harder in order to make that boost pressure, it's working at a different pressure ratio, that puts it in a different area of the compressor map and as a result, for the same inlet manifold pressure, we're actually putting more heat into the air so don't think just because you've got a turbocharger that the inlet restrictions pre turbocharger aren't still a consideration for you. |
| 03:01 | Alright so what we'll do is talk about what the causes of these restrictions are. |
| 03:05 | I'm going to cover these reasonably briefly 'cause I think it's fair to say that most of them are going to be pretty obvious. |
| 03:11 | The first one would be our air filter and this is normally the place most people start. |
| 03:17 | And in particular, while this one's a little bit grubby, this is an aftermarket K&N air filter element for the FD RX7, looking like it also needs a fairly decent clean. |
| 03:29 | So the idea here is that often the factory air filter elements are restrictive. |
| 03:35 | They're not necessarily designed for ultimate performance and generally often we can see quite a significant in power just by changing the air filter. |
| 03:45 | That's not always going to be the case though. |
| 03:48 | Particularly when we were doing some development on the FA20 Toyota 86 Subaru BRZ platform, in stock form we tried a range of different air filters on that car and the net result was a maximum improvement over stock of about 1-1.5 kilowatts at the wheels. |
| 04:05 | So at that point we're almost getting into the realms of run to run dyno variations. |
| 04:09 | That's not the say that's always going to be the case. |
| 04:12 | I still remember clearly in the back of my mind back when I was still growing up and just getting interested in cars and a colleague of mine had what was then a relatively new Subaru Legacy RS powered by the turbocharged EJ20 engine. |
| 04:29 | And he had done a bit of digging online to see what performance upgrades were available and where was your best bang for your buck. |
| 04:37 | And the modifications made there involved replacing the factory paper air filter element with a K&N element and then as with a lot of these air boxes, this one doesn't have one, the RS Legacy had a resonant chamber on the underside of the air box and quite a convoluted restriction to the intake air going into the air box. |
| 04:57 | So by basically eliminating that and running a piece of three inch plumbing ducting straight into the bottom of the air box, we ended up gaining a massive performance advantage. |
| 05:08 | Now this is back before the days I had access to a dyno so this was unfortunately the butt dyno. |
| 05:15 | But as I've gone through my career and done more and more back to back testing with things like this, the dramatic improvement in performance, we weren't talking about five or six horsepower gain, this would have had to have been in the range of 15 to 20 horsepower for a grand total of about $150 worth of components and a little bit of time. |
| 05:32 | So this is one of the things that really opened my eyes to the fact that the intake restrictions can have a significant impact on your performance.. |
| 05:41 | So I kind of talked about two things there, we've talked about the air filter element but I'll also just mention the air box and this is important to understand because a lot of people throw away these air boxes as I've already mentioned, going straight to a pod filter. |
| 05:56 | But there can actually be some pretty big advantages to some of these air boxes, particularly if they are designed properly. |
| 06:02 | In particular, this isn't the best example but we'll just get this under our overhead shot here and this is where the air exits into the stock twin turbo system. |
| 06:12 | And what we can see here is that there is a nice bell mouth, nice rounding on the edge of that intake so basically this helps smooth the airflow out into the turbochargers, helping to promote good flow from the air box out into the turbochargers. |
| 06:29 | And it's elements like these I think that are often overlooked and ignored when people start making modifications in the aftermarket. |
| 06:37 | Basically what we need to understand about air is that air is lazy, it doesn't really like changing direction. |
| 06:44 | So anything we can do to help the airflow out is going to give us a better chance of making more power. |
| 06:51 | And it's important to mention here that we don't need to be a aerodynamicist or working in computational fluid dynamics. |
| 06:59 | A little bit of common sense here is usually enough to get us through and see areas that we can expect to see an improvement. |
| 07:09 | On top of the air box itself, I'll mention again, I gave you the example with the RS Legacy intake but it's quite often there's going to be a resonant chamber attached to the air flow into the air box. |
| 07:23 | The idea with this is to help reduce noise in the passenger compartment when the car is being driven hard. |
| 07:30 | Now this is another instance where the design criteria or the importance for an OE manufacturer can be quite significantly different to what we care about as performance enthusiasts. |
| 07:43 | So we're quite often going to be more than happy to sacrifice a little bit of extra induction noise in the cabin in order to free up some power. |
| 07:52 | So those are the sort of things that we need to consider here. |
| 07:56 | And I'll just try and find, yeah if we just jump across to my laptop screen, it's not the best photo. |
| 08:02 | This is actually a photo that I found though of the RS Legacy intake system that I was talking about. |
| 08:09 | So there's a couple of aspects here, the turbocharger is mounted in the stock EJ20 position down here at the back of the engine and unlike the later models where the intake pipe actually ended up running underneath the intake manifold straight into the turbocharger, this used an awkward 90 degree elbow straight off the turbocharger inlet and the inlet pipe runs up here. |
| 08:31 | Then there's this resonant chamber here, again this is after the airflow meter but again this is just to help reduce some of the noise in the intake. |
| 08:39 | Part of the modification that I was talking about before was removing that resonant chamber there and replacing it with a straight piece of pipe. |
| 08:47 | That just helps smooth the airflow. |
| 08:49 | We've got the airflow meter here, the actual air box itself is this component here and while it's not visible, basically underneath the fender here was the resonant chamber that restricted the airflow into the intake. |
| 09:03 | So it's just a case of having a good look at the design of your particular air box and looking, does the air have to go through a contorted path, basically a maze in order to get to the air filter? If it does there's a pretty good chance that reducing some of that maze, making the airflow path a lot straighter, is going to help your aims in terms of performance. |
| 09:25 | Now there's other aspects as well there in terms of the airflow meter to consider. |
| 09:31 | Now we can't say that all airflow meters are restrictive but a really good case in point is the trap door style airflow meter. |
| 09:40 | Fortunately they've died a natural death because they were such a horrible thing but these were quite popular back I think probably in the late '80s, maybe early '90s. |
| 09:52 | We'll jump across and have a look at this one here which is off a Mazda NA Miata or MX5. |
| 09:58 | So the idea with the trap door is just as its name implies, there is a trap door that the airflow is actually going to move. |
| 10:06 | And there's essentially a little calibrated potentiometer up inside the trap door airflow meter. |
| 10:12 | And as that trapdoor swings further open, it moves the little wiper on that potentiometer and gives a variable voltage to the ECU. |
| 10:20 | Now it works in so much as it will give an airflow meter or a variable voltage with respect to airflow but of course the airflow needs to physically move that trapdoor out of the way so doesn't take a rocket scientist to figure out that that's probably not going to be the freest flowing intake. |
| 10:38 | These were used on the MX5 or Miata as I mentioned. |
| 10:42 | Locally or the Japanese domestic market Mazda, no what is it, it's Mazda 323 is the car that I'm looking for, it was powered by the Mazda B6 turbo engine. |
| 10:54 | That's a car I actually owned back in my earlier days and was also fitted with this trap door airflow meter. |
| 11:00 | And we actually found that removing that airflow meter alone, no more boost, no other changes, basically just removing the airflow meter with an aftermarket standalone ECU, was generally worth about 12 to 15 horsepower at the wheels. |
| 11:16 | So that's the sort of level of restriction that these trap door airflow meters were providing. |
| 11:22 | Now obviously we've moved on, trap door airflow meters, you're not going to find any of those being produced anymore on late model vehicles. |
| 11:29 | Most have moved onto either the hot wire or Karman vortex style airflow meter. |
| 11:34 | And that's not to say that these aren't restrictive either. |
| 11:38 | And you need to basically do a little bit of research and find out whether there is a known restriction with your particular airflow meter. |
| 11:46 | A good case in point is the gen 3 GM LS1. |
| 11:51 | The stock airflow meter on the LS1 was quite restrictive, it was quite small in diameter and we were finding that by removing the stock airflow meter and performing a speed density calibration on those particular vehicles, we were able to free up around about 10 or 15 rear wheel horsepower. |
| 12:10 | If we move to the later model LS, maybe LS2, LS3, GM learned their lesson, they stepped up to a larger diameter airflow meter and by removing those and doing the same speed density tune there's almost no power to be gained there at all. |
| 12:26 | So doesn't necessarily mean that just because you've got an airflow meter there is going to be a restriction. |
| 12:34 | So how do we actually know that we've got restrictions in our intake system and how do we narrow down more specifically where they are? There's a couple of clues that we can use to help guide us and one of them, if we've got a naturally aspirated engine is to look at what the manifold pressure is showing us during a ramp run. |
| 12:56 | So we'll jump across to my laptop screen here and this isn't the most obvious example but it does demonstrate the point. |
| 13:03 | So this is a dyno run from a Toyota 86 that's in relatively stock form. |
| 13:08 | So at the top of the screen in white here we've got our ramp run there, so we've got our RPM, so we're running the engine all the way through to about 7500 RPM. |
| 13:17 | The next plot in, actually at the bottom in green we can see our throttle position, so obviously just showing that during that entire ramp run we are at 100% throttle. |
| 13:28 | The piece of data that we want to use is a key here is our manifold pressure which is shown in the middle in red. |
| 13:35 | So obviously if there is no restriction at all, we should be seeing atmospheric pressure give or take in our inlet manifold. |
| 13:42 | And we can see at the start of the run, that's exactly what we've got. |
| 13:45 | If I click on that point there we're at 0.98 bar. |
| 13:49 | What we can see, again is a little bit of variation in that run, I probably should have smoothed it before we got to this point but we can see there's a general trend where the manifold pressure is dropping off very slightly as the RPM increases. |
| 14:04 | And if we look at what we've got right up at high RPM, we're at 0.92 bar. |
| 14:10 | So we've dropped 0.06 bar from the start of the run to the end of the run. |
| 14:16 | So this is showing that there is a restriction in that intake system. |
| 14:21 | It doesn't obviously show us where it is and what this is really doing is showing us any restriction presented in the entire intake system so this could be in the inlet plumbing into the airbox, it could be the air filter, it could be restrictions due to the air box design itself, it could be the plumbing from the air box to the airflow meter, the airflow meter, the plumbing from the airflow meter to the throttle body and it could even be the throttle body itself. |
| 14:46 | So this just shows us that we do have a problem. |
| 14:49 | From here it's up to us to do a little bit of testing and decide on what changes are going to be viable and give us the best results. |
| 15:01 | Now there's a few ways of doing this and it really depends how thorough you want to be, how much time you've got on your hands and whether you've got easy access to a dyno or you've got easy access to the parts. |
| 15:12 | One way would be to simply start swapping parts, so try some aftermarket air filters, try some aftermarket air boxes, maybe try a pod filter, maybe try removing the airflow meter, make up new plumbing to the throttle body and do this in stages so you can see each step of the way where you're getting improvements. |
| 15:31 | That's exactly what we did when we were developing our staged upgrades for the Toyota 86, we established where the biggest bang for your buck was and it turns out as I mentioned, the air filter in stock form was actually a pretty good thing. |
| 15:45 | What we actually found, just let me find this photo. |
| 15:51 | If I can. |
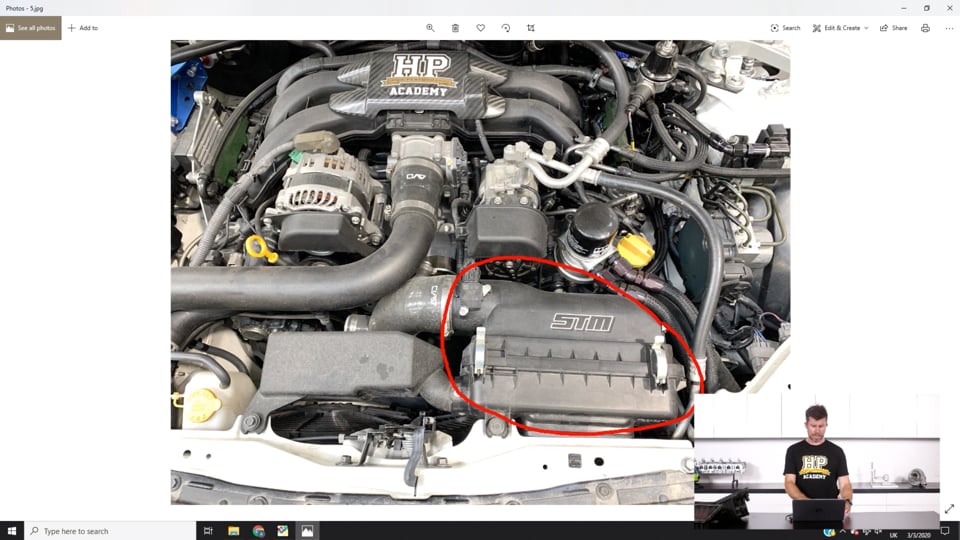
| 15:59 | Right, yeah if we just jump across to my laptop screen. |
| 16:02 | So this is the intake system on our FA20. |
| 16:05 | Admittedly out car is now turbocharged but a lot of this still stands anyway. |
| 16:10 | So we can see we've got the stock air box here. |
| 16:15 | Despite the fact that we're running on a MAP sensor we actually are still using the factory mass airflow sensor. |
| 16:20 | A couple of reasons for this, because we can scale this pretty accurately we can log this and we're actually getting real values for mass airflow. |
| 16:28 | This is quite valuable for us in terms of a development aspect, not necessary to run the engine but that's why we've got it there. |
| 16:34 | We also established fairly early on that the stock mass airflow sensor made absolutely no difference whether it was there or not to the performance of the engine. |
| 16:42 | This part here, from here on obviously this is where we're going, our intake down to the turbocharger, we'll come back and actually look at that in a little bit more detail later on. |
| 16:52 | We're going to look at the rest of the air box system for the moment though. |
| 16:55 | So this part here, this is one of these resonant chambers that OE manufacturers love so much that are designed to take out the noise from the intake system. |
| 17:05 | In this case we've left that intact because the air doesn't actually flow through it, this is an extension to the air box. |
| 17:11 | Instead the air comes into the air box through this gap here which runs underneath our radiator support panel right here. |
| 17:19 | So what we ended up doing is we found that the piece of intake that runs onto the front of the air box was actually a source of restriction and a lot of this was due to the basic design where it wasn't flared, it basically just had sharp edges. |
| 17:38 | And this is a unit, I think it's still in production, that HKS make. |
| 17:42 | And basically what it does is it gives us a larger opening here, so this is about double the size of the factory opening. |
| 17:50 | It's also favouring airflow, or picking up airflow from the bottom of this area where it's actually more likely to pick up cold air compared to stock. |
| 18:01 | And basically between the larger size, the way it's angled and the way it's smoother than the factory intake system, that alone was good to pick up about two to three kilowatts at the top end so we're talking about very small changes but this was a noticeable and repeatable change that we could make. |
| 18:22 | So this was part of our upgrade strategy for the intake system and at this point there's also other aftermarket intakes for the FA20 which we didn't get a chance to test so not necessarily saying that this is the be all and end all but it does give you a pretty good example of what can be improved upon. |
| 18:43 | Now the ways of finding these limitations, I've just mentioned there that we can look at our manifold pressure signal during a ramp run on the dyno but this is a fairly limited use. |
| 18:55 | First of all that's really only going to be of any use if you're running a naturally aspirated engine. |
| 18:59 | If you're running a turbocharged engine, the manifold pressure in the plenum chamber really just tells you how hard you're driving the turbocharger. |
| 19:05 | Yes it's going to be influenced by inlet restrictions but it's not necessarily telling you what those inlet restrictions are or where abouts they are. |
| 19:15 | So there are a couple of other options. |
| 19:17 | One is to use a spare MAP sensor for your testing and this would allow you to move that MAP sensor around. |
| 19:26 | What you can do is drill holes in various parts of your inlet track and place that MAP sensor into those various places and then perform a ramp run on the dyno, log the data from that sensor and basically if you're seeing something similar to our ramp run here where the manifold pressure is dropping away from atmospheric, this will show you that you've got a restriction. |
| 19:50 | So by basically placing this, let's say at the inlet to the air filter, so inside of the air box, what that's going to do is test the restriction of everything before it, so this would be the resonant chamber at the entrance to the air box for example. |
| 20:04 | Then if you place it after the air filter, then you're going to be measuring the effect of the air filter and everything before it. |
| 20:12 | So basically by stepping through you can see where your major restrictions lie. |
| 20:16 | The problem with this is that it isn't very sensitive and again if we look back at our data here on our dyno, from our dyno log, we can see that you're only seeing very small changes. |
| 20:28 | So another option that you have available, and this requires a little bit of work but it's not particularly difficult, would be to make what's called a water manometer. |
| 20:38 | So bit of a mouthful but not very complex, let's just jump across to my laptop screen, and basically a water manometer is just a piece of plastic tubing with water in it, generally we'll colour the water so that it's nice and easy to see. |
| 20:53 | We're going to end up putting a U shaped channel which we can see here. |
| 20:57 | Generally it's going to be easiest to attach that onto a long board, so we want a vertical board, basically the water manometer when we're viewing it, we want to have that located so it's vertical. |
| 21:10 | Then what we've got is basically two open ends to the manometer and what we can do is attach one via a long piece of tube to the point on our intake system that we want to test. |
| 21:24 | So for example if we've got this point here, connected to a position where we're getting a low pressure area under high RPM, what that's going to do is exactly what we've seen here. |
| 21:36 | It's going to generally suck the water up towards it. |
| 21:39 | So by measuring the height difference of our water, how much it moves, this is going to give you an indication of how much restriction you've got. |
| 21:48 | So obviously takes a little bit to make this but it's really not complex, it's not going to be very costly either. |
| 21:54 | And it's very sensitive, unlike the MAP sensor, it can be a lot more sensitive and give you a really good idea of exactly the magnitude of those restrictions. |
| 22:04 | So by being a little bit clever with this, what you can do is step through the intake system, checking at each location and seeing where abouts the bigger restrictions are. |
| 22:14 | And this is important again because rather than just jumping in and replacing the entire system, you may actually find that the entire intake system is performing really well with the exception of the restriction to the inlet of the air box. |
| 22:29 | So just by freeing that up, which may cost you nothing more than a little bit of time, you may actually get 95% of the gains of a complete aftermarket intake which could cost you $500, $600, $700 USD or thereabouts. |
| 22:43 | So those are the important aspects to keep in mind there. |
| 22:47 | Really simple to do, all it's going to cost you is a little bit of your own time to go and do that testing. |
| 22:53 | While obviously the best place to do that testing is on the dyno, there's nothing wrong with using a helper and using one of these home built manometers out on the road in order to do exactly the same testing, all you need to do is have your helper watch the level that that water's getting up to as you perform a pull through let's say third gear, wide open throttle all the way through to the rev limiter. |
| 23:17 | Alright we're going to jump into questions and answers really shortly so this is a good time to just mention, if you do have any other questions, any questions on this topic, please feel free to ask them. |
| 23:28 | There are a couple of standout things that you can look for though in your intake system which are generally going to be not that helpful for promoting good airflow. |
| 23:40 | As cars have become more modern I think a lot of OE manufacturers have kind of cottoned onto this as well. |
| 23:47 | So we're not seeing as many areas with these restrictions, these obvious restrictions as we used to. |
| 23:54 | But let's jump across to my laptop screen. |
| 23:56 | This is a good case in point which is the factory inlet piping on the FD RX7 from the intercooler to the throttle body. |
| 24:05 | And this piece of black corrugated hose here, we used to see a lot of it and it is horrible. |
| 24:12 | The idea behind it is that those corrugations allow some degree of flexibility in that hose, really important because one end of this is fixed to the intercooler which is fixed to the chassis. |
| 24:25 | The other end of course is attached to the intake pipe that's attached to the engine which is going to move. |
| 24:31 | So we need some form of flexibility in this pipe and that's what those corrugations present. |
| 24:36 | However they look just as ugly on the inside as they do on the outside and basically any time air has to flow over an irregular surface this can affect the ability for the air to flow smoothly and conversely we end up reducing our potential power. |
| 24:52 | So if you're seeing something like this then I would strongly be recommending to replace that with something that is smooth. |
| 25:01 | Now again, we obviously need to retain some flexibility in there and there's a couple of ways of doing this. |
| 25:07 | First of all, with common cars like the FD RX7, you're almost certainly going to be able to get replacement components like this that will be nice and smooth on the inside, giving you the potential for a performance increase so you probably don't have to reinvent the wheel. |
| 25:22 | Other option here is to essentially use two straight silicon joiners so I would be using a silicon joiner at this end here, a silicon joiner at this end here and then in between them we could just use a simple alloy or stainless fabricated pipe which is going to be nice and smooth on the inside. |
| 25:39 | So that's still allowing that flexibility as the engine moves but just smoothing that out. |
| 25:46 | The other aspect I'm just going to touch on again because I see so many people do this, is the air filter, sorry the pod filter versus the air box and just understanding that the pod filter sucking in that hot air from the engine bay is actually going to most often be a step backwards. |
| 26:04 | So what we want to do, if you are going to go to a pod filter, and sometimes it's inevitable, sometimes you can't retain a factory air box, sometimes you may have an air box that's been well proven to be very restrictive. |
| 26:15 | Under those conditions if you're going to go to a pod filter, just give some thought to ducting cool air to it and also heat shielding it. |
| 26:23 | So basically what we would used to do is basically build up our own air box inside of the engine bay, seal off the area where the pod filter is fitted and then find a way of ducting air from either the front bumper or somewhere underneath the car up into that pod filter. |
| 26:40 | It's always a good idea to just monitor your intake air temperatures and if you're doing that with a factory air box and then you go to a pod filter, often you'll actually be quite surprised at just how much the air temperature has climbed. |
| 26:53 | Be mindful if you are monitoring this on a turbocharged engine that you might not see the air temperature in the plenum chamber rise massively but what you also need to understand is that you've got the intercooler working harder to remove some of that heat. |
| 27:10 | So to really see the effect of the pod filter, what you actually want to do is monitor the air temperature pre turbocharger, both before and after you fit that pod filter, that's going to show you exactly what's going on. |
| 27:24 | Right I just also, I'll just make sure I have shown you everything I wanted to show you. |
| 27:33 | No I've got one more bit that I wanted to show you here. |
| 27:36 | So this is actually one of our own development vehicles which is our VE SS Commodore, just showing exactly what we can expect from some of the aftermarket components. |
| 27:47 | So this is a photo of a factory VE SS Commodore engine bay. |
| 27:52 | So what we've got here is the air box that's fitted over on the side of the engine bay. |
| 27:59 | That pulls air in from down below the headlight, we can't actually see that area but quite a restrictive inlet into that air box, it's got a large area K&N panel filter. |
| 28:10 | In this case, because again this is a car that we did a lot of development on, we found that the factory panel filter was actually a little bit restrictive. |
| 28:17 | Going to an aftermarket filter element for that air box was worth, I think off the top of my head around about four or five horsepower so it's one of those cases where it can be worthwhile. |
| 28:29 | The airflow then comes out of the air box, this is the airflow meter which we wanted to retain, we've got this convoluted corrugated intake piping which I've already just discussed how restrictive that can be. |
| 28:41 | There is then a resonant chamber which comes off the intake pipe as it goes through a 90 degree bend onto the throttle body. |
| 28:51 | So that's the stock system there. |
| 28:53 | And what we did is we fitted what is quite a popular upgrade in the GM tuning world, particularly in New Zealand and Australia, which is fit, excuse the filthy engine bay here on our project car, this is what's referred to as an OTR or over the radiator cold air intake. |
| 29:10 | This particular one is from VCM Suite in Australia. |
| 29:13 | So obviously you can see the factory air box and all of that plumbing is completely gone. |
| 29:19 | In this case the airflow meter is now fitted directly onto the throttle body and this plastic intake system pulls air from in front of the radiator, so the radiator actually gets folded back a little bit, it gets angled backwards so that gives enough room for the intake to slot down in front of the radiator. |
| 29:38 | So we're getting nice cold air straight from the front bumper or the grill area. |
| 29:42 | It also has quite a large diameter, large surface area K&N filter in it. |
| 29:48 | So these, with tuning are worth somewhere in the region of about 25 to 30 wheel horsepower, so just showing you the magnitude of those changes, quite dramatic. |
| 30:00 | That's probably one of the most extreme examples that I've seen. |
| 30:05 | Lastly before we get into questions and answers, I also mentioned that when I was running my tuning shop, quite often if we were searching for power with an intake system, just to see what was available, what we would do is remove the entire intake system off the throttle body, obviously this doesn't work if you've got an airflow meter but in a lot of the aftermarket ECUs we were dealing with, we were running a speed density system so we can do that. |
| 30:33 | And I'd have handy in the dyno cell a few pieces of different shaped silicon plumbing, so basically intercooler joiners and I also had a large diameter spun aluminium funnel so what I'd do is basically set that up so that the silicon joiners were straight onto the throttle body as straight as we could get them and then use the aluminium funnel which gave a nice bell mouth into the silicon joiners. |
| 31:00 | So basically at that point we had as good an intake system as we could get. |
| 31:05 | As free flowing as we could get, as little restriction as we could get and you do a run on the dyno in that form, that would show you the best you're likely to see. |
| 31:14 | You could then get some indication of how much power you're giving away with the intake system that was fitted to the car. |
| 31:21 | At that point, if it was a few horsepower, might not be worth chasing. |
| 31:24 | If you're starting to talk about 10 to 15 horsepower, obviously that's when we'd start looking a little bit deeper and start getting a bit more specific as to alright, well what is the main cause of that power loss? I said that's the last thing I was going to talk about but there's actually one more that I just wanted to mention because this is a bit of a freak occurrence that I haven't seen repeated since. |
| 31:46 | But worth talking about when we are talking about intake systems. |
| 31:49 | This was a Mk I Escort rally car that I tuned, I was involved in the tuning of a number of years ago on the Hondata tuning system. |
| 31:59 | And this Mk I Escort was fitted interestingly with a Honda F20C which is why we were using the Hondata tuning system. |
| 32:07 | And due to the way the intake manifold sat in the engine bay, the person who built the car ran a 90 degree silicon bend directly off the throttle body and into a air filter. |
| 32:19 | No big deal, or so we thought. |
| 32:21 | It looked like it should flow pretty well, it had a pod filter that was set up so that it was going to be sucking cold air directly from behind the headlights. |
| 32:30 | Now we tuned the engine, it made good power and really there was nothing wrong with that. |
| 32:35 | After we'd finished tuning though just as a test, we ended up taking the air filter out and we ran a straight pipe straight off the throttle body and did another test and we picked up 20 wheel horsepower which on an F20C is no small amount of power to gain. |
| 32:52 | And that sort of blew us away, we thought that was an anomaly on the dyno so straight away we refitted the old system, back to back tested it and sure enough we were back to exactly where we were. |
| 33:02 | It was completely repeatable, 20 odd wheel horsepower. |
| 33:05 | And what we ended up finding through a lot more testing was that particular intake system really responded by having a long section of straight pipe before the throttle body. |
| 33:16 | I think we actually got a little bit more detailed with it and we found that we needed a section of straight pipe at least 100 or I think it might have been 150 mm long before it went into a turn if we wanted to make maximum power. |
| 33:29 | Unfortunately in the Mk I Escort engine bay that was simply impossible so sometimes you are limited by what you have room to fit but that was a really good example just everything looked like it should work, there was no obvious reason for it but that particular inlet manifold design, that engine, just wanted that long section of straight pipe and it really responded in terms of power. |
| 33:53 | Alright we'll jump into our questions, if you've got any more questions, please feel free to ask them. |
| 34:05 | Noah's asked, planning on an affordable Hayabusa rebuild, stroked with a MegaSquirt for a tube chassis car. |
| 34:11 | Bought engine building lessons, any specific advice for my build? Not particularly, the Hayabusa engine, it's not one that I have built myself so I can't give you any specifics on the Hayabusa engine. |
| 34:28 | There's a fairly well trodden path, the Hayabusa engine is probably one of the more popular out there in the sport bike market, been used plenty of times for engine swaps into cars so there's undoubtedly a huge amount of information out there. |
| 34:42 | So nothing specific that I can really give you, I've tuned plenty of them and they make impressive power for what they are. |
| 34:51 | Don't think there's going to be anything specific in there that I can add that's not going to already be in our courses. |
| 34:57 | Obviously if you've got any other questions, use our forums and ask your questions in there. |
| 35:04 | Holdenian has asked, opinions on stock MAF sensor or speed density, tuner mentioned he doesn't like speed density because it's an estimate at best. |
| 35:12 | Yeah so I think a lot of tuners actually jump to speed density unnecessarily. |
| 35:19 | Basically jumping to speed density because it's what they're used to. |
| 35:22 | A lot of tuners get into that situation where they think that any mass airflow sensor is going to be a restriction, hence moving to speed density is going to give them some power advantage. |
| 35:32 | As I talked about in the webinar, that simply isn't always the case, you need to understand in your particular application, is there a known limitation or restriction from the airflow meter. |
| 35:43 | If not, really there's not going to be an advantage to it. |
| 35:45 | I don't necessarily agree that speed density is not as accurate. |
| 35:50 | Yeah it is an estimate but with modern ECUs, both OE and aftermarket, it can still do an excellent job. |
| 36:01 | So it's not necessarily to say that speed density is inferior to a mass airflow sensor system, what I would say, particularly if you are dealing with a factory system, is that if you've got a mass airflow sensor that's not restrictive, if it's calibrated correctly, if it's tuned correctly it actually makes the whole tune much quicker and easier so no real reason to jump to speed density if you don't have to. |
| 36:28 | Darker Shades has asked, in regards to the air, would there be a power increase if we threw a lot of ice in the airbox? I don't think you're going to see much of a power increase but I don't think your engine's going to last too long ingesting crushed ice. |
| 36:46 | So probably not something that I would recommend. |
| 36:51 | Probably a tongue in cheek comment there. |
| 36:53 | The reality is anything that we can do to cool our intake air down is going to be quite helpful. |
| 37:00 | That's really obvious in a turbocharged application where we can test different intercoolers and see the effect on power of different air temperatures. |
| 37:08 | A little bit harder to do with a naturally aspirated engine but if you pick up air from directly behind the radiator where it's going to be hot versus maybe moving your intake out of the engine bay where it's picking up cold air from the dyno fan, that's going to show you just how important that cold air is. |
| 37:27 | Dimitri's asked, from my experience which filter elements are more free flowing and which clean the best? Look I don't think I'm in a position to really give you a thorough run down on this. |
| 37:40 | I'm not sponsored by K&N, I have used a lot of K&N and I've found them to be a pretty good filter, they do a good job, pretty cost effective. |
| 37:51 | I definitely can't say that that makes K&N the best, it's just what I've kind of tended to gravitate towards. |
| 37:59 | What we do need to be careful of as well when choosing aftermarket filter elements is with oiled filter elements like the K&N, we do need to be a little bit mindful of the effect on a hot wire airflow meter over time, what they can do is actually put deposits onto the hot wire element which can actually affect the MAF sensor's accuracy so that's probably aside from your question. |
| 38:22 | But yeah I can't really answer you, I haven't done a back to back on the full range of filters out there unfortunately. |
| 38:31 | Eduardo's asked, can a velocity stack help? OK so a couple of aspects here, velocity stack as you're referring to it, I think what you're really talking about in the inlet trumpet. |
| 38:44 | And that's a little bit different to an inlet restriction. |
| 38:47 | Particularly if you've got ITB, individual throttle bodies on the engine, then we can get essentially a tuning effect from the length of the inlet trumpet. |
| 38:57 | What we're looking for is the length actually from the the inlet trumpet to the inlet valve. |
| 39:02 | And basically if we get that length right we can actually aid the cylinder filling at specific RPM ranges. |
| 39:09 | So that can help us either improve our bottom end torque or perhaps our high RPM torque and power. |
| 39:17 | Yeah either way if you're using a velocity stack, that's sort of aside from the inlet restrictions, you're still in most instances probably going to want to run an air filter and intake system onto those velocity stacks, so everything we've talked about is still kind of the same there. |
| 39:34 | Big Brap has asked, is it better to prioritise cooler air over the interior pipe texture? Why not have both? Difficult to answer because the reality is going to be it's going to depend on a bunch of other factors as well. |
| 39:49 | Cooler air, definitely important, basically we know from the ideal gas law that every thing we increase the air temperature by 10°C we're reducing air density by around about 2.5-3%. |
| 40:02 | So that gives you straight away a bit of a feel for the potential effect on power. |
| 40:07 | The effect of the interior pipe texture, I'm guessing you're sort of referring back to the image I showed you of the corrugated intake pipe. |
| 40:17 | That's going to depend on the size of the pipe as well so it's not just the fact that there are corrugations. |
| 40:23 | If we've got a pipe that's maybe massively oversize for the amount of air that it needs to move, the corrugations on the inside are going to have less effect on the restriction to airflow. |
| 40:34 | So it's a bit of a bigger question that perhaps it might seem on the face value. |
| 40:44 | Beyond The Lull has asked, what psi boost would you run on a 13b before adding auxiliary injection such as water methanol spray on 98 octane? OK good question, here in New Zealand for whatever reason, water/methanol injection is maybe not as popular as I see it in a lot of markets, particularly the U.S., water/methanol injection seems to be very popular. |
| 41:12 | So it's not actually something that I spent a lot of time working with through my old business. |
| 41:19 | We've done a little bit of testing here in house on our Toyota 86 with a water/methanol injection kit and it certainly can help. |
| 41:26 | What we need to understand with the 13b or any rotary engine for that matter is that they are very very sensitive to any level of knock or detonation so we can very easily damage the apex seals and when that happens it's going to be pretty expensive so we don't want to do that. |
| 41:45 | Generally for that reason I tend to be a little bit conservative. |
| 41:48 | On pump gas depending on the size of the turbocharger and the rest of the setup, I would probably limit my boost pressure to around about 18 to 20 psi. |
| 41:58 | Now that's not to say that you can't go further but this gives us a nice safety buffer, safety margin. |
| 42:04 | If you want to run water/methanol injection, that may let you push your boost pressure higher. |
| 42:10 | Water/methanol injection kind of acts a little bit like running a good quality race fuel. |
| 42:15 | On a lot of the drag rotary engines that I ran on VP Racing C16 and Q16 were running 35 to 40 psi of boost so I wouldn't necessarily suggest going that far on water/methanol injection but yeah you're definitely going to be able to push a little bit further but a lot of this comes down to the rest of your tuning and exactly how much water and methanol you are injecting. |
| 42:38 | Dimitri's asked, what's the rough formula for intake pipe size versus psi or CFM? So at which point to increase the intake pipe size? Actually Dimitri that is a great question and it's one that I don't have an answer for. |
| 42:52 | Often we're going to be limited by another part of the intake system so what I mean by this is let's say we've got a turbocharger with a 2.5 inch inlet. |
| 43:03 | Ultimately that's going to be the choke point of the intake system. |
| 43:06 | So there's not a huge amount of point putting a four inch inlet pipe up to that turbocharger because it's still going to be the inlet to the turbocharger that is the restriction. |
| 43:17 | I know that back when I was building my drag car I looked a little bit more detail into this, this was more along the lines of sizing the intercooler plumbing as opposed to the intake system, we ran no intake at all on the turbocharger on our drag car. |
| 43:33 | And there is some information on that but I don't have it at hand sorry. |
| 43:37 | What I might do after this webinar is add that into our forum. |
| 43:43 | Manitou Black's asked, question, paper, dry foam, oiled cotton or foam? I'm guessing what is the best option for the filter element. |
| 43:53 | Paper is common in OE applications, can be quite restrictive, not the best for flow. |
| 44:01 | The foam and oiled style air filters seem to be the most common in the aftermarket. |
| 44:07 | Again I've already talked about the fact that predominantly I tend to run K&N which is an oiled filter. |
| 44:15 | You do need to also keep in mind what I mentioned about the fact that the oil can end up contaminating the airflow meter but I mean other than the fact that paper elements generally you don't see these in the aftermarket because they can be restrictive, more than that I can't really tell you sorry. |
| 44:33 | K Tireman's asked, I've noticed a lot of aftermarket intakes have the location for the throttle body, a small portion blocked off, this is usually on the cheaper intake manifolds, I've not tried this yet but have considered shaving this down considerably. |
| 44:47 | Would this be recommended? I'm actually not 100% sure what you're referencing there. |
| 44:54 | I don't think that's something that I've seen. |
| 44:57 | Maybe if you can expand on that and I'll see if I can come back to it. |
| 45:01 | Trazdad has asked, would placing the cold air filter in the fender have more restrictions than placing it in the engine bay? Not necessarily and that actually can be a really good option is getting the air filter or pod filter completely out of the engine bay. |
| 45:15 | What we do need to be mindful of though is we, if you place it down in the inner fender, particularly if it's down close to the road surface, it can be a lot more prone to picking up debris, so that can end up with your filter becoming dirty a lot quicker. |
| 45:30 | The other really big concern as well is if you live in an area where you get a lot of rain, you can be a lot more prone to picking up a lot of water through the air filter. |
| 45:39 | Now rain itself's not going to necessarily be an issue but what we can get into a situation is where you drive through a large puddle, that can end up flooding the air filter and in a worst case scenario that could end up hydraulicing your engine. |
| 45:52 | So you need to be mindful of that. |
| 45:56 | Nissan John has asked, for a naturally aspirated engine, how large of an effect does the diameter of the pre throttle body piping have on the overall performance of the engine, bigger is not probably better? Exactly, this really comes down to what I was mentioning before. |
| 46:10 | With a turbocharged engine you're only going to flow as much air as that throttle body can so to a degree having a massive intake system plumbing right up to the throttle body, isn't necessarily going to give you an advantage. |
| 46:23 | There's a balancing act here because every time we put a bend or a restriction in the intake pipe, then that's going to obviously limit its flow. |
| 46:34 | So what I'm getting at here is if we're running a pipe that's exactly the same diameter as the throttle body and it's a short pipe with the air filter on the end, probably absolutely fine. |
| 46:44 | If that pipe starts to get a little bit longer and now we've got maybe three or four 90 degree bends in it, each of those bends acts as a restriction, restricting the overall flow through that pipe in which case it can be an advantage to step up a little bit, maybe got half an inch larger in diameter, that's going to give you a larger intake pipe reducing the effect of those restrictions and basically getting back to the situation where the throttle body is the final restriction in the system. |
| 47:12 | Beyond the Lull's asked, any opinions on mushroom pop filters? Heard stories about turbos sucking them in so hard they touch the turbo fins. |
| 47:19 | Mushroom filters, yeah they seem to be pretty popular from a couple of the Japanese tuning houses, HKS and GReddy are a couple of examples. |
| 47:31 | I've used the genuine filters myself and I've had no problems with them. |
| 47:35 | I think we actually did some back to back testing on one of these at some point and kind of proved that they maybe weren't the most free flowing filters. |
| 47:43 | If I remember correctly, we did a back to back between an HKS mushroom style filter and a K&N conventional pod filter and we saw quite an advantage with the K&N. |
| 47:54 | There's a couple of things about that, a lot of the people who wanted to stay true to JDM roots when modifying cars, want that JDM look of the HKS mushroom filter so have at it. |
| 48:07 | The other thing is the advantage they do offer is that they are quite a small form factor so they sit quite close to the turbocharger and if you are tight for space that might be a deciding factor in going that way. |
| 48:20 | But no in my own experience as long as you're using genuine, I've never seen one fall apart or get sucked into the turbocharger, couldn't say the same for the no doubt unlimited supply of rip offs from China that you'll see of all of those filters. |
| 48:37 | Barry's asked, what about water cooled runners on the ITBs or loads of fins on the runners to dissipate heat? Neither of those are things I've ever seen. |
| 48:49 | So I mean water cooled runners on the ITBs, that's starting to get to be a hell of a lot of work for the potential gains and a huge amount of complexity that you're adding into your engine given that you're going to need a water supply, a pump, plumbing and a cooler to get the heat out of the water so yeah I don't think there's enough upside to warrant the downside. |
| 49:12 | Fins on the runners, you're only going to be able to dissipate heat to the ambient temperature which in the engine bay is going to hopefully be a lot hotter than your intake air anyway so that's also not going to be a huge help. |
| 49:24 | Really focus on getting the heat out of the intake air as much as you can. |
| 49:30 | Once it's gone through the throttle body, it is what it is and probably not really enough that we can do to manipulate that that it's worth worrying about. |
| 49:46 | Next question, port and polished or port and dimple the intake runners? I'm assuming he's saying port and dimple the intake runners. |
| 49:55 | Looking at the gold ball style modifications that some CNC programs are putting onto intake runners. |
| 50:03 | Probably a little bit outside of the scope of today's lesson and I do not port and polish heads. |
| 50:08 | It's a very specialised skill and it's one that I've just not been interested in learning. |
| 50:14 | The thing about modifications to the intake ports like this is it's not a case of necessarily bigger is better. |
| 50:23 | What we often find is that a smaller port that actually flows worse on a flow bench on the dyno will actually perform better because it's all about balancing air velocity with air volume. |
| 50:36 | So it's actually quite a complex science that goes into porting and polishing. |
| 50:40 | I've never seen any back to back tests between a conventionally ported intake and one that has had the dimple port applied to it. |
| 50:48 | I imagine there's probably data out there if you search for it though. |
| 50:55 | Redskin12 has asked, have you carried out any in or out of vehicle testing with an air cleaner in open air versus one with a shroud at the rear of the enclosed scoop to stop air blowing straight through it? No, not quite sure how that would work just off the top of my head. |
| 51:16 | I guess what we have done is we have tested with the air filter maybe in an air box like this without the rest of the air box, I'm not 100% sure if that's what you're referring to. |
| 51:31 | It's a good way of narrowing down where your inlet restrictions lie. |
| 51:34 | Obviously something that's going to be easier to do on the dyno than out on the road though but yeah not 100% sure if that's the actual angle you're going for there. |
| 51:42 | Big Brap has asked, does heat soak become an unseen problem, affecting the induction piping and how to you reduce the intake air temps? Yeah it does so I mean anything that's going to allow heat into the intake air is going to ultimately affect our performance. |
| 51:55 | Some of it though is basically, we can't do anything about it. |
| 51:59 | Heat soak's going to be an issue when we shut down the engine, when the engine is hot we're obviously going to have all of the components inside of the engine bay heat soak. |
| 52:07 | It's only an issue that's going to be present for a couple of minutes after we start the engine up again and once we've got the engine back up and running, particularly at road speed and air flowing through the engine bay again, everything sort of reaches equilibrium pretty quickly. |
| 52:22 | You can potentially get yourself a small gain by using some of the heat reflective tape on your intake plumbing. |
| 52:30 | The reality is it's probably only going to net you a small improvement though and whether that's worth it, personal preference really. |
| 52:40 | OK we've got through the main questions, we've got one which is a little off topic here from Dory who's asked, what kind of porting will you do in your rotary engined development car? Haven't 100% decided yet. |
| 52:52 | The reality is with rotary engines when you go bigger in the porting, obviously they're going to respond and make a lot more power. |
| 53:00 | Bridge porting, definitely sounds great as well, that's going to give you that classic rotary brap at idle and cruise. |
| 53:09 | What I really think with this car, because we want to keep it fairly street is that we'll be doing a relatively mild port job on it, probably just a mild extend port so that we're not going to be destroying the low end torque and power and also we're not going to be destroying the drivability so that's kind of the theory at the moment. |
| 53:30 | For the moment we'll just get it up and running with the stock 13b with completely stock ports and get ourselves a baseline before we worry about going much further. |
| 53:39 | We've got another donor motor sitting there that we might build up once the engine is up and running, the car is up and running. |
| 53:46 | Alright team, that's brought us to the end of our questions, some great ones in there. |
| 53:49 | So pretty simple topic but hopefully you've at least learned a little bit more from that and it's given you a few tools that you can put in your toolbox for actually testing and finding out where your restrictions are. |
| 54:00 | As usual if you've got questions after this webinar has aired, please ask those in the forum and I'll be happy to answer them there. |
| 54:07 | Thanks for joining us and hopefully we'll see you again next time, cheers. |
Timestamps
0:00 - What are they and why is it important?
3:00 - What causes restrictions?
12:30 - Signs that we have a restriction
23:15 - Smooth versus corrugated plumbing
25:45 - Airbox vs Pod filters
27:30 - What can you expect from aftermarket components?
30:05 - Removing the intake system to test available power
31:35 - Effect of plumbing length
34:00 - Questions


