057 | Elite knock control - Haltech Elite 2500
Summary
Knock or detonation is one of the most common causes for failure of any high performance engine. Closed loop knock control when properly configured and tuned can provide a margin of safety to detect knock and automatically retard the ignition timing to prevent damage. In this webinar we will look at how to correctly approach configuring and tuning this function using a Haltech Elite 2500 fitted to our Nissan 350Z
| 00:00 | - Hey it's Andre from High Performance Academy and in this webinar we're going to be discussing configuring and tuning the knock control functionality on the new Haltech Elite series of ECUs. |
| 00:14 | Before we actually get involved with the configuration and setup in the Elite ECU, just a quick, we'll have a quick discussion about what exactly knock is and why we need to detect it, how we detect it and how we can avoid it. |
| 00:30 | So what most people consider is when the spark event occurs inside our cylinder, we get something resembling an explosion occurring inside the combustion chamber. |
| 00:41 | Now under normal combustion, that's actually not the case, what we get is a flame front that will smoothy propagate out through the combustion chamber starting at that spark plug. |
| 00:55 | And what happens as the flame front moves out through the combustion chamber, it ignites the fuel and air charge ahead of it. |
| 01:03 | Now what this results in is a relatively slow combustion event and it also results in a smooth increase in the pressure inside the cylinder. |
| 01:13 | So that's what we want to achieve. |
| 01:15 | Now when knock occurs, knock is also known as detonation, when knock occurs, some point after the spark event has started combustion, what we get is the heat and pressure building up inside the combustion chamber, becomes so great that pockets of fuel and air around the outside of the combustion chamber can spontaneously combust. |
| 01:41 | Now when this happens, it is in fact a little bit like a stick of dynamite exploding inside the cylinder. |
| 01:49 | And we get some very very sharp pressure spikes as a result of this spontaneous combustion. |
| 01:56 | Now this is very dangerous for our engine for two reasons. |
| 01:59 | First of all, the pressure spiking, the pressure waves inside the cylinder, will strip away the layer of boundary gases that protect both the top of the piston as well as the combustion chamber from the full heat of combustion. |
| 02:16 | Now when we think about it, in most modern engines, our cylinder head is made out of aluminium and so is our piston. |
| 02:23 | And aluminium, depending on the particular alloy, might have a melting point somewhere in the region of 700°C. |
| 02:32 | Now our full heat of combustion is much higher than that and it's this boundary layer of stagnant gas that protects both the crown of the piston as well as our combustion chamber from being melted. |
| 02:45 | Now when that boundary layer is stripped away from the piston by the pressure spiking resulting from knock or detonation, that full heat of combustion can reach the piston. |
| 02:56 | Now in very minor instances of knock, what we will see is a sand blasted appearance to the outside edge of the crown of the piston. |
| 03:09 | In really extreme situations, we can get a result that looks something like that where the whole side of the piston can be melted away. |
| 03:21 | And that can all happen very very quickly. |
| 03:25 | So that's one aspect of detonation, the other aspect of it is the pressure spiking that occurs inside the cylinder, somewhat resembles hitting the top of the piston with a sledge hammer if you like, just to give is a simple view. |
| 03:42 | So particularly on fragile cast pistons which are so common in a lot of factory engines, one of the key aspects or key results of knock occurring will be damaged cracked or broken ring lands. |
| 03:58 | So that will result in oil consumption and a loss of compression. |
| 04:02 | So ultimately we need to stay away from knock or detonation, it's very important and if you've followed any of our lessons and many of our webinars, I am constantly going on about using audio knock detection equipment when we are tuning the engine, to audibly listen and notice when knock is occurring and that's one of the guides we use when we're optimising the ignition table in any ECU. |
| 04:30 | We're either tuning the ignition timing until we reach MBT, so basically we're advancing the timing until we see the torque peak and plateau, or alternatively if our engine is knock limited, we're going to see or have the engine begin to knock or detonate while that torque's still increasing. |
| 04:50 | If we reach that point where the engine is knocking or detonating, then we need to retard the timing and allow a safety margin. |
| 04:59 | Now just talking about what we're actually using for knock detection, regardless of whether we're using an audio knock detection system like the Plex Knock Monitor that we use or you're talking about the factory or aftermarket ECU's knock detection strategy, we're generally using a sensor that looks a little bit like this. |
| 05:20 | So this is a Bosch donut style knock sensor and what it is is a piezo electric sensor and that responds to vibration in the engine block and it translates that vibration, it turns that vibration in the block into an electrical signal that can be monitored by the ECU. |
| 05:44 | Now before we move into looking at the software in the Elite and go through the setup procedure, I just want to mention, there's one very distinct difference, a lot of people will confuse knock or detonation with another term that's thrown around a lot which is pre ignition. |
| 06:04 | Those two terms are very different. |
| 06:07 | Knock or detonation is an abnormal combustion event that occurs after the spark has already initiated combustion. |
| 06:17 | So the reason why we get knock or detonation is after the spark has occured, we're going to see that pressure and hence heat inside the combustion chamber rise and that is what causes pockets of unburned fuel and air to spontaneously combust. |
| 06:33 | Pre ignition on the other hand occurs, as its name implies, before the ignition event happens. |
| 06:41 | And generally what's causing pre ignition will be some hot surface somewhere in the combustion chamber, quite often the spark plug will be enough to ignite the air and fuel charge inside the cylinder before the spark has occured. |
| 06:57 | So very very different terms and I just wanted to make sure that that is understood before we move on. |
| 07:06 | Alright now that we've talked about what knock is and how we can detect it, let's just jump into our Haltech Elite here and we'll go through some of the configuration options that we need to look at. |
| 07:20 | So before we even start setting up knock detection, we need to enable the function, we can do that through our setup menu, you can see at the moment I've already entered the terms knock here and we need, the term knock there, and we need to set up, first of all, knock detection and this is the input from the knock sensor that the Haltech Elite is going to be using for its knock detection strategy. |
| 07:51 | And you can see up here, first of all we have options for one or two knock sensors. |
| 07:57 | Now on our VQ35, it is relatively abnormal for a V configuration engine, the engine is fitted with one factory knock sensor mounted in the valley between the cylinders so we only have one knock sensor input. |
| 08:13 | Now this would also be pretty typical for the likes of an inline four cylinder engine where we only have one knock sensor mounted to the block. |
| 08:22 | More often on a V configuration engine or also maybe an inline six where you've got a longer block, it wouldn't be uncommon to have two knock sensors wired up and in this case we can select a second knock sensor if we have wired that. |
| 08:38 | You also have the option in the Elite here to set up a warning light output if you want to have some driver indication that knock's occurring and you can see that we've got the option there of using a check engine light or something similar to indicate to the driver that knock is occurring. |
| 08:59 | So once we've configured a knock input, now I'll just actually talk about where we should put the knock sensor as well on the block, so obviously this is a factory engine, we've already got the knock sensor factory fitted to the engine. |
| 09:12 | If you're setting up an engine from scratch, an aftermarket setup and you're wiring everything from scratch and making up your own harness, you've probably got the opportunity to fit the knock sensor in a number of locations. |
| 09:25 | Now on some modern engines, you've got a limitation on how much space you've got probably in the engine bay, and how many bosses you've got available on the actual engine block as well. |
| 09:39 | So sometimes you're limited on where you can physically fit the sensor. |
| 09:43 | If you've got the opportunity I find the best place to fit the sensor is always high up on the actual engine block. |
| 09:52 | So somewhere near to the deck surface, that generally gives you the best signal to noise ratio from your sensor. |
| 10:03 | Beyond that, I've also found that fitting the sensor low down on the engine block or even sometimes on a cast sump will still work well. |
| 10:12 | My least preferred option would be fitting the sensor to the cylinder head or to the rocker cover and in that instance what you find is you do get a lot of valve train noise being transferred through into the sensor. |
| 10:28 | It's particularly more of an issue as well if you've got a solid lifter arrangement for your valve train as well, they tend to be a little bit noisier than a hydraulic cam, hydraulic valve setup. |
| 10:42 | Now one last thing I wanted to mention as well, you see this is the conventional knock sensor that we'll be using and as standard they come with an 8 mm hole through the centre of the sensor. |
| 10:55 | What I find is generally the number of M8 threaded bosses that you've got available, or 5/16th threaded bosses you've got available in your engine block, may be quite limited and a lot of engine blocks, we only have 10 mm or perhaps 3/8th threaded bosses available. |
| 11:13 | What I've found through my own experience is if you're careful and you use a drill press, it is actually possible to drill out the centre of a Bosch donut style knock sensor to 10 mm and it's not going to damage the sensor, the sensor will still work perfectly and it just frees you up a little bit, it gives you a little bit more range on where abouts on the engine block you can actually mount that sensor. |
| 11:40 | So that's just a little tip for you from my own experience of where we can fit, how we can modify the sensor to make it a little bit easier to fit. |
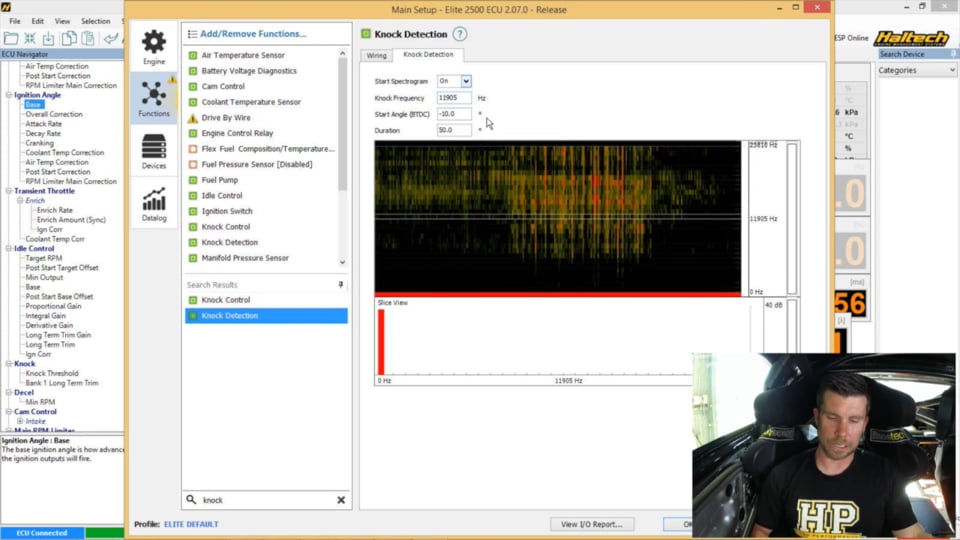
| 11:51 | OK so now we move into the next tab which is our knock detection and the Haltech ECU actually makes this really really easy because we can visually see exactly what's going on, what frequency the knock is occurring at using their spectrograph program. |
| 12:10 | Now before I get in and give you a demonstration of that I just wanted to explain what's happening here. |
| 12:17 | So knock, the frequency that knock occurs at in an engine is very specific to a particular engine. |
| 12:26 | We find that generally the frequency that knock occurs at is very closely tied into the bore diameter. |
| 12:35 | So of course you've got a lot of noise going on inside the engine, the engine is a mechanically very noisy place and in order to give the knock detection system the best chance of detecting knock and ignoring all of that other background noise of piston slap, bearings and valve train noise that we perhaps don't care so much about, we can use the knock detection system to focus specifically on the frequency that knock is occurring at. |
| 13:04 | Now the calculation for working out a rough baseline for where we can expect to find the knock frequency for a particular engine, what I'll do is I'll just bring up my calculator now. |
| 13:19 | OK so if we take the bore diameter which in the case of our VQ35 is 95.5 mm, this calculation needs to be done in millimetres, so metric measurements. |
| 13:33 | And then we multiply that by pie which is 3.142. |
| 13:37 | OK if we take the inverse of that and then we multiply it by 1800 which is just a constant, that calculation will give us an approximate starting point for the knock frequency in kHz. |
| 13:52 | So in this case you can see that the result I've got is 5.99 or 6 kHz. |
| 13:58 | So that's a good, if you've got no previous knowledge, that's a good indication of where the centre frequency for your knock is likely to occur. |
| 14:07 | One more thing though that is important to understand, if you're using a factory sensor that's come fitted to an engine, particularly on any engine that's post about the year 2000, it's quite likely that that sensor will be a tuned or narrowband sensor and what it often, what the factory often fit is what's called a second or even a third harmonic sensor. |
| 14:35 | So what it does is it looks, it's tuned to look at frequencies that are a multiple of that base knock frequency. |
| 14:42 | So if for example our calculator frequency there was 6 kHz, the second harmonic would occur at 12 kHz. |
| 14:52 | Now the reason that the factory OE manufacturers use a tune sensor like this that looks at the second harmonic is it improves the signal to noise ratio. |
| 15:03 | So we're less likely to see interference from background engine noise at that second or even third harmonic. |
| 15:10 | OK so what we're going to do, I'll just mention as well we have a window here for where we're expecting our knock to occur. |
| 15:21 | Generally I'm going to leave that untouched, generally that's not something we need to worry too much about, generally knock occurs over a relatively consistent window just about regardless of our engine. |
| 15:34 | So what I'm going to do is we'll just give you a quick demonstration of how we can use this spectrograph to visually see what is going on with our knock frequency. |
| 15:46 | To do this, what we need to do is generate some light detonation. |
| 15:51 | I know that sounds a little bit scary when everything we learn about knock is that we must avoid it at all costs but particularly if we're doing it under controlled conditions, we're doing it at light load and low RPM, and we're not undertaking sustained knock or detonation then it isn't actually that damaging for our engine. |
| 16:11 | So what I'm going to do, we've gone back to our base ignition table here and what I'm going to do, you can see I've got these cells here highlighted which are our wide open throttle areas of running at 2000 and 2500 RPM. |
| 16:27 | What I'm going to do just temporarily is advance those to 40 degrees. |
| 16:32 | Now I know from my prior testing that that is enough on this particular engine to generate some detonation. |
| 16:39 | While you're doing this, obviously I would strongly recommend that you use knock detection equipment. |
| 16:48 | Alright so we'll do back, we'll get our engine running now in fourth gear. |
| 16:52 | And we'll just have a look at our spectrograph and see what actually happens when we create some knock so we're going to turn that spectrograph on and what we can see on the screen is a representation of the frequency that noise is occurring at. |
| 17:11 | And hopefully you'll be able to see this on your screen, we're seeing a lot of little green pulses being shown on the screen there so at the moment I'm just sitting at light load and I don't have any knock occurring so what we need to do is we need to generate some knock and see what that looks like and we're going to see some higher intensity frequencies being shown on this spectrograph by red. |
| 17:37 | I'll just turn it back on. |
| 17:42 | OK so that's full throttle now and we can see some knock occurring. |
| 17:45 | Now you can see that we've got some knock being shown at a couple of frequencies here and what we want to do, unfortunately I can't pause that display. |
| 17:57 | What we want to do is choose the frequency where we saw the highest intensity occurring. |
| 18:04 | Now you can see at the moment, what I've got there on the right hand side of the screen is one of those areas of high intensity knock was at 11900 Hz so 12 kHz which as we calculated earlier, that's actually double our base frequency which is what I would expect to see with a second harmonic sensor. |
| 18:29 | So what we can do is we can simply click set as centre frequency and that sets our knock frequency there to whatever we've just determined. |
| 18:38 | Now if you want, we can then, what it will do is it will reset the scaling on our spectrograph, you can see now that our centre frequency on our spectrograph is set to 11.9 kHz and we can rerun that test and just ensure that that is a good accurate representation of where we are seeing the knock occur. |
| 19:02 | So let's just do that again. |
| 19:06 | So at the moment I'm just at light throttle, we've got no knock occurring. |
| 19:10 | I'll just bring the throttle up. |
| 19:14 | And we can see that we're probably a little bit low here, I'm just going to adjust that frequency up and we've set it at 14 kHz. |
| 19:25 | OK so that sets our basic knock detection strategy, that sets the frequency where we're actually seeing knock occur so that's the first step of our knock detection. |
| 19:38 | The second function we've got is our knock control, so this is how we're going to tell the Elite what we want the computer to do based on detecting a knock event. |
| 19:50 | So we've got two tabs here and firstly under knock control, we have our mode. |
| 19:55 | So at the moment I've only got one sensor, as we've already discussed so we're going to use the unbanked mode. |
| 20:02 | If we're using a sensor per bank, we can choose the banked mode which can improve the accuracy of the knock detection per cylinder. |
| 20:13 | OK so we've also got a short term retard which is the maximum amount of ignition retard that we will allow the ECU to apply and we've got a decay rate, so that's how quickly that knock will be removed if no knock is occurring. |
| 20:36 | We've also got a hysteresis time, so this prevents the ECU reacting multiple times to the same knock event. |
| 20:45 | Now it's important at this point to just mention that the knock detection strategy in any aftermarket ECU is not designed as a replacement for proper accurate tuning of our ignition tables. |
| 21:01 | I always like to think of the knock detection strategy as a safety backstop. |
| 21:07 | That's in case we're out on the road or racetrack, for some particular reason our engine temperature, our intake air temperature, are running much higher than what we saw when we tuned the engine on the dyno, or perhaps for some reason we ended up with a tank of fuel which was old with a lower effective octane rating. |
| 21:29 | Just enough to push the engine over the edge and make it knock or detonate and in this case we're using the knock detection strategy to help prevent any engine damage by automatically retarding the timing if knock is detected. |
| 21:46 | Now the other tab here is our long term trim, now this is one of the functions of the Elite that I really like, there's a number of functions inside the ECU where we can apply this long term trim or self learning. |
| 22:03 | So if we enable this trim, what this does is it will automatically populate a long term trim table in the ECU with the results of our knock control strategy so if the ECU is continually retarding timing in certain areas of our mapping, this long term trim table will be populated with the results of those trims. |
| 22:28 | Now what we can do then is drive the car around, basically if there's a certain area of our mapping where we've got the timing over advanced, over time the long term trim table will be populated with enough ignition retard to hopefully prevent that knock occurring. |
| 22:46 | Then what we can do is once we've driven the car around, we're happy with everything, we can click on this apply to base table and what that will do is it will retard the timing in our base ignition table and correct that area that we've got over advanced. |
| 23:04 | OK so that's our basic setups there. |
| 23:07 | Now we actually need to tune the knock control system. |
| 23:11 | Now the easiest way to do that is to start by adding a new page, you can see at the moment we've got a page set up here called main and we've also got another page for doing our variable cam timing tuning which has got parameters and channels relevant to that particular function. |
| 23:32 | If we click on view and we click on load page, we can choose from a number of pre configured pages here that Haltech provide with the Elite software and I'm just going to load up the knock page. |
| 23:48 | Now of course you can create your own page and basically set it up however you want but in this example we're going to use the pre defined knock setup page. |
| 24:01 | Now what we're trying to do here is set up and tune this knock threshold table which we'll find under the knock sub menu. |
| 24:13 | And if we look at this table at the moment, what we've got is a table that is set up with a threshold. |
| 24:21 | Now how this basically works, the numbers in it are defined as DB. |
| 24:26 | And how it basically works is if we see, if the ECU detects a noise input from the knock detection system that is in excess of the numbers in this particular table, that's when it will define that knock is occurring and it will retard the timing as a result of that knock event. |
| 24:51 | OK so at the moment, what we can see is we've got a three dimensional table, we've got throttle position on our X axis and we've got our engine RPM on our vertical axis. |
| 25:02 | Now we can choose to set this table up as a 3D table like this and it does make some sense because the amount of noise that the knock sensor is detecting will depend on how much load we've got on the engine as well as how much RPM we've got. |
| 25:21 | So what we see is a noise signal that increases relative to throttle position or load as well as relative to engine RPM. |
| 25:29 | So if we want to set this system up to be as accurate as possible, what we need to really do is tune the system so that it has a lower threshold at low RPM and low throttle position and the threshold increases as RPM and load increase. |
| 25:48 | And you can see that at the moment, I really don't have that set up, we've got a table that's two dimensional, all we're going is increasing the threshold as we go up in RPM. |
| 25:58 | We're starting at low RPM with a number of 30, increasing that to 47. |
| 26:03 | For simplicity, what I'm going to do at the moment is we'll just disable this throttle position axis and we'll set this up as a simple two dimensional table. |
| 26:12 | And how I like to set this up is start by setting the table with a threshold at the maximum which is 60. |
| 26:21 | We can see over on the right hand side in this time graph, we have the input from our knock signal relative to the actual knock threshold, you can see at the moment, knock threshold sitting up here at 60. |
| 26:35 | So this is a good way of using the time graph function to tune the knock system. |
| 26:42 | What I'm going to do now is I'll do a quick ramp run on the dyno. |
| 26:47 | Before we do that, it's important to go back to our base ignition table and we will set our 40 degree ignition advance back at something sensible just so we don't do any damage and we know that at that point we were seeing knock occur. |
| 27:05 | OK so what we'll do is we'll use the PC logger function here, I'm going to go back to our knock page and I'm just going to do a quick ramp run and we will have a look at the results of the knock input relative to our engine RPM. |
| 27:24 | Now it's important when we do this test to make sure, using our audio knock detection system that the engine isn't physically knocking. |
| 27:47 | OK so that's our run there and what I'm going to do is just play back the run file and we will look through and have a look at what our knock signal's doing. |
| 28:04 | So when we use the playback function in the Elite, what we're doing is looking at the data at that particular point in our table. |
| 28:12 | So what I like to do is basically use the feedback of this system to help us tune the knock threshold. |
| 28:21 | So what we can do is move through our run and you can see if we watch here, you can see as I move through the run you can see our little cursor move through the RPM range as we move through the revs at wide open throttle. |
| 28:36 | Of course I've made this a two dimensional table just for simplicity. |
| 28:39 | If we had left it as a 3D table you'd be able to see what was happening with our throttle position as well. |
| 28:47 | So we started at around about 1750 RPM and what we'd want to do is look at the knock level that we were seeing at that particular point in the RPM graph. |
| 28:59 | Now once we've tuned this table we will go through and just confirm the accuracy of it. |
| 29:06 | What we want to do is set the threshold at each point in the RPM table just a little bit higher than what we were actually seeing in terms of the knock signal. |
| 29:17 | So at this point we're seeing a signal around about 25 to 26. |
| 29:22 | A good rule of thumb is to start by adding around about 10% to that reading. |
| 29:28 | So what I'm going to do at 1500 is we'll set the threshold to 27. |
| 29:35 | Once we've done that, we'll move through to the next point which is 2000 RPM. |
| 29:39 | And at 2000 RPM we're seeing approximately the same noise level, perhaps just a little bit higher. |
| 29:46 | We don't really need to be super accurate right now because we will do another run and just confirm exactly how accurate this is all working out. |
| 29:56 | So I'm just moving through the RPM now and just increasing, you can see now we're up to 3000 RPM and you can see we've got a little spike there that just sits on about 30 so we'll just go a little bit higher than that and you'll also obviously notice that the signal that we're getting from that knock sensor does vary a little bit. |
| 30:20 | So when we're setting that threshold, you do have to apply some common sense and sort of look for a value for our threshold that is above the no knock peaks that we are seeing. |
| 30:34 | So now we're up at about 33. |
| 30:37 | So we'll go and set that at 36 and we'll just continue through and do exactly the same process here. |
| 30:50 | And finally if we get it all the way up to 6000 and we're up to about 46. |
| 30:59 | OK so now we've got a threshold table that is relatively well tuned. |
| 31:06 | And what we would want to do straight away is test, do another run, again we want to make sure that under no knock conditions, we're not actually exceeding that knock threshold, so let's just do a quick test now and make sure that that is in fact the case. |
| 31:25 | And if you are seeing any areas where you're getting a little bit close to that knock threshold, we can obviously just go back in and make the necessary adjustment to our knock threshold. |
| 31:41 | Right we're at wide open throttle now so we'll just start our run. |
| 32:00 | OK so you can see there, probably our knock threshold table actually needs a little bit of work but mainly in the light load areas where we're actually off the throttle. |
| 32:11 | If we go back through our playback here, you can see what we've got here is our green line which is our knock threshold and our blue line which is the input from our knock sensor. |
| 32:23 | And you can see particularly right here in this little area we're probably a little bit tight to our knock threshold so we want to always have, under no knock conditions, just a little bit of margin. |
| 32:36 | Now obviously there's a trade off here because if our margin between our knock signal and our threshold is too tight, we do risk having the ECU detect false knock. |
| 32:47 | If on the other hand, we've got too much room between our knock signal and our threshold, it's also possible for the ECU to ignore an actual knock event. |
| 32:59 | So we'll just move through and you can see that during our run, for the most part we've got a pretty well set up knock threshold there. |
| 33:07 | Now we can also, once we've done that. we can test how well the knock threshold is working. |
| 33:15 | Let's just create a little bit of knock again, so I'm going back to our main ignition table and I'm just going to set the timing at 2500 and 3000 RPM there to 40 degrees which as we already know is enough to create some knock. |
| 33:35 | Let's just start our run again and we'll do another run and just see our knock control system in action. |
| 33:56 | So what we should see is once we start our run, we get up to around 2500 RPM, we should see that blue line exceed our knock threshold. |
| 34:10 | OK and that's exactly what we did see. |
| 34:14 | So if we stop our playback there, stop our logging and playback, we can see that in this particular area here, our knock signal exceeds our threshold and you can see that the red value here is our knock level. |
| 34:33 | So what that's going to do is it's going to result in ignition retard being applied and we can see, if we look now at our bank one knock long term trim, you can see the result of the ignition trims that have been applied just in the time that we've been driving the car here on the dyno. |
| 34:55 | Now obviously as I said we've only, just for the sake of this particular test here, we've set up a two dimensional table, we want to be really accurate, we would set up the three dimensional table and probably just from that little demonstration that I've given there, our actual knock threshold is still just a little bit close to our knock level. |
| 35:18 | Alright we'll do into some questions now so if you have got anything that you'd like me to explain in a little bit more detail, now is the time to ask. |
| 35:30 | And we'll have a look and see what we've got. |
| 35:35 | Janu has said, how do we know what heat range to use to prevent pre ignition? It's a little bit dependent, a lot of that really is going to come from experience. |
| 35:51 | Really the causes for pre ignition are quite varied and to be honest the heat range of the spark plug is only one small aspect. |
| 36:03 | Pre ignition is probably an issue that is more prevalent on engines that are running on alcohol based fuel, so methanol and E85. |
| 36:15 | Not such an issue for us on pump fuel unless we've got a very old engine where we've got a lot of carbon build up in the cylinder. |
| 36:24 | So reasons for pre ignition as I mentioned, will be a hotspot somewhere in the combustion chamber that's causing, that's hot enough to cause the fuel and air charge to ignite. |
| 36:36 | Now with alcohol fuel, because the alcohol fuel is a little bit more susceptible to oil dilution than a petroleum based fuel, that oil dilution which we can get from running a methanol based fuel very rich, will wash the lubricating oil off the bore walls and hence it's quite common for methanol based fuels to suffer from oil dilution and that can be enough to drop the auto ignition point of the fuel down low enough that it can be ignited by a hotspot. |
| 37:10 | So it's not always the spark plug that will be the cause of the pre ignition and in the cases where you're running on methanol fuel, there are some other aspects, so basically what I'm getting at here is going to a colder range heat range on your spark plug is not always going to be a sure fire fix for pre ignition. |
| 37:37 | So generally my usual rule of thumb is if we're tuning a street based engine on pump fuel then I would generally be using one or maybe two heat ranges colder in the spark plug than what the factory recommends. |
| 37:54 | On E85 I would generally be at least two heat ranges colder than stock and really what it comes down to is how hard you're pushing the engine, how much power it's making. |
| 38:04 | On methanol based fuels, it's very common to be running on a 10 heat range which is a very very cold spark plug and often particularly in colder climates is not something you're going to have very much success getting the engine to actually cold start on. |
| 38:26 | OK Barry G's asked a question that right now I actually can't tell you the answer for. |
| 38:31 | Does the Haltech support per cylinder knock control. |
| 38:36 | And I know that yesterday I did ask Mitch from Haltech to come along as I was querying him on some of the finer details of the knock control strategy on the Hatech so hopefully if he has joined us in the chatroom, he will be able to jump in there and answer that. |
| 38:53 | I'm just looking now and it doesn't look like he is in there. |
| 38:55 | If he doesn't pipe up with the answer, what I will do however is find out for you and get you a definitive answer and I will post that in the forum for you. |
| 39:06 | Alright looks like that's all of the questions we've got here so thank you for joining us. |
| 39:12 | As usual if you do have anything more that crops up after this webinar, please ask those questions in the forum and I'll be happy to answer them there. |
| 39:21 | And as usual, if you haven't already, and you are enjoying our content and our webinars and our courses, Ben and I would both love it if you could jump on and leave us a review on our Facebook page. |
| 39:33 | Alright guys, thanks a lot and we'll see you next week. |


