084 | Link G4+ Rev Limit Configuration
Summary
Most tuners don’t give too much thought to rev limits and how they function, however they can have a big affect on engine reliability. In this webinar we will look at the options when it comes to configuring a rev limiter. We’ll discuss the pros and cons of fuel cut vs ignition cut, as well as Link’s 'Advanced Mode’ settings.
| 00:00 | - Hey it's Andre from the High Performance Academy, thanks for joining us for this webinar. |
| 00:04 | We're going to be looking at the rev limit functionality in this webinar. |
| 00:10 | We're going to be looking at that on the Link G4/G4+ platform using our Nissan 350Z. |
| 00:18 | Now on the face of it, rev limits are relatively straightforward for the most part, relatively self explanatory. |
| 00:25 | They're there to protect your engine against excessive RPM. |
| 00:30 | And I know that a lot of tuners don't probably put too much more thought into it than that. |
| 00:36 | However there are some subtleties to do with the rev limiter configuration and there's also a couple of idiosyncracies I've personally found with the Link G4 and G4+ platforms and the way the rev limiter is integrated with these ECUs. |
| 00:53 | So today's webinar is going to just discuss this relatively simple aspect in a little bit more detail and we'll also go into detail on the advanced setup functionality in the rev limiter and discuss each of those concepts, each of those parameters and how they should be adjusted. |
| 01:13 | Now as always, we're going to have a section for questions and answers at the end of the webinar so if you do have any questions, please feel free to type those into the comments box and Ben will transfer those through to me and I'll deal with those at the end of the webinar. |
| 01:30 | Now before we go too much further I'll just get our engine running and we'll just get online with our G4+ ECU. |
| 01:39 | Alright so one of the first or main parameters that most tuners are going to need to understand when they're setting up their rev limiter is how the ECU will actually control engine speed. |
| 01:53 | So let's start by opening our ECU settings window and we'll go to RPM limit. |
| 02:01 | And this is where we can actually find all of the RPM limits so you can see that that's shown here in our menu, let's click on that. |
| 02:10 | And this is the default setup or default settings that we would have visible so it's relatively straightforward, we have our RPM limit mode and this is one of the main parameters we're going to need to concentrate on and if we double click on this we have our options that are available, you can see that we can choose either an ignition percentage cut, a fuel percentage cut or a special mode that Link use called rotary only. |
| 02:41 | So I just want to spend a little bit of time discussing each of these modes and the pros and cons of each. |
| 02:48 | So this is how the ECU will control engine speed, so obviously if we want to control the engine speed and prevent excessive engine RPM, then we need to stop the engine firing and we can do that in one of two ways, we can either turn off the spark to individual cylinders or we can turn off the fuel to individual cylinders. |
| 03:12 | So that's the ignition and fuel percentage cut modes. |
| 03:16 | The rotary only mode is one that I'm not going to spend too much more time talking about here. |
| 03:21 | As it's name suggests, it's there primarily for rotary applications and rotary applications, particularly those engines with stock apex seals, if you have an aggressive rev limiter with a lot of popping and banging, primarily due to perhaps ignition cutting, that can in its own be enough to actually damage the engine so the rotary only mode is specially designed to be as soft on the engine rev limit as possible in order to give as much protection to the rotary engine as possible. |
| 03:59 | So for most of us, our mode selection is going to come down to whether we're going to be using ignition cutting or fuel cutting. |
| 04:07 | Now in most instances, I would tend to use fuel cutting where possible and the reason for this is in some applications, using an ignition cut can be potentially damaging to the valve train in the engine. |
| 04:25 | So particularly for engines such as Nissan's SR20DE, SR20DET where they're well known for valve train problems with their rocker arm design and hydraulic lifters, using an ignition cut if the stars align and everything works out just wrong, what we end up doing is sending cylinders full of unburned air and fuel out into the exhaust. |
| 04:55 | Now if they combust in the exhaust system there, what that can do, it can be enough to pop the exhaust valves back off their seats and in turn that can allow the hydraulic lifter to pump up. |
| 05:09 | In a worse case scenario we can have it throw the rocker arm off and all sorts of ugly activity happens after that. |
| 05:18 | So in general, if you've got an engine with known problems with valve train reliability, the fuel cut mode is generally safer. |
| 05:30 | Now of course if you are wanting to get flames and popping and banging out of your exhaust system, or you're tuning a launch control strategy where you want to build boost pressure by purposefully having the ignition event retarded and igniting the fuel later in the engine cycle and unburned fuel and air out in the exhaust system, you're going to need to use the ignition cutting mode to get the best results however it's important to understand the ramifications of that. |
| 06:01 | So simply put, fuel cutting, we are cutting the injection event to individual cylinders. |
| 06:07 | If we're cutting the ignition, we're cutting the ignition event to individual cylinders. |
| 06:12 | So in one instance where we're cutting the ignition, we've got unburned fuel and air passing through the cylinder, it's not going to combust in the cylinder because there is no spark event but it may end up combusting in the exhaust system. |
| 06:26 | Now when we're talking about the cut, particularly when we're talking about fuel cut, I know that a lot of tuners get a little bit nervous about fuel cutting thinking that that is going to result in a lean air/fuel ratio. |
| 06:42 | Now that's not really the case, what we're doing when the ECU cuts fuel, it is cutting all of the fuel for one individual injection event to a cylinder. |
| 06:54 | So essentially no fuel is entering that cylinder so we're not going to get any combustion occurring so it's not that the cylinder is actually going to run lean. |
| 07:04 | Now I'll just clarify a little bit because what we will actually find is that during normal operation, some portion of the fuel being delivered by the injector will tend to form a fuel film on the port wall, the back of the valve, the intake port and what that does is when the injection event is cut, some of that fuel will still make it into the cylinder but it's a very very small amount of fuel, generally that's going to result in a mixture inside the cylinder that's far too lean to actually combust. |
| 07:39 | When the injection event is reinstated after the cut period though, what we are going to find is there will be a very short momentary section in time where that fuel film will need to be built back up. |
| 07:56 | So the engine can run momentarily slightly lean when the injection is reinstated. |
| 08:02 | It's a little bit like the acceleration enrichment functionality where if we accelerate sharply on the throttle without any accel enrichment we will see a lean spike in our air/fuel ratio. |
| 08:16 | OK so we've talked about the ignition cut and the fuel cut modes, again my recommendation in most instances, unless you have a specific reason to do so, you would want to be using the fuel cut mode, it is the safest. |
| 08:34 | However in the Link G4 help file you will find that they do recommend, if you're using group fire injection, that you use the ignition cut mode. |
| 08:48 | Sorry if you are using group fire injection that you use, I'll just actually make sure that I'm giving you the right advice here. |
| 08:59 | If you're using group injection, you should be using the ignition cut mode and if you're using auxiliary injection you should also be using, let me just check here, you should be using ignition percent cut limiting. |
| 09:15 | Now all of the information that I am going to go over here as well I'll just point out, is avialable in the help file. |
| 09:21 | I'm going to aim here to give you a slightly more thorough explanation of what's going on and I also know that unfortunately most tuners don't spend a lot of time in the help file and that's one point I will make with the Link G4 platform, the help file can be accessed by pressing F1, it's always focused on whatever functionality we are looking at at the time and it is incredibly on depth so if you ever do get stuck, it is always worthwhile looking at their help file. |
| 09:52 | OK so moving down and in the next option we have is our table allocation and we can simply select here whether we're going to use a 2D table for our rev limit, so this is where we're actually defining the engine's rev limit. |
| 10:09 | Or if we want to define that based on 2 parameters, we can use the 3D table. |
| 10:15 | In my experience, I don't think I've ever used the 3D table, the 2D table is the default setup and that's what most people, most tuners will be using. |
| 10:25 | So we can't actually alter our rev limit here. |
| 10:29 | What we can do, we're going to come back and talk about our advanced mode shortly. |
| 10:33 | What we can do, if we press escape again, and we click, we type in RPM, we're going to find the RPM limit table and this is where we actually define our engine rev limit. |
| 10:46 | And you can see, remember we've got our 2D table, we've got engine coolant temperature as our axis and you can see we've got our engine rev limit vs engine coolant temperature. |
| 10:57 | You can see there's a couple of things that I've done here. |
| 11:01 | What I'll do is I'll just remove this change that I have made for this webinar first. |
| 11:07 | You can see that when the engine coolant temperature is very low, and likewise when it gets above 110°C, I've purposefully reduced my engine rev limiter. |
| 11:18 | At the low end of the scale this simply means that when the engine is still warming up we can't drive it at very high RPM. |
| 11:25 | So it's just a protection strategy in essence and likewise when the engine coolant temperature exceeds an area I'm happy with, in this case 110°C, it would indicate that something's not right, we're overheating, we've just bought the engine RPM limit down. |
| 11:42 | Now particularly for a driver who isn't paying attention to any of the gauges or any warnings on the dash, this straight away is going to bring their attention to the fact that something is definitely not right and it's going to mean that it's impossible to continue really beating up on the car hard so it's a good protection strategy for our engine. |
| 12:03 | Now you'll notice here in the main area that I'm expecting the engine to operate in from 20°C through to 100°C, I've set the engine rev limit to 6700 RPM. |
| 12:19 | Now this Nissan VQ35, the factory rev limiter is at 6500 RPM. |
| 12:25 | And this is one of the idiosyncrasies that I wanted to explain with the G4 and G4+ software that does confuse a few tuners who are new to using this product. |
| 12:37 | Now the way the G4+ rev limiter setup works is that there is a control range, this isn't uncommon, we're going to look at the control range shortly when we look at that advanced mode functionality but the control range defines a certain RPM range over which the rev limiter will function and by default, if we haven't made any changes, that will be 200 RPM. |
| 13:01 | So the way the G4+ platform works is that the values that we have here in our engine rev limit table are the end of that control range. |
| 13:16 | So what this means is that if we set our engine rev limit at 6500, we're actually going to begin soft cutting or begin just touching the rev limit 200 RPM earlier or in this case 6300 RPM. |
| 13:32 | So in order to begin our rev limiting at 6500 RPM which is the factory rev limit as I mentioned for the VQ35, I've actually purposefully set my rev limit 200 RPM higher. |
| 13:44 | So this is probably one of the most common questions tuners have about the G4+, why is my rev limit coming in earlier and that's because of that control range. |
| 13:56 | OK let's go back to our RPM limit setup and now we're going to talk about our advance mode. |
| 14:04 | Now the functionality that I've just looked at is all you're going to need in probably 95% of cases. |
| 14:15 | The ECU will take care of the rest and provide and adaptive rev limit function that's going to be satisfactory for most applications. |
| 14:24 | However if you want a little bit more control over how the rev limiter is used or applied by the ECU then we do have the ability to control that quite accurately by enabling the advanced mode and we can do that simply by turning advanced mode on. |
| 14:43 | Now you can see when I've done that, we've now got access to quite a few more parameters that we can adjust and I'm going to go through each of these in turn and talk about them but I find the easiest way is to start with a graphical representation of what is actually happening with the rev limiter functionality. |
| 15:07 | Now again, if I press F1 and we scroll down we can see that this is shown in the help file. |
| 15:13 | However just to keep things a little bit simpler, and a little bit less cluttered, I've also added this into my notes. |
| 15:21 | Just give me a second and I will get to those. |
| 15:24 | And I've just blown this up so we can see it. |
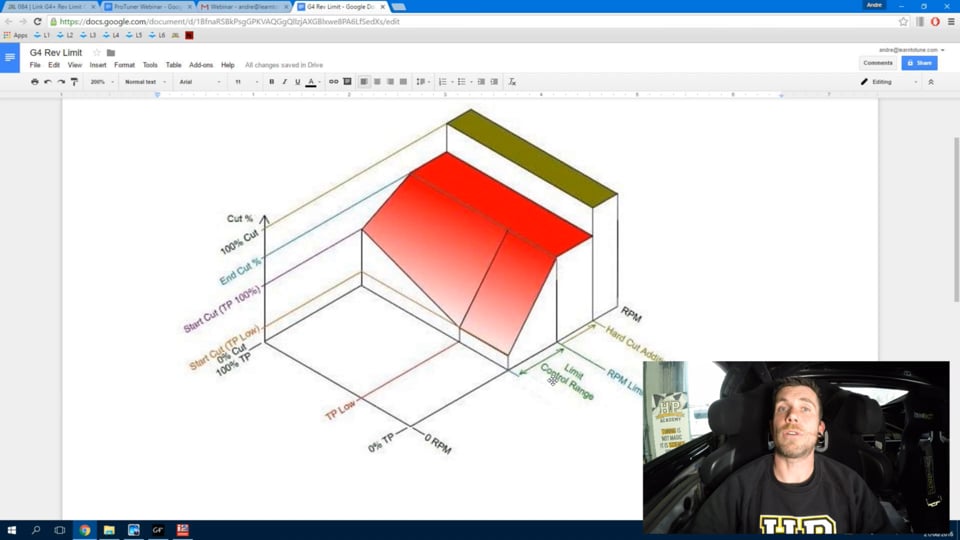
| 15:28 | Right so what we've got on this particular table here, this graph is a demonstration of how the cut is being applied depending on our engine RPM and depending on our throttle position. |
| 15:42 | So we can see that on this axis here we have our throttle position and we start with our throttle position here at 0%, so closed throttle and here we're at 100% throttle. |
| 15:55 | So this axis is our throttle position. |
| 15:58 | And next we have our engine RPM axis. |
| 16:01 | Again we start at 0 RPM and the top of our axis we're at maximum RPM, whatever that may be for our particular application. |
| 16:11 | Our third axis we have the percent of cut that is being applied. |
| 16:17 | So at the bottom of the axis we have 0% cut and of course at the top of the axis we have 100% cut. |
| 16:24 | So what this does is it graphically demonstrates how the cut is being varied based on our throttle position, based on our engine RPM. |
| 16:34 | So first of all we have our limit control range here. |
| 16:38 | So this is one of the parameters that we have the ability to adjust. |
| 16:41 | So remember I mentioned we have our engine RPM limit, so this is the limit from the table, the 2D table that we looked at and you'll also remember that I said that our limit control range begins before our RPM limit. |
| 16:58 | So this is why our engine starts, the ECU will begin rev limiting prior to the limit that we've actually put into our 2D table. |
| 17:08 | Now what we can do is define a start cut, so how much ignition or fuel cut is being applied initially as we move into the limit control range. |
| 17:22 | Now obviously the amount of cut that needs to be applied in order to control our engine speed is going to be dependent on how much power the engine's producing. |
| 17:32 | Now what I mean by that is if we've got an engine that's producing 100 horsepower for example, it's not going to require as much fuel or ignition cutting to control the engine speed as if it was producing 500 horsepower. |
| 17:47 | And the way the Link ECU deals with this is by basing the cut on our current throttle position. |
| 17:55 | So we can see that we have a parameter here called TP Low. |
| 17:59 | So this is our low throttle position. |
| 18:01 | And we have a start cut value that the ECU will use if we approach the limit control range and we're below the TP low setting. |
| 18:13 | So what we do is we begin at low throttle settings where the engine isn't making much power, with a relatively low cut percentage. |
| 18:21 | You can see we also have a parameter here with our start cut at 100% throttle. |
| 18:25 | So this is the cut that the ECU will provide if we enter our limit control range at high throttle position. |
| 18:34 | And you can see that essentially there is a straight line interpolation between 100% cut and our low cut. |
| 18:44 | So this allows us to tailor the initial amount of fuel or ignition cutting based on how aggressively essentially the engine RPM is climbing or how aggressively we're entering our limit control range. |
| 19:00 | So this gives us a lot of control to make sure that regardless of how aggressively we hit the RPM limit, we're going to be able to control the engine RPM and prevent it overshooting our limit. |
| 19:12 | Now we have a limit control range, as we've talked about, so as we move from the beginning of our limit control range to the end, we're increasing our cut and what that means is if we push past the start of the limiting effect, that means that the engine's producing more power, we need to produce a larger amount of cut in order to control the RPM so you can see that as we move up in the RPM, the amount of cut is progressively increased and we can control the amount of cut, the end cut parameter that is what will be produced as we actually hit our engine RPM limit. |
| 19:53 | Lastly we can also instigate a hard cut. |
| 19:59 | So we can instigate a hard cut where we can completely cut fuel, completely cut spark or both when we achieve a certain RPM above our RPM limit. |
| 20:12 | So I just find that this is a great way of graphically showing what's actually going on inside the ECU because without this graphical representation, it can be a little bit tricky to understand how these parameters relate to each other. |
| 20:28 | Let's pop back now into our software and now we can actually talk about each of the parameters. |
| 20:36 | So now we have, we'll just move down and we'll talk about them in order. |
| 20:40 | We have our hard limit. |
| 20:42 | So we can choose whether or not we want to have the hard limit active, we can turn that on or off and if we turn it on you can see that we have the option of an ignition 100% cut, fuel 100% cut or both fuel and ignition 100% cut. |
| 21:01 | Now whether we choose to use this will to some degree also relate to what we're using for our end cut parameter. |
| 21:11 | We'll just go back to our diagram here. |
| 21:15 | You can see that our end cut here, we can control the maximum amount of ignition or fuel cut that's going to be applied at the point where we get to our RPM limit. |
| 21:27 | Now if that was set to 100% which we can do, in essence that is the same as a hard cut so we've got the same total effect. |
| 21:37 | If we want a softer cut we can limit that but it may allow the engine RPM to climb past our rev limiter, in which case we can use the hard cut to prevent it going too far. |
| 21:48 | All of this really comes down to how much RPM over and above our rev limit we're prepared to tolerate. |
| 21:56 | In some engines, exceeding the rev limit could be incredibly dangerous, we might be right on the edge in which case we really want to be very very sure that the engine RPM isn't going to exceed our limit. |
| 22:08 | I'm going to, let's just turn that on and I'm going to set that to fuel and ignition 100% cut and I'm hoping I'll be able to demonstrate these with some logging very shortly. |
| 22:20 | Next we have our cut effect and if we double click on this we can choose either adaptive or constant. |
| 22:27 | Now by default this is set to adaptive. |
| 22:29 | I've yet to see a reason why we would change this but in essence, it is the cut sequence that will be used. |
| 22:38 | So if we use the adaptive cut sequence, what the ECU does is it randomises the order that cylinders will be cut to ensure that one cylinder isn't repeatedly being cut. |
| 22:50 | In some instances if we did this, if we repeatedly cut the same cylinder, it could result in that cylinder becoming perhaps fuel fouled for example if we were using an ignition cut. |
| 23:02 | So typically I would leave this set on adaptive, if we use constant then it will use, the ECU will use a constant repetitive cut for a particular cut percentage. |
| 23:16 | Next we have our limit control range which we've talked about now. |
| 23:19 | So this is the control range between when the cutting will first start, so essentially our soft cut where that will begin and how many RPM before our engine RPM limit parameter, that will begin. |
| 23:37 | So essentially the point of this parameter here is the wider the control range is, the greater, the larger the RPM is, the softer the cut gradient will be if we go back to our little graph here, we're talking about this gradient which we can see here. |
| 23:56 | The gentler that will be and it generally allows the ECU to cut the engine and control the engine RPM more smoothly. |
| 24:05 | If we reduce this and let's say had a very very tight cut control range, limit control range of 50 or 20 RPM, that gradient is much steeper and we're going to get a much more aggressive cut and the engine RPM will tend to move around a little bit more. |
| 24:26 | The default value here is 200 RPM and in most instances, unless you've got a reason to change this, I find that works very well and I will just talk briefly here about why we may want to change this. |
| 24:38 | In some race classes, particularly one I was involved in here in New Zealand, the NZ V8 Touring cars, there is a class rev limit. |
| 24:46 | And of course the drivers want to get the maximum out of their available rev range as possible, so in that case most of the drivers elect to have a complete hard cut at the class regulation rev limit and they obviously are pretty sharp on their gear changes and manually are controlling when they're changing gear and are staying away from that cut. |
| 25:12 | The downside is if you do hang the engine up on that rev limiter, the engine cut is quite aggressive, it can upset the car so the wider your cut range is, the smoother the cutting will be and this is going to make the engine smoother, particularly if we hang the engine up on the rev limiter out on the road or the racetrack. |
| 25:35 | OK next we have our hard limit activation. |
| 25:38 | So this is how far above the engine rev limit parameter from our 2D table the hard limit will be added. |
| 25:47 | So in this case, let's just add 50 RPM to that for our example. |
| 25:51 | Again where you choose to have this is up to you and it will depend on how tolerant of engine RPM your particular engine is. |
| 25:59 | Now we have our end cut parameter here. |
| 26:03 | So this is the amount of cut, in this case remember we are using at this stage, against my better judgement, but for the purpose of this demonstration ignition cut. |
| 26:13 | So in this case when we get to our engine rev limit parameter from our 2D table, we're actually going to be cutting the ignition by 100%. |
| 26:22 | So hopefully what that should mean is we never ever get to our hard cut. |
| 26:26 | But to demonstrate this, let's start by setting this to 85%, we'll have a play with this once we start doing a demonstration. |
| 26:34 | Now we have our start cut TP 100, let's just go back and this is the parameter here. |
| 26:42 | So this is the amount of cut that will be initially brought in if we enter the limit control range at 100% throttle. |
| 26:52 | So again, because we're entering the control range with a lot more engine power at 100% throttle, we're going to need to cut more fuel or spark. |
| 27:02 | So in this case, we've set this to 60%. |
| 27:06 | Next we have our start cut at our TP low parameter. |
| 27:11 | So what I'm going to do is just set this to 20%. |
| 27:15 | So again with less throttle, we don't need as much power reduction so we start with a lower power reduction value. |
| 27:23 | And this works in conjunction with our TP low parameter. |
| 27:27 | I'm going to set this to 10% and a point here is if we leave this set to 0, the ECU will ignore it and it will simply use the TP 100% value. |
| 27:40 | We also have our exit decay rate so this is how quickly the cut percentage will be reintroducted or removed I guess I should say, after the engine RPM has exited the limit state. |
| 27:56 | So this is how much percent per 20 ms will be removed. |
| 28:02 | Obviously the higher the value we enter there the more quickly the engine will recover after a rev limit event. |
| 28:09 | And we can also use an ignition trim as well to help reduce engine power as we approach the engine rev limit. |
| 28:20 | So that's a quick description of each of those parameters. |
| 28:25 | Again, we will be having questions and answers so if you do want any more information about any of these, please ask them in the comments and I'll address those. |
| 28:34 | Now what I've got here, I'll just start our logging working. |
| 28:39 | I've just got a log file set up here that's going to hopefully demonstrate some of these parameters. |
| 28:46 | In particular at the top here we have our current engine speed along with our engine rev limit value, so our current rev limit. |
| 28:56 | We've got our throttle position, I've got our lambda values and I'm not really going to be looking at our air/fuel ratio but I do want to demonstrate what happens to our air/fuel ratio when we hit a limit. |
| 29:11 | So we'll be looking at that shortly. |
| 29:13 | We've got our rev limit status and then finally at the bottom we've got both percentage ignition and percentage fuel cut values. |
| 29:22 | So this is going to be able to show us exactly what's happening as we're hitting that limiter. |
| 29:27 | What I'm going to do first of all is I'm going to come back to our tuning page and I'm going to just adjust our rev limit and I don't really want to be sitting at 6500 RPM for this demonstration so what I'm going to do is just highlight the area that we're currently operating in and let's just set that to 3500 RPM just for the purposes of our demonstration. |
| 29:51 | So now if we pop back to our logging, let's just see what happens with the rev limit and first of all what I'm going to do is I'm going to go to about 15 or 20% throttle. |
| 30:03 | So we're going to enter the rev limit control range with relatively little engine power. |
| 30:14 | OK so we'll just have a quick look at exactly what was happening there. |
| 30:19 | And we're going to talk a little bit about how we can tune the rev limit operation. |
| 30:24 | So first of all what we want to do is we want to have a look at how closely our engine speed is matching our rev limit. |
| 30:33 | And you can see that in this case with relatively little engine power, remember that our control range in this case is 200 RPM so with a rev limit at 3500, we're actually going to be starting to hit our soft cut, our initial rev limit will begin functioning at about 3300 RPM. |
| 30:54 | And you can see with, in this case 20% throttle, we're getting through to about 3400 RPM, we're sitting about halfway through our control range. |
| 31:03 | What we're looking for with good rev limiter action is we're looking to see a relatively stable percentage cut regardless of whether we're using fuel or ignition, we don't want to be seeing dramatic changes in our ignition cut because that in return is going to result in our engine RPM becoming somewhat erratic. |
| 31:25 | Now I did mention that I had our air/fuel ratio here just so we could see what the effect was when we hit our cut. |
| 31:32 | And this is an area that I know a lot of tuners still struggle a little bit with is reading the air/fuel ratio or lambda values when we've got a limiter effective. |
| 31:42 | Obviously on the face of it, we've got lambda of 1.5 and 1.37, the engine looks to be running incredibly lean. |
| 31:52 | However what we need to understand is we're using an ignition cut, this means that we're sending cylinders full of unburned fuel and air out through the exhaust and the lambda sensor will be registering the unburned air, the uncombusted oxygen and that's why it reads lean so we can't actually take any notice of our lambda, or air/fuel ratio meter while a cut is active, we can't tune the air/fuel ratio while a cut is active and on a different matter, exactly the same thing occurs if we end up with an ignition misfire during engine operation. |
| 32:33 | When we have a cylinder misfire, again we're getting an unburnt cylinder full of unburnt fuel and air passing across the oxygen sensor and that unburnt oxygen is being, uncombusted oxygen is being measured and giving the lean value, lean reading there. |
| 32:53 | OK so we started, we can see that we're sitting at around about 21% throttle there and we've got an ignition cut sitting at around about 66%. |
| 33:04 | And let's just go back, I want to demonstrate what will happen when we start changing our cut. |
| 33:14 | Let's just bring this up, I just want to make sure that I am, let's bring our TP low value up, we're going to bring that up to 30% so that we make sure that we're entering at our low cut value. |
| 33:28 | And now I'm going to set that to 20. |
| 33:31 | So what we've done here, hopefully what this should show is that initially as we enter the control range, we shouldn't have sufficient cutting, we're only using 20% now and remember we saw that the ECU was actually using around about 60%. |
| 33:49 | So let's just go back, we'll start our logger again and we'll go up. |
| 33:56 | OK let's just see what happened there. |
| 33:59 | It's not actually a very good demonstration, I'm going to do this at wider throttle opening to better demonstrate it. |
| 34:04 | Essentially what I'm trying to demonstrate here is that if our initial cut value is too low, what it can do is allow the engine RPM to exceed the rev limiter briefly and of course this cut is adaptive, the ECU is only using our initial values for a starting point. |
| 34:24 | So as soon as the cut is active, then it will run through a closed loop control strategy to adjust the cut as required in order to control the engine RPM. |
| 34:35 | But let's try, in this case we've got our start cut at 100% set to 60% cut, 100% throttle is set to 60% cut. |
| 34:47 | What I'm going to do is we'll just change this to 100 just so we can change it around a little bit. |
| 34:52 | OK we'll set our 100% cut to initially be 40% of our ignition cut and we'll start our log and now I'm going to go to full throttle and allow the engine RPM to go through our cut control range. |
| 35:11 | OK so let's just zoom in here, again we haven't allowed the engine RPM to really exceed our engine cut and that's again because we've got this adaptive control strategy but you can see that our initial cut that the engine actually needed when it first came into the control range was actually closer to around about 70%. |
| 35:36 | Now we've also seen that our cut value has gone all the way to 97%. |
| 35:42 | If we go back now and we'll change our end cut value this time to 85%. |
| 35:48 | And what I'm expecting here is that this will not be sufficient to control the engine RPM, it should allow it to exceed our engine RPM limit. |
| 35:59 | Remember we still have our hard limit active here so this time we should see our hard limit become active, so let's start our logging. |
| 36:11 | And we'll just stop our log file there and that one has actually been a great demonstration which is perfect. |
| 36:17 | You can see initially we've got our light blue line which is our percentage ignition cut. |
| 36:22 | We're sitting at around about 85% which remember was the limit, that's the maximum that the ECU could use. |
| 36:31 | So now we've seen our engine RPM actually exceed our RPM limit value. |
| 36:38 | We've got up to 3566 RPM. |
| 36:42 | Let's just swap back, remember that we set our hard limit activation value to 50 RPM. |
| 36:48 | So at this point we have exceeded that, we've gone 66 RPM above our cut point and you can see the spike being demonstrated here, we've now got both 100% ignition and 100% fuel cut. |
| 37:03 | And if we look further through the log we can see there's a couple of instances where that's occurred. |
| 37:10 | So in essence what we've shown there is that setting, the 100% TP initial cut to 85%, that's not sufficient to control our engine speed. |
| 37:23 | We've exceeded our rev limit and of course the ECU has brought in the hard cut to prevent that. |
| 37:30 | Just to give you another demonstration, what I'll do is I'll just bring this down just a little bit further and we'll turn our cut off. |
| 37:40 | And we'll do one more demonstration now. |
| 37:42 | So in this case, we've reduced our TP 100 cut percent so this shouldn't be sufficient ignition cut to control engine speed. |
| 37:52 | So what I'm expecting to see here, and we've also turned off our hard cut limit, I'm expecting to see the engine RPM simply pull past our engine rev limit. |
| 38:01 | So let's go to full throttle now and see what happens. |
| 38:09 | And that's exactly what we've seen so nothing particularly dramatic here but it is worth understanding how these parameters work, how they inter relate. |
| 38:20 | Now personally my preference when I'm setting up the advanced mode is I leave the hard cut disabled and I simply set the limit control range to whatever I want, 200 RPM the default value is usually a pretty good place to leave that, it results in relatively smooth limiting in most instances in my experience. |
| 38:46 | And I set our TP, our start cut TP, sorry I'll try that again. |
| 38:54 | I set our end cut, so this is the maximum cut that will be used when we reach the engine RPM limit, I set this to 100%. |
| 39:04 | So when we actually reach the rev limit that we've programmed into our 2D engine rev limit table, we're going to end up with a 100% cut of fuel or ignition depending on what parameter we're cutting. |
| 39:17 | So what this should mean is that we are using our engine RPM limit value from that table as a ceiling, as an upper ceiling and the engine speed should not exceed that. |
| 39:30 | We're still going to end up with a smooth and progressive cut between our limit, the start of our limit control range and our engine rev limit. |
| 39:39 | And the aim really is to then with our start cut, TP100 and our start cut TP low is to adjust these parameters until we've got a smooth activation as we move into our limit control range. |
| 39:57 | So this means that we're not going to get any spiking above our engine RPM limit and we're going to end up with a smooth control of our engine speed across our limit control range. |
| 40:11 | Now what I'm going to do is just to demonstrate our limit range and the effect of that, we've obviously been using 200 RPM at the moment. |
| 40:21 | What we're going to do is set that to 20 RPM. |
| 40:25 | We've got our hard limit deactivated at the moment, it's not operating but we have an end limit cut of 100%. |
| 40:35 | So what I'm going to do now, we'll just go back to our logging, we'll start our logging and we'll have a look at the effect of a very tight control range such as 50 RPM. |
| 40:49 | OK now let's just stop our logging there, I'll just get rid of our fuel table, I don't need that. |
| 40:58 | Now it's probably going to have been a little bit difficult for you to audibly hear that in the webinar but the whole note of the engine rev limit changes there, we had a much more aggressive cut. |
| 41:09 | You can see that, if we look at our percentage, ignition cut as well, we've now got a much more aggressive and erratic shape to that. |
| 41:19 | There's the amount of cut that's required is changing quite dramatically. |
| 41:24 | Because our engine RPM is now exceeding our engine speed limit, occasionally in fact we've seen it jump in this case up to 3648 RPM in one position. |
| 41:38 | So this is what you're likely to see if you've got a very tight cut, limit control range I should say as opposed to what we saw when we had our 200 RPM limit control range, now we've seen this, let's just go back, we'll put in a 200 RPM control range. |
| 42:00 | Let's go back to our logging and see how that looks. |
| 42:07 | OK so our 200 RPM vs our 20 RPM control range, we've got a much more accurate control over our engine RPM, it's staying much much closer to our engine speed limit. |
| 42:21 | And you can also see that the smoothness of our rev limit is shown in the relative smoothness of our percentage ignition cut that's being applied, we don't have any massive peaks and troughs like we saw in our last log file. |
| 42:38 | So again there's no necessary no right or wrong way of setting this up, it really comes down to what you're trying to achieve. |
| 42:45 | My example that I gave earlier is that in some instances, particularly a race class where we have a hard cut limit or an engine rev limit for the class that we aren't allowed to exceed, we're going to find that we want to use as much of that available engine rev limit as we possibly can and in that case having a very very tight cut, limit control range or simply going straight onto the hard limit is going to achieve that. |
| 43:15 | The downside is the car's going to be upset or the engine's going to feel quite harsh when we do actually hit that limit. |
| 43:25 | On the other side of that, if we're using a normal control range such as 200, we're going to be able to sit on that engine RPM limit, it's not going to be too harsh on the engine, it's not going to upset the performance of the car. |
| 43:36 | Right we're going to get into questions and answers very shortly so if you do have anything that you want me to talk about, please ask that now in the comments. |
| 43:47 | One thing I do want to just touch on which again, this should be relatively easy to understand but I still know that a lot of people overlook this. |
| 43:57 | The engine rev limit is only going to be effective while we're actually accelerating through a gear. |
| 44:08 | What I mean by this is if we downshift the engine too early, downshift through the gears too early in the rev range, what this is going to do is cause what's called a mechanical over rev. |
| 44:21 | So simply the gear ratio that we choose is going to force the engine RPM to exceed our rev limit and no ECU on the planet is able to prevent that particular situation. |
| 44:34 | The ECU will be cutting fuel or cutting spark or cutting both as it's programmed to do but the reason that the engine speed has exceeded the rev limit is because it is mechanically forced to do so based on the current vehicle speed and the gear that we've selected. |
| 44:55 | So it isn't completely bulletproof and a driver can still exceed the rev limit if they really try hard enough. |
| 45:04 | Now one other thing I will just touch on as well, I'm not going to go into too much detail on this because we have another webinar that I'm going to direct you to. |
| 45:15 | You see that we have a number of GP limits, I'll just go back to those again. |
| 45:22 | So we have GP RPM limits here. |
| 45:27 | We have GP RPM limit 1 and GP RPM limit 2. |
| 45:30 | And GP stands for general purpose, we can use these for other functions as we see fit. |
| 45:36 | I've just brought up the GP RPM limit 1 table because in our 350z I am using this as an engine protection strategy. |
| 45:46 | You can see in this case, we've got our oil pressure on our vertical axis and what we're doing is controlling our engine RPM based on the current engine speed and oil pressure. |
| 46:01 | So all we're doing essentially is if the engine oil pressure drops below a point that I'm happy with, you can see that if we follow a little line through here, we sort of have an area of this table where if the engine oil pressure drops below around about 300 kPa, above 4000 RPM, you can see the engine rev limit will be dropped to 3000 RPM. |
| 46:27 | So that's just as a safeguard to prevent engine damage and if you are interested in learning more about how to do that, we do have a webinar on engine protection on the G4+ platform and you can search for that in the webinar archive. |
| 46:41 | Alright let's jump into some questions and we'll see what we've got. |
| 46:47 | First question from HS Engineering is, on Mitsubishi 4G63s with factory ECUs, you'll often see knock being registered when the rev limiter is reached. |
| 46:58 | Do you think this is real knock or just vibration triggering the knock sensor? You're probably aware that these cars use fuel cut for rev limiting. |
| 47:06 | I'll just point out actually, fuel cut is by far and away the most common technique for factory cars to rev limit and there's a couple of reasons there and this is actually something I should have mentioned in the body of the webinar. |
| 47:20 | If you have a car fitted with catalytic converters using ignition cutting can damage the catalytic converter so you do need to be quite careful. |
| 47:32 | OK to answer your question, in most instances the knock, in my experience, has not been real and it will be the knock detection system being triggered by, obviously it's quite a harsh cut that is occurring when the rev limiter is in effect and generally that can trigger the knock control system. |
| 47:54 | I have had some engines, and I think probably if I think back, it seems to be mostly Subaru engines where I have audibly through my knock detection system, heard the engine knocking on the rev limit so you do need to tread carefully, however the easiest way to tell is if you're using audio knock detection equipment, you're going to be able to hear if the engine is audibly suffering from knock. |
| 48:25 | Janoo's asked, I noticed when I'm using ignition cut on some reflashed cars I run into misfire codes during launch control or two step, is it normal and should I disable the misfire code when using the ignition cut? Yeah essentially the ECU is doing its job because you are creating a misfire. |
| 48:44 | It's not a problem I have run into myself but I could certainly see why that would trigger the ignition misfire code. |
| 48:55 | The easiest way would be to deal with that by disabling it however of course the problem you've got there is you're then going to be blind if that code should have been tripped through an actual ignition misfire event. |
| 49:11 | I have had some trouble with that code on the Toyota 86 and Subaru BRZ ECUs, it does seem to be quite overly sensitive and has, I've seen several situations where it's triggered, in my opinion, quite needlessly and I think as well, if I'm not mistaken, you an also in some ECUs adjust the parameters for when that misfire code will be activated. |
| 49:39 | Of course the aggressiveness with which ignition cutting will be used on a rev limiter or launch control would probably override any adjustments you'd make there so potentially your only option would be to disable it. |
| 49:55 | Janoo's also asked does a soft cut mean the engines resumes faster and a hard cut means the engine resumes slower? Look potentially the engine may resume operation faster from a soft cut. |
| 50:09 | When I use the term soft cut and hard cut, all I'm really referring to is how far in the G4+ platform we are through that limit control range. |
| 50:18 | So a soft cut we're only applying a relatively mild amount of ignition or fuel cutting whereas when we get to the hard cut, we're generally going to be applying a 100% cut. |
| 50:32 | Barry G's asked, if additional RPM limits are enabled, e.g. the additional GP limits, which RPM limiter takes precedence? The lowest limit will always take precendence. |
| 50:44 | So if you noticed when I showed you the GP limit table that I'm using on our 350z, in the areas where I didn't want that GP limit to be active, I actually set the rev limit to 10,000 RPM. |
| 51:00 | I definitely would not like to see what would happen to our VQ35 if it hit 10,000 RPM but of course the main engine rev limit table is active well before that so that becomes the rev limit that takes precedence. |
| 51:17 | Dave Creedman has asked, so a tight limit control of 10 to 20 will give a very harsh old school type of rev limit? Yeah generally and I'm hoping, I know these demonstrations are probably a little bit tricky because a lot of this comes down to audibly hearing the note of the engine rather than simply looking at the engine RPM trace in our data log and I doubt you've got the full comprehension of that via a webinar unfortunately but yes that's exactly what happens. |
| 51:48 | A wider control limit, limit control range is going to end up with a smoother engine RPM control through that control range whereas when I reduced there for the demonstration to 20 RPM we were getting quite a large swing in our engine RPM, the engine was moving around quit a lot and it feels and sounds a lot harsher. |
| 52:11 | Mitch Detailed has said, also note the more aggressive the cut, the harder it is on any belt system. |
| 52:17 | There's a ZL1 video on the web as a great description. |
| 52:21 | Yeah that's actually not something that I'd taken into account but it is a valid point. |
| 52:27 | Particularly on anything running potentially like a centrifugal supercharger or a belt driven supercharger, I should just leave it at that, if the engine RPM is moving around very aggressively and very quickly, obviously that's been transmitted into any driven auxiliary belts and that can result in potentially problems. |
| 52:50 | I'll make sure I go and check out that video after this webinar and see exactly what that's all about. |
| 52:57 | Our next question is from Mark SR20 who says, I notice you make it very easy to adjust and monitor on the Link G4+ but if you're using a Haltech Elite 1500, there are many different options in the software or is it mainly the same? Look to be honest mark, probably the best solution is we'll do exactly the same webinar on the Haltech Elite platform. |
| 53:19 | That is not an aspect of the Elite that I've personally gone into in too much depth right now however it's all about understanding the parameters that you need to log and if you understand which parameters you need to log, the Haltech's logging system is still very sophisticated and you're able to see exactly what's going on there, it's just a case of knowing which parameters to look at to see what your ignition and fuel cutting is doing. |
| 53:47 | Alright that's taken us to the end of our questions so hopefully that webinar has given you some insight. |
| 53:53 | Again, really for most instances, leaving the advance mode disabled is going to be suitable for 95% of tuners and again just to reiterate, in most cases, unless there's a reason why you don't want to or wouldn't want to, I would suggest that you use fuel cutting in order to provide a safer and smoother limit operation on your engine, particularly again those with known valve train weaknesses. |
| 54:24 | The purpose of this webinar was to demonstrate what the parameters inside the advanced mode do, how they interact and how you can go about adjusting the rev limit to your particular preferences. |
| 54:39 | And remember again the one key point that I will make is that with the way the G4+ rev limit does function, you're going to find that your soft cut or your engine RPM limiting starts before the RPM value that you've got in your RPM limit table and remember it will start that limit control range value prior so by default 200 RPM before the value you've got in your table. |
| 55:08 | Alright guys thank you for joining us, if you do have any more questions that have cropped up after this webinar, as usual, please put those into the webinar section in the forum and I'll answer them there and if you haven't already, please leave us a review on our Facebook if you're finding these lessons helpful. |
| 55:27 | Thanks guys and we'll see you all next week. |


