094 | Tuning for Nitrous Oxide
Summary
Nitrous oxide is a popular power adder however it is often misunderstood when it comes to selecting a nitrous kit and controlling it with an ECU. In this webinar we will discuss the different types of nitrous system such as dry, wet and direct port, and look at various strategies for controlling the nitrous delivery through the ECU. We will also discuss how to deal with fuel and ignition delivery for nitrous oxide.
This webinar will be theory based and we will use the Link G4+ ECU for the demonstration.
| 00:00 | - In this webinar, we're going to be looking at nitrous oxide, the subject of nitrous oxide tuning and specifically how we need to adapt our tuning processes to the addition of nitrous oxide and we're going to be demonstrating this using the Link G4+ platform on our 350z. |
| 00:20 | Now I'll make it apparent right here so there's no one disappointed, this will be a theoretical webinar, we're not actually going to be demonstrating on the dyno a nitrous kit in action. |
| 00:33 | However the concepts really, the fundamentals behind tuning using nitrous oxide are really the important part and we don't actually need to see the car running on the dyno to understand how that works. |
| 00:48 | Now I know that through my career I've heard nitrous viewed by a lot of tuners as the devil, something evil, it's scary, it's dangerous and you can get yourself into a lot of trouble trying to tune an engine running nitrous oxide. |
| 01:07 | And I think it's built up kind of a barrier where people really don't want to get involved with nitrous oxide, they think that instantly fitting any nitrous kit to an engine is going to result in almost certain destruction of the engine. |
| 01:23 | And really this webinar is going to explain both how nitrous works and how we should approach tuning to suit nitrous oxide. |
| 01:31 | And the reality of this is if we understand how this system works, we understand the implications of adding nitrous oxide to any engine, and we understand what we're going to be expecting to do with our tuning to account for this, really nitrous oxide can be a very safe way of adding power to our engines and really when I think of it, I don't really class it any differently to any other power adder, it's really just exactly the same as tuning an engine, running perhaps a turbocharger or a supercharger, we simply need to understand that and adapt our tuning strategy to suit. |
| 02:12 | OK so first of all let's talk about what nitrous oxide is and exactly how it works or how it adds power. |
| 02:21 | I feel at this stage for most people in the industry, there's probably already a reasonable level of knowledge around nitrous oxide. |
| 02:30 | I don't want to dwell on this too long but just for clarity I will cover the very basics. |
| 02:35 | So nitrous oxide is two parts nitrogen to one part oxygen. |
| 02:41 | And it's injected as a gas, or it actually starts out as a liquid, transfers into a gas as it's injected into the engine and what it does, once it gets to a certain temperature around 300°C, the nitrogen and oxygen molecules separate, they disassociate, the nitrogen essentially passes through the engine but it's the oxygen that we're really interested in. |
| 03:06 | And his really comes back to one of the key aspects of engine performance, the engine really is an air pump, it's the amount of oxygen that is inside the combustion chamber or trapped inside the combustion chamber during the intake stroke, that's going to dictate how much power we're able to get out of the engine. |
| 03:26 | And really as far as our job as tuners goes, it's simply to match that amount of air with the correct amount of fuel and then ignite it at the right point in the engine cycle so that we can achieve maximum torque from it. |
| 03:40 | If we do our jobs correctly, the engine's going to make the power it's designed to do. |
| 03:45 | So really the limitation on how much power we can get out of our engine is simply how much oxygen we can cram into the combustion chamber during the intake stroke. |
| 03:56 | That's really where superchargers and turbochargers come in. |
| 04:02 | They're designed essentially to compress the intake charge and force more oxygen into the cylinders. |
| 04:08 | Nitrous works in a similar way by injecting oxygen into the cylinders. |
| 04:13 | We're just simply adding more oxygen and by adding more oxygen this means we can then add more fuel, we can get a larger combustion charge and we make more torque, we make more power. |
| 04:25 | So that's the basis of how nitrous oxide works. |
| 04:30 | Essentially all we're doing, we could think of it as liquid, sorry chemical supercharging, that's a term that it's often referred to. |
| 04:38 | So there's two ways that the nitrous oxide system will actually help increase power. |
| 04:44 | The first one as I've already mentioned is we're simply adding more oxygen and this allows us to add more fuel and get a larger charge, a larger combustion charge. |
| 04:53 | The other way that's often overlooked is as the nitrous oxide is injected into the engine, it begins as a liquid and as it's injected into the engine it goes through a phase change from liquid to vapour. |
| 05:09 | And as it does this it absorbs a huge amount of energy in the form of heat out of the intake charge and it'll actually go, as it goes through this phase change it ends up at about -88°C. |
| 05:24 | So it's a great intercooling device, it's going to draw a huge amount of heat out of your intake charge, that's going to improve the air density entering the engine and it's also, particularly for engines that are very knock sensitive, cooling that charge can help limit, reduce the engine's sensitivity to knock. |
| 05:50 | Now we also need to couple that with the fact we're obviously now burning more fuel and air so we need to still account for this with our tuning but that's an overlooked way that nitrous oxide can help improve our power. |
| 06:05 | Now the webinar is really aimed at how we can look at setting up our ECU and how we can approach our tuning to handle a nitrous oxide system so I don't really want to dwell too much on the actual ways we can introduce nitrous oxide into the engine however it is still important to cover this off briefly as the type of system fitted to the engine is going to have an effect on how we approach this with our tuning. |
| 06:35 | So if we break it down into the simple distinction is between a dry kit or what's known as a dry nitrous kit and a wet nitrous kit. |
| 06:47 | And the simple difference there is with a dry kit the nitrous kit itself is simply adding the nitrous oxide gas to the engine. |
| 06:56 | And we're going to need to add the additional fuel to match, generally through the fuel injectors. |
| 07:04 | The other way of supplying nitrous to the engine is with what's known as a wet kit where both the fuel and the nitrous oxide are supplied through a jet into the engine so this is essentially done outside of the ECU's control to a degree. |
| 07:23 | When we look at these systems we can also break them down further into single point where we only have one single nozzle supplying fuel and nitrous or just the nitrous to the engine, those are great for relatively small shots of nitrous where we're not adding a huge amount of power. |
| 07:40 | For larger systems where we're adding a lot more nitrous, the common approach is what's known as direct port where we have an individual jet for each of the cylinders on the engine, generally these are added into the intake manifold and lastly another common scenario is what's known as a plate system where there's generally a CNC machined plate often that will sit just behind the throttle body and that's got both the nitrous and fuel jets integrated into the plate and this just makes it a really quick and easy way of adding a nitrous system into an existing engine, you only need to unbolt the throttle body, put the plate in place and then bolt everything back together so it's very quick and easy. |
| 08:27 | OK so now we've talked about the nitrous system and how it works, we're going to talk now about what we can expect with our tuning when we hit the dyno for the first time. |
| 08:41 | And as I've kind of mentioned, in my own experience with tuning nitrous systems for both the street as well as drag, I generally really look at the nitrous system as being no different to a supercharger or a turbocharger. |
| 09:00 | And what we need to consider when we're looking at this is what the nitrous kit is doing. |
| 09:04 | Remember we're adding additional oxygen into the cylinder so then we can add additional fuel. |
| 09:11 | Now remember the two considerations we've really got with our tuning is what are we doing with the fuel and what are we doing with our ignition timing. |
| 09:19 | So let's talk about the fuel delivery first. |
| 09:22 | As we increase the load on the engine, one of the considerations we want to keep in mind is thermal control. |
| 09:29 | Controlling and managing the combustion temperature in our engine. |
| 09:34 | And as we combust larger quantities of fuel and air, obviously more heat is going to be produced inside the combustion chamber. |
| 09:42 | So exactly the same way as if we were tuning a turbocharged car and we started increasing the boost, as we move into positive boost pressure, we would start targeting richer air/fuel ratios than what we would expect to use with a naturally aspirated engine running at wide open throttle. |
| 10:01 | And that's simply because as we move into positive boost, the turbocharger is forcing more oxygen molecules into the cylinder and hence we're getting that larger combustion event occurring and we're creating more heat inside the engine. |
| 10:15 | So we're using a richer air/fuel ratio target to help control and combat that combustion temperature and that's essential for our engine reliability. |
| 10:26 | So this is exactly the same with nitrous. |
| 10:28 | As we bring in our nitrous and we start injecting nitrous into the engine, we're going to want to target a richer air/fuel ratio than if our engine was running naturally aspirated. |
| 10:41 | A little bit later we're going to look at the separation here between using a nitrous kit on a naturally aspirated car as well as using a nitrous kit on a turbocharged car so bear with me, we'll come back to this point in a little bit more detail. |
| 10:57 | So that covers what we can expect with our air/fuel ratio targets, we're going to move richer. |
| 11:05 | In general we're going treat these again very much like a supercharged or turbocharged engine, the most boost we ran or hence the larger our nitrous shot that we're using, the richer we're going to go. |
| 11:19 | Now this doesn't continue indefinitely, we're not just simply going to continually target richer and richer air/fuel ratios, there is a practical limit and for a piston engine, we're probably not going to be wanting to target much richer than perhaps about 0.75 lambda when we're running a reasonable sized shot of nitrous. |
| 11:41 | So that's something to keep in mind, we can use similar air/fuel ratio targets or lambda targets to what we would be typically seeing with a turbo or supercharged engine. |
| 11:52 | Now let's talk about our ignition timing and what we need to do with that. |
| 12:00 | So remember that the basic trend that we have with ignition timing, or we have two trends going on inside the engine, as RPM increases we have a trend where in general we're going to see the ignition timing advance as the RPM increases and the reason for this is as the RPM increases, there's less time available for the combustion event to occur. |
| 12:25 | So in order to achieve peak cylinder pressure at the optimal point, we need to start the spark even progressively earlier. |
| 12:33 | So that's the first trend, now that's going to hold true regardless whether we're talking about a naturally aspirated engine, turbocharged or nitrous. |
| 12:42 | What we're interested in though is considering what happens when we bring in our nitrous injection, actually start injecting nitrous into the engine. |
| 12:50 | And the trend we have here is really what we do with our ingition timing as we add more air and fuel molecules into the combustion chamber. |
| 13:00 | And let's start by looking at what that's going to mean when we're at very light load, let's perhaps talk about 3000 RPM, part throttle cruise, we're barely touching the throttle, there's not a lot of air entering the engine, hence we're not combusting a lot of fuel and the engine's not making very much power. |
| 13:19 | So under these conditions, the fuel and air molecules are spread quite sparsely out through the combustion chamber, relatively speaking and what we find is under these conditions the actual combustion event tends to take longer, it's a slower process. |
| 13:35 | So under very light load where we don't have a lot of air and fuel being combusted, we tend to need more spark advance, we need to start our ignition event earlier in order to achieve MBT timing, optimal ignition timing and make maximum torque. |
| 13:52 | Now as we open our throttle and we increase the amount of air entering the engine and we're combusting now more air and fuel molecules, we find that the fuel and air molecules are packed much more tightly together inside the combustion chamber and hence the combustion event actually tends to take less time. |
| 14:10 | So in this instance we find that we don't need as much spark advance so as we open our throttle wider, we tend to retard the timing so that we can still achieve MBT timing. |
| 14:22 | Now obviously there's a separate issue, as we increase the load on the engine, our throttle opening or our boost pressure, we also need to be more careful of managing detonation because that is also a possibility, that's the same with nitrous oxide. |
| 14:38 | So we've talked about that general trend as we increase the airflow into the engine we're going to retard the timing and really when we inject nitrous, we're simply going further in this direction, it's not much different than adding additional boost with a turbocharged engine, when the nitrous system is active we're going to be injecting more oxygen, we're going to be combusting more fuel and oxygen inside the combustion chamber so our combustion event will tend to be faster and we don't need as much ignition timing. |
| 15:09 | So to keep a rule of thumb in mind here and in my own experience the most common application if you like for nitrous oxide systems would be adding nitrous to a naturally aspirated engine and in that case what we're probably going to be starting with is an ignition map that is already tuned correctly for our naturally aspirated engine. |
| 15:36 | And what we can start by doing is retarding the timing approximately 2° for every 50 horsepower of nitrous that we're adding. |
| 15:47 | That's a reasonably good ballpark to work with and for my very first run when adding nitrous, I'll generally work on that principle and then just retard the timing an additional 2° from there just for a little bit of added safety. |
| 16:03 | I always want to start with my timing a little bit more conservative and work up from there. |
| 16:10 | Now on that note as well when we are beginning tuning on any nitrous system. |
| 16:15 | it's typical that we may have a range of jets for our nitrous system. |
| 16:20 | Now regardless whether you're tuning a dry system where you're only injecting the nitrous or a wet system where it's supplying fuel and nitrous, it's always the best idea to start with the smallest jet combination that is available for the kit you're tuning. |
| 16:37 | You're always better to start with a kit that's potentially a little bit too small and then creep up on your tune and this is going to mean that you're applying minimum stress and load to the engine while you first start getting the tune dialled in and then you can start once you've got your tune closed, then you can start adding larger jets and increasing the nitrous flow as you require until you get to whatever your horsepower target is. |
| 17:06 | Now one other thing with our considerations for tuning as well is where abouts we may want to allow the nitrous system to actually become active. |
| 17:17 | And this, along with having our actual tune correct is probably... |
| 17:24 | or nitrous. |
| 17:26 | And what we find is that the nitrous system, because it is a constant flow, it's just a solenoid that opens and then the flow of nitrous will be regulated or controlled solely by our bottle pressure. |
| 17:41 | What we find is that if we switch the nitrous system on at very low RPM, at very low RPM our intake stroke just simply takes longer because the engine's spinning over quite slowly. |
| 17:55 | So if we switch our nitrous system on at perhaps 2000 RPM, what this means is at low RPM we actually end up with a larger relative increase in oxygen entering the cylinders than what we would see at perhaps 6000 or 8000 RPM. |
| 18:13 | So essentially the nitrous kit's going to give us a larger relative gain in power and torque at lower RPM. |
| 18:22 | Now this is where we do need to be careful because if we switch the system on too early, at perhaps 1750 or 2500 RPM, particularly with an engine that has perhaps known weaknesses in terms of its connecting rods or if we're using a very large kit it can simply damage the engine due to the massive loads applied to the top of the piston, at such low RPM we're just simply combusting so much fuel and air. |
| 18:52 | So for this reason we do need to be a little bit mindful of where abouts in the rev range we do bring in the nitrous, particularly with large kits and particularly if you are running an engine that has known weakneses. |
| 19:08 | So in general I'll try and bring the nitrous kit in a little bit higher up in the rev range, perhaps 3500 to 4000 RPM. |
| 19:17 | Although at the same time that does depend on how we're going to be using the nitrous and I'm going to talk about that right now before we actually get into the tuning. |
| 19:29 | OK so let's go to my laptop screen now and I've got a few examples of what we can expect to see with nitrous oxide. |
| 19:39 | And this one that we're looking at right now, this is on a Toyota 1UZ-FE V8 engine that was built up for a drag ute. |
| 19:51 | And it was a relatively high compression engine, it was a built engine and we can see the runs here which go to about 260 kW, these are naturally aspirated runs. |
| 20:05 | So it's already a relatively healthy increase for a 1UZ-FE Lexus V8. |
| 20:12 | Now we were in this instance using a really large hit of nitrous oxide and the first point you can see is the green line here, if we follow this up, you can see that we've actually, I've started this run at about 4500 RPM, sorry I've started the nitrous injection at 4500 RPM. |
| 20:33 | I've still begun the run down at 2000 RPM so right up to this point at 4500 RPM the engine is still running naturally aspirated. |
| 20:42 | So the reason why I've chosen 4500 RPM as my switch on point in this case is in defence to the engine's connecting rods. |
| 20:52 | So we're not brining it in too low in the RPM where we're going to have a massive increase in engine torque, in the force acting on the pistons and then transferred down through the connecting rods. |
| 21:04 | And the other reason I can get away with this in a drag application is because we're only really interested in the performance from about 5500 RPM and up anyway, when the car's actually going down the drag strip, we're always going to be using this higher rev range so we're always going to be running with the nitrous active. |
| 21:24 | And you can see as well just purely from the power increase how dramatic that's been, we've picked up somewhere in the region of about 140 kW at the rear wheels from the activation of that nitrous. |
| 21:40 | Now that also brings another point here which we can see. |
| 21:44 | In this case because the torque increase has been so dramatic over what is a really short rev range, around about 300 to 400 RPM, we've essentially doubled our engine power. |
| 21:57 | The Dynapack dyno, you can see just struggles a little bit to control that and that's why we can see this spiking here. |
| 22:06 | What's happened is the Dynapack's seeing this torque increase really dramatically so it's clamping down really hard on the load, applying a lot more load to the dyno to try and control the engine and then once the car, the engine settles down with the nitrous active, it over compensates and you can see that's why the power actually drops back down before it settles and actually comes back to being stable so particularly if you're tuning on a hub dyno like a Dynapack, these little spikes that you'll see when the nitrous first becomes active are just an aspect of the dyno's control system, you're not going to feel this on the road or track and this is quite normal, we can't get around this. |
| 22:50 | It's exasperated or made worse the larger the nitrous hit that we're using. |
| 22:56 | OK let's move on and the next one I wanted to look at is a separate application. |
| 23:01 | Let's actually, yeah we'll start with this one. |
| 23:04 | The is a car that was tuned by one of my old staff members Chris who's also in the forum, Chris Wall, you'll see him in there. |
| 23:12 | So this was a Nissan SR20 engine that's used for drifting. |
| 23:18 | And it's a really serious engine, it's a well built engine, 2.2 litre running the VE cylinder and we've got two runs essentially here that we're looking at. |
| 23:28 | First of all we have this green run, let's just look at our power for a start. |
| 23:31 | And we'll come up through here. |
| 23:36 | So this is the power that the engine was making naturally aspirated, sorry, wish it was naturally aspirated, this is the power the engine was making purely on the turbo with no nitrous. |
| 23:49 | So it's already a pretty stout engine producing somewhere around about 430 kW at the wheels running something like about 25 pound of boost. |
| 23:58 | Now for boost response, this is the other way that we can use nitrous oxide to aid boost response to use it essentially as an anti lag device and that's exactly what Chris had done here. |
| 24:11 | The other run that we can see here, the nitrous kit is being used to help spool the turbo and we can see the result is particularly in this area we've got a lot more power and torque being made at 3000, 3500 and even 4000 RPM. |
| 24:30 | It simply brings the turbocharger on boost that much earlier. |
| 24:34 | And in this case we can see the torque graph here and at, let's just see, at 3000 RPM here we've almost ended up with double the torque at the rear wheels so it's amazing how powerful this can be. |
| 24:50 | Let's move onto the next screen though and we'll see why that's the case and this is the boost pressure on that same dyno run. |
| 24:58 | So again we can see our two runs that we're interested in, both green, this is the engine's natural boost response. |
| 25:06 | Which for 430 kW out of a 2.2 litre four cylinder, certainly isn't shabby, we're seeing 25 pound of boost before 4500 RPM. |
| 25:15 | However with the nitrous activating at 2500 RPM we can see how quickly the boost pressure rises and then it's reached peak boost at 3600 RPM. |
| 25:28 | So this is the other technique of using the nitrous system for anti lag. |
| 25:32 | Now there's a couple of considerations if we are going to use nitrous for anti lag. |
| 25:38 | What we're going to do typically here is use a smaller shot than what we would be using if we were going to be spraying the entire way through the rev range. |
| 25:49 | And what we really want to do is just bring the nitrous system online to begin spooling the turbocharger and the great thing about turbochargers is they become sort of I guess you could call them self fulfilling so once they actually start spooling, the engine is going to have more air and fuel combusting in the cylinders, hence we get more exhaust flow out the exhaust system and into the turbocharger which further drives the turbo even harder to the system sort of snowballs and it doesn't take very much nitrous to actually spool the turbo up really quickly. |
| 26:25 | So in this instance with a target of 25 psi here we don't need to actually run the nitrous system all the way until we reach peak boost and in fact if we did do that, that would actually be detrimental to our boost control because the boost control system would struggle with the nitrous system adding more exhaust flow and then the system turning on and off, we'd end up most likely with our boost pressure oscillating. |
| 26:51 | So in this sort of system we can probably quite happily turn the nitrous system off somewhere around about 17 maybe 18 psi, well short of our target and it actually won't have any detrimental effect to our spool and our boost response. |
| 27:11 | Now while we're talking about turbocharged cars and nitrous there, I want to just mention one other aspect. |
| 27:18 | A lot of people mistakenly believe that nitrous is just a really simply bolt on fix to adding more horsepower to any engine. |
| 27:28 | And while to a degree on a naturally aspirated engine there is some truth to that, obviously nothing's that easy, when we're talking about a turbocharged engine we do need to consider that the exhaust housing and turbine wheel are still going to present an obstruction or a restriction to our exhaust gas flow. |
| 27:50 | And of course when we're adding additional oxygen by way of nitrous oxide, what we're going to end up doing is combusting more fuel and air inside the cylinder and hence we're actually going to end up with a higher amount of exhaust flow than we would if the engine was just turbocharged on its own. |
| 28:09 | So what this means is that if we are choosing a turbocharger for an engine and we intend to run nitrous all the time, we'll generally want to choose a turbocharger with a slightly larger exhaust housing or perhaps even a larger turbine wheel as well. |
| 28:28 | So the flipside of this is if we're using the system for anti lag as we've just looked at, obviously that doesn't quite hold true. |
| 28:39 | So just understand that with a turbocharged car we still need to get the additional exhaust gas out of the engine and if our exhaust, our turbocharger is quite small, what we may find, particularly at high RPM is the engine simply can't breathe and you're not going to see the gains that you're expecting from a nitrous kit. |
| 29:03 | One more thing on turbocharged cars just before we move in and actually look at some of the setup and tuning, one more thing to consider here is if we're using a large shot of nitrous to spool quite a large turbo on a small engine, we also need to be mindful that we can provide the turbocharger with so much exhaust gas energy that it's possible to drive the compressor wheel into surge. |
| 29:31 | So that's quite a destructive situation we really want to stay away from surge. |
| 29:36 | So again we need to consider our turbocharger sizing. |
| 29:39 | Essentially we're not going to be able to fit a massive turbocharger to our engine, run a huge shot of nitrous and expect to see 30 psi of boost at 1500 or 2000 RPM, it's simply not that easy, there's a lot more going on that needs to be considered. |
| 29:57 | And the important point with any nitrous system is being realistic about your intentions, your aims and your aspirations of what you're expecting out of it. |
| 30:08 | OK so let's jump into our laptop software now and we're going to go through a couple of scenarios of how we're going to deal with tuning for nitrous oxide. |
| 30:19 | Now as I've said, this is an offline theoretical example so we're just going to be looking at how we can go about this without the use of the dyno to demonstrate. |
| 30:32 | What we need to do to start with is figure out what sort of system we're going to be tuning and what we're going to need to account for. |
| 30:39 | Obviously the two parameters we need to consider are our fuel and our ignition. |
| 30:44 | The fuelling though, what we're going to need to do there is going to depend on whether the system is a wet system which is adding its own fuel or a dry system where we need to do the work. |
| 30:55 | Let's start by looking at how we can account for this and what I'm going to do is start by going to the dual fuel and dual ignition tables. |
| 31:03 | And if we click, let's start with our dual fuel table and I'm going to turn the mode to overlay table. |
| 31:13 | Now this is important here, actually what I'll just do is just go online so everyone's going to be able to see the parameters change, it'll be a little bit more obvious when it's blue. |
| 31:24 | What we want to do here is choose the overlay table, we're not trying to swap between, if I can just get back to a full screen. |
| 31:34 | We're not going to be swapping between two fuel tables, although that is a possible way of doing it, I like to use the overlay table instead because what we're doing is applying a percentage change to our main fuel table. |
| 31:51 | So if let's just go back, all of our main fuel tuning is still going to be done with our fuel table one. |
| 31:59 | And then when the nitrous is active, we're going to be using our overlay table to add fuel as we see fit. |
| 32:07 | Now let's just go to our second table and we can find that by typing in fuel and we're now going to have fuel table one and fuel table two showing. |
| 32:19 | And you'll see that it shows fuel table two as being inactive so it's really easy to know which table you're operating in at any time. |
| 32:29 | If we go into fuel table two, you can see as with any parameters we set up for the first time, at the moment the numbers in this table are really just garbage, they're not of any real use to us to we're going to need to do something about that. |
| 32:42 | And in fact the other thing we may want to do, if we swap between this and our main fuel table, so this is our main fuel table we've already tuned, we can see that the axis setup is quite different. |
| 32:54 | Generally while it's not essentially, generally I like to make sure that my axis setup matches for these tables and a really quick and easy way of doing this, rather than having to go through and manually do it, is if we right click, we go to the import/export function, we click on export of clipboard, that's just going to simply copy this entire table to our clipboard, makes it really nice and easy, we can now go to our fuel table two, right click and if we go import from clipboard, that's now copied that entire fuel table into our fuel table two. |
| 33:31 | Before we go any further I'm just going to highlight the entire table, set everything to zero so this starts us in a great position. |
| 33:39 | And it's important to understand when we're using the dual table system, if we are using the overlay system, remember this is making percentage changes to the main fuel table. |
| 33:52 | If on the other hand we're using dual tables, we're simply going to be swapping between one or the other of the fuel tables and then the numbers in that fuel table will become active so it's really critical to understand that difference. |
| 34:06 | As I've mentioned, my preference is to use the overlay system where I'm making percentage changes, this just works better in my mind and makes more sense. |
| 34:15 | The other thing is we can be very specific in the areas that we're making changes. |
| 34:21 | So essentially, any time we've got zeros in this table, the overlay is doing nothing. |
| 34:26 | Let's just go back to our dual table, dual fuel table and we'll see the other aspect we've got here is the table two activation. |
| 34:35 | Now this is an important consideration. |
| 34:38 | When do we want the nitrous system to become active? At its very simplest we could simply fit a button to the steering wheel, fast and furious style and then any time that button, which will be connected to a digital input is active, we'd be swapping between these tables. |
| 34:57 | However that's also potentially quite a dangerous situation so we could end up with the nitrous becoming active at idle or when the engine's not running or under conditions we really don't want the nitrous being injected. |
| 35:12 | Remember the key here is we're really wanting to inject the nitrous higher in the rev range so we're not overloading the engine and creating too much pressure on the pistons. |
| 35:20 | And we really only want to bring the nitrous system in as well when we're actually commanding maximum power so at wide open throttle or at least very close to it. |
| 35:32 | So you can see what I've selected there is virtual auxiliary one. |
| 35:36 | And this is a great way of giving us the ability to control when the nitrous will become active, based on a variety of parameters. |
| 35:47 | And we're going to have a look at these really shortly but first of all let's go through and go over exactly the same process with our ignition table. |
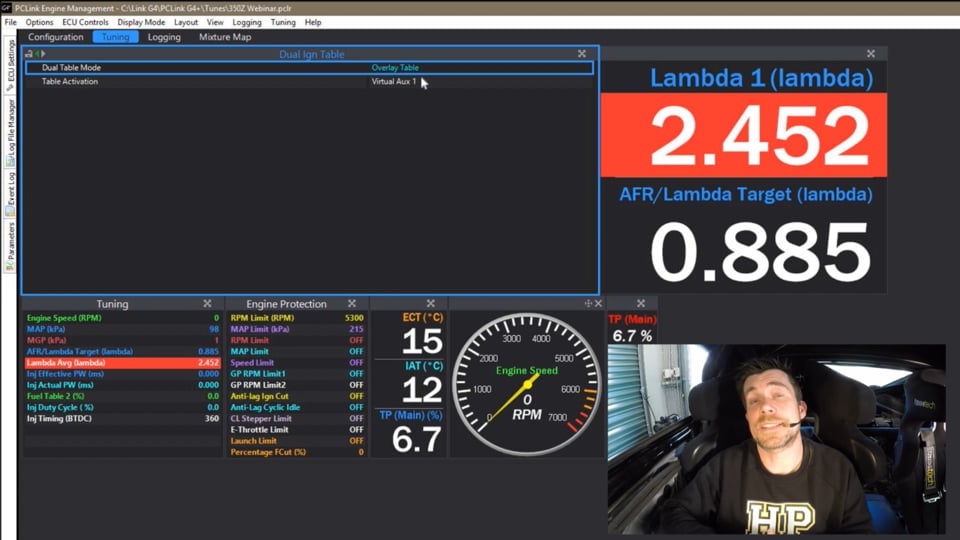
| 35:56 | So I'll just type on dual again and this time we want to select our dual ignition table. |
| 36:02 | And again I'm going to go through and I'm going to select the overlay table mode. |
| 36:07 | You can see that our virtual auxiliary one is again selected as our activation. |
| 36:13 | So essentially when our virtual auxiliary is off, we're going to be running the engine on the normal main fuel and main ignition tables and when the virtual auxiliary one is active we're going to be swapping to these, bringing in these overlay tables. |
| 36:28 | So now what we're going to do is we'll just get rid of that, don't want to do that, we'll go to our main ignition table. |
| 36:34 | I'm just going to again do exactly the same, export the table to the clipboard and then we bring up our ignition two table which is currently inactive, we're going to import the table from the clipboard and again we're going to set that all to zero. |
| 36:53 | So now we need to add some numbers to these tables and decide how we're going to use these tables. |
| 37:02 | Let's start, seeing as we're on it now, with our ignition table and what we want to do here is make some changes based on where our nitrous system is going to be active. |
| 37:14 | Now we need to be careful here because this will depend on exactly what parameters you're going to be using to bring the nitrous system in. |
| 37:23 | So in this case we've copied across our axes initially but you can see that we've got manifold gauge pressure as our load axis. |
| 37:32 | Typical for a load axis for a fuel and ignition table. |
| 37:35 | Now generally we're probably more likely to actually use throttle position as a target to switch the nitrous on or off. |
| 37:45 | It's a really nice clear and easy way of deciding what the driver's demand is. |
| 37:49 | So what we can do, if we press the X key we can select throttle position. |
| 37:57 | No what am I looking for, TP main. |
| 38:02 | Right and we can initialise that axis. |
| 38:04 | And let's say for example we've decided that we're going to bring our nitrous system into use above 90% throttle. |
| 38:15 | And we're also going to bring our nitrous system in above 3000 RPM. |
| 38:20 | So that's the area essentially we're going to be operating in when we're on nitrous and this is where we're going to want to make our changes. |
| 38:29 | Just because there is some interpolation possible, I'll generally make my changes to this table slightly above and to the side of that area. |
| 38:40 | So you can see in this case I've selected 80% throttle and 2500 RPM and above. |
| 38:46 | And now we can simply adjust our timing based on the size of our nitrous kit. |
| 38:50 | So let's for example say that we're going to be injecting, we're going to be using a 50 horsepower shot of nitrous so we can start by retarding the timing by -2°. |
| 39:04 | Remember I said at least initially for our first run, I'd probably take a further 2° out so we'll set our timing there to -4 so what this table is now doing is removing 4° from whatever the timing is in our main table. |
| 39:22 | So this is going to give us a starting point for our ignition table. |
| 39:26 | Now let's swap back and we'll go to our fuel table two. |
| 39:31 | And we'll talk about how we can deal with this. |
| 39:35 | Now again I'm going to make exactly the same change here just for simplicity we'll set our axis to TP main. |
| 39:43 | Initialise our axis and click OK. |
| 39:47 | So again the area that we're going to be operating, remember 90% throttle and above 3000 RPM. |
| 39:54 | That's a horrible line there, I'll try that again. |
| 39:58 | That's about the best I can do with a track pad, so that's the area we're going to be operating in. |
| 40:02 | But what do we want to do with the numbers in our fuel table? So this is really going to depend on what sort of kit we've got fitted to the engine. |
| 40:15 | Remember if it's a dry kit, what we're going to have to do is add all of the fuel through the injectors whereas if it's a wet kit, theoretically the wet kit is going to add the fuel itself and we don't need to do anything here. |
| 40:31 | Because it's a little bit simpler, let's start by talking about how to address the wet kit. |
| 40:37 | Now technically we don't need to do anything and this is generally how I would start my first run when I'm just starting to test the system. |
| 40:46 | Generally what I've found in my own experience though is the jetting supplied by the kit manufacturers for the fuelling is almost always slightly overkill, it's adding too much fuel and we end up running much richer than we actually need to. |
| 41:05 | So in this case we can still use our fuel table in this area and in this case instead of adding fuel, what we can start doing is subtracting fuel. |
| 41:14 | And because we've got a full 3D table, we can be very accurate based on the results that we find but let's say for example that we find that the entire area under wide open throttle ends up around about 5% too rich, we can take 5% out of that area and this time let's also say that above 6000 RPM, we find that the air/fuel ratio actually goes even richer and this time we need to remove 7% to correct that. |
| 41:47 | So this allows us in exactly the same way as we tuned our main fuel table, this allows us to be very accurate with making adjustments to get our air/fuel ratio on target and just adjust for any inaccuracies that that wet system still results in. |
| 42:05 | OK so now let's talk about how we can deal with our fuel trim if we are running a dry system and this does get a little bit trickier. |
| 42:17 | Really we don't necessarily know exactly how much fuel we're going to need to add to start with and generally what I look at is if we have a 200 horsepower engine, an engine producing 200 horsepower for example, and we're adding a 50 horsepower shot of nitrous, then our 50 horsepower shot equates to around about 25% of our engine power so we can assume that that should get us reasonably close. |
| 42:49 | And generally again because I'd like to start a little bit richer and lean the air/fuel ratio out what I'd probably start by doing is adding an additional 10% just for safety's sake and set my fuelling to 35% there in the areas that I'm going to be running under nitrous. |
| 43:11 | Now again in this case, when I'm running a dry kit, just to avoid any problems with interpolation and because now it's so important that the ECU is adding that fuel, what we're going to do is bring, extrapolate that change that we've just made out into the areas just prior to the nitrous kit switching on, so I've extended that out to 80% throttle and I've extended it out to 2750 RPM. |
| 43:41 | So when we're tuning this sort of system, a dry system or even a wet system, we obviously need to be very mindful, particularly on our first run and watch carefully to see what our air/fuel ratio ends up being and be ready to abort the run very quickly if we find that our air/fuel ratio ends up much leaner or even for that matter, much richer than our target. |
| 44:07 | At the same time it doesn't take very long, once we've got that first run and we've had a quick look to see what the air/fuel ratio's doing, it doesn't take very long for us to be able to correct any error we've got. |
| 44:20 | One point I will add though is, let's just have another quick look here at this graph, this dyno graph, a lot of tuners when they run their engine on nitrous for the very first time, what they do, obviously they're a little bit paranoid about potentially damaging the engine, they don't want that to happen so they're really nervous about running the engine and what we find is particularly at this point here where our nitrous first activates, we're going to find that there's going to be some latency in our air/fuel ratio actually establishing a stable value so what we can see is the air/fuel ratio across this point where the engine first comes up onto nitrous, we can find that our air/fuel ratio could be a little bit erratic. |
| 45:07 | And we don't necessarily want to take too much notice of that. |
| 45:11 | What we really need to do is allow the engine to operate in this area once it's become stable with the nitrous active and we can actually see what's really happening inside the engine and get a good idea of our air/fuel ratio. |
| 45:25 | So the point there is particularly in the area where the engine first comes up on nitrous and the nitrous is first activated, it's not uncommon to see a slight irregularity in our air/fuel ratio. |
| 45:39 | OK so we've talked about now trimming our ignition timing and trimming our fuelling. |
| 45:44 | Once we've actually got this process up and running then the tuning process is no different to a naturally aspirated engine or a turbocharged engine. |
| 45:53 | We'll start by adjusting our fuel table two to get our air/fuel ratio on target and then we can move across and start looking at our ignition timing and we can add a little bit of timing and see if that responds in more power. |
| 46:10 | Obviously while we're doing this we do need to be very careful of knock occurring, we need to be monitoring knock. |
| 46:18 | OK so now we're going to look at the virtual auxiliary output that we've talked about briefly and see how we can actually trigger this nitrous system, how we can set up some boundaries as to where exactly we want the nitrous system to activate. |
| 46:35 | And here there's no real right or wrong way of doing this. |
| 46:39 | It's really going to come down to your own personal preferences so we'll look at a couple of options. |
| 46:46 | What we want to do first of all is go to our virtual, if I can spell it right, our virtual auxiliary outputs and we can see we've got three of these here. |
| 46:55 | And these are just as their name implies, an auxiliary output that's not actually connected to a pin on the ECU, hence virtual and we can use these outputs for triggering various functions in the ECU. |
| 47:10 | So let's click on virtual auxiliary output one and we're going to turn the function on. |
| 47:16 | There's a range of pre configured output functions we can choose. |
| 47:20 | The one I'm going to use for our nitrous control is GP output which stands for general purpose output. |
| 47:28 | So let's look at our very simplest set of circumstances under which we may want our nitrous system to become active. |
| 47:36 | We can see that we actually have three conditions listed and we can choose each of these individually. |
| 47:42 | What I'm going to do is I'm going to select two conditions. |
| 47:47 | OK so condition one and condition two must be true. |
| 47:51 | Our first switch condition, switch condition one, says RPM must be greater than. |
| 47:57 | And then the actual value that we're using is set on the next line. |
| 48:02 | So in this case RPM must be greater than 2000 RPM. |
| 48:05 | Let's be a little bit more conservative with that and set it to 3500 RPM. |
| 48:10 | So first of all our virtual auxiliary output is not going to become active until our RPM goes above 3500 RPM. |
| 48:18 | Now that's not going to be much use on its own though because obviously if we're just accelerating at part throttle, we could easily exceed that RPM and hence our nitrous system will become active. |
| 48:30 | We also want to add a throttle position cutout so in this case I'm adding switch condition two, TPS much be greater than and in this case we're going to enter the value we've already mentioned, 90%. |
| 48:44 | So this is a relatively simple way of setting up our nitrous. |
| 48:48 | It's completely independent of the driver, there's no switch necessary on the dash for example or on the steering wheel to actually activate our nitrous system, it's simply going to become active any time we're above 3500 RPM and 90% throttle. |
| 49:06 | The other way that's quite common and again I kind of blame the Fast and the Furious franchise for this, is adding a switch. |
| 49:15 | And in this case what we could do is add a switch condition as well. |
| 49:20 | If I can just find our switches. |
| 49:32 | No I can't find our switches. |
| 49:35 | Actually no we need to do that a different way I'm sorry, if we want to use a switch output for a digital input we need, here we go, no. |
| 49:45 | Right back to being on track. |
| 49:49 | So what we can choose here is our DI value one equals on. |
| 49:55 | Now this is a little bit confusing here because we have this DI value one. |
| 49:59 | Now in the face of it this looks like the value for digital input one equals on. |
| 50:05 | I'm not sure why Link have chosen to label this as such and I actually had a chat with the guys at Link just prior to this webinar just to I could clarify this for everyone. |
| 50:18 | What this really means, I would like to read it, let's get rid of the one completely and we'll call it DI value equals on. |
| 50:24 | Get rid of the one altogether and then in the next instance we would choose the value, our digital input that we've wired our switch up to so let's say for example we've got that wired up to digital input four. |
| 50:37 | So now we've got our, go back and we'll change our conditions to condition one two and three. |
| 50:42 | So we've got three conditions here that are defining when our nitrous can become active. |
| 50:50 | First of all our RPM has to be over 3500, we also have to be at 90% throttle position or higher and then finally we have to press the button to actually request nitrous. |
| 51:00 | So this would be a pretty common way of setting up our nitrous system. |
| 51:05 | We may want to use more parameters though than we have available here, you can see we only have three conditions in a virtual auxiliary output. |
| 51:17 | And what we can do is stack these virtual auxiliary outputs. |
| 51:21 | So let's look at the system we may want to use for anti lag. |
| 51:26 | So let's say for example in this case we want our RPM activation point to be 2500 RPM or above, we're only using a small shot. |
| 51:35 | We also want our throttle position to be greater than 90% and this time we're not going to have a switch. |
| 51:45 | We want our manifold pressure to be, let's add two parameters in here, we want our manifold absolute pressure to be greater than 100 kPa so this means we are starting to move into positive boost pressure. |
| 52:01 | But now we also want to switch this system off once we get up to our boost target or relatively close to it. |
| 52:08 | So how can we do that? What we can do now is look at our auxiliary, virtual auxiliary output two and we can turn this one on. |
| 52:20 | Again we're going to use our GP mode and we'll use conditions one and two. |
| 52:25 | Now our first condition, we want to only use this if the output of virtual auxiliary one is true so that has to be true to start with. |
| 52:35 | Again I'll just find this, auxiliary value one equals on. |
| 52:42 | So again this is the same as what I've just talked about with our DIs. |
| 52:46 | Forget about the one, what we want to do here is name the auxiliary value, the virtual output that we want to be on. |
| 52:54 | In this case it is auxiliary, virtual auxiliary output one. |
| 52:58 | So that's our first condition. |
| 53:00 | Virtual auxiliary output one must be true before we can go any further. |
| 53:04 | Our second condition, let's say that our manifold absolute pressure is less than 200 kPa. |
| 53:12 | So now what we've got is a system where it's going to switch on when we're above 90% throttle and 2500 RPM and above 100 kPa and the system is going to switch off when our manifold absolute pressure exceeds 200 kPa. |
| 53:29 | So we've got a lot of flexibility in the way we set this up. |
| 53:33 | One point that I'll just mention here, if you do want to stack these virtual auxiliary outputs, and obviously we could use all three giving us nine separate conditions that have to be true for the nitrous system to activate, perhaps you want to add engine coolant temperature in there, perhaps we want to disable the system when we're below second gear for example, or any other number of aspects, maybe nitrous bottle pressure even, we can stack up to nine of those parameters. |
| 54:05 | If we are going to do that, what we do need to do is go back to our dual fuel tables and we need to adjust the activation parameter so that this still holds true. |
| 54:16 | So in this case we would choose our virtual auxiliary two and we can do exactly the same for our ignition table and set our virtual auxiliary two. |
| 54:29 | So it's really important to make sure that the actual switch on and off conditions that you're utilising are the ones that are switching between our tables. |
| 54:37 | Alright we're almost at the end of this, hopefully you're all still with me, I know there's been a few complexities that we've gone through here. |
| 54:46 | We will be stopping for some questions and answers pretty shortly so please fire those through to Ben in the chat box now and I'll get to those as soon as I can. |
| 54:57 | There's one aspect that we still haven't touched on though and this is how we're actually going to activate our nitrous solenoids. |
| 55:06 | So what we can do with that is we can use one of our auxiliary outputs to set this up. |
| 55:13 | Let's just choose one that's not in use at the moment. |
| 55:16 | And we need to turn this on and again what I'm going to do here is select GP output. |
| 55:23 | Now in this case what we can do in the G4+ as well is give this a label so we can see at a glance once it's set up that this is for our nitrous system. |
| 55:35 | So this makes it really easy, particularly when you're going back over this system over a system that you've tuned previously, it's really easy to tell exactly what you were using, any of the auxiliary outputs for... |
| 55:50 | Sorry I'm just going to stop, have a quick drink before I can't talk any more. |
| 55:59 | OK so now we get down to our setup for this particular output and one key point here is our switch off timer, this could be really dangerous, we want to make sure for the way we're using our nitrous system that it switches off as soon as our conditions are no longer active. |
| 56:18 | Now you can see the setup for this looks a lot like what we already had for our virtual auxiliaries. |
| 56:25 | Now the reason I've gone through, and I'm sorry I'll go back, we could use just our conditions here to function our nitrous output and then we could switch our dual tables on whether or not this output is active. |
| 56:39 | However doing so limits us in this case to three conditions. |
| 56:44 | So if we use our virtual auxiliary outputs this gives us a lot more flexibility. |
| 56:48 | Again really it's up to you how you do this though. |
| 56:53 | OK so we're going to leave our switch logic in this case set up to condition one only and our condition one, if I can find it in our list reasonably easy, will be our virtual auxiliary and we're looking for virtual auxiliary value one equals on and remember in this case with our setup we're using virtual auxiliary two as the trigger function. |
| 57:18 | So this gives us an output now that's going to be driven by the virtual auxiliary output inside the ECU and the virtual auxiliary is only going to switch when our conditions are met, then it's going to switch our fuel and ignition tables instantly to those overlay tables we've already looked at and then also we're going to end up activating our nitrous solenoids and actually beginning the injection of the nitrous and/or fuel into the engine. |
| 57:50 | OK so the key points to remember there really when it comes to nitrous, don't be scared of it. |
| 57:56 | Really it's no different to any other power adder. |
| 57:59 | We're simply forcing more oxygen into the combustion chamber, allowing us to add more fuel and achieve a larger combustion event, making more power. |
| 58:11 | So the two key parameters that you need to keep in mind there, as we add nitrous we need to retard the timing. |
| 58:18 | Rough rule of thumb there, two degrees per 50 horsepower, plus an additional retard of 2° for our very first run just to make sure that we're safe and then we're also going to be adding fuel, we're going to be targeting a richer air/fuel ratio, similar to the sort of air/fuel ratio targets we may be used to targeting with a turbocharged or supercharged engine. |
| 58:44 | Always start small with your nitrous setup and then begin adding more nitrous once you're on top of your configuration and your tuning. |
| 58:52 | Start small and creep up on it rather than going for gold on your very first run. |
| 58:56 | And the other aspect to remember is the most damage is likely to be done if you're brining your nitrous in very low in the engine RPM so that's something to be wary of. |
| 59:09 | Now one more point that I just recalled I haven't actually mentioned there, if you are using the open loop fuel air/fuel ratio target tables in the G4+ and you're on modelled fuel equation, another aspect that we can use is our fuel overlay tables to do some of the work. |
| 59:28 | I'll just go through that very briefly. |
| 59:32 | Here we've got our main air/fuel ratio target table, so these would be tuned understandably to the sort of air/fuel ratios or lambda targets that we were running naturally aspirated. |
| 59:44 | Or in this case naturally aspirated. |
| 59:47 | If we go into our fuel main, we can see we have a parameter here for lambda target table overlay. |
| 59:55 | And at the moment that's turned off. |
| 59:58 | If we set this to on and now we can go to our AFR, open loop AFR target table overlay. |
| 01:00:05 | So again this is an overlay so this is making a change to our main AFR target table. |
| 01:00:13 | And we can configure how this would be set up. |
| 01:00:17 | So as a really quick and dirty example, let's just turn off our throttle position axis for a start. |
| 01:00:27 | And what we're going to do is set our X axis as our virtual, if I can find it, virtual VA is the shortcut for our virtual auxiliary in this case, remember we're using VA2, virtual auxiliary two and we initialise that axis there and we're looking at the value zero is off and one is on. |
| 01:00:52 | So for a really simple example, let's say we're targeting 0.90 lambda when we're naturally aspirated, in this case we want to leave our value at zero when we're not active, at zero. |
| 01:01:08 | When the virtual auxiliary position changes to one though, what we can do is subtract 0.1 from our lambda target, so this will now target 0.80. |
| 01:01:19 | So particularly if you're using the VE fuel model, this is going to make some of the required change to our fuelling but you're still going to need to include the dual fuel table to completely compensate. |
| 01:01:34 | The reason this can be important is if you are using closed loop fuel control, if the actual air/fuel ratio target table doesn't update to your new realistic values for what you'd like to run when the nitrous is active, the closed loop system can start trying to chase your naturally aspirated air/fuel ratio targets and essentially remove any additional fuel that you're adding in so that's something to be wary of. |
| 01:02:01 | OK we'll move into questions and answers now so let's see what we've got. |
| 01:02:10 | OK our first question comes from HS Engineering who's asked, Andre have you ever tried a dry system injected pre turbo? In theory there should be some gains in turbo efficiency by doing so. |
| 01:02:20 | Look to be honest no I haven't and I'll be perfectly honest here, my experience with nitrous on turbocharged engines has been relatively limited. |
| 01:02:31 | What I've found is we sort of started with my own drag car with a direct port nitrous kit on that engine, it was a Mitsubishi 4G63 for those who aren't aware. |
| 01:02:41 | I though that this was going to be the way to make all the power that I could ever want and what I kind of found, particularly for a drag application was I could always make more power than we could put to the ground with the turbo alone so I think I didn't ever actually run that engine with nitrous on the gas down the strip, it was only boosted, excuse me, try that again. |
| 01:03:08 | I never actually ran the car down the strip running nitrous, we were only ever using boost and I think ultimately we stripped the kit off and sold it. |
| 01:03:16 | Now I know that's not quite your question. |
| 01:03:19 | Yes much like water injection there can potentially be some improvements in compressor efficiency, it's simply not something I can comment on too thoroughly as I haven't tested it myself but yes the concept is there for sure. |
| 01:03:34 | Barry G has asked, does nitrous really require much colder plugs? Some people go as far as to run plugs without ground straps, is that really required? Look no I don't think it's, it's not that dramatic and really again this all comes back to, we can treat the nitrous engine very similar to how we treat a turbocharged engine and I'll be using a similar spark plug heat range to what I would be using in a turbocharged engine. |
| 01:04:04 | And really the heat range that you're going to need to use, so essentially how cold you need to go with your spark plug, will depend exactly on how large the nitrous shot that you're using is. |
| 01:04:16 | So a good place to be for a moderate kit perhaps up to around about 150 horsepower on a street application, I might go down two heat ranges in spark plug over what I would be running naturally aspirated. |
| 01:04:32 | With a turbocharged car, if you're already running a moderate amount of boost, we may want to perhaps consider going one heat range colder. |
| 01:04:39 | After you've actually run the engine, if you're looking at the spark plugs this should give you some indication by the discolouration of the ground strap on the electrode, ground strap on the spark plug as to where abouts you need to go with your heat range if you need to adjust it further. |
| 01:04:56 | D Holmes has said, I think this is a comment that's come up while I've been talking, just to be clear, I meant exducer, larger rear AR may be required when running nitrous on turbocharged vehicles. |
| 01:05:11 | Yeah absolutely so this is a situation where turbo sizing gets a little bit tricky with dedicated nitrous cars because essentially we end up with a mismatch in our turbo sizing and essentially what we may end up needing is a larger exhaust side to our turbocharger so that may be just the AR of the exhaust housing or if we're going very large in our nitrous kit, we may need to go to a larger turbine wheel as well as a larger exhaust housing relative to the compressor side of the turbocharger because the compressor is no longer strictly adding all of the air, it's not required to add all of the air, we're chemically doing that through our nitrous injection. |
| 01:05:58 | Barry G's asked, what situations tend to lead to nitrous backfires? Ok so essentially one of the problems we can get is a situation where we have accidentally filled the intake manifold or run the nitrous system when the engine isn't active so that's one of the biggest problems is when we've got, particularly with a wet kit because we've obviously added fuel and oxygen together so we've got this highly combustable gas sitting there in the intake manifold and potentially whatever cylinders had the intake valves open at the time. |
| 01:06:35 | So it's really critical to make sure we have safety parameters in our system, so conditions in our activation schedule that are going to prevent the system running when the engine isn't running. |
| 01:06:50 | If we do have an accidental situation like this, it's really important to make sure that we clear the cylinders of any remaining fuel and air before we try starting it and this will require us to take the plugs out and turn the engine over, we want to make sure there's absolutely no chance of any ignition events occurring while we've got potentially nitrous and fuel in the intake manifold. |
| 01:07:16 | The other thing we probably are best to do is simply leave the engine for an extended period of time for that to settle back down and get rid of any remaining gases. |
| 01:07:28 | MCR's asked, what about adding wheel speed so NOS cannot be activated in neutral? Yeah absolutely, wheel speed's another parameter, a condition we can use. |
| 01:07:37 | Really the sky's the limit or really up to your imagination on what parameters you are going to use to limit the activation of the nitrous and I think I briefly touched on, we may want to add gear dependence there which is really no different to speed. |
| 01:07:54 | Generally, particularly in the lower gears we're going to be very traction limited anyway so there's not a lot of point bringing nitrous in in first gear so yes that's a really good idea. |
| 01:08:06 | Barry G's asked, have you ever run into distribution problems running a single fogger system? How common is this on motors running nitrous systems? I would have to say I probably haven't had the breadth of experience with nitrous systems to really be able to comment thoroughly on that. |
| 01:08:23 | Certainly I have run both direct port as well as single point fogger systems. |
| 01:08:30 | I haven't ever run any really large single point systems though and certainly I would imagine this is where we could get into larger problems with distribution. |
| 01:08:43 | But essentially we also need to consider that air distribution in particular is going to be problematic anyway for our engine so if we're getting uneven distribution of our nitrous into the engine we're likely to be getting uneven distribution of airflow into the cylinders even when we're not on the bottle so it's a consideration either way. |
| 01:09:03 | Really the problem's become, or the concern's become more profound as we start leaning on an engine further and harder and making more and more specific power. |
| 01:09:14 | Just like a turbo only or a supercharged only engine, as our specific power level climbs, our tuning window becomes narrower and it doesn't take much for a single cylinder to end up lean and become damaged as a result. |
| 01:09:31 | HS Engineering's asked, so by choosing virtual two for the map switching, it automatically takes virtual auxiliary one into account? Yeah but virtue of the way I had configured that, remember my first switching condition for virtual auxiliary two was that virtual auxiliary one had to first of all be true. |
| 01:09:54 | So you need to make that distinction, that needs to be one of your conditions inside virtual auxiliary two in order to use that, it's not automatic. |
| 01:10:04 | Turnam has asked, on the turbo application, if you didn't need nitrous for spooling up, would you see a gain in adding nitrous or would you just wind the boost up? After all, any way you increase cylinder pressure will have the same result won't it? Yeah absolutely this really comes back to kind of what I touched on where a lot of peoople think they've got to the limit of their turbocharger's flow and adding boost isn't really giving them any improvement in power anymore so OK let's look at simple options, let's add 100 shot of nitrous, obviously that's going to give us an additional 100 horsepower. |
| 01:10:42 | The other thing with this is if our turbocharger's already absolutely maxed out and tapped out, what we're going to find is our exhaust back pressure pre turbocharger is going to often be exceptionally high and essentially that's strangling the engine down. |
| 01:10:59 | So when we add 100 horsepower shot of nitrous, sure we're getting the oxygen into the engine but that's still got to flow out and get out of the engine through the strangled turbocharger so often we'll find that when we add 100 horsepower shot of nitrous to a turbo system that's already absolutely on its limit, we're going to see a relatively minimal increase in our power and certainly nothing like the 100 horsepower you may expect, maybe you'll get 20 or 30 horsepower so you'll also see that as the RPM increases, the amount of your gain, the power gain will drop away quite dramatically. |
| 01:11:37 | So you're going to get a reasonable increase in power at lower RPM where the turbcocharger isn't quite strangled and as the back pressure builds in the manifold it's going to reduce the gains we're seeing. |
| 01:11:51 | 93 has said, do we need to shut the nitrous off a few hundred RPM before the rev limiter? OK this is a really good question and really it comes down to how we're doing our limiting. |
| 01:12:04 | OK so I actually probably should have mentioned this in the webinar itself so thank you for brining it up. |
| 01:12:10 | Let's look at a situation where we're using ignition cutting. |
| 01:12:13 | Now essentially we can run on an ignition cut rev limiter with nitrous and fuel flowing. |
| 01:12:20 | Might not necessarily be a recommended way of doing things but if you look at what's really happening, it's no different than our engine operating normally off nitrous on a ignition cut rev limiter. |
| 01:12:34 | We're still injecting fuel, we've still got oxygen passing through the cylinders, we're simply cutting the spark, fuel and air is exiting through the cylinder unburnt. |
| 01:12:42 | The dangerous scenario though is if we're using a fuel cut, particularly if we're running on a wet system where the nitrous is adding its own fuel, in that situation if we're using a fuel cut then the engine can pull straight past the rev limiter because while the injectors to the engine may be shut off, we're still simply adding fuel and oxygen through the nitrous system so that is a really big consideration you need to keep in mind. |
| 01:13:10 | Chris 250's asked, how would you work a nitrous overlay alongside flex fuel? You're really testing me there Chris. |
| 01:13:19 | I'll be perfectly honest, it's not something I've even given any consideration to. |
| 01:13:23 | And I probably need to give it a little bit of thought to come up with how I would deal with it. |
| 01:13:31 | What you're going to have is a fully functioned flex fuel system operating aside from the nitrous and you're going to need to trim your fuelling and ignition timing relative to two parameters now, specifically ethanol content and whether or not your nitrous system is active. |
| 01:13:53 | A pure first thought that comes into my mind here and after I've had more time to think about it I might come up with a better alternative, I'd probably consider using one of the 4D or 5D fuel and ignition trim tables to set up a 3D table with ethanol content and nitrous trigger condition as the axes and see how I got on with that. |
| 01:14:18 | That's my first thought. |
| 01:14:22 | Slaughter 5 has asked, in regards to preventing nitrous backfire, what about taking out an ignition relay and turning the motor over to flush out the spray? In the motor, yeah absolutely I mean essentially what you need to do is ensure 100% unless you want to rebuild your intake manifold that there is no ignition occurring while you're doing that so really it comes down to how careful you want to be about making sure that you've done exactly that but yeah if remove the ignition relay and that is going to certainly prevent spark, then yes that's a viable way of flushing out the system and moving that unburned fuel and air out of the engine. |
| 01:15:05 | Alright guys that's brought us to the end of our webinar. |
| 01:15:07 | Hopefully that's made you a little bit less scared of nitrous if you've never approached it before and hopefully I've given you some solid steps to take in order to go about tuning a nitrous system and getting good results without damaging the engine. |
| 01:15:22 | As usual if you do have any further questions, please ask them in the forum and I'll be happy to answer them in there. |
| 01:15:29 | And as usual if you haven't already given us a testimonial that we can use for our website, we'd really love to hear from you. |
| 01:15:37 | Please write us a short testimonial, only needs to be a couple of sentences and fire those through via email to ben@hpacademy.com, we'd love to have them, it'd be really helpful for everyone. |


