108 | Vernier Adjustable Cam Timing
Summary
While continuously variable cam timing is common in modern engines, fixed cam timing is still popular in older engines, or even modern engines that are modified with very aggressive cam profiles. In these situations we may be faced with adjusting the cam timing mechanically using vernier adjustable cam wheels. in this webinar we will discuss the techniques you should be applying when using vernier cam gears.
| 00:00 | - Thanks for joining us for this webinar. |
| 00:02 | In this webinar we're going to be looking into the process of tuning variable cam timing using the older mechanical system of a vernier adjustable cam pulley. |
| 00:14 | Now obviously in modern times we're seeing more and more engines come out equipped with continuously variable cam control systems where the cam timing can be altered while the engine's running using the ECU. |
| 00:28 | However it's still, we still see a number of engines, particularly older ones or those modified specifically for motorsport use where the fixed vernier adjustable cam timing system is used. |
| 00:45 | And while I'd like to think that this should be fairly straightforward and understood by most people, if we could just jump to my laptop screen for the moment, this is really what we're talking about here, this sort of cam pulley where we have an outer pulley which is where the cambelt or obviously we can also do this with a cam chain, that's where the cam belt or cam chain runs on and then we have the inner which is fixed to the actual camshaft itself and we then have the ability to loosen off the locking screws and physically advance or retard the cam timing relative to the crankshaft position. |
| 01:22 | And what we're doing here is we're adjusting the valve timing events so that we can adjust or affect the engine's operation. |
| 01:32 | And I see that this is an area that a lot of people have a lack of understanding on, much as we see with the continuously variable cam timing engines and a lot of ways, using a vernier adjustable cam wheel is actually much simpler because we are going to be focusing on one set of compromises for the sort of power and torque production that we're going to want from our engine. |
| 01:58 | I'll just jump back into my notes now and what we want to talk about here is what we're actually trying to do when we're adjusting the cam timing. |
| 02:09 | And really what we're trying to do here is optimise the airflow into the engine and of course the exhaust flow out of the engine and in turn what this is going to do, when we get it right, we're going to be optimising the volumetric efficiency of the engine. |
| 02:24 | When we increase the engine's volumetric efficiency, we're forcing more air into the engine and remember in essence our engine is just a large air pump, the more air that we can get into the cylinders, the more fuel we can also add to go with that air and the larger combustion event we get, hence the more power our engine will produce. |
| 02:44 | When we're talking about fixed cam timing like this though, we're just adjusting a vernier adjustable cam gear, we do need to make a compromise, what we need to do is decide where abouts in the engine's rev range we would like to optimise the cam timing and hence optimise the engine's volumetric efficiency. |
| 03:05 | So we've got the opportunity to optimise the engine's performance in one area of the rev range and unfortunately with this sort of system, when we optimise in one area, what we generally do is see a decrease in performance in other areas. |
| 03:21 | So it isn't really an area where we can have our cake and eat it too, we do need to accept that there is going to be some compromise here. |
| 03:30 | So what we're really doing there, to put that another way, we can focus our energies on improving the low RPM torque production or we could focus our energies on optimising the high RPM torque production but we can't have both. |
| 03:47 | So a lot of what we're trying to achieve here is going to come down to the way the engine is being used. |
| 03:53 | For example, if we were looking at an engine that was being used in a drag application where it's constantly going to be operating at high RPM, we may be quite happy in that situation to completely sacrifice our bottom end performance and really focus on a narrow rev range between let's say 6000 and 8000 RPM. |
| 04:15 | Now down the drag strip, that's the sort of rev range the engine is going to be operating in, hence it makes sense to optimise the airflow into the cylinders at that point and make maximum power across that range. |
| 04:28 | The same could be said for engines that are used in circuit competitions, circuit racing, perhaps where they are backed by a sequential gearbox with a very narrow set of gear ratios. |
| 04:43 | What this is going to mean is that the RPM isn't going to drop dramatically from one gear to the next and out on the racetrack we're going to be again operating the engine over a relatively narrow powerband, narrow rev range and hence we can focus our energy on optimising that high RPM performance and sacrificing our bottom end performance. |
| 05:08 | Now another aspect I'll just mention here that I've just about overlooked is that it isn't uncommon in high performance engines to remove a continuously variable cam timing system and instead run a fixed cam timing system using these vernier adjustable cam gears. |
| 05:27 | Now what that does is it removes some of the advantages of the continuously variable cam timing system, obviously we can't use the computer now to advance and retard the cams. |
| 05:38 | But when we're designing and developing an engine for a specific task, let's say drag racing or circuit racing with a sequential gearbox as I've mentioned. |
| 05:48 | We know that we're going to be operating over that narrow powerband and generally when we're talking about an engine that from the factory runs continuously variable cam timing, it's going to be equipped with a very mild cam profile that's going to allow the cam timing to be swung through perhaps 30 to 40° of movement. |
| 06:09 | What we're going to do when we're developing that engine for a specific task is fit a much more aggressive cam that's going to give us the benefit of more airflow. |
| 06:19 | However we're not going to be able to now move that cam as far as we could with the small factory cam. |
| 06:27 | So what I'm talking about here is removing the small factory cams, getting rid of the continuously variable cam operation, instead using a fixed cam wheel or vernier adjustable cam wheel and dialling our cam timing in to be optimal at a particular point in the rev range. |
| 06:46 | Now let's have a quick look at the valve timing event. |
| 06:51 | So if I can actually just get this to work, my laptop's just giving me some trouble. |
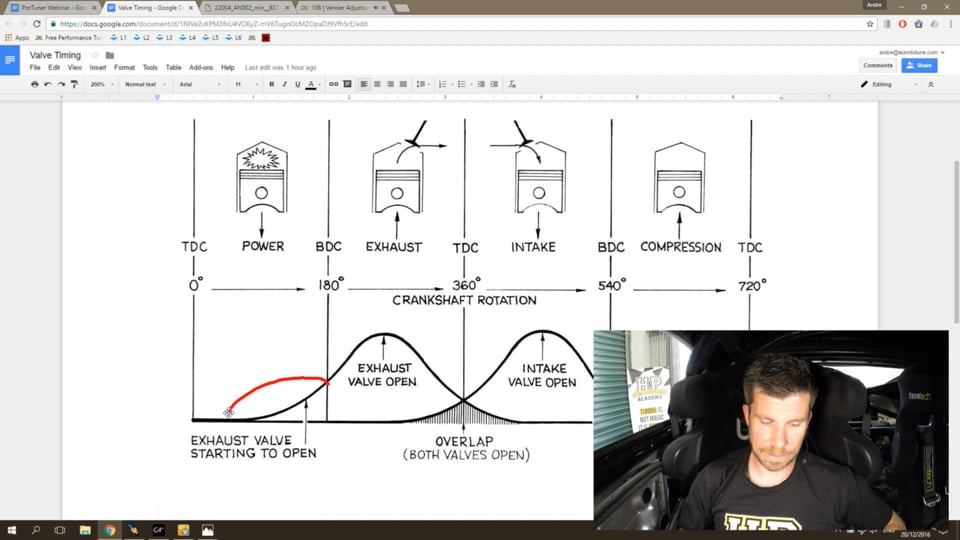
| 06:56 | On my laptop screen we've got the valve timing event, so this is what's actually happening inside the engine and we start over here at 0° of crankshaft rotation, TDC so this is the point where we've just had the spark event occur and as we can see here, this particular point, the first 180° of rotation are the powerstroke. |
| 07:22 | Now when we look at it on a really basic aspect, we could consider that the exhaust valve opens at the bottom of the power stroke, or the beginning of our exhaust stroke and then as soon as we get to the top of the stroke, the exhaust valve closes. |
| 07:36 | Likewise the intake valve begins opening at the start of our intake stroke and closes at the bottom. |
| 07:43 | Now that's not a very realistic indication of what's actually happening and if we look at our diagram here, we can see that our exhaust value actually begins to open while we're still inside the power stroke. |
| 07:58 | Our exhaust valve then continues to open, it'll peak and it will begin to close. |
| 08:04 | This part here, we're on our exhaust stroke so this is where we've gone through the power stroke, piston's reached bottom dead centre and it's extracted all of that power during, all of the energy from that expanding combustion event during the power stroke and now during the exhaust stroke our exhaust valves are open and the piston is moving back towards top dead centre and it is forcing those used exhaust gases back out. |
| 08:32 | Then we move through top dead centre again. |
| 08:36 | So this is also important to note, there are two full crankshaft revolutions for one engine cycle and we can see that's represented here, we've gone 360° so we're back here at top dead centre, we've gone through one full revolution of the crankshaft. |
| 08:56 | So at TDC we're now in the overlap area where both our intake and our exhaust valves are open and from TDC the piston now moves down the bore again, we're creating a low pressure area inside the cylinder, we're not sucking in a fresh charge of fuel and air. |
| 09:14 | We go through bottom dead centre and again you can see that the intake valves stay open as we move into the compression stroke. |
| 09:23 | So this is the important point to note here, we're not, if we drew an approximate diagram of what the exhaust valve opening might look like on paper, we see it open at bottom dead centre, stays open and then it closes as we get to TDC, that's not very realistic, that's not what's actually happening. |
| 09:43 | We need to understand that the exhaust valve opens before we reach bottom dead centre. |
| 09:48 | While we're still on the power stroke. |
| 09:51 | Likewise it stays open as we're moving into the intake stroke. |
| 09:55 | Then we look at the intake valve, we look at the intake valve, it starts to open while we're still on the exhaust stroke and it also stays open into the compression stroke while the piston is starting to move up the bore. |
| 10:09 | Right I'll just jump back to my notes now we've got an indication of what's actually happening there. |
| 10:15 | So now we've talked about the fact that the crankshaft does two full revolutions for every engine cycle. |
| 10:22 | Another way to look at that as well which is often missed or overlooked is the cam train, the valve train operates at half engine speed so that's another important aspect to note. |
| 10:34 | OK so where do our advantages come from, where is the potential in making power when we're moving the cam timing around? What we need to understand is that the intake air in particular, because it has a mass or a density to it, it also has, comprises some inertia, it has some inertia attached to it and this is what we're really trying to take advantage of when we're adjusting our cam timing. |
| 11:03 | So if we consider the intake stroke for example, particularly at high RPM where we've got high air speed, high inlet air speed going down the intake ports, past the intake valves, now if we leave the intake valve open into the compression stroke, what's happening now is the piston is starting to move up the bore. |
| 11:25 | So it's on the compression stroke, it's already moving up towards top dead centre and if you think about what's happening there, we've still got the intake valve open so it would be natural to assume that as the piston moves up the bore, it would now be forcing our fresh charge of air and fuel out of the cylinder, obviously that's not what we want. |
| 11:46 | However at high RPM, because our inlet air velocity is very fast, we've got a lot of inertia attached to that air, we get a ram effect by leaving the intake valve open into the compression stroke and what we can do is gain some extra cylinder filling by allowing that ram effect to force more air and fuel into the cylinder even while the piston is still moving up the bore. |
| 12:12 | Now this is where our compromise comes in because what happens at high RPM where we've got that inertia of the inlet charge, that doesn't work for us, that doesn't work in our favour when we're at low RPM and we've got low air speed, we don't have that ram effect. |
| 12:31 | So what I mean by this is the correct cam timing or optimal cam timing at high RPM to take advantage of that ram effect is not going to work for us at low RPM where we don't have that air speed. |
| 12:45 | And the general trend we see here which I'm going to talk about in a lot of detail shortly is that if we want to make maximum power and torque at high RPM, we'll generally retard the cam timing, so this has the intake valve remaining open further into our compression stroke and if we go back to my laptop screen for a second, and this is what we're talking about here, this area where the intake valve is open into the compression stroke. |
| 13:17 | So when we talk about retarding the timing, what we're meaning there is that the valve events happen later so if I can just draw a really terrible picture here just to represent what we're talking about, please excuse my drawing skills. |
| 13:34 | OK so now what we've done is we've moved our valve timing event across to the right. |
| 13:39 | It's all happening later in the engine cycle, later, hence retarded. |
| 13:44 | So that's what we're going to do when we want to optimise our performance at high RPM, we're going to generally have the valve timing events happen later, we're going to retard the cam timing. |
| 13:57 | Right I'll just jump back to my notes now and what we're going to do is have a look at a quick dyno demonstration, admittedly on our Nissan 350z we're going to forget for a moment that this engine is fitted with variable valve timing, you're just going to assume that I can jump out of the car in between dyno demonstrations and physically adjust the valve timing. |
| 14:19 | What we're going to do is look at two dyno runs with the valve timing at maximum advance and we're going to look at the valve timing at maximum retard and see how that affects the engine performance. |
| 14:31 | So we'll just start the engine up now and we'll get that underway. |
| 14:35 | So in order to understand what's going on, let's just jump into my laptop software for a moment and what we're looking at here is our VVT inlet target map and what we've got here is a really basic setup. |
| 14:52 | At the moment you can see that the area that I've just highlighted, this is the wide open throttle operating area so this is where we're going to be operating during a wide open trottle ramp run and what I've done is I've simply set all of the cam timing targets to zero and for this particular system, this ends up being the natural position for our cam which is the most retarded position. |
| 15:18 | So this is going to give us a demonstration of what we'll end up with with the cam timing at maximum retard. |
| 15:26 | Remember at this point we are only adjusting the inlet camshaft position. |
| 15:31 | Right now we understand that, we'll just jump across to our dyno screen and you'll be able to watch this run take place. |
| 15:40 | I'm just getting into 4th gear now. |
| 15:44 | I'll just give the engine a few seconds to settle down. |
| 15:47 | Alright just go through to full throttle. |
| 15:48 | So we're going to perform one full run. |
| 15:51 | Now it's important to also note here that the fuelling at the moment is optimised for a completely mapped cam table. |
| 15:59 | So we're going to see the air/fuel ratio result with our cam timing at maximum retard. |
| 16:05 | Alright let's do our run now. |
| 16:27 | OK so that's our first run complete, we're not really that interested in the outright power level, what we're really interested in is what the shape of these two graphs are going to look like once I've done my second run. |
| 16:40 | So we'll just quickly save this one now and I'll call this retard, should be enough of an indication as to what's going on there. |
| 16:47 | Let's jump back into our laptop software for a second and what I'm going to do, if I can get my laptop to play the game, I can, we're going to highlight the entire wide open throttle operating area and I'm just going to select 30°. |
| 17:03 | Now before we do this run, I'll just point out as well that the range of camshaft movement that we'll typically see with this sort of engine, a continuously variable cam timing engine, is much greater than the range we're likely to be advancing or retarding the cam with a fixed cam control system where we're using a vernier adjustable cam system so the 30° that I'm now swinging the cams, this is much greater, probably double the sort of range that we're likely to move the cam timing with a vernier adjustable cam wheel. |
| 17:38 | Alright let's get our engine back running again and we'll go back into 4th gear now. |
| 17:46 | Alright jump across to our dyno screen and we'll do our second run. |
| 17:50 | The important point here, you'll be able to see this run overlaid directly ontop of our first run and we'll be able to see the dramatic differences in the shape of the power graph. |
| 18:23 | Alright so we've got our second run done there and two things to note really, first of all we can see that our green line, with our cam timing advanced, remember this is going to favour low RPM cylinder filling. |
| 18:36 | With our cam timing advanced that's exactly what we've seen in terms of our power graph, we can see that our power is dramatically improved, right up to around about 5200 RPM at which point we fall over and we see more power being produced if we have our cam timing at maximum retard. |
| 18:56 | Obviously I've gone for 2 very dramatic ends of the spectrum here, that's not how we're going to tune but this is just a demonstration to really show us the point. |
| 19:04 | Now what I'm going to do is we'll save this run here, we'll call this advanced, really technical and descriptive names admittedly and we're going to have a look at these two together. |
| 19:17 | So we've got our blue run here which is our retarded run and we've got our red run which is our advanced run. |
| 19:24 | So the two things that are important, we can see that our red run with our cam timing advanced we've made more low RPM and mid RPM power and the other aspect to look at here is our air/fuel ratio, now remember I haven't made any changes to our fuel delivery between these two runs and we're not running with closed loop fuel control turned on and that's been apparent because our red run here, you can see that our air/fuel ratio's moved much leaner, we're sitting around 13.0:1 whereas with our blue run we're down at around about 12.0. |
| 19:59 | So that simply shows, it demonstrates that the engine is moving more air and remember what I said at the start, what we're doing is changing the volumetric efficiency of the engine, we're trying to optimise the cylinder filling. |
| 20:12 | Now flipside of that is at high RPM when we've gone past about 5400 RPM, we can see particularly right at the top, 6400 RPM, we've gone from 132 kW down to 109 kW and again we see that represented in our air/fuel ratio or lambda, we can see that our red run, we've started to move rich while conversely our blue run, we've moved lean. |
| 20:39 | So hopefully that gives you a little bit more insight, even though we are working on a continuously variable cam timing engine, the effect that we're going to see by physically getting out of the car, switching it off and making adjustments to our vernier adjustable cam pulleys is going to give us exactly the same result and this is what we're expecting to see. |
| 21:02 | Now I've talked a little bit about the intake valve opening, valve timing events and the effect on power, we'll just talk briefly as well about the exhaust timing events. |
| 21:13 | Now what we're trying to do here on the exhaust stroke is we're trying to extract maximum power from the expanding combustion charge that we've got during that powerstroke. |
| 21:24 | However we also need to open the exhaust valves before the piston reaches bottom dead centre to allow the remaining pressure inside the cylinder to blow down or vent out through the exhaust valves prior to the piston starting to move up the bore again and if we don't get that right, if we don't open the exhaust valves early enough, what we're going to find is that remaining pressure essentially acts against the piston, it's counter productive, as we're moving back up the bore so that's important to understand. |
| 21:55 | OK so now we've got a little bit of insight, we're going to talk about some of the general trends that we can expect to see when we're adjusting our cam timing. |
| 22:06 | First of all, the power and torque changes that we're likely to see when we're making adjustments to the cam timing will be much more sensitive to changes to the intake cam position. |
| 22:21 | We don't see nearly the same effect from adjusting the exhaust cam timing and that's also, you can see that in effect with a lot of factory engines running variable cam timing on the less performance specified engines or performance related engines, we often see variable cam control only applied to the intake cam. |
| 22:46 | Obviously adding a function such as variable cam control is still a cost to the manufacturer so because they get the largest benefit from the intake cam timing, that's why we see it applied there and that's exactly the situation with the VQ35 in our Nissan 350z, it only has variable cam control on the intake valve. |
| 23:09 | The next aspect which we've already touched on, if we advance the cam timing, so in other words we have our valve timing events happening sooner in the engine cycle, this will generally improve or focus our performance on the low RPM range of our powerband while retarding the cam timing has the opposite effect and generally will improve our high RPM performance. |
| 23:34 | Now it is important, I'm going to touch on this again shortly, it is important to note that this is relative to some sort of defined cam timing starting point. |
| 23:45 | So obviously if our base timing is completely out and we're already exceptionally retarded, we can be so far out of the ballpark that we can't see our way back in essence and that's why it's really important to start with some kind of base cam timing with dialled in cam timing so we actually know where we're starting from, where the centrelines of the cam lobes are so we can then work forwards or backwards from that particular point. |
| 24:14 | Now when we're advancing the cam, there's some effects there that we also need to be aware of. |
| 24:21 | In particular when we advance the cam, what we're going to be doing is decreasing the piston to intake valve clearance. |
| 24:29 | Now if we can just jump back to my little diagram here, again if we think about this diagram, any time I'm doing work with cam timing, dialling in cams or adjusting cam timing, it's always a really powerful aspect to just quickly scribble out this particular valve timing diagram, I'm only really focusing here, or talking here about this bit at the bottom, don't need to talk about each of the strokes, and that just gives us some indication of exactly what's happening. |
| 24:56 | But just talking about advancing the cam, so in this case we're moving the cam centrelines to the left of our diagram. |
| 25:04 | We can see that what that will result in is the cam, the intake cam will have opened further, the intake valve I should say, will have opened further around this TDC point, that's where our piston is at the top of the stroke so naturally that means that we're going to end up reducing the clearance between the intake valve and the piston. |
| 25:25 | Likewise, advancing the cam timing is going to have the effect of increasing the clearance between the piston and the exhaust valve, for exactly the same reason we're also moving the exhaust cam to the left and that means that when we go through this TDC area here, the exhaust valves aren't as far open. |
| 25:46 | Now obviously if we go the opposite way, if we retard the cams and we're moving to the right of our diagram, we have exactly the opposite situation happening, we're going to be reducing the clearance between our exhaust valve in our piston and we're going to be increasing the clearance between our intake valve and our piston. |
| 26:04 | So again these are things that probably are quite easy to forget. |
| 26:09 | If we simply draw out this diagram and have an understanding of where we are in the engine cycle, where the piston is, what's happening to the intake and exhaust valves, it's very easy to understand quickly from this diagram exactly what the effect on our clearances are going to be. |
| 26:24 | OK so we've talked now about advancing and retarding the cams together. |
| 26:29 | So if you're running a single cam engine, obviously that is our only option, we can't affect the lobe separation angle with a single cam engine. |
| 26:41 | However if we're talking about a twin cam engine, then it is possible to adjust the cams independent of each other and that's going to not only advance or retard a cam at the same time it's going to affect this area here, if we just jump again back to our diagram, it's going to affect this area here, our overlap which is the time when both our intake and our exhaust valves are open. |
| 27:06 | And again, looking at the diagram, we could see that for example, if we leave the intake cam fixed, and we retarded the exhaust cam, again I'll just do my horrible little scribble here, we're going to end up with something that looks like this and that's given us a lot more area in this overlap range. |
| 27:28 | So either retarding the exhaust cam and leaving the intake cam fixed or alternatively leaving the exhaust cam fixed and advancing the intake cam, both of these actions will have the effect of increasing valve overlap. |
| 27:44 | So let's talk about what happens when we first of all increase our overlap, so this is known as a tighter lobe separation angle. |
| 27:54 | When I'm talking about the lobe separation angle, again looking at our diagram here, if we come down here through the centre of our exhaust valve, or our exhaust cam and through the centre of our intake cam lobe, the angle between these two points is our lobe separation angle so that's an important aspect of cam design, particularly with a single cam engine like a GM LS V8, we're going to see the lobe separation angle or LSA listed as one of the key parameters on the cam card. |
| 28:29 | Alright so when we increase our overlap or we have a tighter lobe separation angle, we're going to have the effect of increasing our dynamic compression ratio so what this means is we're trapping, because we've got less overlap, we're trapping more of the intake charge inside the cylinder so the effect of dynamic compression ratio is increased. |
| 28:53 | Now what this does is it has several effects, first of all it improves or tends to improve our low RPM torque and at the same time as improving the low RPM torque, it will also actually increase our peak torque value. |
| 29:07 | Now this comes in hand with the fact that it's resulting in more peak cylinder pressure, it's actually increasing the peak cylinder pressure. |
| 29:16 | And this has some effects on our tuning requirements. |
| 29:19 | In particular, any time we increase our peak cylinder pressure, it's going to make the engine more susceptible to suffering from knock so we need to understand this, particularly if we're tuning an engine that is running on pump gas, if we increase our overlap we may end up with the engine being more susceptible to knock. |
| 29:41 | We're also going to end up reducing our vacuum at idle so if we're looking at the manifold pressure at idle, when we've got more overlap we're going to end up reducing the vacuum at idle and the other thing that this does as well is it tends to reduce our piston to valve clearance, we're moving the cam centrelines closer together so our valves tend to be open further across the overlap period, so across the TDC period. |
| 30:13 | So again if we're marginal on our valve clearance this can be problematic. |
| 30:18 | OK so now what we're going to look at is if we go the opposite way, essentially we get the opposite sort of set of circumstances. |
| 30:27 | We're going to end up improving our high RPM torque and we're also going to be reducing our peak torque value. |
| 30:36 | We also find that we tend to reduce our chances of knock and hence the engine may take a little bit more ignition advance. |
| 30:46 | Of course as well as we do this, we find that we increase our vacuum at idle and this tends to improve our idle quality. |
| 30:56 | So if we've got a lot of overlap, we're going to have poor vacuum at idle and this in turn is also going to result in a poor idle quality. |
| 31:04 | With minimal overlap we're going to increase our vacuum at idle and we're going to get a good idle quality and this is the important aspect for a road car as well, we do want something that's going to give us a reasonable idle quality. |
| 31:22 | One other aspect that I will just touch on here is that overlap during cruise operation, this is really an aspect that's probably more of a consideration for OE manufacturers in terms of emissions as well as fuel economy, when we use a reasonable amount of overlap in the cruise areas of operation, what we tend to get is an internal exhaust gas recirculation if you like and what this also has the effect of doing is reducing the pumping losses in our engine which can in turn go some way to improving our fuel economy. |
| 32:03 | Again, with fixed cam timing, we really have to make a compromise and obviously if we're going to the trouble of fitting aftermarket cams and vernier adjustable cam gears then we are really probably focusing more on our wide open throttle operation, probably much less concerned with our fuel economy. |
| 32:23 | OK so let's get onto some considerations so this is what we really need to keep in mind before we move into actually tuning on the dyno and what we want to look at is first of all where is our cam dialled in now, where are our inlet and exhaust cam centrelines dialled in? Now this is a problem because a lot of tuners will go and fit vernier adjustable cam gears to an engine and simply start with the vernier adjustable cam gears dialled in at 0. |
| 32:57 | And what I mean by that, let's just jump back to my laptop screen for a second, can see that here on our little picture of our HKS vernier adjustable cam gear, we have a little scale here and in particular there's a mark here on the cam outer and then we have a range of marks on the cam inner. |
| 33:18 | So we can use these to take note of how far advanced or retarded our cam timing is. |
| 33:24 | Now a lot of tuners, what they're going to do is put the aftermarket cams into the engine, fit the vernier adjustable cam gears and simply start with them dialled in in the central or zero position and assume that that's going to give us a good starting point. |
| 33:41 | That is a pretty bold assumption because we have absolutely no idea how the cams have been manufactured, where the cam centrelines lie in relation to the dowel position of the cam and in essence while we can potentially get good results doing it this way, we have absolutely no idea where exactly the cam is dialled in to start with. |
| 34:03 | And this makes it problematic when we start making changes, we don't really know where our cam centrelines are so we don't know where we end up when we actually make adjustments, let's say for example we've found that the engine wants to run with the cam, the inlet cam 4° retarded, we don't actually know what that gives us in the way of a camshaft centreline so we don't really know where we're at. |
| 34:29 | Let's just jump back to my notes for a second now. |
| 34:33 | So my advice really is we want to start with our cam dialled in, even when we've got vernier adjustable cam gears and we're going to jump on the dyno, it's always best to actually go through the process of degreeing the cam and finding out exactly where it's dialled in, or dialling it into the manufacturer's recommendation. |
| 34:54 | Now the next aspect with this as well, any time we're moving the cam position around, any time we're advancing or retarding the cam timing, as we've already found out, this is going to affect our valve to piston clearance, so we need to factor this in and particularly if we're expecting to move the cam a reasonable amount, this can result in valve to piston contact if we're not careful. |
| 35:23 | Now this is really a situation that is difficult for us as tuners because unless we've gone through the process and built the engine, we may not have any real idea as to how far we can move the cam before we're going to end up with valve to piston contact. |
| 35:39 | So in this instance it pays to be a little bit cautious. |
| 35:44 | Generally any time I'm building a performance engine with a large cam profile and I know that I might be moving the cam around when I'm on the dyno, I'm going to go through the process of checking the valve to piston clearance and see how much movement I have available in the cams before I start running into problems with valve to piston contact. |
| 36:07 | I can then use this information to help decide how far I'm prepared to go when I am on the dyno. |
| 36:14 | I will mention though that if we are dealing with an off the shelf cam and it's a relatively mild cam profile then generally this does give us a reasonable amount of leeway to move the cam and certainly it wouldn't be uncommon to advance or retard the cam by perhaps 4 or 6° but we do need to understand the implication of this and understand that in some situations we may get ourselves into trouble if we're going to do that. |
| 36:46 | If in doubt, always check with the engine builder or the cam manufacturer to see what is actually acceptable. |
| 36:54 | Next we also need to consider what we're trying to achieve or what we want to achieve out of the particular tuning task and really what I mean by this is where abouts do we want to focus our tuning efforts? Are we looking at high RPM performance or low RPM performance? I've already covered a little bit of this but particularly for cars that are going to be used on the road, it's really probably more sensible to focus our energy on low to mid range torque and sacrifice a little bit of high RPM performance and the reason for this is we're going to be spending more of our time in a road car using the low RPM rev range so a little bit of additional torque here is really going to make a noticeable difference. |
| 37:40 | It's not that often that we're going to be spending time at wide open throttle. |
| 37:44 | OK so the other consideration that we need to keep in mind as well, if our ECU is taking trigger inputs from a cam angle sensor, something that's physically being driven off the camshaft, any time we adjust the cam timing, this will have the effect or can have the effect of moving our base ignition timing. |
| 38:09 | It's a really easy one to overlook so any time we're adjusting the cam timing on an engine that uses a cam angle sensor and we're adjusting the cam that that particular sensor is driven off, we need to check and reset our base ignition timing after any change, otherwise we're going to end up affecting our ignition timing as well, so 2 problems here, first of all if we're changing our cam timing and effectively advancing or retarding our ignition timing, there's two changes we're making so it's really pointless, it's futile, we can't tell if the difference we've just seen came from the cam timing change or whether it came from the ignition timing change. |
| 38:50 | So the other aspect of course is if we're advancing the timing on a knock limited engine, this may be dangerous so we need to be very careful there. |
| 39:00 | OK I'm going to move into some questions, I see we do already have some questions which is great, if you do have any more, please feel free to ask those now and I'll get into them shortly. |
| 39:12 | I just want to, now we've got some background, I just want to go through the approach to tuning the cam timing that I personally use. |
| 39:21 | And I'm not sure here that I'd say there is one single approach that you must use. |
| 39:27 | Any time we're adjusting cam timing, be it vernier or through variable valve timing system, through an ECU, it does become an iterative process, the reason for this is that as we adjust, for example the intake cam, where it's affecting the volumetric efficiency of the engine, so we're affecting the amount of air inside the engine. |
| 39:49 | In turn, this may mean that we need to go back and readjust our fuel delivery and because we're varying the amount of fuel and air being combusted, in turn this may also mean that we need to adjust our ignition timing to get back to MBT. |
| 40:05 | So then we'd go through the process again one we've seen the effect of that cam timing change. |
| 40:10 | Of course if we're adjusting both the intake and the exhaust cam timing independently of each other on a double overhead cam engine, then we have another parameter because we can advance or retard the cams together or we can advance and retard them individually, hence affecting that overlap that we've talked about so we have a lot more adjustability there. |
| 40:34 | Really what it's going to come down to is how much time you want to spend on this particular task. |
| 40:40 | And the approach that I'm going to give you here is the approach I use that I believe gives you probably 95 to 98% of the available gains in the minimal amount of time, particularly if we're tuning for a commercial purpose, time is money and often we can't spend hours checking every possible iteration of cam timing on these double overhead cam engines, it's just simply not a cost effective way of working. |
| 41:08 | So the first process we go through is to make sure that our cams are degreed into the manufacturer's specification, this means that we know we're going to be starting in the ballpark, this means that we also know when we advance or retard the cams, we know where our centrelines end up. |
| 41:26 | And the reason I say that this is important, as we gain experience with particular engines, and particular cam combinations, we're going to tend to start building up a bit of a knowledge or understanding of what sort of centrelines a particular engine may want to see. |
| 41:42 | And an example of that that I'll give you is that the Mitsubishi 4G63 engines, I was quite familiar with, I built a number of these for drag applications and in those drag applications we were using quite aggressive cam profiles and I'd generally use a starting point for my cam centrelines of around about 110° for our intake cam and around about 114° for the exhaust cam and when I was talking about this, let's just quickly jump back to my diagram here again, when I talk about this for the intake cam here, when I say centreline, what we're talking about is the peak lift area and when I say 110°, what I'm talking about is we are 110° after top dead centre. |
| 42:30 | Likewise the exhaust cam, what I'm talking about here is the centreline versus our TDC point and when we're talking about centrelines for our exhaust cam, we're talking in degrees before top dead centre. |
| 42:43 | So for that particular engine and the sort of cam profiles that I was using, I knew that that was a reasonably good starting point that was going to get me in the ballpark, whereas if we're simply installing the cams and running them at the zero or centre marks on our vernier cam gears, we have absolutely no idea where we are relative to the manufacturer's specifications or what we expect that particular cam to work at. |
| 43:10 | I'll just jump back to my notes and we'll complete this now. |
| 43:14 | OK so once we've got our cams dialled in, our base timing set, we're just simply going to go through the process of getting a baseline tune done. |
| 43:22 | Now at this particular point, this is where I would deviate a little bit from the procedure that we discuss and go through in the practical dyno tuning and practical road tuning courses. |
| 43:34 | Under these situations where we know we're going to be moving the cam timing around, I'll actually jump straight through and start focusing on wide open throttle running. |
| 43:44 | And the reason for that is we're not going to learn a lot about the cam performance if we start with doing our steady state tuning at part throttle and because we've just discussed any time we adjust our cam timing we're affecting the volumetric efficiency of the engine or in other words the airflow into the engine, what that's going to mean is when we've gone through, done all of our steady state tuning, finally got to our wide open throttle running and then realise that we need to adjust our cam timing, we're going to have to go back and redo all of that time consuming work with our steady state tuning over again. |
| 44:17 | So it pays to get our cam timing dialled in where we want under wide open throttle conditions, once we're happy with that we're happy with our compromises, then we can go back in the process and begin our steady state tuning. |
| 44:30 | So once we've got our baseline tune under wide open throttle, now we're actually going to start making some changes to our cam timing. |
| 44:37 | And initially what I recommend doing is making changes of 2° per adjustment. |
| 44:44 | Now if you're making really small changes of a degree of timing or less then it's probably going to be quite hard initially to see the effect of these when we're doing back to back tests so I find 2° is enough that you're actually going to get the effect of that change, you're going to see it on the dyno screen. |
| 45:04 | And while we're initially going to start with relatively coarse adjustments of 2°, once we start finding the trend of the direction we want to move, we're going to be abnle to start fine tuning those changes and maybe making smaller changes but initially what we really want to see is what the engine wants and we need to make a large change initially, 2° or so and that's going to let us quickly see whether we want to advance or retard the cam timing in order to get the power optimised where we want it in the powerband. |
| 45:40 | OK so what I would do is I'd start also with the intake cam, if we're tuning a double overhead cam engine, and I would leave the exhaust cam timing fixed initially. |
| 45:50 | Remember as I've already said, we're going to see the largest gains or changes in our power curve from the intake cam timing and much less generally from our exhaust cam timing so obviously it makes the most sense to make our adjustments or concentrate our efforts on the intake cam initially. |
| 46:09 | So every time we've made a change we need to then check our base ignition timing if we've got a cam angle sensor fitted to our cam as we've discussed. |
| 46:18 | Once we know that's right, we can then go through and rerun the car on the dyno and see what the effect of that change was. |
| 46:25 | Now when we're looking at this, when we're running it up, what we're looking for as well is the trend that we see in our air/fuel ratio. |
| 46:34 | So if we've run our base tune, we know our air/fuel ratio's perfect and then we make a change to our cam timing and we find that the air/fuel ratio has gone lean, this is generally indicative that we've improved the airflow, we've got more air moving into the engine, so as long as that lean mixture has occurred in the area we're interested in, this would be a positive effect. |
| 46:55 | So if we've got that lean air/fuel ratio, we may need to make changes to our fuelling in order to get us back in our ballpark. |
| 47:03 | So this is sort of a rinse and repeat process, we'll find that quite quickly we'll see whether we need to advance or retard the cam timing from our base timing position in order to move the power curve in the direction we want. |
| 47:20 | And once we've seen that trend we'll just simply continue to go in that direction until we get to a point where we're either decreasing our power or our power has plateaued. |
| 47:33 | Once we've done that, we can then begin the process on our exhaust cam and again we're just repeating the same process, we'll make changes of 2° at a time to our exhaust cam timing and see what effect that has in our powerband. |
| 47:48 | We can use the concepts that I discussed, the trends that I discussed earlier as to what we're likely to expect from making adjustments to our exhaust cam timing. |
| 47:59 | Because remember if we're making changes like this while we've got our intake cam timing fixed, we're essentially affecting our overlap period here so the period when the intake and exhaust valves are both open. |
| 48:12 | Once we've got the exhaust cam timing optimal, obviously we've moved the intake cam, we've moved the exhaust cam, there may be still some room for movement in advancing or retarding the cams overall so as a last step, I would tend to make a 2° advance and a 2° retard of both cams together and just see if I get any net gain from that procedure. |
| 48:38 | Once we're happy with everything, we can then complete our tune. |
| 48:43 | I'd also recommend strongly that once you're happy with where the cams are dialled in, that you remove the lock screws and apply a small dab of a loctite product to each screw one at a time. |
| 48:59 | This is just going to give you some more peace of mind that our cam timing isn't going to actually change once we jump off the dyno. |
| 49:06 | Obviously that's the last thing we want. |
| 49:08 | If our vernier cam gears come loose and we end up at full advance or full retard, we can easily end up with some carnage if we're very limited on our valve clearance from the get go. |
| 49:22 | OK I'll just go into some questions now, looks like we've got a few which is great. |
| 49:27 | First question comes from Viper, in case I don't cover it, if you were adjusting manually would you just turn the motor over by hand to make sure there's no interference between the valves and pistons? How do you allow for thermal expansion, valve float? I'm sure you'd also have to change the fuelling as you're changing VE but do you adjust timing to suit? OK a few questions in there, let's discuss the valve clearance problem to start with. |
| 49:51 | Unfortunately the only way to really confirm valve to piston clearance is during the assembly process. |
| 50:00 | Simply adjusting the cam timing and turning the engine over is not enough because as you've quite rightly mentioned there, we're not really accounting for the actual operating conditions so while thermal expansion is maybe not a big consideration, what we are going to see is at high RPM, a small amount of rod stretch, we're also seeing the piston rock very slightly in the bore around TDC which can influence the valve to piston clearance. |
| 50:30 | Likewise, a really large consideration is that we may end up with problems with valve float which can affect our running valve to piston clearance as opposed to what we check under static conditions. |
| 50:43 | This is really a bigger problem when we're talking about our exhaust valves because with the exhaust valves the piston is actually chasing the exhaust valves closed so the piston's moving towards TDC while the exhaust valve is closing so if the valve floats or is no longer controlled by the exhaust cam, this is the point where we can end up with the piston smacking the exhaust valve. |
| 51:06 | So yeah it's really important to check those clearances during assembly. |
| 51:10 | My own personal procedure is to use modelling clay or playdough and do a dummy assembly with the cams at the most advanced that I want to run and the most retarded that I want to run and just confirm what sort of clearance I've got. |
| 51:25 | Or alternatively that's going to guide me on how far I can move the cam. |
| 51:29 | I know this doesn't really answer the question, what do you do when you get a car that comes to you with vernier cam gears already fitted and you've got no idea. |
| 51:38 | In those instances we need to use a little bit of caution and generally in my experience as well, when we're tuning basic road going combinations, these are a little bit more forgiving, we're not going to be running a really radical cam profile and generally we're going to find that we can move the cam quite a long way and probably beyond where we'll actually need to run it before we strike problems. |
| 52:05 | Take that with a grain of salt though, I can't guarantee that obviously and you need to do your own checking and confirm and be happy with the decisions you're making, I can't make those decisions for you. |
| 52:17 | As for the fuelling and ignition timing, I think I touched on that but again just to really reiterate, what we're doing here is affecting the amount of air entering the cylinder. |
| 52:26 | Any time we adjust the amount of air, change the amount of air entering the cylinder, we almost certainly are going to need to adjust our fuel delivery to maintain our target air/fuel ratio and it also can affect the optimal ignition timing to achieve MBT so again iterative process, cam timing, fuelling, ignition, cam timing, fuelling ignition, we can't just adjust the cam timing and leave everything else running. |
| 52:55 | I will actually add though, if we are tuning an engine that uses a mass airflow sensor, some of what I've just talked about may not be 100% relevant because the mass airflow sensor is directly measuring airflow, mass airflow so hence the ECU in a mass airflow system will account to a reasonable degree for any increase in airflow and maintain a stable air/fuel ratio so obviously nine times out of 10 when we're doing this, we'll be working with a speed density type system. |
| 53:28 | Right, really long answer to your question there, looks like I've got one more from Viper though, say if you could turn it over by hand with 15° advance, would you then be confident that you could safely run 10°? Or are there just too many variables? Look that probably on its own, it's a reasonable assertion and I see where you're going with that. |
| 53:50 | It probably on its own is not enough, a common way of checking the valve to piston clearance without using playdough, it's not one that I personally use but what we can do is take the piston within 20° of TDC each side, during the overlap period and then what we can do is depress the valve so you have to have a way of physically moving the valve independent of the cam and this is going to give you the ability to check how much clearance you have before the valve actually contacts the piston. |
| 54:26 | You're not obviously seeing exactly what's going on like you do with playdough or modelling clay, that is a fairly common way a lot of engine builders use to check valve to piston clearance or how much additional tolerance you've got. |
| 54:41 | Generally I like to see a minimum of about 60 thou clearance, I'll talk in inches there, 60 thousandths of an inch clearance or 1.5 mm clearance on the intake valves and around about 80 thou or 2 mm on the exhaust side so that's just some rough guidelines there. |
| 55:02 | Barry G has asked, question, what impact does moving the cam timing have on the optimal ignition timing? Think I've just probably touched on that as well so yeah any time we're affecting the mass of fuel and air being combusted in the cylinder, it can affect the combustion process, combustion speed and hence the amount of ignition timing we need to reach MBT. |
| 55:25 | TDE Champ has asked, does turbo selection and exhaust back pressure come into play when considering how much valve overlap you'll try and use and scavenge? Yeah absolutely it's probably an area I haven't really touched on or definitely haven't really touched on in this webinar. |
| 55:40 | So yes the amount of back pressure we have, so essentially our turbo sizing in the turbine side of things, how much back pressure that creates will affect the amount of overlap the engine will want or how much overlap we can utilise and generally as we move to a tighter exhaust housing, we tend to see the engine is going to respond better and better with minimal overlap, particularly at high RPM. |
| 56:11 | As we move to a larger exhaust housing and there's less exhaust manifold pressure created, in that case, and I touched on this in our turbo webinar recently as well, what we find is that the engine starts actually responding a little bit more like a naturally aspirated engine and can benefit from some additional overlap so that is something to keep in the back of your mind. |
| 56:35 | Although generally I don't try and get too hung up on these sort of variables or trying to decide exactly how much overlap I've got. |
| 56:43 | Really, use the dyno and the results the dyno is showing you to guide you in your tuning. |
| 56:48 | It is always nice obviously to have some fundamental understanding of what's likely to occur. |
| 56:56 | Our next question is from Barry who's asked, what factors during an engine build can impact on the cam timing out of spec? Not quite sure I understand your question there. |
| 57:10 | The cam timing, during any engine build if I'm using vernier adjustable cam gears, I'm going to be adjusting or dialling in the cam so that when I start my tuning process, I know that my centrelines for the cam position are exactly what the cam sheet, cam spec say and one of the problems we see with a lot of the aftermarket vernier adjustable cam gears, particularly in modern years we've seen a drive to have a lot of these cam gears come out of Taiwan and China and the quality can be a little bit variable. |
| 57:46 | The problem with this is if we fit, take off a factory cam gear for example with a factory cam and we replace that with a vernier adjustable cam gear and we start with that set at 0 or our centre point, this doesn't necessarily mean we are going to have exactly the same cam centreline as what we had with the factory cam gear so that's why it's quite important to check. |
| 58:11 | Belotech's asked, the cam angle sensor or distributor type engines on the intake or exhaust cam, was my question, that affect the ignition timing? So yeah again hopefully I've covered that. |
| 58:22 | If you are running a cam angle sensor it's really critical to reconfirm your base ignition timing any time you make adjustments to the cam timing. |
| 58:32 | Now I'll just elaborate on that a little bit more, if you're using a crank trigger system and you're running a pickup off one of the cams for a synchronisation pulse, we also do need to be a little bit careful because it is possible if your location of your synchronisation pulse is a little marginal, getting close to one of the reference teeth on the crankshaft, it is possible that adjusting your cam timing can get you close enough that we may run into triggering issues. |
| 59:03 | So just be aware that's something you may need to consider. |
| 59:05 | Probably more of a consideration when we're talking about aftermarket trigger systems, less likely to be a scenario you'll be worried about with an OE trigger system. |
| 59:15 | Viper's asked, when I say to degree the cam first, if you're fitting a vernier cam wheel to a stock cam, will you not just lock the crank and cams in position, remove the stock cam pulley and fit the vernier so the starting point is the same as stock? Yeah possibly you could do that, you're going to need a way of really locking the cams up so they can't move. |
| 59:39 | In my experience, I don't know how realistic that is, what you've got to understand here is we're talking about very very fine movement so even a degree of camshaft movement or a couple of degrees of camshaft movement is going to affect the engine operation. |
| 59:53 | Of course if you're doing that, you've got a small amount of movement and you're then hitting the dyno to optimise it, that may not be a consideration but by far the most common reason for fitting vernier adjustable cam gears in my own work I guess has been to go along with a set of new aftermarket cams in which case we really have no starting point and it's important to begin by dialling in the cam centrelines. |
| 01:00:20 | TDE Champ's asked, when starting wide open throttle runs, I said do you still tune the ignition map flat or do we tune the ignition map as well? So really what I'm talking about here is just simply jumping ahead with our entire tuning. |
| 01:00:32 | We'll have started with a flat ignition timing map and really all we're going to do is focus on starting our tune with the wide open throttle areas and also I'll note at this point I'm probably not trying to be super fussy with my tune, I'm not going to be wasting a lot of time here on my initial tune getting the air/fuel ratio absolutely 100% spot on or getting the ignition timing absolutely perfectly tuned to MBT because I simply know that I'm going to be coming back and revisiting both the fuel and ignition timing multiple times so I'm trying to get my tune close and then I'm going to be making my adjustments to the cam timing. |
| 01:01:15 | Now I'll just elaborate on that aspect a little bit as well because while I've said it is an iterative process and every time we adjust our cam timing we may need to revisit our fuel and our ignition, particularly when it comes to the ignition timing, we tend to see that while yes we may need to make some changes if we've made a dramatic change to our cam timing, particularly as we make small adjustments of only perhaps 2°, our effect on our ignition timing or the need to change our ignition timing is much less. |
| 01:01:52 | So what I'm getting at here is if we've got a relatively close tune with our base cam timing position, our fuelling is in the ballpark, our ignition timing is reasonably close, we can often leave those relatively unchanged for a reasonable amount of cam movement before we have to go and adjust them so while we still might not have our ignition timing and fuelling optimal, if we've made a change to our cam timing and we see an improvement in power and torque in the area we're looking for, that's generally going to be a positive change regardless whether we have optimised our fuel and ignition or we've left it as it is. |
| 01:02:31 | So what we can do there is leave our tune broadly in the ballpark, get our cam timing close and then go through and optimise our fuel and ignition timing. |
| 01:02:42 | Just saves a little bit of time and again this comes back to a practical application as opposed to what we could do if we had all of the time in the world and this is really decision only you can make based on how long you're prepared to assign to the task of adjusting and dialling in the cam timing. |
| 01:03:04 | Belotech's asked, will it be OK to do the cam timing adjustment on a boosted engine on low boost for max engine output and when that's done, continue with the tune on higher boost levels? Look to a degree if we want to optimise the performance at high boost, that's really where we need to adjust our cam timing and the reason for this is on a turbocharged engine, what we're going to find is that when we raise the boost pressure, this is going to affect our exhaust back pressure and again that's going to affect the optimal cam timing. |
| 01:03:39 | Depending how far you're moving your boost pressure between low and high boost, this may or may not end up being a significant factor. |
| 01:03:48 | So for example if I was tuning an engine with a low boost at perhaps 16 psi and perhaps a high boost at 22 psi, I'd be probably more than happy there to optimise the cam timing at low boost where the engine's less stressed and then accept that what we see at high boost may not quite be optimal but there's a chance it's going to be really really close. |
| 01:04:15 | If on the other hand though we were tuning an engine that was perhaps used for drag applications and was running between say 20 psi and 50 or 60 psi, it would probably be pretty futile optimising our cam timing at low boost and expecting that to still be relevant at 60 psi, there's going to be such a dramatic difference in our exhaust manifold back pressure that what we learn at low boost probably isn't that useful at high boost and again here we need to make a compromise. |
| 01:04:47 | Dave Co Motorsports has asked what about a dual cam engine with a single cam gear, meaning two cams that are fixed internally. |
| 01:04:54 | Can adjusting the cam gear still have a positive impact? Or because both cams will be changed, is it counter productive? OK so really the examples that jump to my mind there would be the Toyota engines, 1UZ-FE for example where we have a scissor drive arrangement where we have a cam gear on one cam and then internally there is a helical drive that drives the other cam. |
| 01:05:20 | Now in this situation we're really no different than what I talked about with a single cam push rod style engine. |
| 01:05:29 | We're going to be adjusting the cam timing together, so we're going to be advancing and retarding essentially both the intake and exhaust cams together. |
| 01:05:38 | So there are still advantages to be had in doing this and we just need to understand that there's a compromise, we can't affect the lobe separation angle with this sort of system, we're going to retain the same amount of overlap and simply going to be rertarding and advancing the cams together. |
| 01:05:56 | This can still affect though, where abouts in our engine's rev range we're going to see maximum power and torque. |
| 01:06:05 | OK that's brought us to the end of our webinar and hopefully that's given you some more insight into an approach we can use when tuning an engine with vernier adjustable cam gears. |
| 01:06:15 | As usual, if you've got any further questions that come up after this webinar has aired, please ask them in the forum and I'll be happy to answer them there. |
| 01:06:25 | Until next time, look forward to seeing you in our next webinar, thanks guys. |


