133 | How to tune a turbo engine
Summary
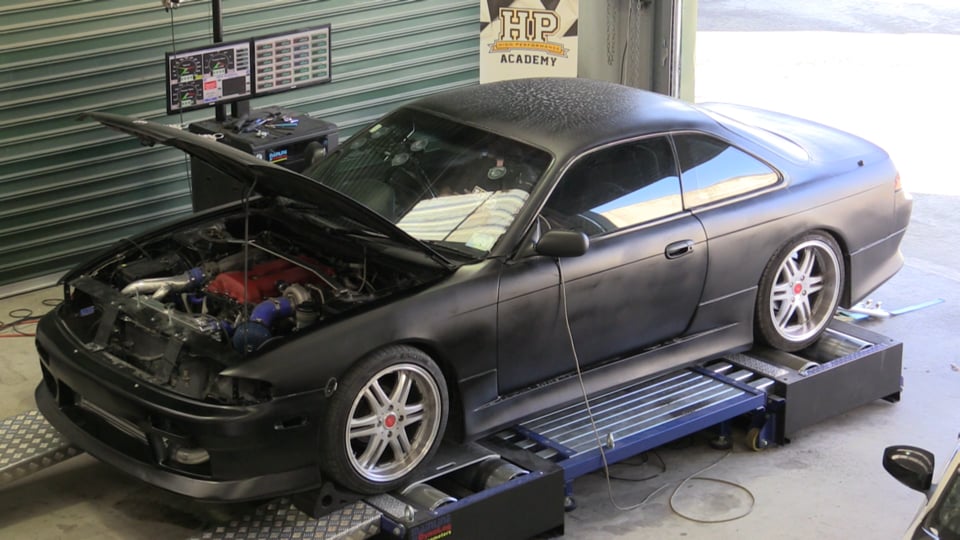
Tuning a turbocharged engine can seem daunting to those coming from a background of tuning naturally aspirated engines. in this webinar we’ll cover what you need to understand, as well as a step by step approach to the tuning process. For this webinar we will be using a Nissan Silvia S14 fitted with a Link G4+ ECU
| 00:00 | Hi guys, it's Andre from High Performance Academy. |
| 00:02 | Thanks for joining us for this webinar. |
| 00:04 | In this webinar we're going to be delving deep into the techniques that we can use for tuning a turbocharged car. |
| 00:10 | Now, for today's webinar in particular, we're going to be demonstrating these techniques on a Nissan S14 running a Nissan SR20DET two liter turbocharged engine, and the ECU fitted to this is a plug and play Link G4 Plus ECU. |
| 00:28 | While some of the techniques that we are going to be looking at are some of the specifics of the ECU really only applied to the Link G4 Plus brand, really a lot of what we're going to be focusing on, the fundamental principles behind the tuning techniques of course are going to apply regardless of what we are tuning. |
| 00:47 | Now, when we're talking about tuning turbocharged cars, I know that this does tend to scare off a lot of novice tuners. |
| 00:56 | They may be quite comfortable tuning a naturally aspirated engine, but the idea of tuning a high powered or even just a moderately powered turbocharged engine can seem a little bit daunting. |
| 01:08 | So, this webinar is really intended to show you that there is nothing to be afraid of. |
| 01:13 | I will give you some tools and techniques that you can use, and hopefully also a better understanding of what we're actually trying to achieve and how we need to go about it. |
| 01:23 | If you understand all of this, you're going to be able to get a better result faster. |
| 01:27 | And most importantly, without risking any potential damage to your engine. |
| 01:32 | Now, really when it comes down to tuning a turbocharged engine, fundamentally they aren't actually much different than a naturally aspirated engine. |
| 01:42 | Really what we're trying to do here is tune the fuel, optimize the fuel delivery to suit the amount of air entering the engine, the massive air entering the engine, and then of course choose or optimize the ignition timing. |
| 01:53 | So, we're creating the spark at the correct point in order to create maximum cylinder pressure at the optimum point in the engine cycle. |
| 02:02 | You remember, it's typically somewhere in the region of about 16 to 18 degrees after top dead center. |
| 02:08 | Now, of course there are some considerations to understand when we are dealing with a turbocharged engine in comparison to a naturally aspirated engine. |
| 02:19 | First of all, when we're talking about a turbocharged engine as we move into positive boost, what we can do is actually forget for a minute that we're typically using manifold pressure or boost pressure on our load axis on a standalone ECU. |
| 02:36 | Really the important aspect here is that as we move past 100 kPa, our atmospheric pressure, which is the maximum we can reach with a naturally aspirated engine, as we move up into the positive boost regions, what we're really doing is using that turbocharger simply to cram more air into our cylinders. |
| 02:54 | Now, if we understand that, then we can actually apply the trends that we should already understand in terms of what the engine is going to want with the fuel and ignition requirements. |
| 03:07 | So, this again, really, when we break it down, forget about the turbocharger for a minute, just think about what we're doing to the engine. |
| 03:13 | We're forcing more air into the cylinders. |
| 03:15 | So, this has two effects. |
| 03:16 | First of all, let's deal with the fuel delivery. |
| 03:19 | As we force more air into the cylinder, we're always adding more fuel to mix with that air anyway, even if we're targeting a fixed air fuel ratio. |
| 03:28 | But as we increase that airflow into the cylinder, what we're creating is more heat during the combustion process. |
| 03:35 | And remember that the heat is one of the aspects that can potentially be damaging to our engine. |
| 03:41 | So, as we increase the airflow into the engine, we tend to move towards a richer air fuel ratio target. |
| 03:49 | So, as we move from a naturally aspirated point, 100 kPa, up into positive boost pressure, because of the extra fuel in here that we're combusting inside the cylinder, we're going to naturally begin targeting a richer air fuel ratio the further we move into boost. |
| 04:05 | Now, that's not to say that we're indefinitely going to target richer and richer as our boost pressure increases. |
| 04:11 | What we find is that there is a kind of a limit of how rich we can really run the engine before our power really starts to taper off. |
| 04:20 | We may even run into problems with rich misfires. |
| 04:23 | But I'm going to talk in terms of lambda here on a pump fuel on a standard piston engine. |
| 04:31 | We may be targeting somewhere in the region of maybe 0.88 to 0.92 for a naturally aspirated engine at wide open throttle. |
| 04:41 | If we take a turbocharged engine, let's say we're running one bar around 15 psi of boost, we may go richer than that naturally aspirated target. |
| 04:49 | We may end up tuning in the region of perhaps 0.78 to maybe 0.82 lambda. |
| 04:55 | As we move further into positive boost, we may choose to move richer again. |
| 05:00 | So, that's one of our trends. |
| 05:01 | As we increase our boost pressure, really what we're doing is just forcing more air into the cylinders, hence we start targeting a richer air fuel ratio to help cool and control that combustion chamber temperature. |
| 05:13 | Now, let's talk about the ignition timing. |
| 05:14 | And really the trend we've got here is exactly the same again as what we see in a naturally aspirated engine. |
| 05:20 | As we move from low load, such as idle or light throttle cruise, through to wide open throttle or 100 kPa in a naturally aspirated engine, we tend to see the trend where our ignition timing is retarded. |
| 05:34 | Now, it's simply because at light throttle, we don't have a lot of air entering the engine. |
| 05:39 | We don't have a lot of air and fuel molecules inside the combustion chamber. |
| 05:43 | And the actual combustion process tends to be quite slow. |
| 05:47 | The speed that the flame front moves through the combustion chamber is relatively slow, relatively speaking anyway. |
| 05:53 | When we go to wide open throttle though, we're now got a lot more fuel and air molecules tightly packed inside the cylinder. |
| 05:59 | And the actual combustion speed increases. |
| 06:01 | The flame front moves faster through the cylinder. |
| 06:03 | It can combust all of that fuel and air much quicker. |
| 06:06 | So, naturally when the combustion speed increases, we don't need to have as much ignition advance. |
| 06:13 | We don't need to start the ignition event as early in order to achieve peak cylinder pressure at our optimum point. |
| 06:20 | Now, this process, this trend again continues as we move into positive boost pressure. |
| 06:25 | We're going to see a trend where as we increase our boost pressure, we tend to retard the timing. |
| 06:31 | Now, the other aspect that goes hand in hand with this of course is that particularly if we're dealing with a turbocharged engine running on pump fuel, we're very likely to find that that engine will be knock limited. |
| 06:43 | And what this means is that as we advance the timing towards MBT, we may find that we end up suffering from knock, detonation occurring before we actually reach MBT. |
| 06:55 | So, when we're on the dyno, we'll see that the torque figures are still increasing. |
| 06:59 | But if we're audibly listening for knock, we're going to find that the engine starts to detonate before we reach MBT. |
| 07:08 | And that of course becomes our threshold or our limit. |
| 07:11 | And in fact what we're going to want to do is retard the timing a little bit from that knock threshold just to provide a buffer, a safety margin. |
| 07:20 | Ok, so, really that's what I mean by the fundamentals. |
| 07:24 | If we understand what's happening inside the engine, then it's going to be much easier for you to get your head around what we need to do as we increase or decrease the boost pressure. |
| 07:36 | Let's jump across to my laptop screen for a moment. |
| 07:39 | And I've got on my screen at the moment the AFR target map. |
| 07:44 | Now, this is going to be familiar to any of you who have taken our understanding air fuel ratio course. |
| 07:50 | And what it does is it breaks down the operating regions of the engine into a few separate zones. |
| 07:56 | Now, on the vertical axis here, we have our manifold pressure. |
| 08:00 | Of course, that is common with standalone ECUs as our load axis. |
| 08:05 | So, it makes sense to look at that here. |
| 08:08 | We've got a line through here that I'm just putting in at 100 kPa. |
| 08:12 | Now, of course on a naturally aspirated engine, when we are at wide open throttle, this becomes our limit. |
| 08:18 | Our atmospheric pressure becomes the limit of the manifold pressure. |
| 08:23 | So, this means that under wide open throttle in a naturally aspirated engine, we are operating exclusively in this full load NA zone. |
| 08:35 | When we're talking about a turbocharged engine though, things become quite different. |
| 08:39 | And what I'm going to do is just start by drawing in a bit of an approximation of what a boost curve might look like for our engine. |
| 08:46 | Let's just run through like that. |
| 08:49 | And what we see now is that when we go to full throttle, we can move up into our boosted regions. |
| 08:57 | Obviously, how far we move into these boosted regions is going to depend on our turbo, our wastegate spring pressure, and of course what we're trying to achieve as well. |
| 09:05 | The key point here though to take away from our AFR target map is that the region that the engine is going to be operating in does change a little bit from naturally aspirated to a turbocharged engine. |
| 09:20 | We'll see we've got this region labeled cruise here. |
| 09:24 | It's obviously still really important regardless whether the engine is naturally aspirated or turbocharged. |
| 09:29 | We're going to be spending a lot of our time running in this area. |
| 09:32 | The other area though with a turbocharged engine, where we're going to be spending quite a bit of time is in this transition area. |
| 09:39 | We're not quite at full boost. |
| 09:41 | We may only be using as little as 25 to maybe 40% throttle. |
| 09:46 | And this is the sort of area that we're going to be operating or transitioning up into when we're maybe driving up a mild hill, maybe we're applying just a little bit of acceleration, a little bit of throttle in order to pass cars on the motorway, on the open road. |
| 10:01 | So, that's going to transition us up into the positive boost areas. |
| 10:05 | So, it's important to adjust our tuning techniques so that our air fuel ratio remains correct as we move into these regions. |
| 10:17 | So, what we're going to do now when we're moving into our steady state tuning process is we're going to be moving up into the positive boost regions. |
| 10:27 | So, when we're tuning a turbocharged car under steady state conditions, this is one of the aspects that I think tends to scare a lot of tuners off. |
| 10:36 | The engine can end up producing quite a lot more heat than a naturally aspirated engine, particularly around the exhaust system, the turbocharger exhaust housing and the exhaust manifold itself. |
| 10:47 | And when we are tuning on the dyno, which is what we're going to be looking at here today on our mainline chassis dyno, heat management, thermal management of the car is really one of our key aspects that we do need to keep our mind on. |
| 11:02 | And this really relates to a few separate aspects. |
| 11:05 | First of all, we have one of the most obvious, which is our engine coolant temperature. |
| 11:10 | We need to make sure that we're monitoring and keeping an eye on that. |
| 11:14 | It's very, very easy with a turbocharged car, particularly as we move up into the higher RPM regions when we're steady state tuning. |
| 11:23 | We're producing quite a lot of power, quite a lot of load on the engine, and this in turn results in the engine coolant temperature can climb quite quickly. |
| 11:32 | It's very easy to have our minds so focused on the task of actually optimizing the fuel or the ignition timing or both that we ignore the engine coolant temperature and it gets out of control. |
| 11:42 | So, we need to be very careful that we make a mental note to watch our engine coolant temperature, make sure that that is not getting too high. |
| 11:52 | The other aspect that's probably a little more subtle is watching our intake air temperature. |
| 11:58 | Again, when we're in positive boost pressure, we are creating heat out of the turbocharger. |
| 12:04 | The turbocharger by its very operation will be adding heat to the air as it compresses it. |
| 12:10 | Now, naturally we're probably going to have an intercooler fitted to the car, but particularly under sustained high load operation and steady state, or if we're doing back to back runs in ramp run modes on our dyno, what we can find is that we end up heat soaking that intercooler. |
| 12:28 | It's very difficult in a dyno cell to replicate the airflow that we're likely to see at maybe 60 to 100 mile an hour out on the open road. |
| 12:37 | And what this can mean is that the cooling available for the intercoolers is not as good as what we actually will see in the real world. |
| 12:46 | Now, while we do have air temperature compensation in our ECU, be that through a compensation table or directly in the fuel model, depending on how the ECU operates, what we really wanna do when we are tuning on the dyno is make sure that the conditions that we are tuning under are as realistic as possible. |
| 13:03 | The closer we can get our actual operating conditions on the dyno to what the car will see out in the real world, the better the results we're going to get, the better the accuracy of our tune. |
| 13:15 | So, it's really important to make sure we monitor that. |
| 13:18 | Now, in saying that, it's probably, we'll cover this a little bit further into the webinar where we move into ramp runs, but one of the tricks that I do use on a chassis dyno when I am tuning a turbocharged car using ramp runs is to keep a spray bottle of water handy. |
| 13:36 | And what I'll do is do a full power run on the dyno, ramp run on the dyno, and then I can spray water over the intercooler. |
| 13:43 | And that's going to help with the dyno fan still blowing on it, that's going to help pull heat out of that intercooler and helps give more consistency for the intake air temperature run to run. |
| 13:56 | Last aspect in terms of heat management that we need to probably keep an eye on as well, if we can, is our oil temperature. |
| 14:03 | This is less of a concern, and of course a lot of aftermarket ECUs won't be fitted with an oil temperature sensor. |
| 14:12 | But if you do have the ability to monitor that, it is something that is worth keeping an eye on as again, consistent steady state tuning under high load and high RPM will put a lot more heat into the oil, into the engine's oil. |
| 14:27 | And of course that can be dangerous if it gets out of control. |
| 14:32 | Okay, so let's move back to my laptop screen for a moment and we'll just again address this air fuel ratio target map. |
| 14:41 | And really when we are tuning, regardless whether it's naturally aspirated or turbocharged, supercharged, what we're really wanting to do is use the dyno in the smartest way possible to replicate the way the engine is going to run on the road. |
| 14:56 | And this is where we're breaking up our tuning process between steady state tuning and ramp runs. |
| 15:03 | What we really wanna do is steady state tune the fuel and ignition maps in the areas that the engine is actually going to be operating in steady state. |
| 15:12 | So, for example, typically if we go to wide open throttle, the engine's really not going to be in steady state because the engine's going to be producing more torque and power, it's going to be accelerating. |
| 15:23 | However, if we're at perhaps 15 to 20% throttle in a high gear, under cruise conditions, the engine torque will be such that the RPM stays relatively consistent. |
| 15:35 | So, under those conditions, we're going to be running in steady state conditions and that's how we're using the dyno. |
| 15:40 | So, again, just jumping back to this target map, we'll just draw in our boost line again. |
| 15:45 | For some reason, this time we've got a little bit more boost but that's just fine. |
| 15:49 | So, as I mentioned before, in a naturally aspirated engine, we are operating down in this cruise area. |
| 15:55 | We just want to extend the area that we're going to be focusing our main energies on up slightly into our positive boost area. |
| 16:04 | This is the area that the engine is going to spend the most amount of its time operating in when we're just cruising around or driving. |
| 16:13 | And it pays to spend our attention here on getting our fuel and ignition really accurately mapped. |
| 16:19 | This is going to pay dividends, because the car will be more responsive to throttle input, it's going to offer better fuel economy, lower emissions, just generally it's going to be a nicer car to drive. |
| 16:31 | The flip side of this is, just like with a naturally aspirated engine, there's less point spending our energy and time tuning at high RPM and low load. |
| 16:42 | The reason for this is we're not going to be driving there under steady state conditions. |
| 16:46 | The chances are we're only going to be transitioning through these areas and while obviously we still need numbers in the maps here that are at least in the ballpark, we certainly don't need to be as accurate there. |
| 17:00 | If anything, it's safer to be a little bit on the rich side. |
| 17:04 | So, an understanding again here of just what we're actually trying to achieve will allow us to do a better job. |
| 17:12 | Alright, let's look at where the engine will run at wide open throttle. |
| 17:16 | So, we've got, I'll just get rid of that line that we put in. |
| 17:19 | So, we've got with a turbocharged engine an unusual situation where we will be able to run at various different boost levels depending on what we're doing with our boost control. |
| 17:31 | So, the line that I've drawn in here may be our minimum boost pressure, this may be the wastegate spring pressure. |
| 17:37 | So, we can't physically lower the boost pressure any lower than this. |
| 17:41 | This will be dependent on the turbocharger system and the wastegate system. |
| 17:45 | However, of course we can then either electronically or pneumatically increase our boost target as well, our boost pressure. |
| 17:54 | So, with a turbocharged engine we do have this unique ability to run at multiple boost set points depending on what we're actually trying to do with the engine. |
| 18:03 | And as I mentioned earlier, we may choose to use a slightly different air fuel ratio lander target at each of these points. |
| 18:11 | You can see here for example our high boost setting, which I've drawn in at approximately 240 kPa. |
| 18:17 | You know we may want to be significantly richer at 240 kPa than what we'd wanting to be at 160 to 170 kPa. |
| 18:26 | There's physically more load on the engine, we are creating more heat in the combustion chamber and we need to manage and control that with our air fuel ratio. |
| 18:35 | So, it's another consideration. |
| 18:37 | Ok, now that we've got a little bit of an idea there of what we're trying to achieve with our air fuel ratio maps, what I'm going to do is jump into our G4 Plus tuning software. |
| 18:50 | And there's a few setups that we want to go through when we are tuning a turbocharged engine and a lot of these really are irrespective of the actual ECU that we are going to be tuning on. |
| 19:05 | Some of these are just common sense approach aspects that we really want to go through. |
| 19:09 | Just to give us some safeguards and make sure that while we're getting our initial tune set up and configured, that we're not going to end up with something silly happening that could potentially damage the engine. |
| 19:20 | So, one of the first points here is to start by setting a map limit or a manifold pressure limit. |
| 19:26 | So, let's just go into our map limit table in the G4 Plus. |
| 19:30 | And what we want to do here is set something sensible. |
| 19:35 | Particularly, if we're dealing with a car that we've never seen before, we don't have any real understanding of the parts fitted to it other than perhaps what the customer or owner has told us. |
| 19:45 | We really at some points have to take a bit of a stab in the dark here and make an educated guess. |
| 19:51 | So, what I've done here is set the map limit table everywhere right through the engine coolant temperature range to 220 kPa. |
| 20:00 | Now, an important aspect to keep in mind here that is really specific to the G4 Plus range of ECUs is the way that Link do their limiting. |
| 20:10 | This happens for both RPM as well as manifold pressure limits is that there is a control range. |
| 20:16 | By default for manifold pressure it's 20 kPa. |
| 20:20 | So, the ECU will actually begin soft limiting 20 kPa before the value in this table. |
| 20:27 | So, what I mean by this is we've got values of 220 kPa in our map limit table. |
| 20:32 | We'll actually begin getting a soft cut occurring at 200 kPa. |
| 20:37 | So, that's something that trips up a lot of Link tuners who aren't aware of this. |
| 20:42 | They're wondering why they're hitting a manifold pressure limit, map limit, when the actual manifold pressure they're seeing is still lower than this target. |
| 20:50 | It's all because of that control range. |
| 20:53 | Likewise, without getting too far away from what we're trying to talk about here, by default there is a 200 RPM control range on our rev limit. |
| 21:01 | It basically has exactly the same effect. |
| 21:05 | Ok, so, we've set a manifold pressure limit. |
| 21:07 | So, if during our first runs we find that the manifold pressure is going crazy, maybe there's a problem mechanically with our wastegate, with our boost control system, this is going to protect the engine. |
| 21:18 | So, we've got a safeguard in place straight away that's going to limit any potential damage. |
| 21:23 | At the same time we also want to begin by running on minimum boost pressure. |
| 21:29 | So, regardless of how our boost pressure is controlled, whether we're using the ECU to control boost pressure, whether we've got an electronic solenoid in there, or whether we're using a manual pneumatic bleed valve style of boost control, whatever we're doing there we want to make sure that for our first test runs on the dyno we are going to be seeing the minimum boost pressure that the engine can produce. |
| 21:52 | Again, what we're wanting to do here is just make sure that we're starting with the minimal amount of load on the engine, the safest possible configuration that we can get the engine into, and that is obviously at the lowest boost setting. |
| 22:04 | Once we've got everything tuned and calibrated there, then we can start increasing the boost pressure and starting to increase the load being placed on the engine. |
| 22:14 | Now, the other aspect of this as well is if we start by running on the wastegate spring pressure alone with no electronic control, it's going to give us a really good idea of what the base boost control for the engine is like. |
| 22:30 | This is going to give us some insight into whether or not we have any issues going on that may end up presenting themselves a little bit later on when we start trying to electronically manipulate the boost pressure. |
| 22:42 | Let's just jump across to our notepad here and I'll just give you a quick sort of idea of what that might look like, or the most typical ones. |
| 22:51 | Let's just try and draw a couple of lines here. |
| 22:54 | Ok, so, if we have RPM, wow, really wouldn't make an artist. |
| 23:01 | Lucky I'm good at tuning. |
| 23:03 | And we've got manifold pressure, yep, I can draw this I'm sure. |
| 23:09 | Ok, so, this is one of the most common scenarios that we're going to see as we run the car on the dyno. |
| 23:16 | What we're going to find is that as the RPM increases, we find that the boost climbs up and then the wastegate opens and we get boost control. |
| 23:24 | In the perfect world we are normally going to hope that at least on the wastegate spring, we end up with a relatively flat boost curve. |
| 23:31 | With a factory turbocharged car, what we'll find is because of the turbocharger sizing, we'll find that at high RPM because of the increasing exhaust back pressure, quite often the manifold pressure will actually fall over and start dropping away. |
| 23:44 | It's not necessarily a problem and as I say, this is a pretty common aspect with a factory turbocharger system. |
| 23:51 | More worrying though is when we get a situation where as RPM increases, we see the boost start to rise out of control. |
| 24:01 | This is normally indicative of a wastegate that is either too small or alternatively is located in a way that it really can't get good flow from the exhaust manifold. |
| 24:13 | Now, if we're seeing this sort of situation and it is bad enough, I have had problems with cars where by 7000 RPM, we're seeing that boost pressure end up at sort of 25 to 28 psi or more, albeit we may end up only seeing 15 or 16 psi down where the wastegate first opens. |
| 24:34 | In some situations we simply can't complete a tune on the car, it's not going to be safe to complete the tune on the car and the car will need to actually have some mechanical changes made to it. |
| 24:46 | So, as I say, if we're starting on a wastegate spring pressure, this is going to give us a really good idea of what we're dealing with to start with and in particular what it's going to do is stop you chasing your tail and wasting a lot of time trying to fix boost control problems electronically that you simply can't. |
| 25:03 | For example, contrary to some tuners belief, there is no way of reducing the boost pressure climb that we're seeing here if that's happening just because of a wastegate sizing problem or a wastegate location problem. |
| 25:18 | There's nothing we can do with the boost control settings in an ECU that is going to correct that. |
| 25:25 | Before we move on, I just want to make one more point here. |
| 25:27 | Again, if you're following our 10 step process, I recommend starting with a conservative, safe, and that means retarded ignition timing map. |
| 25:37 | The ignition timing map on a turbocharged engine, as we retard the timing, what it does is it creates a lot more exhaust gas temperature. |
| 25:46 | This provides more energy to the turbocharger so if you are running very, very retarded ignition timing, we may actually see a situation where we do get a little bit of boost creep at higher RPM and as you start optimising the ignition timing, advancing it towards MBT, what we'll actually find is that boost pressure drops back down again. |
| 26:07 | So, that's just one thing that we do need to keep in mind with regard to our ignition timing if you are starting with conservative, retarded ignition timing values. |
| 26:19 | Ok, let's move back into our G4 Plus. |
| 26:21 | I've just got the engine up and running here so we're just sitting here at idle and what we've got, this particular ECU doesn't have onboard lambda going into it. |
| 26:32 | So, Colin has just transposed the air fuel ratio lambda data from the dyno on top of the screen so you can see both our lambda target value below and hopefully you'll be able to see our actual lambda value directly above that. |
| 26:50 | OK, so as well as our map limit and our boost control strategy, I should also mention there's a few ways of getting our boost pressure down to our minimum setting. |
| 27:02 | We can physically set, physically disconnect the boost control solenoid if we're running electronic control or alternatively, we can set our boost control tables in our ECU to zero to start with. |
| 27:15 | It doesn't really matter as long as you understand what you're trying to achieve and know what that's going to achieve, what that's going to do to your tuning, to your boost control. |
| 27:26 | Now, the other thing that we need to understand here is if we go into our fuel main menu, for this particular car, because we don't have any real data on the injectors, I am running in the traditional fuel mode in the G4 Plus. |
| 27:42 | So, essentially the main fuel table is a millisecond based fuel table now. |
| 27:48 | Or what it's doing is providing a percentage of our master fuel value here of 12 milliseconds. |
| 27:57 | In the G4 Plus we also do have this background fuel or load equation mode as well. |
| 28:03 | You see that that says load equals map. |
| 28:06 | It's important just to have an idea of what that does. |
| 28:08 | So, it does a background adjustment to the final injector pulse width being delivered to the injectors. |
| 28:16 | So, what this does is it works on the principle that as we double the manifold pressure, we need to double the injector pulse width in order to maintain a consistent air fuel ratio. |
| 28:29 | So, the numbers in this table here, what they actually mean is that if we have a number of 100% at 100 kPa or atmospheric pressure, then we will end up with our master injector pulse width of 12 milliseconds being supplied through to the injectors before any background compensations are applied. |
| 28:53 | And then as our manifold pressure varies, the ECU is automatically reducing or increasing the injector pulse width to suit. |
| 29:01 | Now, another really important aspect if we are using the traditional fuel equation is the interaction of our open loop lambda table or our overlay table, which we can see here. |
| 29:15 | We've got two of these options here, open loop lambda table and lambda target table overlay. |
| 29:20 | You'll see that I've got both of these off and really whether you choose to use these is a personal preference aspect. |
| 29:27 | For this case, I am choosing to leave them turned off. |
| 29:30 | We do need to understand how that's going to affect our tuning. |
| 29:34 | Let's go through to our AFR lambda target table and we'll have a look at that. |
| 29:39 | So, we've got a conventional lambda target table and regardless really whether we are using that overlay table or not, I'd really recommend filling this in with our realistic lambda target value, something that's sensible and what we actually want to be targeting. |
| 29:58 | Now, if you are using the lambda target overlay, that function is turned on, then the ECU will make changes to the final injector pulse width based on the numbers in this table. |
| 30:11 | So, I like to think of this as Lynx's sort of pseudo volumetric efficiency method of tuning before they actually brought out their model fuel equation, which is a proper VE fuel model. |
| 30:23 | So, essentially with this, if you've got the overlay table turned on, if you tune your fuel table so that your measured air fuel ratio matches your target, then just like a VE based fuel model, if you make changes to the AFR targets, then the measured air fuel ratio should also track those changes pretty accurately. |
| 30:44 | So, that's just something to keep in mind. |
| 30:46 | If we've got it turned off like I have now, it's not going to have any effect on our actual tuning with the exception if we're using closed loop lambda control. |
| 30:54 | So, just really important to understand that. |
| 30:56 | If we turn it on, what it has the effect of doing is flattening our fuel table. |
| 31:02 | So, our fuel table shape just ends up a little bit flatter because we're not required to compensate for different air fuel ratio targets in our main fuel table itself. |
| 31:14 | Okay, so let's have a look at our steady state tuning process. |
| 31:18 | What I've done, as we'll jump back to our fuel table, what I've done is I've started with some pretty conservative ignition values in there. |
| 31:24 | We're going to focus on our fuel table for a start. |
| 31:27 | So, let's just get our engine up and running here. |
| 31:31 | And what we're going to do is go through to 2,500 RPM, where we can get into positive boost pressure. |
| 31:43 | Let's come up to 2,500 RPM. |
| 31:45 | So, right now, you can see that I'm sitting just about at minus 40 kPa here. |
| 31:53 | And at the moment, my lambda is just marginally leaner than my target of lambda one. |
| 32:01 | We're sitting about 1.01, 1.02. |
| 32:06 | So, just like if we were tuning a naturally aspirated engine, we're just going to add a small amount to that particular cell in the fuel table. |
| 32:14 | And we're right on our target now. |
| 32:16 | Now, we can increase our throttle opening. |
| 32:18 | We'll move up to our minus 20 kPa target. |
| 32:22 | Pretty well on our target there. |
| 32:24 | I'll just remove a little bit of fuel. |
| 32:26 | We're right on our target of lambda one. |
| 32:29 | And all I'm doing is just referencing the AFR lambda target value there is coming simply from that AFR lambda target map that we've already looked at. |
| 32:39 | Ok, so we'll come up to zero kPa now. |
| 32:42 | And we see that our lambda target's sitting around about 0.975. |
| 32:46 | We're actually pretty much right on our target. |
| 32:49 | Now, this is an aspect that is also important to understand. |
| 32:53 | If we're running a naturally aspirated engine right now, we would be at wide open throttle. |
| 32:57 | And we'd probably be targeting maybe 0.88 lambda, maybe 0.90, somewhere in that region. |
| 33:05 | Now, you'll notice that if we look at my throttle position, we've achieved zero kPa there, or 100 kPa atmospheric pressure, with just 28% throttle. |
| 33:16 | So, we've really barely got the throttle open. |
| 33:19 | So, ultimately, the amount of fuel and air being combusted at the moment is still not really that massive. |
| 33:27 | So, you can see that that's why my lambda target at the moment is sitting at 0.96, 0.97. |
| 33:34 | So, our actual lambda target that I'm using here, during those transition areas in the AFR target map is quite a bit leaner than what we'd use on a naturally aspirated engine, let's just go across and look at that. |
| 33:48 | So, 100 kPa here, you can see that I'm targeting 0.95 lambda. |
| 33:54 | So, just an important aspect there, particularly because you're going to be operating in this region quite a lot, in the cruise areas, you want to make sure that your targets there are a little bit leaner than what you would use on a naturally aspirated engine, otherwise you're going to be affecting your fuel economy. |
| 34:14 | Okay, so now I'm just going to increase my throttle and we're coming up to 20 kPa of positive boost pressure now so we're actually up into the positive boost areas. |
| 34:24 | Again, our air fuel ratio, our measured lambda is pretty close to my target of 0.918. |
| 34:32 | We'll just move here around a little bit, I'll just remove a touch of fuel. |
| 34:35 | And we'll just move up. |
| 34:36 | Okay, at this point, I am now at wide open throttle. |
| 34:40 | You can see my throttle position, all the way at wide open throttle. |
| 34:44 | And this is the part that a lot of tuners get a little bit scared about. |
| 34:48 | We're now in positive boost pressure at steady state, wide open throttle, and you can see that it really is not a concern for the engine. |
| 34:55 | You'll understand that right now at 2500 RPM, the actual amount of power that we're producing is still relatively low, we're at 240 newton metres, or 23 odd kilowatts, so the engine isn't really producing a huge amount of power, and that's really what we're considering. |
| 35:12 | Of course, normally I would also be monitoring for knock during this process, but at the moment I know that the ignition table is conservative so I don't need to worry about that. |
| 35:21 | So, we've tuned that zone already, as you can see we're right on our target. |
| 35:26 | So, really, that's the process we're going to go through with our steady state fuel and ignition tuning. |
| 35:32 | The ignition tuning's exactly the same. |
| 35:33 | We're of course just looking at our torque plot on the dyno as opposed to our air fuel ratio. |
| 35:40 | Now, what we're going to do is increase our engine RPM now, we'll go all the way out to 4000 RPM. |
| 35:49 | Now, this is where things do start changing a little bit. |
| 35:51 | As I said, thermal management is one of our biggest concerns when we are tuning a turbocharged engine. |
| 35:58 | And while at 2500 RPM, we are producing a huge amount of load, we are producing a huge amount of power. |
| 36:06 | When we start increasing our engine RPM, of course everything does increase in terms of the amount of stress and load and heat being placed on the engine. |
| 36:17 | So, we're sitting there at zero kPa at the moment. |
| 36:22 | A technique that we can use here, if we've got an engine that's really struggling to maintain temperature, is what we can do is go into load for a little bit, look at our air fuel ratio, or if we're tuning our ignition timing, look at the torque value, and then before we make a change, rather than making a change while we're in that zone, we can back off the throttle, back to a lower load point where there's not so much stress being placed on the engine, and we can make that change and then we can go back and have a look. |
| 36:51 | So, let's have a look at that process now. |
| 36:52 | Let's tune our 20 kPa 4000 RPM site. |
| 36:57 | So, I'm just going to increase my throttle. |
| 37:01 | Right, I'm in the middle of that site now. |
| 37:03 | I'm looking at my measured lambda, you can see we're sitting about 0.82, and our actual target was 0.92. |
| 37:12 | So, now I've had a look at that, I know what my air fuel ratio was, I've now reduced the throttle, we're back down into vacuum, there's less stress being placed on the engine and we're comfortable. |
| 37:23 | There's a few ways we can make these changes. |
| 37:25 | What I'm going to do is just bring up our calculator, and using the correction equation that we found in our EFI tuning fundamentals course, we can calculate a correction factor to apply there. |
| 37:38 | So, you remember that's just our measured, in that case it was 0.82, divided by our target, which was 0.92. |
| 37:46 | So, what we need to do there is multiply the value in our table by 0.89, essentially we're removing 11% fuel. |
| 37:53 | So, let's do that now, we'll multiply by 0.89. |
| 37:57 | Ok, so, we've made that change without the engine actually being under any load or any stress. |
| 38:02 | We'll just go back in now, come back into that site, and we're still marginally rich, we're sitting at 0.89, 0.90, but you can see we're much closer to our target. |
| 38:17 | So, we don't actually have to place the engine under sustained high load in order to make our tuning changes. |
| 38:23 | We can go into a zone, look at what our air fuel ratio is, come back out and then make any adjustments before finally going back and having a look and making sure that correction was effective. |
| 38:34 | This is a much safer way of tuning. |
| 38:36 | Now, likewise when we are moving into untuned zones, we do need to be a little bit sensible about how to approach those. |
| 38:46 | Of course, the tuning envelope if you like is a little bit tighter on a turbocharged engine in terms of giving the engine a safe air fuel ratio, safe ignition timing that's not going to damage it. |
| 38:58 | So, if we tune a zone, increase the load, and then find that the air fuel ratio is lean, we're much safer to drop the throttle position again, come back out of that zone, make the necessary changes, in other words add some fuel to it, and then go back and have another look. |
| 39:14 | Rather than sitting there with the engine running leaner than ideal while we slowly go about increasing the fuel and getting that on point. |
| 39:21 | So, that's something to consider there. |
| 39:23 | Likewise obviously if we move into an untuned ignition zone as we're increasing the load, we find that the engine is starting to suffer from knock, we're much better to reduce the throttle position, get rid of that knock, we can then reduce the timing and go back and have another look. |
| 39:39 | Ok, so, the process that I recommend is our steady state tuning out to around 2 3rds of our engine rev limiter. |
| 39:45 | So, in this case we'd do this out to around 4 1⁄2 thousand RPM. |
| 39:49 | So, we are here going all the way up to our wastegate spring pressure in steady state. |
| 39:55 | Essentially, we're treating the engine just like it's naturally aspirated, although obviously our target air fuel ratios are going to be different. |
| 40:02 | Once we've done that we can then transition across to doing some ramp runs, and we're going to have a look at one of those now. |
| 40:09 | Now, once we do transition through to doing ramp runs, of course we should find that our air fuel ratio is already pretty close to the target that we're expecting. |
| 40:18 | We should also find that our ignition timing is relatively close. |
| 40:23 | Part of the 10 step process before we go and start doing this, I always recommend adding a little bit of extra fuel and removing just a little bit of extra timing from those wide open throttle operating areas so we can just creep up on our tune. |
| 40:35 | It's always safest to start a little rich and a little bit retarded in terms of our ignition timing rather than the other way around and be over advanced or a little bit lean. |
| 40:46 | So, what we're going to do now is we'll just start our link logging. |
| 40:49 | I'll get back into fourth gear here on the dyno, and we're going to do a single wide open throttle ramp run and see how we can use that data to help us. |
| 40:58 | So, let's jump across to the dyno screen and we'll watch this ramp run. |
| 41:02 | For this purpose we're only going to go out to about 5000 RPM. |
| 41:05 | It's going to give us enough data to see the process. |
| 41:23 | Okay, so that's our little ramp run complete there and we've got a fairly uninspiring 175 horsepower at the wheels, 130 kilowatts. |
| 41:31 | So, our top line there is our lambda plot and we can see that our middle line is our manifold pressure obviously our power line at the bottom. |
| 41:40 | We can see that our air fuel ratio plot, we started up around about 0.96, 0.97 when at the beginning of the run we've essentially got very little boost, only about one psi, one and a half psi. |
| 41:52 | As we see the boost increase, we see our measured lambda start to drop richer and then at the point where we actually hit the wastegate spring pressure, in this case 10 psi, we'll just save that so we can actually go back and have a look at it, we saw that the lambda met our target. |
| 42:14 | Sorry, I'm just having a few technical problems. |
| 42:16 | Right, there we go. |
| 42:18 | Yeah, we can see that where we reach our peak boost pressure, our wastegate spring pressure around about 10 psi, we see that we've come down to our target of about 0.80. |
| 42:28 | And of course we can see we've got this little lean area here around about 4, 6, 4, 750 RPM. |
| 42:35 | So, the process here again is really the same as what we apply when we are tuning a naturally aspirated engine. |
| 42:42 | What we're doing is using the feedback from the dyno to first of all adjust our fueling. |
| 42:46 | Any areas that are rich or any areas that are lean, we're going to go through and correct those in the fuel map. |
| 42:54 | Once we've done that, then we can go ahead and optimise our ignition timing. |
| 42:58 | Now, what we've done here once we've completed our ramp run tuning and our steady state tuning is we've got a complete fuel and ignition map built up for our engine at our wastegate spring pressure level. |
| 43:10 | Once we've done this though, normally what we're going to want to do is start increasing the boost pressure. |
| 43:16 | And before we do that, what we can do is extrapolate the results that we're seeing out into the higher boost areas. |
| 43:24 | So, by looking at the trends in our fuel and our ignition maps, we can then copy those trends out into those untuned areas. |
| 43:33 | So, let's just jump back into our laptop screen here. |
| 43:36 | And for example, on our fuel table here, we're running approximately through, I'll try and draw that a little bit nicer, we're running approximately through this sort of 60 kPa zone here. |
| 43:49 | We're probably transitioning up towards the 80 kPa zone, so we're probably sort of interpolating between these two rows. |
| 43:57 | So, what we can do though is have a look at the shape of the numbers in this table across the areas that we have tuned. |
| 44:04 | So, for example here, we've got a value at 40 kPa of 60.4%. |
| 44:10 | As we've moved up, we've got a value at 60 kPa of 62.4, then a value at 80 kPa of 64.4. |
| 44:17 | Now, this is as far as we would have really tuned under ramp run conditions and steady state conditions. |
| 44:23 | Chances are though, we may wanna end up running at 100 or 120 or 140 kPa of boost pressure, so what we can do is extrapolate that shape up into those untuned areas. |
| 44:34 | Now, you can see we've essentially been going up about 2% in that fuel table per 20 kPa. |
| 44:39 | And I've just continued that trend here, so we've got values of 66.4 and 68.4%. |
| 44:46 | So, essentially once we've got a tuned row, let's say we've tuned our 80 kPa row, what we can do in the G4 Plus software is highlight that entire row, use the control and up arrow to copy that up into the next column, and then all I'm going to do is follow that trend, which we know we're adding around about 2% of fuel. |
| 45:06 | Now, that's not necessarily going to be 100% perfect, and particularly if we're tuning on a VE based fuel model, contrary to popular belief, we don't see the VE numbers continue to increase indefinitely as we increase our boost pressure. |
| 45:21 | The actual manifold pressure is accounted for in the main fuel equation, so in the VE table itself, all we're really doing is accounting for changes in the engine's volumetric efficiency. |
| 45:33 | So, what we tend to see is as we start to go from zero kPa up into positive boost, we'll generally see those VE numbers climb initially, climb quite sharply. |
| 45:44 | But as we continue to increase the boost pressure, those VE numbers will then plateau, and if we actually continue to increase the boost pressure beyond the sort of happy operating point or the efficient point of the turbocharger, we'll actually start to see the fuel table nose over, the VE table nose over and start dropping off. |
| 46:01 | Of course,, as I've mentioned though, it's always safest to start with a little bit more fuel, be a little bit richer than we want, and then we can remove that once we start doing ramp runs at higher boost. |
| 46:13 | Likewise, if we just jump across to our ignition table, again, we would have been running through around about the 170 kPa point here, so we're sort of again interpolating between two rows in our table, but we're doing exactly the same thing once we've got a complete developed ignition map, , which I'll say right now, that's not what we've got here, this is just a safe starting point for us to tune from. |
| 46:40 | What we would do is take the same trends that we're seeing in that table and extrapolate them up into those untuned areas, so in this case, we've gone sort of from 17 to 14, so we've made a three degree change. |
| 46:52 | We've gone from 14 to 12, so we've made a two degree change, and then from 12 down to nine, so a three degree change there. |
| 46:59 | So, again, what we can do there is highlight the entire row, control and up arrow, and then minus, let's say minus three, we don't wanna add any timing, and the same again. |
| 47:12 | So, that's just going to extrapolate that trend out. |
| 47:15 | Once we've done that extrapolation, the next step of our tuning process is to increase the boost pressure, and then we can optimise our tuning. |
| 47:24 | And what I generally try and do here is make small adjustments. |
| 47:27 | Our tables at this point are set up in 20 kPa increments, and that's a nice place to sort of be jumping our boost pressure. |
| 47:34 | What it's going to mean is that you're going to get quite a good feel for what changes need to be made to fuel and ignition timing as we increase the boost pressure. |
| 47:44 | Right now we've just extrapolated those numbers and taken a really broad guess. |
| 47:49 | As we move into the next untuned area, , which in this case might be 200 kPa, we can fine tune that guess, and then further extrapolate those new values out to 220 kPa. |
| 48:00 | So, all the time we're sort of taking the information that we've learned and fine tuning our guesses out into those untuned areas, and the idea behind doing this is twofold. |
| 48:10 | First of all, it's going to mean that when we do move into an untuned area, we should already be very close. |
| 48:15 | So, this is going to reduce the chance of doing damage to the engine. |
| 48:20 | Also from a commercial aspect, if we're tuning cars for a living, it's going to mean that it's going to reduce our time spent on the dyno. |
| 48:28 | The tune should already be really close, so we don't need to spend as much time, do as many runs, getting everything optimised there. |
| 48:37 | The other thing that is advisable, it's something I've always incorporated in my own ignition maps, particularly if we're running on pump gas where we know that the engine is going to be heavily knock limited, is right at the higher limits beyond where I actually expect the engine to run. |
| 48:54 | So, let's say in this case, we're only ever expecting to run a maximum boost pressure, I'll try and draw that a little bit nicer, maximum boost pressure of 180 kPa. |
| 49:05 | It's possible that on a slight over boost when we come into a gear onto the throttle, we might end up jumping up slightly into this 200 kPa road briefly, but we certainly wouldn't expect to be hitting 220 kPa. |
| 49:18 | So, what we can do here just to safeguard the engine is remove further timing at 220 kPa. |
| 49:25 | So, we're going to end up with quite a sharp drop off. |
| 49:27 | And this just means that if something fails mechanically, we've got obviously our manifold boost, our manifold pressure limit to protect the engine, but we've also got the timing that we're pulling out there at that area so that we're less likely to end up resulting in detonation when we do this. |
| 49:42 | Okay, so the tuning process when we are increasing the boost pressure, particularly on pump fuel, is you're very likely to find that you get to a point where you start going around in circles, adding boost, but ending up with more detonation occurring because of the spiraling increasing combustion chamber temperatures, the combustion temperature promotes detonation. |
| 50:07 | So, in order to reduce that, we tend to have to pull timing out, retard the timing. |
| 50:13 | So, you tend to go around in a circle, adding boost, removing timing, and kind of putting a whole lot more stress and load on the engine, and kind of achieving the same ultimate power level. |
| 50:22 | So, this is a really good guide when you start getting to the point where your ignition table is starting to nose over quite sharply and you're starting to have to pull a lot of timing as you increase the boost pressure, but you're not seeing any gain in power. |
| 50:36 | That's a pretty good indication, unless you've got a very specific reason to keep fighting and pushing forward, you're probably best to leave the maximum boost pressure set at that point. |
| 50:48 | There's really minimal amounts to be gained, and again, you're just putting a lot more heat stress and load onto the engine for no real benefit. |
| 50:56 | Ok, we're going to move into questions and answers shortly, but I just want to cover off one more aspect here, which is, again, this is probably a slightly more advanced technique. |
| 51:09 | We're dealing with a car that is going to be running very high boost pressure, and we are starting with a very, very stiff wastegate spring that might end up giving us maybe 20 or maybe 25 psi of wastegate spring pressure, so that's the minimum boost pressure we can run. |
| 51:29 | We may find this situation in cars that we really want to run very high boost pressure, maybe on ethanol blended or race fuels, or in drag applications as well. |
| 51:41 | Now,, let's jump across to my laptop screen, and this gives us a slightly unique situation. |
| 51:45 | I'll just again draw this sort of boost curve that we might expect to see here on our screen, and we'll come up somewhere around about here. |
| 51:58 | Ok, so that might approximate what we're likely to see. |
| 52:02 | Actually, no, I'm going to draw that a little bit lower down so we're seeing peak boost a little bit sooner. |
| 52:09 | Right. |
| 52:11 | Now, under these situations, we can modify our technique a little bit. |
| 52:17 | The steady state tuning technique is not strictly necessary to cover in all of the area underneath that boost curve because what we're going to find is that the area that the engine actually is going to operate in under steady state conditions is much more defined or restricted than that. |
| 52:35 | We're going to find that under steady state conditions, we're probably going to end up operating in this area. |
| 52:41 | So, this is where we again need to spend most of our time. |
| 52:44 | The reason for this is this is the area we're going to operate in when we're applying a little bit more throttle going up a hill like I've already mentioned or trying to pass. |
| 52:53 | With a high boost situation like this, what we're going to find is as we get to maybe three and a half thousand RPM, so in this vicinity here, if we apply more throttle, what we find is that the turbocharger builds boost very, very quickly. |
| 53:08 | So,, it tends to transition from 150, 160 kPa up to 250, 260 kPa very, very quickly. |
| 53:16 | Makes it all but impossible to actually operate in this higher boost area in steady state. |
| 53:21 | So, how do we approach this tuning technique? This is a little bit scary as I've sort of touched on because what we're going to do is use a combination of our steady state tuning technique. |
| 53:33 | We're also going to go straight to doing some wide open throttle ramp runs. |
| 53:37 | So, here, what I'd suggest is doing our steady state tuning up to perhaps 150 to 170 kPa. |
| 53:44 | And you will find that there is a point where it's almost impossible to hold the boost pressure really stable, as I've said, as we add more throttle, the turbocharger tends to spool very quickly and it will increase boost pressure even as we maintain a constant throttle position. |
| 54:00 | So, we're going to steady state tune that area of the map and we can transition to doing some wide open throttle ramp runs. |
| 54:07 | Now, of course, under this situation, we don't really know what our numbers are going to be in our fuel and ignition maps at maximum boost, or sorry, our wastegate spring pressure boost level at 3,500, 4,000 RPM. |
| 54:20 | So, what we want to do here is start by doing small ramp runs. |
| 54:24 | We may do a ramp run from perhaps 1,500 RPM out to 2,500 RPM. |
| 54:29 | Now, that's going to give us a little bit of a snapshot of what's going to happen in that untuned area and we're going to be able to follow that trend that we're seeing, slowly increase our ramp runs 500 RPM at a time until we've got out to a point where we can run right the way through the rev range. |
| 54:46 | So, that's going to give us a situation where we've got our engine tuned broadly at wide open throttle and we're also going to be tuned under steady state conditions down here. |
| 54:58 | And, of course, we've got this area in between that isn't tuned. |
| 55:02 | So, the way I'm going to deal with that is because we expect to see our VE numbers or fuel table numbers move reasonably smoothly, what we can do is simply interpolate our values between these two bounds and that's going to give us numbers that, while they may not be pinpoint accurate, because we're not operating in steady state conditions in that area, we're going to be definitely close enough to get through. |
| 55:30 | Alright, so, this is starting to get a little long here, so I'll just really quickly cover off the six steps of that process that we've gone through and we'll jump into questions. |
| 55:41 | So, the first step is to make sure that we've got our boost control system set to minimum boost and we've got a map limit set up so that we've got some protection in case something goes wrong. |
| 55:51 | We're going to steady state tune our fuel and ignition exactly like we would for a naturally aspirated engine, albeit with, obviously, our modified air fuel ratio targets. |
| 56:01 | We're then going to start moving into wastegate boost pressure runs, the ramp run conditions on the dyno, and we're going to tune and optimise that fuel and ignition under that minimum boost pressure condition. |
| 56:13 | We're going to then extrapolate the results that we're seeing for both fuel and ignition out into those untuned areas. |
| 56:20 | Then we're going to begin slowly raising our boost pressure before fine tuning those areas as we increase the boost and move further out into the untuned zones. |
| 56:30 | Finally, if we're tuning a high boost application where we've jumped straight ahead and gone to wide open throttle, or alternatively, if we're making quite large increases in our boost pressure, maybe we're jumping across rows for fuel and ignition, we can choose to interpolate between those zones because, again, we're expecting the fuel and ignition numbers should have a relatively smooth and consistent shape to the maps. |
| 56:55 | Ok, let's move into some questions here and we'll see what we've got. |
| 57:01 | Corey has asked, "Do the same fundamentals apply to a supercharged application being that the boost is fixed?". |
| 57:08 | So, Corey was talking there about the point where I was explaining the air fuel ratio target map diagram. |
| 57:14 | So, yeah, absolutely they do. |
| 57:16 | So, while the boost pressure from a supercharger is fixed, what we will still see is very much the same boost response or boost curve relative to throttle position. |
| 57:28 | What I mean by this is with a supercharger, regardless whether it is a positive displacement style supercharger or it's centrifugal, if we go to 2,500, 3,000 RPM steady state on the dyno and start at minimal throttle position, we're going to be in vacuum, just like a turbocharger application. |
| 57:47 | And then as we slowly increase the throttle, we're going to move into boost pressure. |
| 57:51 | Of course, with a supercharger, we generally don't have the luxury of being able to tune at multiple boost set points. |
| 57:58 | Our boost is set by the speed that the supercharger is being spun, so that kind of limits where we're going to be. |
| 58:05 | So, if anything, it simplifies the process because we are only tuning at one set point. |
| 58:10 | Tyler's asked, "Could you also limit your boost by using wastegate control as well instead of the map limit table?". |
| 58:17 | So, two aspects here. |
| 58:18 | The map limit table I'm using is a safety backstop in case there is something wrong. |
| 58:22 | So, this is going to provide a hard cut for either fuel or ignition, depending on how we've got that set up. |
| 58:29 | If something is mechanically wrong and honestly, the number of times a car comes into me for a tune where another, the owner or another workshop has fitted a boost controller, I'm going to say right here that probably 90% of the time that boost control system is installed incorrectly. |
| 58:48 | I don't know why it's so hard for people to get their head around. |
| 58:51 | I believe it's really a simple system if you understand what's going on, but I guess that points to the fact that probably most people don't understand it. |
| 59:00 | And yeah, if you've got that situation, you can think you've done everything correctly in terms of reducing the boost pressure, but because the system's plumbed wrong, you're going to end up with maximum boost, and that's where that map limit table is hopefully going to save you. |
| 59:16 | Matt has asked, "I'm curious about this one, map drops at high RPM with a factory small turbo due to exhaust pressure. |
| 59:22 | Is it exhaust back pressure or the compressor running out of flow?". |
| 59:27 | Ok, so normally what that is caused by is the small exhaust side of the turbocharger, and what happens if we're looking at the exhaust manifold back pressure, so the pressure measured pre-turbine housing, with a factory turbocharger, it's not uncommon to see that reach somewhere as high as perhaps double boost pressure. |
| 59:47 | That means as if we've got 15 psi of boost pressure in the inlet manifold, we can easily see 30 psi, sometimes more in the exhaust manifold. |
| 59:55 | That boost pressure, sorry, that exhaust manifold pressure tends to ramp up as the engine speed increases, as the turbocharger becomes more and more restrictive, and what happens is the exhaust manifold pressure overcomes the wastegate and kind of forces it open. |
| 01:00:12 | So, that's one of the reasons why we sort of tend to see that boost pressure drop off. |
| 01:00:17 | You don't tend to see that because of the compressor running out of flow. |
| 01:00:22 | You get to that point, there's two things that are happening. |
| 01:00:24 | One is you're superheating the air because the compressor is really way out of its efficiency range. |
| 01:00:30 | So, it's superheating the air that's exiting the compressor. |
| 01:00:33 | And you can get to a situation, I've struck this a few times in drag applications, where you simply get out of turbocharger flow and you can find that you can go from maybe 45 psi to 50 psi and essentially end up with no more power on the dyno as a result. |
| 01:00:51 | Hackman has asked, "Can you cover the knock sensor set up on the G4 Plus and add it to the screen during the session?". |
| 01:00:59 | Unfortunately, G4 Plus knock control is really a little bit too detailed for me to do justice to in this webinar. |
| 01:01:07 | However, if you go into the webinar archive and you search knock control, you're going to find webinars in there specific to the knock control strategy on the G4 Plus. |
| 01:01:17 | So, I'd recommend that you go through there. |
| 01:01:19 | It is all explained in detail in about an hour long webinar that I simply couldn't do justice to right here in our questions and answers. |
| 01:01:28 | Crazy Driver has asked, "Can we use modeled fuel equation with TPS as a load axis? Map load source to tune ITB turbo engines.". |
| 01:01:37 | Not only can you do that, that is also the recommended way of doing that. |
| 01:01:42 | So, yeah, if you wanna use the modeled fuel equation on an ITB turbocharged engine, you are going to want to use throttle position as your load axis on that volumetric efficiency table. |
| 01:01:53 | Key point to keep in mind here is that you need to still use manifold pressure as the load axis on your air fuel ratio target table. |
| 01:02:03 | And that's the way the ECU is going to be able to adjust the air fuel ratio as your manifold pressure increases or decreases. |
| 01:02:11 | One little catch there is that you may need to also incorporate a 4D compensation table, because as you start pushing turbochargers very hard and the exhaust manifold pressure starts to get excessive, what we can find is that our air fuel ratio is going to start moving richer than our target. |
| 01:02:33 | Again, if you jump into the archives there, the webinar archives, this actually wasn't on the G4 Plus modeled fuel equation, but very, very similar. |
| 01:02:42 | Link have been quite unique in that. |
| 01:02:44 | Even prior to releasing their volumetric efficiency modeled fuel equation, their traditional mode was so close to replicating a VE model anyway that it kinda crosses over. |
| 01:02:57 | In the archive there, if you search 4D tuning, there's a webinar that we did on a Nissan GTR running a RB26 with independent throttle bodies and a turbocharger, explains the entire process there. |
| 01:03:12 | Hackman has asked "if 170 kPa would be peak zone for normal operation, would you want to add a row just for that range even though it does interpolate?". |
| 01:03:21 | Yeah, absolutely, you could do exactly that. |
| 01:03:26 | Probably was a poor example in this case because we are interpolating. |
| 01:03:30 | Generally, that would probably be my preference would be to, if we are running a really straight boost line, I'd quite like to have a row in the ECU's fuel and ignition table right on that boost set point so that I can be really specific with my tuning changes. |
| 01:03:47 | TDA Champs asked, "how about a quick explanation of the process for tuning AVCS while increasing and tuning the boost control at once?". |
| 01:03:56 | Right, throw me right under the bus there, Tyler, but I'll see if I can do justice to that. |
| 01:04:02 | Really, the process here with our cam control tuning is not too much different. |
| 01:04:09 | It's just one more aspect, or in the case of some engines, two more aspects where we've got variable intake and exhaust cams that's going to affect the engine's volumetric efficiency. |
| 01:04:20 | What we often find, though, with variable cam control systems that does tend to make our job a little bit easier is that provided we're working across broadly an efficient range of the turbocharger's use, we'll actually find that the ideal or optimal AVCS target points, or cam timing points, don't tend to change much. |
| 01:04:45 | So, what I mean by this is we're probably unlikely to find that we're going to need vastly different cam timing targets at 10 psi to 15 psi across an area of the turbocharger's operation that it's efficient. |
| 01:05:00 | If we start really pushing the turbocharger hard and it starts becoming restrictive, kind of like the example I used before with the individual throttle bodies, we are at high boost pressure or high RPM, the exhaust manifold pressure is starting to really strangle the whole engine. |
| 01:05:14 | Under those conditions, we may need to look at changing our cam targets. |
| 01:05:20 | But generally, as a good guide, the AVCS targets won't change too dramatically as our boost pressure targets change. |
| 01:05:27 | So, the process of tuning those, again, covered really adequately in several webinars. |
| 01:05:32 | So, if you search variable cam timing, VVT in our archives, you're going to find a few examples of that on the G4 Plus as well as the Haltech Elite and the AM Infinity and Motec M1, we've got all of them in there. |
| 01:05:49 | Mac Paint has asked, "In cars naturally aspirated with a high relation of pressure, is less aggressive parameters of ignition when lower compression can be had more aggression in the ignition timing?". |
| 01:06:05 | I'm sorry there, I'm not 100% sure. |
| 01:06:09 | I don't quite follow that question. |
| 01:06:11 | I think if I'm getting to the bottom of your question there, what we're sort of getting to is really the trend that I was talking about earlier in the webinar where as we increase the massive air entering the engine, the trend is that we need less ignition timing. |
| 01:06:29 | So, there as we increase boost pressure on a turbocharged engine, we tend to require less ignition advance. |
| 01:06:37 | I'm sorry if I've been off track with that answer, but that's the best I can do, I'm sorry. |
| 01:06:43 | Right, that's brought us to the end of our webinar there. |
| 01:06:45 | So, hopefully that's given you some more confidence behind tuning turbocharged engines, something that you can go out and apply in your own tuning next time you've got a turbocharged car on the dyno. |
| 01:06:58 | As usual, if you do have any further questions, please ask those in the webinar section of the forum and I'll answer them in there. |
| 01:07:06 | And other than that, look forward to seeing everyone back next week, thanks for joining us guys. |
0:00 - Introduction
2:19 - Moving into positive boost
5:13 - Ignition timing
7:36 - AFR targets
10:27 - Replcite road conditions on dyno
18:37 - G4 Plus Tuning Software setup
23:03 - Wastegate relevance
29:34 - Lambda targets
31:14 - Steady state tuning
40:09 - Ramp runs
51:09 - High boost pressure & stiff wastegate
55:30 - Summary
56:55 - Q&A


