138 | Tuning Drive by Wire Throttle Control
Summary
DBW or E-Throttle is common on most late model production engines and we’re seeing more and more aftermarket ECUs adopt this technology. In this webinar we’ll discuss the technology, look at what is required from your ECU to control a DBW system, look at the configuration and testing, and finally discuss some techniques we can use to optimise torque delivery using DBW throttle mapping.
| 00:00 | - It's Andre from High Performance Academy. |
| 00:01 | Thanks for joining us for today's webinar where we're going to be discussing drive by wire throttle on the Haltech Elite Series of ECUs. |
| 00:10 | So drive by wire throttle, certainly not a new technology, also known as fly by wire throttle, or sometimes referred to as e throttle or electronic throttle Now essentially the technology is pretty straight forward What we're doing is replacing the cable that normally goes between the driver's throttle pedal and the throttle body itself with electronics. |
| 00:33 | Now this simplifies the system from a mechanical standpoint. |
| 00:37 | Although obviously it does add some sophistication, some complexity in terms of the electronics required to do this. |
| 00:44 | Specifically when it comes to the safety element which we'll be focusing on shortly. |
| 00:51 | So the throttle body is fitted with a DC Servo Motor which physically drives the throttle, opening and closing it, based on whatever the driver's requesting with the accelerator pedal. |
| 01:03 | Now there are some advantages with doing so, there's a reason why OE manufacturers have moved to drive by wire throttle and we're seeing very very few cars come out these days that still run a conventional cable throttle. |
| 01:17 | One of the biggest advantages is, with complete control over the actual opening of the throttle body at the engine this gives the manufacturers a lot of control over the torque delivery of the engine. |
| 01:31 | So no longer are we running a fixed relationship between the driver's foot pedal position and the accelerator position at the engine. |
| 01:40 | We can essentially do whatever we want with that relationship So particularly in applications where the ECU needs to control the torque. |
| 01:49 | This gives complete control to the ECU. |
| 01:52 | There's a huge amount of control that the ECU can go through there. |
| 01:56 | For us in the aftermarket, this gives us the opportunity to run multiple throttle maps. |
| 02:02 | so this can be used to adjust the feel of the car. |
| 02:05 | Also can be used particularly in high powered cars that have traction problems. |
| 02:10 | Particularly maybe two wheel drive turbo charged cars. |
| 02:13 | If you're running on a wet track, you can have a second throttle map that dulls down the throttle control maybe even limiting the maximum amount of throttle opening in order to help reduce the engine torque and make the car easier to drive, make it easier to control on a slippery surface. |
| 02:35 | The other aspect which we don't wanna overlook here is by using drive by wire throttle, the idle speed can be controlled directly with the throttle opening. |
| 02:42 | So this again simplifies things, because we don't need an auxiliary idle air control valve in order to bypass air around the throttle body. |
| 02:51 | We can directly control the idle speed by either opening or closing the throttle plate. |
| 02:57 | Now when we talk about drive by wire throttle, there are a lot of people out there who view drive by wire technology as being pretty poor. |
| 03:07 | Maybe they think that the speed of operation of drive by wire throttle is very limited and this is going to result in a doughy, spongy performance. |
| 03:16 | There's obviously the issues of safety. |
| 03:20 | The response rate is definitely something that we notice as an issue in selected OE factory cars running drive by wire throttle. |
| 03:29 | Particularly in the earlier days of drive by wire, maybe the earlier 2000s where that technology was just starting to emerge from OE manufacturers. |
| 03:38 | We did find there were several models of car where the throttle response, or the speed that the throttle responds to the driver's foot pedal, tended to be dulled down a little bit and gave a sort of a doughy response to the way the car drove. |
| 03:52 | This is very much dependent on the system however in the aftermarket this is not necessarily an issue anymore. |
| 04:00 | In the aftermarket we're obviously a lot more focussed on performance. |
| 04:04 | This is a very mature technology now. |
| 04:06 | We've got a lot of aftermarket ECUs come on board offering drive by wire support because obviously all of these late model engines are coming out with these drive by wire throttle bodies. |
| 04:17 | We don't wanna be going and ripping those off and going back to cable. |
| 04:22 | To give you some idea of how quickly a well configured, well set up drive by wire throttle system can respond, if we were to simply sit in the car and go from completely closed foot pedal position or driver's accelerator pedal position, and then just quickly as we can, mash the throttle to the floor. |
| 04:43 | What we'll typically find is that there may be a delay in the actual throttle plate moving of somewhere in the vicinity of perhaps 10 to 20 milliseconds. |
| 04:52 | Obviously very dependent on the particular system. |
| 04:54 | And when we actually reach full throttle with the driver's foot pedal, there may be a delay in the throttle plate at the engine reaching full throttle for somewhere in the region of maybe 30 to 60 milliseconds. |
| 05:07 | Now just to give some perspective on those numbers. |
| 05:11 | It takes between 300 and 400 milliseconds for the human eye to blink. |
| 05:17 | So it's really an incredibly short amount of time. |
| 05:19 | And when we look at it with some perspective like that, we realize that the delay that we're seeing is definitely not something we're going to be able to notice from the driver's seat. |
| 05:30 | The other thing that I think is often overlooked, is even with a cable throttle system, there is inherently some amount of flex in the cable system and this in turn leads to some amount of lag. |
| 05:42 | So the performance we can get with a well set up drive by wire throttle system, really mirrors what we could expect to achieve with a cable throttle. |
| 05:51 | And obviously gives us all of those other advantages as well Now let's just deal with the safety issues because obviously this is a real concern, no one wants a throttle jamming wide open and sending the car out of control. |
| 06:05 | And this is one of the biggest concerns when we talk about drive by wire throttle systems. |
| 06:10 | Understandably it's a concern for the OE manufacturers as well. |
| 06:15 | So the way this is dealt with is that there are two sensors fitted to the throttle pedal. |
| 06:20 | And there are two sensors fitted to the throttle body that measure the throttle blade opening and the driver's foot pedal position. |
| 06:28 | And these are used to basically back up each other. |
| 06:31 | So essentially the ECU is looking at these signals and in terms of the driver's accelerator pedal for example, it's looking for both of the sensors in that throttle pedal to correlate with each other. |
| 06:45 | So if those sensors don't correlate, this means that there is a fault with the throttle pedal, or accelerator pedal, and the ECU can employ some safety strategies. |
| 06:55 | Likewise if the two sensors at the throttle body don't correlate as they should, again the ECU knows something has gone wrong with those sensors and can again employ a safety strategy. |
| 07:06 | Now on top of that the ECU is also constantly looking at the target throttle position. |
| 07:13 | So this is our desired throttle opening. |
| 07:15 | And it's looking at the measured throttle position, so this is the actual throttle position that the throttle body is achieving. |
| 07:23 | And again if there's a discrepancy between those two, then the ECU knows something's wrong. |
| 07:29 | So if there's something physically jammed in the throttle, the throttle body, the throttle is jammed wide open, and we come off the throttle pedal, then the ECU knows that the current throttle position is not matching our target, it's way higher than our target, so it can employ some safety strategies there which can include bringing in a very low RPM limit. |
| 07:50 | So essentially what it's doing there is cutting either fuel or spark, or both, to control our engine speed, reduce engine power and torque, and obviously make sure that we're not going to end up out of control. |
| 08:02 | So if we actually look at that in comparison to a conventional cable throttle, we've actually got some advantages there because if the throttle body jams open in a cable mechanism then there's nothing that we can do nothing that the ECU can do to prevent that situation. |
| 08:19 | And that isn't an unlikely scenario either. |
| 08:24 | If we looked at the history, of failures that have occurred around throttle bodies, I would be hazarding a guess that we've seen more issues created with cable throttles jamming that we have with drive by wire throttle systems because of all those safety precautions we've got there. |
| 08:43 | In my own drag car I used a cable throttle as was mandated in our regulations and I have had that throttle body jam. |
| 08:52 | Fortunately it was only at part throttle as I went across the finish line and pulled a parachute at about 180mph. |
| 08:59 | And I can tell you now it's quite a scary exercise trying to slow down and brake a car even with the parachute, against what was probably still 500 or 600 horsepower. |
| 09:09 | So nobody wants that. |
| 09:11 | Now this particular webinar we really are focussing here on the Haltech Elite ECU. |
| 09:16 | And the Haltech Elite actually goes one step further with the safety precautions and they use what they refer to as a supervisor processor. |
| 09:26 | And the supervisor processor is there purely to monitor what's going on with the drive by wire system. |
| 09:34 | And if the main processor that's looking after the drive by wire control and the supervisor processor don't match in what they're seeing then again this is an opportunity for the Haltech to employ some safety strategies. |
| 09:47 | So really it's a very safe system with the way our current technology has developed and it's really not a system that we need to fear or be scared of. |
| 10:00 | What we're going to do now is jump into my laptop software and we're just going to go through the configuration and set up process here on a Haltech Elite 2500 that is fitted to our Nissan 350z And what we're going to do is start with our wiring. |
| 10:16 | So we'll go into our setup and what we're on here is our drive by wire functionality our drive by wire setup. |
| 10:25 | And I've just gone across to our wiring tab which defines all of the input and output wiring. |
| 10:31 | What we've got here first of all is our drive by wire motor, Our dual half bridge output that actually controls the DC Servo Motor. |
| 10:41 | So that's a function of the Haltech Elite that is essential for drive by wire throttle control. |
| 10:47 | So that's the output, that's what's controlling the motor Below that we've got our four inputs. |
| 10:52 | Remember I said that we had two sensors on our throttle pedal or accelerator pedal and we have two sensors on the throttle position sensor or throttle body itself. |
| 11:03 | So these are listed here as TPS input one and two. |
| 11:07 | And then below that we have APP which is the abbreviation of accelerator pedal position one and two. |
| 11:14 | Now at the moment we can wire these wherever you want on the Haltech Elite. |
| 11:20 | It is important though to take note of the recommendations, and it is recommended that we wire these on AVI two through to AVI five. |
| 11:32 | Now the reason I just mentioned that is just talking to the guys at Haltech before we aired for this webinar, there will be a firmware update coming along in the not too distant future which will require that you use those particular inputs. |
| 11:48 | You will not be able to use drive by wire on any other inputs. |
| 11:52 | Now the reason for that is that AVI two through to five are high speed inputs and that's obviously essential for something that is working so quickly, and they're also linked to that supervisor processor, so that's important to understand. |
| 12:09 | Make sure if you are wiring from scratch that you follow that convention and use AVI two through to five. |
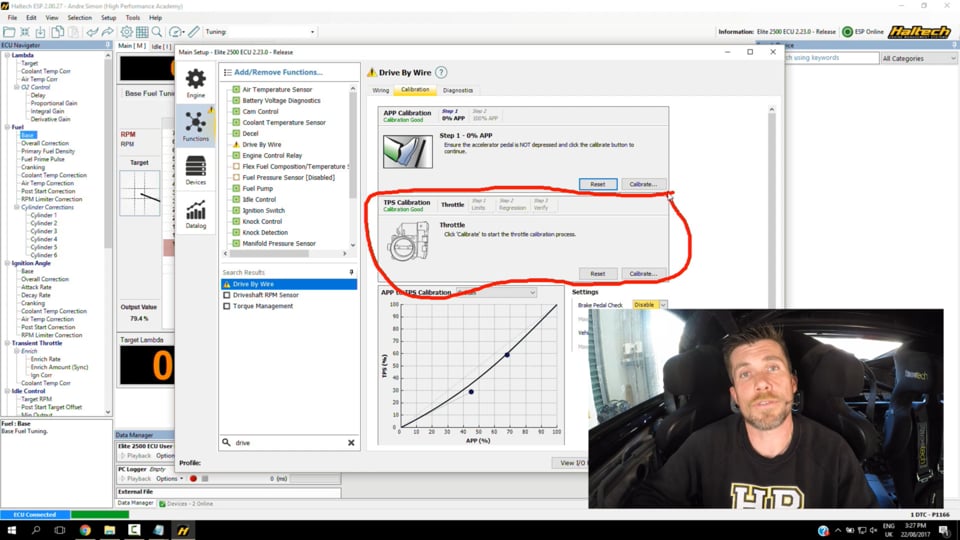
| 12:17 | Now once we've actually got everthing wired up, everything set up, we can simply click on the calibration tab and this is one of the really nice features of the Haltech Elite Series is it makes it incredibly simple to go through the configuration process for a drive by wire throttle body. |
| 12:34 | So it's all laid out and it's really easy to follow so we can see our first step here is to perform an accelerator pedal position calibration. |
| 12:42 | So what we can do here is just follow the instructions on screen. |
| 12:46 | So we can see here it's saying step one, to calibrate the 0% position. |
| 12:52 | So this is where we're completely off the throttle. |
| 12:54 | It asks us to make sure that the pedal is not depressed, we wanna be completely off the throttle pedal at this point and we can simply click calibrate. |
| 13:02 | So what the ECU is doing here is just reading the voltage coming in from the accelerator pedal position sensors, both of them, when the throttle pedal is closed. |
| 13:12 | Next we go to step two and here we're calibrating the accelerator pedal position sensors at 100% throttle. |
| 13:19 | Pretty straight forward here, we simply want to go all the way to full throttle. |
| 13:22 | We want to also make sure that we apply a reasonable amount of force here. |
| 13:27 | It's very easy to do this if we're setting up a car in the workshop and we actually just press down on the throttle or accelerator pedal with our hand. |
| 13:37 | Now the amount of force that we can apply with our hand understandably is not exactly the same as what we can do with our foot in the heat of battle so quite often the actual limit that we will achieve, the voltage that we'll achieve if we're going and pressing on that pedal really hard with our foot, is going to be slightly higher. |
| 13:55 | So I always recommend here setting this with our foot and applying a reasonably high amount of pressure to indicate what we're actually going to see when we're driving the car. |
| 14:03 | So we're at full throttle now and we can again click calibrate, job done. |
| 14:08 | Our throttle pedal, or accelerator pedal, position sensors are now both calibrated. |
| 14:13 | Now we can move down here and we've got our TPS calibration. |
| 14:17 | Now this is where the Haltech really makes it easy. |
| 14:20 | Normally when we are calibrating a drive by wire throttle body, there's a lot of work to do. |
| 14:26 | These are controlled via a PID algorithm. |
| 14:30 | So what this is, PID for those who aren't aware stands for proportional, integral and derivative. |
| 14:35 | These are gains that are used to effect the output to the servo motor, when there' an error between our target throttle position and the measured throttle position. |
| 14:44 | These are essential, that PID algorithm is essential to the fast and accurate control of our throttle body. |
| 14:52 | So normally what we find is that the manufacturer of our ECU will provide us with data sheets for different throttle bodies and we need to physically set up the PID gains, we need to set up perhaps the frequency that the throttle body's being operated at and a range of other parameters. |
| 15:06 | None particularly difficult but it does require we have that data. |
| 15:09 | With the Haltech Elite this actually gets done automatically. |
| 15:12 | So here the process is simply, all we need to do is click calibrate. |
| 15:17 | And what the ECU will do is go through a couple of steps, first it'll find the open and closed throttle limits. |
| 15:23 | And then at the moment it's going through this step two which is listed as regression, and what it's doing here is actually calibrating the PID algorithm automatically. |
| 15:33 | Speaking to the guys at Haltech, they basically suggested that this is kind of like a Haltech magic. |
| 15:40 | I can't really elaborate too much more on exactly what is going on. |
| 15:45 | During that process they use what they refer to as a kick and chase method where the ECU is moving the throttle body and obviously looking at the response it gets. |
| 15:57 | It goes through a third step which is verifying, and at this point our calibration is complete. |
| 16:01 | So that's all we actually need to do for our base drive by wire throttle calibration. |
| 16:06 | Really couldn't be simpler as long as we've got our wiring set up correctly it is really very easy There is a little bit more to do here though. |
| 16:14 | We can see first of all on the right hand side we have got a couple of settings here. |
| 16:19 | One relates to our brake pedal check and the other is a vehicle speed check. |
| 16:22 | So if we've got a brake pedal sensor fitted and wired up to the ECU which in this case we haven't which is why it's disabled, what we can do is limit the maximum throttle opening when we have our foot on the brake. |
| 16:37 | So this is a safety mechanism. |
| 16:39 | Essentially it limits the amount of engine torque that can be applied while our foot is on the brake. |
| 16:44 | Of course in some instances this may be detrimental. |
| 16:48 | Particularly it's going to prevent you doing a burnout with your foot on the brake, so that may be detrimental particularly if you're into drag racing, it's also going to limit the throttle opening if you're staging an automatic transmission vehicle, and you're using your left foot on the brake while you're staging. |
| 17:06 | We've also got a speed check that is below this, and again this just limits the throttle opening when the car is stationary. |
| 17:15 | On the left hand side we've got a really important aspect here for our drive by wire throttle, and this is again one of the areas where we have some big advantages over a cable throttle. |
| 17:26 | What we can do here is define the throttle body position versus our accelerator pedal position. |
| 17:35 | So on the vertical axis here we can see we've got throttle position. |
| 17:40 | And this is the throttle position at the actual throttle body. |
| 17:43 | So this is how far open the throttle plate is. |
| 17:46 | And on the horizontal axis you can see we've got our accelerator pedal position. |
| 17:50 | Now you can see we've got a line here that isn't quite a one to one relationship. |
| 17:56 | We're actually curving away so essentially we're not opening the throttle body as far as our accelerator pedal position would indicate. |
| 18:05 | So to give you some numbers here, if we look at this particular point here, when we have 40% accelerator pedal position, we've actually only got 30% throttle position, so the throttle body is open 10% less than our accelerator pedal is indicating. |
| 18:22 | Now we can effect the shape of this curve, we can essentially do just about anything we want. |
| 18:27 | And this is really important because what we find or something that's really often overlooked is the air flow through a throttle body is very non linear and what this means is that over the first maybe 25% to 30% of throttle opening, we see a really large increase in our air flow. |
| 18:46 | That's effecting the engine's torque output. |
| 18:49 | So over the last 50% to 70% of our throttle opening we're still seeing an increase in the air flow but it's much lower. |
| 18:56 | So what we can do is manipulate this curve to essentially achieve a more linear relationship, between air flow and accelerator pedal position, and hence a more linear relationship between the accelerator pedal and our engine torque. |
| 19:13 | So this can make, particularly a powerful car with a large throttle body, this can make it much easier to control the engine, make it much easier for us to control the power output of the engine. |
| 19:27 | Now before we moved on I already talked about how drive by wire throttle allows us to perform idle speed control through the drive by wire throttle. |
| 19:35 | So we'll just go up to our idle speed control function here. |
| 19:40 | You can see on the wiring here we've got the set up configured to drive by wire for our signal type. |
| 19:47 | So this means we are using a drive by wire throttle. |
| 19:49 | Not gonna go through every set up here in our idle speed control. |
| 19:53 | You can see that our mode or our control mode here is set to closed loop, and this means that the ECU will adjust our throttle position to achieve our target idle speed. |
| 20:04 | One of the important things here to understand though, is we do have this parameter which is labelled as drive by wire or DBW max position. |
| 20:13 | And we can see that that is set to 10%. |
| 20:16 | So this is the maximum drive by wire throttle opening that the ECU can use in order to do the closed loop idle speed control. |
| 20:24 | This also effects the numbers in our base idle speed control table. |
| 20:29 | So in other words we've got a 0% to 100% range for our base idle speed duty cycle. |
| 20:35 | And in this case a value of 100% relates to our drive by wire maximum position that would have our throttle open 10%. |
| 20:44 | So the important thing to understand here, 10% is probably a pretty good place to start. |
| 20:50 | If you're getting to a situation where, particularly with a cold start, the idle speed is too low and we're seeing the closed loop idle speed control max out at 100%, in that case we may want to come in here and just increase that drive by wire maximum position value by a couple of percent just to give the ECU a little more control range to get our idle speed on target. |
| 21:13 | The flip side of that is if the range is too great it reduces the resolution essentially of our control and this makes it harder for the ECU to gain really smooth idle speed control and this can result in hunting and surging and oscillation around our idle speed control set point. |
| 21:32 | So just important to understand that. |
| 21:36 | So I just wanted to show you some of the other aspects that we need to understand here. |
| 21:42 | We'll move down in our ECU navigator panel. |
| 21:44 | And we see that near the bottom here we have some settings for our drive by wire throttle. |
| 21:51 | In particular we've got some open and closed rate damping configurations here. |
| 21:57 | These are all values that can be set between one and 10 and essentially the larger we set these numbers, the more damping will be applied to our throttle position control. |
| 22:10 | So in this case we can see here we've got on the open rate damping, and we've currently got this set to a value of one. |
| 22:18 | Now if we just look at the parameter, it's probably a little bit small here but if we just look at the parameter for throttle position, what I'm going to do is just go straight to wide open throttle. |
| 22:28 | And that's not gonna do anything which is helpful. |
| 22:38 | Right we'll just reset everything. |
| 22:40 | That's not particularly helpful. |
| 22:43 | OK we're back up and running here. |
| 22:44 | What I'm going to do is just go through to full throttle. |
| 22:49 | And we're going into fault which is ideal considering this is a webinar on drive by wire throttle control and we are now going into fault. |
| 23:01 | This is probably something to do with the configuration process that I just went through so I'm just going to go through and do that all over again. |
| 23:13 | Right we'll just go through the calibration process, and we'll just calibrate our accelerator pedal position. |
| 23:22 | And we'll go through and we'll reset our throttle pedal position as well. |
| 23:27 | I've just got a calibration error that's come up there on our accelerator pedal position so we'll just go through that. |
| 23:33 | Once we've gone through the TPS calibration we'll see if we can get this all doing what it should. |
| 23:44 | I will mention that in the two years or so that we have had this ECU in our 350z, this is the first time I've had any trouble with it. |
| 23:54 | Of course it's only ever going to happen when we are presenting a webinar. |
| 23:58 | Alright so that's calibrated our throttle position sensor. |
| 24:03 | What we'll do now is just calibrate our accelerator pedal position. |
| 24:10 | OK we've got it saying that our calibration is good now. |
| 24:15 | Just go through this one more time. |
| 24:24 | OK we'll see if we're OK now, and we are. |
| 24:28 | OK back to where we were, what I wanted to show you here is the effect of the damping control on our throttle position. |
| 24:35 | So we can see at the moment the throttle is essentially closed, we're sitting at 5.6%. |
| 24:39 | Just going to go to 100% throttle on our accelerator pedal and we see that the TPS followed that very quickly. |
| 24:45 | We'll just back off back to idle now and what I'm going to do is set the damping here to the maximum value of 10. |
| 24:53 | And I'm just going to go straight to full throttle again, OK I'm at full throttle now. |
| 24:57 | We see that the accelerator pedal, sorry the throttle position actually delays or lags quite dramatically, I'll just do it again. |
| 25:05 | I'm just gonna go straight to full throttle now. |
| 25:08 | So we see that the delay is around about a second there. |
| 25:11 | So that's the effect of our damping. |
| 25:14 | Now generally we're probably going to want to run as little damping as we need to there. |
| 25:19 | And this isn't really as aspect of the control strategy, this is more a case of smoothing the throttle response. |
| 25:26 | So this is what we see with some of the factory cars that are referred to as having slow throttle response or a sort of soggy throttle response with drive by wire. |
| 25:38 | They can be purposefully damped like this in order to put less force into the engine mounts. |
| 25:44 | Basically make the car smoother, quieter, and easier to drive for most drivers. |
| 25:50 | So this is a way we can effect that, and we have the ability to control that on both our opening and our closing. |
| 25:58 | Now if we move back down as well, this is where the drive by wire system can get a little bit smarter. |
| 26:05 | We can see we've got an aspect here listed as maximum TPS. |
| 26:10 | Now by default this will just be a single parameter and generally this is going to be set to 100%. |
| 26:16 | As its name implies it limits the maximum throttle opening that we can employ. |
| 26:23 | Now I've actually gone ahead and set this up as a three dimensional table. |
| 26:28 | If we press F3 this will bring up our axis set up for this particular table. |
| 26:33 | And really the way we can go about configuring this is really up to your imagination. |
| 26:38 | We have the ability to have up to four dimensions for this table. |
| 26:42 | You can see at the moment I've got this set up with engine RPM on our X axis and I've got accelerator pedal position on the Y axis. |
| 26:53 | We could also set up a digital input there as a switch so we could set that up as our third axis and we could have different calibrations for our maximum throttle opening depending on our switch position. |
| 27:08 | So this would be a perfect application where we could change our throttle mapping based on a wet or dry switch on the dashboard. |
| 27:17 | You can also set up an axis here based on wheel slip so you can reduce your throttle position based on the amount of wheel spin that's occuring. |
| 27:26 | So essentially sort of a passive form of traction control there. |
| 27:32 | So we can see at the moment this table is set to 100%, I'll just get rid of that column, that row there. |
| 27:39 | So it's essentially doing nothing, it's not limiting our throttle control and remember here if we just jump back, our throttle relationship between accelerator pedal and throttle pedal is all set up based on this map here that we can adjust. |
| 27:56 | We'll just get back out of that. |
| 27:58 | So if we go here, obviously the engine's shut off, and we're at zero RPM and at the moment we can see that I'm sitting at 100% accelerator pedal position. |
| 28:09 | Let's just change that value now to 50%. |
| 28:12 | We'll go to full throttle and we can see that our actual live tracking of our throttle position is sitting at 50% as requested. |
| 28:21 | So again the way we can set this up really is up to your imagination on what you're trying to do, there really is no fixed way that we need to set this up. |
| 28:29 | A real common example here, an engine that I was involved with a little while ago which was a high revving V8 that was built around two Kawasaki ZX-12R cylinder heads and a billet block. |
| 28:44 | That engine revved through to about 12000 RPM. |
| 28:49 | It was fitted with individual throttle bodies with trumpets which would be pretty normal for motorbike engines. |
| 28:55 | And what we actually find is that if you want to produce maximum torque at low RPM, we actually need to restrain or control that throttle opening and reduce it. |
| 29:04 | So we don't want, in that particular application, we didn't want to go all the way to 100% throttle until the engine had actually reached about 4500 to 5000 RPM. |
| 29:14 | So at 2000 RPM for example settling on the dyno, we actually found that we produced maximum torque if we restricted the throttle opening to only about 35%. |
| 29:25 | So again we can achieve that in this particular table here, or using a table like this. |
| 29:33 | Now the other aspect that I just wanted to touch on here, we're going to move into some questions and answers shortly, so if you do have any questions that you'd like me to cover off, please ask those in the chat, in the comments, and Ben will transfer those through to me. |
| 29:48 | The other aspect here is we can see the channels that I've got set up over here on the right hand side. |
| 29:54 | Now this monitors what's going on with all of the inputs So in particular we can see at the top we've got four channels here. |
| 30:02 | They are labeled DBW Sup, which is supervisor accelerator pedal and throttle pedal. |
| 30:10 | So this comes down to the supervisor processor that the Haltech Elite employs to just keep track of the drive by wire throttle. |
| 30:18 | Then below this we have the standard drive by wire accelerator pedal and throttle pedal positions. |
| 30:24 | So these are raw voltages, we can see those on the right hand side there. |
| 30:28 | And what we can see is as I move the throttle we see those voltages moving around. |
| 30:35 | The other thing we can see here as well is the duty cycle being sent out to our drive by wire throttle body. |
| 30:42 | So at the moment you can see that the throttle position is sitting here at about 5.5%. |
| 30:46 | And you can see that the duty cycle is sitting at about minus 20%, it's moving around a little bit. |
| 30:51 | If I give the throttle a quick blip, so to give the accelerator pedal a quick blip, what you can see is straight away, as soon as I move the throttle, the duty cycle being sent out to the throttle body moves quite positive, it jumped up to about 40% there. |
| 31:06 | And the throttle position achieves its target, and then once it achieves its target, it settles down. |
| 31:13 | So hopefully that's given you some insight into the drive by wire throttle system. |
| 31:18 | The ease of configuring it despite my faulty attemp there. |
| 31:23 | The ease of configuring it in the Haltech Elite system, and how you can affect the feel of the throttle body, how you can effect the torque delivery versus accelerator pedal position on that Haltech Elite ECU. |
| 31:37 | Alright I'll just jump across now and have a look and see if we've got any questions remember if you do have any questions, please feel free to ask them and I will do my best to answer them. |
| 31:48 | Now our first question comes from 86Matt who's asked would you increase the TPS versus APP curve or decrease it when you add more power? OK so generally what you're going to do is move the curve down or reduce the curve so as the engine produces more torque for a given throttle opening, what we find is that we can achieve better control of the engine torque if we reduce the throttle opening versus accelerator pedal position. |
| 32:18 | Now I will note this is a really really subjective aspect, there is no magic numbers that we can apply here to every situation. |
| 32:26 | The correct relationship between that accelerator pedal position and the throttle position, is so much dependent on the particular driver. |
| 32:37 | Some drivers will like a really aggressive feel to the throttle where it's ramping up quite sharply. |
| 32:43 | Whereas other drivers will prefer a much softer response so it gives them a longer pedal before they're actually getting to a point where the engine's making significant torque, so there is no fixed numbers that you should put in there. |
| 32:57 | And it's really important as well to make small changes to that table and feel out the effects for yourself. |
| 33:04 | What you'll find though is if you go too far and the relationship becomes linear or for example you even go as far as opening the throttle body further than the accelerator pedal position would suggest, what we can get to is a situation where the car becomes quite hard to control, and particularly for a street car can be quite difficult to maintain a constant speed. |
| 33:32 | Henrich Anderson's asked is there an anti lag advantage with drive by wire. |
| 33:36 | In the Haltech Elite at this stage, I personally haven't actually set up an anti lag system. |
| 33:41 | Our testing on the Elite here at High Performance Academy has really been restricted purely to our Nissan 350z. |
| 33:49 | So I can't speak here specifically for that Haltech Elite. |
| 33:53 | However in general, yes, drive by wire throttle gives a huge advantage to the anti lag strategy. |
| 33:59 | The reason for that is that the anti lag strategy relies on air bypassing, typically around a fixed cable throttle body. |
| 34:08 | So we find there's a variety of ways of doing this with air bypass solenoids or throttle jackers that physically open the throttle body. |
| 34:16 | And the important thing here is the anti lag system is very dependent. |
| 34:20 | The feel and aggressiveness of the anti lag system is very dependent on exactly how much air is being bypassed around the throttle body. |
| 34:27 | So with a conventional throttle kicker, it's very difficult to adjust that, it's a mechanical system that needs to be physically altered in order to affect the air bypass. |
| 34:39 | With drive by wire we can easily adjust the air bypass by simply opening or closing the throttle body further. |
| 34:45 | And the advantage of this process is we can often have a switch on the dash to give multiple maps for our anti lag depending on the particular rally stage we're in. |
| 34:56 | Some drivers also like a really aggressive anti lag strategy which can tend to make the car push a little bit under brakes. |
| 35:04 | Other drivers, particularly novice drivers, that's not gonna be that comfortable so they'll want a more subtle or softer anti lag response. |
| 35:15 | Tristan Lim has asked will HPA provide a PID algorithm course in the future? We actually already have, the PID control algorithm, I know it's an area that a lot of people struggle with. |
| 35:30 | A lot of professional tuners still don't properly understand what PID is and how to approach tuning it. |
| 35:38 | We covered this in detail in our electronic boost control tuning course because PID is one of the key aspects of setting up a closed loop boost control system. |
| 35:49 | And in particular we give a really nice analogy of how you can view those three gains, the proportional, the integral, and the derivative gain. |
| 35:57 | And then a step by step process to work through. |
| 36:00 | Now of course PID is used in a variety of applications in our ECUs. |
| 36:04 | Essentially anything where we're trying to achieve a target and we're using feedback inside the ECU to adjust the output in order to get closer to that target. |
| 36:17 | Wittlebeast asks what's the explanation for less throttle makes more torque? Look I couldn't actually give you a thorough one there Andy. |
| 36:25 | My understanding or how it was actually explained to me by the engine builder who was with us when we were tuning that engine is that the lower throttle opening affects the air velocity. |
| 36:40 | Yeah I can't really jump too far into the physics of that. |
| 36:43 | I'm really not qualified in that area to give you a thorough answer and I'm certainly not going to guess. |
| 36:49 | What I can say is it's certainly not unusual. |
| 36:52 | We were tuning a Yamaha R1 street bike just a couple of days ago for Colin, one of our staff and that's a 1000cc, four cylinder engine, exactly the same situation with that, it revs to 14000 RPM and in the throttle, drive by wire throttle mapping, that was not reaching 100% throttle until about 4500 or 5000 RPM. |
| 37:17 | To test I did set it to wide open right from the start of our ramp run around about 2000 RPM and we lost a small amount of torque and power as a result. |
| 37:32 | Tristan Lim has asked how do we configure PID algorithm settings for other ECUs? OK so today's webinar really has been focussed on the Elite Series specifically and obviously they make it really easy because their calibration is done automatically by the ECU. |
| 37:50 | Because the PID algorithm, the PID numbers or gains that we need for a drive by wire throttle system are so specific to the ECU and the actual drive by wire throttle body that we're tuning, this is a safety aspect. |
| 38:05 | So what you'll find is that most ECU manufacturers will give you their recommended PID settings or for that matter all of the drive by wire throttle body settings for a given throttle body. |
| 38:18 | And some ECU manufacturers go as far as to actually ask you to send in a throttle body if they don't have information for it. |
| 38:28 | So Motec are a great example here. |
| 38:30 | If they don't have data for the drive by wire throttle body, they'll ask you to send in that throttle body via one of their dealers and they will actually characterise that throttle body and give you the correct data. |
| 38:40 | Now if you get that wrong it is going to affect the control of the throttle body and it is a safety aspect so it's really important there to discuss that with the ECU manufacturer. |
| 38:51 | Big Boy has asked is this the same process on all other ECUs including OE ECUs? So no it is not. |
| 38:58 | Again Haltech make this really easy. |
| 39:03 | The conventional system would be a menu structure where we have a variety of settings specific to the throttle body and we need to configure those to suit so that would be the normal strategy for an aftermarket ECU. |
| 39:18 | OE ECUs, generally we'll find that the control strategy for the drive by wire throttle body will be hard coded into the ECU and we don't have the ability to change that. |
| 39:28 | So what this means is that for most OE factory ECUs we wouldn't be able to easily swap to a different drive by wire throttle body. |
| 39:41 | Look that's taken us to the end of our questions there. |
| 39:44 | So as usual if you do have any further questions that you would like me to cover. |
| 39:49 | Anything I haven't gone into here, or anything that pops up after this webinar, please make sure that you ask that in the forum and I'll be happy to answer that there. |
| 39:57 | Thanks for joining us everyone. |
| 39:58 | I look forward to seeing everyone next week. |


