140 | 5 Common Problems When Tuning A Car
Summary
As a professional tuner, you’ll typically find that most tuning jobs will involve some kind of problem that requires diagnosis and repair before the tuning session can be completed. In this webinar we’ll cover the top problems we’ve seen over our career as a professional tuning workshop. You can learn from these issues to speed up your own diagnosis and minimise wasted time.
| 00:00 | - It's Andre from the High Performance Academy, welcome to today's webinar where we're going to be looking at five of the most common problems you're likely to face when it comes to running a car on the dyno. |
| 00:11 | Now particularly for those who are new to the industry, you may have this false illusion maybe that we simply put the cars on the dyno, we tune the cars and then we take the cars off the dyno and send them on their way. |
| 00:24 | Now I admit that is the perfect world but unfortunately after 15 years of the industry I know too well that that is often a fairy tale ending that isn't really that well aligned with reality. |
| 00:37 | More often than not we are going to strike some kind of problem while we have the car on the dyno, through to something really minor that can be easily fixed, through to much more significant problems that are going to require the car to come off the dyno and some major work to be undertaken in order to correct whatever is wrong. |
| 00:56 | So in this webinar we're going to look at some of those key problems that I strike. |
| 01:01 | Obviously there is just about an unlimited range of potential problems that you might come across. |
| 01:07 | But again after 15 years of doing this every day for a living there are some common trends that tend to come up time and time again. |
| 01:16 | Some common problems that we do see. |
| 01:18 | And what I'm hoping to do here is share some of my experience with you, give you some tips and pointers on what to look for, what are the glaring alarm bells that you should be taking note of while you're tuning the car on the dyno. |
| 01:33 | Basically if you can learn from our experience, it's going to help reduce the amount of time you're wasting, potentially maybe even save some damage to an engine, and all around it's just going to speed up and improve your tuning experience. |
| 01:48 | Now I think probably over those 15 years of doing this for a living, if I averaged everything out I would say that about one in every five cars that goes on our dyno or went on our dyno would go perfectly smoothly, exactly as we expected. |
| 02:04 | And the other four cars are going to be in that sort of zone where they're exhibiting some kind of problem from minor through to reasonably significant. |
| 02:16 | So I think probably the most common, the single most common problem that I saw with cars being delivered to us for tuning work was a situation where the fuel system limited what we could do. |
| 02:29 | So essentially there was some problem with the fuel system. |
| 02:32 | Now this again could be related to a number of different aspects, and we're going to go over those shortly. |
| 02:40 | However what we're often going to find is that there is some clear signs that something isn't right if we simply take note of them while we're on the dyno tuning, and look at what the ECU and the car are trying to tell us. |
| 02:55 | One of the key parameters here that we need to understand is that if everything is working as it's intended, everything's working as it should and the fuel system is up to task, what we should generally get is a fuel table or an efficiency table, volumetric efficiency table that roughly looks the same as the shape of our torque curve. |
| 03:18 | Basically the torque curve is the airflow into the engine. |
| 03:22 | And what we're trying to do is match that airflow with fuel. |
| 03:25 | So all things being equal the shape of our fuel table or efficiency table should broadly be similar to the shape of our torque curve. |
| 03:34 | So if we understand that, we know what's going on there, one of the key warnings that we will get with an engine where the fuel system is beyond its limits is that the engine is going to start going lean at higher RPM. |
| 03:48 | Now what we're going to do there naturally is start adding additional fuel or additional numbers into our volumetric efficiency table in order to increase the fuel delivery and correct that lean situation. |
| 04:00 | Now if we're not aware of what's going on here, we can go around in circles making several ramp runs on the dyno, adding fuel, or numbers into our efficiency table, repeating our run and finding out that we're still as lean as we ever were. |
| 04:14 | Let's have a quick look at my laptop screen for a moment, and we've got here just a quick example efficiency table from a Motec M1 ECU. |
| 04:24 | Now this is probably a mild example of what I would expect to see here. |
| 04:30 | Now in this particular engine, it's a Toyota 86, a supercharged FA20 engine. |
| 04:35 | And what we can see here is that generally in the higher load, higher RPM areas of this efficiency table we're seeing the numbers, or the shape of that efficiency table actually continue to increase. |
| 04:48 | Now despite this we know that with this particular engine peak torque occurs somewhere around about 4000 to 4500 RPM and then the torque starts to flatten and then taper away. |
| 04:59 | So we certainly shouldn't expect to see our efficiency numbers continue to increase as we move towards the red line, which is what we're seeing here. |
| 05:08 | The other aspect that's a good indicator is where we're at down in the off boost area, we can see that the shape of our efficiency table is showing what we'd expect. |
| 05:18 | We can see that the efficiency table is tending to taper away or drop away, let's just see if we can see that a little bit more clearly. |
| 05:26 | So if we look at this we're getting our peak torque value around about here. |
| 05:29 | And off boost we're seeing that those numbers are dropping away. |
| 05:33 | On higher boost we can see that those numbers are continuing and peaking up around 7500 RPM. |
| 05:39 | So this is a clear indication that something isn't right, and if we can take note of this, it's going to lead us to be looking for our problem a lot sooner. |
| 05:49 | Now at the same time we're also likely to see the result of this is an air fuel ratio plot that's going to continue moving leaner as our engine RPM increases. |
| 05:59 | And despite what we wanna try doing with our fuel table we're not going to be able to correct that. |
| 06:07 | That's simply because we are out of fuel flow. |
| 06:11 | So it is quite easy to miss and it's easy to waste a bunch of time potentially as well on a high powered engine. |
| 06:17 | If we are running it at a lean air fuel ratio, it is possible that we can end up doing some damage. |
| 06:22 | So none of this is really what we're ideally after so it pays to be able to pick up on this pretty quickly. |
| 06:29 | So what are the potential drivers for this situation, what can cause this? Well one of the key ones would be a set of fuel injectors that aren't large enough for the proposed fuel flow, to support essentially the amount of power that we're expecting out of our engine. |
| 06:45 | Now this one of its own is actually relatively straight forward. |
| 06:48 | When we're familiar with a particular engine, particular fuel, we tend to build up a bit of an idea on what size injectors we're going to need for a given application in order to meet a customer's power goals. |
| 07:01 | If you're not aware there are some really good online calculators. |
| 07:04 | There's a great one on Injector Dynamic's website. |
| 07:07 | Their fuel flow calculator is gonna give you a guide to what particular injector that you're going to need, what size injector you're going to need for a given application in order to support a certain amount of power at a certain RPM. |
| 07:20 | So the injector side of things should be pretty straight forward, that's reasonably easy to figure out. |
| 07:25 | And of course if we are logging or looking at our data logging during a run, we're going to be able to see our injector duty cycle tapping out at 100% and obviously from that point on the injectors can't flow any more fuel, we're going to see the air fuel ratio move lean as a result. |
| 07:42 | Probably the more common issue that I saw that gives rise to this scenario, is where the fuel pump either isn't big enough or the fuel pump isn't being supplied with sufficient voltage to really be operating at the sort of fuel flow values that the pump is capable of. |
| 08:06 | Now just like the injectors we should be able to choose a pump that's going to be suitable for our power aims. |
| 08:12 | But the area that is often overlooked is that the pump flow is very dependent on the amount of voltage being supplied to the pump. |
| 08:20 | So we're expecting that the pump will be supplied a solid 14 volts. |
| 08:26 | Generally our vehicle's charging systems will be working somewhere between about 13.8 and maybe 14.2 volts, if the alternator's doing everything it should do. |
| 08:35 | And that's what we're basing our fuel flow numbers on from our pump. |
| 08:39 | It's really really common though, particularly with an older car, with factory wiring to the fuel pump, so factory power and ground wiring to the fuel pump, if we add a higher flowing fuel pump, it's quite often we're going to find that the fuel pump isn't actually getting anything like 14 volts under load. |
| 08:58 | It's quite often we'll find that if we actually check the voltage at the fuel pump with a digital volt meter during the dyno run we may see that that voltage is only reaching perhaps maybe 10.5 through to maybe 12 volts. |
| 09:12 | In this situation we're seeing a significant drop away in the flow potential from that fuel pump. |
| 09:18 | The fuel pump can't supply the sort of fuel that it's rated to and in turn we'll see that the fuel pressure will start to drop away. |
| 09:26 | So that's one of the really key things to look for there. |
| 09:29 | If on paper everything, all of the components fitted to the fuel system should be easily capable of supporting the power levels we're aiming for, one of my first tests is to connect a volt meter to the fuel pump and actually see what sort of voltage I am getting. |
| 09:47 | Now there should be some other telling signs though that we can look at, that will also indicate things aren't quite right here. |
| 09:54 | Obviously I've already discussed the injector duty cycle issue. |
| 09:57 | But in turn we're also going to see problems being displayed here if we are logging and monitoring our fuel pressure. |
| 10:05 | Now unfortunately this is one of the sensors, that while I'd love to have on every car, we often find customers' cars coming to us where fuel pressure sensors aren't fitted. |
| 10:15 | So this is a situation where we may need to add a fuel pressure sensor, run this into the dyno, or even a mechanical fuel pressure gauge for the purposes of testing. |
| 10:26 | What we should find with a fuel pressure regulator that's manifold pressure referenced, is that if everything's working properly, the fuel pressure should track boost pressure. |
| 10:36 | So what I mean by this is if our base fuel pressure is 43.5 psi and then we run 20 psi of boost pressure, the fuel pressure should come up by the same amount as our boost pressure. |
| 10:49 | So under high boost we should see about 63.5 psi of fuel pressure. |
| 10:55 | If the fuel pump isn't capable of supporting the flow that it needs, what you're going to find is that initially the fuel pressure may come up to the range that we're expecting, however as the RPM increases, the fuel flow is starting to be used up by the injectors, we're going to find that that fuel pressure will start to drop away. |
| 11:15 | So if we can log that, really another good sign that there is a problem with the fuel pump. |
| 11:22 | Either the size of the fuel pump or the voltage supply. |
| 11:27 | Another common area here that a lot of people go wrong is that they'll go to quite a bit of trouble to rewire the aftermarket fuel pump that they've just fitted with a fit gauge, heavy gauge power feed to the pump. |
| 11:41 | They've run it through a relay, they've done everything right in that respect. |
| 11:45 | However it's just as important to also make sure that the fuel pump is supplied with a solid earth. |
| 11:51 | And again if you're relying on the factory earthing this can be problematic in some cars. |
| 11:56 | Particularly there are some model of Subaru where there are known grounding problems for the fuel pump, so that's another thing to consider there. |
| 12:04 | Now of course this doesn't cover every potential problem that you may encounter with the fuel system. |
| 12:10 | Another real common problem that you may encounter is a situation where everything does look like it should be up to task, but you may have a blocked or partially blocked fuel filter that's again reducing the fuel flow at high RPM, right where the engine needs it most. |
| 12:28 | OK so that's covered the basics there of our fuel system limitation, a problem where either we've run out of fuel injector or run out of fuel pump and this is resulting in a lean air fuel ratio. |
| 12:41 | Probably the second most common issue that I've seen in my career is the situation where we've run into an ignition misfire while we've got a car on the dyno. |
| 12:51 | This is a really frustrating situation. |
| 12:54 | Unfortunately is really really common, particularly if we've got a factory turbo charged car and we are increasing the boost pressure pushing it a little bit harder that what it was being pushed in factory form, this can put a lot more stress on the ignition system of the car. |
| 13:15 | And this can in turn result in an ignition misfire. |
| 13:21 | So there are a lot of factors here that can add up to a misfire, and I'm not going to cover all of them, I'm just going to cover off the main ones that I see as the most likely culprits. |
| 13:33 | Of course you always wanna start with your low hanging fruit and basically look at the easiest and quickest solutions to a problem first. |
| 13:40 | It's always easiest too for example either fit a fresh set of spark plugs or gap the existing spark plugs tighter and fix the problem for a very modest outlay in terms of time and money rather than going through and replacing the entire ignition system in terms of coils et cetera, possibly needlessly. |
| 14:00 | So yeah the most common problem I saw was a situation where the spark plugs fitted to the engine either were just old and worn, possibly they had an excessive spark plug gap, or a situation where there are some known vehicles where in factory form, they'll be absolutely fine but as soon as we start leaning on them a little bit harder and increasing the boost, the factory specified spark plug gap can be excessive and this can result in an ignition misfire. |
| 14:32 | And what happens here is as the plug gap is increased we need more and more spark energy in order to bridge that gap. |
| 14:40 | And this gets worse when we increase the boost pressure because the cylinder pressure, pressure inside the cylinder, inside the combustion chamber is physically higher. |
| 14:48 | And this just makes it that much more difficult for the spark to bridge that gap. |
| 14:52 | So a good example of one of these vehicles that I've been involved with over the years in the Australian domestic market Ford Falcon. |
| 15:01 | Specifically the BA through to FG Ford Falcon turbo running the four litre straight six Barra turbo charged engine. |
| 15:08 | Now in stock form these have a factory specified plug gap I think around about 1.1 or even 1.2 millimetres. |
| 15:16 | Now that's not particularly unusual, however with that particular car we know that if we want to increase the boost pressure when we're modifying that particular engine we are going to need to remove the factory fitted spark plugs and simply reduce the plug gap. |
| 15:31 | Fitting a fresh set of factory gapped plugs is actually not going to fix anything, and in this case we need to reduce the plug gap down to somewhere in the region of about 0.8 to 0.9 millimetres. |
| 15:45 | So that's one of the first places I'll start, I'm going to remove the plugs, I'm going to inspect and check the plug gaps and I'm going to try reducing the plug gaps. |
| 15:54 | It's not a difficult task, all we need is a set of feeler blades and a little bit of time and we can easily reduce that plug gap. |
| 16:01 | And on turbo charged engines I'm not afraid to run plug gaps in the range of 22 thou, or 20 thou, maybe half a millimetre that range. |
| 16:11 | There's two schools of thought here, I know that a lot of people believe that a larger plug gap is going to result in a better burn and in turn it's going to result in more power and torque. |
| 16:23 | Personally after testing that theory in several engines, while I can't say that this is an across the board result, I've never been able to see an improvement at power and torque from an excessive plug gap. |
| 16:34 | But what this does lead to on turbo charged engines is an increased likelihood of an ignition misfire under high load under high boost, and that's definitely going to be detrimental to your engine performance so we want to make sure that we stay away from that wherever possible. |
| 16:51 | Now of course beyond the spark plug we can also have a scenario where we do have a faulty coil that's creating a weak spark. |
| 16:59 | So this is just as likely to be a culprit. |
| 17:02 | Probably one of the most common engines that we deal with, here in New Zealand we see a lot of Japanese domestic market vehicles, so I'm going to use those as some examples. |
| 17:11 | The Nissan RB range of engines, we see a lot of those, we've tuned and modified a lot of them. |
| 17:18 | And in particular with the RB series of engines in factory form the direct coil on plug spark ignition system, results in those ignition coils being fitted down in the valley between the two cam shafts and generally there's a factory fitted cover that goes over the top. |
| 17:38 | So essentially these coils are sitting there absolutely cooking with engine heat, and of course we're also seeing some of these vehicles, some of these engines now that may have covered 100000, 200000 kilometers, so it's quite common in these situations to find that the factory fitted coils simply are not up to task anymore and you need to replace them. |
| 18:00 | Now one of the situations here that a lot of tuners get stuck in the trap of, is trying to diagnose a misfire and looking at their air fuel ratio plot on the dyno and noticing that at the time of the misfire the air fuel ratio moves excessively lean. |
| 18:18 | Now that's to be expected, that isn't necessarily the cause of your problem. |
| 18:23 | It's much more likely to be the result of the misfire. |
| 18:26 | Now what happens here is when we get a misfire, a full cylinder of unburnt fuel and air moves through the cylinder and moves out into the exhaust system. |
| 18:36 | And it's the oxygen in that unburnt charge that is being detected by our lambda sensor or our wide band sensor in the exhaust. |
| 18:44 | And this is going to give a false lean reading. |
| 18:47 | Now that's not necessarily as I've said, the cause of our problem. |
| 18:51 | if you are diagnosing what's going on here what you want to do is look at what the air fuel ratio was doing immediately prior to the misfire. |
| 19:00 | Because it is definitely possible that a misfire can be the result of an air fuel ratio that is either excessively rich or excessively lean. |
| 19:09 | But as I've said you need to be looking and analysing your air fuel ratio just at the point prior to where that ignition misfire occured. |
| 19:16 | And if your air fuel ratio at that point is in the ballpark, much more likely to be looking at a spark energy related problem. |
| 19:24 | The other thing with a ignition misfire problem is that it can easily be confused with trigger system problems which we are going to discuss next, so I'll just park that for a moment. |
| 19:39 | If you are looking at a problem on the dyno that is related to spark energy though, regardless whether it's a coil problem or whether it's a spark plug problem, you're going to find that it will get worse as the cylinder pressure increases. |
| 19:55 | And that's because as the cylinder pressure increases it becomes harder to ignite the fuel and air charge. |
| 20:04 | Now what you're going to find for this reason is as the boosters increase on a turbo charged car you're going to find that that misfire gets worse. |
| 20:12 | So this is the common scenario where at low boost we have no trouble, the engine is easy to tune, we've got no misfires then we go and increase the boost pressure, and all of a sudden we've got a problem. |
| 20:22 | Likewise you're most likely to find that your ignition misfire problem, if it's related to spark energy, is going to occur around about the peak torque area in your dyno graph. |
| 20:35 | This is where it gets hardest to ignite the fuel and air charge. |
| 20:39 | Now on that note as well another common problem that novice tuners make is to start with severely retarded ignition timing, with the expectation that this'll make sure that the engine's nice and safe. |
| 20:51 | Now if we can just jump across to my laptop screen here, this is a graph that I do use for other training purposes. |
| 20:58 | But what we want to do here is just take note of what's happening on this graph, So on the vertical axis here we have the pressure inside the combustion chamber. |
| 21:06 | On the horizontal axis we have both our ignition timing as well as where abouts in the engine cycle we happen to be. |
| 21:13 | So the point that we've got here in the centre, zero. |
| 21:16 | This is top dead centre on the compression stroke. |
| 21:18 | So even without the combustion event occurring, what we can see is that as we move towards top dead centre, we see the pressure inside the cylinder naturally starts to increase. |
| 21:30 | And the reason for this is that we've got a volume of fuel and air trapped inside that cylinder. |
| 21:36 | As the piston moves closer towards top dead centre the volume inside the combustion chamber is getting less and less so that fuel and air charge is being tightly packed together then compressed and hence the pressure rises. |
| 21:48 | Now the point here is that if we start our spark event here at the point labelled point A which is 35 degrees before top dead centre, we can see that at this point the cylinder pressure is much lower than if we tried to start our spark event at point C which in this case is 13 degrees before top dead centre. |
| 22:08 | So while you're trying to start with a really safe conservative ignition timing, which I'm all for, I understand that, what's often overlooked is retarding the timing actually can make it more likely to suffer from an ignition misfire, if you're dealing with an engine that has a marginal ignition system to start with. |
| 22:28 | Right let's move onto our third point which is trigger system issues. |
| 22:32 | So when I'm talking about the trigger system, what I'm talking about is the inputs to the ECU that tell it what the engine speed is, as well as where abouts in the engine cycle the engine is at any point. |
| 22:46 | And these are two of the most critical inputs to the ECU. |
| 22:50 | All of the calculations based on fuel and ignition timing are based off these two inputs. |
| 22:57 | I say two but in many instances we may have one and in many instances with cam control engines we may have multiple. |
| 23:05 | So any errors that we're seeing or any errors that the ECU is seeing in terms of the trigger inputs are going to make it very very difficult for us to do a good job of tuning the engine, because we're going to get erratic ignition timing, we're going to get erratic fuel delivery and all of that's going to make things really really difficult. |
| 23:27 | Now it's very dependent on the engine that we're dealing with and of course then we've got the scenario of whether or not we're running a factory fitted OE trigger system. |
| 23:37 | Which we'd like to think in most instances would be pretty rock solid. |
| 23:41 | Or we've cobbled together some after market trigger system for some specific reason. |
| 23:47 | Obviously if we're making our own trigger system and we're not really up to speed with how this needs to be done this can open ourselves up for a huge number of problems. |
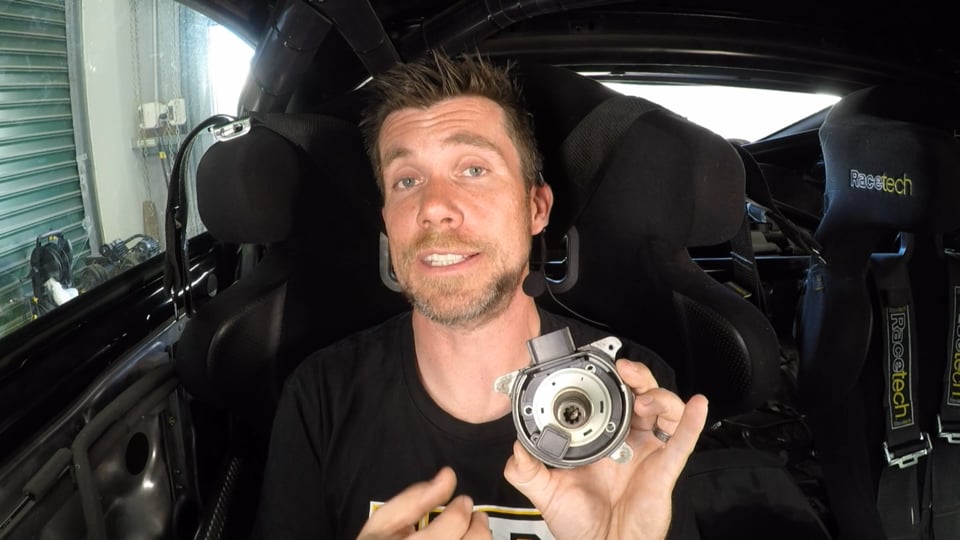
| 23:56 | One of the common trigger problems that we see is from the Nissan 360 degree optical trigger system which I've got here in front of me. |
| 24:05 | This is a cam angle sensor that's fitted to the engine. |
| 24:09 | Hopefully on the GoPro footage here you'll be able to get a pretty good indication of what this trigger disc looks like. |
| 24:15 | But essentially this gives the ECU two pieces of information. |
| 24:18 | On the outside of the trigger disc there are 360 tiny little slots. |
| 24:23 | Remembering that this is fitted to the cam shaft so it's operating at half engine speed and the ECU is going to see 180 of these slots per engine revolution. |
| 24:34 | On the inside we also have a range of slots which tell the ECU which cylinder is firing, where abouts in the engine cycle the engine is at any particular point. |
| 24:46 | Now while this does work quite well in factory engines and there's certainly the Nissan ECU decodes this system quite well. |
| 24:54 | It's got a high tooth count, so it's got a lot of detail allowing potentially very very accurate control of fuel and ignition. |
| 25:01 | The problem comes in that when we start modifying the engine particularly if we fit larger cams this can cause harmonics in the valve train and this can cause essentially an oscillation in the trigger disc, it's going to move backwards and forwards at high speed and this can confuse the ECU, it's going to get multiple inputs where it should be expecting less. |
| 25:23 | And it's going to see too many or too few reference teeth of reference inputs between each of the synchronization inputs. |
| 25:31 | So what this does is it presents a situation where the ECU isn't really 100% sure what's going on. |
| 25:40 | And an aftermarket ECU will quite often log trigger faults or synchronization faults as a result of this. |
| 25:47 | But it's important to understand what this can look like. |
| 25:51 | So if we jump across to my laptop screen here, I've got a log file from a linked G4+ ECU on a Nissan RB engine. |
| 26:01 | And what we can see here at the top of this graph is the engine speed. |
| 26:07 | So this is the logged engine RPM during a ramp run of this particular engine. |
| 26:11 | And I'll just try and expand on this a little bit so hopefully it's a little bit clearer. |
| 26:16 | You can see particularly as the RPM increases the RPM traces really erratic. |
| 26:22 | And this is not normal. |
| 26:24 | In a normal run on a well developed trigger system we should see essentially a really straight line like I've drawn in there. |
| 26:32 | So any time we're seeing the RPM jump up and down like this, this can be an indication that we have a trigger problem. |
| 26:41 | Now the other trace here that I've got shown, is our engine RPM rate of change in red here. |
| 26:48 | So this is the rate of change of engine RPM, in RPM per second. |
| 26:53 | Now what we expect to see here is a little bit of movement in the RPM rate of change. |
| 27:00 | So we can see down here at low RPM, where the engine is just being settled prior to the run at 1800 RPM, we can see that while the engine RPM rate of change is moving up and down a little bit, it's relatively consistent. |
| 27:12 | What we can see here though which is an indication that we've got a problem is this really large spiking in our RPM rate of change up to plus or minus about 5000 to 6000 RPM per second. |
| 27:25 | Now this isn't realistic and this is a good indication that we do have a problem. |
| 27:31 | Now how this manifests itself when we have the car on the dyno though is you'll have an engine where it's really really difficult to maintain control over the fuel delivery. |
| 27:42 | You also may have an engine that exhibits knock or detonation for no apparent reason, that's also inconsistent run to run. |
| 27:50 | An engine where it may not accept the sort of ignition timing that we know should be typical for that particular type of engine. |
| 27:58 | Now I've just got a dyno graph here as well if we can look at my laptop screen, that is a really good comparison of exactly this scenario. |
| 28:07 | So these two runs here, hopefully you'll be able to see the red run on the screen. |
| 28:11 | I know it doesn't show up very well. |
| 28:12 | These are from the same engine. |
| 28:14 | Again this is a Nisson RB26 fitted with a larger turbo charger. |
| 28:18 | I'm just going to trace in the initial red run here just in case it is a little bit hard for you guys to make out. |
| 28:26 | And we'll just talk about the results that we've got here. |
| 28:29 | So we can see that basically up to about 5000 RPM everything is looking relatively consistent, pretty much what we might be expecting. |
| 28:39 | And as soon as we get up to 5000 RPM, up to this point here, the wheels just completely fall off, our torque and power drops away, it's erratic and what we'd find with this particular engine is it wouldn't take anywhere near the timing that we'd be expecting it to take, and the engine would be suffering from knock. |
| 28:57 | In particular the sharp peaks and falls that we've got here in our power graph, this would be a result of the ignition timing being all over the place. |
| 29:08 | So it might go from perhaps positive 20 degrees to minus five degrees and anywhere in between so we're not getting a consistent ignition timing. |
| 29:17 | This would also be really obvious if we had a timing light on the engine during a ramp run on the dyno and we were physically watching the timing being delivered at the crank pulley, it would not be what the ECU was demonstrating. |
| 29:31 | So with this particular engine an aftermarket trigger system was fitted while the engine was still on the dyno and we could see the result with the blue run. |
| 29:39 | So in particular we can see the huge amount of power difference under this area of the curve. |
| 29:46 | We've gone up 81 kilowatts at the wheels at this particular point. |
| 29:51 | And more importantly we've now got an engine that's completely tuneable, it's going to respond to fuel and ignition exactly how we would expect it to. |
| 30:01 | So those are some key points to look for there if you've got an engine that appears erratic to tune, it's knocking erratically but not repeatedly in the same areas run after run. |
| 30:14 | We've got a torque curve and a power curve that are erratic and nowhere near what we're expecting. |
| 30:20 | And then if we're looking at our log data and we're seeing a scenario where the RPM is erratic we've got that large RPM rate of change there as well. |
| 30:32 | Now there area huge range of scenarios that can cause this particular problem. |
| 30:38 | There's too many to list but it's certainly is going to at least point you in the right direction. |
| 30:44 | It could come down to a mechanical problem with the trigger system design. |
| 30:48 | It could just be a problem with the phasing of the reference input to the synchronization input that's coming from the camshaft for example. |
| 30:58 | It could be to do with the setup electronically inside the ECU for the likes of the magnetic or reluctor sensor threshold or voltages. |
| 31:11 | Another common one that I just wanted to cover off here because this has been discussed a little bit online recently and I just wanted to show an example. |
| 31:19 | This comes straight from the Link G4+ help file, under their solving trigger issues section so if we can jump into my laptop screen. |
| 31:28 | A really common type of trigger system is the multi tooth missing, where you might have perhaps a 36-2 or maybe a 60-2 trigger wheel. |
| 31:37 | So at the top here I'm just going to basically paraphrase what Link is saying here. |
| 31:42 | At the top here we can see how that missing tooth section is designed. |
| 31:46 | And this is generally the correct way of designing that missing tooth. |
| 31:50 | You can see that the missing tooth section is not full depth here. |
| 31:56 | It's only about half the depth of the teeth and that's a really important aspect. |
| 32:02 | What we find here is that if the gap is designed correctly this is the sort of signal that we're going to find from the reluctor sensor across that missing tooth. |
| 32:15 | We can see here the missing tooth as the scope picks it up. |
| 32:20 | And we can see that in particular the amplitude of the signal is slightly higher here across that missing tooth than what we see for the rest of the signal. |
| 32:30 | So that's what we want to see, that's a well designed system that's working correctly. |
| 32:35 | Another common way particularly in the aftermarket is to develop a missing tooth trigger wheel that looks a little bit like this, where the missing tooth section is full depth. |
| 32:44 | Now the problem with this is at higher RPM what we're going to see is the amplitude over that missing tooth is massively increased. |
| 32:53 | So this particular log here, this particular capture, it was made at 7200 RPM. |
| 32:59 | Now at this particular point everything is actually still working. |
| 33:03 | The key point here is to look at what's happening as we come down after the missing tooth. |
| 33:09 | And the point that Link have labelled here, B, we can see that the voltage actually drops still below the zero threshold. |
| 33:18 | So I'll just draw that in so you can see. |
| 33:20 | So the voltage comes down and it drops down below the zero point. |
| 33:25 | So at this point the ECU is still seeing the signal it's required to see, the voltage is still dropping through that zero threshold so the ECU will see the correct signal. |
| 33:36 | However what happens as the RPM increases further is that the signal will no longer drop through zero. |
| 33:43 | So we end up with our signal dropping down and just coming back up. |
| 33:47 | So the ECU essentially misses that tooth completely and it will start resulting in a misfire. |
| 33:53 | So it's really easy to see on a scope, and the problem you will see with this sort of system if your missing teeth are designed like this, is you're going to see a misfire that occurs at high RPM. |
| 34:06 | OK so we've covered our trigger issues, now we're going to move on and we're going to talk about wiring issues. |
| 34:13 | Now this is another real big can of worms that's really impossible for me to cover everything because there are so many potential causes for issues here when it comes to wiring. |
| 34:27 | In particular though if I covered off the most common scenarios that I see, one of the main areas would be issues with the power feeds to the ECU as well as poor grounding. |
| 34:42 | These are really really common areas where if the ECU is not correctly grounded and doesn't have a solid power feed to it, it's not going to be able to do its job properly. |
| 34:53 | Another issue which really comes back to our triggering is on these trigger inputs it's essential to shield these sensors, these inputs correctly to avoid the ECU being affected by interference inside the engine bay, it's obviously electrically a very noisy place to be operating so we want to make sure that our trigger inputs are correctly shielded. |
| 35:17 | We wanna make sure that our engine is correctly grounded and our ECU is correctly grounded to the engine block. |
| 35:25 | A real easy mistake to make here is particularly after an engine has been rebuilt, if the block has been painted it's really easy to put the engine back into the car and connect our grounds both to the ECU as well as our main battery ground through the chassis. |
| 35:42 | And if we haven't removed the paint from the engine block we're not going to get good contact with those earth points and it's going to cause a huge manner of really tricky and frustrating problems to fault find. |
| 35:57 | Another issue that I quite often see is where someone who really doesn't understand the wiring process for an aftermarket ECU hasn't really followed through the wiring recommendations of the ECU manufacturer, has gone through and grounded their sensor wiring straight to the engine block instead of back to the sensor ground point at the ECU. |
| 36:19 | Now every ECU is different in how they specify this. |
| 36:23 | But generally all of our analog voltage inputs in particular things such as our manifold absolute pressure sensors, our throttle position sensors, our thermistor inputs such as intake air temperature and engine coolant temperature, rely on being able to very accurately measure voltages from the sensor zero vault plane, so it's important that those sensors are grounded at the sensor zero volt input on the ECU. |
| 36:51 | When we're talking about older engines, older cars as well we start seeing a variety of other problems crop up, just simply due to the age of the wiring harness to the age of the components fitted to the car. |
| 37:04 | And again really coming back to my earlier example of the Nissan RB, another problem with those RB engines is the coil harness that runs to the ignition coils, just like the ignition coils themselves, that harness is run underneath a cam cover and it's stuck down there in the valley between the two camshafts, and it's simply being cooked every time the engine is running so it's quite common to see problems with the wiring fail, the connectors themselves fail there, and this in turn can result in some problems when we're running the engine on the dyno. |
| 37:39 | Lastly here another thing to look for which hopefully won't be that common is mechanical damage to the wiring harness. |
| 37:45 | So this is where it's been perhaps rubbed through and damaged on a component in the engine bay, maybe it's been damaged because it's been run too close to the exhaust system and it's physically been melted. |
| 37:59 | So these are things that should go without saying when it comes to designing our wiring harness. |
| 38:05 | But of course as engine tuners, often all of these things are done without any input from ourselves and we're just simply left to pick up the pieces, and it can be a really frustrating exercise trying to fault find and figure out what of a myriad of potential problems is causing the current issue that we're seeing. |
| 38:22 | Doesn't help that of course a lot of these issues can look the same. |
| 38:26 | So a wiring problem can cause a misfire and of course we now know that that misfire could be related to a wiring problem, it could be related to a spark energy problem, or it potentially could be related to a triggering problem as well. |
| 38:41 | OK we are going to move into some questions and answers really shortly. |
| 38:46 | I've got one more aspect to cover off. |
| 38:48 | So as usual please if you do have any questions to ask, ask them now in the comments and Ben will transfer those through to me. |
| 38:58 | OK so the last aspect which becomes a little sort of a point that can be argued here, is the result of mechanical failure while a car is on the dyno. |
| 39:11 | Now I'm not talking here about a situation where we've put a car on the dyno and we've gone for gold, we've tried to max out every component on the engine making maximum power, and we've resulted in a rod hanging out the side of the block. |
| 39:26 | These sort of failures obviously are fairly clear, they're fairly cut and dried as to what has gone wrong. |
| 39:32 | And I don't wanna get into the argument of who's fault that is, whether it's the tuner, whether it's the engine builder, or whether it's the person that specified the package. |
| 39:39 | What I'm really wanting to focus on here is a couple of the issues that I've seen over my career which are not the result of a tuning fault, a tuning problem, but something that we can pick up or should be looking for when it comes to tuning the engine. |
| 39:56 | Conversely this is also one of those areas that is hotly debated as to whether or not it is the fault of the tuner. |
| 40:04 | I strongly believe, and I'm gonna talk more about this shortly, I strongly believe that it is not a tuning fault. |
| 40:10 | So the two aspects that I wanna talk about here are a head gasket that begins leaking while the car's on the dyno, and an engine bearing problem. |
| 40:20 | So we'll start with talking about the head gasket. |
| 40:22 | Now I'm not talking here about your everyday road going engine, what I'm talking about mainly will be related to high boost high powered engines. |
| 40:32 | Over my career I spend a lot of time tuning high powered drag engines. |
| 40:36 | And particularly since I focus mainly on the Japanese domestic market, the engines that we're dealing with are predominantly factory based engines that may have only been designed to produce maybe 300 horsepower, maybe 500 horsepower, and we've modified them heavily, and we're expecting that 300 horsepower engine or those bare components, the block and the cylinder head, to now support 1200 or maybe 1300 horsepower. |
| 41:01 | So what this results in is a huge increase in cylinder pressure, and of course it's the job of the head gasket and the fastening system that holds the head down to the block to cope with that cylinder pressure and hold it all in. |
| 41:15 | And while we'd like to think that all of our engine components, the cylinder head and the engine block, are rock solid and don't move around, under these sorts of conditions the components actually flex much more than we'd expect. |
| 41:29 | So it's really quite common when we're starting to push the limits in terms of boost pressure on a small displacement engine, we're going to find that our limiting factor beyond the component strength of the piston, conrods, and crankshaft, is actually the head gasket integrity, or in other words how well the cylinder head gasket seals and keeps that combustion pressure inside the engine. |
| 41:53 | Now what we're going to see normally is if the head gasket fails, we're going to see that that combustion pressure will escape from the cylinder and it's first of all going to make it's way into the water jacket. |
| 42:04 | Here it pressurises the cooling system, pressurises that water and inevitably the cooling system will become over pressured. |
| 42:13 | We're generally going to have a radiator cap that will be rated to something like 20 or 22 psi maybe. |
| 42:20 | It's going to see much more pressure than that, and it's going to result in the radiator cap releasing this extra pressure and it's going to push water out into the overflow. |
| 42:30 | So that's going to be the signs of a head gasket that's leaking. |
| 42:34 | Now initially this may not actually show up, we might not be too aware of this with the actual dyno results. |
| 42:41 | If the head gasket is only leaking slightly, it may have very little impact on our actual tuning, the engine tune's still going to look absolutely fine, but it is one of those aspects that we do need to keep an eye on. |
| 42:54 | Now in particular what I'd suggest here, if we are tuning an engine that we're pushing like this, one of the key things that I always did, was I ran the overflow from the radiator, instead of into the normal header tank which often is buried, often you can't physically see what's in that, I'd run it temporarily for the tuning process into a clear container. |
| 43:17 | Maybe even an empty Coke bottle or something similar. |
| 43:21 | Now what this allowed me to do, is perform a run on the dyno and then after the run I could get out and I could have a look and see if any water had been pushed out into the overflow. |
| 43:30 | And this was a sign, if I was starting to see water getting pushed into that overflow, this was a sign that we were at or potentially getting beyond the head gasket's sealing limitations. |
| 43:40 | So really easy thing to look at there. |
| 43:43 | Of course we don't wanna continue running the engine if the head gasket is leaking. |
| 43:48 | Initially this isn't a major issue. |
| 43:50 | What we're going to do is just have to replace the head gasket. |
| 43:54 | But it generally, if we catch it early, it's not actually going to do any damage to the cylinder head or the engine block. |
| 44:01 | If we do ignore the warning signs though and keep running the engine, this can damage those components and require a lot more corrective work so we do want to watch this and catch it early. |
| 44:12 | Another indicator here from the driver's seat that we may have a problem with this sort of engine, is the scenario where the engine mysteriously overheats after a dyno run. |
| 44:23 | We may find that the engine coolant temperature starts to increase near the end of the run, and then once we come back to idle, we'll see that engine coolant temperature continue to increase quite dramatically, and it may take some period of time to come back. |
| 44:38 | All of these are indicators that we may have a problem. |
| 44:42 | In some of the high powered drag applications that I was involved with, because this was an occupational hazard, we fitted coolant pressure system sensors so we could physically monitor and log what the coolant pressure was doing. |
| 44:55 | And if we saw the pressure start spiking up above the pressure rating for our radiator cap again this is an indicator that we have a problem there. |
| 45:06 | The other aspect that I wanted to talk about here was our bearing failures. |
| 45:11 | So sadly this is another problem that is a little bit more common than you'd like. |
| 45:16 | Often you're going to find this occurs in an engine that is either getting old and pretty tired, hasn't been well looked after, or alternatively it's quite common to find in a freshly built engine where something hasn't been addressed, maybe the clearances aren't quite correct and this results in a metal to metal contact during the running in process while we've got the car on the dyno. |
| 45:42 | Now I've found that this is often something that we will actually pick up initially through audio knock detection equipment. |
| 45:48 | What we're gong to hear is particularly under light load the engine bearings, basically when the bearings make metal to metal contact they wear very very quickly and this results in an increase in the clearance. |
| 46:02 | And this will show up as an audible knocking or rattle and it's noticeable particularly as we come off and on the throttle. |
| 46:10 | If we're actually under moderate load, the cylinder pressure tends to load the piston and then the conrod against the crankshaft. |
| 46:16 | So we don't tend to hear too much noise. |
| 46:19 | But as we're on and off the throttle and the cylinder pressure is reduced, this allows the piston and rod assembly to essentially float on the conrod journal, the crank journal, and this is where we hear the noise. |
| 46:30 | So if you hear anything like this, this is s good indicator that we may have a problem. |
| 46:35 | Another way that this will show up on an engine that is run in, and we're actually enduring the tuning process, is if we are doing some back to back runs on the dyno or some ramp runs on the dyno, we've got a baseline pull, and we've made a small change perhaps to our fuelling or our ignition timing or our boost and maybe we're expecting a mild increase in power. |
| 46:55 | If we perform another run and for some unexplained reason we've got a significant drop off in power, this can be a really good warning alarm bell, something is not right, it can be a result of that additional friction, due to the bearing material being destroyed, that is causing that drop off in power. |
| 47:15 | So at this point I'd be looking for that tell tale rattle. |
| 47:21 | We can often hear this at idle if we simply give the engine a rev up and down, and this would be an indicator that we need to abort, stop what we're doing, and make sure that everything is OK. |
| 47:33 | Unfortunately if it is a bearing problem, it's not gonna be OK, the engine's going to need to come out, and it's going to need to be assessed and rebuilt. |
| 47:42 | But of course that is at that point beyond our control. |
| 47:47 | If we are monitoring oil pressure as well, This could be a result of low oil pressure so it's a really good idea, particularly on a freshly built engine, to always have an oil pressure gauge fitted to the engine. |
| 47:59 | Even if it is only during the running in process, this has saved a number of engines that I've been tuning where I've noticed that the oil pressure is low and as the oil comes up to temperature, starts to drop away dramatically. |
| 48:13 | A tuner colleague of mine just recently had this on a Mitsubishi 4G63. |
| 48:17 | Had a full engine build by a professional engine builder, they'd put the engine in, started it up. |
| 48:23 | Initially had reasonable oil pressure, although probably not as high as they'd have expected. |
| 48:29 | And after the engine started running on the dyno quickly the oil pressure dropped away to the point where it was making less than 20 psi of oil pressure at about 2500, 3000 RPM. |
| 48:42 | At which point the tuner stopped the running in process and then end result of this was during the engine build the balance shaft had been removed, but the engine builder had forgotten to rotate the balance shaft bearings to block off the oil feed inside the engine block to the balance shafts. |
| 48:58 | So essentially there's a massive oil leak internally inside the engine. |
| 49:03 | OK so again this hasn't been a comprehensive look at every potential issue that you may come across. |
| 49:11 | Even now after 15 years in the industry, I still occasionally will put a car on the dyno and find a problem that I have never seen before. |
| 49:22 | So that's probably one of the aspects that I still enjoy, there's always something new to learn. |
| 49:27 | But those are definitely five of the most common mistakes, or common problems that I see. |
| 49:32 | And hopefully if those can save you time, then watching this webinar has been well worthwhile. |
| 49:39 | We'll move into our questions now. |
| 49:41 | Again if you do have any more questions, please ask those and I'll attempt to answer them shortly. |
| 49:48 | First question comes from Kester J, who's asked, the shape of the curve for when the fuel is static versus reference. |
| 49:54 | I think Kester's there talking about my discussion around the shape of our fuel table will broadly be the same as the shape of our torque curve. |
| 50:04 | So really what I was talking about here was under wide open throttle conditions. |
| 50:10 | So if we've got a naturally aspirated engine at that point a relationship between our fuel pressure and our manifold pressure, should be relatively fixed. |
| 50:19 | So at this point yeah the shape should be the same as our torque curve or very similar to our torque curve. |
| 50:26 | The only situation where we wouldn't see that is if we're running a fixed fuel pressure on a turbo charged or super charged engine where the ECU isn't really accounting for this. |
| 50:38 | Maybe it's an injection time based ECU. |
| 50:40 | In this case this does throw things off slightly. |
| 50:44 | Janu's asked do you recommend bypass fuel pump controller and hardwire them with an aftermarket pump? Is a fuel pump controller a must have for an everyday daily driver? Look in most instances I don't run a fuel pump speed controller with a heavily modified engine. |
| 51:00 | There's two schools of thought here. |
| 51:02 | Yes there can be some advantages to the fuel pump speed controller. |
| 51:06 | The two advantages really are that the fuel pump speed is going to be reduced under low fuel requirements, so idle and cruise. |
| 51:15 | This in turn is going to mean that the fuel isn't going to be needlessly circulated through the fuel system which can reduce the temperature in the fuel system. |
| 51:23 | The other aspect which is probably more relevant though is that it reduces the noise from the fuel pump. |
| 51:29 | It's dependent really on what you're trying to achieve. |
| 51:32 | If you've got some really large fuel pumps in a daily driver where noise is a big consideration then there's no harm in running a fuel pump speed controller. |
| 51:42 | I think there's probably a cross over point where you're getting to the point where you're making enough power that the fuel pump speed controller's probably not necessary and you're also probably at that same point where the car's not really that great as a daily driver anyway. |
| 51:58 | Chances are the noise from the fuel pump is the least of your worries. |
| 52:03 | In our own Toyota 86 though, we have quite comfortably run an aftermarket fuel pump through the factory Toyota or Subaru fuel pump speed controller with no issues. |
| 52:14 | Obviously there's going to be a limitation there depending on the amount of current that the fuel pump speed controller is able to provide. |
| 52:22 | And as we move to a larger fuel pump that's going to require more power, this may become a limiting factor and mean that the fuel pump isn't going to be able to get the voltage and current that it's requiring. |
| 52:35 | Next question is what's the signs to look for to detect a failing wide band sensor? Will it begin reading richer and richer, or will it read sporadically? OK in my own experience I generally find that there isn't much of a drift in the sensor reading. |
| 52:51 | What I generally find is that the sensor will read, it'll read accurately, and then it will simply drop out and stop reading all together. |
| 52:58 | So this is probably not something I could say across the board. |
| 53:02 | In general I'm running Motec PLMs, or a Motec LTC. |
| 53:08 | In our dyno we're also running the NTK wide band sensor as well, so I can't say that this is something we could use across the board. |
| 53:18 | But in my experience with both the Bosch LSU 4.2, Bosch LSU 4.9, and as well as the NTK sensors, these sensors tend to read accurately and then simply stop working altogether. |
| 53:31 | If you do use wide band system that allows free air calibration, this is something that you do want to do reasonably regularly though. |
| 53:41 | TDE Champ said what's a general rule for lower spark plug gap in relation to boost or power output? Tyler I don't think I'd say I really have a fixed rule of thumb. |
| 53:52 | If the engine is misfiring, i'll certainly try dropping the spark plug gap. |
| 53:58 | And I'm not afraid to go down as low as I've said sort of 20 thou, maybe 18 thou, that sort of range. |
| 54:07 | We do get a problem when we start going very very tight in the plug gaps. |
| 54:11 | Essentially we create a spark that is so small that that in itself can create a misfire event. |
| 54:18 | So I probably if I needed to, if I'm still having problems with ignition misfires and I'm down around the sort of 20 thou 18 thou, around about that half a mil plug gap, I'd probably be starting to look for other potential problems. |
| 54:33 | Now that's sort of certainly a plug gap I'm more than comfortable running in a competition turbo charged engine. |
| 54:41 | Possibly for a road car you may want to be a little bit wider than that. |
| 54:45 | But as I've said in the body of the webinar, you are much more likely to have problems from a misfire than you are from potentially losing power and torque as a result of a plug gap that's a little too tight. |
| 54:59 | Next question is do we have a list of spares or a list of items that you recommend a customer bring when they're getting their car tuned? For example spark plugs et cetera. |
| 55:09 | This list would be reasonably comprehensive and it's probably a webinar for another day really, it's more to do with the pre dyno checklist. |
| 55:18 | We obviously can't expect to have a full set of spares. |
| 55:23 | Generally though in terms of the one aspect you have mentioned there, it would be great to start the dyno session with a fresh set of spark plugs that have been correctly gapped. |
| 55:34 | Now on some engines it's obviously a 10 minute job to change a set of spark plugs but on some engines that is a major pain in the bum and you really want to have that done before the car goes on the dyno. |
| 55:46 | Otherwise it's gonna waste a huge amount of time. |
| 55:48 | Which is difficult to charge for, and generally if you're the customer, it's gonna end up costing you more money than you're really expecting for your dyno session. |
| 55:57 | So if we can have everything ready to run then that's ideal. |
| 56:02 | Probably one of the other aspects there just to do with your question though, that I didn't add in my list of five topics, is boost control system plumbing is another really really common scenario. |
| 56:15 | I see this wrong much more often than I see it right. |
| 56:18 | And while often it's pretty easy to sort out while the car's on the dyno, generally you're gonna be trying to do this when everything is at operating temperature. |
| 56:27 | Normally it results in a few burns and a few curse words and not really that great. |
| 56:32 | So if we can get the boost control system tested before the car goes on the dyno, that's just gonna make everything go much more smoothly as well. |
| 56:42 | Lewis Hall has asked how many psi or bar is considered low and high boost? That's a really good question actually and I don't think there is a specific line in the sand. |
| 56:54 | What I would consider low boost is for some other people probably starting to sound scary high. |
| 57:02 | It's also gonna depend on what fuel you're running. |
| 57:04 | So particularly on a pump gasoline where the octane is relatively low, it's a poor grade of fuel, we're really limited on what we can run in the way of boost pressure before we get to a situation where the engine is simply starting to suffer from knock. |
| 57:19 | We go 'round in a circle adding boost, removing timing to prevent the knock, and we're making no more power, but adding a whole bunch more heat and stress into the engine. |
| 57:27 | So just to give you some rough guidelines here, on pump gas in most instances, although it can't be an across the board rule of thumb, in most instances I find that we're generally limited to somewhere in the region of maybe 22 to 25 psi of boost pressure. |
| 57:44 | At that point we get into that realm where we're really knock limited, really knock sensitive and we need to retard the timing to prevent that knock occuring. |
| 57:52 | So we can add boost pressure but more often than not it's actually going to not give us any more power. |
| 57:56 | When we're dealing with a good quality fuel, maybe a race fuel or maybe E85 for example this gives us much more potential to increase the boost. |
| 58:05 | So for me if I'm talking high boost, I'm probably starting to look at 30 plus psi. |
| 58:12 | Of course in drag applications it's not uncommon to run 60, 70, or even 90 plus psi of boost. |
| 58:19 | So for those guys 30 psi is just probably starting to come up on the turbo a little bit and really isn't stretching anything. |
| 58:28 | So it's very dependent on your application and your own expectations. |
| 58:34 | Next question comes from Daniel Schultz who's asked what's your thought on indexing the spark plugs so the opening of the gap is facing a more unified direction? More or less if all the spark plugs are facing a certain direction, could that alter or make a difference within the combustion chamber? OK yeah good question there, this is something that has been addressed a few times it has come up a few times. |
| 58:54 | So indexing the spark plugs, as Daniel has mentioned, the idea here is that we're facing all of the electrodes in the same uniform manner. |
| 59:02 | Generally the idea is to face the plug gap, the open plug gap towards the intake valves of the engine. |
| 59:09 | This relies on making a mark down the ceramic on the spark plug generally with something like a sharpie marker so we can visually see when the plug is installed what the orientation of that line is, and then by shimming the spark plug with thin washers we can adjust the indexing of the plug. |
| 59:27 | I have tried this myself with some of our Mitsubishi 4G63 drag engines, and what I can tell you is in my own experimentation it didn't have any effect, either beneficial or negative. |
| 59:40 | I couldn't of course say that that holds across the board for every particular engine. |
| 59:45 | But in my own experimentation, I didn't see any advantage. |
| 59:51 | Joshua Lays asked do plasma coils really make a difference? Like the Okada plasma coil to get a bigger spark. |
| 59:57 | Not something that I've personally tested so I can't really give you an answer there. |
| 01:00:03 | In our drag applications we're typically running a capacitive discharge ignition system to give a high level of spark energy. |
| 01:00:11 | These days we're seeing a lot of really high energy inductive coils available in the market anyway and this is really reducing the need for CDI ignition. |
| 01:00:21 | Yeah I don't have any experience with the plasma coils though so I can't really give you too much more to work with there I'm sorry. |
| 01:00:30 | Actually what I will say though, 'cause this really goes for my testing between inductive ignition and CDI ignition, I'm gonna assume that the same probably could be said for the plasma coils, is that provided we aren't suffering from an ignition misfire, I've never seen the benefit of increasing the spark energy. |
| 01:00:49 | So I've done this on a Mitsubishi 4G63 that was producing around 700 wheel horsepower. |
| 01:00:55 | We went from a factory induction ignition system, inductive ignition coil system, through to a M&W CDI ignition system, and back to back we saw no more power difference that we'd expect from a run to run variation. |
| 01:01:11 | Of course that's not to say the CDI doesn't have it place. |
| 01:01:15 | If we increase the boost further and made more power the inductive ignition system had its limitations, that's where the CDI system came into play. |
| 01:01:25 | Evo Auto's asked what type of spark plug do your prefer? Iridium, platinum or copper? Look it's really down to the application. |
| 01:01:32 | I think there's a big sales pitch around the rear earth material such as iridium and platinum. |
| 01:01:39 | In my own experience on a lot of our high powered drag engines we were running relatively basic copper spark plugs. |
| 01:01:45 | One of the things with the iridium or platinum plugs is their advantages are actually more around their service life. |
| 01:01:53 | So particularly useful in these engines where it is quite time consuming and difficult to replace the spark plugs. |
| 01:01:59 | The iridium plugs tend to offer a much longer service life, which means that the maintenance costs for a production road car come down because the plugs don't need to be replaced as often. |
| 01:02:10 | Of course for our application for motorsport use we're going to generally be replacing these plugs much more frequently so that becomes much less of a concern. |
| 01:02:22 | The Stig's asked is there any auto manufacturers that you find where the wiring does not have proper shielding of sensors and or the ECUs? Look nothing that springs to mind there, I can't say that's not the case, but certainly I mean if you're dealing with an OE application it's fair to assume that that particular application's gonna be pretty well sorted in factory form. |
| 01:02:45 | And if we're swapping to an aftermarket standalone ECU developed for that vehicle, again we shouldn't expect any real problem. |
| 01:02:54 | Brian Lord has asked 4G63 Evo 8, 9 stock coil failures common on the M800? What aftermarket coil on plug to look at? Is the factory gap a cause under high boost? Ok I mean I've spent a high part of my career working on Mitsubishi Lancer Evos of all generations and I can't say that I've had problems with the stock coils failing on M800 Motec ECUs. |
| 01:03:23 | If you are having problems with that, I wouldn't mind betting that you may have a problem with your dwell table If you're over dwelling the coils, this can result in premature failure. |
| 01:03:33 | Having said that the factory coils do still have their limits. |
| 01:03:38 | And the two options that we've used both come from Spark Tech. |
| 01:03:43 | They were a sponsor of some of our drag cars back in our earlier days. |
| 01:03:46 | But I mean beyond the fact that they were a sponsor I feel that they are probably one of the best value for money products for the Mitsubishi Evo platform. |
| 01:03:54 | Plug and play, incredibly simple to fit, reliable and they do what they say they're gonna do. |
| 01:04:00 | Doesn't hurt that they look pretty great as well. |
| 01:04:03 | So for a road car I would tend to be recommending the inductive system though unless you had a very good reason to go to the CDI system. |
| 01:04:12 | CDIs really do still have some reliability problems. |
| 01:04:17 | Maybe saying they've got reliability problems isn't quite fair. |
| 01:04:21 | But they are very very sensitive so that's something you need to consider. |
| 01:04:25 | It's very very easy to damage a capacitive discharge ignition system. |
| 01:04:29 | I recall one of the drag cars that we built that held the late model Mitsubishi Evo world record, one of the very first times we ran that, was running the Spark Tech CDI system, which runs consequently a M&W CDI, Spark Tech don't actually make that component. |
| 01:04:45 | We started the car up, moved it out of the trailer ready for a day's drag racing, it was sitting there idling and the car just shut off. |
| 01:04:52 | And the reason for that was the CDI computer itself had failed. |
| 01:04:56 | I never really got a good indication as to why that was. |
| 01:05:00 | But CDI computers can be actually damaged if the engine does misfire, so there's huge amount of spark energy, when it can't jump the plug gap, it ends up doing some nasty things sometimes inside the CDI computer. |
| 01:05:16 | Tim W's asked is there any downside to gapping down the spark plugs from the plug longevity? Or as far as you're concerned does gapping the plugs not affect their life? Wondering if it's better to buy the plug with a low a gap as manufactured or if reducing the plug gap is totally equivalent? Yeah absolutely no problem in reducing the gap, and probably the other issue you're going to find is that there aren't a huge number of plugs that I've come across with the sort of tight plug gaps that we may require for really high boost applications. |
| 01:05:49 | So yeah no problem with actually gapping those tighter. |
| 01:05:53 | Last question comes from Mike Mann, touching on the subject of running out a fuel pump and seeing high VE numbers at the end. |
| 01:05:59 | If the base pressure's 320, is dropping to 290 differential OK or normal for a Bosch 044 supplying four 800cc injectors? Look I would like, obviously if everything is working perfectly I would like to see that differential pressure remain absolutely consistent. |
| 01:06:22 | If we've got 320kPa base pressure, we should see that differential pressure remain the same regardless of whether we're at 2000 RPM or we're at 7500 RPM. |
| 01:06:34 | What that would suggest to me is you are probably starting to get to a point where your fuel pump flow is getting potentially marginal. |
| 01:06:45 | Whether or not that's an issue for you, I mean essentially if 290 kPa, given your injector size is still enough to physically achieve your target air fuel ratio and leave reasonable head room in your injectors, and that's not necessary to say you have a problem. |
| 01:07:01 | It would indicate you are approaching that limit though and what it's going to mean is unless your ECU is directly compensating for that change in differential pressure which a lot of them these days will be if you've got a fuel pressure sensor fitted, you're going to be artificially accounting for that drop in differential pressure in your fuel table or your VE table. |
| 01:07:23 | Now to give you an example there, is that normal, no it's not necessarily normal. |
| 01:07:29 | We've just done a complete upgrade on our Toyota 86 using a Radium fuel surge tank fitted in tank with a Walbro 450 fuel pump, and a Turbosmart fuel pressure regulator fitted in the engine bay. |
| 01:07:45 | We're actually running four bar differential pressure on that engine and we achieve a four bar within about plus or minus five or six kPa throughout an entire dyno run, so definitely we can achieve a fixed fuel pressure, or fixed consistent differential fuel pressure. |
| 01:08:01 | Now the other thing I should probably add to that is some of this may be an aspect of your fuel pressure regulator as well. |
| 01:08:07 | Not all of these are created equal. |
| 01:08:09 | OK guys that brings us to the end of our questions. |
| 01:08:12 | Hopefully you've taken something away from today's webinar that is going to be able to save you time next time you hit the dyno. |
| 01:08:20 | Now for those of you who have been watching online remember this is one of our member's webinars. |
| 01:08:26 | This is something we run every week, and you can join up as a High Performance Academy gold member that'll give you access to these webinars. |
| 01:08:35 | You'll also be able to view over 140 hours of existing content in our webinar archive. |
| 01:08:40 | Alright thank you guys for joining us, I look forward to seeing you all next week. |


