144 | Pre-Tune Checklist
Summary
If you want to get the best out of a tuning session it’s important to start with a solid base to work from. In this webinar we’ll cover the critical pre-tune checks that every car owner or dyno tuner should be going through prior to loading a car onto the dyno. These checks will save time and money, and may even save an engine.
| 00:00 | - It's Andre from the High Performance Academy, welcome along to today's webinar where we're going to be discussing some of the pre tune checks that you should be making to any car before it goes on a dyno. |
| 00:13 | Now from my own experience with around about 15 years in the dyno tuning industry now, I'd say that on average out of every five cars that I tune, probably only one of those cars actually goes on the dyno, gets tuned with absolutely no drama or no problems and then rolls off the dyno again and back out to the customer. |
| 00:36 | The other four cars out of that five are going to present some level of trouble or problems to the tuner. |
| 00:43 | Now of course some of these might be quite minor and can be rectified relatively quickly and easily. |
| 00:49 | But on the flipside of it there's always some significant problems that can end up wasting a huge amount of time. |
| 00:55 | Now when it comes to dyno time, it's expensive. |
| 00:59 | So anything that wastes time is simply going to cost money. |
| 01:03 | If you're the customer taking your car to a dyno shop then you're going to end up with a bigger bill than you were hoping for. |
| 01:10 | The problem with this is likely that you're going to actually have to still take your car back so that the tuning process can be completed, if the problem that was struck was significant enough. |
| 01:21 | As a tuning workshop on the other hand, if you strike problems, often these can be very difficult to charge out at your normal dyno rate. |
| 01:31 | This becomes a situation where you end up making less money potentially than you could if you were simply running the dyno all day every day. |
| 01:41 | So regardless what side of the fence you're on, whether you're a car owner or a dyno shop operator, obviously these problems that we can strike, aren't something that we want, and we wanna be able to do anything we can to prevent these problems from cropping up. |
| 01:57 | So we're gonna go over what I've experienced as the most common problems. |
| 02:03 | Some of these are incredibly simple, some of them are a little bit more complex. |
| 02:06 | The incredibly simple ones, you should think would go without saying, but time and time again we see these problems crop up so I'm going to talk about them. |
| 02:14 | As usual we will have questions and answers so if you do have anything that you'd like me to talk about or anything that I discuss that you'd like me to go into more detail on and elaborate on, please ask those in the comments or in the chat and we'll deal with those at the end of the webinar. |
| 02:30 | OK so we're going to start with one of the most simple aspects and that is the fuel in the car. |
| 02:37 | You'd be surprised how many times a customer has dropped off a car to me to have it tuned, and I start the car up and find that the low level fuel light warning is already glowing, right from the start. |
| 02:50 | Now tuning is not magic, in order to actually be able to tune the engine, we are going to need to run it on the dyno. |
| 02:58 | This does require fuel and particularly if we are completing a relatively significant tune, a tune from scratch for example, we're actually going to end up going through quite a large volume of fuel. |
| 03:11 | So this is the first place to start, we want to make sure that the car always starts with a full tank of fuel. |
| 03:18 | Now it goes a little bit deeper than that as well though. |
| 03:21 | There is a little bit more to consider here. |
| 03:23 | We also wanna make sure that the car is delivered for tuning with the type of fuel that the owner is planning on running. |
| 03:33 | Now again you'd think this would go without saying, but there's two instances here that I quite often strike. |
| 03:39 | One is where the customer delivers their car for tuning on a special race fuel, maybe this is something like VP Racing's Q16 or C16, or maybe it's something a little bit simpler like E85. |
| 03:52 | There's sometimes an expectation from the customer that the dyno shop is going to be able to provide that particular fuel. |
| 04:00 | Now of course sometimes that might be the case, but certainly in the case of the dyno shop that we ran, we didn't hold fuel on site, it was actually illegal for us to do so. |
| 04:09 | So this presents a big problem. |
| 04:10 | We couldn't easily get access to Q16 or E85 at the drop of a hat, this needed to be prearranged, so at this point we find that we can't tune the car, we've wasted a potential dyno booking, the customer's unhappy, they're without their car, and then we've got to bump other dyno bookings potentially later in the week in order to fit that car in. |
| 04:30 | So make sure the car is filled with the fuel that we're going to be running it on, or is supplied with the fuel that the customer wants. |
| 04:40 | Another slightly weirder situation that I've struck with a lot of customers, or a few customers I should say, probably not the majority, is where they've delivered the car with the tank filled with a high octane pump fuel. |
| 04:54 | Here locally in New Zealand the highest grade pump fuel we have access to is 98 octane. |
| 05:00 | It's still not an amazing fuel but it does certainly help, particularly if we're tuning a turbo charged engine that's very sensitive or prone to suffering from detonation. |
| 05:10 | These customers though intend to actually run the car after it's tuned, on a lower grade 95 octane fuel, which at the pump is slightly cheaper. |
| 05:21 | Now in my mind as a tuner that doesn't make a lot of sense. |
| 05:23 | We've optimised the fuel, and more importantly the ignition timing and boost, to be safe and knock free on that high octane, 98 octane fuel. |
| 05:33 | We can't therefore guarantee that if the customer goes and fills that tank up with 95 octane, that it will be safe. |
| 05:39 | And there's obviously the potential for damage from detonation occurring. |
| 05:43 | Now I've queried a few of the customers about why they've done this when I've found out what their intentions are, and they've said to me it's simply that they've supplied it with high octane fuel to get a higher number on the dyno. |
| 05:55 | Again doesn't make a lot of sense to me. |
| 05:57 | But the problem is from the tuner's perspective, this opens up a potential liability here. |
| 06:02 | We tune the car on 98 octane fuel, the customer then runs it on 95 octane fuel, and the car suffers from knock or detonation and is damaged and that potentially is seen as being the tuner's problem. |
| 06:14 | So not something that we really want occurring there. |
| 06:20 | The next aspect here is the fuel system. |
| 06:23 | So we'll move on from the fuel level. |
| 06:26 | Another really common cause for problem is the size of the fuel system. |
| 06:31 | So basically the fuel system just not being able to keep up and supply enough fuel to keep the engine happy with the sort of power levels that the engine is expected to run. |
| 06:44 | OK this again should be something that's really straightforward and easy to solve. |
| 06:50 | We need to make sure that the fuel pump is capable of supplying enough fuel, and we need to make sure that the injectors are capable of supplying the sort of fuel levels that we're going to need for whatever power level the engine is going to make. |
| 07:06 | Now this is a problem that we see time and time again. |
| 07:10 | On face value, sizing the fuel pump and the injectors should be relatively straightforward, however again we see problems with people not doing this correctly. |
| 07:20 | If you are interested in learning how to do this properly, we have run a previous webinar that is available to our members in our archive, on sizing the fuel system correctly. |
| 07:31 | You'll learn how to calculate what the required fuel injector size is, and you'll also learn how to calculate what size fuel pump you're going to need for a particular application. |
| 07:42 | Again this is a frustration from the dyno tuners' perspective because generally we're going to find out that the fuel system isn't big enough once we start getting quite a long way through the tuning process and we're getting up to the higher power levels, the higher RPM levels. |
| 08:00 | So we've already potentially wasted an hour or two of dyno time at the point where we find that the fuel system isn't up to task. |
| 08:06 | So obviously this is wasting time and money, the other problem is that when the size of the fuel system is dealt with and bigger injectors, bigger fuel pump or potentially both are fitted, all of the previous work on the dyno has been wasted. |
| 08:23 | So we do want to make sure that all of those components are up to task. |
| 08:27 | Another common problem that I do strike regularly though is even with a fuel system that on paper, should be up to task, we've got a voltage supply problem to the fuel pump that means that the pump isn't getting full voltage while the engine is running, and this can dramatically reduce the flow from a fuel pump that again on paper should be more than up to task of dealing with the required fuel flow. |
| 08:55 | So again here some aspects that should be relatively straightforward to check and confirm. |
| 09:00 | As far as the fuel pump voltage goes, this can be a little bit more tricky, but we can use a digital voltmeter, connect that directly to the terminals on the fuel pump to confirm that that is getting sufficient voltage. |
| 09:15 | Moving on, the next aspect that we'll deal with is the tires, wheels, the lock nuts for the car. |
| 09:23 | Now this is going to come down to what sort of dyno you are going to be running the car on. |
| 09:29 | On a hub dyno which is what I used to use in my old workshop, obviously we need to remove the wheels from the car. |
| 09:36 | Now this should be a relatively straightforward task. |
| 09:40 | But we obviously if we've got a set of lock nuts fitted to the car we are going to need the lock nut key in order to remove the wheels from the car. |
| 09:50 | So this is an aspect which should be straightforward and simple, just take the lock nut out and remove the wheels but you'd be surprised how many customers came to me and had absolutely no idea where their lock nut was, and this makes it really difficult for us to do our job. |
| 10:05 | Often it's just about impossible to remove these lock nuts. |
| 10:08 | This also would cause an issue of course if that customer ended up with a flat tire. |
| 10:14 | But for our purposes, getting the wheels off the car, we need to make sure that the lock nut is supplied with the vehicle. |
| 10:22 | If you're running on a rolling road, the tire condition is also something we need to consider. |
| 10:27 | We don't necessarily need brand new rubber on the car, but if you've got a set of really worn tires where there's canvas showing or worse still, metal strands coming out of your tires, this is certainly not something we would want to be running on a rolling road dyno, because we definitely risk the potential of that tire failing on the dyno. |
| 10:50 | Now that's going to damage both the car, as well as our dyno. |
| 10:53 | So if you've got really worn tires, that's something that you'd want to deal with before the car goes to the dyno shop. |
| 11:00 | A tip here as well, particularly if you're running quite a lot of negative camber, you're going to find that the wear occurs on the inside edge of the tire. |
| 11:11 | So you can view the outside of the tire and everything might look perfectly OK, but it's the inside edge of the tire where that damage is going to occur, and going to show up, so make sure that you have a good look at the tire and make sure that that is up to task there. |
| 11:30 | OK moving on, probably one of the most common causes for issues while actually up and tuning on the dyno is ignition misfires. |
| 11:42 | Now there's a range of potential reasons that could cause an ignition misfire, can't deal with all of them here, and we're really gonna be dealing with the simple one that's easy to check and easy to look at which is the condition of the spark plugs fitted to the engine. |
| 11:59 | Particularly if they're an unknown entity, it can be a really good idea to take the plugs out, inspect them and replace them. |
| 12:09 | I've got an example here of what we don't want to see. |
| 12:12 | This is a plug where the ground strap has been completely worn away or melted. |
| 12:19 | So what this could cause is under light load, the engine can idle and run OK. |
| 12:24 | Of course as soon as we go to full load on the dyno, this is going to cause a misfire, and this is again going to waste time on the dyno while the misfire is diagnosed, the plugs are removed and then the plugs are replaced. |
| 12:39 | So it's easier to check the condition of those plugs before the car goes anywhere near the dyno shop. |
| 12:47 | At the same time the other aspect that goes hand in hand with the spark plug condition is the spark plug gap. |
| 12:55 | This is something that we want to check and make sure that the plug gap is adequate for what we're trying to do. |
| 13:02 | We'll quite often find that the sort of plug gaps that are defined or suggested by OE manufacturers aren't going to be suitable for our performance applications and again while the plug gap might be suitable for idle and light throttle cruise conditions, as soon as we go to high load, this can cause a misfire, so we want to be able to check on that. |
| 13:24 | Moving on, the next aspect that can cause issues is the condition of our clutch. |
| 13:30 | There is obviously going to be a lot of load being placed on the clutch while we're tuning on the dyno. |
| 13:39 | And again I've been surprised at the number of cars that I've had come across the dyno, been delivered for dyno tuning, we've got the car up and running and started going to full load and found that the clutch is slipping. |
| 13:54 | And when I've discussed this with the customer, the customer's said oh yeah I knew the clutch was slipping. |
| 13:59 | Well if the clutch is slipping on the road, then it's definitely going to slip on the dyno, and again we're going to end up wasting a lot of time. |
| 14:07 | So make sure that the clutch condition is up to task, make sure that it is at least not slipping when we're out on the road or on the racetrack. |
| 14:16 | Next one which again should go without saying, is the oil and water levels in the engine. |
| 14:21 | Now we don't need to go through and necessarily do a complete full service on the engine, but again it's going to be under a significant amount of stress and load while it's on the dyno, so we want to make sure that at least the oil and water levels are correct. |
| 14:37 | And at the same time this really goes in with my next topic which is making sure that we don't have any leaks. |
| 14:43 | From a dyno operator's perspective, we absolutely hate leaks. |
| 14:48 | They make a huge amount of mess in the dyno bay and this is going to take time to clean up. |
| 14:53 | You might find, depending on the specific dyno operator, that they also have a cleanup charge, so you could be liable for paying some additional money for having the dyno bay cleaned up if your car's going to leak oil and water all across it. |
| 15:09 | Now the other aspect here though that's a little bit more serIous is these leaks, particularly if you've got an oil leak, they can potentially be dangerous. |
| 15:16 | if you've got an oil leak that gets onto a hot exhaust system this can cause a fire. |
| 15:22 | One of the conditions I've seen or situations I've seen where this is a big problem is where an oil leak has been dripping down onto an exhaust system that's been wrapped with one of the fabric heat shield or heat tapes. |
| 15:36 | Now it soaks into that heat proof tape and this, when the car is under high load, can actually smoulder or catch fire, so we want to be very careful with that. |
| 15:49 | The next aspect which is relevant here to turbo charged engines specifically is the plumbing of the boost control system. |
| 15:59 | Now really here I'm talking about where the car has been fitted with an aftermarket turbo system or an aftermarket wastegate system or boost control system. |
| 16:08 | Obviously all of these boost control systems come with very specific instructions showing you how to correctly plumb these systems up. |
| 16:19 | Constantly though I see cars being delivered with aftermarket boost control systems, or boost control solenoids installed, and finding that once we start running the car on the dyno, that the boost control solenoid or the wastegate has been plumbed up incorrectly which is resulting in excessive boost pressure or an inability to control boost. |
| 16:40 | Now this can potentially be dangerous. |
| 16:44 | If we're starting our tuning process commanding minimal boost pressure, we're asking for wastegate spring pressure so that we can put the minimal amount of load on the engine that we can, and then start building up our tune at low stress, low load and then increasing the boost from there, if the boost control system is plumbed incorrectly, rather than getting minimal boost, we're actually going to end up getting way more than the minimal boost that the wastegate can provide. |
| 17:12 | And this potentially of course can end up damaging our engine while we're figuring all of that out. |
| 17:18 | At worst though, or sorry at best I should say, this is going to waste time because we're gonna have to stop the tuning process, diagnose the boost control system plumbing, and then of course all of these systems are plumbed down in the exhaust system where everything, after running the car on the dyno, is going to be incredibly hot. |
| 17:38 | So it's best to make sure that we've got that correct from the start before the car goes anywhere near the dyno. |
| 17:45 | Now if we can just jump to my laptop screen for a moment, I've just got two of the more common setups using the very popular Mac three port solenoid, which we can see here these Mac three port solenoids are used by probably the majority of aftermarket electronic boost controllers that we'll come across as well as it's very popular for fitment to an aftermarket standalone ECU. |
| 18:08 | So in this case we're looking at the setup for a factory style internal wastegate, which has only got one port on it. |
| 18:14 | And the correct way of plumbing this sort of system is to make sure that the port labelled com which stands for common is plumbed to the wastegate actuator. |
| 18:26 | Then we've got the normally opened port here which is on the front of the solenoid, this needs to be plumbed to a pressure source. |
| 18:34 | So in this case we've taken that from the compressor cover on the turbo charger. |
| 18:37 | Now what this will mean is that under normal conditions when the solenoid is not powered up, the normally open and the common port are connected. |
| 18:46 | So essentially we just get this connection straight through the solenoid as if it wasn't there, and this means that we run on our minimum boost pressure. |
| 18:53 | This normally closed port or NC port, this can be either plumbed to atmosphere or plumbed back into the intake system pre turbo charger, that'll reduce the noise that the boost control system makes in operation. |
| 19:07 | So that's the correct way to plumb up a three port solenoid. |
| 19:10 | We'll move across to the external wastegate using the three port solenoid. |
| 19:16 | There are actually a couple of ways of plumbing this, but this is the preferred technique that I use. |
| 19:22 | And here we are plumbing the bottom port of the wastegate directly to boost pressure. |
| 19:29 | So again we can see that's going straight to our compressor cover. |
| 19:32 | We're actually using T piece here, so we're t-ing that boost pressure source off up to our normally closed port on our three port solenoid. |
| 19:41 | In this case our common port is connected to the top of the wastegate. |
| 19:46 | So again here when the solenoid is not energised, when it's not got power to it, we see that this common port is connected to our normally open so it's exactly as if this top port on our wastegate was just venting straight to atmosphere. |
| 20:02 | Of course at the same time we've got boost pressure coming straight to the bottom port of the wastegate. |
| 20:07 | So it will open and this will mean again that we are achieving minimum boost pressure. |
| 20:12 | So it's really really easy to understand and know if we've got it plumbed up correctly if we simply understand how these three port solenoids work. |
| 20:20 | Those two drawings that I've just shown you there come from our boost control tuning course. |
| 20:25 | So if you're interested in learning more about the wastegate system, plumbing it correctly, as well as of course how to correctly tune boost control, that course is definitely worth checking out. |
| 20:35 | Alright I'll just move back to my notes now. |
| 20:39 | So on top of the boost control plumbing, the other issue that we may strike is a situation where the base ignition timing on the ECU is not correctly set. |
| 20:52 | Now what I'm talking about here is a parameter in the ECU that's used to calibrate the ignition timing, so that the ignition timing we're seeing on the laptop screen is exactly the same as what we are getting, if we connect a timing light to the engine and physically look at the crank pulley. |
| 21:09 | This is one of the critical configuration steps of the tuning process. |
| 21:14 | We need to make sure that this is correct. |
| 21:16 | Now this needs to be done by the tuner. |
| 21:19 | But one of the aspects that we see on some engines when we're fitting aftermarket standalone ECUs is there may actually not be any timing marks available on the crank pulley. |
| 21:29 | So again if we've already got the car loaded up on the dyno, and we go to set the base ignition timing and find that there are no timing marks on the pulley, this is a huge waste of time because we're actually going to have to go through the process of fitting a positive stop into the engine and making our own timing marks on that front pulley. |
| 21:49 | And depending on the engine that's a process that could take anywhere from 15 minutes up to an hour or thereabouts. |
| 21:55 | So again a good idea if this is done prior to the car showing up to the dyno. |
| 22:01 | Although the actual process of setting the base timing is something that the person performing the tuning should always do. |
| 22:09 | Even if I've got a car delivered to me where the customer or another tuner has told me the base timing is correctly set, I'm always going to check this to put my own mind at rest that it is correct. |
| 22:21 | OK we're going to move into questions really shortly. |
| 22:25 | So if you do have any more questions, please ask those in the comments and I'll get to those shortly. |
| 22:32 | I've just got a few more topics that I wanted to discuss here. |
| 22:35 | Another really common aspect or problem that I've seen, this is really more to do with where we've got an engine swap or an aftermarket ECU that's been wired into an engine where the alternator is controlled by the ECU we may find that the engine starts and runs but it's really easy to overlook that the charging system doesn't work. |
| 23:00 | What I mean by this is that the alternator isn't charging. |
| 23:03 | Now this is a subtle but really important aspect. |
| 23:06 | We've got 12 volt batteries fitted to our cars but when the engine's actually up and running the alternator that charges that battery will have the electrical system in the car operating somewhere between about 13.8 and about 14.2 volts. |
| 23:21 | Now the problem is if we don't have the alternator charging we can get the car to start and run, and on face value everything may appear to be OK. |
| 23:31 | But what we'll find is if the alternator isn't charging, instead of having 14 volts, we'll start potentially, if our battery's in good condition and well charged, with maybe 11 to 12 volts, but of course as we run the car for longer and longer, the current draw from all of the systems on the engine, the fuel pumps et cetera will start to drain the battery and that battery voltage will drop. |
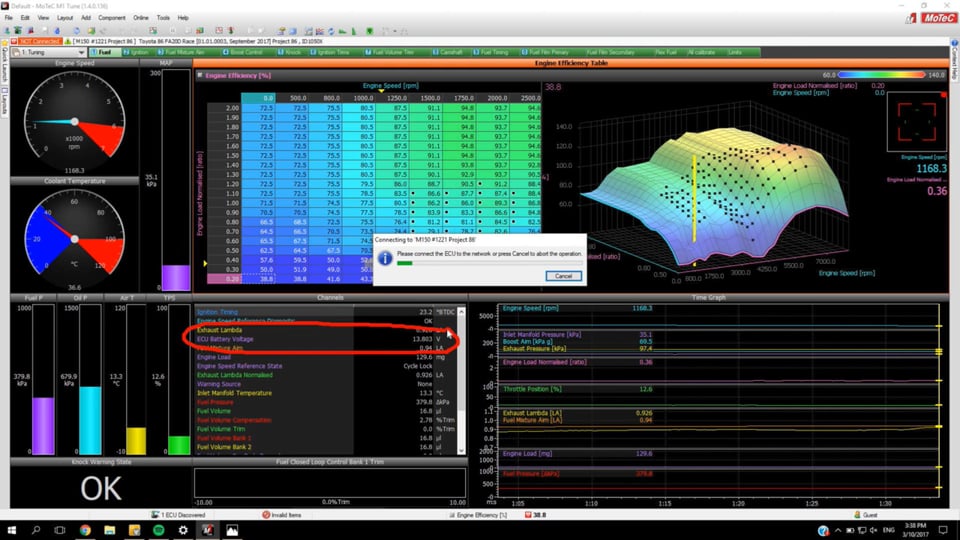
| 23:53 | So this is something that's really really easy to check during our initial startup exercise with the car, and to just demonstrate this let's just jump across to my laptop screen at the moment. |
| 24:04 | Sitting in our Toyota 86 that's fitted a Motec M150 ECU. |
| 24:08 | And I just wanna show you a couple of parameters here. |
| 24:11 | So we're on our main fuel tuning worksheet here, and we can see under our channels we've got in purple here the channel ECU battery voltage. |
| 24:22 | So at the moment the engine isn't running, we can see that that's sitting at about 11.6 volts. |
| 24:26 | So let's start the engine. |
| 24:30 | And we'll see that as soon as the engine starts there, you can see that that's jumped up to, it's actually dropped back down. |
| 24:36 | With a little bit of RPM on board, you can see that's sitting at about 13.8, 13.9 volts. |
| 24:42 | So this is a quick check that we can do before we go anywhere near the dyno. |
| 24:46 | We want to just start the engine and make sure that the alternator is actually kicking into life. |
| 24:51 | Now if we are tuning a race engine with an underdrive pulley on the front of the crankshaft or a special alternator what we may find is that if we start the engine and we just allow it to idle at maybe 800 or 900 RPM, then the alternator may not initially start to charge. |
| 25:12 | In that situation what can be worthwhile doing before we start diagnosing problems with the charging system, is just to bring the RPM up to perhaps 3000 or 4000 RPM briefly and this can be enough the get the alternator to begin charging. |
| 25:28 | So some really simple and quick checks that we can do there that are going to again save us a lot of drama later on. |
| 25:37 | OK I'll just head back to my notes now. |
| 25:39 | The other aspect and this really isn't strictly a necessity for, this isn't necessarily a necessity for our pre tune checklist however what we may want to do is perform a leak down and compression test on our engine. |
| 25:59 | Now particularly if we're the owner of the car, this is going to give us a little bit of confidence that the engine is mechanically in good condition. |
| 26:08 | If we are the workshop owner, again this can allow us to pick up problems with the engine before we actually start tuning it. |
| 26:17 | And this is a really common scenario where we've got an engine delivered to us that may be already mechanically damaged and we find that once we start running it something actually becomes a really apparent problem. |
| 26:32 | And of course from the customer's perspective, often this might look like we as the tuner have damaged the engine when the reality is that there was something wrong with it right from the get go. |
| 26:41 | We've obviously put it on the dyno, put it under load, and the engine has begun to fail. |
| 26:46 | This is something that probably would've happened if the car was simply driven hard on the road as well but because we're the last person to touch it of course we're the ones that often end up getting blamed. |
| 26:57 | So a compression and leak down test is a really good way of just confirming the condition of the engine. |
| 27:04 | Now if you are the owner of the car, this is also a good test to do regularly. |
| 27:09 | So it's going to give you an indication of whether the health of the engine is starting to decline. |
| 27:15 | If we keep a log of our compression and leak down tests, we can see over time how those are tracking and make sure that the compression and leak down values are still safe and sound. |
| 27:28 | One point is if we are going to be doing compression and leak down tests we want to make sure that they are always done from the same conditions. |
| 27:35 | What I mean here is that if we perform our compression and leak down tests when the engine is stone cold, this is going to give us different results to if we compare the compression and leak down results when the engine is at operating conditions. |
| 27:50 | So it's important to make sure that we perform the tests under the same condition. |
| 27:55 | Just talking about this two tests as well, the compression test is useful to a point because we will see if there is a cylinder or more than one cylinder that is low on compression. |
| 28:09 | The actual numbers that come from a compression test aren't particularly relevant, what we're really looking for is the consistency across all of the cylinders on our engine. |
| 28:19 | The reason I say that the numbers aren't particularly relevant is because aspects such as the cam profile will have a really large impact on our compression ratio test as will also the cranking speed while we are performing a compression test. |
| 28:35 | So we can end up getting a result that might be 120 psi, we could end up getting a result that's 180 psi, and both of those results could actually come from an engine that is perfectly mechanically healthy, but it just would be, what we're really looking for here I should say is the difference across multiple cylinders. |
| 28:55 | So all of our compression results across the engine should be within a few psi of each other. |
| 29:02 | The leak down test is performed with the engine stationery with the cylinder that we're testing at top dead centre on the compression stroke. |
| 29:11 | And the advantage with the leak down test is we can actually get more of a feel for where a particular problem may lie. |
| 29:19 | So for example if we've got a low leak down we'll be able to tell by listening to the engine components whether that leakage is coming back past the intake valves perhaps back past the exhaust valves, or back into the crank case past the rings. |
| 29:35 | Just backing up with that as well, in our leak down and compression test, another really good habit to get into is having your oil analysed. |
| 29:44 | There's companies all around the world that specialise in doing this, and this is something that's a really good idea for any really high stressed engine because we'll be able to pick up from the oil analysis if we're starting to get a problem potentially with an engine bearing before it actually fails and we don't need to go to the expense and trouble of disassembling the engine to check that. |
| 30:08 | So again it's a good way of keeping track of you engine health if you are doing this regularly. |
| 30:14 | So this is a kit that we're using here in New Zealand. |
| 30:18 | So what we do here, this is called a wear check kit, and we simply take an oil sample, this can be done at the time that an oil change is being undertaken or we can sample between oil changes. |
| 30:33 | The oil samples taken, details of the oil, the mileage, the engine et cetera are also taken and then we send that sample off and it gets analysed. |
| 30:42 | So if we can just jump across to my laptop screen for a moment. |
| 30:46 | This is the sort of complexity or detail that these results come in. |
| 30:50 | We can see for example here, we've got the unit number, this is just a registration of the car so we can indicate what that's come from. |
| 31:01 | We've got down here straight away our diagnosis which says that all wear levels appear within acceptable limits for this first sample. |
| 31:08 | Obviously if there are any problems indicated there they will be noted. |
| 31:14 | So in particular we have had samples come back which have noted excessive fuel contamination in the oil. |
| 31:21 | On the right hand side if you know a little bit more about the metallurgy of your engine as well as how oils work, we can see an analysis of all of the components here, for example the metals in the oil in parts per million. |
| 31:35 | Particularly this is a good way of picking up the components that come from the engine bearings, if we've got a bearing failure, also contaminants that are included in the oil and then for example here we've got fuel and water percentages so a really good and relatively cheap way of keeping track of the condition of your engine and picking up a problem quickly before it can become more serious. |
| 32:01 | Alright we'll move into some questions now, again if you do have anything that you'd like to ask, please ask those in the comments and I'll address those shortly. |
| 32:12 | OK so it seems like everyone has also been asking while I've been talking is the fuel octane labelling the same around the world? And no it is not, just to add to confusion there. |
| 32:22 | I mentioned our local 98 octane fuel. |
| 32:25 | So there are two ways of rating the octane of a fuel. |
| 32:29 | There's the research method and there's the motor method. |
| 32:34 | So we can have our fuel rated by either the research method on its own, the motor method on its own, these give quite dramatically different values by the way. |
| 32:44 | The other way that's commonly used around the world is by taking the average of the two, which is also referred to as R plus M divided by two. |
| 32:54 | So simply take the octane rating that comes from the research method, the octane rating that comes from the motor method, and then divide it by two. |
| 33:02 | So yeah if you're trying to compare octane ratings of fuels from different parts of the world, we do need to know how the fuel has actually been rated otherwise the numbers simply aren't relevant. |
| 33:16 | First question comes from Tyler who's asked what's my choice on timing light and what's my preferred method for connecting a timing light with individual coil packs like on the BRZ? OK I've got two timing lights. |
| 33:30 | I've got a Snap-on digital dial back timing light which has the advantage of being able to dial back the timing value. |
| 33:41 | So what I mean by this is if we only have a single marker on our crank pulley for top dead centre, which is becoming more and more common on late model cars where we don't have the full range, perhaps top dead centre, five, 10, 15, 20 degrees et cetera. |
| 33:57 | If we've only got TDC, quite often we will find that the engine won't idle particularly happily at zero degrees timing or TDC. |
| 34:07 | Normally they'll like to idle perhaps at 10 to 18 degrees of advance. |
| 34:11 | So if we are going through the base timing calibration process with that sort of engine, we need to set the timing at zero while we're going through the calibration process. |
| 34:20 | The dial back timing light allows us to set the timing to whatever we want. |
| 34:24 | Let's say 15 degrees inside the ECU. |
| 34:27 | We enter 15 degrees on the timing light, and then when the timing is actually 15 degrees, our TDC marker will line up. |
| 34:35 | Now these are a little bit tricky to use though if you don't understand the implications and they can cause issues with waste spark ignition systems because we're essentially getting two sparks per engine cycle instead of one like we'll see with a direct coil on plug system. |
| 34:52 | So you can get mislead quite easily with a dial back timing light if you don't understand how to correctly use it. |
| 35:00 | So for that reason I've also got a really cheap Optilux timing light. |
| 35:05 | This is a no frills timing light and it simply creates a flash every time there's a spark. |
| 35:11 | So this will require us to set the timing to a value that's visible on the front pulley. |
| 35:19 | OK to answer your other question, how do I connect the timing light. |
| 35:23 | With individual coil packs this does get a little bit tricky. |
| 35:27 | In some instances we will find that the low voltage wiring to the coils will actually be sufficient to trigger our timing light. |
| 35:37 | However the preferred technique is to actually remove the ignition coil altogether, and I keep a short extension ignition lead in the workshop that I can then connect onto the spark plug itself and then temporarily connect that to the coil pack and then we can clip our timing light onto that ignition coil. |
| 35:59 | So that gives us an absolute foolproof result and we know that we're going to be getting accurate timing information. |
| 36:05 | It's such an important aspect, we don't want to be taking chances here. |
| 36:10 | Justin Beldos has asked, if the compression test is good across cylinders, should I proceed with a leak down test? No it's absolutely not an essential and certainly the leak down test is a test that is seldom performed by a lot of mechanical workshops so it isn't an essential, it's just a nice addition to the compression test. |
| 36:32 | And more importantly if your compression test is showing inconsistencies, as I mentioned, it gives you the ability to find out in a little bit more detail where the source of that cylinder leakage is coming from. |
| 36:44 | Comet has asked, is checking conditions where you're tuning important? A shop must be pretty stable when road tuning probably not. |
| 36:51 | OK I mean the problem we've got here is we don't really have a lot of control over the conditions that the engine is going, or the dyno shop is experiencing during the tuning process. |
| 37:02 | This is going to be based on location and the time of the year. |
| 37:07 | Based here in Queenstown in New Zealand, this is a bit of a problem or can present a bit of a problem. |
| 37:13 | In the middle of winter we can reach temperatures sub zero on the degrees celsius scale. |
| 37:20 | Whereas in summer we can get into the low 30s. |
| 37:23 | So that's quite a spread. |
| 37:25 | Now of course with modern EFI, that's one of the advantages of EFI is that it will be accounting for these changing atmospheric conditions. |
| 37:35 | The biggest problem I see with this is if we're tuning a car in the middle of summer it can be impossible to accurately calibrate the warmup and cold start enrichment tables in the ECU. |
| 37:48 | And the reason for this is even first thing in the morning we may only be seeing the engine coolant temperature getting down to perhaps 12 or 15 degrees centigrade. |
| 37:57 | That's a dramatic difference from perhaps zero or below zero that we can see in winter. |
| 38:03 | There's no real way around this. |
| 38:05 | We can extrapolate the results we are seeing in the areas we can tune, essentially taking a best guess. |
| 38:11 | But in some instances we may need to have the car returned to us in colder temperatures if it is playing up. |
| 38:19 | Obviously we would also like to have a dyno cell set up that's providing good air flow through that dyno cell to keep the engine cool, and replicate real world conditions that we are seeing out on the road. |
| 38:36 | Love Boost's asked if a boost pump or fuel pump booster is equipped, does the 14 to 13 volt gap make a difference in performance or safety or if the tune potentially becoming dangerous if you start to lose the charging system? OK so a fuel pump voltage booster, I ran one of these on my old drag car to bring the voltage to the fuel pump up to 16 volts. |
| 38:58 | So these work quite well but they still rely on the actual charging system for the vehicle working. |
| 39:04 | So essentially the same results still apply. |
| 39:07 | We still need our actual alternator charging correctly. |
| 39:10 | That's going to provide the correct 13.8, 14.2 volts through to the fuel pump voltage booster, that's then going to allow that fuel pump voltage booster to do its job and bring the voltage up to whatever it's designed to do to the fuel pump. |
| 39:24 | So if our charging system isn't working, the voltage is dropping away, we're still going to see exactly the same kind of problems. |
| 39:29 | The issue there I guess comes down to if we are checking the voltage at the fuel pump, we're going to be wanting to make sure that we have the voltage that the fuel pump voltage booster is supplying. |
| 39:42 | Ross Sheldon's asked what tires to you prefer to use? Eg a little worn, say 70% but an older, harder tire. |
| 39:48 | I've always been told used tires are best. |
| 39:53 | OK this is obviously related to a rolling road dyno. |
| 39:57 | And it's something that we have been learning with having now had our Mainline chassis dyno for the better part of sort of 2.5 years. |
| 40:05 | The tires that we are running are going to have an impact on the power reading from the dyno, so that's one important aspect. |
| 40:13 | Particularly what we'll find here with our race cars, if we're running on a slick or a semi slick, because these tires are so soft and sticky, this actually results in a lower power reading at the tire contact patch compared to a hard road tire. |
| 40:30 | So my personal preference there, I don't know if I've got an opinion on brand new or worn, I personally haven't seen a difference there. |
| 40:38 | But certainly if you want to get consistent results, and you want higher results, then a hard tire will do a better job, it doesn't lose as much power through that tire contact patch. |
| 40:51 | Of course on very high powered cars though, this can result in the potential for wheel spin, so a slightly softer, stickier tire there, may result in a little bit of a loss in power at the tire contact patch, but less wheel spin, which is obviously essential to our tuning process. |
| 41:09 | Certainly given my own experience as well, I would not recommend running a car on a slick tire if you can avoid it. |
| 41:17 | What you'll find is that the tire will get very very hot during the tuning process and this can result in a lot of damage to the tire and even the failure of the tire as well so slicks don't really go very well with a rolling road dyno. |
| 41:34 | Darius has asked, not completely related to the topic, but what's your preference, a chassis or a hub dyno? So rolling road there or hub dyno. |
| 41:44 | Look I've used both and the reality is, probably unsurprisingly, both have their pros and cons. |
| 41:51 | The rolling road dyno generally a little bit quicker to get the car set up and running on. |
| 41:55 | For us the real big pro here and the reason that we've selected the Mainline chassis dyno, is that the software for the dyno, and particularly the data analysis and the ability to get data straight from an aftermarket ECU into the dyno is second to none and this allows us to do a really good job with tuning as well as presenting the tuning topics that we teach in our courses. |
| 42:22 | So that's really important there. |
| 42:24 | The other thing with the rolling road dynos is generally up until the recent crop of really high horsepower hub dynos, they were able to support higher power ratings than hub dynos. |
| 42:38 | And because there's some inertia involved with the rolling road dyno, these allow us to calibrate and tune more advanced functions such as gear change, ignition, cut control, auto blip on downshifts et cetera, which are impossible to tune accurately on an hub dyno. |
| 42:54 | Hub dynos generally we will get a little bit more consistency run to run and session to session because we don't rely on that tire contact patch, so they probably provide slightly better consistency but they also take a little bit longer to get the car physically set up and running on. |
| 43:16 | Alright that's brought us to the end of our questions there so hopefully everyone's learned a little bit there. |
| 43:21 | Regardless whether you're coming from the perspective of a customer planning to take your car to a workshop or a workshop that's running cars on the dyno, there's gonna be something in there for everyone to consider and hopefully this is going to save everyone money and save everyone a lot of wasted time. |
| 43:39 | As usual, if you do have any more questions, please ask those in the forum and I'll be happy to answer them there. |


