152 | Your Guide to Tuning Tools
Summary
Regardless whether you’re a home enthusiast or contemplating a career as a professional engine tuner, you’re going to need a range of specialist tools to perform your job and get the best results possible. In this webinar we’ll cover what we consider to be essential tools that every tuner should have in their tool box.
| 00:00 | - Hey guys it's Andre from High Performance Academy, welcome along to another one of our webinars. |
| 00:04 | In this webinar we're going to be discussing some of the key tuning tools that you're going to need if you want to get started in the world of EFI tuning. |
| 00:14 | Now there's probably a misconception here that you do need to spend thousands of dollars, maybe even hundreds of thousands of dollars if you're in the market for a dyno, in order to get yourself up and running and start tuning vehicles. |
| 00:27 | So we're going to see that that maybe isn't necessarily the case, we'll see what tools I'd consider to be essentials and we'll see how you can get around maybe not having a hundred thousand dollars or so for the outright purchase of your own dyno, right at the get go. |
| 00:43 | Now during the webinar as well we will be having a section for questions and answers, so if there's anything about these tools that I talk about that you'd like to know more about, or anything generally related to the tuning tools that you think you should be using, please ask those in the comments and the chat, and the guys will transfer those questions through to me, and we'll deal with those at the end of the webinar. |
| 01:09 | OK so when we look at the tools that we do require, there are a fairly wide variety, and some of these I would consider to be essentials, and some of them I would consider to be tools that are nice to have that we may find that we don't necessarily end up using particularly frequently. |
| 01:29 | So we're going to start by covering some of those core tools. |
| 01:32 | And probably the first one that really springs to mind is a wide band air fuel ratio meter. |
| 01:38 | Really when it comes down to it, when we are optimising the calibration or tuning any ECU, really the two things we are trying to optimise are the fuel delivery and the ignition timing. |
| 01:50 | So understandably having an accurate way of displaying the air fuel ratio that the engine is running at, is absolutely critical. |
| 02:00 | Now there are a wide range of ways that we can do this, and the best option for you is going to depend on exactly what you're doing and what you're tuning. |
| 02:09 | So for example if you're an enthusiast getting involved in tuning, maybe you've built your own project car, with that sort of situation where you're really interested mainly in tuning just one car, what I'd definitely be going for is a wide band controller, that's permanently mounted, permanently installed in your car. |
| 02:30 | These are available from a huge range of manufacturers, AEM, Innovate, the list really just is endless. |
| 02:38 | But essentially there's two ways of doing this. |
| 02:41 | One, we can have a wide band controller, which takes the signal and controls a wide band air fuel ratio sensor fitted to the exhaust, and then outputs the air fuel ratio data through to your ECU. |
| 02:54 | The other way which is a really nice feature, is to use one that also provides a visual feedback in terms of a gauge so you can see at a glance somewhere mounted on your dashboard, what the current air fuel ratio is. |
| 03:07 | So a unit that is going to offer something like that, if I can just find exactly where I've put it. |
| 03:14 | Put something on top of it. |
| 03:16 | This one's a little bit more advanced. |
| 03:17 | But this is the AEM four channel UEGO controller. |
| 03:20 | So this will actually control up to four lambda sensors. |
| 03:24 | So this is a bit more advanced, this is what we would use for individual cylinder lambda, but the same technique is still 100% applicable here. |
| 03:33 | We would be just normally choosing a single channel, wide band for an inline engine, or if we're tuning a v configuration engine, or an inline engine that's twin turbo for example, we may choose a dual channel wide band so we can look at each bank of cylinders, or the exhaust gas coming out of each of the turbo chargers. |
| 03:56 | So we get a slightly more accurate idea of what's going on. |
| 03:59 | So this particular controller has no visual display, this simply communicates back to an ECU or a dashlogger via either CAN or an analog voltage output. |
| 04:13 | So you're going to need to wire that up to whatever you're using for logging that and then configure it to suit. |
| 04:19 | Now the advantage of a standalone controller, regardless who is manufacturing that, is if you've got an ECU that's capable, you're going to be able to then datalog into the ECU, when you're on a dyno or you are tuning with your laptop, you'll be able to display the air fuel ratio straight there on your laptop, makes your fuel tuning so much easier. |
| 04:41 | And then in some instances as well, your ECU may actually be able to run closed loop fuel control so it'll be constantly looking at the measured air fuel ratio, your target air fuel ratio, and then it can make adjustments to the fuel delivery if there's an error. |
| 04:56 | So if we're too lean it'll add some fuel, and if we're too rich it can remove some fuel. |
| 05:01 | Logging all of this gives you the ability to then refine your tune later once you're off the dyno. |
| 05:08 | So that's one way of doing it, the other way as I said is with a gauge so that you can also monitor that visually while you're driving. |
| 05:16 | This is particularly useful if you are running an engine that is on the edge a little bit. |
| 05:22 | So something that's producing very high specific power levels, generally in that situation the window for tuning becomes a little bit narrower. |
| 05:30 | So a lean air fuel ratio may end up pushing the engine over the edge and resulting in damage quite quickly so if we've got that wide band meter mounted somewhere on the dash, we don't need to be staring at it the whole time we're driving the car. |
| 05:45 | But what we can do particularly when we're in a high gear under high load, we can just glance at that gauge out of our peripheral vision every now and then, and that's just going to give you a visual cue, that your air fuel ratio is correct. |
| 05:57 | Now if you are tuning more than one car then something like this, a permanent fitted unit is probably not too much use to you so if you're getting started out tuning and you're looking at starting a shop or tuning a variety of cars, then you're going to need a portable wide band meter that you can easily swap between different cars. |
| 06:18 | So the one I personally use and I have for years, is the Innovate LM-2, before this I used the Innovate LM-1. |
| 06:26 | These are available in both single channel and dual channel units. |
| 06:32 | Again the single channel will take input from a single wideband sensor. |
| 06:37 | If you are running a v configuration engine or if you are going to be tuning v configuration engines, then it is worthwhile looking for the dual wideband input unit. |
| 06:50 | So these are portable, as you can see it's a really small unit, really easy to take from one car to the next. |
| 06:57 | One of the tips that I would give you, and this really goes for any portable wideband regardless what the brand is, I've just placed a suction cup on the back of this. |
| 07:08 | So all I can do there is quickly suction cup this to the windscreen when I'm fitting all of my sensors into the car. |
| 07:15 | This means that it's there in my peripheral vision, I can see it really easily, I don't need to take my eyes off the road if I'm on the road, on the dyno it's visible right there straight in front of me as well. |
| 07:30 | So makes it really quick and easy to move from one car to the next. |
| 07:34 | These understandably come with a range of wiring harnesses. |
| 07:38 | You're going to need to supply the unit with power. |
| 07:43 | They do also have the ability to take input from the factory OBD2 port if you're reflashing or tuning a factory ECU. |
| 07:52 | And then you can also output the wideband air fuel ratio data, either via an analog output or via serial. |
| 08:00 | So this allows you to interface that wideband air fuel ratio meter with a factory ECU in some cases via a reflashing interface such as in the case of HP tuners, you can run a wideband straight into your laptop, so you've got that coming into your laptop via the serial port and you can look at all of that data straight in the VCM scanner software. |
| 08:25 | As well as that, you can also as I've said, output via analog voltage straight to your ECU or datalogger. |
| 08:31 | One thing, and this is probably a word of caution for any wideband air fuel ratio meter, if it is an analog voltage type, you do need to be very careful with your wiring, if you are using an analog voltage signal. |
| 08:45 | It's very important in particular to follow the manufacturer's recommendations for the sensor zero volt and analog voltage output. |
| 08:54 | The reason for this is we're looking at a voltage that may move between perhaps 0.5 and maybe 4.5 volts. |
| 09:02 | And that's representing our current air fuel ratio or lambda. |
| 09:06 | So if there's an offset in the voltage that's even very slight, this can have a big impact on the accuracy of the actual air fuel ratio data we see in the laptop. |
| 09:17 | Now of course when you're looking at a digital number in the laptop screen, it's very easy to just blindly believe it, and depending on how bad that voltage offset is, the actual air fuel ratio may be five, 10 or even 15% different, to what you're actually seeing on your laptop screen. |
| 09:33 | So very important to watch that. |
| 09:36 | And another way of just confirming that as well, is when you've got a wideband meter like this, which will give you a visual display of your air fuel ratio data, straight here on the screen, if we are wiring this into our ECU, we want to compare and make sure that we are getting exactly the same reading on both devices. |
| 09:57 | If we don't, then we know that we've got a problem. |
| 10:02 | Now in terms of our wideband air fuel ratio meter, you also are going to need to fit the lambda sensor into the exhaust. |
| 10:09 | So most of the wideband meters that you're going to see these days use the fairly generic Bosch LSU 4.9 lambda sensor. |
| 10:21 | And there are a lot of complaints out there about the sensors not lasting very long. |
| 10:29 | So I just wanted to talk a little bit about that. |
| 10:31 | There is a few reasons that the sensors may not last particularly well. |
| 10:35 | The first would be to do with the way you've mounted the sensor. |
| 10:39 | The sensors are very susceptible to being damaged from moisture so thermal shock from moisture actually hitting the sensor can very quickly destroy the sensor element. |
| 10:49 | So what we want to do is make sure that the sensor is protected as far as possible from moisture. |
| 10:55 | If we are permanently mounting the sensor in the exhaust system, it's important to mount the sensor above horizontal in the exhaust pipe. |
| 11:04 | And this means that it's not going to end up with moisture pooling on top of it. |
| 11:08 | We can initially during a cold start see moisture pool on the lower side of the exhaust system. |
| 11:14 | So that's an important consideration. |
| 11:17 | The other aspect here as well as where abouts in the exhaust system we actually mount it. |
| 11:21 | So we'll see a lot of factory sensors inevitably are mounted very far up the exhaust system, generally in front and behind the catalytic converters. |
| 11:31 | A lot of tuners will fit the wideband sensor to a tailpipe extension kit which is fitted into the tip of the tail pipe. |
| 11:41 | And this presents a couple of problems. |
| 11:42 | First of all in terms of that sensor life, if you are mounting the sensor all the way back there in the tailpipe you are going to definitely expose that sensor to a huge amount of moisture during the first five or 10 minutes that the engine is running after a cold start. |
| 11:57 | So if you're going to do that, and I know a lot of tuners do, I would generally suggest that you warm the car up thoroughly before you place the sensor in the exhaust system. |
| 12:09 | Now I'll go over another issue with that location for the sensor shortly, but we're talking about sensor life, so as long as we've got the sensor mounted, it's not going to be exposed to moisture and it's also not going to directly be exposed to vibration or shock loading. |
| 12:26 | That's one thing that you can do to keep your sensor alive. |
| 12:28 | The other thing you do need to consider is the way the sensor is controlled. |
| 12:33 | So in a factory ECU that's using one of these sensors, the wideband sensor is only heated once the engine is up and running. |
| 12:44 | And this again helps to prevent the thermal shock associated with the moisture. |
| 12:49 | So we're seeing a lot of the existing wideband controllers that are out there on the market, don't follow this sort of recommendation and basically the sensor will be powered, the controller will be running, any time the engine or ECU is powered up. |
| 13:04 | So if you've got the key in the run position and you haven't started the car, that will also start heating up your sensor. |
| 13:12 | So then when you go to start the engine from cold, this is where you can get that shock loading moisture contacting the sensor and thermal shock on the sensor which can make it fail very quickly. |
| 13:24 | A lot of people are blaming the sensors and you've got to understand that these sensors are fitting to factory cars where they're expected to cope well with maybe 100000 miles of use, they don't obviously want them failing within the warranty period of the car. |
| 13:41 | So we're seeing now a lot of the controllers on the market will actually take this into consideration, particularly if you've got an ECU that has an onboard wideband controller. |
| 13:51 | The latest crop of these will look at engine speed and they will only operate the sensor when the engine is running. |
| 13:59 | In these instances I've had exceptionally good life expectancy out of the sensors. |
| 14:04 | And provided you're not running on leaded fuels, you can get 12 months or more use out of them even in a competition car without too much trouble. |
| 14:13 | Another aspect there with the sensor life as well, you do need to be careful of the temperature that they are exposed to. |
| 14:20 | This can be a problem in some engines, particularly rotary engines, or if you want to fit the sensors pre turbo charger, off the top of my head now I think that the Bosch specification sheet suggests that the maximum sustained temperature shouldn't exceed 930 degrees centigrade. |
| 14:37 | So that's just another thing you need to consider. |
| 14:41 | OK so talking about that tailpipe extension kit as well, because I know that a lot of tuners are using this because it's really easy to fit the sensor here. |
| 14:50 | Doesn't take a lot of work, you don't have to break out the mig welder in order to weld another sensor boss into your exhaust system. |
| 14:56 | Now this can be effective, particularly under wide open throttle operation you'll generally get an accurate signal, an accurate reading from a tailpipe extension kit, provided that the tailpipe extension kit is well designed. |
| 15:12 | However when you are at low exhaust flow, so particularly idle and light throttle cruise, particularly if you've got a large diameter exhaust tip, you can end up with a situation where the sensor will be contaminated with ambient oxygen from the outside air. |
| 15:28 | And this will give you a false reading. |
| 15:30 | So it's quite common with these sorts of kits to end up seeing the air fuel ratio reading show very lean, particularly at idle and cruise. |
| 15:39 | So this makes it essentially impossible to use that sort of method for accurately tuning the idle and cruise mixtures on that sort of car. |
| 15:49 | So my personal recommendation, I always fit an O2 sensor weld boss to the exhaust system. |
| 15:55 | It is a one off hassle. |
| 15:57 | We do it the first time and then any time the car comes back for tuning work, we can fit our wideband sensor into it. |
| 16:04 | In between times if the car isn't fitted with a permanent wideband controller, we can just put a blanking bung into that boss. |
| 16:11 | So as a professional tuning workshop, we had a one off cost that we charge to the customer, that covered this expense for that very first time. |
| 16:20 | So hopefully that gives you some insight into the requirements there for your wideband. |
| 16:26 | Now obviously I've shown you there two products. |
| 16:28 | I've shown you the AEM four channel UEGO unit, I've also shown you the LM-2. |
| 16:34 | But just wanna reiterate again that there are a huge number of brands out there on the market. |
| 16:39 | Our own dyno, our Mainline dyno, is also fitted with a Motec PLM. |
| 16:44 | There are just a huge number of brands. |
| 16:46 | So something out there to suit just about everyone's budget and requirements. |
| 16:50 | Just remember if you do have the ability to input your wideband air fuel ratio data, your data into your ECU or dashlogger via CAN, that is an advantage because it ensures the accuracy and integrity of the data, unlike the problems which I've discussed previously with an analog voltage input. |
| 17:13 | OK we're going to move on. |
| 17:14 | I said that the two aspects that we are trying to control predominantly are the fuelling and the ignition timing. |
| 17:21 | And in order to properly calibrate the ignition timing, ideally we do need to have the car on a load bearing dyno. |
| 17:27 | But particularly if we are forced to run on a lower grade or lower octane of fuel, we may run into a scenario where the engine is knock limited. |
| 17:38 | Now this is an area that causes a little bit of controversy and we've seen this with a few of our posts on our Facebook page. |
| 17:46 | So just wanted to delve into this, because I think it is a really important aspect to understand. |
| 17:52 | Now there are a lot of tuners out there around the world who genuinely believe that knock detection equipment, a way of detecting or noticing when knock is occurring simply isn't essential. |
| 18:04 | And the argument I often hear for this is we should be running the car on a high grade of fuel that's not going to result in chances of detonation. |
| 18:15 | And I wholeheartedly agree. |
| 18:17 | If you have the opportunity to run a car on a better grade of fuel, then knock is much less of an issue, we're much safer in our tuning, we're ultimately probably going to be able to make more power, and from the tuner's perspective, our job is much much easier because in most instances we don't have to worry about knock. |
| 18:36 | So particularly when we're talking about some of the competition cars that run on E85, some of the specific race fuels such as VP Racing Q16, C16 or even drag cars running on methanol, then in those instances knock is much less of an issue, and the other problem we get at that instant is the specific power levels are so high that when knock occurs, we're almost instantly going to end up with relatively catastrophic engine damage. |
| 19:09 | So at that point detecting knock audibly using audio knock detection becomes something of a moot point. |
| 19:15 | So in that market, yes there is an argument for not using knock equipment. |
| 19:22 | But living in the tuning world that I've grown up in and been in for the last 16 years, I probably would say that 85% of what I tune falls into the category that I would consider as knock limited. |
| 19:39 | So these are the applications where we're tuning a car that's predominantly going to be running on pump gasoline, particularly if that engine is turbo charged, then this is almost certainly going to be the case, that as we are advancing the ignition timing and we're moving towards MBT, we're seeing the torque increase on the dyno, we're going to get into a situation where while that torque is still increasing, we get to the onset of detonation. |
| 20:02 | Now for those who aren't aware I'll just briefly cover what detonation is. |
| 20:06 | It's an abnormal type of combustion where during the combustion process, after the spark has initiated combustion, we end up with pockets of unburnt fuel and and air around the outside of the combustion chamber that spontaneously combust due to the heat rising inside the combustion chamber. |
| 20:25 | Now when this happens we end up with the energy released from that fuel very very quickly. |
| 20:31 | So we end up with very sharp spikes in pressure inside the cylinder and this is incredibly dangerous to our engine and damaging to our engine. |
| 20:39 | The spikes in pressure can exceed the mechanical strength of components and also those pressure spikes could be likened to someone slamming down on the crown of the piston with a sledgehammer and this can result in broken ring lands in our piston, bent conrods, even damage to our big end bearings. |
| 20:58 | The other aspect that's really critical to understand with detonation and how it creates that damage. |
| 21:04 | Sorry I'lll just mention, detonation and knock are two terms for exactly the same type of abnormal combustion there, so they are interchangeable. |
| 21:12 | But when that occurs, those sharp pressure spikes also strip away the boundary layer of gases that protect the aluminium crown of the piston from the full heat of combustion. |
| 21:23 | So this is why we see a sand blasted appearance to our piston crown in an engine that has suffered from light detonation. |
| 21:31 | But in extreme situations that detonation can melt straight through the side of the piston very very quickly. |
| 21:38 | So that's why I am a strong advocate of audio knock detection and I believe this is another essential element that every tuner should have in their tuning toolbox. |
| 21:51 | Unless you're in the lucky situation where you are purely tuning engines that run on very high grades of race fuel. |
| 21:59 | So what is audio knock detection? OK it is a way of taking a signal from a knock sensor. |
| 22:07 | The knock sensor, this one here, let's just go to our overhead camera, this is a Bosch wideband knock sensor, fairly generic sensor, we'll see these fitted to a lot of factory cars, and it is a piezoelectric sensor that just gets bolted to the engine. |
| 22:23 | Generally this will be bolted to the engine block fairly high up near to the deck surface where the cylinder head bolts on. |
| 22:30 | So the piezoelectric sensor essentially outputs a voltage that is in relation to the vibration that the knock sensor is being subjected to. |
| 22:41 | So an audio knock detection system starts with a knock sensor at its heart, and then it also includes a digital signal processor that takes the signal from that knock sensor, processes it, depending on the unit that we're using, we may have the ability to focus on a specific frequency. |
| 22:59 | In particular the specific frequency for a given engine that we know knock is going to occur at. |
| 23:05 | This allows us to filter out and get rid of a lot of the background mechanical noise that every engine's going to have and make it much clearer for us to audibly listen for detonation. |
| 23:15 | Once we've done that, then the signal is sent to a set of headphones, we've got an amplifier on our audio knock detection unit so we can control the volume. |
| 23:24 | And we can literally listen to the engine, and we're going to be able to hear the sounds of detonation occurring. |
| 23:33 | One of the common questions I get is what does knock sound like? And that to a degree is going to depend on the particular knock unit your are using. |
| 23:45 | But I just wanted to give you a bit of an idea, this is actually a recording, you'll be able to find these for yourself if you go to theknockbox.com.au This is an Australian made product that I used earlier in my career, really good product, that is made for audio knock detection. |
| 24:02 | And we'll just play this sound sample now. |
| 24:05 | This is of heavy knock in an engine running at 3500 RPM. |
| 24:09 | So just have a listen. |
| 24:28 | OK so in that sample, the noise of knock is the deeper ticks that you can hear over and above the background noise, and that was really severe knock. |
| 24:37 | It's actually quite hard to listen to as a tuner because straight away if I heard that, I'd be getting straight out of the throttle. |
| 24:45 | So that's how the audio knock detection system works. |
| 24:50 | And the great thing with the audio knock detection system is that it is portable, it means you can take it from one car, one engine, to the next. |
| 24:58 | So there's two products that I am going to focus on here, I've just talked about the Knock Box product. |
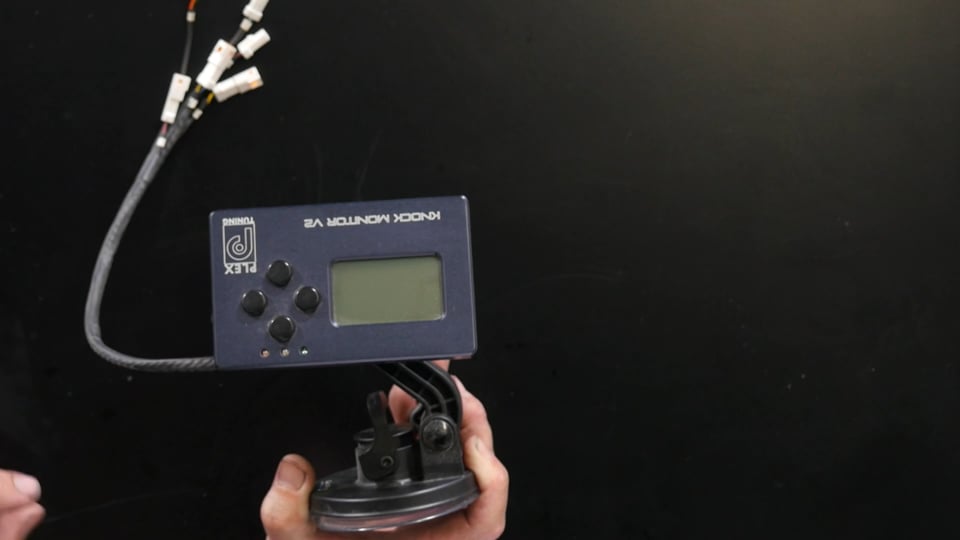
| 25:04 | The two that I am using these days, first of all I have the Plex Knock Monitor, this is their version two. |
| 25:12 | Again we'll just go to our overhead screen so you can get a better look at that. |
| 25:16 | So this is a fairly sophisticated product, actually it's a very very sophisticated product that allows you to graph the knock threshold on the screen versus engine RPM via the harness here. |
| 25:31 | You can connect two knock sensors, one per bank, and you can also connect various inputs. |
| 25:36 | So for example you can connect an RPM trigger from ignition one, and this also allows the knock monitor to do individual cylinder knock detection. |
| 25:46 | Essentially you tell it what the firing order of your engine is, how many cylinders it has, and you set it up with a trigger of the ignition one channel and the knock monitor can do the rest. |
| 25:58 | Also can output to a dyno or dashlogger via CAN as well, so pretty sophisticated piece of equipment. |
| 26:06 | As well as the visual aspect, on the bottom of it we have dual earphone jacks, so this is where we an connect our earphones. |
| 26:15 | This is nice from a training aspect as well because it does have those dual ports, so we can actually have two sets of headphones plugged into this at the same time. |
| 26:24 | It does take power from a USB source, or you can also wire it up permanently, so you've got a couple of options there. |
| 26:34 | Now just like with our wideband air fuel ratio meter, I've actually modified this slightly. |
| 26:38 | So again if we can just go to the back of this. |
| 26:40 | There is no easy way of mounting the knock monitor. |
| 26:44 | Which I found a bit of a problem, so we came up with an easy solution here, with some GoPro adapters and there is just a GoPro mount stuck to the back of the knock monitor. |
| 26:56 | And again my favourite little adapter here, we've got the suction cup, so I can simply suction cup this to the windscreen. |
| 27:02 | I do this alongside my wideband air fuel ratio meter and this makes it very very easy for me to see the knock monitor as well as my wideband. |
| 27:12 | There's actually a few warning lights on the top of the knock monitor as well that we can set up, basically to give us a visual indication if we're getting severe detonation. |
| 27:21 | So the knock monitor is a really sophisticated device, also gives you the ability to decide on exactly what frequency you want to filter the audio at, so this means that you can play around with those filters and really find the frequency that works best for your particular engine. |
| 27:39 | And in some instances it makes it so easy to hear knock because it removes almost all of that background engine noise and you are just left with those ticks when detonation does occur. |
| 27:51 | So for a professional tuning shop, the knock monitor is a great choice, but it is quite a pricey unit as well, because it is so fully featured. |
| 27:59 | The other unit, actually I'll show here their newer design. |
| 28:03 | The other unit that I use quite regularly is the Link G4 Plus Knock Block, we'll go to our overhead camera again here. |
| 28:10 | So this is a cheaper product, it's a little less fully featured. |
| 28:15 | We've got as you can see no visual display on this one, it is purely audio. |
| 28:20 | Again it has dual knock inputs so you can run two knock sensors into it. |
| 28:25 | It is a CNC machined aluminium closure. |
| 28:28 | So it is a really hard wearing product which is up to professional use. |
| 28:33 | You've got a volume knob on the end of it, and then we can connect our headset into it. |
| 28:39 | One of the nice things with this unit as well is it does have an onboard battery. |
| 28:44 | And from fully charged this will last up to three days, so quite useful when you forget to plug it in, it does have a USB port for charging. |
| 28:53 | So the G4 Plus Knock Block, as I've said, audio only, and it just runs a fixed wideband audio filter. |
| 29:00 | So as I've said, little less sophisticated than the knock monitor version two but still a very very capable product and really worthwhile having one of those in your arsenal. |
| 29:16 | Now a lot of the people we talk to about knock also say well my ECU has onboard knock control, and this may go for either a factory fitted ECU as well as some of the newer range of aftermarket ECUs also have onboard knock control. |
| 29:31 | These are brilliant products, the are a brilliant control strategy, however they still need to be calibrated and set up correctly. |
| 29:40 | We need to know that these knock control strategies are able to accurately notice when knock is occuring and control it. |
| 29:49 | So even with these strategies built in, I actually still use audio knock detection in order to validate that the system is working. |
| 29:58 | So what we want to do there, and it does sound a little bit scary, but believe me it can be done safely, what we want to do is at relatively low RPM, and light to moderate load, we want to purposefully induce a little bit of detonation just so we can audibly hear it. |
| 30:13 | We don't need to stay in sustained heavy detonation, we can just move in and out of a cell where we're over advanced the timing, causing light detonation. |
| 30:22 | We want to log that and make sure that our ECU is able to pick it up at the same point that we're audibly able to hear that occurring. |
| 30:29 | And that's why the audio knock detection system is still in my opinion an essential piece of kit. |
| 30:35 | Even if you are tuning ECUs that already have knock detection. |
| 30:39 | I'll just talk about the OE ECUs that have knock control as well because I've had a few instances where I've been tuning cars with onboard knock control through the factory ECU where the ECU was falsely reporting knock that actually wasn't happening. |
| 30:56 | So this is particularly common if you've heavily modified an engine and the factory filtering in setup for the knock control is no longer valid or no longer functional, accurate. |
| 31:07 | So that obviously is a safe condition, the ECU will just be needlessly pulling timing and you'll be giving away some potential power. |
| 31:15 | But just as common and much more dangerous, I've had the scenario where the ECU has been reporting no knock and I've been able to audibly hear that occurring through my headset. |
| 31:28 | So just in my opinion again just something that really is absolutely essential. |
| 31:35 | Now something that goes along with this, and again is often overlooked by tuners, is some ear protection. |
| 31:42 | With these audio knock detection systems, quite often a lot of tuners will use a noise cancelling headset. |
| 31:50 | Now I've tried this, I've tried a variety of techniques and the one that I always come back to is a simple and cheap set of earbuds with a set of really high quality ear defenders over the top. |
| 32:03 | So these are a locally available brand from 3M, they're called a Peltor, and these are a grade five plus ear defender. |
| 32:11 | So simply these over the top of your earbuds and they do a remarkably good job at removing all of the ambient noise from the dyno cell or from the car when you're driving. |
| 32:23 | I've tried the noise cancelling headsets, and particularly a lot of the cars that I was involved with tuning were drag cars with open exhausts and I think the problem I found was the sound pressure level created during a ramp run actually exceeded the headphones ability to cancel that noise and I ended up with them clipping. |
| 32:43 | So that was really horrible because you just can't hear anything, you can't make out anything with the headset constantly clipping during a run. |
| 32:51 | So even if you aren't using knock detection, you're going to ignore everything I've just talked about, that's your choice but you still want to protect your ears and if you are tuning cars for a living, it is a very noisy environment, this can over time damage your ears. |
| 33:06 | So you still want to be considering a good quality set of ear defenders anyway. |
| 33:12 | OK so we've covered the essentials. |
| 33:14 | One more that should go without saying is our laptop. |
| 33:19 | So we're obviously going to need some way of making tuning changes. |
| 33:23 | Now for the most part tuning is a relatively low stress task for most modern laptops. |
| 33:30 | So you certainly don't need the latest and greatest laptop. |
| 33:34 | The other thing that I've found over 16 years now in the industry is tuning is quite hard on laptops so if you can get more than about two years of use out of a laptop, you're probably doing pretty well. |
| 33:46 | So I kind of treat them as something of a disposable item. |
| 33:50 | Generally I'd be looking for a laptop somewhere in about the USD$500 to USD$600 mark. |
| 33:57 | That's going to get you something that's good, you can get much cheaper lower end units though and I would stay away from them, I've done that in the past and really regretted it. |
| 34:07 | Generally they operate so slowly that the lost time that you have waiting for your laptop to do something, you'd have actually saved money by purchasing a more expensive laptop. |
| 34:21 | So yeah definitely don't be going for the top shelf, the best of the best, it's just not necessary. |
| 34:25 | Things that you should be looking for in a laptop are a solid state hard drive, particularly with the vibration that the laptop is going to be exposed to, solid state hard drives tend to be a little bit more reliable than a conventional hard drive, they're also a little bit faster and they also sap a little bit less battery energy. |
| 34:45 | So your battery life tends to be a little bit better with a solid state hard drive. |
| 34:49 | Battery life will probably be one of the things that I would put highest on my list of priorities. |
| 34:54 | With a tuning laptop you're going to quite often be working either in a car or at the racetrack looking at data for hours on end with no easy access to power so if you can have a laptop that has several hours of useful battery life then that's going to be a big advantage. |
| 35:12 | The other thing that comes down to probably really a personal preference is the size of the laptop. |
| 35:17 | I've gone to a 15 inch monitor on the HP notebook that I'm using here today. |
| 35:23 | I've also got a 13 inch MacBook Pro. |
| 35:25 | I personally prefer the smaller laptops. |
| 35:28 | Although we're now finding on a lot of the modern ECUs that we're exposed to that they're packing more and more information onto the tuning screen, and with the smaller screens it can be just a little bit tricky to make that out. |
| 35:42 | So I think 15 inch is a good compromise, the 17 inch, just a bit too big and bulky to really be useful when you're sitting in a car. |
| 35:53 | Just because I mentioned that as well, you'll find, I mentioned Mac there are well, you'll find that in the tuning industry, almost all of the software is exclusively for PC laptops. |
| 36:05 | So that caused a little bit of grief in my world. |
| 36:08 | I started out with PC notebooks. |
| 36:11 | I now use a MacBook for all of my productivity work so I really wanted to narrow everything down and just use one laptop for everything. |
| 36:19 | So with the late model MacBooks, you can use software to run PC applications. |
| 36:26 | The software package that I personally use is called Fusion although there are other versions out there. |
| 36:33 | I found that successful to a point. |
| 36:36 | But there were still a few problems with certain software packages and I found in the end, I had to give up and resort to using the PC notebook. |
| 36:44 | So sorry for those of you out there who are dedicated Mac fans, you probably are going to have to suck it up and get a PC notebook. |
| 36:53 | Good news is that PC notebooks are heaps cheaper than Macs so there's one thing to keep in mind. |
| 36:58 | OK so we'll move on now and we'll talk about some of the other tools that you are going to need to have access to. |
| 37:04 | Particularly when you are configuring and setting up and aftermarket ECU for the first time, one of the tasks you're going to need to perform is to set or at least check the base ignition timing. |
| 37:16 | So what I mean by this is we're calibrating the ignition timing in the ECU so that the numbers that we see on our laptop screen are exactly what's being delivered to the engine. |
| 37:27 | So in order to do this we are going to need a timing light so let me just move a few things around, I've got stuff all over the place here. |
| 37:36 | And I'll try and show you our timing light. |
| 37:40 | So the timing light I've got here is a Snap-on dial back timing light, we'll just go to our overhead camera, is probably the easiest. |
| 37:48 | This is not an essential type of timing light to use. |
| 37:52 | The other timing light that I normally use is an Optilux, just a conventional inductive timing light. |
| 37:58 | The nice function of the Snap-on dial back timing light is on this digital screen that we can see here, we can actually program a certain amount of ignition timing using the buttons on the front of the timing light. |
| 38:12 | And what that does is allows us, particularly if we've got an engine where we only have a single marker on the front crank pulley, maybe we only have a marker for top dead centre, quite often going to find that at idle, the engine won't run particularly happily with zero degrees of ignition advance, it's probably going to be much happier running 16, 18, maybe 20 degrees of ignition timing. |
| 38:33 | So what we can do is set the timing in the ECU to a certain value that the engine's quite comfortable running at and then we can adjust the dial back on our timing light to the same value and then our timing should align with our TDC marker. |
| 38:49 | With these timing lights, we have a set of leads that connect to a battery, and then we also have an inductive clamp that goes around the ignition lead for number one cylinder. |
| 39:00 | So that's going to get us an actual signal that's showing exactly when the spark is occurring. |
| 39:05 | Now the dial back timing light, you do need to be careful if you are using one of these, they're really powerful if you understand the limitations. |
| 39:14 | One of the ways you can get yourself into trouble if you are using the dial back feature on a waste spark ignition system, that's going to confuse the timing light. |
| 39:23 | So you can end up getting a false signal from that timing light. |
| 39:27 | So in that instance the Optilux or inductive style timing light is a safer option because it is absolutely foolproof. |
| 39:35 | The only thing is it is only going to only show a flash from that timing light when we actually get a spark event occur. |
| 39:45 | One little tip there as well, a lot of the modern engines that we are running now, will be coil on plug ignition where there are no longer ignition leads. |
| 39:55 | A really good trick here is too keep a short ignition lead handy just somewhere in your toolbox. |
| 40:02 | You can then remove the coil pack from number one cylinder and then you can run that ignition lead from the coil pack down onto the spark plug, and then you can strap your timing light onto that ignition lead and basically that's gonna give you exactly the same thing as if you had the conventional ignition system. |
| 40:21 | OK so another really simply device, simple tool that you should have in your toolbox, and these are so cheap there's no reason not to have one, is a basic digital voltmeter, digital multimeter. |
| 40:32 | So again we'll just show that on our overhead camera. |
| 40:35 | Now this really is a very basic digital voltmeter, these are in the range of about USD$50 This one is from SP Tools. |
| 40:48 | It doesn't do anything particularly advanced. |
| 40:50 | We are using that primarily for voltage, measuring voltages and also for measuring resistance. |
| 40:58 | So again this comes down to the situation where we often are going to need to actually get out and start fault finding or diagnosing a problem on the car. |
| 41:09 | One of the most common problems that we will come across is related to the electrical systems. |
| 41:15 | So if we have a voltmeter handy, these can pay for themselves time and time again in actually tracking down small faults. |
| 41:23 | Don't have one here to show you, but along with the voltmeter, another one that is really useful to have is a test light. |
| 41:32 | So these can be used to quickly show that we have a voltage available. |
| 41:38 | Although the downside is they will show you have a voltage just by illuminating an LED light, they won't show you exactly how much voltage we have. |
| 41:46 | They can also be used, the LED test lights are quite often used just to confirm, for example across an injector plug, that we are actually getting a pulse width modulated signal out of that plug. |
| 41:59 | So good for testing those sorts of outputs. |
| 42:03 | Now the next one we're going to talk about is one of those tools which we really don't use very often, but when we do need one there's nothing else that's going to do the job, and that's an oscilloscope. |
| 42:16 | Now a long time ago when I started my tuning, getting an oscilloscope was a pretty expensive task, and these were big bulky bench mounted oscilloscopes. |
| 42:26 | These days we have a range of really high quality PC based oscilloscopes and that's what I've got here. |
| 42:34 | This is a entry level picoscope, this is a 2000 series, we'll just show that again on our overhead camera. |
| 42:41 | It is very basic, so that's all I need for what we're doing. |
| 42:44 | It has dual inputs so I can look at two signals at the same time and then we can see it has a USB output that goes to our laptop. |
| 42:54 | Anyone who's ever used an oscilloscope before will be probably familiar with the attachments that we use on an oscilloscope. |
| 43:03 | So the oscilloscope is useful for looking at signals that change relative to time. |
| 43:09 | So I'm talking here about things such as the trigger inputs to the ECU for engine speed and engine position. |
| 43:16 | We can look at exactly what the voltage is doing relative to time and these are essential for fault finding some of the more peculiar triggering problems or ECU related problems that we are having. |
| 43:29 | So again a tool that we probably won't need very often, but when you do need to be able to visualise those signals, nothing else can do the job. |
| 43:41 | As I say that I will mention that we are seeing more and more of the aftermarket ECU manufacturers now also employ some kind of built in scope functionality in their ECUs. |
| 43:53 | So that does help us out if we are using one of those ECUs but if you're not then the picoscope's a great option. |
| 44:02 | It's been a while since we bought that but they are incredibly cheap, I'm pretty sure that that particular unit's somewhere in the region of about USD$200 so in the big scheme of things, it is a pretty cost effective tool. |
| 44:16 | OK we are going to get into some questions and answers really shortly so if you do have any, I can see we've got a few in there already, now is a really good time to ask those questions. |
| 44:27 | We'll jump into probably one of the bigger ticket items which is understandably the dyno. |
| 44:33 | So this is I think one of the areas that has caused a bit of trepidation with novice tuners thinking that if they want to get into tuning, that they need to purchase their own dyno. |
| 44:44 | And while obviously that would be the ideal scenario, they are a pretty pricey piece of equipment. |
| 44:51 | Probably an entry level dyno, you'd be looking at somewhere in the region of maybe USD$35000 to USD$45000. |
| 44:57 | For a high end four wheel drive dyno you can easily be looking at USD$150000 or even more. |
| 45:03 | So obviously pretty difficult to justify unless you're rolling in cash, for just the home enthusiast who's only really interested in tuning his own car. |
| 45:12 | However there are other options. |
| 45:14 | Depending on where you live in the world, you can certainly approach local tuning shops and some of them will be prepared to hire you dyno time on their own dyno. |
| 45:26 | So this is an effective way of dipping your toes in the water so to speak and seeing if tuning is something that you wanna pursue a little bit more seriously. |
| 45:35 | And you can start building up your reputation and your knowledge with someone else's dyno. |
| 45:41 | A lot of tuning shops that aren't particularly busy, this will be a perfect opportunity for them, they're still getting some use out of their asset, and it's not costing you a huge amount of money. |
| 45:52 | Now when it comes to dynos, there are broadly two styles of chassis dyno. |
| 45:57 | I will be focusing here on chassis dynos because that is predominantly what we would be looking at. |
| 46:04 | Engine dynos are relatively rare unless you're working in high end motorsport. |
| 46:10 | So as far as the chassis dynos go, these are broken down into what I refer to as inertia type or load bearing. |
| 46:18 | So the inertia type, these come from a range of manufacturers, one of the common ones, particularly in the US market is Dynojet, and the inertia type dyno has no power absorbing module. |
| 46:29 | So these are where we'll often see a single large diameter roller, and it is a large roller which has a large known mass, and basically the way the dyno works is that it measures how quickly that roller is accelerated based on knowing the mass of the roller, the diameter of the roller, it's possible then to calculate power and torque. |
| 46:52 | These are useful for tuning under wide open throttle conditions however there is no power absorber, there's nothing to apply a load to that roller, so they are of no use whatsoever for tuning under part throttle conditions. |
| 47:07 | Particularly if we are wanting to optimise our ignition timing to MBT, we don't get torque feedback under those part throttle conditions from an inertia dyno. |
| 47:18 | So really really good for tuning drag cars for example. |
| 47:22 | But a little bit limited on anything that is running an aftermarket ECU that we want to map fully in three dimensions. |
| 47:30 | The other type of dyno, I refer to as a load bearing dyno, and this is where the dyno is fitted with a power absorber module that can essentially apply a load to the wheels. |
| 47:40 | So this is where we can run the car in what I refer to as steady state where we're setting a fixed engine speed and we can vary our foot position on the throttle, and as we apply more throttle, the engine's going to produce more torque, and the dyno responds by applying more load to the wheels in order to maintain that engine speed, so this is the type of dyno we need if we want to be able to properly map an engine in three dimensions. |
| 48:06 | Also with this sort of dyno we can set the ramp rate, so the acceleration rate for our wide open throttle ramp test. |
| 48:13 | Whereas with an inertia dyno this is really dependent on the amount of engine power and the gear that we choose to perform our ramp run in. |
| 48:22 | So in my opinion, load bearing dyno is definitely what you need to be using unless you are in the situation where you are tuning drag cars solely. |
| 48:33 | When it comes to the dynos we can also further break those down, or these load bearing dynos, into hub dynos and roller dynos, so rolling roads. |
| 48:43 | The hub dynos we're seeing probably a bit of upsurge in their popularity just recently. |
| 48:50 | I actually spent the better part of my career tuning on a Dynopack four wheel drive hub dyno, a dyno that I really enjoyed using, very very accurate, very very repeatable. |
| 49:01 | A little bit of a hassle factor involved in getting the car physically bolted onto the dyno, but in reality if you're tuning a high powered car on a rolling road, it can take just as long if not longer to strap the car down and stop it moving around. |
| 49:14 | Currently we are using a Mainline four wheel drive rolling road chassis dyno. |
| 49:18 | One of the reasons that we've made the move to the Mainline dyno is because the control software and the data analysis on the mainline really is second to none, it is really advanced, and particularly with what we're doing, some of the advanced functions make it very easy for our education side of the business. |
| 49:36 | So really really sophisticated dyno. |
| 49:39 | Whether you go hub dyno or rolling road is going to come down a little bit to what sort of power levels you are tuning. |
| 49:47 | Certainly with the rolling roads, once we start creeping up on the power levels, maybe past the 1000 wheel horsepower mark, or thereabouts, it can get really difficult to control the car without wheel spin. |
| 50:00 | So that can be a problem, can end up with wheel spin basically making it impossible to run the car properly. |
| 50:06 | Hub dynos remove that possibility, and we can control the engine essentially regardless how much power it is going to be making. |
| 50:18 | OK last one I wanted to talk about here is the mechanic's tool set as well. |
| 50:23 | So we've talked about some specific tuning tools here, but you are also going to need from time to time, just access to a general mechanic's tool set. |
| 50:32 | So this again is really about the fact that we are at some point going to need to do some mechanical adjustments to the engine. |
| 50:40 | Maybe we just simply need to change a set of spark plugs. |
| 50:43 | So a general set of mechanic's tools, ring spanners, socket sets, screwdrivers, pri bars, those sorts of things, we're also going to need access to. |
| 50:54 | In particular if you are setting up a dyno cell, it's always nice to have a specific tool set that stays in the dyno bay so that you're not running backwards and forwards between benches in the workshop and the dyno cell when things go wrong. |
| 51:08 | So that's also something you need to consider. |
| 51:11 | OK we'll move into some questions now. |
| 51:13 | Again if you do have any questions, please ask those in the comments or the chat, and I'll get to them shortly. |
| 51:20 | First question comes from Dave who's asked, is there a key identifier to indicate when an O2 sensor has failed? Will they show incorrect readings or will they just stop working altogether? OK yeah that's a really good question Dave, and I think there's a bit of a misconception, or it's certainly not been my experience, there's a misconception out there that when some of these Bosch LSU 4.9 lambda sensors start to fail, that we're going to get massively incorrect readings, which understandably could be quite damaging to our engine if we're still basing our tuning off it. |
| 51:54 | Particularly if we are using close loop lambda control, close loop fuel control, and the ECU is correcting to an incorrect air fuel ratio. |
| 52:03 | That could be damaging. |
| 52:05 | So as I say, that hasn't been my experience. |
| 52:07 | There's two key things that we'll see. |
| 52:09 | First of all, the sensor tends to become a little bit more lethargic to respond and beyond that generally I see them either read pretty accurately, or they'll fail completely and we simply won't get a reading. |
| 52:22 | So while that's not ideal, it's certainly a safer way of having that sensor fail. |
| 52:29 | Okamei has asked, between the AFM and the MAP sensor, which is more reliable? I use an AEM three bar MAP sensor and it lasted only for one year. |
| 52:39 | During retuning my ECU didn't detect any signal, when I reused my factory MAP sensor, my ECU detects the signal, what's the reason for that? OK so probably not really related to our tuning tools webinar but I'll go into it briefly anyway. |
| 52:53 | Both of those sensors, the mass air flow sensor, as well as the MAP sensor have pros and cons. |
| 52:59 | Both can be pretty reliable, depending on the type of air flow meter you're using, a hot wire air flow meter can be susceptible to getting the element dirty, particularly if you're using an oiled filtering, can require regular cleaning. |
| 53:14 | Probably out of the two I would say that the MAP sensor is by far the more reliable of the two units, over the lifetime of the car. |
| 53:23 | However there are some tips there. |
| 53:25 | So if you get moisture into the inside of a MAP sensor, that can end up causing it to fail. |
| 53:32 | So quite often we'll get moisture forming in the inlet plenum on the engine and if the hose to the MAP sensor runs downhill from that, this can result in moisture getting into the MAP sensor. |
| 53:43 | There's probably a bunch of other potential reasons for that MAP sensor to fail but from my own experience they are very reliable. |
| 53:52 | Timeless has asked, the pico is single channel? Any need for more channels? No actually our picoscope is dual channel. |
| 54:00 | And certainly I would recommend dual channel as a minimum requirement. |
| 54:06 | The picoscope, I think they do up to eight channel, even more, but definitely beyond what I would have use for. |
| 54:15 | In some cases more than two channels could be an advantage if you are wanting to look for example at all of the trigger inputs simultaneously on a reasonably advanced engine where you've got maybe a crankshaft speed sensor as well as a synchronisation position sensor, and maybe a couple of cam position sensors, then obviously you're going to want more channels. |
| 54:37 | Not essential. |
| 54:38 | I think generally unless you're considering really advanced use out of that scope, which most of our entry level tuners aren't likely to be, in that case dual channel is going to be more than adequate for your uses. |
| 54:54 | Theo at Final Tunes asked is there a portable O2 sensor that we can just throw on after the catalytic converter, or do we have to temporarily install in in the exhaust before the converter in order to get a proper result? OK Theo another question that I see raised quite frequently. |
| 55:09 | The way the catalytic converter affects the exhaust gas, will that affect the accuracy of our air fuel ratio reading? This is something I actually tested many years ago. |
| 55:21 | I placed one of my Motec PLMs pre catalytic converter and one post catalytic converter, and the difference that I could read between those two was negligible. |
| 55:34 | I didn't see enough of a difference between the pre and post catalytic converter readings to warrant doing anything more serious about it, so I'll quite frequently fit the wideband air fuel ratio meter post catalytic converter. |
| 55:50 | If we think back to what I was talking about earlier with a lot of tuners using a tail pipe extension kit, obviously that is going to be post catalytic converter. |
| 55:57 | So that's going to be, sort of, there's nothing we can do about that, it is what it is. |
| 56:02 | But definitely it's not something I have seen as a real issue causing a noticeable or significant change in the air fuel ratio reading. |
| 56:14 | Evo Gerard has asked, if you're tuning multiple cars, is measuring air fuel ratio at the exhaust acceptable? Also is using a single channel wideband acceptable on V6 engines especially when you are measuring at the exhaust? By measuring air fuel ratio at the exhaust, I think what you're probably getting at there Gerard, is measuring at the exhaust tip. |
| 56:37 | So my personal line in the sand there, is it's not something I like to do. |
| 56:43 | Certainly if I am tuning an aftermarket standalone ECU where I'm going to need to be quite accurate and tune all of the cells in the entire fuel map, then in that instance I will always fit a separate bung to the exhaust system. |
| 56:59 | In some instances when we're reflashing factory ECUs, particularly when we're reflashing them for light modifications, maybe an intake, maybe an exhaust system, under those conditions quite often the only changes we will be doing will be under wide open throttle conditions and in those instances a tailpipe extension kit can actually work quite effectively. |
| 57:21 | We'll also have the feedback from the factory ECU in terms of the short term and long term fuel trims, to sort of back up and tell us what's actually happening in the idle and the cruise areas if we do have inconsistencies there. |
| 57:33 | So I mean it is essentially a lazy way of going about it. |
| 57:37 | It's quicker, it's cheaper, because we don't have to fit a wideband sensor bung to the exhaust system, and it has some downsides that you do need to understand. |
| 57:46 | In terms of the V6 or V8 engines, if you are going to use a single wideband, and there isn't anything specifically wrong with doing that, particularly if you've got a factory ECU, you may not have the ability to control the individual cylinder fuelling or bank to bank fuelling anyway. |
| 58:03 | So it is an achievable way of tuning. |
| 58:05 | What I like to do in that instance is make sure that the sensor is fitted at a point in the exhaust system where it's sampling both banks of cylinders, because essentially what we're looking at is the average of the air fuel ratio of each cylinder in that way. |
| 58:21 | BMX Spares has asked, I'm starting my Subaru tuning business and I'm looking to buy a portable wideband setup. |
| 58:28 | Despite the recommendation for an LM2, the online sentiment and reviews of them are far less than stellar. |
| 58:33 | Is there a disadvantage to creating a portable gauge from an AEM wideband gauge and using a serial output to log? OK I just wanna address that because it is something that I am well aware of. |
| 58:43 | And just for complete transparency here, we're in no way supported or sponsored by Innovate. |
| 58:50 | And the Innovate brand, the only reason I stick with it, is because it is the brand that I used through my old professional tuning workshop. |
| 58:58 | So it's something that I've personally found to work really really well. |
| 59:02 | I am well aware that there are a lot of people with negative comments about the LM2 or the Innovate products in general. |
| 59:11 | All I can say is just in my own personal experience, that isn't something that I've witnessed. |
| 59:16 | So that being said, you are obviously able to use any portable wideband that you want, and as I mentioned earlier in the webinar, there are literally hundreds of different options out there. |
| 59:27 | So you should be able to find something that suits your budget and your requirements. |
| 59:35 | To specifically answer your question, you could create a portable gauge with the AEM wideband gauge and using the serial output to log, that's absolutely fine. |
| 59:44 | You'd just obviously want a way of securing that gauge nicely as you go into a car. |
| 59:49 | Obviously that suction cup that I showed you on the back of our LM2 is a really nice way of doing exactly that. |
| 59:57 | Dusanne has asked, OK I'm just trying to decipher this here so I can see what Dusanne's actually getting at there. |
| 01:00:07 | I think basically the question here is is there a way of calculating the frequency that knock occurs. |
| 01:00:16 | Hopefully if I've got that wrong, Dusanne can clear that up. |
| 01:00:20 | So we do actually have a webinar specifically about knock control where we go over this in a lot more detail. |
| 01:00:29 | There is a frequency calculation that we can go through. |
| 01:00:33 | I cannot off the top of my head remember it now, so I don't want to explain it and tell you something that's wrong. |
| 01:00:42 | But essentially the base frequency for knock can be calculated pretty accurately based solely on the diameter of the bore, the cylinder bore. |
| 01:00:52 | There are other aspects that will affect the knock frequency in a given engine, but the main driver behind the frequency of knock will be the bore diameter. |
| 01:01:02 | So for example, if you don't have access to our webinars, you can also find that on the Formula page, Formula is another brand of audio knock detection, they actually have a page that you can just punch in your bore diameter and that will give you the base frequency for knock. |
| 01:01:20 | So hopefully that answers your question there. |
| 01:01:23 | Jordan has asked, thoughts on using an aftermarket wideband gauge to log through a factory ECU using a TephraMod? Logging through the factory ECU, probably nothing wrong with doing that. |
| 01:01:41 | That's not something that I've personally done myself. |
| 01:01:46 | If I'm remembering back to how that all works, I think that gets input through, the factory ECU still has access to the narrow band O2 sensor input which is really important for the factory ECU to still be able to control the short term and long term fuel trims. |
| 01:02:06 | So if you are wanting to log that into something like EvoScan for example, then yeah that's probably a nice way of doing it. |
| 01:02:15 | It's always obviously nice to have all of the parameters that you wanna analyse in the same log file. |
| 01:02:21 | So specifically then if you have an area that your air fuel ratio is too rich or too lean, you can see at exactly what sort of load, and what sort of RPM that point was. |
| 01:02:30 | Can pinpoint that so you know whereabouts in your tables that you need to make those sorts of changes. |
| 01:02:36 | The key point there is just simply to reiterate again, you wanna make sure that whatever you are logging in EvoScan there, is reading accurate or comparable to the actual wideband meter. |
| 01:02:48 | So that's something we can get into trouble with due to voltage offsets. |
| 01:02:53 | Alright guys that's brought us to the end of our questions there so thanks for all of those questions, and hopefully that's given you a little bit more insight into what tools we may need to get started in tuning. |
| 01:03:06 | If you do have any more questions that arise after this webinar has aired, please ask those in the forum and I'll be happy to answer them there. |
| 01:03:15 | Thanks for joining us. |


