158 | How to use a torque wrench
Summary
A quality torque wrench is one of the most important tools in the engine builders tool box and while they aren’t necessarily a complex tool, they’re often misused and misunderstood. In this webinar we’ll discuss the proper techniques for using, storing and caring for a torque wrench.
| 00:00 | - It's Andre from the High Performance Academy, welcome along to today's webinar where we're going to be discussing some of the dos and don'ts when it comes to using a torque wrench. |
| 00:08 | Now I know straight away a lot of you will be thinking that this is a topic that probably doesn't need much explanation. |
| 00:14 | Honestly how hard can it be to use a torque wrench? And while there is some truth in this, I still consistently see people not understanding the correct approach to using a torque wrench and some of those important dos and don'ts, so there's gonna be some information in here that's probably still going to be valuable to everyone who's watching. |
| 00:33 | Of course as usual, we are going to have a question and answer session at the end of the lesson so if there's anything related to torque wrench use that you'd like me to discuss or anything that we go into here today during the lesson that you'd like me to discuss in more detail, please ask those in the comments or in the chat, and the guys will transfer those through to me. |
| 00:54 | So to start with the torque wrench is critical to achieve the correct amount of clamping force with any fastener on your vehicle. |
| 01:02 | Now today we're really going to be focusing more on the fasteners that are really mission critical, so I'm talking here about the fasteners primarily that are going to be inside our engines. |
| 01:14 | Obviously some fasteners are not as critical as others when it comes to our cars and for example if we're talking about a wheel nut, while obviously we want the torque to be correct, it's unlikely however if we happen to over torque or under torque the wheel nuts by perhaps five foot pound, it's probably pretty unlikely that that wheel is likely to fall off. |
| 01:38 | Now when it comes to some of those mission critical fasteners inside our engine though, probably one of the most critical and most stressed fasteners inside the engine would be the conrod big end bolts. |
| 01:50 | When we are tightening those fasteners, we want to be very sure that the torque that we are tightening them to is to the manufacturer's specification. |
| 02:01 | Now if we can get that right, what that's going to mean is that it's going to give us the correct amount of clamping force, and this means also that the fastener can do its job as the manufacturer intended. |
| 02:12 | So obviously in particular my example there of the connecting rod, this means that that connecting rod is not going to fall apart once that engine produces a lot of horsepower and starts running to high RPM. |
| 02:24 | OK so we're going to have a look at what happens when we maybe get it wrong. |
| 02:29 | So if we jump across to my laptop screen for a moment. |
| 02:31 | What we've got here is a stress-strain diagram. |
| 02:34 | And this is a diagram that can be produced pretty much for any type of material. |
| 02:38 | And what it does, essentially on our vertical axis here where we have the label stress, I'm not gonna get too involved with this, but essentially what you can think of that as, is the clamping load that is applied by the fastener when it's tightened up. |
| 02:53 | Now first of all we can see that if we exceed, if we continue to tighten the fastener too much, we actually go all the way through here to our rupture point. |
| 03:04 | So what we're going to find is that if our fastener is overtightened, we do actually risk that fastener failing completely. |
| 03:13 | Even so if we don't get to that rupture point, what we find is that once we move past our peak, we actually start to see the clamping force being supplied by that fastener start to fall away. |
| 03:25 | So when it comes to torquing up fasteners, more is not always more. |
| 03:30 | Likewise of course if we under torque our fastener, we're probably likely to end up somewhere down here, and what this is going to do is result in less clamping force being applied than the manufacturer of that component has recommended or specified and of course that could give us problems with that part leaking or failing in operation. |
| 03:54 | So a good example of this situation would be the head sealing surface. |
| 03:59 | So this is the surface where the cylinder head is clamped to the block. |
| 04:03 | So if we don't have enough clamping force in that particular fastener, what we're going to find is that as our combustion pressure increases, in other words, as we make more power in our engine, if the pressure inside the combustion chamber, or the forces inside the combustion chamber exceed the clamping force being provided by our fasteners then of course we can have the head lift on the engine block and in turn the head gasket is going to start leaking. |
| 04:33 | OK so that's a little bit of insight into what we are trying to do there when we are torquing our fasteners up. |
| 04:40 | Really when it comes to achieving the right clamping load from our fastener, what we're doing is relying on our torque wrench in order to correctly achieve that so there is a relationship there between the torque that we apply to the fastener, and the amount of clamping load or stretch in other words that that fastener is being applied, or is being applied to the fastener. |
| 05:05 | OK so generally there's two ways of tightening a fastener with a torque wrench. |
| 05:10 | We can use torque on its own, so this is where we are simply using the torque output from the torque wrench. |
| 05:18 | Or we also can use the torque angle method, which is used with a torque to yield fastener which is quite common in a lot of factory applications for the likes of head bolts for example. |
| 05:29 | So this is where we're going to initially torque all of our fasteners down to a given torque and then we're going to use a torque angle gauge, we're gonna show this in a little bit more detail shortly, to then torque the fastener further to a certain angle. |
| 05:44 | Now if we can just jump back to our stress-strain diagram for a moment on my laptop screen. |
| 05:49 | So if we are using an aftermarket fastener, quite often such as an ARP stud kit, these are specified with a torque and essentially with those particular fasteners, we're always operating in this elastic area of the stress-strain diagram. |
| 06:06 | So what this means is that the fastener or stud is not ever going to be permanently distorted or stretched so when we loosen that fastener off it's going to return to its original length. |
| 06:17 | With a torque to yield fastener, what we're actually doing is stretching the fastener and we're permanently deforming it. |
| 06:25 | So we're going to be operating somewhere in this are of plastic deformation. |
| 06:29 | So the fastener will actually be stretched permanently or deformed permanently. |
| 06:34 | This is why torque to yield fasteners do need to be replaced. |
| 06:38 | What we can see from that stress-strain diagram is once we go past around about this point here which is known as the proportional limit, we see that initially our stress starts to drop off for additional elongation of our fastener, but if we continue we do actually see that start to climb. |
| 06:54 | So with a torque to yield fastener correctly fitted, we can actually get an increase in the clamping load. |
| 07:00 | Of course we can't compare, we're not comparing apples to apples if we're talking about a factory or OE bolt for a head compared to an ARP fastener, ARP stud kit. |
| 07:14 | The ARP stud kit is made from a far superior material. |
| 07:17 | So even while we are operating in the elastic region of that fastener's deformation, we are still getting an increase in clamping force when compared to a factory bolt. |
| 07:30 | OK so if we are using torque to torque angle, we obviously need the torque angle gauge which we've just talked about. |
| 07:37 | Or the other option though is we do have here a Snap-on digital torque wrench. |
| 07:43 | Now the Snap-on digital torque wrench has a built in angle function. |
| 07:48 | So let's just see if I can show you this on our overhead camera. |
| 07:52 | So what I'll do is I'll turn on the torque wrench. |
| 07:55 | And at the moment we're on the torque function. |
| 07:59 | So if I can change that. |
| 08:02 | OK now we're on torque angle, this is just going to need to calibrate so I'll put it down. |
| 08:10 | And we can set our angle, so hopefully you can see that. |
| 08:13 | We can set our angle and as we turn the torque wrench, the torque wrench is going to actually indicate to us when we have achieved the correct amount of torque angle. |
| 08:25 | Alright let's just head back to my notes here. |
| 08:30 | It is important to understand again, I'll just reiterate, that if we are using torque to yield fasteners, the are permanently stretched and they can't be reused. |
| 08:39 | If you're using a factory workshop manual, you're going to see that it is specified that these are a one time use fastener, they do need to be replaced. |
| 08:48 | OK so we're going to talk now about the aspects you need to understand or know about when it comes to a torque wrench. |
| 08:56 | So of course we do have a digital and a mechanical wrench. |
| 09:00 | So we've already briefly had a look at our Snap-on digital torque wrench, these aren't going to be for everyone. |
| 09:06 | They are a pretty pricey item, this one is quite old now, I can't quite remember exactly what we paid for this, but these are probably somewhere in the region of maybe USD$700-800. |
| 09:16 | We've also got a more traditional mechanical torque wrench. |
| 09:22 | So these have a scale, again we'll just jump to our overhead camera here. |
| 09:27 | These have a scale here, and to adjust our mechanical torque wrench, what we're going to do is just wind up the torque wrench and we have a little pointer that's visible through the window there. |
| 09:40 | And we're simply going to adjust our torque until we reach whatever our preset is. |
| 09:46 | On the other hand if we're using our Snap-on digital torque wrench, let's just display that again, this one really is very very easy. |
| 09:55 | We can display in units of newton metres or foot pound or inch pound. |
| 09:59 | And all we need to do is use the plus and minus arrow keys and that's going to adjust our torque setting. |
| 10:09 | OK let me just check on my notes again. |
| 10:11 | It is also important to understand that when it comes to torque wrenches, they are available in a range of different sizes, so for our automotive uses we're probably going to be using quarter inch, 3/8th drive, and half inch drive. |
| 10:24 | So those numbers, those terms there, refer to the size of the drive flange for the sockets that we're going to be attaching. |
| 10:33 | So this particular one here that I have in front of me is a 3/8th drive torque wrench. |
| 10:38 | Our larger Snap-on torque wrench is a half inch drive. |
| 10:41 | So we're going to need to choose those based on the particular job that we're going to be using them for. |
| 10:48 | So essentially they're based on the fastener that we're going to be torquing up and the torque spec for that fastener. |
| 10:56 | So for example here our half inch drive Snap-on torque wrench is useful between a range of 25 and 250 foot pound of torque. |
| 11:05 | And on the other hand, our 3/8th drive mechanical torque wrench will go between 20 and 80 foot pound of torque. |
| 11:19 | So we're going to obviously be using those based on the fastener specification or the torque specification for the fastener that we are going to be using. |
| 11:27 | So you need to also understand that there will be an overlap typically in the torque range between the likes of the 3/8th and the half inch torque wrenches for example. |
| 11:36 | And often we also want to stay away from using the absolute lower extreme of the torque wrench's range as what we can find there is the accuracy can taper off. |
| 11:48 | So most mechanical torque wrenches for example, will have a working range of 20% to 100% of the full measurement scale. |
| 11:58 | So what this means is for a torque wrench with a measurement range of 15 to 100 foot pound, this would mean that the torque wrench wasn't accurate or absolutely accurate until we are at or above 20 foot pound, since 20 foot pound is 20% of the 100 foot pound full scale value. |
| 12:17 | So that's a really important thing to note there and this is where having a range of torque wrenches available in the workshop is quite helpful. |
| 12:24 | Generally if we're getting right down to the bottom end of our scale, or for that matter the upper end of our scale, we can move up or down to the next size torque wrench so that we're operating somewhere closer to the middle of the scale. |
| 12:39 | Now generally speaking if it's in use frequently, we also want to check the calibration of our torque wrenches relatively often. |
| 12:49 | Generally somewhere around about once a year. |
| 12:51 | So what this means is that the torque wrench, the actual accuracy of the torque wrench can drift away. |
| 12:58 | Particularly if the torque wrench is being used a lot or the other aspect here is if the torque wrench has been mishandled and maybe it's taken a fall from a workbench, this could affect the accuracy of the torque wrench. |
| 13:11 | Most mechanics are never going to give this a second thought. |
| 13:14 | They'll have a torque wrench that's probably been kicking around for the last 10 or 15 years, and they just rely on it. |
| 13:20 | And that's particularly the case when it comes to these digital torque wrenches. |
| 13:23 | When you've got a digital number staring at you from the torque wrench, it's really easy to simply believe that value. |
| 13:30 | However when it comes to those mission critical fasteners such as the ones inside our engine, we really do want to be 100% sure that the values that we are achieving are what the torque wrench is displaying to us. |
| 13:45 | So there are specialist companies all around the world who specialise in calibrating precision measuring instruments such as our torque wrenches. |
| 13:59 | So for a relatively modest amount of money, you can get your torque wrench calibration checked and adjusted if required. |
| 14:08 | It's also important to understand what a torque wrench is designed for and probably more importantly what it is not designed for. |
| 14:15 | So they're really only designed for the final torquing and installation of fasteners. |
| 14:20 | They're not designed for assembly. |
| 14:23 | We're not going to be using these as a general tool. |
| 14:25 | So they're not there to replace a strong arm, or alternatively a normal ratchet that we're going to be using for working on our engines. |
| 14:33 | They are really only designed for use when we're doing our final assembly and torquing down our fasteners. |
| 14:42 | Now also when it comes to our mechanical torque wrench here, let's just head to our overhead camera again. |
| 14:48 | So we're already looked at the fact that we have our scale here, our measurement scale which is how we're going to adjust the torque value. |
| 14:56 | On the underside of the torque wrench, we have a little locking tab. |
| 15:01 | So what we want to do is start by unlocking that, and then we can simply wind our thumb wheel in, until we get to the torque value that we want. |
| 15:09 | Once we're at that torque value, it's also a good idea to then lock the torque wrench, and this just simply means that if we're torquing a range of fasteners at a specific torque setting, then we're not going to end up with that torque value accidentally being bumped. |
| 15:23 | Now the part that a lot of people overlook as well is once we've completed the task, and we're going to be putting our torque wrench away, we want to also unwind that scale, we want to back it all the way off to the minimum value before we store our torque wrench. |
| 15:39 | If we do store the torque wrench for long periods of time, with the setting adjusted in, we can find that that will affect the accuracy of the torque wrench. |
| 15:51 | Finally when it comes to storing our torque wrenches as well, again because they are a precision piece of equipment, we wanna take care of them. |
| 15:59 | We always want to store them in a plastic carry case, or hardcover case just to protect them. |
| 16:05 | So our 3/8th drive torque wrench comes in a handy little carry case and also if we jump across here, we've got our Snap-on torque wrench carry case. |
| 16:16 | So that just means that it can be put on our shelf safely and it's less likely to get knocked or bumped by other tools in our workshop. |
| 16:26 | OK so we've gone through the basics there, and hopefully that's given you a little bit better understanding of what we're trying to do and of those pieces of equipment. |
| 16:35 | What we're going to do now is look at how we can get the best results from your torque wrench. |
| 16:40 | Now of course it should go without saying that we want to start by reading the instructions and following them, however often that isn't the case. |
| 16:49 | In particular when we're looking at torquing down a particular fastener, we want to start by taking note of the manufacturer's recommendation for torque specifications. |
| 16:59 | So if we're dealing with an OE engine, then this is going to come from the factory workshop manual, if we're dealing with an aftermarket stud kit or fastener kit then that's going to come form the manufacturer. |
| 17:10 | But we want to be also very clear, particularly when we're dealing with aftermarket stud kits or aftermarket rod bolts, we want to be very clear that we are using the correct specifications for that particular fastener. |
| 17:23 | For example when it comes to conrod big end bolts, there are a range of different material types. |
| 17:29 | So under the ARP brand for example, their standard bolt is made from their ARP 2000 material. |
| 17:37 | If we're starting to step up to higher RPM levels and more powerful engines we may want to upgrade the bolt material to a stronger material. |
| 17:46 | So L19 or custom age 625 are other materials that ARP offer. |
| 17:52 | The important point here is that the torque specifications for those different materials can vary. |
| 17:58 | So we want to be very careful that we are using the correct torque specifications for that particular material. |
| 18:06 | Next we also want to take note of the recommended lubricant. |
| 18:10 | In order to get the correct torque and the correct clamping load from our fastener, it's really important that we use the lubricant for the installation of the fastener or bolt or stud, that's recommended by the manufacturer. |
| 18:25 | This will affect the friction between the thread, so it is really important because if we don't use the correct lubricant, what we can end up with is more friction, and hence we're going to actually get less stretch or clamping load in that fastener for a given amount of torque. |
| 18:41 | Next we want to also clean all of the parts that we're going to be installing here. |
| 18:47 | It's always a good idea to inspect the threads of any of our studs, any of our nuts, any of our bolts that we're going to be assembling, what we're looking for here is any signs of galling, any signs of damage from debris et cetera. |
| 19:01 | And if any of those fasteners are damaged, that again is going to affect our torque, it's going to affect our friction, torque, and hence our clamping loads. |
| 19:10 | So if any of those fasteners are damaged, they will need to be replaced. |
| 19:16 | The other aspect here is we need to understand and take note of the correct torque sequence. |
| 19:22 | So what we'll find is that that is defined in the OE factory workshop manual for the engine that we're working on. |
| 19:30 | Particularly if for example we're looking at torquing down the main bearing caps for our crankshaft or the head, what we're generally going to be doing is starting with our centre fasteners and then working our way out. |
| 19:41 | So often when we go from a factory fastener for a head bolt for example, to an ARP stud kit or any aftermarket stud kit, often the manufacturer of that stud kit will define the torque setting that the stud kit needs to be torqued to, but may ignore completely the torque sequence. |
| 19:59 | In that case what we always want to do is use the manufacturer's torque sequence, the OE engine manufacturer's torque sequence I should say, and obviously we're going to be torquing there to the stud kit manufacturer's recommendation. |
| 20:12 | Another aspect here, we may find occasionally that a fastener manufacturer recommends that the fastener is cycled a certain number of times before it is finally tightened. |
| 20:24 | Now this is in order to get consistency in the actual clamping of the fastener. |
| 20:31 | And if we don't follow those instructions, understandably we may not get the best possible results there. |
| 20:38 | OK so what we're going to do now is we'll have a quick demonstration of how we can torque up an ARP stud kit or any fastener for that matter that is not a torque to yield fastener, so a fastener that is not requiring the torque angle system or torque angle method. |
| 20:57 | So what we're going to do here is we're going to be torquing the fastener in stages. |
| 21:03 | Typically we're going to be torquing in two to three different stages. |
| 21:08 | And what we'll also often find is that the manufacturer of the stud kit will just give us the final torque value, they're not going to give us the stages. |
| 21:16 | Those aren't too critical. |
| 21:18 | What we can do is basically split the final torque figure either in half or thirds, depending on how many stages we want to go through. |
| 21:25 | OK so let's go through this process now. |
| 21:30 | What I'll do is I'll just set up our extra camera here so we've got another angle here. |
| 21:35 | So what we're going to be doing is demonstrating this on our Honda B18C engine. |
| 21:39 | Just to make this demonstration nice and quick, I'm only going to be concentrating on our two centre main studs here. |
| 21:46 | So what I've done is prior to starting this webinar we've just installed the ARP nuts and washers here. |
| 21:53 | Now in particular here with our ARP stud kit, this comes with ARP's moly based lubricant. |
| 22:01 | So in this case we're going to be using their ARP moly based lubricant. |
| 22:05 | If we're doing a factory bolt, more often than not the factory workshop manual is going to call for a clean 10W30 engine oil or something of that nature, so again just making sure we're using the correct lubricant. |
| 22:19 | So we can just start everything here by hand. |
| 22:21 | And what we're going to do initially, we're not even going to use our torque wrench, we're just going to snug everything down using a strong arm here, not really applying any torque, you can see I'm just using this vertical, so essentially everything is just finger tight. |
| 22:34 | Once we've done that, and this is just simply to help pull the main bearing caps down into the register in the block, what we can do is we can get our torque wrench, and I'm going to turn this on. |
| 22:48 | Let's just go back to our overhead shot for a moment here while we're setting this up. |
| 22:52 | So in this case our torque setting, our ultimate torque setting is 80 foot pound. |
| 22:58 | For our first stage here, let's just go to 30 foot pound. |
| 23:03 | It's not quite a third but it doesn't actually matter that much, it's not super critical. |
| 23:07 | What we're wanting is for our first stage, just enough torque to snug down all of our fasteners. |
| 23:12 | So what I'm going to do is just apply that. |
| 23:14 | When we're holding the torque wrench, what we want to do is make sure that we are holding the centre of the handle, and we can support the head of the torque wrench with our other hand. |
| 23:24 | And I'm also going to use my foot just to support the engine stand, although with 30 foot pound, it's a relatively light torque, we don't need very much. |
| 23:31 | Now the next point that people often miss is that we want to be very smooth with the movement of our torque wrench. |
| 23:38 | Particularly there's a small amount of friction to get over when we first start moving the fastener and we don't want to make jerky movements. |
| 23:46 | So what I've done there, this particular torque wrench will give two signals, it will beep to me as well as vibrate through the handle when I've reached my torque setting, and then it will show me the torque setting that I've reached on the digital read out. |
| 23:59 | So I'll just do our second fastener. |
| 24:03 | OK so once we've completed that, that's showing me that I've got to the 29.5 foot pound of torque. |
| 24:09 | So that's the process we're going to go through there. |
| 24:11 | It's just Important, the key takeaways here are that we want to be really smooth with the movement of our torque wrench. |
| 24:18 | We don't want to be jerky, and we also do need to understand that initially when we first start moving the torque, moving the fastener, we're going to need a slight increase in torque on our torque wrench in order to actually overcome that initial friction and get the fastener moving. |
| 24:37 | So we also want to be very careful that we're always looking for that indicator that our torque wrench has reached the setting that we've asked for. |
| 24:45 | So it's going to differ from one torque wrench to another, as I've mentioned, this particular Snap-on torque wrench, it will vibrate through the handle and it will also give us an audible beep. |
| 24:54 | Now the reason that we get two signals from our torque wrench like that is because in a noisy workshop often it can be hard to hear audibly when we get that beep. |
| 25:04 | OK so what we'll do now is we'll just swap across to our 3/8th drive and we're going to go through the same process here. |
| 25:12 | I will just mention here with our 3/8th drive, our 3/8th drive torque wrench, we can also swap the direction of rotation by pushing the drive head through to the opposite side. |
| 25:25 | The reason for this is if we are torquing a left hand threaded fastener, the torque wrench only operates in one direction. |
| 25:33 | OK so we've just torqued to 30 foot pound here, what we'll do is we'll just use our 3/8th drive to take that up to 50 foot pound. |
| 25:41 | So I'm just taking that to the 50 foot pound setting there, I'll lock it in place and we'll go through the process now of torquing that. |
| 25:49 | And you'll be able to hear this particular torque wrench will click quite loudly when we reach that setting. |
| 25:55 | So that means we've reached that setting. |
| 25:58 | We can also feel that clicking through the handle, so again it's giving us two signals. |
| 26:04 | I'll just do our other fastener as well. |
| 26:11 | So it should be really really clear when we have reached that particular setting. |
| 26:16 | OK so when we're doing that, again just making sure that everything we're doing is really nice and smooth. |
| 26:23 | OK we're going to go through there, we're going to do our three stages. |
| 26:27 | Once we've gone to our final torque setting as well, I always find it's a good idea to just do one final check of all of our fasteners. |
| 26:34 | It can get confusing if you're not paying 100% attention when you are torquing in a particular order, and you're moving out from the inside of your engine block out to the outside, it can potentially give you the option of missing an individual fastener. |
| 26:51 | So what we want to do once we've torqued everything down to that final stage, what we're going to do is leave our torque wrench set on our final torque setting, and we're going to go individually across each of our fasteners and check each one individually just for a final sanity check to make sure that we have got them torqued correctly. |
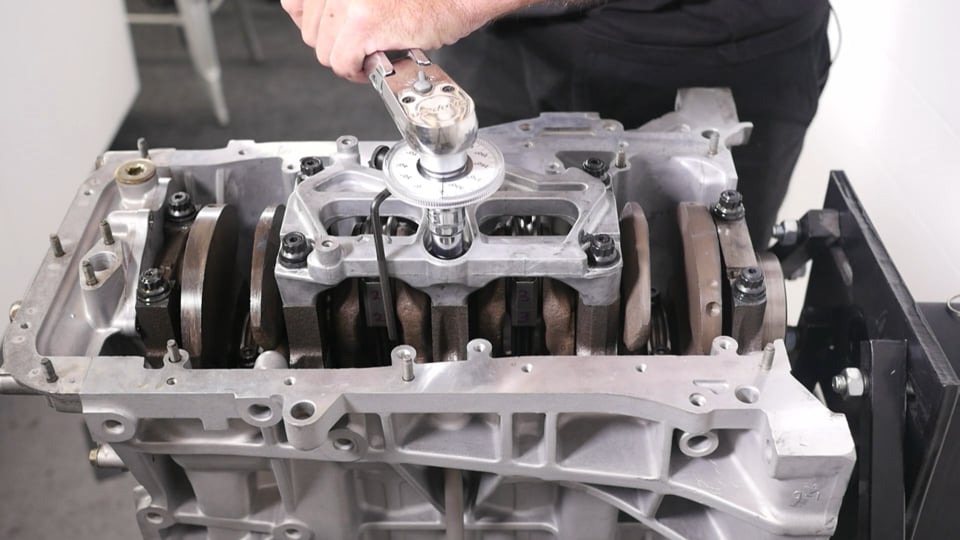
| 27:11 | So what we'll do now is we'll have a quick look at how we can use the torque angle gauge. |
| 27:15 | So in this instance I am going to use our Snap-on torque wrench for this demonstration, even though it does have a torque angle function. |
| 27:23 | So let's just have a look at our overhead camera here and we'll see if we can have a look at our torque angle gauge. |
| 27:31 | So these are relatively cheap, available from a range of different suppliers. |
| 27:35 | And basically what it is, is a through socket, where we can place the socket that we're going to be using for our fastener on the end of it, and our torque wrench will go on the other end, and hopefully you'll be able to see, we've got a 360 degree dial here that we can adjust or zero. |
| 27:54 | And then on the other side as well, we have a stop. |
| 27:57 | So what we're going to do is set up our stop somewhere where it will prevent the torque angle gauge from rotating and then by zeroing it, we can then rotate or tighten our fastener a very specific number of degrees. |
| 28:11 | OK so we'll get set up and have a look at how we can use that. |
| 28:15 | What I'm going to do, again I'll just look at one fastener here, and I'm just going to loosen that off. |
| 28:21 | OK what we'll do is we'll always start with a torque to yield fastener with a torque setting. |
| 28:29 | So in this case what I'm going to do is just torque our fastener down again to 30 foot pound. |
| 28:36 | This again will come from the workshop manual so you don't need to come up with this number by yourself. |
| 28:42 | And once we've got the fastener torqued down initially, what I'm going to do, this is a really important aspect here with torque to yield fasteners, is I'm going to take a paint marker pen and I'm just going to paint the head of the bolt, or the nut. |
| 29:00 | I'll just show you that, hopefully a little bit better, with our remote camera. |
| 29:07 | OK so the reason we're doing this, is again because we are torquing In a number of stages and we are doing this in order, what we're going to want to do is make sure that once we've finished all of the stages of torquing our fasteners down, we're going to want to make sure, that all of the fasteners have been torqued, we don't want to have missed any. |
| 29:28 | Of course with torque to yield, we can't go through and do that final check at a specific torque rating. |
| 29:34 | So what we're going to do, we're going to start by marking the head of all of our fasteners and we're going to mark those in one orientation. |
| 29:42 | So generally I'll start by marking the head of the fastener where it's facing the front of the engine. |
| 29:47 | And then what we want to do is generally we'll be asked to torque perhaps in two stages of 90 degrees. |
| 29:51 | So we'll torque all of the fasteners down, and at each point we can make sure visually that each of the fasteners has actually been adjusted or torqued and then when we've finished all of our stages, if we're doing two stages of 90 degrees, obviously that's a total of 180 so what we should find is all of those paint marks should now be facing towards the rear of the engine. |
| 30:15 | OK so what I'm going to do is I'm going to fit my torque angle gauge here. |
| 30:19 | And we're going to locate that on the top of the fastener, and what we're going to do is start also by putting the socket on. |
| 30:28 | That's gonna be a huge help we'll find. |
| 30:30 | And what we wanna do is rotate the stop around. |
| 30:34 | So in this case we just wanna get it against something firm that is not going to move. |
| 30:39 | So in this case I've just got it resting up against the cradle. |
| 30:42 | Once we've got that done, what we can do is just rotate the dial indicator until it's sitting on zero. |
| 30:50 | And then what we can do is rotate our fastener, and we're going to see the torque angle gauge move. |
| 30:58 | So again this is a little bit tricky, it takes a little bit to get used to, because we can, we want to make sure that we can clearly see exactly what's happening there and exactly how much we've moved the torque angle gauge. |
| 31:11 | I'll just grab our iPhone camera here and we'll get in there and we can see that in this instance, we've gone from zero through to 40 degrees. |
| 31:20 | So it does take a little bit to get used to using a torque angle gauge. |
| 31:24 | And you do need to be very careful that the torque angle gauge is correctly supported in order to make sure that we're getting accurate values from that torque angle gauge. |
| 31:38 | So again once we've gone through that, we'd also just make sure that all of our paint markers are facing the same way. |
| 31:44 | Alright so we'll move into some questions and answers, again if you do have any more, please ask those in the comments or in the chat. |
| 31:52 | Now again obviously this is a relatively simple device, it's a simple tool to use. |
| 31:58 | But there are, like any tool, there are a few tips that really are going to help you get the best results from that tool, and I do see this often misused. |
| 32:09 | Probably my key takeaways there, would be to make sure that you have your torque wrench calibrated relatively frequently. |
| 32:17 | Particularly if you're using your torque wrench for mission critical fasteners, make sure that you are checking the fasteners that you're using for their condition, make sure that you are using the correct lubricant for the fasteners as per the manufacturer's recommendations. |
| 32:33 | And also the way we use the torque wrench, just making sure that we always move the torque wrench smoothly and that we are not jerking the torque wrench, that's going to affect the accuracy of our torque setting. |
| 32:46 | Another thing I'll just mention there as well, there's a misconception that we can't use an extension on a torque wrench and that's not the case. |
| 32:56 | If we are using a torque wrench, and in some instances we're simply going to have to in order to get our torque wrench down maybe into the confines of a cylinder head, the extension is not going to actually affect the torque that is applied to the fastener. |
| 33:12 | What we do wanna stay away from is anything that's going to extend the torque wrench. |
| 33:17 | So something like a crowfoot extension or something like that, that actually physically changes the pivot point for the torque wrench, that will have an affect on our torque setting. |
| 33:27 | Also it's a good idea to stay away from any wobble joints or anything like that in the extensions that we are using. |
| 33:36 | I always try and use the shortest extension I can possibly get away with. |
| 33:41 | James has asked, from my experience, the rule of thumb when an OEM gives a range of acceptable torque values, where do you like to set the torque? Generally I would suggest that most of the engines that I deal with, if not all of them, won't give an actual range for torque settings for a fastener, generally there's just a single value. |
| 34:04 | If you are faced with a range, provided that you are using the correct lubricant, that's obviously the key point there, and it's a performance application, I would be going towards the top end of that spectrum. |
| 34:19 | And actually another point there along with this as well, probably a little bit off topic but what you will often find is with aftermarket stud kits, I'm going to use the ARP stud kit here as an example, the actual specification there for the torque is usually at 75% of yield strength. |
| 34:37 | So what we can find is that's a point where we're going to be able to reuse that fastener multiple times, it's not going to stretch, it's going to be in the elastic range of deformation, so we're going to be able to reuse it. |
| 34:50 | However what we can find is that often we can bump up that torque a little bit, move closer to that yield value, and that's also going to improve the clamping. |
| 34:59 | So this is a little trick that I used on some of our 4G63 drag engines where we really were pushing the boundaries of what we could get away with, with some of the lower end studs. |
| 35:10 | In the end we also moved to a slightly stronger material for the studs we were using. |
| 35:18 | Attentive Student has asked, after operation, e.g. head studs, does the clamping force reduce and require rechecking or is this taken into account in the initial value? OK so head studs are probably a unique one there. |
| 35:30 | So in some instances, yes we can find that after the engine has been operated a few times, or in other words heat cycled, we can find that the components, in particular the head gasket will settle a little bit. |
| 35:41 | So often you'll find that a head gasket manufacturer will actually recommend that the head is retorqued after it's been used a couple of times. |
| 35:50 | So really there you need to pay attention to the head gasket manufacturer's recommendations. |
| 35:54 | That's certainly not something that we need to worry about with fasteners for the likes of our main bearing caps or our conrod bearing caps. |
| 36:06 | Yeoh has asked, how's the calibration of a torque wrench done for both mechanical and digital types? That is not something that I personally do, it's something that I leave to the professionals. |
| 36:17 | So I couldn't actually tell you what is adjusted or changed in the torque wrench in order to achieve that calibration process, all I can tell you is that it is a process that can be completed. |
| 36:28 | Alright only a couple of questions there, obviously pretty simple webinar, so not too surprising. |
| 36:34 | Hopefully it has given you guys a little bit more insight into how to get the best out of your torque wrench and most importantly how to ensure that all of those mission critical fasteners in your engine are torqued to the correct specifications. |
| 36:47 | As usual if you do have any other questions following the airing of this webinar, you can ask them in the forum and I'll be happy to answer them there. |
| 36:55 | Alright thanks everyone for joining us, and I look forward to seeing you all next week. |
| 37:00 | Now for those who are joining us next week, just a little reminder that next week's webinar is going to be one day later than normal because we have a local public holiday here in New Zealand so we'll be airing that webinar on Wednesday instead of Tuesday which is our usual day for airing it. |
| 37:18 | For those of you in the northern hemisphere, you're probably watching this on a Monday, but I'm pretty sure you can figure that all out, we'll be 24 hours later. |
| 37:27 | OK thanks guys, we'll see you next time, cheers. |


