165 | Haltech Elite ESP Tuner Software Tutorial Plus Tips and Tricks
Summary
In this webinar we will explore the Haltech Elite ESP tuning software and see how it can be used on the dyno to help us quickly tune both the fuel and ignition timing. We will also look at some tips and tricks that you can incorporate to get better results from the software in less time, while also helping to ensure engine reliability.
| 00:00 | - Hey guys it's Andre from High Performance Academy, welcome along to today's webinar where we're going to be diving into the Haltech ESP tuning software used for their Elite series of ECUs. |
| 00:11 | The Elite series has been around for a few years now, it's certainly nothing new, but it is a product that has been gaining a lot of momentum all around the world. |
| 00:21 | Obviously incredibly popular in its home country Australia. |
| 00:24 | But it's popping up all over the world. |
| 00:26 | And particularly this webinar is designed for tuners who are maybe thinking of the transition across to the Elite software platform, the Elite ECU platform. |
| 00:36 | I know as a tuner myself, it can be a little bit daunting when you're faced with a brand new ECU that you're not particularly familiar with. |
| 00:45 | There's always a lot to learn when it comes to dealing with a brand new ECU. |
| 00:50 | And a lot of it comes down to getting your head around the way the software is laid out, the way the software operates, and of course there's always a bunch of little tricks and tips that you can use in order to speed up the tuning process. |
| 01:04 | So that's the intention of today's webinar. |
| 01:07 | I want to be very clear right now that it is not designed to be an absolute in depth look at every single feature of the ESP software. |
| 01:17 | We are not going to be able to do justice to that in an hour long webinar. |
| 01:21 | So this will be probably scratching the surface and for any of you out there watching now who are already familiar with the Haltech Elite software, hopefully you can still learn something, but again it's not designed to be a complete and in depth tutorial on the software. |
| 01:38 | OK so for today's webinar we will be looking at this on the Nissan 350z. |
| 01:46 | And what we've done in order to get our Elite 2500 wired up and running on our Nissan 350z is we've made a patch harness. |
| 01:55 | This just allows us on the 350z to really quickly and easily swap between a range of different ECUs so we've got that up and running in our 350z. |
| 02:05 | What I'm going to do for a start is we'll just start the engine up and we can head across to our Elite software. |
| 02:14 | And we're going to start with just a basic tour here. |
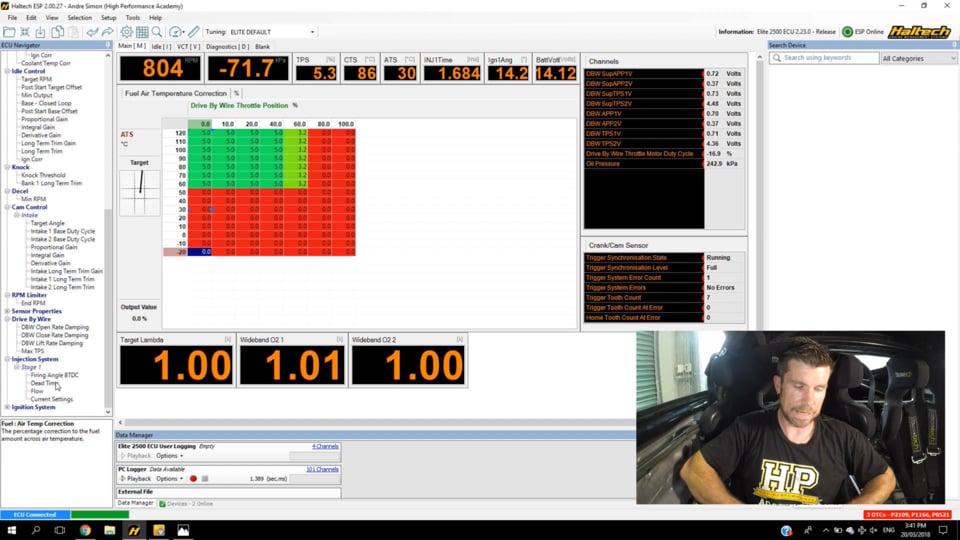
| 02:18 | What we want to do, at the moment we're looking at our main tuning page. |
| 02:25 | I'm going to talk about all of these in a moment, and there's a range of information that is displayed here which again can look a little bit daunting to start with. |
| 02:34 | Don't worry, we're gonna tour through each of these elements, but right now, at the moment, we are looking at our base fuel table. |
| 02:42 | At the bottom here I've also got a few pieces of information that are relevant to our fuel tuning in particular, you can see we've got our target lambda. |
| 02:49 | And in this particular ECU we have a Haltech dual wideband controller connected as well and this is communicating via CAN. |
| 02:59 | So we've got our wideband O2 1 and our wideband O2 2 inputs, so we can actually see what our individual bank to bank lambda is doing. |
| 03:11 | OK so what I want to do is just quickly start with a tour of the fuel model selection in the Haltech. |
| 03:18 | So we can get to all of this by using the main setup icon here in the top of our screen. |
| 03:24 | And if we click on this what we want to do is come back to our engine icon here in the left hand side. |
| 03:31 | And there's a range of information here. |
| 03:33 | We go through a lot of this when we're doing our initial configuration and setup for the Haltech Elite ECU. |
| 03:40 | But what I want to do here is look at our fuel models. |
| 03:44 | And what we can do is come across to our fuel tab here which is where we can access this particular information. |
| 03:50 | So this is one of the main aspects or one of the first aspects we really need to decide on when we are tuning with the Haltech Elite. |
| 03:58 | We want to understand or decide on what tuning method we want to use for our fuel delivery. |
| 04:03 | So this is our first option, at the top we've got tuning method and we've got a drop down box here. |
| 04:10 | At the moment you can see that I've selected volumetric efficiency. |
| 04:13 | We also have the option of mass air flow, and we have the option of injection time. |
| 04:18 | Now mass airflow, while there's no reason why we can't, it's not something that we see used particularly frequently on aftermarket standalone ECUs. |
| 04:29 | Predominantly we will be working on the speed density principle. |
| 04:32 | So the two common options we have here are volumetric efficiency or injection time. |
| 04:37 | So understanding this right at the outset is really critical because it forms a really important aspect of our workflow when it comes to tuning the ECU. |
| 04:48 | So volumetric efficiency, we're going to talk about in a moment because it's probably the more complex. |
| 04:54 | We're going to start by talking about our injection time option. |
| 04:59 | So those of you who have transitioned from the Platinum range of ECUs would also have been familiar with injection time, also the older series of Haltech ECUs pre Platinum. |
| 05:09 | So injection time essentially what we're doing in our main fuel table or our base fuel table, we are simply defining the pulse width to be delivered to our fuel injectors. |
| 05:21 | It's really that simple. |
| 05:22 | We're just directly requesting a specific pulse width to be delivered to the injectors and that's what the ECU is going to do. |
| 05:30 | Now of course there are potentially some compensations that will be applied to that final pulse width. |
| 05:36 | But what this means if we are tuning in injection time mode, what we need to do if we want to adjust our air fuel ratio then we need to achieve this by directly adding more fuel, if we wanna richen the mixture for example, adding more fuel into our fuel table. |
| 05:54 | OK so injection time these days is probably a mode or a tuning method that has fallen from favour a little bit. |
| 06:02 | I think a lot of this is down to marketing hype. |
| 06:06 | But we are seeing most of the modern crop of ECUs now are adopt the volumetric efficiency or VE based tuning model so that's what we're using here today. |
| 06:17 | The volumetric efficiency based tuning model, there are some advantages to it. |
| 06:21 | So don't get me wrong, it isn't just marketing hype. |
| 06:24 | But I think more to the point a lot of people out there in the tuning industry, a lot of enthusiasts, think that volumetric efficiency is now the only way to tune our ECUs and if we don't have a VE based fuel model or VE based ECU, then we're wasting our time. |
| 06:41 | It's simply not the truth, we can get great results in either way. |
| 06:45 | It's just that the approach that we need for our tuning varies dramatically between them. |
| 06:49 | So when we're tuning a volumetric efficiency based tuning method, what this means is that our base fuel table isn't actually a fuel table at all. |
| 06:59 | Instead what it does is it defines the volumetric efficiecy of the engine or in other words how completely the engine is filling its cylinders. |
| 07:08 | To dumb it down, really what we're doing, is defining how much air is entering the cylinders at each of our load and RPM break points. |
| 07:16 | Now remember that when we're trying to choose an air fuel ratio, really it's the mass of air entering the engine that the ECU needs to know. |
| 07:24 | If it accurately knows what the mass of air entering the engine is, which is derived from the engine's volumetric efficiency, then if it also knows what size injectors are fitted, or in other words, what pulse width to deliver to the injector in order to achieve a certain volume of fuel flow, then it becomes very easy for the ECU to decide how long to open the injectors for in order to achieve our target air fuel ratio. |
| 07:49 | So the volumetric efficiency based fuel model, what we're essentially doing is tuning a VE table, defining how completely the engine is filling its cylinders with air. |
| 08:00 | Now if we do our job correctly there, if we accurately tune this, what it means is that the ECU can really easily adjust the fuel delivery in order to achieve a different air fuel ratio target, if we change our desired air fuel ratio target. |
| 08:16 | The problem with the VE based fuel model is there is a little bit more work for us to do during the configuration and setup in order to allow the ECU to seamlessly do all of the heavy lifting in the background and simplify our job. |
| 08:30 | So let's have a quick look at some of these aspects. |
| 08:32 | First of all when we are using a volumetric efficiency based fuel model, it's really important for the ECU to know some factors about the engine that it's running as well as the fuel it's running on. |
| 08:45 | So let's just click back across to our main setup tab here. |
| 08:49 | And one of the aspects here is we have our engine capacity, in this case it's a 3.5 litre V6. |
| 08:56 | As well as our number of cylinders which we'll see down from this. |
| 09:00 | So this basically tells the ECU what volume of air would be filling the cylinders if we're achieving for example 100% volumetric efficiency. |
| 09:11 | We'll move back across to our fuel tab. |
| 09:13 | So as well as knowing accurately how much air is entering the engine during each engine cycle, we also need to tell the ECU a little bit of information about our fuel system. |
| 09:24 | So for example here we have our fuel type. |
| 09:28 | So this allows the ECU to decide what mass of fuel needs to be delivered to achieve our target. |
| 09:34 | In this case we have the option of petrol, we have the option of a methanol, a flex fuel, or an ethanol blend. |
| 09:43 | So we've got a little bit of flexibility there I should also mention that when we are running flex fuel which allows us to seamlessly swap between pump gasoline and any blend of ethanol and the ECU will seamlessly control that in the background. |
| 09:58 | Volumetric efficiency does make that system a lot smoother. |
| 10:02 | Moving down, the other aspect that we need to consider here is our fuel load type, our fuel pressure input type, and our fuel pressure. |
| 10:12 | Our fuel load type is, in this case manifold absolute pressure, pretty common on a speed density system. |
| 10:17 | And this just defines what we're going to be using for the load axis on our fuel table by default. |
| 10:22 | Our fuel pressure input though is really important. |
| 10:25 | So in this case we have constant or we can have MAP reference. |
| 10:29 | So this will depend on the fuel system in our car. |
| 10:32 | So in this case because our 350z is a returnless system, it runs at a constant fuel pressure. |
| 10:38 | So that's why we've got constant there. |
| 10:40 | And we have our base fuel pressure set, in this case we've measured this at 380 kPa, that's what we've set that to. |
| 10:47 | And this helps the ECU decide on what the differential pressure is across the injectors which in turn affects the amount of fuel that the injectors will supply for a given pulse width. |
| 10:57 | So again all of this is really essential. |
| 10:59 | It's not particularly difficult to go through and set up but I can't labour this enough, if we don't get this right then our VE based fuel model is going to not work correctly. |
| 11:09 | Before we move on, there's one more aspect that I wanted to talk about here. |
| 11:14 | Which is this little tick box here which says auto VE air temp compensation. |
| 11:19 | So this is something that can trip up a lot of tuners coming across to a VE based fuel model. |
| 11:25 | In a proper volumetric efficiency based fuel model, the air temperature is automatically taken into account during the air mass calculation that the ECU does in the background. |
| 11:38 | So what this means is that for a VE based fuel model, we typically won't see a air temperature correction table which you'd be really familiar with if you've come across from an injection time based ECU. |
| 11:51 | So in a VE based fuel model all of that is handled automatically in the background by the ECU. |
| 11:57 | Only sometimes we find that this can be a little bit overbearing. |
| 12:03 | So Haltech give us the option to decide how we're going to deal with this. |
| 12:08 | So by having this little tick box ticked, it understandably, as its name implies, will mean that the air temperature compensation is automatically done by the ECU in the background. |
| 12:18 | Now the important point there is if you have ticked that, if we come back out of that menu, here we've got our sub menus for all of our different parameters that we're going to be talking about shortly. |
| 12:30 | For the moment I'm just gonna jump ahead, we're looking at our fuel options, and what I want to do is come down here to our air temp correction table. |
| 12:40 | OK so if you are allowing the ECU to do automatic compensation for the air temperature, this table here would typically be set to zero. |
| 12:52 | So again for any of you coming from an injection time based fuel ECU you'd be really familiar with actually having this table here completely filled in with numbers. |
| 13:03 | In round terms we generally see around about a 3% change in the fuel requirements as the air temperature changes by 10 degrees. |
| 13:13 | So remembering that this is now done automatically in the background of that ECU. |
| 13:18 | If we tune with that little tick box ticked, but we have this table here set up how we would on a conventional injection time based ECU, we've basically got double compensation for our air temperature. |
| 13:30 | We're compensating for that change in air density with air temperature twice and we're gonna really struggle to get consistent air fuel ratios as our air temperature changes. |
| 13:38 | Having said that, we still may want to use this table in some instances. |
| 13:44 | So because of the possibilities of where the air temp sensor is fitted in the inlet track, heat soak et cetera, the automatic compensation for air temperature may often still leave a little bit to be desired and we may find in some instances it overcompensates and we end up with lean areas, or in some instances it may undercompensate and we may end up with rich areas perhaps. |
| 14:09 | So we can still use this table. |
| 14:10 | And you can see I've got some weird numbers in this table here that may have been part of that aspect where we can try and sort of manipulate the automatic correction in order to get our air fuel ratio doing exactly what we want. |
| 14:25 | But again just to simplify this right down, if we are using the VE fuel model, and we have that little tick box for auto VE air temp correction ticked, we would definitely wanna start with our air temperature correction table set to zero. |
| 14:41 | OK got a little bit out of sync there and I just wanna get back to our basic setups. |
| 14:46 | We've talked about our engine capacity, we've talked about our fuel model, and we've talked about fuel pressure. |
| 14:51 | Again with a volumetric efficiency based fuel model, it's really a case of garbage in, garbage out. |
| 14:57 | So we want to give the ECU all of the inputs that it needs, all of the accurate setup information it needs, so it can do the best job possible, and the next step that we need to look at is our injection system. |
| 15:10 | So we can find that down the bottom of our menu structure here. |
| 15:13 | We've got injection system, we've got stage one, in this case we only have one stage of injectors. |
| 15:18 | And in this case we've got a couple of options that we want to talk about here. |
| 15:22 | We'll start with our fuel flow. |
| 15:24 | So it's really important to have this accurately set. |
| 15:27 | This defines the volume of fuel that will be supplied through the injectors based on the current fuel pressure. |
| 15:34 | Now you can see that rather than a single number, this table here, I have set up with differential fuel pressure on the x axis. |
| 15:44 | So what I'm doing here, for those of you who are interested, this is also fitted with a set of Injector Dynamics ID1000 injectors, what I've done here is I've set this table up so that we can compensate for the changing differential pressure. |
| 16:00 | This is an issue that we see in an engine with a returnless fuel system, as the manifold pressure varies because the fuel pressure is staying fixed, we see the differential pressure across the injector vary and what happens is that as that differential pressure across the injector varies, so too does the flow through the injector. |
| 16:18 | So just so you can see how that works, let's just turn on our little cell pointer here. |
| 16:25 | So hopefully you can see there's a little blue cell pointer that shows us where abouts we are in this table at the moment. |
| 16:32 | We're sitting at idle at 800 RPM minus 70 kPa. |
| 16:35 | I'm just gonna pull up the throttle and hopefully you'll be able to see that little cell pointer move. |
| 16:40 | So what we saw is that as I blipped the throttle, it moved across to the left, because as I blipped the throttle, and the manifold pressure increases from minus 70 kPa closer to zero or atmospheric pressure, what this means is our differential pressure drops, which also means that the flow across the injector drops. |
| 17:00 | So again this is one of those subtle aspects, the more information we can have here to accurately define the injector flow, the better job the ECU's gonne be able to do at controlling the pulse width of the injector and it's going to mean that our volumetric efficiency table values are going to likely be more realistic. |
| 17:17 | The last part here that we'll talk about with our injection system is our injector dead time, also referred to as latency or injector offset. |
| 17:26 | So this basically defines the lag between the ECU requesting the injector to open and flow fuel and the injector actually supplying fuel. |
| 17:37 | So there's a little bit of delay between the signal being sent to the injector and the injector opening and flowing fuel and likewise there's actually a small delay, a much smaller delay when the signal from the ECU is turned off, the injector actually stays open momentarily as well. |
| 17:52 | So what this means is there's a discrepancy between the amount of fuel the injector actually supplies and the amount of time that the ECU has to command the injector to be open. |
| 18:02 | So this table here again, it's set up three dimensionally. |
| 18:05 | Quite often people who are less familiar with the concept of injector dead time, would be used to seeing this as a two dimensional table with battery voltage as one of the axis. |
| 18:16 | The problem is that in a returnless fuel system, again as we've just mentioned, our differential pressure is constantly changing based on the current manifold vacuum or manifold pressure. |
| 18:28 | So in this instance when we're dealing with injector dead time for a constant flow, constant pressure fuel system, we actually need to also incorporate differential pressure as one of these axis. |
| 18:40 | Now if any of you are sitting out there thinking well where the hell do I get this information from? Don't worry, all of this information is really easy to basically copy and paste. |
| 18:50 | In this case because we're using Injector Dynamics ID1000 injectors, we've simply copied and pasted that information from the ID website. |
| 18:58 | So this is one more reason why you also want to be making sure when you're swapping injectors, that you're purchasing injectors from a manufacturer that can supply you with all of the data that you need to do a proper setup. |
| 19:10 | Again just as our ECUs are becoming a little bit more complex so that they can do a better job of controlling the way the engine runs, this in turn demands that the tuner does a little bit more work and supplies a little bit more information so that everything works as it can, or as it should. |
| 19:28 | Again basically if we have garbage in, we're going to get garbage out. |
| 19:34 | OK so in terms of the fuelling setup, we also have the ability, if we just head back across at the moment to our main setup page. |
| 19:42 | We've got the ability to also incorporate a range of corrections. |
| 19:48 | So we can see here on the right hand side here, we've got our fuel tables and we can basically make the ECU here as simple or as complex as we want. |
| 19:57 | So by default we'll find that most of these additional corrections are disabled. |
| 20:02 | But here we can see for example we have a coolant temp correction. |
| 20:07 | Obviously something that we're always going to want so that we an incorporate additional fuelling when the engine is cold. |
| 20:14 | We've also got the air temp correction that we've just recently talked about. |
| 20:19 | Moving down here as well we've got some more advanced corrections. |
| 20:22 | So for example here we've got our cylinder correction. |
| 20:25 | So what this allows us to do is actually provide individual cylinder fuel compensation. |
| 20:31 | So if we've got, which hopefully in a moment you're actually going to see, we've got a few bank to bank variations that come into play on our 350z. |
| 20:40 | This allows you to bring in these compensations. |
| 20:42 | But the beauty of this system is that if you don't need any of these compensations, you can untick the box and then they'll be hidden from the menu on the left. |
| 20:51 | So if we just cancel this down, we'll go back across to our fuel sub menu, and for example we can see we've got our air temperature correction and coolant temp corrections. |
| 21:02 | We've also got our cylinder temp corrections. |
| 21:04 | So these are our individual cylinder correction tables. |
| 21:06 | We can go in and we can have a look at each of those and see that at the moment obviously all of these are set to zero so those aren't having any effect. |
| 21:16 | So it means that at least when you're starting out you can begin with what is a relatively decluttered setup. |
| 21:22 | Something really simple where you can concentrate on the bare bones and then as you find that you need additional compensations to deal with something unique, you can bring those in. |
| 21:32 | Now we'll just head back there as well. |
| 21:34 | And we also have the ability to bring in a range of generic corrections. |
| 21:39 | So these really allow you to do just about anything you want based in the current situatIon. |
| 21:44 | So you could be as clever as you want with these to basically make the ECU do what you want it to do. |
| 21:49 | So for example if you wanted to bring in a fuel correction based on gear or based on road speed, you could do that. |
| 21:56 | Maybe you wanna trim in a little bit of fuel when the engine's really being worked hard and maybe it's in 6th gear and it's up over 200 kilometres and hour, you can do that with these generic corrections. |
| 22:06 | If we move over as well to our ignition setup, you can see that we have much the same setup here for our ignition table. |
| 22:15 | So we can incorporate any of these corrections that we require and remove any that we don't feel necessary. |
| 22:24 | OK so we'll exit out of that and let's just come back across to our base fuel table for the moment. |
| 22:30 | And again I just wanna reiterate for those who are new to that volumetric efficiency tuning model, the workflow here is really a little bit different. |
| 22:39 | And this is something that you need to really understand. |
| 22:42 | With the volumetric efficiency based tuning method, this table that we're looking at here which is a little bit awkwardly called out base fuel tuning, it's not actually a fuel table at all. |
| 22:57 | As I mentioned earlier, it is now a volumetric efficiency or VE table. |
| 23:02 | So this table here is actually defining the volumetric efficiency of the engine. |
| 23:07 | Or in other words in simple language we're talking about how completely the engine is filling its cylinders at each of these individual break points. |
| 23:14 | So the tuning workflow that we need to go through when we're tuning a volumetric efficiency based fuel model is that before we start making changes to our fuel table or VE table as I'd like to refer to it, what we need to do first of all is head back up in our ECU navigator menu here. |
| 23:33 | We wanna come up to our lambda target. |
| 23:36 | And I'll click on our lambda target table. |
| 23:38 | And this is the first place we need to come. |
| 23:41 | We need to set our desired lambda targets to what we actually want the engine to be running. |
| 23:48 | So this is the first place to do our work, we wanna make sure that this is correctly and sensibly configured to give us the actual type of lambda number that we want the engine running depending on whereabouts we are in the load and RPM range. |
| 24:02 | Once we've configured this correctly, then we can head back across to our volumetric efficiency table or base fuel table, and then what we're going to simply be doing is tuning or adjusting the cells, adjusting the numbers that are in this table, until our measured air fuel ratio or lambda, which we've got here on the right hand side from our two widebands, until that matches our target. |
| 24:28 | Now if we've done all of our configuration and setup correctly, if everything's working as it should, when our measured air fuel ratio or lambda matches our target, then this by default means that the volumetric efficiency in our VE table is also accurate. |
| 24:43 | Now the beauty of the VE based tuning method, is that if we do that work, we accurately tune our VE table, until our measured air fuel ratio matches our target, then if for any reason we want to come back across to our lambda target table, and you go hey you know what, I'm at idle now but I don't really wanna be running lambda one. |
| 25:02 | Maybe I want to run at 0.90 so let's richen it up. |
| 25:06 | So when we do this, instantly we can see that our measured lambda tracks to our new target. |
| 25:13 | So that hasn't required us to go back into that fuel or VE table. |
| 25:17 | Once our VE table is tuned, unless we make actual hardware changes to the engine, something that's physically going to affect the air flow through the engine, we can make any tuning changes we want to our target lambda straight in our lambda target table. |
| 25:32 | So we'll just set that back up to lambda one and we'll see that our measured lambda again tracks to our new target. |
| 25:40 | So I think this is probably one of the most common mistakes that tuners who are new to a VE based fuel model make. |
| 25:47 | They ignore that lambda target table, don't understand how it works or what it does and instead they leave that to whatever default values may be in it and simply try and get their measured lambda to match whatever they want in their head and they try and do all of that work in the VE table and that's going to end up with the system just not working. |
| 26:07 | It's not going to be accurate and it's not going to work as well as it should. |
| 26:12 | OK so next getting into a few of these tips with the software. |
| 26:16 | So at the moment we've got a range of tuning pages which we can see here across the top. |
| 26:22 | Some of these will come by default. |
| 26:24 | We've got our main, we've got idle, we've got one set up for variable cam timing, VCT tuning, we've got a diagnostic page, and then we've got a blank page where you can add you own. |
| 26:34 | Now you can manipulate these to basically show whatever data you want. |
| 26:39 | So for example we've got a number of numerical display boxes across the top here. |
| 26:44 | This makes it really easy to see at a glance what some of the key parameters that we're interested in are doing. |
| 26:50 | Obviously down the bottom I've got a couple here that I'm interested in. |
| 26:54 | We've got our target lambda and our two wideband inputs. |
| 26:57 | At the moment we're running in closed loop mode. |
| 26:59 | So let's just see how we can add our feedback from our closed loop control system. |
| 27:05 | So by right clicking anywhere on the screen, we've got an option to add a range of gauges. |
| 27:11 | So let's in this case go down and we're going to add a number display which matches what we've already got here, these are called number displays. |
| 27:20 | So if we right click on this we can now select the channel that's going to be displayed in that box. |
| 27:25 | And this is really easy to do because we can just simply start typing and the software will then fill in the blanks and we can really quickly narrow down a search and find what we're actually interested in. |
| 27:37 | So in this case let's go down and what we want to display here is our O2 control, short term feedback. |
| 27:45 | So this is for bank one. |
| 27:46 | So we can see what our closed loop fuel control is doing on our left bank of cylinders. |
| 27:52 | We can see that it's currently pulling out 2.5, 3% So we're pretty close to our target but it's important to understand. |
| 27:59 | And let's do that again, what we're going to do is now do exactly the same we'll add our right bank there, so we'll select channel there. |
| 28:06 | Again we're going to type in O2 and we'll cycle through until we see our O2 bank two short term trim. |
| 28:12 | So these are quite useful as a bit of a measure of how accurate or how close our tune is there as well. |
| 28:23 | Likewise we've got a channel list here. |
| 28:24 | So at the moment just randomly we've got a bunch of information related to the drive by wire throttle and then at the bottom here I've also added another channel there showing our oil pressure. |
| 28:35 | Again you can right click there and select channels And basically exactly the same goes, you can type in whatever you want to look at, and you could add the two channels here for our wideband and now those wideband channels will be displayed in a couple of spots. |
| 28:52 | We've got them there as well as numerically. |
| 28:54 | So a lot of this comes down to how you want to view the data. |
| 28:58 | You also have the ability to bring these in as analog gauges instead of numerical values if you'd prefer. |
| 29:04 | So really absolutely down to your personal preference. |
| 29:06 | And it can certainly speed up your tuning process if you are going to be doing a particular task, let's say variable cam timing for example, you can set this up so you can see exactly what your cam timing is doing and this makes it really easy for example I'm just giving the throttle a bit of a blip here, and while it's a little bit small, we can see that we've now got our inlet cam target versus our measured position being shown. |
| 29:34 | This makes it really easy to make sure that our cam timing is tracking our target. |
| 29:39 | So in this case we've got it set up for inlet and exhaust cam, but our VQ35 here does not have variable exhaust cam so that's why we've only got our inlet cams showing. |
| 29:49 | So again it's really simple if we can split off our tuning tasks so we can maybe tune our fuel delivery and our ignition timing on our main tuning page, and then we can split off some of the more specialist tasks onto an individual page so we're not cluttering up our main page with a lot of information that's not relevant to fuel and ignition tuning. |
| 30:10 | Or likewise when we're focusing on VCT or idle tuning, we can focus solely on that task. |
| 30:17 | Another where we might wanna set up a specific tuning page is if we were working on boost control. |
| 30:24 | OK so now that we've had a look at the different pages and how we can manipulate those to suit, one thing I just wanna show you here while we are still on our lambda page, our lambda target page here, or lambda target table I should say, is that a lot of people don't like tuning in units of lambda so that's fine, you can easily change your units, we can use the little ruler icon here on our toolbar. |
| 30:56 | And this will allow us to change any of the units for any of the channels. |
| 31:00 | So for example if you'd prefer to work in units of air fuel ratio, you can choose how the air fuel ratio will be displayed in this drop down menu, so in this case let's choose air fuel ratio units for a gasoline or petrol and straight away we can see that all of those numbers magically change to suit our new units. |
| 31:21 | For this example though I am just gonna head back to lambda. |
| 31:25 | But of course if we look at this table here, we can see that we've got the ability to change our units for any of the parameters or any of the channels there that the ECU is displaying. |
| 31:36 | So particularly if you're in the US market, and you're more familiar with working in imperial units maybe psi instead of kPa, fahrenheit instead of centigrade. |
| 31:45 | Obviously you can adjust these to suit your own requirements really easily. |
| 31:51 | OK we'll head back across to our base fuel table here and another aspect that's important to understand is how we can adjust the axis setup. |
| 32:01 | So we've got our default axis set up here but of course we may want to change the parameter that we're using for our load input. |
| 32:09 | We may want to flip our RPM and our load axis around. |
| 32:12 | Or basically do whatever we want. |
| 32:14 | So we can do that if we head up to our table axis setup icon here, we'll just click on that, and that'll open up. |
| 32:21 | So this allows us to set up the axis for our base fuel tuning table. |
| 32:26 | So we have the ability to use up to three axis. |
| 32:29 | In this case we can see that we're using two. |
| 32:31 | We're using, oh not that one, we're using our axis one which is enabled and our axis two which is enabled. |
| 32:38 | If we wanted to make this a four dimensional table we could add a third axis. |
| 32:43 | In this case I'm keeping it nice and simple. |
| 32:45 | So we've got our channel here for load which is our fuel load input. |
| 32:52 | Remember that was manifold absolute pressure, we set that up in our initial fuel setup that we looked at. |
| 32:58 | And then we can choose the load break points. |
| 33:01 | So we've got the ability to choose up to 32 here. |
| 33:04 | We can for example if we were talking about a turbocharged engine, we could start adding some additional zones out into the positive boost area. |
| 33:13 | So we can directly enter values. |
| 33:15 | We can delete values or we can add values, depending on how you want to use this functionality. |
| 33:24 | Also gives you the ability to use this linearised function here as well to give you a consistent break point jump between different cells. |
| 33:34 | So then we've got our RPM for our other axis, again pretty much self explanatory, follows exactly what we're just looked at, we've got the same ability to have up to 32 break points. |
| 33:43 | And if we want to, if we're not really happy with looking at RPM on the Y axis, we wanna swap that across to our X axis, we can just swap these parameters around, it's really simple to achieve. |
| 33:55 | We'll cancel out of that menu there. |
| 33:58 | So moving on, we wanna see now how we can actually go about making tuning adjustments. |
| 34:06 | So in order to do this, what I'll do is just get us up and running here on our Mainline dyno, we'll apply a little bit of load, and get us running in steady state. |
| 34:18 | And we're at 2000 RPM now. |
| 34:22 | So there's a few things to take into account here. |
| 34:26 | First of all one of the really important things to keep in mind, and this is regardless of what ECU you're tuning on, is you always want to be in the centre of the active cell before you make tuning changes. |
| 34:37 | Now one of the changes that I might have done a little bit too quickly for people to actually see, if we go to properties, we've got this enabled cell pointer. |
| 34:47 | So by default this is going to be turned off. |
| 34:49 | We'll go OK, and this shows us where abouts we're operating in the particular table we're on. |
| 34:56 | Just with a small blue circle. |
| 34:58 | Nothing necessarily wrong with that. |
| 35:00 | But personally I find it a little bit hard with that system to decide exactly where we're operating or how close to the centre of the cell we're at. |
| 35:08 | So by right clicking there, clicking on properties, and enable cell pointer, this brings up a square box and I just find that's a little bit easier to correlate to where exactly I am and what I need to do to get into the centre of the cell. |
| 35:20 | Now another key that you're going to wanna keep in mind is if we press the spacebar on the keyboard, that's going to jump us to the active cell. |
| 35:27 | Or as close as we are to the active cell. |
| 35:29 | Now as I've just said, we wanna be in the centre of the cell before we make a change. |
| 35:34 | So we can see both graphically here with our little cell pointer that we're not in the centre of that cell. |
| 35:40 | But also on the left hand side this is a really nice feature in the Haltech software, we've got our target. |
| 35:45 | So this shows us again how close we are to the centre of that cell. |
| 35:50 | So what I'll do is I'll just drop our load down a little bit and I'll bring our RPM up a little bit. |
| 35:56 | So we'll get into the centre of that cell, and you can see that as we move closer to the centre of the cell, that little target turns green. |
| 36:06 | And we can see really really clearly how close we are to the centre of that cell. |
| 36:12 | So when we're right in the centre there, that means that we are going to be getting the most accurate results when we are making our changes. |
| 36:21 | OK just so that I don't confuse matters here because I'll just explain what we're seeing here. |
| 36:25 | We've got our two lambda readings from our wideband sensors and we can see that we've got at this point, a variation from bank to bank. |
| 36:34 | So we've got our left bank running a little bit leaner than our right bank. |
| 36:38 | And I don't wanna confuse matters so what I'm gonna do here is I'm just going to remove our second lambda reading. |
| 36:47 | In fact what I'm going to do, I'll make it even easier, what we'll do is we'll go to our functions and we're gonna have another look at this shortly. |
| 36:54 | So for the moment just to make this really simple, we'll just disable our closed loop lambda by setting the start point to 7000 RPM. |
| 37:04 | So what you can see here is now our closed loop lambda, our short term fuel trim is sitting at zero. |
| 37:10 | This means that our closed loop lambda control is doing nothing. |
| 37:13 | OK so now we're actually free to make some tuning changes and again there's a variety of ways that we can make changes in order to achieve our target. |
| 37:21 | One of the first things we want to be familiar with is by increasing and decreasing the value. |
| 37:27 | So if we use our page up on our laptop screen, we're going to add 1%. |
| 37:34 | So we've gone from 91.3 to 92.3, 93.3, 94.3 So we're adding 1% every time we do a key press. |
| 37:42 | So that's making a relatively coarse change. |
| 37:46 | If we want to make a smaller change, we can make a change by pressing the control key down while we press page up and page down. |
| 37:54 | And every time we do that, that's gonna make a change of 0.2% So it's gonna make a finer change and that's handy when we're getting really close to our target. |
| 38:03 | Now if you're a really long way away from your target, you can actually make a coarser change of 10% by holding down the shift key, pressing page up and page down. |
| 38:11 | So you can see there we've gone from 92.3 up to 102.3 We're a little bit rich so let's just delete that change that we've made there. |
| 38:19 | So at the moment we can see that we're sitting at 14.0 and oh sorry we're using the wrong one. |
| 38:27 | I've managed to just confuse myself. |
| 38:29 | So what we'll do is remove all of that information for the moment. |
| 38:33 | So we're tuning off this bank here. |
| 38:35 | So we're seeing that our current wideband input is 15.2:1 so we're a little bit too lean. |
| 38:42 | Actually what I'm also gonna do, 'cause I said I'd do but I didn't, is I'm gonna swap back to lambda. |
| 38:49 | Alright so we can increase or decrease those numbers until we're on our target. |
| 38:56 | That's a relatively slow process to go through there. |
| 38:58 | Particularly one of the reasons that I prefer tuning using units of lambda is because it allows us to almost instantly get onto our target by making a percentage change. |
| 39:09 | So in this case we wanna use our correction equation which is our measured lambda divided by our desired or target lambda. |
| 39:18 | So 1.05 divided by 1.0 in this case our measured of 1.05 divided by our target of 1.0 gives us a correction that we can put in. |
| 39:26 | In this case what we actually know is that we need to increase our fuel delivery there by about 5% to correct that. |
| 39:32 | So we can do a percentage change directly by pressing the P key on the keyboard. |
| 39:36 | So you'll see that when I do that, the percentage change box comes up. |
| 39:40 | So in this case what we're going to do is ask for a percentage change, in this case it actually is jumping up to 6% so I'll ask for 6% additional fuel. |
| 39:49 | So you can see that in one change there, just by one key press, we've corrected our error. |
| 39:54 | We've gone a little bit far and we're swapping between 5% and 6% there so let's make a further change and we'll take 1% out. |
| 40:03 | So it makes it really really quick and easy, if we're looking at our measured lambda versus our target, we can correct those errors very very easily and very very quickly. |
| 40:10 | Let's just open the throttle now and we'll come up to another cell where we can make some further changes. |
| 40:16 | So again just pressing the spacebar to jump to the active cell. |
| 40:20 | Now we can also use math changes here. |
| 40:22 | So let's say for example we want to add or subtract. |
| 40:25 | We can press the minus key, we can press the minus key, let's get to the right cell, and that's going to bring up our direct entry box. |
| 40:35 | So this gives us a few options here. |
| 40:37 | So at the moment we've got minus two. |
| 40:40 | So that's going to remove 2% when I press enter. |
| 40:42 | However we could directly enter a value as well. |
| 40:46 | So we could decide that maybe we wanted this cell to be 100%, press enter and that change becomes active. |
| 40:52 | Likewise we could decide that we want to add 5% to that cell. |
| 41:00 | Gotta press the right key in order to do that. |
| 41:02 | So it gives us that ability there, if we actually press the right keys, gives us the ability there to really quickly make wholesale changes to the cell that we're tuning in order to get us on target. |
| 41:12 | And that's a tuning change that we're going to be able to use particularly when we're a little way away from our target and we need to get there quickly. |
| 41:20 | So it really comes down to tuner's preference there in terms of which way you want to make those inputs. |
| 41:26 | I tend to vary the changes that I'm making on the keyboard depending on how far away I am from my target. |
| 41:34 | So if I'm a long way away I might quickly use the percentage change initially. |
| 41:37 | For a long way away, one percentage change may not quite get us on our target, then I'll probably be close enough that I'll be able to use the control page up and control page down keys to make very very small changes to get us really accurately on our target. |
| 41:51 | Now if you do have a wideband input into the ECU though, another really nice feature is the quick tune function. |
| 41:58 | So if we press the Q key on the keyboard, what that will do is straight away make the correct change to the cell that we're tuning in order to get us on our target. |
| 42:08 | So you can see that's exactly what that did. |
| 42:09 | If that happened a little bit fast, I'll just re enter the value we had. |
| 42:13 | So we had 105% in the VE table there. |
| 42:16 | That's giving us a lambda of 0.96, 0.97, so if I press the Q key now, press it, that change takes place, you can see that it's changed the number in the cell from 105% down to 101.4% And straight away we're on our target, or at least very close to it. |
| 42:34 | And for those of you maybe who aren't familiar with tuning, you're seeing those changes that I made, and going well hey the lambda's still moving around, you said it was lambda one but now it's 1.01 or maybe it's 0.99 It's important to understand that our lambda does always move around. |
| 42:48 | It's never a fixed value. |
| 42:49 | So there's always gonna be some small discrepancies there as we operate the engine and the lambda changes slightly. |
| 42:56 | OK so we've looked at a few ways of making our changes there. |
| 43:00 | That quick lambda function and our percentage change probably are the two key takeaways. |
| 43:05 | Really really important ways to make quick changes to our fuelling. |
| 43:09 | Particularly if your fuel table is a long way away from target, allows you to really quickly correct that and get the engine running with a minimal amount of input from the tuner. |
| 43:18 | For all of those changes, I'm just gonna reiterate once again though, it's garbage in garbage out, we wanna be as close as possible to the centre of the cell we're trying to adjust in order to really accurately make those tuning changes, and that's gonna give us the best possible results. |
| 43:33 | Now we've looked at making changes there to a single cell but sometimes we may want to make changes to a block of cells. |
| 43:39 | So by holding down the shift key and using the arrow keys, we can move around and highlight a block of cells. |
| 43:46 | Once we've done that then we can use all of the same functions that we've already seen. |
| 43:51 | So let's say for example we want to remove 2% from all of those cells. |
| 43:56 | We can do exactly that. |
| 44:00 | We can add, let's just in this case change them all I should say, to 105%, that will set them all to our current value, or we can make a percentage change. |
| 44:10 | Let's add 10% to those cells. |
| 44:12 | So we can adjust a range of cells really quickly. |
| 44:16 | Likewise while we're got those cells highlighted, we can still use the page up and page down keys, control page up and shift page up, page down, in order to alter all of those cells at the same time. |
| 44:26 | Now once you've highlighted those cells though, this is another little function that for people new to Haltech will find a little bit frustrating initially, you can see that now all of those cells stay highlighted and as I move around I'm constantly highlighting a block of cells which is gonna make it really difficult if I now want to make an individual cell change. |
| 44:45 | It's OK though, if we press the escape key, that'll jump back to just highlighting an individual cell. |
| 44:52 | One other function that I'll just talk about here while we are looking at how we can make tuning changes, is the linearise function. |
| 45:00 | So if we want to interpolate or linearise a range of cells, what we can do there is highlight the cells that we want to linearise and by pressing the L key, L for linearise, that's going to do exactly that. |
| 45:12 | So in that case it's linearised between the two bounds there at minus 80 kPa and minus 30 kPa. |
| 45:20 | OK so what we want to do now is I want to just have a look at how we can use some of the data logging functionality here in the Haltech Elite tuning software in order to fast track your tuning again. |
| 45:36 | Remember we are going to be having some questions and answer as well, it's not too far off now, so if you do have any questions, of anything I've talked about, please ask those in the comments or in the chat and I will do my best to answer them shortly. |
| 45:50 | OK so we've got a couple of options here, we have onboard ECU logging which is handy if you're sending a car out into the world, maybe down the dragstrip, out onto the racetrack, you can datalog into the ECU and analyse that data later. |
| 46:02 | When we've got our laptop hooked up though, what we can do is log directly to our PC. |
| 46:08 | Which makes it really really easy. |
| 46:10 | So we'll see down below here we've got our data manager, let's just drag that up a little bit. |
| 46:16 | And here what we're looking for is our PC logger. |
| 46:21 | So there's a few aspects of this that we need to understand. |
| 46:23 | First of all we can see here, currently it's saying that it's going to log 100 channels. |
| 46:28 | Now that's a huge amount of data, probably not necessary to look at all of that data. |
| 46:33 | But we can go into our options and into setup and this will allow us to select the data that we're going to be logging. |
| 46:43 | So for example here in the top left corner we have a little check box that says use page layout channels. |
| 46:49 | So we've got this ticked, basically it's going to log any of the channels on our current page layout. |
| 46:54 | It's gonna log anything relevant to the current page, which may be useful, it means we don't necessarily straight away choose what we're going to look at, but it is gonna give us a lot of data. |
| 47:05 | Let's leave it like that for the moment. |
| 47:07 | What we're going to do is just quickly perform a wide open throttle ramp run here on our 350z. |
| 47:13 | So for the purposes of watching this, actually before we do that ramp run though, in order to use our PC logger, we do need to actually start it recording, otherwise we're not gonna get any data, we can do that with the little record button. |
| 47:27 | So I'm just gonna press that now. |
| 47:28 | And you can see that it shows that it's starting to record data. |
| 47:32 | Let's head across to our dyno screen. |
| 47:34 | And we'll perform a ramp run here. |
| 47:41 | Alright we'll just go through to full throttle, fourth gear, and we'll get our run underway. |
| 48:05 | Alright so we've got our run complete there. |
| 48:07 | And we can see we've got 164.5 kilowatts or 220.6 horsepower at the wheels. |
| 48:14 | Don't really care about the power though, let's jump back into our laptop tuning software. |
| 48:18 | What I wanna do now is press the little stop button to stop our PC logger. |
| 48:23 | OK so now what we can do is analyse all of the data, everything that was recorded during that run. |
| 48:28 | So in order to do that, we're gonna click playback. |
| 48:30 | Now when we click playback, we get a really quick visual representation of all of that data. |
| 48:37 | Remembering that we had 100 channels there that we were logging. |
| 48:41 | So right now it looks like a complete mess, there's not a lot of useful data that we can take out of that. |
| 48:47 | So in order to view that we can go through our channels and in this case let's just make it really simple, let's deselect all of our channels and we'll look at our engine RPM. |
| 48:59 | OK so now we can see something that actually makes a little bit of sense. |
| 49:02 | We can see our RPM trace and remembering that we performed a full throttle ramp run, we can see obviously our ramp run started around about this point and we finished at around about this point. |
| 49:12 | So the beauty of this is it makes it really easy for us to see exactly whereabouts we were accessing inside each of the tables during the time when the engine was running. |
| 49:22 | So for example at the start of our ramp run here, we can see that we're sort of sitting between our zero and minus 10 kPa columns in our volumetric efficiency table. |
| 49:34 | We're at about 350 metres above sea level here so barometric air pressure is a little bit lower than some of you who live at sea level are lucky to see. |
| 49:41 | So that's why we're interpolating there, and we can also use this to help us with our tuning. |
| 49:47 | Obviously it's the main point here. |
| 49:49 | So for example here we can see our wideband lambda is sitting at 0.90, our target on the other hand, 0.89 So at this particular cell we're just a touch leaner, around about 1% leaner than our target. |
| 50:01 | I don't really care about that right now for this purpose. |
| 50:04 | But let's just cycle through here. |
| 50:06 | OK so in this instance we can see that when we get up to 2500 RPM now we are moving a little bit leaner. |
| 50:14 | So we can see that we're at 0.93 remembering out target's 0.89 In other words we're around about 4% leaner than our target so we can use that data logging now to help make some changes and fine tune our fuel delivery. |
| 50:27 | So in this case what I'd simply do is select the two cells we're interpolating between and we can select the P function for percentage change, enter a value of four which is our error. |
| 50:37 | Now that should pretty closely correct our errors there in just one set of changes. |
| 50:42 | So we'll simply continue to go through our log here looking at any areas where our lambda didn't quite meet our target, particularly right here in the top end, we can see that again we're now quite lean. |
| 50:56 | We're about 8% lean in this particular cell. |
| 50:59 | We're still interpolating a little bit here so we might want to make that change like so. |
| 51:04 | So by using the data logging there built in we can really quickly fine tune our fuel delivery or whatever aspect of the calibration that we're trying to change. |
| 51:17 | Now in this instance as well let's just close our playback and we'll go to our setup again there. |
| 51:23 | It's important to note there that when that playback is active, we're not seeing live data, so we're only seeing data from wherever we are in that particular log file. |
| 51:34 | So in order to go back and start seeing live data again, which you'd obviously want to do when we're steady state tuning, we need to close down that playback. |
| 51:41 | So if we go to options now, we'll go back to our setup, so as I've said if we've got this little tick box in the corner ticked, that will show the page layout channel. |
| 51:52 | So in this case remember we had 100 channels, it's a huge amount of data. |
| 51:56 | If we untick that, now we can select exactly what channels we want to see. |
| 52:00 | In this case I've got a really basic setup here consisting of RPM, our wideband O2 for bank one and our target lambda. |
| 52:08 | Obviously we can add or remove channels as we wish in order to display the sort of data that we're interested in. |
| 52:15 | So probably one of the most powerful features in my opinion there is using that onboard logging to really help us fine tune our fuel delivery. |
| 52:25 | Now I also wanna talk a little bit more about the closed loop fuel control. |
| 52:31 | Tuners these days and particularly those who are just getting started in the industry, maybe even as a hobbyist, obviously a lot of the ECUs we're getting these days really promote themselves on their self learning abilities and I think this becomes a really big selling point. |
| 52:45 | I think that self learning abilities in a lot of ECUs are a great function to have. |
| 52:51 | But it still doesn't mean that we don't need to do our job properly in the first place. |
| 52:57 | So I just wanna talk about the self learning on the Elite because this is a function that Haltech quite rightly and quite proudly promote about the ECU. |
| 53:06 | And we just need to understand how that works. |
| 53:08 | Now this will be a brief overview. |
| 53:10 | For those who wanna get a little bit more in depth, we actually have a complete webinar just purely on the self learning functionality in our webinar archive. |
| 53:18 | So jump in and have a look at that if you want a more in depth look at it. |
| 53:22 | So we'll go back to our setup. |
| 53:24 | And now I'm on the functions tab. |
| 53:28 | And we're looking here at our O2 control. |
| 53:30 | So you'll remember that I initially turned our O2 control off, well I just disabled it, got it out of the range by setting it so that it would only function above 7000 RPM. |
| 53:41 | So right now I'm just gonna re enable our short term trim. |
| 53:44 | So this is normal closed loop fuel control, we've got a lot of functionality around how this will work. |
| 53:49 | We can control whereabouts the closed loop control will work, do you want it operating only at idle and cruise, do you want it operating at the wide open throttle and full RPM range of the engine as well. |
| 54:02 | And then what we'll do is come over to our long term fuel trim. |
| 54:07 | So this is the function that essentially gives us the learning ability for the Haltech Elite ECU. |
| 54:13 | So if we enable this functionality here, again we've got a few controls which I'm not going to go into, we'll apply this function, and we need to do a reboot in order for that function to become active. |
| 54:26 | We'll just get up and running again, and I just wanna talk about how this functionality works. |
| 54:30 | While we're waiting for everything to come back up online, what I'll do is just bring back in our O2 closed loop feedback control, just so we can see what our feedback's doing. |
| 54:43 | OK so we've got our short term fuel trims operating which is great. |
| 54:48 | We've also got our learning, our self learning function. |
| 54:50 | Now when we turn on our long term fuel trims, our self learning, what we end up with here is our bank one and our bank two long term fuel trim tables become active. |
| 55:01 | So what these do is over time they look at what the short term fuel trim is doing and they act on that to basically drive it back towards zero. |
| 55:12 | So if we look at our bank one long term trim right now, we can see that while I've been sitting here talking, that bank one trim has been slowly reducing the trim there and as I've been talking as well, we can see that our short term fuel trim is now sitting much closer to zero. |
| 55:28 | So this is just something that happens in the background. |
| 55:30 | And what we can do essentially, once we've got our fuel table, our VE table pretty closely tuned, we can use this to fine tune our fuel table out in the real world. |
| 55:41 | So by just allowing the long term fuel trim tables to populate as we drive the car, basically the more data points, the more samples we can get, the more complete these tables will be, we then have the ability to go back into our O2 control setup and you'll see that we have the ability here to apply those changes to our base table. |
| 56:02 | So what that will do is actually apply those corrections from our long term fuel trims into the base table. |
| 56:09 | The important thing to understand here again for the novice tuner or even the more experienced tuner is understanding what these trims are doing, when you're tuning the fuel delivery. |
| 56:20 | So for example right now we're sitting at idle, actually let's give the control a little bit more work to do we'll come back up to 2000 RPM in steady state. |
| 56:37 | OK so we'll just sit here for a moment while our trims stabilise. |
| 56:42 | And we're seeing everything sort of working now, we're seeing our short term fuel trim's currently going negative, it's driven our wideband reading back to lambda one, we're sitting at minus 6.5 And now what we're going to do is see our trims inside our long term fuel trim table slowly but surely, they will also reduce so that our short term fuel trim comes back to zero. |
| 57:07 | So the problem is if you don't understand the interaction of these controls, we could be sitting here thinking to ourselves, well our fuel table is actually pretty damn good. |
| 57:19 | Let's just go back over to our base fuel table. |
| 57:23 | We've got a value of 101.4% here. |
| 57:27 | if I just again allow the ECU to sort itself out and do its job. |
| 57:32 | Basically because of the long term fuel trims, what it's going to do is over time it's gonna drive that short term fuel trim back down towards zero. |
| 57:40 | And when that's sitting at zero, basically we're looking at it thinking well our job's done here, we don't need to correct that particular cell in our fuel table. |
| 57:49 | But then if we jump back across and look at our long term fuel trim table, we'll see that in actual fact we've got a negative trim in that table. |
| 57:57 | So we need to take that into account because otherwise we can end up relying on our long term fuel trims to do the job that we should be doing in the first place. |
| 58:04 | Our job as the tuner should be to get our base fuel table as close as we can, so that the long term and short term fuel trims have as little work to do as possible. |
| 58:14 | Now another thing I'll just mention there as well, is that if you are relying on the closed loop fuel control you aren't going to be able to use that quick tune function, the Q key on the keyboard. |
| 58:25 | So you really need to just decide for yourself how you're going to be running the ECU while you're doing tuning. |
| 58:31 | Traditionally I tend to run the ECU in an open loop control mode so that I know that it's not doing any feedback functionality while I'm going through and performing my tuning. |
| 58:42 | And then once I'm happy with the tune, then I'll enable the closed loop trims. |
| 58:47 | Alright so as I've said, quick introduction there to the tuning software. |
| 58:53 | Definitely not a complete or in depth look. |
| 58:56 | But hopefully that's given you some more insight into how the software works and hopefully as well might have given you a few tips that can save you time. |
| 59:07 | What we'll do now is head over and have a look at some questions so again if you do have any questions, please ask those in the comments or in the chat and I will do my best to answer them there. |
| 59:18 | Chris has asked, I touched on the lambda target table and how that works in conjunction with the VE model, can you give some insight on how the other two tables under the lambda tab work? Let me just jump back across to the tuning software and we'll have a quick look at this. |
| 59:36 | OK so what we've got here is basically these are correction tables that act on top of the main target table. |
| 59:45 | So for example here the two that we've got is coolant temperature and air temperature correction. |
| 59:49 | So this allows us to adjust our lambda targets based on coolant temperature and air temperature. |
| 59:56 | So for example we may want to run the engine a little bit richer during cold start, and we can see we've more or less got exactly that situation there. |
| 01:00:04 | We're removing at 20 degrees centigrade, we're removing 0.02 from our lambda target. |
| 01:00:09 | So for example if we were targeting lambda 1.0 we would in fact end up targeting 0.98 So it just allows us to manipulate that lambda target table. |
| 01:00:22 | Likewise with our air temperature correction, in this case we've got nothing in there, I'm not changing my lambda target. |
| 01:00:27 | But wouldn't be uncommon maybe on a turbocharged engine at high inlet air temperature to maybe want to again just for safety's sake richen the air fuel ratio target up as our temperature changes. |
| 01:00:38 | So this is again a VE based fuel model aspect. |
| 01:00:41 | Traditionally if we wanted to achieve that same aim, we would do so with our warm up enrichment tables and we would do so with our air temperature correction tables. |
| 01:00:53 | Remembering in this volumetric efficiency model, the air temperature correction table aims to maintain a consistent air fuel ratio as air temperature changes. |
| 01:00:59 | So the air temp correction table for our lambda target allows us to then target a varying lambda. |
| 01:01:07 | And likewise with our coolant temperature correction, we still have a warm up enrichment table, but that is simply defining how much more fuel needs to be delivered in order to meet our current air fuel ratio target. |
| 01:01:21 | What we're talking about here instead is actually also varying the target air fuel ratio. |
| 01:01:26 | Alright I'll head back across to my questions now. |
| 01:01:30 | Ave at Comm Motorsports has asked, with your experience using many different ECUs, how does the Haltech Elite stack up? Look I think it's a really competent system and it is really feature packed. |
| 01:01:42 | It's difficult for me to pick winners. |
| 01:01:46 | What I would say is that out of every system that I use, and there are a huge range, what I'll find is that there will be a few features that I absolutely love and you look at them and go why hasn't every ECU manufacturer jumped on this function or functionality? And then there'll be another aspect and you look at it and you shake your head and go, and how on earth did they decide that that would be a good idea? And I mean Haltech, not to take away from what they've achieved there, they're exactly in this boat, they've got a really really solid product, I love a lot of the functionality. |
| 01:02:17 | Some of it doesn't quite work to my own personal liking but this also comes from a familiarity that's perhaps come from a different brand so you're always going to have that bias based on what you've spent the majority of your time working on. |
| 01:02:31 | But I would say in summary there that anyone shifting across to the Elite software, is not going to find it lacking. |
| 01:02:40 | It's definitely very feature packed there. |
| 01:02:42 | One last question's just jumped in there. |
| 01:02:46 | Hussain has asked if the axis becomes red, what will be the problem with it rich or lean? Not quite sure exactly what you mean there Hussain, sorry I'm not sure I'm not sure I'm gonna be able to answer that question for you. |
| 01:03:04 | If we can get a little bit more clarification, but our latency here might make that impossible. |
| 01:03:09 | You can ask any further clarification in our forum though after this webinar has aired. |
| 01:03:15 | Alright I will call it quits there, we haven't got any more questions coming through there. |
| 01:03:20 | So again, hopefully everyone's enjoyed this webinar, and hopefully you've got a little bit more insight into the Haltech Elite ESP software. |
| 01:03:27 | If anyone does have questions after this webinar has aired, please ask them in the forum, and I'll be happy to answer them in there. |
| 01:03:35 | Thanks for joining us. |


