175 | How to Find True TDC (Top Dead Center)
Summary
One of the critical tasks that you’ll need to complete when degreeing a camshaft is to find an accurate TDC point. In this webinar we’ll discuss a variety of methods you can use to make your own TDC marker. This is also a valuable technique for making TDC marks on your crankshaft pulley or damper in order to set ignition timing during the tuning process.
| 00:00 | - Hey guys it's Andre from High Performance Academy, welcome along to another webinar. |
| 00:04 | In this webinar we're going to be discussing the topic of finding true TDC or true top dead centre in our engines. |
| 00:12 | And this is a topic that covers actually both engine building and engine tuning areas. |
| 00:18 | So obviously finding true top dead centre is one of the critical aspects that we'll need to go through when we are going through a process such as dialling in or degreeing a cam. |
| 00:29 | We need to know exactly where abouts the engine is in the cycle relative to TDC and this is one of the key aspects with fitting a degree wheel to our engine and zeroing that before we go through the degreeing process. |
| 00:41 | However also we need to know where true TDC is when it comes to setting our base ignition timing when we are tuning an engine. |
| 00:50 | And this is one of the base set up parameters that we need to go through when we're installing an ECU in a car. |
| 00:56 | So it's really really important, it's one of those aspects that is often misunderstood, often overlooked, and particularly with the tuning side of things, if our base ignition timing is incorrectly set because the true TDC mark is wrong, this can end up with our ignition timing either overly retarded or worse still, over advanced. |
| 01:19 | And if the ignition timing is overly advanced, this can quickly lead to damage in an engine, particularly one that's fairly highly strung or turbo charged, can lead to detonation which is going to damage an engine very quickly. |
| 01:31 | And the aspect here with regard to tuning is that a lot of tuners will trust the factory marks that come equipped on the engine. |
| 01:41 | And while in most instances we would like to think that these are going to be reliable, there are instances where aftermarket crank pulleys have been fitted and the timing marks don't actually align with the stock marks anymore so this can actually be misleading. |
| 01:58 | Another aspect that we quite often see with engines that have done quite a high mileage is that the outer ring of the crank pulley or harmonic dampener will often move relative to the location on the crank pulley where it bolts to the crankshaft. |
| 02:14 | So again this can be misleading if the pulley has moved and the harmonic dampener has begun to fail. |
| 02:21 | So it's never a good idea to assume that these timing marks are correct. |
| 02:25 | And as we'll see, it's actually relatively quick, pain free, and easy to go through and make our own timing marks. |
| 02:33 | So there are a few ways that we can go about finding true TDC, depending on exactly where abouts we are in the engine building process. |
| 02:43 | So I'm gonna cover the topics here for both engine building and engine tuning. |
| 02:47 | Clearly if we're looking at engine tuning, then it's fair to assume that the engine will be completely built and we're going to go through the process with our Honda B18C behind me, of looking at how we can do this with an engine even fitted into the car. |
| 03:03 | However if we're going through the engine building process and we haven't got to a point yet where the cylinder head has been fitted, then this gives us a couple of additional options. |
| 03:13 | So the key point here, what we're trying to do is find the point in the engine cycle where number one piston is exactly at top dead centre. |
| 03:24 | Now that might on face value sound pretty simple. |
| 03:26 | Surely all we need to do is turn the engine over until the piston comes up to the top of the bore, and that's TDC. |
| 03:33 | The problem is that we'll find that the piston actually dwells at TDC for quite a large amount of crankshaft rotation. |
| 03:42 | So we may find that the piston is at or very close to TDC through around about five or six degrees of rotation of the crankshaft. |
| 03:49 | So physically just measuring the piston where it is at TDC isn't going to help us, we're not going to be able to get an accurate assessment of where top dead centre is by using that technique. |
| 04:01 | So instead what we want to do is actually stop the piston a little bit down from TDC. |
| 04:08 | So we wanna stop the piston just before it reaches the top of the stroke, and we want to measure that point where the piston stops. |
| 04:15 | We're then going to rotate the engine back the opposite direction, so we're going to rotate the engine back through bottom dead centre, and then we're gonna come up to exactly the same point, just down from TDC and we're going to find that point. |
| 04:27 | We'll go through this process so it becomes a little bit clearer, but when we do that, what we find is that true top dead centre is exactly between the two points we found. |
| 04:36 | So with all of that out of the way, what we obviously need is a way of accurately and repeatedly stopping the piston at exactly the same point in the bore, or exactly the same distance down from top dead centre. |
| 04:48 | So if we are in a position where the cylinder head is still off the car, off the engine block I should say, we can use a component such as this. |
| 04:58 | So let's just go to our overhead shot here. |
| 05:00 | So this particular product here is a deck bridge or a positive stop. |
| 05:07 | And what we can do is bolt it down across the top of our bore. |
| 05:11 | As we can see here, it has a little adjustable stop that we can wind down. |
| 05:16 | And what we're going to do is wind this down so it just contacts the crown of our piston, and then we can bring the piston up until it contacts this stop, just down from TDC and this will be a nice rigid positive stop, so this will allow us to make sure that the piston is reaching exactly the same point down from top dead centre. |
| 05:35 | We can go through the process that we're going to have a look at shortly, once we've fitted this and set it up. |
| 05:41 | So that's one way we can do it. |
| 05:44 | It isn't strictly necessary to use a positive stop either. |
| 05:49 | Another way we can go through this process is to use a dial indicator. |
| 05:53 | And what we're going to do with our dial indicator is set it up so that it is zeroed where the piston is at top dead centre. |
| 06:01 | Again for exactly the same reason we've just talked about. |
| 06:03 | We can't actually find TDC when the piston is right at the top of the bore because of that dwell. |
| 06:09 | So by using the dial indicator we can then measure down from TDC a fixed amount, somewhere in the region of maybe 50 thou of movement, that would be sufficient and again we're going to use our dial indicator to find that point on both sides of TDC. |
| 06:25 | So again if we've got the cylinder head off the engine block, we can use a magnetic deck bridge like this one that I've got here which has a dial indicator fitted to it. |
| 06:37 | These are typically used for measuring our piston deck height. |
| 06:43 | So it's actually not used for finding true TDC but by extending the dial indicator further down into the bore, it can serve two functions. |
| 06:53 | So those are two techniques that we can use if the engine still has the cylinder head off the block. |
| 06:59 | As I've said, we're going to have a look at exactly what markings we're going to use on our crank pulley or our degree wheel shortly but I just wanted to talk about those two techniques. |
| 07:09 | The technique we're going to use here, we've got our cylinder head fitted, so as I've said we can use this for engine building and we can use this for finding true TDC when we are tuning the engine as well. |
| 07:22 | And what this relies on again is some kind of positive stop that we can use to prevent the piston coming all the way up to TDC. |
| 07:30 | So in this case we're going to use this little tool here which is designed specifically as a piston positive stop, let's have a look at it on our overhead camera. |
| 07:41 | So this is a pretty simple piece of equipment, this was purchased from JEGS. |
| 07:45 | I think they're around about USD$15, so they're quite cheap. |
| 07:49 | It's made out of brass and it is relatively soft where it's going to contact the piston. |
| 07:54 | The positive stop will need to be purchased with the correct thread for whatever spark plugs your cylinder head takes. |
| 08:01 | And it is adjustable so that you can set this positive stop up regardless of the piston design, whether it's a domed piston crown or whether it's a dished piston crown that would be typical for a turbo application. |
| 08:16 | So the idea behind this positive stop is we're simply going to wind it into our number one cylinder spark plug hole and we're then going to adjust our positive stop so that it contacts the piston just a little bit below top dead centre. |
| 08:29 | Then we can go through the process of finding TDC on our crank pulley. |
| 08:34 | So let's go through that process now. |
| 08:37 | We've got our Honda B18C, so I'm just going to initially take our positive stop here, and I'm going to use a spark plug socket to just wind this down into the cylinder head. |
| 08:48 | Once we've done that, we also need to adjust our positive stop so it will contact the piston. |
| 08:53 | So let's get this installed into the cylinder head here. |
| 08:55 | When we do this, we also want to make sure that initially our piston is down from top dead centre. |
| 09:01 | So we don't really wanna be winding this down directly into our piston. |
| 09:06 | OK so we've got that fitted now. |
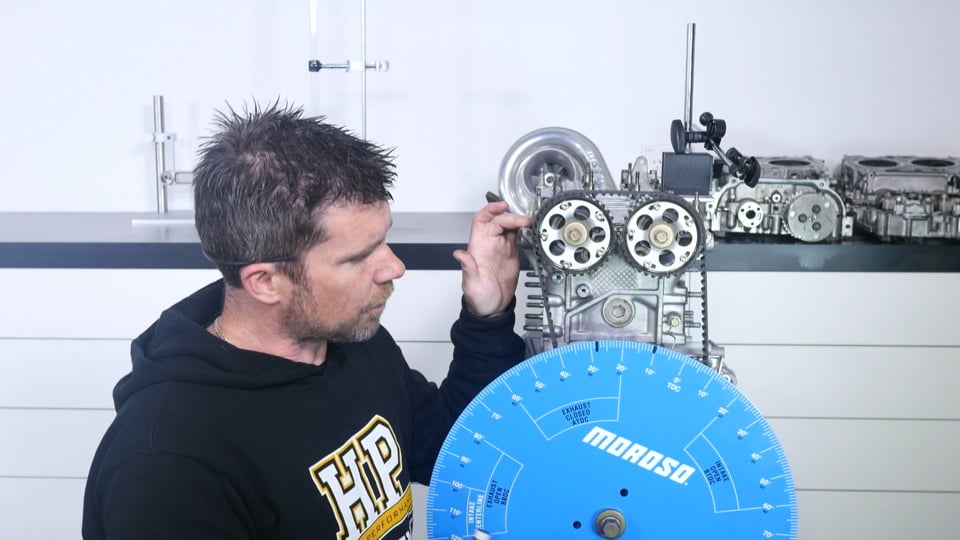
| 09:08 | Now on this particular engine, what we've done is we've fitted our degree wheel and I've purposefully made sure that I haven't actually zeroed this correctly. |
| 09:16 | So I want this webinar to be useful, If you are using a degree wheel but also if you are using a crank pulley which has no markings on it. |
| 09:25 | So what we're going to do now is wind our engine through and come up on top dead centre. |
| 09:32 | So at the moment we're going through top dead centre at the moment, and you can see that there's no resistance there, there's nothing stopping the engine from moving and this is because at the moment our little stop there is not actually wound down far enough to contact the piston. |
| 09:50 | So what I'm going to do is take a screwdriver here and I'm just going to adjust this stop, I'm going to wind it down until we get it to contact the piston. |
| 09:58 | So this is a process of adjusting the stop and then moving our crankshaft gently until the piston comes up on the stop. |
| 10:05 | So we've got to that point there. |
| 10:07 | So at this point on our degree wheel here, let's just go and have a look at this. |
| 10:12 | On our degree wheel here, we are contacting the stop. |
| 10:16 | Now when we are adjusting this stop, what we also want to do is make sure that we are letting the piston come up as close to TDC as we can. |
| 10:28 | That's going to make it much more accurate, particularly if you're marking the factory crank pulley or harmonic dampener, it's gonna make your markings much more accurate, because they're going to be that much closer together. |
| 10:39 | So at the moment, in this case, TDC is somewhere around about this point here. |
| 10:44 | So we're actually quite a long way from TDC. |
| 10:47 | So what I'm going to do is I'm just going to back the crankshaft off slightly, I wanna do that before I adjust the stop otherwise we're actually going to be scratching the crown of the piston. |
| 10:57 | And now I'm just going to move that stop out one full turn and I'm going to try again. |
| 11:04 | So we're still coming up on the stop, so I'm going to complete that process again, just moving it out by one turn at a time. |
| 11:12 | And we can see that we're getting a little bit further along each time I do that. |
| 11:17 | So I'm just going to keep going with this until we no longer touch that stop, or we're getting pretty close to our true TDC mark. |
| 11:25 | So OK at this point we're now no longer touching the stop. |
| 11:28 | So I just wanna turn that back in half a turn. |
| 11:31 | And we're coming up on our stop there. |
| 11:34 | OK so that's our stop installed, the installation of that is set up. |
| 11:38 | Now what we can do is go through and actually make some marks on our crank pulley. |
| 11:42 | So what I'm going to do here is just use a whiteboard marker for this purpose and we'll talk about how you can actually do this when you're doing it on your real engine. |
| 11:55 | So what we're going to do is come up on that stop there. |
| 11:59 | And I'm just going to hold a little bit of pressure on the crankshaft, so what we find, if you can see these marks here hopefully at home, if I let go of the strong arm that I'm using to turn the crankshaft here, what it will actually do is spring back a little bit. |
| 12:15 | So when we are making our marks, we want to be very sure that we're holding a little bit of pressure against the crankshaft, making sure that the piston is loaded against that stop. |
| 12:25 | And what I'm going to do is just make a mark here on our degree wheel. |
| 12:30 | So that's our first mark there. |
| 12:32 | Now what we want to do is rotate the crankshaft in the opposite direction. |
| 12:36 | We wanna do this very gently as well because we don't want to pound the piston into the stop. |
| 12:42 | That's probably not gonna end particularly well for us. |
| 12:45 | OK so we've come back up on the stop there. |
| 12:48 | And we can see in this instance, we're right on our 10 degree mark. |
| 12:53 | And again I just want you to disregard at this point, the marks that we've got there, the degree markings. |
| 12:59 | It's just for the purposes of this demonstration, we don't have that degree wheel set up accurately and I've done that on purpose. |
| 13:09 | OK so we've got our two marks there, and what we can now do is find our true TDC. |
| 13:15 | So again if we look at our two marks here, what we know is that true top dead centre is exactly halfway between those two marks. |
| 13:26 | And this is why I was saying it is quite important to make sure that our positive stop is stopping the piston relatively close to TDC. |
| 13:37 | You can see that those two marks right now are relatively close together. |
| 13:41 | So that's good, it makes it really easy for us to be accurate. |
| 13:44 | However if we had moved the stop a lot further down, we're going to have one mark out here and one mark out here and that makes it a lot more tricky for use to be really accurate. |
| 13:53 | OK so there are a couple of ways we can find what that true TDC value is. |
| 13:59 | So in this case because we do have degree markings on here, what we can do is simply add the two degree markings together and then divide them by two. |
| 14:07 | So in this case if we're looking here, we have one mark at 10 degrees, and then we have another mark at 28 degrees. |
| 14:14 | So let's just go to our overhead camera and we'll see exactly how we can do that. |
| 14:21 | Alright so what we wanna do here is add 10 degrees and 28 degrees, and we'll divide those by two, that gives us a value of 19 degrees. |
| 14:30 | So let's go back down and we'll have a look at our degree wheel. |
| 14:34 | So what this means is that our true TDC is exactly there. |
| 14:39 | So then we can remove our two marks, we know where our TDC mark is, and that's where our TDC value, that's where that number one piston is at exactly top dead centre. |
| 14:52 | OK so with a degree wheel like this, obviously we also want to zero the degree wheel so this involves moving our pointer or loosening the degree wheel on the crankshaft and actually rotating it so that our TDC marker is actually accurate. |
| 15:09 | But as I said we can use this technique on a crank pulley that doesn't have any markings as well. |
| 15:16 | So we've looked at our degree wheel, now we're going to have a look at what we can do to do this on a crank pulley. |
| 15:23 | So what I've got here is a harmonic dampener off a GM LS1 V8. |
| 15:28 | So these actually don't have any degree markings at all. |
| 15:32 | This isn't overly common but we do see a lot of late model engines now where the degree markings may or may not be visible. |
| 15:41 | So in this case we've got no markings at all. |
| 15:44 | And what we need to do is start with a reference point. |
| 15:47 | So on our Honda engine that we've just looked at, I have made up a flexible pointer that we can use to reference where abouts we are on that crank pulley. |
| 15:59 | With a factory engine with the harmonic dampener installed, we can still do exactly that, you can make up a pointer. |
| 16:06 | Generally though what I like to do is find a reference point somewhere on the front cover behind the harmonic dampener and make a reference mark on that. |
| 16:18 | So for example here we can see, we'll go to our overhead camera. |
| 16:22 | Here is the plastic front cover from a Honda B series engine. |
| 16:26 | And what we can actually see is that there is a reference mark here. |
| 16:31 | So this is the piece of plastic here, is the pointer that the Honda engine as a reference to the marks on the crank pulley. |
| 16:43 | Now if we don't have those, we can physically make a mark on the crank case or the front cover though, somewhere where it's going to come pretty close to our crank pulley and then what we can do is use that when we're going through with our positive stop, making our marks on the harmonic dampener. |
| 17:02 | Now the way I tend to do this is to use a little file, so here I've got a little needle file, and our first two marks that we're using, we don't really want to make these permanent. |
| 17:17 | So we can just either use a vivid mark, which we've looked at there, or we can simply put a small scratch mark on the surface of the harmonic dampener. |
| 17:26 | Once we've got our two marks though we know that true TDC is directly in between and once we've found that point what we can use is our file to physically file a little divet into our crank pulley. |
| 17:42 | So let's just have a look at this here on our overhead camera. |
| 17:44 | So what we'll do is we'll just file the edge of our harmonic dampener. |
| 17:49 | And this is going to make a permanent marker on that harmonic dampener that we can always reference. |
| 17:55 | So once we've made that, it's also very easy to make it nice and accurate. |
| 17:58 | It's also a good idea to fill that in with some corrector fluid, some white corrector fluid, so twink, or something of that nature, and that just makes it really really obvious when the crank pulley is spinning and we're viewing it with the timing light. |
| 18:14 | So that's the process we go through there. |
| 18:16 | Now also when we are making marks on a harmonic dampener like this, we need to change our process of finding where we are exactly in between the two marks as well. |
| 18:28 | Obviously on our degree wheel, that's nice and easy, we've got degree markings so we can go through that process we looked at, adding the two together and dividing them by two and that'll show us exactly where TDC is. |
| 18:40 | If we've just got two marks on our crank pulley though, this gets a little bit trickier, and the technique that I use here, is to simply use a vernier calliper like this. |
| 18:51 | In this case we've got digital vernier callipers. |
| 18:53 | So we can measure the distance between the two marks, and we can split the difference and make a match mark right in between. |
| 19:01 | So again this is where it becomes more important to make sure that our two match marks are quite close together. |
| 19:08 | Obviously if we've got our marks, sort of 45 degrees apart on our crank pulley, it becomes much more difficult for us to be truely accurate so we want to make sure that that positive stop is really close to TDC so that our two marks that we're making on our crank pulley are already very very close together. |
| 19:28 | We're going to move into some questions and answers really shortly. |
| 19:33 | So if you have got any questions that you'd like me to cover here, please ask those in the comments. |
| 19:39 | There are a few more things that I need to go through here. |
| 19:42 | Once we've got our true TDC mark found, really really important aspect here is to make sure that that positive stop gets removed from the engine. |
| 19:55 | There's more than one engine has ended up with a hole in a piston because the engine builder got distracted, left that positive stop sitting inside the engine and it's ended up being turned over on the starter motor. |
| 20:06 | It's not gonna take very much effort to punch a hole through the top of the piston. |
| 20:11 | So you need to be very very careful to make sure that that positive stop is removed before you go anywhere near trying to start the engine. |
| 20:19 | On this note as well it is a really good idea to make sure that the starter motor is disabled during this process, if you've got the engine fitted in a car. |
| 20:28 | Maybe take the exciter wire off the starter motor or physically disconnect the battery just to be absolutely 100% certain that there is no chance that the engine could be inadvertently kicked over on the starter motor. |
| 20:41 | It's a very very silly way to end up damaging an engine. |
| 20:46 | You're going to also be up for some expensive replacement components. |
| 20:50 | Now the other aspect as well is that while we've looked at a positive stop that you can buy from the likes of JEGS, they are quite cheap. |
| 20:59 | Obviously a lot of people aren't going to have immediate access to one of those. |
| 21:04 | And there's some other simple solutions as well. |
| 21:07 | So one of these is to take a spark plug, an old spark plug out of your engine and you can modify that spark plug as well. |
| 21:16 | So I'll just get our crank pulley out of the way here, and we'll go back to our overhead shot. |
| 21:23 | So what we want to do here is basically extend our spark plug so that it's going to come down far enough to contact the top of the piston crown. |
| 21:32 | So pretty easy way of doing this is to remove the ground electrode and to remove the electrode projecting out of the base of the spark plug. |
| 21:42 | And what we can do is take a small piece of steel bar. |
| 21:46 | And we can then tig weld that to the end of the spark plug. |
| 21:50 | So this gives us the option of basically doing exactly what we've just looked at with our positive stop but with material that we've already probably got hanging around the workshop. |
| 22:00 | If you are going to do this, there's a couple of little warnings that I would give. |
| 22:04 | You do need to make sure that the little extension that you're going to weld to that spark plug is well and truely attached. |
| 22:11 | The last thing you want is for that to end up breaking off and floating around inside your engine. |
| 22:16 | You also want to be very careful when you are welding to the plug. |
| 22:20 | This is why I recommend using tig welding. |
| 22:23 | You want to be very sure that you're not going to end up damaging the threads because if you do that, then you can end up damaging the threads in turn in the cylinder head which again is a pretty expensive and time consuming process to correctly repair. |
| 22:38 | The one thing I would say if you are going to modify a spark plug is that obviously it's not going to be as easily adjustable as the positive stop that we looked at. |
| 22:48 | So it does take a little bit of trial and error. |
| 22:50 | Finding the correct length for your little protrusion that you're gonna weld onto the spark plug so that you're again stopping that piston just down from TDC. |
| 23:00 | Of course if you are specialising and working in one particular engine, once you've got that positive stop made, you've got that for good, and it's going to be useful on every engine of that type that you then build in the future. |
| 23:13 | Alright we will jump into some questions here. |
| 23:16 | And if you do have any more, please ask them. |
| 23:20 | Our first question comes from Craig, who's asked, can you use the stop tool on heads with side mounted spark plugs? Yeah that's a really good question there Craig. |
| 23:28 | So the LS is a great example there, where we don't have a centrally located spark plug. |
| 23:34 | So this is where you do need to be very careful if you are modifying a spark plug. |
| 23:40 | You do need a lot of rigidity in this, otherwise with a side mounted plug, what you can end up doing is bending that protrusion and breaking it off. |
| 23:49 | So with our little brass tool that I showed you there, yes that can be used on side mounted spark plugs in the likes of an LS V8. |
| 23:59 | Amos has asked, can you go over pinning a crank pulley real fast? What I might get you to do there Amos, if you're still online, is maybe just give us a little bit more information about exactly what you want me to talk about there and I'll see if I can fill you in. |
| 24:16 | Freaks89 has asked, whenever you do have factory timing marks, how much can you rely on them, or on an engine that's pretty much stock. |
| 24:25 | OK this is a bit hard to answer because so much of it depends on the age of the engine. |
| 24:32 | So if we're dealing with a factory engine, 100% stock, that's relatively new, relatively low mileage, then the factory timing marks are normally pretty good. |
| 24:42 | When I have compared or found true TDC on a factory engine, you'll normally find that the timing marks are perhaps within one or maybe two degrees. |
| 24:51 | So they're probably pretty damn good. |
| 24:53 | So certainly in most instances on a factory engine, that's going to be accurate enough for us to set our base ignition timing. |
| 25:00 | The problem with this is that when the engine ages, as I've said, the harmonic dampeners can fail. |
| 25:08 | So what happens here with the harmonic dampener, we've got basically a two piece dampener, so there's an inner core that is physically located to the crankshaft and then we've got our outer band of the harmonic dampener. |
| 25:23 | Between the two is a piece of rubber and this is how the harmonic dampener works, that rubber is essential to the operation of the harmonic dampener. |
| 25:31 | The problem with it is that over time as these age, the outer ring of our harmonic dampener can debond essentially from that rubber, and what this does is it allows it to rotate with respect to the inner. |
| 25:45 | So our timing marks, which will be on the outside of our harmonic dampener, obviously if those rotate with respect to the inside or the crankshaft, then the timing marks could be absolutely anywhere. |
| 25:57 | I would say that this isn't particularly common. |
| 26:01 | But it is a real concern that you do need to consider. |
| 26:05 | So I would always check if there's any chance at all that you've got a high mileage engine where the harmonic dampener may potentially be problematic. |
| 26:17 | Of course we can see roughly where our timing marks are, which can give you a pretty good idea if you're going to need to dig deeper. |
| 26:27 | So it's relatively easy to find approximately where top dead centre is on our engine and this can be achieved simply by putting a long screwdriver down the spark plug hole in number one cylinder and gently rotating the crankshaft using a strong arm or a ratchet, and feeling where the piston comes up and dwells at TDC. |
| 26:50 | So that, as I've said, is not gonna get you really accurate information. |
| 26:54 | You can find TDC within about plus or minus five degrees. |
| 26:58 | But if you've done that, then you look at the timing marks on the crank pulley and compare those to the timing marks on the engine front cover and they're miles out, this would be a pretty good indication that you've got some problems there, and you'd need to look a little bit deeper. |
| 27:14 | So we can do a really coarse check and see, if the timing marks look like they're pretty accurate, chances are that the dampener hasn't moved. |
| 27:21 | Alright we've got a little bit more information here form Amos, who's said, with an LS crank pulley, it isn't fixed to the crank, do they make something to put a pin or key on the crank and pulley after the engine has already been assembled. |
| 27:33 | OK so with the LS engine, and this is actually an LS pulley that I've been showing you so yeah this is just an interference fit onto the crankshaft. |
| 27:45 | It isn't dowelled, it isn't keyed onto the crankshaft. |
| 27:49 | Which is relatively uncommon. |
| 27:52 | Of course in this instance with the LS as I've mentioned, there are no timing marks on the crank pulley. |
| 27:58 | So it's not particularly important from that aspect, what we do need to understand though is that the relationship between the crank pulley and the crankshaft, is essential from a balance perspective. |
| 28:10 | So particularly if you are building an LS engine and you are having the components dynamically balanced by your machine shop, then you need to keep the orientation of the harmonic dampener and the crankshaft the same as what they were when they were balanced. |
| 28:26 | So normally in this instance, the engine machine shop will put a match mark on your crank shaft and your pulley so you know how to align that. |
| 28:36 | In the aftermarket with a stroker kit for example, typically we'd be dealing with a crankshaft that has had a key weigh added, so there are options there, it just really depends how involved you want to get. |
| 28:49 | Now I actually am just gonna jump back as well because there is one more way that I'll cover here just briefly that we can find TDC. |
| 28:57 | So we've talked about the positive stop aspect and that's probably my preference. |
| 29:02 | But we can also do this with a dial gauge. |
| 29:06 | So I've got a dial gauge here, these are key for dialling in cams as well. |
| 29:12 | We need to have a dial gauge for the cam degreeing process. |
| 29:16 | But with a dial gauge with a long enough extension we can also put this down through the spark plug hole and we can then do exactly the same as I was talking about earlier where we'll turn the engine through until the piston comes up to TDC, zero our dial gauge as the piston comes up to top dead centre, and then we can read off the dial gauge and move the piston down a fixed amount from TDC on both sides. |
| 29:42 | So in this case I'd probably be trying to move the piston down about 50 thousandths of an inch each side of TDC. |
| 29:50 | We can view that on our dial gauge and use that location to make our match marks. |
| 29:56 | Alright guys that's brought us to the end of our webinar. |
| 29:58 | We've got no more questions there so of course for our members, if you do have any questions after this webinar has aired, please ask those in the forum and I'll be happy to answer them there. |
| 30:09 | Thanks everyone for joining us and I look forward to seeing you all next time. |


