178 | Setting Up Drive By Wire Throttle Control - AEM Infinity
Summary
DBW throttle control is now common place on most late model performance engines. Achieving fast and accurate control over the DBW system is essential for safe and reliable operation of your engine and in this webinar we’ll go through the setup and tuning process on an AEM Infinity ECU in our Nissan 350Z
| 00:00 | - Hey guys, Andre from High Performance Academy here, welcome along to another webinar. |
| 00:04 | In this webinar we are going to be looking at drive by wire throttle control, setting up the drive by wire throttle system and how we can go about tuning it using the AEM Infinity fitted to our Nissan 350z. |
| 00:18 | Now while we are focusing here on the AEM product, a lot of what we are going to be talking about is more generic, related to drive by wire throttle in a larger sense. |
| 00:27 | So there's gonna be a lot of information in here that's going to be relevant to other brands as well. |
| 00:33 | Now in terms of drive by wire, I just want to take a step back and talk about the technology because there is a lot of misconceptions and misunderstanding about it. |
| 00:41 | It is obviously a technology that has been pretty well established now. |
| 00:45 | So there is no going back, it is unfortunately, for those of you who are in love with cable throttles, it is the future so it is something that is definitely worth embracing. |
| 00:55 | Now there are some big advantages with drive by wire throttle systems, both from an OE manufacturer's perspective as well as from our perspective in the aftermarket. |
| 01:05 | So I just wanna touch on those before we delve into the AEM system, have a look at setting up and configuring our drive by wire throttle. |
| 01:12 | One of the biggest aspects from the OE manufacturer's situation or aspect is that they have obviously complete control over the relationship between the driver's foot pedal position and the opening of the throttle body on the engine. |
| 01:27 | So the drive can be punching that throttle pedal right through the fire wall and the factory ECU can simply close the throttle body on the engine and restrict air flow into the engine if for any reason at all the ECU decides that that's what they want to do. |
| 01:41 | There's a variety of aspects this can be used for. |
| 01:44 | Obviously there's safety aspects if something goes wrong. |
| 01:47 | There is also torque control which is quite important, particularly with modern DSG or DCT gear boxes which require a torque reduction for the shift to progress. |
| 02:00 | There's also the ability for the OE manufacturers to purposefully detune engines. |
| 02:06 | And this is used quite frequently where there are a variety of different models in the manufacturer's lineup and they wanna differentiate between the bottom entry level model and the top of the line which is obviously going to command more money. |
| 02:20 | So obviously one of the ways they can do this is with the trim of the car. |
| 02:24 | But of course adding additional engine power to the top of the line model is a great way to distinguish the two models. |
| 02:31 | And this can be done with exactly the same mechanical engine package and simply detuning the drive by wire throttle opening in the lower spec engine. |
| 02:39 | So if we get hold of one of those low spec engines where that's been done, it's a really easy way of opening that engine up and improving the performance. |
| 02:48 | For us in the aftermarket we've also got some significant advantages with drive by wire throttle. |
| 02:53 | One of them is the ability to completely manage the torque output from the engine. |
| 02:58 | And we're going to have a look at a really quick example on the mainline dyno shortly but in my past I was involved with the tuning of a racing series here in New Zealand. |
| 03:11 | It was a racing series which used a variety of different engines and their aim was to get power and torque parity across what was three very different engines. |
| 03:22 | We had a Ford Coyote Boss five litre V8, we had a GM 6.2 litre LS3 V8, and we had a very highly tuned Toyota TRD developed 3UZFE five litre V8. |
| 03:36 | What we did to get parity across those very different engines, was we used drive by wire throttle control and by developing a full three dimensional table of throttle position versus engine RPM. |
| 03:47 | What we were able to do is open and close the throttle body on the engine as the engine ran through the rev range, in order to match the torque and power curves between those three engines within about plus or minus 3%, so it was actually incredibly effective. |
| 04:03 | It shows how powerful that drive by wire throttle control can be. |
| 04:07 | We've also got the ability to have multiple drive by wire throttle maps, so we can have a map for wet conditions and dry conditions for example, to make the throttle more or less aggressive and help the driver's control over the car. |
| 04:22 | And we've also got the ability to use the drive by wire throttle for aspects such as down shift throttle blipping which is so important if we're running a sequential gearbox or a paddle shifted gearbox. |
| 04:32 | So this allows the driver to basically completely disregard the clutch pedal after the car's left the line and concentrate solely on braking and accelerating and the ECU can do a lot of the hard work for us. |
| 04:45 | Again, before we move into the actual demonstration here, I also just want to mention that there is a lot of people out there who think that drive by wire throttle bodies are inherently slow to operate. |
| 04:56 | And really these days that's just not accurate. |
| 05:00 | There is some truth in this I guess from some of the earlier developed drive by wire throttle bodies. |
| 05:07 | Obviously the technology has matured as manufacturers have improved the control over the throttle bodies as well as the actual manufacturing of the throttle bodies themselves. |
| 05:17 | So these days the throttle bodies can move very very quickly, they can replicate almost exactly what a cable throttle body can do. |
| 05:27 | And what's often overlooked is that even with a cable system, there will be some latency introduced into the system because cables stretch. |
| 05:35 | So you're probably unlikely to be able to pick the difference between a modern properly calibrated, properly set up drive by wire throttle system, and a properly set up cable throttle system. |
| 05:48 | The other concern I often get pointed out to is that drive by wire throttle systems can inherently be dangerous, and again I'd say that that's not accurate. |
| 05:59 | The ECUs use some very very clever, very very special detection to make sure that the drive by wire throttle position is matching the desired target from the ECU. |
| 06:11 | And if the target and the measured position don't match then the ECU can go into a safety shutdown mode. |
| 06:17 | There's also the redundancy in both the driver's foot position pedal, and as well as the throttle position sensors. |
| 06:25 | So there are two sensors in the throttle body themselves. |
| 06:28 | So both of these have to match. |
| 06:30 | Likewise in the driver's pedal there are two sensor which also have to match. |
| 06:33 | So there's quite a lot of safety and a lot of thought that has gone into the system and a modern well developed drive by wire throttle system is every bit as safe as a cable throttle, probably more so. |
| 06:45 | I probably would wage that there are more people that have been involved in an accident or a crash due to a cable throttle sticking than there have been with a properly developed drive by wire throttle system. |
| 06:58 | Right with that out of the way, we will get into our demonstration. |
| 07:01 | As usual, if you do have any questions through this or anything that I've already talked about, please ask those in the comments and the guys will transfer those through to me. |
| 07:10 | So what we're going to do is we'll just go online with our Infinity ECU and let's just jump over to my laptop screen. |
| 07:18 | So for a start what we're going to do is we're going to go to our wizards, and our setup wizard. |
| 07:23 | This is one of the nice features with the AEM Infinity is that a lot of the setup functionality can be controlled here through the setup wizard so this makes it nice and easy for us. |
| 07:35 | Alright what we're going to do is we're going to start by clicking here on our drive by wire setup button. |
| 07:41 | So this goes through a setup, an automated setup process, and all we really need to do is follow the instructions here that are presented to us on screen. |
| 07:51 | And what this is going to do is calibrate, first of all the driver's foot pedal position sensor, so it's going to calibrate what wide open throttle and closed throttle are, then it's also going to go through and essentially drive the drive by wire throttle to wide open and fully closed. |
| 08:06 | And it's going to get the extremities of the two sensors in the throttle body and the two sensors in the foot position sensor. |
| 08:14 | So there is also here a drop down menu that allows us to select a predefined throttle body. |
| 08:21 | In this case we actually do have one here for our Nissan VQ35 single drive by wire. |
| 08:25 | To go through this process here though, we're going to click on custom, and we're going to leave this set on custom. |
| 08:31 | And what we're going to do is start here by clicking on the calibrate sensor data only and we can go and click start. |
| 08:38 | Now we do have the option here for a brake throttle override which basically is used to kill the engine if the brakes and the accelerator are held on at the same time. |
| 08:50 | I'm just going to disable that and I'm going to say that I'm happy for that to be disabled. |
| 08:56 | And we'll click next. |
| 08:58 | And what we're going to do now is go through and follow the instructions that are on screen. |
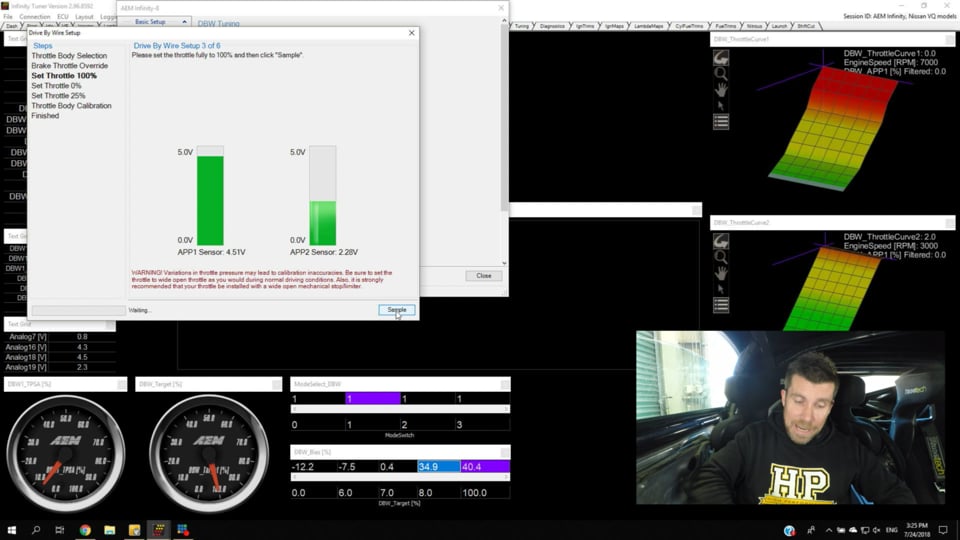
| 09:03 | So this first step here, or actually it is step three, is to go to 100% wide open throttle and then we need to click sample. |
| 09:11 | So we can see here our two sensors, APP1 and APP2 and we're seeing the live voltage from those two sensors. |
| 09:19 | It's really important when we're doing this wide open throttle detection as well, to make sure that we are quite brutal on the throttle. |
| 09:26 | We want to really be quite forceful on that throttle. |
| 09:29 | Because if we just barely touch the throttle stop and then in reality when we're out on the racetrack or even on the road and in the heat of the moment we're a little bit more aggressive, we're really trying to get that last quarter of a horsepower out of the engine, then it is possible to exceed the voltage readings that we have registered during this step and that's going to affect the rest of our process there and it may cause the ECU to detect an error. |
| 09:55 | Alright so we're going to full throttle here. |
| 09:57 | We'll hold off full throttle, make sure those are stable and we're going to click sample and the ECU will sample the voltage. |
| 10:04 | It says done, we can now let off the throttle and click next. |
| 10:07 | Alright the next step here is we want to be at 0% throttle. |
| 10:11 | So we want to make sure that we're right off that throttle and again we can click sample. |
| 10:17 | I'll just let that complete, we can click next. |
| 10:20 | Now this next step is a little unique, AEM Infinity's the only one I've seen do this but it wants to also take a sample at about 25% throttle. |
| 10:28 | So the idea here is that we just want to open the throttle, hold it within those two ranges there. |
| 10:33 | Again it'll show as done when that's complete and we can click next. |
| 10:37 | Now we're going to go through and it's going to automatically calibrate the throttle body so all we need to do here is click sample, and it's basically going to drive the throttle body wide open, and it's going to close the throttle body and it's going to complete that setup. |
| 10:54 | Alright so that actually comes up with an error in our case. |
| 10:56 | That's not what we should normally see so we're going to just carry on there. |
| 11:01 | So this automated setup that we've just gone through, that basically sets up the extremes of our sensor on both our throttle pedal and our drive by wire throttle. |
| 11:10 | That's the simple part of the process, and as you've seen there, it's automated so it's pretty easy to go through. |
| 11:16 | There is a little bit more to this though. |
| 11:18 | So if we click here on our show advanced setup, and we'll allow this to open. |
| 11:25 | This allows us to then tune our PID control for our drive by wire throttle. |
| 11:31 | Now for our preconfigured drive by wire throttle bodies, this is going to be automated. |
| 11:36 | If you've got another throttle body that isn't handled there, I'd also suggest that you contact AEM and they should for most popular throttle bodies, be able to give you PID settings to enter in here. |
| 11:50 | It's really important to just point out here that if you have your PID settings for your drive by wire throttle body incorrectly set, then it is very easy for the ECU to lose control of the throttle body. |
| 12:02 | Obviously doesn't take a rocket scientist to figure out that that could be quite dangerous so I can't stress enough that if you can get hold of AEM and get the PID settings for your throttle body, that's going to be the best place to start. |
| 12:17 | Alright at the moment what I've got is I've got these zeroed. |
| 12:20 | So we're actually going to go through the process and see how we can go about setting these up. |
| 12:24 | So the first step here though, I'm going to click on this little tick box and I'm going to disable the drive by wire throttle system. |
| 12:30 | And this just stops the motor being driven. |
| 12:34 | So we'll close down our setup box there. |
| 12:38 | And what we're looking for here, we are on our drive by wire setup tab. |
| 12:43 | And what we're looking for here in our text grid on the left hand side, no, my little pointer's not working here on this software unfortunately. |
| 12:52 | We've got our drive by wire throttle target and we can see that that is set at 5%. |
| 12:56 | What we can see is that our throttle position which is directly below this, I'm sorry you're gonna have to just search for my cursor here, I can't highlight this, is showing that our actual throttle opening is 6.8% So this is a point that's often overlooked with our drive by wire throttle systems. |
| 13:13 | They will have a zero point and it's not completely closed. |
| 13:17 | So if you don't power the throttle body, it will actually sit slightly open. |
| 13:21 | So the neutral point for this particular throttle body there, is 6.8% Now one of the setup functions or aspects we want to go through here is to set up the drive by wire bias table. |
| 13:34 | And essentially I sort of explain this as an open loop duty cycle target table. |
| 13:41 | That kind of gets us into the ballpark before we start applying any PID control. |
| 13:46 | So for those who aren't aware what PID control is, this is a closed loop control algorithm and the ECU is monitoring our drive by wire throttle target and it's comparing that to our measured drive by wire throttle position. |
| 14:01 | And if there's an error between the two, it's going to use the PID control algorithm to make changes to the duty cycle being applied to the throttle body, in order to get us onto our target. |
| 14:11 | So getting that accurately tuned is essential but at the same time we need a good open loop duty cycle table to give us the best chance possible of getting onto that target. |
| 14:23 | It's like any closed loop control system, let's compare it to for example, idle speed control, or actually boost control's probably a good one. |
| 14:32 | If we're using a little three port solenoid and we're applying a duty cycle to that solenoid in order to achieve our target boost, what we're going to do is start with the close loop control disabled so the ECU's gonna do nothing if we're not matching our target. |
| 14:48 | And we're going to tune the open loop duty cycle table until we're really really close to our boost target. |
| 14:55 | So that's just a case of doing some runs on the dyno, looking at our boost that we're achieving on the dyno, comparing that to where we want it to be. |
| 15:01 | If we're below our target we're going to increase the duty cycle being supplied to the wastegate solenoid, if we're above the target, we're going to reduce it. |
| 15:09 | So that gets us really close to our target and the closer we can get in open loop like this, the less work the the ECU has to do, the less error we're going to have, so the better the closed loop control's going to be. |
| 15:20 | So that's exactly what we're doing here with our drive by wire bias. |
| 15:25 | So the first point here is we've basically got our duty cycles in the top of this table and our drive by wire target in the bottom. |
| 15:33 | So we can see here we've got 7% so we can change this, let's say 6.8%, basically we want our neutral position there so our natural position for our drive by wire throttle which we've just found here, 6.8% So in this position the ECU is applying no duty cycle to our drive by wire motor. |
| 15:54 | Once we've got that set up, we're going to go back to our wizard, we're going to go back to our setup wizard and we're going to re enable our drive by wire throttle system. |
| 16:04 | What we're going to do now is go through and make some changes to this bias table in order to get our drive by wire throttle at least moving and following our target. |
| 16:16 | So again if we just click on our advanced setup here, we'll see that our P I, and D settings are all zero. |
| 16:23 | So our proportional, integral, and derivative gains are all set to zero. |
| 16:26 | This means that there is no close loop control. |
| 16:30 | Alright we'll close that down, and what we're going to do is just use our plot in the middle, our data logger, so we'll start up our data logger. |
| 16:38 | And what we're going to do is move our throttle open and closed, and we'll just close that down, I'll pause it and we'll have a quick look here. |
| 16:46 | So basically the two pieces of data that we've got on this, the white is our drive by wire target. |
| 16:52 | So essentially this tells us what we're demanding with our throttle. |
| 16:56 | So this is what the driver is asking for. |
| 16:58 | Then our green line is what the throttle body's actually doing. |
| 17:02 | So we can see at the moment we've got some movement there. |
| 17:04 | It's actually following pretty well 'cause I've already got some data in this table. |
| 17:07 | But it is a little bit laggy. |
| 17:09 | We're never going to be able to get this to be perfect, with open loop alone. |
| 17:14 | We're going to need our PID control which we'll look at shortly. |
| 17:17 | But what we'll do is we'll just have a look at how this can be set. |
| 17:20 | So what we've got in the middle at our zero position, we've got our natural resting position of our drive by wire throttle, 6.8% What we want to do is basically have points either side of this, that are around about 1% to 1.5% less and 1% to 1.5% greater. |
| 17:38 | So let's set this to 5.5% and we'll leave that at 8% Now so that we can actually make this do something, what we're going to do is just start by reducing the duty cycle above. |
| 17:52 | So what we're demanding the throttle opening. |
| 17:54 | So what we can see is we've got two positions here above our rest position, we've got one at 8% throttle opening and we've got one at 100% So what we want is basically the extremes of this table to be 0% and 100% drive by wire target. |
| 18:11 | So if we now open and close the throttle, we can see that our green line here for our drive by wire throttle position is barely moving. |
| 18:21 | You can also watch, in the bottom left hand corner of the screen we've got two gauges, and these are showing the same information. |
| 18:28 | On the left we have our throttle position and on the right of those we've got our target or driver's pedal position. |
| 18:34 | So we can see that we're basically barely moving here. |
| 18:37 | So what we want to do is just increase these values here, and we're going to do this in 5% increments until we actually get our throttle position tracking that target as close as we can. |
| 18:50 | We're not gonna beat ourselves up on this, it is open loop, it's never going to be perfect. |
| 18:54 | But you can see just with that change now, we're getting a little bit closer. |
| 18:56 | So let's go through and we'll make one more change. |
| 18:59 | And by doing it in just 5% increments, it gives you a pretty good idea of the effect of the change that you're making. |
| 19:06 | So now we're at 30% and 35%, we can see that we're getting better control but we're still not quite there. |
| 19:13 | Let's go another step, we'll go 35 and 40. |
| 19:20 | OK so now we've got some reasonable control. |
| 19:22 | What we'll do, just to get a little bit more resolution in that, we'll start up our data logger again. |
| 19:29 | And we're basically back at the numbers where I started from. |
| 19:32 | OK so that's looked at everything as we open the throttle. |
| 19:36 | What we also need to do is have a look here and realise that when the throttle is requesting to be closed, we're not quite there. |
| 19:44 | So what we can see is that if we look over here on our drive by wire target, we're targeting 5% but we've actually got 6.6% So we need to essentially look at the same values on the other side here. |
| 19:57 | Now generally when we are tuning this drive by wire bias table, the numbers on the opening side of that table tend to be greater, or larger, than on the closing side, because on the opening side we are overcoming or trying to overcome the spring tension inherent in the drive by wire throttle bodies. |
| 20:14 | So the numbers won't be equal, not gonna see opposite numbers on the closing side because we've got that spring helping to close the throttle body down. |
| 20:22 | So what we're trying to do here is we're just going to reduce these numbers until we're getting pretty close to our target. |
| 20:29 | So again not beating ourselves up because we're not going to be able to get exact, so we'll go minus 10 and maybe minus 15 here. |
| 20:39 | And we'll look at that. |
| 20:40 | So we've overshot there a little bit, so we're actually probably pretty close, we'll go back to minus 7.5 and maybe minus 12.5 Again like I said you don't need to beat yourself up about this, we're just trying to get our open loop target set pretty close, looks like we're following pretty well there. |
| 20:59 | OK so that's got us with some numbers in there that are going to be a pretty good starting point but of course we now need to enable some closed loop control. |
| 21:09 | Let's go back into our wizards here, go back into our setup wizard. |
| 21:15 | And now we can go into our advanced setup. |
| 21:19 | Now there's one actually point that I have overlooked here. |
| 21:23 | When we're doing that testing that we've just gone through, it's really important, before you do that testing, to come down to the bottom of our advanced settings and just untick this drive by wire throttle tracking errors at zero RPM. |
| 21:36 | Now while we're going through that initial setup that we've just looked at, we're going to have some tracking errors, and by tracking errors, what I'm talking about here is errors where the throttle position is nowhere near matching our target. |
| 21:50 | Now under normal circumstances, the ECU's going to detect that as a major problem and it will shut down the throttle. |
| 21:56 | So obviously when we are doing this setup we want to have that little box ticked so that we can actually achieve what we're trying to. |
| 22:03 | But of course once we've completed the setup, we also want to come back here and enable that little box again. |
| 22:09 | So untick it. |
| 22:11 | While I'm talking about errors here, the other thing we need to consider and I've talked about the fact that there are safety precautions in here. |
| 22:18 | We've got an engine rev limit that will be enabled if the drive by wire throttle system is deemed to be faulty. |
| 22:25 | So we can set this to whatever we want. |
| 22:27 | Generally we wanna keep this something somewhat sensible. |
| 22:30 | Somewhere around about 1600 to 1800 RPM. |
| 22:33 | Something that's going to allow the engine to still run. |
| 22:36 | We can potentially limp the car off the road or the racetrack and get it to safety but of course we don't want it set at an RPM that's potentially going to be dangerous. |
| 22:46 | So 1700 there is probably a pretty good starting point. |
| 22:49 | Alright so what we're going to do is come up to our PID controls and I'm just gonna slide this up out of the way a little bit so that we're going to be able to see our time graph, our plot, at the same time. |
| 23:03 | So the process with this is, I'm going to be pretty brief here, there is, I could run a whole webinar here on proportional, integral, and derivative gains and how to correctly tune a PID system. |
| 23:16 | So I'm going to be pretty brief here, but the process we're going to go through is going to start with our proportional gain. |
| 23:22 | Now proportional gain gives a result or an output that is proportional to the size of the error. |
| 23:28 | So the bigger the error is, the more effect the proportional gain will have. |
| 23:31 | If we go too far with our proportional gain, we get into a situation where our system becomes unstable. |
| 23:38 | So actually what I'm going to do, I'll just have to close this, we'll start our graph, our logger, and we'll go back into our setup wizard again and I'll show you the effect of that. |
| 23:46 | So we'll click on our advanced setup. |
| 23:50 | And we'll come down to our proportional gain and what we're going to do is put in a value here that causes the system to become unstable. |
| 23:56 | So right here we've got zero, we can see we've got that really slow response as I go to full throttle, we're not tracking our target too well. |
| 24:03 | Let's go to a proportional gain of two, so straight away you can see the effect of that. |
| 24:10 | We're not following our target much much more closely. |
| 24:13 | Let's go though and set this to six. |
| 24:15 | So this hopefully will be a little bit too much and we should go into oscillation. |
| 24:20 | OK so you may have heard that as well there, the throttle body just fluttered when it closed and we can see that with this little flutter that we've got at the base of our graph there. |
| 24:31 | We'll go a little bit further though, let's set our proportional gain to 10. |
| 24:35 | OK so now the system has gone into oscillation, it's completely unstable. |
| 24:39 | So that gives you some indication as well of the extent or how far you can go with your proportional gain. |
| 24:45 | We obviously don't want the system to become unstable like that, just managed to close that down so let's bring that back up. |
| 24:51 | So what we wanna do first of all with our proportional gain is kind of get some feel for the extent of how far we can go. |
| 24:57 | And in this case, I'll just do this again, we've got a proportional gain there of four at the moment. |
| 25:03 | I'll open and close our throttle, and what we're looking for, it's a little bit hard to see right now but we've got a little bit of flutter where we're overshooting our target. |
| 25:11 | And this is actually easier to see if we look on the bottom left gauge, watch what happens when the gauge comes back down to its zero point. |
| 25:20 | So you can see it just flutters a little bit or oscillates a little bit. |
| 25:23 | So if we bring this down to a proportional gain of two, we see that there's almost no flutter. |
| 25:29 | So with a proportional gain it's a trade off. |
| 25:31 | The higher the proportional gain is, the faster we're going to respond to an error in our target. |
| 25:37 | But we get into that situation where we have the potential for it overshooting. |
| 25:40 | OK so next we come to our integral gain and our integral gain is a gain that works relative to error that's remaining over time. |
| 25:50 | With our proportional gain we can't get perfect control with just the proportional gain. |
| 25:54 | The reason for this is as we get closer and closer to our target, the effect of the proportional gain becomes less because our error also is reduced. |
| 26:03 | So integral gain works on any remaining error over time. |
| 26:06 | So generally as a bit of a guide, we probably want to start with our integral gain somewhere around about half of the proportional gain. |
| 26:14 | So we'll set that for the moment to one, and we can, I'm just gonna close this down, I'll restart our logger here because we've got a bit too much data and it's a little bit hard to see what's going on. |
| 26:24 | So we've got pretty good control there. |
| 26:27 | We're not quite perfect but we're pretty close. |
| 26:30 | And what we can see is that we've also still got the odd tiny oscillation here. |
| 26:36 | Now with proportional gain it is a bit of a trade off. |
| 26:39 | As I've said, the more our proportional gain, the higher our proportional gain is, the faster our response, but we do get into the situation where we overshoot our target. |
| 26:48 | So a third aspect that we can add in here is we can add some derivative gains. |
| 26:53 | So the derivative gain basically is like a breaking effect and it helps prevent that overshoot. |
| 26:59 | With a derivative gain here in the AEM Infinity, the values are going to be very very small and in fact some of the drive by wire settings have no derivative gain at all. |
| 27:09 | For our particular set up, a value of around about 0.05 tends to work quite well. |
| 27:14 | So we'll start our logger again and we can see that we're tracking pretty well there. |
| 27:19 | We're tracking our target without too much problem. |
| 27:24 | Alright so that sort of goes through a basis of the setup there. |
| 27:28 | We've just talked about those PID gains, so you've got an idea of what they do and remembering again the best place to get the correct data for those is from AEM for your particular drive by wire throttle body. |
| 27:38 | If you don't have that correct, then you can potentially get yourself into trouble with the ECU losing control of the throttle body. |
| 27:46 | So it is very important to understand that this has quite a dramatic effect on the potential safety of the car. |
| 27:52 | OK so we've got that set up now, we've got our drive by wire parameters basically set up. |
| 27:58 | I just wanna go back into our setup wizard though and cover just one more aspect here which is our drive by wire idle control range. |
| 28:05 | So when we're using drive by wire throttle, typically we're going to be using the throttle body for idle speed control as well. |
| 28:13 | So the ECU is physically going to be opening and closing the throttle body in order to function the idle speed control aspect. |
| 28:18 | We don't generally need an additional idle speed control or air bypass motor. |
| 28:23 | So what this does, the idle control range here sets the maximum throttle opening that will be used for the idle speed control strategy. |
| 28:32 | And essentially what this does is it sets us with a range that the idle based position tables will use. |
| 28:40 | So in other words if we've got a value of six here, 6% throttle opening, that's going to be our maximum throttle opening that we can use. |
| 28:47 | And that will correspond to a value of 100% in our base idle position table. |
| 28:55 | So it's really important to understand that. |
| 28:58 | For those who have come from a cable throttle tuning sort of background, where you've got an actual idle air bypass valve. |
| 29:06 | So if you get yourself into a situation where when the engine is, particularly when it's cold and you can't get it to idle high enough, no matter what numbers you put into your base position table, what you need to do is come back in here and address that by giving the idle, the drive by wire throttle body a little bit more room to move. |
| 29:23 | So we might bump that up to maybe 8% or even 10% Conversely if we've got this drive by wire idle control range set too great, so it's too high, maybe we've set that to 15% or 20%, then it makes the resolution in our base position table for idle speed control a lot coarser and we can struggle to get really good really fine control over our idle speed. |
| 29:47 | Alright so what we're going to do now is we'll get our engine up and running. |
| 29:52 | No we won't. |
| 29:55 | We'll try and get our engine running. |
| 29:58 | That is a miracle. |
| 30:01 | Alright we're gonna need a new battery for this fairly shortly. |
| 30:04 | But we got it running so that's great, because now I can do the next part of our demonstration. |
| 30:09 | It's much much more difficult to do if we don't have our engine running. |
| 30:13 | Alright so what we need to understand, is one of the biggest controls we've got in our ECU, once we've actually got our drive by wire set up and operating, is this table here, our drive by wire throttle curve. |
| 30:26 | So what this does is it defines the relationship between our throttle position and the position of our drive by wire throttle body. |
| 30:35 | And most people would sort of think that the sensible option here would be that 50% throttle, well we'd want 50% drive by wire throttle opening. |
| 30:44 | But that's actually not the case. |
| 30:45 | What we find is that the air flow through a throttle body is very non linear. |
| 30:50 | What I mean by this is that when we've got the throttle body open 50%, we're probably getting more like 80% of our maximum air flow. |
| 31:00 | So if we have a linear relationship between our throttle position and our drive by wire throttle body position, we're going to end up with an engine that's really hard to drive, the torque output will be quite hard to control. |
| 31:15 | So we want to take that into account when we are setting this table. |
| 31:19 | So on our vertical axis here we have our accelerator pedal position, this is what APP stands for. |
| 31:28 | So this is what the driver's throttle is actually doing. |
| 31:30 | And if we start this up and running, we can see as I move through that table and open and close the throttle, we move through our three dimensional table here. |
| 31:41 | The numbers in this table that we've got filled in, these are what the throttle position, the drive by wire throttle position, is going to do. |
| 31:50 | So at the moment in there we can see that we've got a little bit of a curve. |
| 31:53 | It's shown over here graphically on the right hand side. |
| 31:55 | But it's relatively close to linear and that's definitely not what we're going to want. |
| 31:59 | So what we're going to do is have a quick demonstration here on our Mainline dyno and we'll just show the effect of the torque output. |
| 32:05 | So I'll just get ourselves up and running here in fourth gear. |
| 32:12 | And we'll head across to the dyno. |
| 32:15 | And we'll talk about what we're looking at. |
| 32:18 | OK so what we've got here on our torque graph, we can see this is the torque being measured by the dyno, we can see that currently we're registering 235, 240 foot pound of torque. |
| 32:32 | Let's jump back across to our laptop software for a moment and we can see that at the moment we're operating here at 2000 RPM and you can see clearly my throttle position is 100%. |
| 32:46 | So the accelerator pedal position is 100, the drive by wire throttle position is 100 so obviously what we'd expect. |
| 32:53 | Now the problem with this sort of setup when we've got that linear arrangement, is if I back off to 50% throttle we're also going to get, well in this case 40% drive by wire throttle opening. |
| 33:05 | Let's just change that to 50% so we can really see. |
| 33:08 | So we'll back off and we can see that our throttle position now, we're sitting at 50%. |
| 33:16 | Let's head back across to our dyno though and look at our torque. |
| 33:20 | We can see that our torque actually hasn't changed at all. |
| 33:24 | We're still sitting at 230 to 240 foot pound of torque. |
| 33:28 | So the problem for the driver is if the driver's driving this car around a racetrack and let's say for example it's a little bit slippery mid corner, so the driver's going to back out of the throttle expecting some kind of semi linear relationship between throttle position and engine torque, yet they've backed all the way out to 50% throttle and nothing has changed, the engine is developing exactly the same amount of torque. |
| 33:53 | So what we'll do now is we'll drop our throttle down, let's just keep looking at our torque on our dyno here. |
| 33:58 | So I'm just gently closing down my throttle and now we start to see our torque is dropping away. |
| 34:05 | So we're down to 200 foot pound of torque. |
| 34:07 | Let's bring it all the way down to maybe 120 and we'll see what that relates to in terms of our throttle position. |
| 34:16 | Alright so we're down at about 115 now and we'll look over at our laptop software for a moment and we can see that we're actually down to a throttle opening here of almost 15% So you can see that that's a huge amount we need to pull out of our throttle in order to get a significant reduction in our torque. |
| 34:38 | What we could do though, let's come back up to 50% throttle. |
| 34:42 | And so this means that remember our accelerator pedal position is now 50% Right now we're still commanding 50% drive by wire throttle opening as well, so we've still got our 230, 240 foot pound over on our dyno but instead of closing our throttle, what we're going to do is just adjust our drive by wire throttle opening at this point to 15% And when we do that, we've got a little bit of interpolation here. |
| 35:09 | So let's just make this work really nicely and we'll change all the targets around it, let's jump back across to our dyno and we can see that now our torque has in fact reduced. |
| 35:21 | So what we want to do there is basically use this drive by wire throttle target table in order to get a more linear relationship between our engine torque and our throttle position. |
| 35:33 | Now this really becomes driver dependent and car dependent. |
| 35:37 | We've only looked at one tiny place there, 2000 RPM. |
| 35:40 | What we do there at 2000 RPM doesn't necessarily mean we're gonna get exactly the same results at higher RPM. |
| 35:46 | But it is important just to understand this relationship. |
| 35:50 | And it becomes even more important if we're tuning a turbocharged engine. |
| 35:53 | With a turbocharged engine, we find that the turbos are just so good at making boost pressure that we can end up higher in the rev range, let's say for example our target boost pressure's 20 psi and we're at 100% throttle, we've got our 20 psi of boost pressure. |
| 36:08 | We may be able to find that as we close down the throttle, the wastegate also closes in order to drive the turbo harder and harder to maintain our 20 psi and we may find that we still maintain 20 psi down to maybe 50%, 40%, maybe even 30% pedal position. |
| 36:25 | So what this means again for a turbocharged car is we've got a very non linear relationship between our engine torque and our throttle position. |
| 36:34 | And we can correct that in one of these maps. |
| 36:37 | So what we might end up with, let's just jump back into our laptop software here. |
| 36:41 | And I'm just gonna go very broadly through here and give you an idea of a shape that we might end up with that's a bit more realistic. |
| 36:48 | So with an accelerator pedal position of 10%, you might end up requesting a drive by wire throttle opening of maybe 2% or maybe 5% At 20% throttle opening we may be looking at something like 9% from our drive by wire throttle, then we may step up to something like 14% or 15% Then at 40% pedal position, we may want to end up being about half of that, maybe about 20% Then at 50% we might be 30% And then what we find as well with the throttle body, the air flow through the throttle body, I said it's very non linear, we get a large increase in air flow as we initially crack the throttle body open. |
| 37:28 | From around about 70% or 80% throttle opening through to 100% we see almost no difference in our air flow. |
| 37:35 | So what we tend to do is take this into account when we're designing or developing these tables. |
| 37:40 | So at 60% accelerator pedal position, we might want something more like 40% at our throttle body. |
| 37:48 | At 70% we may be looking at something like 50% Then we'll sort of step this up, so we start opening it a little bit more abruptly as we get higher in the accelerator pedal position. |
| 38:03 | So this is sort of something, maybe closer to that, something like this, we can see graphically over here on the right hand side. |
| 38:13 | We've got kind of an exponential shape to that table and this is quite typical. |
| 38:16 | This is what we'd expect with a well developed drive by wire throttle table. |
| 38:21 | I haven't done a great job there, we'd probably go through and make that a little bit smoother but hopefully you get the idea. |
| 38:26 | Now the other aspect here which I did mention is that with drive by wire throttle we usually are going to have the option of multiple tables within the ECU and that's exactly what we've got here. |
| 38:38 | I don't actually have the three dimensional numeric values as we've seen here for our initial table but we do have a second curve table graphically being displayed here on the bottom right hand side of our laptop software. |
| 38:53 | So we can see again we've got a linear relationship there like we started out with, with our throttle curve one. |
| 39:00 | So what we can do here is we can switch between throttle curve one and throttle curve two based on just about any parameters we want but one of the usual techniques that I'll use this for is a wet throttle map versus a dry throttle map. |
| 39:15 | So with the wet throttle map what we may want to do is purposefully limit the maximum throttle opening around the peak torque area of our engine's torque curve. |
| 39:25 | So this basically artificially reduces our peak engine torque. |
| 39:29 | And so instead of allowing 100% throttle opening maybe around about 3500 to 4000 RPM, we may limit the maximum throttle opening to only 60% through that region. |
| 39:41 | Then once we move higher in the rev range and the torque naturally starts to drop off, then we may allow the throttle opening to go back up to 100% Likewise with a wet throttle map where the engine, the car is likely to be very traction limited, we're also more likely to feed the throttle in a little bit slower so we make that curve that we've already looked at, even more exponential than what we set out with. |
| 40:04 | We're gonna move into some questions and answer really shortly so just a prompt here, if you do have anything that I've talked about that you'd like me to delve into deeper or anything to do with drive by wire throttle in general, please ask those in the comments and I'll be happy to try and answer those shortly. |
| 40:20 | Now another way that I have used the multiple throttle target tables is in a circuit car that I tuned that ran in a class where there was a breakout time. |
| 40:32 | So what this means is that if the driver went faster than the breakout time for his particular class, he was handicapped. |
| 40:39 | So obviously we wanna run as close to that breakout time as you possibly can without going faster than it. |
| 40:44 | And naturally as the car was developed, we got to a situation where across the various tracks he raced at, the car was usually able to break out by perhaps one or two seconds a lap. |
| 40:54 | So what we did was developed a throttle map which basically reduced the engine power to a point where he could drive the car 10/10ths as hard as he could, and he'd be underneath or safe, he wouldn't be breaking out, wouldn't be running underneath that breakout time. |
| 41:11 | Of course in the heat of battle though, if you're caught up in a fight for a position, naturally your lap time is going to tend to be a little bit slower under those conditions anyway, you're being a bit more defensive, maybe you have to take different lines in order to try and get, defend, or get around a car and under those conditions he could switch to the full power throttle map that would allow him to actually get past a competitor but under those conditions he's also unlikely to break out. |
| 41:37 | So of course as with most things with our modern ECUs, a lot of this comes down to really how smart or clever you wanna be about the use and what you're actually trying to achieve. |
| 41:48 | There is really no right or wrong way when it comes to tuning these sorts of things in terms of how you're going to set up your throttle maps, it just comes down to a personal preference. |
| 41:59 | Alright we'll head over and we'll have a look and see if we've got some questions here. |
| 42:10 | Jeremy Keely has asked, can I tie proximity sensors into a potential strategy of cutting throttle? Probably need you to elaborate a little bit more on that question there Jeremy in terms of what you're actually trying to achieve. |
| 42:25 | What proximity sensors are you talking about, where are those, and what are you actually wanting to achieve. |
| 42:30 | So try and clarify that and I'll see if I can come back and give you a little bit more information. |
| 42:35 | Craig has asked, have you used mixed throttle bodies and pedal sets from other manufacturers? I.e. a Toyota pedal with a Ford throttle body in the case of using a larger throttle body? Yeah absolutely what we find is that the throttle pedal assembly is in most cases normally pretty sort of run of the mill. |
| 42:54 | There's not a lot of special things going on with the throttle pedals. |
| 42:58 | So yeah one of the ones that I use quite frequently is a VZ Holden Commodore. |
| 43:04 | This is an Australian domestic market model. |
| 43:06 | Those were a pedal that we could get hold of relatively cheaply and the connector set was also available really easily. |
| 43:14 | And so basically the drive by wire pedal is just two zero to five volt outputs, two zero to five volt position sensors. |
| 43:23 | So the wiring to it's pretty easy. |
| 43:25 | Often the drive by wire pedals will share a five volt and a sensor zero volt. |
| 43:30 | So you've got a sensor zero volt, a five volt and then two voltage outputs. |
| 43:33 | In other situations you may find that each of the two sensors has its own dedicated five volt and zero volt, so it'll have six wires. |
| 43:41 | But really it's very basic, as long as you've got those two sensor inputs to the ECU and they're calibrated so the ECU knows what closed throttle and what open throttle looks like, the rest is straightforward. |
| 43:51 | The throttle body is the tricky part here though. |
| 43:55 | With the throttle body, that's the one where there's no generic numbers you can put in. |
| 44:01 | The PID control strategy is different for every different throttle body so you really need to tune to suit the throttle body, not the driver's foot pedal. |
| 44:11 | Allan has asked, is rev hang feature of modern drive by wire systems nowadays? Is there a workaround with the factory ECU? Yeah it actually does seem to be on certain makes and model of car, it's not across the board. |
| 44:23 | I'm not 100% sure what the OE strategy is behind, but yeah definitely it is something that we notice. |
| 44:30 | So depends on the particular ECU you're tuning and the completeness of the definitions in the software as to whether or not you can do anything about that. |
| 44:41 | So yeah very very ECU specific there. |
| 44:44 | Vince has asked, have you tuned any LS drive by wire throttles and do you recommend tuning them? Yeah absolutely I've tuned plenty of those. |
| 44:51 | The touring car series that I alluded to earlier in the webinar, the Holden Commodores were fitted with the GM 6.2 litre LS3 which used the LS drive by wire throttle. |
| 45:04 | So yeah plenty of tuning experience with those, they are a throttle body that works exceptionally well. |
| 45:10 | One of the ones that I've had limited success with actually was fitted to the Ford Coyote Boss engine. |
| 45:16 | This is our Ford racing throttle body, I think it was 100 mil throttle body off the top of my head. |
| 45:21 | And we had huge amounts of trouble with that particular throttle body. |
| 45:24 | It seemed like it was just about impossible, regardless of the ECU controlling it, to get a really really stable control, out of that particular throttle body. |
| 45:35 | OK so Jeremy has asked if I'm, just to elaborate on his earlier question, if I'm building a Cheetah drift car and I'm judged based on proximity, can I use the input of parking assist sensors to tell the ECU to cut the throttle while my driver stupidly holds the pedal down? That's a fairly valid question, I'd say you probably wanna train a better driver maybe. |
| 45:54 | I would say no is the answer there, and the reason for this is we have to understand that drive by wire throttle is obviously very very linked to the safety of the car, so we don't really want anything going on in there that's likely to be a problem for car safety. |
| 46:13 | So the interaction that we've got available to us is quite limited in that regard. |
| 46:19 | It may be possible if you could set up a proximity sensor as a digital input to your ECU somehow, to use that to switch between drive by wire throttle target tables. |
| 46:30 | Personally I think you're gonna find that that would end up causing more harm than good and it's not something that I'd personally recommend. |
| 46:37 | Alright guys that has brought us to the end of our questions there. |
| 46:40 | Hopefully everyone's enjoyed today's webinar and learned just a little bit more about drive by wire throttle on the AEM Infinity. |
| 46:46 | As usual for our members, if you do have any other questions, please ask those in the forum and I'll be happy to answer them there. |
| 46:52 | Thanks for joining us and I look forward to seeing you next time. |


