180 | Cost-Effective Crimping
Summary
When you're dealing with a new connector and terminal for the first time, determining how to ensure you get a reliable crimp connection can be a tricky process. This webinar will look at a couple of common connectors used in the automotive aftermarket, and a couple of connectors favored by the OEMs. We will perform test crimps with different tooling and show the results, discussing how we determine which is the correct tool for the application.
| 00:00 | - Hi guys, it's Zac from High Performance Academy here, welcome along to today's online gold member's webinar. |
| 00:05 | Really really great to have you with us. |
| 00:08 | We've got a fun wiring webinar today, well I say fun, it's fun for me. |
| 00:12 | We're gonna be going through a couple of really common crimping situations, and I'm gonna show you how we can use a low cost general purpose $30 crimp tool for three different really common applications you're gonna find, both in the automotive aftermarket, and actually the OEM world. |
| 00:28 | I've chosen a couple of examples, we're gonna go through crimping an AMP Superseal 1.0 connector, a TE Multilock connector, and a TE Econoseal connector. |
| 00:41 | Those are two really common connectors that you find in OEM applications. |
| 00:44 | Particularly these are going to be used for our FD3S RX7 project. |
| 00:51 | And that's actually why I've chosen them as I need to go through and figure out what size dies I'm going to use in the crimp tool to do the operation so I though we'd do that on camera and get it all documented. |
| 01:02 | So there's no excuses for any mistakes down the line. |
| 01:07 | So we're gonna jump straight into this here and I wanna have a talk about the tool we're gonna use. |
| 01:12 | I'll get this under my iPhone camera here so we can have a little bit of a closer look and just get some good lighting on that, there we go. |
| 01:22 | Now this is a general purpose crimp tool, and it's called so because it's got multiple die sizes that you use depending on the size of terminal and wire that you're going to crimp. |
| 01:33 | It's also got two different styles of die, so if I get this angled right we can see we've got these dies along the top here, all have a, currently it's upside down, w shape to them and we're going to use those dies for crimping the open barrel section of our terminal that connects, makes the actual electrical connection to our copper conductor strands. |
| 01:56 | And the dies down the bottom here are round section dies, and we're gonna use those for crimping the open barrel conductor section that is going to provide strain relief and make contact with the actual insulation of the wire. |
| 02:12 | That being said, you don't always use these round section dies for that purpose, sometimes you do use the open barrel dies, the w shaped ones up the top here and we'll go through how to figure out that. |
| 02:24 | Right now in fact because we're gonna jump straight into our first terminal, which is going to be our Multilock connector terminal here. |
| 02:36 | So I'll get one of these just under our iPhone camera again and we'll have a bit of a detailed look at what we've got going on. |
| 02:45 | So you can see we've got, just trying to get that in focus there, there we go, we've got two different open barrel crimp sections here. |
| 02:53 | We've got the front section which is a wee bit smaller, and that is the section we crimp down that actually makes contact with the bared electrical conductor strands of our wire. |
| 03:02 | And then at the back here we've got a larger section that we crimp down onto the insulation of our wire and that provides really good strain relief and means any bending that happens in the wire, it doesn't place any strain on the actual crimped join. |
| 03:16 | I'm just gonna grab one other connector here and show you another difference. |
| 03:20 | So both of these terminals here are actually for Multilock connectors. |
| 03:29 | But you're gonna see once I get them situated and under our iPhone camera here again, hopefully that's coming out reasonably clear that they've got very very different open barrel sizes where they're actually gonna crimp down onto our copper conductor strands of our wire. |
| 03:47 | I'll just try and get that to actually focus in there, yeah there we go. |
| 03:51 | So you can see those are actually quite different sizes. |
| 03:53 | And this is really common when you're searching for terminals for OEM connectors. |
| 03:59 | Most of the time they're going to have at least two different sizes, typically they'll come in a smaller size that will be suitable for 24 to 20 gauge wires and a larger size is gonna be suitable for 18 and 16 gauge wires. |
| 04:15 | The situation we're gonna be working with in our RX7 project, I'm actually gonna be crimping an 18 gauge wire to this, so I'm gonna select that larger terminal, and just put the smaller one away and try to not get those mixed up and confused. |
| 04:30 | So getting into the actual crimping process, the first thing we're going to need to do is strip back a section of the insulation of our wire. |
| 04:39 | Now the length if insulation that we want to strip is actually really important and you determine it by looking at the length of this open barrel crimp section that's going to make contact with the copper conductor strands. |
| 04:52 | And you need the stripped section of insulation to bear enough conductor strands that it's going to protrude all the way through that open barrel section. |
| 04:59 | You need to be able to see it on both sides so you can ensure that the crimp has been successful and it's you know you've got full contact for best electrical continuity possible. |
| 05:11 | So I'll strip a section of this back now. |
| 05:16 | And I'll just pop over to the cellphone camera again. |
| 05:21 | And you can see when I get things framed up and focused. |
| 05:30 | I'll try to move this over here a little bit. |
| 05:34 | You can see I've bared enough copper conductor there that it is definitely protruding all the way through that open barrel section. |
| 05:40 | And the larger open barrel section is still gonna meet up nicely with our insulation. |
| 05:45 | So once you get to this stage you then need to determine which of the multiple die sizes in our tool here you're going to use. |
| 05:52 | And it would be really really nice if there was some magical chart that you could go to that would list every connector you're going to find and every tool and what size die you're going to use. |
| 06:03 | Now unfortunately that list doesn't exist. |
| 06:05 | And it does mean we do need to do a little bit of trial and error. |
| 06:09 | You're probably gonna have to perform a few test crimps to get the best result and get something that you know is gonna be reliable and you're willing to put your name on when it goes out the door. |
| 06:19 | In the absolute ideal world, and if we were working in a production environment, this is absolutely how we'd do it. |
| 06:23 | There is a manufacturer specified tool for this operation. |
| 06:28 | And we would have the correct manufacturer specified tool for every crimp terminal we were working with. |
| 06:35 | However those tools can cost several hundred dollars and if you needed 20 of them you can see that things get very very expensive very quickly. |
| 06:42 | We have found that there is sufficient crossover between them that using some good quality general purpose tools we can cover the entire range and still get a really professional and reliable result. |
| 06:55 | Particularly when we're building harnesses in more of a one off fashion for individual projects. |
| 07:00 | So when it comes to determining the die size, I'm gonna try and do this under our iPhone camera again as we do need to have a little bit of, you need to sort of be able to see it here. |
| 07:11 | So what I like to do is line the crimp section up. |
| 07:20 | Sorry I'm just gonna work around my fat fingers here. |
| 07:24 | Line the crimp section up and you want it so that when you, that's actually gonna be too small, you want it so that when you close the terminal onto the tool it just touches and there's a little bit of resistance and it actually is gonna hold that terminal in place. |
| 07:39 | So to start off with here we're gonna try that C sized die as it's actually looking like a pretty good size. |
| 07:45 | So we'll get that in our tool and we're gonna get our wire inserted in there. |
| 07:52 | Get everything lined up and just pop back over to that cellphone camera once more. |
| 08:01 | And you can see I've got my wire inserted in there, there's no copper conductor strands poking out the side, that's really really important as we need for all the strands to head through that section there. |
| 08:12 | And then we can apply pressure to the handles and complete our crimp operation. |
| 08:16 | So just on that cellphone camera again, we'll have a close up look, and see how that has worked out there. |
| 08:28 | So we can see it's folded those tangs of our open barrel crimp join over quite nicely and it does actually look really really tidy. |
| 08:35 | It's given us a little bell mouth at the end here which is nice, so that's really good strain relief. |
| 08:40 | So initially that looks pretty successful. |
| 08:43 | What we do then is we actually do a tug test and that just is where you simply hold the terminal and pull on the wire, and you need to put quite a bit of force behind this as you want to be sure that it's absolutely going to stay in place when we're out in the field. |
| 08:59 | So we'll do that now and we'll get a bit of force on that, and that is a failure, right. |
| 09:06 | So that's one of the situations where this really looked like it was actually gonna be a success, I had high hopes for that. |
| 09:13 | That larger die size, everything looked really really tidy once it was crimped, it looked nice and tight, but that didn't take too much force to pull out of there. |
| 09:21 | So that has actually failed. |
| 09:23 | So we're just gonna trim another bit of wire off. |
| 09:27 | Get another appropriately sized Multilock terminal and I'm gonna insert this into our tool. |
| 09:35 | This time we're going to choose the D size die which is the next size down. |
| 09:41 | And just leave that set up there while I strip another wee section of insulation off our wire. |
| 09:51 | And we'll try and get this under the overhead shot here. |
| 09:55 | So we can see, I'll get my wire inserted into my terminal and everything is lined up. |
| 10:05 | I've got no copper conductor strands out the side there and I can apply pressure and that actually felt quite good so we'll pop over to that detail shot again. |
| 10:22 | And you can see there that once again that looks really really nice. |
| 10:26 | We've got a nicely even folded over open barrel section here. |
| 10:31 | We've got our little bell mouth, we've got our copper conductor strands poking through completely visible so we know we've got full contact on our copper, and undertaking that tug test again. |
| 10:43 | I can really put quite a lot of force on that and it's not budging whatsoever. |
| 10:47 | So I know that is gonna be a totally successful crimp join. |
| 10:51 | And it's going to be really solid once we're actually out in the field. |
| 10:56 | Once we get to this stage we've made our open barrel conductor crimp that is making connection to our copper conductor strand. |
| 11:03 | So we've got electrical continuity now, but we need to crimp our strain relief section here as that's really important. |
| 11:09 | Because it means when this is inserted into our connector body, any bending strain that's placed on the wire is going to be taken up by the insulation and not by the point right where that crimp join actually joins the copper conductor strands which eventually would work harden and fracture. |
| 11:25 | So it is a very similar situation to the one we've just been through. |
| 11:31 | It's a little bit of a trial and error process. |
| 11:33 | We're going to use the same tool for this, and I think because there is a general rule of thumb I go with and that is when I come to crimp the insulation section of the open barrel conductor, I will step up one die size from where I crimped the conductor portion of the open barrel conductor. |
| 11:51 | So we'll pop up to the C section die here and get that all lined up in place, apply a bit of pressure and take it out of our tool and that has definitely crimped over quite nicely. |
| 12:06 | Popping back over to our detail shot once more. |
| 12:10 | Get that framed up and we can see that I've used our C sized die to fold over those upper tangs and right at the beginning of the video I did mention that we will often use the round section dies of our multi purpose tool to do this. |
| 12:28 | This is actually a terminal where we don't do that, we use the W shaped open barrel crimp tool because these tangs were quite long and they were directly in line with one another so if we try to bend them round with that round section die tool they would have butted into one another and we would've had a failed crimp. |
| 12:46 | But those are making good contact with our insulation there and they're gonna be providing really good strain relief, so that's gonna be a nice reliable crimp, that'll be good for the life of the vehicle. |
| 12:59 | Actually there is one other point I want to mention there and it involves the connector body. |
| 13:05 | Obviously this is the last part of the process you're going to do is gonna be terminating this into our connector body. |
| 13:10 | And you need to make sure that when you've crimped the insulation section of your open barrel crimp that the crimp is narrow enough that this can actually fit into your connector body. |
| 13:26 | So if I go ahead and try and pin this in now I can see it does in fact fit all the way in there and that's held in by the locking key now and we can actually lock that in place and that wire is not gonna move anywhere. |
| 13:43 | So that's gonna be a really good successful crimp join that's gonna be really good for the life of the vehicle. |
| 13:48 | The next demonstration I have for you today is very similar. |
| 13:51 | There are a couple of differences though. |
| 13:53 | We're going to use, it's based on a TE Econoseal connector. |
| 13:58 | And it's also an open barrel crimp connector but it includes an integrated wire seal. |
| 14:05 | So this is my wee bag of connector supplies here. |
| 14:09 | So I'll pull one of these out and I've actually got two bags of these connectors again because once again it's the same story. |
| 14:15 | There's two different sizes of them depending on the wire size you're going to use. |
| 14:18 | In this instance I know that when I build the wiring harness I'm going to be crimping 22 gauge wire to it, so I've chosen that smaller size of terminal. |
| 14:27 | So I'll just get all my bits and pieces sorted out here. |
| 14:32 | And then we'll have a talk about all the individual pieces of the project. |
| 14:38 | So the main difference is actually gonna be the wire seal. |
| 14:41 | So I'll just pop that on the end of my tool and we'll head over to our cellphone camera again and have a talk about how they work. |
| 14:51 | So this is what's known as a single wire seal. |
| 14:54 | Often called an integrated wire seal. |
| 14:57 | And it gets installed onto the wire. |
| 15:01 | Try and get that, there we go. |
| 15:03 | Gets installed onto the wire and then when the terminal gets crimped onto the wire, obviously the first open barrel crimp section needs to make electrical connection with our stripped conductors, but the strain relief crimp section actually crimps around that portion of our single wire seal, and this holds it in place, connects it to the terminal body, and then when it gets inserted into the connector body the ribs up here actually seal it environmentally. |
| 15:33 | So these are really commonly seen. |
| 15:36 | There's a couple of different brands of connectors our there that use the same style of seals. |
| 15:41 | Weather Pack being another common one used in the industry. |
| 15:45 | Got my 22 gauge wire here and the first thing I'm going to do for this is I'm actually gonna install my seal in place and you can do this before or after you strip a section of the insulation. |
| 15:56 | I like to do it before as it eliminates any chance of any errant copper conductor strands actually poking out the side of the seals. |
| 16:04 | So we'll get that in there and I need to pull it a wee way down the wire. |
| 16:10 | It's just being a little bit tricky. |
| 16:12 | Sometimes actually a little bit of lubricant can be really handy in this situation, particularly silicon based lubricants such as tire shine's actually a really good one. |
| 16:23 | As it's not gonna effect anything electrically, it's not gonna add to any corrosion and it really does allow things to slide around nicely. |
| 16:29 | So I've got my wire seal inserted down my wire a wee way and I'm gonna go ahead and strip a section of insulation back here. |
| 16:38 | So that is gonna be my 22 gauge size on my wire strippers here. |
| 16:44 | Get the right amount poking through. |
| 16:47 | Right and we've got, there we go, we've stripped a section and we've got our copper conductor strands out the end of the wire there so then we need to slide our wire seal all the way back up to the end of our insulation. |
| 16:59 | And that way when we crimp our terminal on, everything is going to line up nicely. |
| 17:06 | So popping back over to our cellphone camera here we can just see how that's going to work. |
| 17:12 | You can see there that, well if you could see there, that everything's going to line up and that crimp is going to end up in exactly the right place. |
| 17:25 | So now we're in the same situation again, we've got a terminal, a section of wire here, we need to connect the two and we need to know the size die that we're going to use on our crimp tool. |
| 17:32 | So I think we're gonna start off once again with the D size die. |
| 17:40 | I do, when I'm doing this I do generally tend to start a little bit larger on the die size and work my way down. |
| 17:47 | As I find it a little bit easier that way. |
| 17:51 | So I'm gonna get that terminal inserted in our D size die here. |
| 17:55 | Gonna get everything lined up in place, our copper conductor strands all the way through that open barrel crimp section and apply pressure. |
| 18:07 | And right away I can see that it has folded over our open barrel crimp section nicely but I suspect that it's probably not going to be tight enough. |
| 18:15 | And popping over to our cellphone camera again I'll go through why I think that is. |
| 18:22 | So if we have a look at this. |
| 18:27 | We can see that it does actually on initial inspection look quite nice however the width that we've ended up with here on our crimped section is actually a wee bit wider than where the terminal necks down. |
| 18:41 | And that's the reason I suspect this isn't actually going to be a tight enough crimp as I would've expected to see that being a wee bit closer to this dimension here. |
| 18:51 | So we'll undertake our tug test. |
| 18:54 | And yep absolutely definitely not gonna be the right sized die for this application. |
| 19:01 | So we'll pop that terminal to one side, making sure that we don't mix it up with anything else. |
| 19:08 | And I will get a replacement and I'll fit this into our tool. |
| 19:12 | This time I'm gonna move down a die size, I'm gonna go to our E size die here, which is actually the smallest this tool has. |
| 19:23 | That's fitting in there quite nicely, get everything lined up once more, apply pressure and that is looking quite nice and tight now. |
| 19:35 | I can put quite a lot of force on that and it's not moving around at all. |
| 19:39 | Just on our cellphone camera once more we'll have a quick look at that. |
| 19:43 | And you can definitely see that it's crimped much tighter, the dimensions at the front here are actually, it's a nice line here so that is definitely going to be the right size die for that operation. |
| 19:57 | Now we need to crimp the larger open barrel section here which is going to crimp down onto our wire seal. |
| 20:03 | And for that we are going to use one of the round die sections on our tool here, and I'm going to start with the larger one I definitely don't think it's going to be the smaller one here as that's around about the size of our wire, so I think we're going to be golden with this larger die size here. |
| 20:20 | Get everything lined up which is sometimes a little bit easier said than done. |
| 20:25 | Often actually just closing these up a wee bit by hand first can be really helpful. |
| 20:31 | Get that all lined up, apply our pressure, and that is gripping that wire seal nice and tightly. |
| 20:41 | Just on our cellphone camera again for a detailed shot of that. |
| 20:45 | There we go. |
| 20:47 | So you can see that's gripping onto that wire seal, you can give it a little bit of a tug test actually just be getting our fingernails behind that wire seal and you can see it's not gonna move. |
| 20:56 | So that is gonna be a good successful crimp join that is going to be nice and reliable for the life of the vehicle. |
| 21:02 | Once again the final test is going to be how it inserts into our connector body. |
| 21:06 | Also just on our overhead view again here. |
| 21:10 | This is a TE Econoseal connector. |
| 21:15 | So we'll get that in the back here around the right way. |
| 21:18 | Nice click, so that is engaged really nice and then the last part of actually installing these terminals is to put the locking flange in the front here which I'll just get in place. |
| 21:33 | So that is gonna be securely held in there and it's gonna be good for the life of the wiring harness. |
| 21:39 | As a wee aside, you will notice that these connector bodies actually look pretty new, they're all looking pretty tidy and clean. |
| 21:46 | I can tell you they did not look like that when I got them out of the engine bay. |
| 21:50 | They were from an RX7 that had leaked a lot of oil over its life and they were just gungy and covered in grime. |
| 21:58 | And a really good way to clean connector bodies like this is to get hold of an ultrasonic cleaner, typically they're sold for cleaning jewellery. |
| 22:06 | I like to use about a 50:50 mix of boiling water and simple green, and yeah sort of half an hour to an hour in the ultrasonic cleaner and connector bodies like this really do come up almost looking brand new. |
| 22:18 | One thing you definitely have to check when you're trying to reuse any connector body is that it's still nice and pliable, the plastic hasn't gone brittle from too many heat cycles. |
| 22:27 | So this one's got a good locking tab on the back here so I know when I put this back in the vehicle it's gonna hold itself onto its sensor nicely and not crack and fray away. |
| 22:38 | So now we're gonna get onto our final example which is a really commonly seen connector usage in the aftermarket which is our AMP Superseal 1.0 But just before that, we are gonna have a question and answer section on sort of any automotive wiring related topics at the end of this webinar, so if you've got any of those questions, pop them through on our chat now. |
| 23:00 | We are aware that the chat on our website has broken unfortunately, our website magician Cam is away at the moment so we couldn't get that fixed in time for today's webinar. |
| 23:10 | We'll have it fixed for next week but pop onto our Facebook website and we've got a livestream going there and you'll be able to ask any questions there, the guys will pop them through to me and we'll get those answered. |
| 23:21 | So the situation I'm going to be in when I'm wiring up our RX7 is that I'm going to be installing an ECU that has an AMP Superseal 1.0 connector and I'm going to need to crimp those pins onto our 22 gauge wire again so I'm just gonna slip that one off and use the same 22 gauge wire we've got here for our example. |
| 23:42 | So having a look at our terminal, just gonna pop back over to our cellphone camera cause there is one important difference with these terminals I really want to point out. |
| 23:55 | There we go, hopefully we can see that nice and clearly there. |
| 23:59 | So we can see we've got our standard open barrel crimp section here that's gonna make that connection to our conductor strands, and then our open barrel section here that is gonna make the connection to our insulation is actually, these are triangle shaped and they're offset from one another and just keep that in mind as we go through the crimping process as it'll become very apparent why that is. |
| 24:23 | So the situation is the same as we've been in before, we're gonna strip a section of insulation back here on our 22 sized dies, that is long enough that our copper conductor strands are all the way through our open barrel section there. |
| 24:39 | Looking at this it's a very very similar size to the example we've just done with our Econoseal so I'm gonna head straight to our E sized die on our general purpose crimping tool here. |
| 24:52 | And I'm gonna get everything lined up, all the way through there, nice and tidy, and apply that pressure. |
| 25:04 | And straight away that looks like a pretty good crimp join, everything is folded over nice and evenly and I can do a pretty firm tug test on that and nothing is moving. |
| 25:15 | So that is going to be nice and reliable and tight for the life of the vehicle. |
| 25:20 | Now we need to get onto the next section which is crimping down the open barrel terminal onto our wire insulation. |
| 25:29 | And as I mentioned, the two tangs here are offset from one another, and they're that way for a very specific reason, it's because when we crimp this down we want to use a round die section in our crimp tool, and that means that as those two tangs fold over, they can actually overlap one another. |
| 25:47 | And when you come to pin these terminals into the back of an AMP Superseal 1.0 connector, that becomes very important as they have to fit through a round hole. |
| 25:56 | So if you were to crimp this with a W shaped open barrel crimp die, they end up being quite wide and often you can't get them actually into the connector body. |
| 26:07 | So for this situation, as I mentioned before the smallest of the round die sections here which is the B die, is actually around about the same size as our wire so I suspect that's going to be the size that we're going to want to use so I'm gonna get that all lined up, apply our pressure, and there we go that's actually looking nice and tidy. |
| 26:31 | We'll pop over to our cellphone camera again and have a good look at that. |
| 26:37 | We can see we've got those tangs folded over nice and tidily. |
| 26:42 | They're gripping that insulation really well and they're nice and tight, they're gonna be giving us good strain relief so any bending that happens is gonna happen on the insulation and not further down where this crimp join is happening, avoiding us any possible issues down the line. |
| 27:01 | Now you'll notice that I've mentioned a few times during this webinar that we're gonna apply a pressure with our hands and I've used that wording for a very specific reason, is that this isn't a ratcheting crimp tool. |
| 27:15 | A lot of the crimp tools you find are ratcheting and they're that way for a reason and it's because once you start the crimp with a ratcheting crimp tool, you can't actually release the tool until you apply the maximum amount of pressure and finish the operation. |
| 27:28 | With a tool like this, a general purpose tool, we can actually choose the amount of pressure that we want to apply. |
| 27:33 | And once again in a production environment we're going to use a ratcheting tool because we know that it's going to be set up to provide the perfect amount of pressure every time. |
| 27:42 | But in a more one off environment like we're often building wiring harnesses for, I find a tool like this that I can choose the amount of pressure to apply to be more valuable. |
| 27:53 | And to be hones this is probably the tool that I end up reaching for the most when I'm terminating a harness for a sort of club level race car or a modified street car. |
| 28:05 | But if we get into the more professional realms of motorsport where we're using auto sport connectors and close barrel crimping, then absolutely you're going to have to use the manufacturer specified tooling and there really is going to be no way around that. |
| 28:20 | The amount of pressure you're going to apply when you're using a tool like this does come down to a little bit of practice. |
| 28:25 | So one thing I would recommend is getting yourself a few lengths of wire and buying some terminals like this. |
| 28:33 | The terminals I have here for Econoseal and Multilock connector bodies are actually very very cheap from the likes of RS Components or DigiKey or even element14 so you can buy 100 of them and have a good practice and it's really not going to cost you too much money at all. |
| 28:53 | I really hope that's given you a little bit of insight into how we go through the process of selecting a crimp tool for our application and let you know that you can get a really reliable and professional result without spending the earth. |
| 29:10 | I absolutely wish that I could go back in time and take back some of the money that I've spend in crimping tools over the years as they sit in the bottom of my tool kit now and very rarely get pulled out for the type of work I'm going these days which is club level race cars and modified street cars. |
| 29:27 | So I really hope you've enjoyed that and it's given you a little bit of insight into yeah how we make that selection. |
| 29:33 | So we're gonna pop over to my laptop now and hopefully the guys are popping through a few questions for me. |
| 29:43 | And we will get those answered. |
| 29:47 | Craig has asked would it be a good idea to put a dab of dielectric grease on the copper before crimping? That's actually a really good question and it's probably gonna depend on your application. |
| 29:57 | The blanket answer to that would be yes it is going to give you a little bit of extra protection. |
| 30:00 | Dielectric grease by its nature is not conductive but that's not gonna be a problem because when we perform the crimping operation it does actually end up giving us a little bit of a cold weld. |
| 30:10 | When we apply that pressure with the right sized die we're actually gonna deform the copper and everything is gonna end up in contact. |
| 30:16 | So none of that dielectric grease is gonna get trapped in there, it's gonna squeeze out of the side and probably give us a good barrier from any further ingress of grime. |
| 30:29 | Particularly for a sealed connector here, like our Econoseal, probably going to be less important because we've got that wire seal doing the job. |
| 30:40 | But if I was crimping onto our Multilock connector here and this was going to be in a position where I suspect it might get dusty then yeah that probably is a very good idea so absolutely go ahead and do that one. |
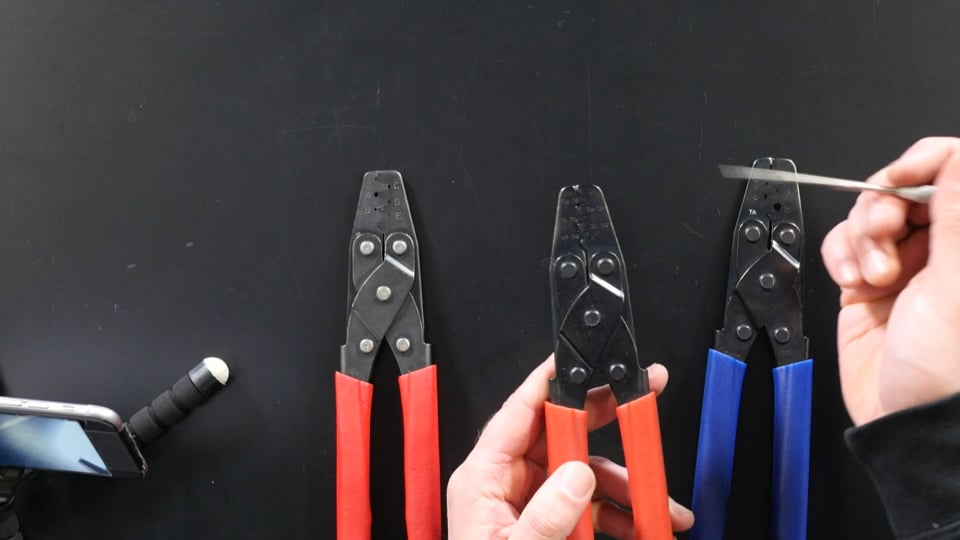
| 30:53 | I've got a question here from Yeo Z, when you're looking for a general purpose open barrel crimp, what kind of die are you looking for? In my local market they mostly have W shaped dies. |
| 31:04 | I'll probably be working mostly on TE connecters, Superseal/Econoseal. |
| 31:09 | Really good question and to be honest, this tool here is probably the one I'm going to recommend that you try and find. |
| 31:17 | There are three common tools that actually have this exact same look to them. |
| 31:24 | So it's the same shape handle, same length and same operation. |
| 31:27 | I do actually have all three here 'cause I anticipated we might get this question. |
| 31:31 | And if we pop to our overhead camera, get everything out of the way. |
| 31:36 | Hopefully there's enough detail on that overhead camera that we can see the difference between our tools here. |
| 31:41 | So the one on my right here is for Weather Pack connectors. |
| 31:47 | And you can see it's got our W shaped open barrel dies and quite large round dies. |
| 31:53 | The one on the middle here solely has our W shaped open barrel crimps, and to be honest I very very rarely pull this one out of my tool kit as I find almost all other applications are covered by these two tools here. |
| 32:07 | These are available from just a myriad of online resellers. |
| 32:12 | I think I got these two here from Motorsport Electronics here in New Zealand. |
| 32:16 | But I'm sure any of the motorsport or automotive wiring suppliers are going to have them. |
| 32:22 | The likes of Race-Spec online or MilSpecWiring.com for example. |
| 32:28 | Got a question here from Ron, have I ever had a question where the terminal bending at an angle between the contact pin area and the open barrel section for the copper? Sometimes this makes the terminal wavy and makes it hard to insert in the connector. |
| 32:40 | This only happens with universal tool and not factory style tools as they have a die to hold the terminal from bending or twisting while crimping. |
| 32:47 | Yes I have absolutely had that happen and it happens when you've selected a size die that is actually too small and that ends up deforming the copper in such a way that it stresses that join between our larger open barrel section for the insulation in our smaller open barrel section and they'll bend away from one another. |
| 33:06 | The solution to that is to, you can go about it two ways I've found. |
| 33:10 | You can step up a die size and try it there. |
| 33:13 | If that's not giving you the reliability when you perform your tug test you can step back down to that smaller size but try applying a little bit less pressure, little bit less hand pressure, and that should see you right in that situation. |
| 33:27 | Yeo Z has asked, do AMP Superseal only work with a certain range of wire gauges. |
| 33:32 | Having trouble doing shopping here. |
| 33:35 | There are two different part numbers for AMP Superseal connectors. |
| 33:40 | One, as I mentioned it's that common situation where one is for a smaller size wire, so that's going to be from 20 to 24 AWG, and the other is for larger sized wire which is 16 and 18 AWG. |
| 33:53 | If you're working in metric units that's going to be, the smaller size is going to be from 0.25 millimetre squared to I think 0.5 millimetre squared. |
| 34:02 | And then the larger size is gonna cover you from the larger size there, so that's 0.75 millimetre squared I think up to 1.25 millimetre squared. |
| 34:10 | The part number on the ones I have here is 3-, actually we'll get these under here 'cause you can take a screenshot. |
| 34:17 | 3-1447221-4 and I know that they are actually the smaller size. |
| 34:22 | Sorry I know that they're actually the larger size. |
| 34:26 | I think the same part number but with the suffix -3 is for the smaller size. |
| 34:30 | So hopefully that helps you out with your shopping. |
| 34:35 | Jason has asked when working with tefzel wire /16 or /32 I find it difficult to locate common terminals like spade or ring terminals that will actually give you a good crimp on the insulation. |
| 34:45 | Do any companies such as TE etc have terminals that are more geared for tefzel wire? That is probably going to depend on the size of wire that you're going to be using. |
| 34:59 | What you're looking for in that situation is a ring terminal that has a completely encased closed barrel terminal and by that I mean that the closed barrel section doesn't come up and it doesn't have a join. |
| 35:16 | You want it to be one piece and you're going to need to use a specific closed barrel crimper for that situation. |
| 35:22 | Off the top of my head I can't think of any brands that you're going to just be able to google and find but I think you're looking in the right direction at TE/AMP as I know they do do a range of ring terminals and they are probably going to supply them to that higher level. |
| 35:37 | You're going to have to be very careful with the size terminal you select though as it is going to have to be right for the wire. |
| 35:46 | Mike has asked, is there any benefit to soldering after the barrel is crimped. |
| 35:51 | And the answer to that is no there is absolutely no benefit to that whatsoever. |
| 35:55 | I touched on this earlier on was that when we perform a crimp join we supply adequate pressure that we're actually going to deform the copper and the terminal itself and they're essentially gonna be cold welded together after the process. |
| 36:07 | So you're not gonna get any benefit from soldering after that. |
| 36:10 | You're not going to get any better electrical connection. |
| 36:12 | In fact you're possibly gonna make the situation worse as no matter how good you are at soldering you are going to get some solder wick back up the wire. |
| 36:20 | And if it is enough it can actually wick all the way past your strain relief crimp and it can turn a section of the copper wire past that into what is basically a solid core wire. |
| 36:33 | Then any bending strain that's gonna be applied to that is gonna be on that solid core section which is gonna be really subject to breaking from vibration. |
| 36:40 | So no I could never recommend soldering after crimping as it's really not gonna give you any benefit whatsoever. |
| 36:51 | Craig says does Zac make those beautiful looms you see on show cars? Ah well that's a really good question. |
| 36:57 | I make all different kinds of wiring looms. |
| 37:00 | For a long time actually before I came to work at HPA I did work on very very high level single seat race car wiring harnesses. |
| 37:09 | So these were built with absolutely no limit to the budget so it was all the best gear, all the best tooling. |
| 37:16 | Everything was specified and designed to within an inch of its life. |
| 37:21 | Concentrically twisted just beautiful beautiful wiring harnesses. |
| 37:27 | And that may sound like it is a dream job to anyone that likes working with wiring harnesses and I can tell you that for a while it absolutely is. |
| 37:36 | But my main love is actually the modified street car and the club day track car genre. |
| 37:41 | So coming to work for HPA was a really good fit in that respect as it's allowed me to create courses that cross over a lot of my professional motorsport knowledge into more achievable realms for the people working on a club day track car or their modified street car. |
| 37:58 | With the aim of just getting a really aesthetically pleasing and totally solid and reliable result as chasing down wiring gremlins on a modified road car is definitely one of my most hated things. |
| 38:11 | It can cost you so much money when you've actually got the car up and running on the dyno and something goes wrong. |
| 38:16 | So we really need to avoid that. |
| 38:19 | It looks like that has actually bought us to the end of our questions there so that's gonna be the end of our webinar today. |
| 38:25 | I really hope you've enjoyed it. |
| 38:27 | Wiring can be a little bit of a dry topic, it's quite difficult to come up with a webinar that is gonna be visually appealing and keep people engaged. |
| 38:34 | But I think the information that we're trying to get across here is really really important. |
| 38:39 | The key being that with some good quality general purpose tools, you're not gonna have to spend absolute mega bucks on the factory recommended tooling to get the job done. |
| 38:52 | For getting the job done for a club day track car or a modified street car, these are going to be absolutely perfect and they're not gonna cost you the earth and you're definitely gonna come out a winner over paying someone else to do the job for you. |
| 39:04 | So thanks heaps for coming along to today's webinar guys. |
| 39:06 | I really hope you've enjoyed it and we hope to see you on the next one. |


