186 | Configuring Flat-Shifting
Summary
Particularly on turbocharged engines, flat-shifting can reduce the drop off in boost we see on a gear shift. This can improve acceleration and this is why flat shifting is common in drag racing applications. In this webinar we’ll discuss how flat-shifting works, what you’ll need in order to set it up, and go through the process on our 350Z running the Haltech Elite 2500 ECU.
| 00:00 | - Hey guys, Andre from High Performance Academy, welcome along to another webinar. |
| 00:03 | And this time we are gonna be delving into the topic of flatshifting. |
| 00:08 | Now this is a topic that I think probably involves a little bit of misunderstanding about what actually is required, how flashifting even works. |
| 00:19 | So hopefully we're going to get to the bottom of all of that. |
| 00:22 | We're gonna go over the various ways we can use flatshifting. |
| 00:26 | And we're also going to be having a look at some datalogging so we can see exactly how flatshifting works. |
| 00:34 | And then on top of that we're going to have a practical demonstration here using our Nissan 350z. |
| 00:41 | Now the webinar was originally planned to be using the Haltech Elite 2500 ECU. |
| 00:49 | Unfortunately, we couldn't quite do that so today's webinar is going to be presented using the Link G4 Plus ECU. |
| 00:56 | What you do need to understand though is we're gonna be basically looking at the principals behind flatshifting, setting up flatshifting, using flatshifting and tuning flatshifting and these principles don't change regardless what ECU we are working with. |
| 01:10 | So if you have come along to watch this because you're interested in learning about the Elite 2500, there's still gonna be a huge amount of information in this webinar that's gonna be helpful for you. |
| 01:21 | Alright so let's start with what is flatshifting. |
| 01:25 | Well as its name implies, it's pretty straightforward. |
| 01:28 | What we're doing is we are shifting through the gears without lifting our foot off the throttle. |
| 01:35 | So we're keeping our throttle pinned, we are at 100% throttle as we complete the shift. |
| 01:41 | Now what I wanna do is start by dispelling a myth that I hear constantly, even still to this day that flatshifting a factory synchro mesh box is faster than using the clutch. |
| 01:55 | So what we're talking about here is basically pulling a synchro mesh box through the gears without using the clutch. |
| 02:02 | That's not the case, and in fact if you're trying to shift a synchro mesh box without using the clutch you're probably gonna really struggle to get that into gear, you're gonna do a lot of damage to the gearbox, to the synchros in the gearbox, and it's certainly not something I'd recommend. |
| 02:18 | So depending on what type of gearbox we are dealing with, is going to have a big effect on the way we can flatshift and essentially how effective or how helpful that is going to be for us. |
| 02:32 | I'll mention here as usual, at the end of the webinar we are gonna be having a Q&A session so if there is anything that I talk about today that you'd like me to jump into in a little bit more detail, or anything just generally related to the topic that we are talking about, please feel free to ask those questions and I'll do my absolute best to answer them. |
| 02:54 | Alright so how do we incorporate a flatshift function? Well the important thing to understand here is we need some way of controlling the engine torque or limiting the engine torque. |
| 03:09 | Now it's pretty self explanatory, if you've got a factory manual transmission car, you're driving along the street, you're going through a gear at full throttle, if you jump on the clutch to change from lets say third to fourth, you're clearly going to end up with the engine RPM just singing up to the rev limiter and sitting there until you re engage the clutch in the next gear. |
| 03:31 | Now while, yes you could shift like that, it's certainly not gonna be pretty, it's not gonna be really great for the transmission or the clutch, and also if you've got a really powerful car, when you dump the clutch in the next gear, it's likely that that's gonna upset the gearbox, or upset the grip available and cause the car to run into wheel spin. |
| 03:53 | So we don't wanna be doing that. |
| 03:55 | So we need some way of controlling that. |
| 03:58 | I'll just also talk about where the advantages lie and we're gonna have a look at some datalogs here from a couple of cars to see exactly how that works. |
| 04:08 | So the general reason for incorporating a flatshift system is to improve the response of the car on a gearshift. |
| 04:17 | So basically allow it to accelerate quicker, in some instances this can actually result in a shorter shift time. |
| 04:27 | Obviously that would be ideal, and particularly in a dog engagement gearbox, which we'll get onto soon, this certainly can be the case. |
| 04:35 | Particularly one of the biggest advantages though is that with flatshifting on a turbocharged car, what we end up doing is keeping the engine on boost. |
| 04:48 | It's really difficult, particularly when we've got a large turbocharger fitted to a small capacity engine, the turbocharger tends to be quite laggy and if we need to back off the throttle in order to change gears, we're basically slamming the door in front of the turbocharger when the turbocharger is at full boost. |
| 05:06 | That air is then going to be vented out through the blow off valve, the turbocharger speed slows down, and then when we open the throttle again, we're going to find that we are at a much lower boost pressure, and everything has to build back up. |
| 05:19 | So depending on the size of the turbo and the size of our engine, this can end up taking a significant amount of time. |
| 05:25 | And any time we aren't at full power, we're reducing the potential acceleration of the engine. |
| 05:32 | Now I just wanna take you through a couple of examples of this. |
| 05:36 | So let's head across to my laptop screen. |
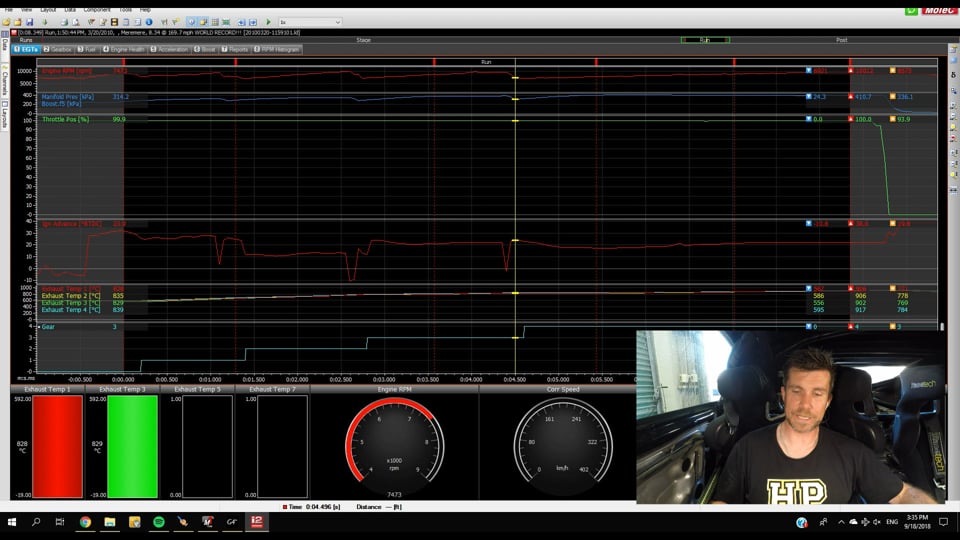
| 05:38 | I've got some data here, this is from a Mitsubishi Lancer Evo 9 that we built a number of years ago. |
| 05:46 | This particular datalog here is from the world record run that it performed. |
| 05:51 | At the time it held the world record for the fastest Mitsubishi Evo four wheel drive with an 8.34 at 169.7 mile an hour. |
| 06:00 | So the data that I want to concentrate on, let's just zoom this down for a little bit. |
| 06:06 | The top set of data here we've got our engine RPM. |
| 06:08 | You'll also see that this is currently set up to display data in a drag format. |
| 06:13 | So the red line, vertical line we've got here is the actual point where the timing for the run started. |
| 06:21 | This particular point here is our 60 foot time, then we've got our 330, our 660, our 1000, and then finally our 1320 foot right at the end. |
| 06:32 | So this allows us to analyse the data in a little bit more detail. |
| 06:35 | So what we can see here is our RPM obviously climbing and then dropping on each of the gear shifts, nothing particularly special there. |
| 06:43 | Then let's just bring up our boost pressure so we can see that in a little bit more detail. |
| 06:48 | So we've got our boost here. |
| 06:50 | I've just filtered that slightly. |
| 06:52 | And here we've got a 2.2 litre engine with a Garrett GT4202 turbo. |
| 06:57 | On today's standards the GT4202's probably a little bit dated, probably not the turbo I would choose for this particular application. |
| 07:06 | But back eight or nine years ago when we were developing this car, it was a pretty stout turbo to select. |
| 07:12 | However it's a pretty big turbo for a 2.2 litre to spool up. |
| 07:16 | So what we can see here is on each of the gear shifts, and even though we are in this case flatshifting, we can see that our boost drops off. |
| 07:24 | But in this instance we drop off on our first to second shift from a 325 kPa down to 281. |
| 07:32 | If we look at our third to fourth gear shift we're at 387 kPa and we drop down to around about 314. |
| 07:41 | Now unfortunately I can't give you a back to back test. |
| 07:44 | But let's just draw on what this might have looked like for our third to fourth gear shift if we weren't flat shifting, we actually were shutting the throttle completely. |
| 07:53 | So we'd end up with our boost dropping quite significantly further. |
| 07:56 | We might get down to maybe 200 kPa or even less. |
| 07:58 | And then the problem is the turbo has to spool up. |
| 08:01 | So we end up with this sort of lethargic rise in our boost. |
| 08:06 | And it's this area in here where we are suffering, where our engine is not making the power that it potentially could, and that is where our problem sits. |
| 08:17 | So just to show that we were in fact flatshifting, we can see our driver throttle position here, so 99.9%, let's just call that 100%, the entire way through the run. |
| 08:27 | That's exactly what we wanna see if everything is working right. |
| 08:30 | Now unfortunately in this instance, I don't actually have the shift request in this particular log. |
| 08:37 | So this is a sequential dog engagement gearbox using a micro switch to activate the shift. |
| 08:42 | We'll talk more about how we can activate the shift shortly, but that's how this was activated. |
| 08:47 | But what we can see with our shifts is we are using a significant amount of ignition retard on the shift. |
| 08:54 | So every time we see these spikes in our ignition, this is where that shift request was coming in. |
| 09:00 | And then in our bottom set of data here we can see the gearbox stepping up through the gears, first to second, second to third, and then finally third to fourth. |
| 09:11 | So quite a significant improvement in our boost response over what we would see if the driver needed to actually shut the throttle. |
| 09:17 | Now I just wanna show you another piece of data here, let's just bring this one up. |
| 09:25 | Now this is kind of taking things to extremes. |
| 09:28 | So this is from another car I was involved with the tuning of, this is the heat treatments limited Nissan R32 GT-R. |
| 09:34 | At the time I was involved with this car it held the outright world record for the fastest four wheel drive. |
| 09:40 | I think at the time the fastest it had gone was around about 7.43, maybe going about 193 mile an hour. |
| 09:48 | Now obviously those times have completely changed now, and we've got four wheel drive R35 GT-Rs in the sixes. |
| 09:56 | That being said, the point that I wanna make here is the shifting, the flatshifting and also the boost response. |
| 10:05 | So let's just have a look at the items of interest here. |
| 10:08 | First of all we've got our RPM trace here. |
| 10:11 | This was using a five speed Liberty clutchless gearbox. |
| 10:16 | So kind of cheating here because no torque interruption is needed in the Liberty clutchless box. |
| 10:23 | I don't wanna dwell on that too much, I just wanna show you how reducing the torque reduction on the gearshift can improve our boost response. |
| 10:32 | So here we can see each of our gear shifts, we're first to second, second to third, third to fourth, and then finally fourth into fifth gear. |
| 10:39 | But what we can see here is that the boost does not drop off at all. |
| 10:45 | This is our boost pressure here and we can see that while we are stepping the boost up as the car goes down the track and we are adjusting the boost pressure relative to gear and position on the track, if we look here at this particular point, we're actually seeing directly after the shift, the boost increase, it doesn't decrease. |
| 11:05 | So that's what it can look like when we've got things all dialled in and everything is absolutely perfect. |
| 11:11 | And this is really the big advantage of clutchless shifting or flatshifting I should say. |
| 11:17 | The ability with a large turbocharger to keep everything on boost, keep it spooled up , and get a really big improvement in our times, typically it's used on the drag strip, there's nothing to stop you using it on a circuit for circuit racing as well. |
| 11:32 | But it is more suited in my personal opinion, to drag racing in this particular style. |
| 11:38 | Now I just wanna talk here about use in naturally aspirated engines. |
| 11:43 | Obviously boost response, not a consideration in a naturally aspirated engine so you're typically not going to see the improvement or advantage in acceleration times with a naturally aspirated engine. |
| 11:55 | That's not to say that it is useless. |
| 11:58 | Often we can find that certain engines might be a little bit doughy on their response when you have to back completely off the throttle, go back to full throttle once you're in the next gear. |
| 12:09 | So being able to stay at full throttle can offer some small advantage, sometimes it's just a mental aspect for the driver as well, knowing that they can keep their throttle pinned, if that gives them some kind of mental advantage in their head, then have at it, that's also gonna help you if you're in the right mindset to be racing your car. |
| 12:30 | OK so what I wanna do now is talk about the requirements for flatshifting. |
| 12:37 | I've kind of touched on them there. |
| 12:38 | What we need is some way of controlling the engine torque during the shift. |
| 12:44 | And there are a variety of ways of doing this depending on the type of gearbox we are operating. |
| 12:49 | In some instances we are going to need to completely cut our engine torque or engine power in order to allow the shift to complete. |
| 12:59 | In other instances we may introduce a momentary ignition cut, fuel cut, or ignition retard or a combination of all three of those, in order to just reduce the engine torque enough to allow the shift to begin. |
| 13:16 | As I've said, that's gonna depend on the type of gearbox you're using, which brings us to our next topic. |
| 13:22 | Essentially when it comes to gearboxes, there are two types that we are gonna be dealing with. |
| 13:29 | I'm not talking here about DSG or DCT dual clutch style transmissions, I'm talking about a conventional manual transmission here. |
| 13:37 | We're either going to be dealing with a factory style synchro mesh engagement, or we're going to be dealing with a motorsport style dog engagement gearbox. |
| 13:47 | Now the common synchro mesh style gearbox, I don't wanna get too hung up on the workings of the synchro mesh box, but essentially there is a synchroniser cone inside the gearbox. |
| 13:58 | We need to understand that when we are shifting gears, all we need to do is slow down or speed up the gear, inside the gearbox so that we can engage the next gear and that's the idea with the synchro cone inside the gearbox. |
| 14:13 | Basically it uses friction so when we're changing from a low gear to a high gear, let's say from third to fourth gear, what we're going to end up with is our engine RPM dropping. |
| 14:23 | So it's important to synchronise the speeds when we get into our next gear and the synchro cone essentially uses friction to slow down the gear set and allow that next gear to be engaged. |
| 14:34 | This is nice and easy for the driver to shift which is why it's favoured by OE manufacturers however it is also quite a slow shifting gearbox, and the problem with the synchro mesh box which is really important to have in the back of your mind here is if you are forcibly shifting a synchro mesh box, you're shifting it really fast, you're forcing it through, you are going to end up quickly wearing your synchros, you're gonna have a gearbox that's no longer going to shift that nicely and it's gonna need a rebuild. |
| 15:07 | So that's something you really need to factor in there. |
| 15:10 | Probably with a synchro mesh box, the small amount of time that you're going to gain by really forcing the gearbox through, is going to actually hurt you in the long run. |
| 15:21 | Alright so when we get to semi professional, professional motorsport levels we're more likely to move to what's referred to as a dog engagement gearbox. |
| 15:33 | Now what I'm gonna do right here is pause for just a few seconds, because I didn't manage to get a photo lined up that I just wanted to show you, so just give me a second here, I'll just get this photo because talking about a dog engagement gearbox without having a bit of a visual reference is a little bit tricky, so hopefully I'll be able to find this really quickly, just bear with me here. |
| 16:02 | And of course as usual with our Instagram feed, the one that I'm looking for is miles back but I'm sure that if I, here we go. |
| 16:12 | Alright it was worth the effort so just bear with me. |
| 16:20 | Alrighty so let's head across to my laptop screen and we'll have a look at the inner workings of a dog engagement gearbox, so we can understand why they offer us some advantages in our shift speeds. |
| 16:33 | So we've got here on the left hand side is our gear stack. |
| 16:38 | And what's important to understand with a gearbox, a lot of novices who aren't really, don't really know the inner workings of a gearbox would think that when we change gears we're physically engaging different gears inside the gearbox, that's not the case. |
| 16:51 | The gears are always constantly in mesh. |
| 16:54 | And instead what we're doing is moving selectors that will lock the particular gear that we want to use with the shaft that it's spinning on. |
| 17:03 | So that's where our dog engagement comes in. |
| 17:06 | So what we've got here is our individual gear, we've got let's say third gear here, and we've got fourth gear directly below it. |
| 17:14 | So this little steel piece that we can see in between here is our selector fork. |
| 17:20 | So when we want to select third gear, what we're going to do is move that selector fork up towards third gear, this is what happens when we move the gear lever. |
| 17:29 | If we wanna select fourth gear, we're gonna move it down towards fourth gear. |
| 17:32 | So that's great, now what we'll look at is what actually happens when we move that selector. |
| 17:36 | So this is what's referred to as our dog ring here on the right hand side. |
| 17:41 | The piece around it is our selector fork, so it's the dog ring that we are moving. |
| 17:45 | Hopefully what you can see is that it's splined on the inside to the actual shaft that it's running on. |
| 17:51 | And these little bits that are protruding out from our dog ring, these are referred to as drive dogs. |
| 17:58 | And what happens is that when we move the dog ring into location, it engages with the matching dogs on our gear. |
| 18:07 | So what happens is that these dogs lock into place and that locks us into the gear, our gear is now engaged. |
| 18:13 | Now there are some advantages and disadvantages with a dog engagement gearbox. |
| 18:20 | The advantage is that we don't require the synchroniser to slow up or to slow down the gears when we're moving. |
| 18:29 | We can really easily get these dogs into location. |
| 18:32 | Again if we look at our picture here, we can see that we've got quite a large gap, large space in between the dogs. |
| 18:38 | So this allows us, as long as we're fast with the shift, to lock those dogs into place really really quickly, so we can get lightning fast shifts with a dog engagement gearbox. |
| 18:48 | The problem with the dog engagement gearbox though is it is also very very easy to damage them. |
| 18:54 | Particularly if you are shifting a dog engagement gearbox slowly, what happens is you can get the dogs clashing together, this quickly rounds the edges of the teeth on the dogs and basically you're gonna have a gearbox that pops out of gear. |
| 19:07 | So they're not really that suitable for street driven cars. |
| 19:11 | They require a certain amount of brute force in order to drive them, and basically the harder and more aggressively you shift them, the better they last. |
| 19:19 | So yeah we can get shifts that are probably under half the time that you could get with a synchro mesh box. |
| 19:26 | So that's how the synchro mesh box works. |
| 19:29 | One other really key aspect to understand with them is that these little dogs, we'll just look at our photo again, which you can't quite see on my picture here, they actually have what's referred to as a back cut. |
| 19:42 | So the dog is not a vertical square edge, it actually has a little back cut. |
| 19:47 | What I'll do, I'll just draw this on my screen here on the left hand side so we can see. |
| 19:52 | So our drive dog actually has a slight back cut which I'm just exaggerating here. |
| 19:59 | Just draw the entire dog. |
| 20:02 | And once the gear is engaged it's very difficult, it's very difficult for it to pop out because that back cut basically, while we've got engine torque involved, actually locks the dog ring into the gear. |
| 20:16 | So this is important, or the reason I'm labouring on about this, is it is an important aspect when it comes to our flatshifting. |
| 20:23 | With a dog engagement gearbox, we don't need to use the clutch. |
| 20:27 | But what we do need to do is interrupt the engine torque. |
| 20:31 | And we need to interrupt the engine torque just to allow the force on that back cut, the force on those two dog teeth to release, so that we can physically pull the lever through to the next gear. |
| 20:42 | Now if you don't have that, if any of you out there have driven a dog engagement gearbox, once you've actually got the car in gear and you've applied a little bit of load, this is easy to do out on the road or the dyno, you don't even need full power. |
| 20:55 | Essentially it doesn't matter how strong you are, you're probably gonna snap the gear lever before you pull it out of gear. |
| 21:01 | So it's physically impossible to pull that car, to pull that gearbox through to the next gear, what we need to do is actually interrupt the engine torque. |
| 21:09 | So there's a couple of ways we can do that. |
| 21:13 | So first of all we can use something to indicate to the ECU that it's going to need to introduce this torque reduction which can be achieved through a fuel cut, or an ignition cut, or possibly both. |
| 21:30 | And this can be done either with a gear knob on top of our gear lever that is referred to as a strain gauge gear lever. |
| 21:37 | Basically in layman's terms it simply sends a signal to the ECU that is dependant on how hard we're pulling on the lever. |
| 21:45 | So basically once that level, the amount of force that we're applying to the lever exceeds a certain level, it's gonna tell the ECU hey the driver is requesting a shift, the ECU will then momentarily cut fuel or cut spark or maybe both, that reduces the engine torque enough just to allow the gear shift to complete. |
| 22:02 | So it's only a very momentary cut that is required. |
| 22:06 | You can also do this with a micro switch attached to the gear lever system. |
| 22:11 | It's a little bit less elegant, probably only really suited to sequential gearboxes as opposed to H pattern. |
| 22:18 | But it is a way that we can do that. |
| 22:21 | An important aspect when we are dealing with dog engagement gearboxes as well is that they can be either sequential or H pattern. |
| 22:30 | Now particularly if you are using a strain gauge style gear lever, this strain gauge will output a voltage dependent on which way you're pulling the gear lever as well. |
| 22:42 | So particularly for a sequential, this means that it can determine whether the driver's pulling back on the gear lever for an upshift, in which case the ECU needs a torque reduction, or alternatively if you've got an engine fitted with drive by wire throttle, when you're pushing forward on the lever for a downshift, often the ECU can bring in an automatic blip of the throttle to match gears on the downshift. |
| 23:05 | Probably getting a little bit beyond our topic today but important to just note that, if we are using a H pattern gearbox, obviously our upshifts can be both backwards and forwards depending which way we're going through the gearbox, in which case the strain gauge gear lever can no longer determine between upshifts and downshifts, everything would be considered the same. |
| 23:26 | Now the other aspect here is the amount of time that we need to interrupt the engine torque. |
| 23:34 | Essentially all we need to do is interrupt the engine torque momentarily, this will allow the dogs to release, and then we've already got enough force on the lever that it's going to pull it through to the next gear. |
| 23:45 | So really ideally what we wanna do is time our torque reduction, our fuel or our ignition cut for just long enough that it's going to allow the next gear to become fully engaged. |
| 23:57 | And this is where the tricky bit comes in with our flatshifting. |
| 24:01 | There's two ways we can do this. |
| 24:03 | One, and this is the older way, the most common way that we used to see was what's referred to as open loop or timed cut. |
| 24:11 | Here essentially all we're doing is basically introducing a cut for a fixed amount of time from whenever the ECU sees the cut signal. |
| 24:20 | Now this can work OK, the problem is that we're assuming that every shift is going to take the same amount of time. |
| 24:28 | And that's not always the case. |
| 24:30 | Some drivers shift faster than others, some gearboxes shift faster than others. |
| 24:34 | And even within the gearbox some shifts will be completed quicker than others. |
| 24:40 | So if you're using a timed cut, the danger is that if the cut time is too short, you're going to end up reintroducing torque while the two gears are still coming together and this can quickly destroy your dog ring. |
| 24:54 | So the technique that is now used more predominantly in aftermarket ECUs is what's called closed loop gear cut control. |
| 25:02 | And this is where the ECU is actually monitoring and looking at the gearbox position. |
| 25:08 | And essentially what it's doing is applying a cut until it knows that the next gear is active or is engaged and then it will reintroduce engine power. |
| 25:17 | So this means that the cut is only ever as long or as short as it needs to be for the gear to be engaged. |
| 25:25 | The advantage is that you're always going to get the shortest possible cut time. |
| 25:29 | And it's also going to ensure that your gearbox reliability is greatly improved. |
| 25:36 | What we'll do here is we'll just have a quick walkthrough of some of the basics of this system. |
| 25:41 | And what I've got to show you here is in the Motec M150 ECU. |
| 25:47 | This is in a car that's fitted with a Holinger six speed sequential gearbox with the strain gauge gear lever. |
| 25:55 | So let's head across to my laptop screen again. |
| 26:00 | And there is a lot of information in here. |
| 26:02 | So I'll just cover a few of the basic aspects here. |
| 26:05 | And the main one that we're on here at the moment or that we want to deal with here is our gear shift timing. |
| 26:10 | And this tells the ECU how to deal with the shift. |
| 26:15 | Now the way the Motec deals with this is actually quite complex, I'm not gonna get too deeply into this here but what we've got here is our shift timing table. |
| 26:25 | And the one that we're looking at here is our torque reversal. |
| 26:29 | So we can see our torque reversal here, and at the moment we're looking at the main one that we'd be interested in for flatshifting which is our upshift power on. |
| 26:40 | So this is where we are upshifting through the gearbox at full power or at a throttle position that the ECU deems to be full power. |
| 26:48 | And we can see here that our torque reversal, so this is the amount of time that the torque reduction is undertaken, this is in milliseconds, is dependent on the gear that we're going through. |
| 27:00 | So for example the shift cut essentially we're saying here for first into second gear will be 80 milliseconds, from there, 70 milliseconds, and then 60 milliseconds. |
| 27:10 | Now this is the maximum amount of time, the system in the Motec is also closed loop so it's physically looking at the gear barrel position sensor, it knows when the next gear is correctly engaged and it can then reintroduce torque as required. |
| 27:30 | Now when we come down we'll also look at how the torque reduction or torque reversal as Motec put it is set up. |
| 27:38 | So there are a few parameters here on the left hand side that we want to look at here. |
| 27:43 | The first one of these is our gearshift ignition cut calibration. |
| 27:48 | So basically when the ECU asks for this torque reversal, this is what's going to happen, in this case it's going to produce a 100% ignition cut. |
| 27:58 | Now this actually is what a lot of tuners will go to when they're first setting up flatshifting. |
| 28:05 | It may be safe to sort of think, well look if I need torque reduction to allow the dogs to disengage, let's just cut the ignition completely, it's obviously gonna give complete torque reduction, everything's gonna work. |
| 28:18 | Now yes that's absolutely true, that will work but it's actually also not necessary. |
| 28:24 | We don't necessarily need to go with 100% torque reduction. |
| 28:28 | And the example of this is that in the days before the advanced ECUs we've got now, where drivers were running sequential gearboxes, sequential dog engagement gearboxes, when they went to upshift, they wouldn't use the clutch but they also wouldn't back completely off the throttle. |
| 28:47 | What you'd find if you've seen any in car from drivers in the old touring car days, what they would do is just apply a little bit of load to the gear lever, so this is pre loading the gear lever, and then all they'd do is just lift out of the throttle slightly. |
| 28:59 | And often this would only take a 25% to maybe 50% movement of the throttle pedal and that was just enough torque reduction to allow the dogs to disengage, the next gear to be engaged and then they go straight back to full throttle. |
| 29:12 | So we don't actually need to be quite as dramatic with our calibration there, our cut, we don't necessarily need to use 100% cut. |
| 29:20 | The other option we've got here that I've just gone to is our gear shift fuel cut calibration. |
| 29:27 | Motec gives us the option of cutting ignition or fuel, this is a good time to talk about this regardless what ECU you're tuning, and what style of gearbox you are shifting. |
| 29:38 | It's always safest in my personal opinion to use a fuel cut where you can. |
| 29:44 | There are some potentials for problems around using an ignition cut, particularly with engines that are known for having problematic valve trains. |
| 29:53 | This can end up causing fuel and air to explode in the exhaust manifold. |
| 29:57 | And in some instances this can pop an exhaust valve back off its seat due the the pressure spike we see in the exhaust manifold. |
| 30:04 | And if this happens with a hydraulic lifter, the hydraulic lifter can pump up, so it can cause some quite nasty side effects. |
| 30:11 | The fuel cut on the other hand is much safer, much less likely to cause you any dramas. |
| 30:20 | And one of the problem engines that I will mention there is the Nissan SR20 DET, with its rocker style valve actuation, is known to have problems with ignition cut rev limiters and also ignition cut for flatshifting. |
| 30:35 | So that gives you the option there, in the Motec you can use fuel cut or ignition cut or a combination of both. |
| 30:41 | The last aspect that I just wanna look at here while we are on this is we do also have the option of a shift ignition cut timing retard. |
| 30:49 | And hopefully you'll remember from the datalog that I showed you from the Mitsubishi Evo 9, we were using a lot of ignition retard and this is another feature that we can incorporate here for flatshifting. |
| 31:01 | We're using a fuel or ignition cut to actually provide the instantaneous torque reduction. |
| 31:08 | But what we can find is that when that ignition cut or fuel cut or both is then reintroduced we've got this sudden hit of engine torque that comes back in. |
| 31:17 | And this can upset a car that is limited in terms of traction and it can also be quite hard on the drive train. |
| 31:24 | So by incorporating an ignition retard as well, what we're doing here is we're using the cut to instigate the shift and then we're using a certain amount of retard to reduce engine torque and we can ramp that ignition timing back up to our normal values to smooth the reintroduction of torque and smooth over the shift, make the shift as smooth and as seamless as we possibly can. |
| 31:49 | Alright so we've dealt there with our dog engagement gearbox and how we can set up flatshifting, what we're looking for there. |
| 31:56 | We'll also now talk about synchro mesh boxes. |
| 32:00 | So as we've talked about there, synchro mesh boxes, we're not going to be able to shift these without using the clutch. |
| 32:07 | I should say we can shift them without using the clutch but it's not gonna be the fastest way and it's also gonna end up really heavily beating up on your gearbox. |
| 32:16 | So you're gonna wanna use the clutch and this instigates an obvious problem, because if we are driving at full throttle in a gear and we punch the clutch, as I've mentioned earlier in the webinar, we're just gonna end up sitting up on the rev limiter. |
| 32:29 | So we don't want that happening. |
| 32:30 | This normally requires a different approach and my own personal one which we'll have a look at in our demonstration shortly, is that I use a secondary rev limiter. |
| 32:40 | So essentially what this does is it holds the engine on a secondary rev limit while our clutch is disengaged and we're going through the gearbox. |
| 32:50 | Again there are a couple of ways that we can do this. |
| 32:54 | We can do it using a clutch switch, we can also do it using a strain gauge. |
| 33:02 | Generally the most common way we would do this with a synchro mesh gearbox though is simply with a clutch switch. |
| 33:09 | Now the two ways we can instigate the cut here, we can do it timed as we've already talked about, all of the exact same problems exist with a synchro mesh box in terms of if we are using a timed cut then we need to make sure that the shift is completed before torque is reintroduced. |
| 33:29 | Problems here of course, one driver may shift faster or slower than the other, some shifts in the gearbox, particularly a cross gate shift in an H pattern, is gonna take longer than a simple shift where we are just going backwards and forwards within a single gate. |
| 33:44 | So it's hard to be precise if you are using a timed shift, and it also really means that we're going to have to take the worst possible scenario and use a shift cut time that is long enough to cope with your slowest shift, and you're obviously going to be giving time away there on the faster shifts. |
| 34:02 | So in my own personal preference with that respect is that I tend to trigger a gear shift cut or a flatshift on a synchro mesh box using a clutch switch. |
| 34:13 | And the reason for this, as we've already talked about, we are using the clutch for the shift, and this kind of gives us a semi closed loop approach. |
| 34:22 | The cut is only going to be active while the driver's clutch pedal is down, and obviously if we are shifting fast, we're only using the clutch until the next gear is engaged. |
| 34:33 | So it's pretty accurate way of doing this, in my own experience this has given me the best possible results. |
| 34:41 | So what we'll do here is we're going to go for a quick walkthrough of this system in the Link G4 Plus software. |
| 34:48 | So let's head across to my laptop screen for a moment. |
| 34:51 | And what we'll do, first of all is we'll have a quick look at our setup here. |
| 34:55 | We've got a digital input which is just a simple switch setup. |
| 34:59 | We've called this switch a clutch switch. |
| 35:03 | No magic there. |
| 35:06 | And we've set it up so that the ECU is correctly identifying when the clutch is engaged or disengaged. |
| 35:12 | Now there's a subtle aspect that's really important here and I see this wrong quite frequently. |
| 35:18 | And in fact the position of the clutch switch in our 350z is a perfect example of this. |
| 35:24 | If we want to get a really effective clutch switch for the purposes of flatshifting it's important that that clutch switch essentially activates right at the point where the clutch first disengages. |
| 35:36 | It's quite common to have a lot of late model cars now where they will incorporate a clutch switch but often this clutch switch is right at the very bottom of the pedal travel. |
| 35:46 | Now while that will work for our purposes for flatshifting, it's not gonna be ideal. |
| 35:51 | And the reason for this is if you think about what's happening, we're at full power, we start to push the clutch pedal down, and we start to disengage the clutch, the clutch is physically disengaged. |
| 36:03 | We're still nowhere near the bottom of the clutch pedal's travel so we're nowhere near that clutch switch. |
| 36:08 | So as soon as the clutch is disengaged the engine RPM is free to increase, we continue moving our foot pedal down, we finally hit the clutch switch, the ECU brings in its secondary rev limit or its cut or whatever we're using, and clamps down. |
| 36:23 | So we've got this big ugly flare in our engine RPM. |
| 36:26 | Then the exact opposite scenario happens when we've got our gear engaged and we go to release the clutch pedal. |
| 36:33 | As soon as we start moving off the floor, our clutch switch disengages, so again our engine RPM is allowed to flare up before we get to the point where our clutch is physically re engaged. |
| 36:45 | And this can give a situation particularly if the flare is significant where we can end up with a really ugly shift that feels horrible and when we're in low traction situations it can actually end up causing wheel spin. |
| 36:56 | It's at least not going to be great for our clutch or our gearbox life either so if we are setting up a clutch switch, particularly for flatshifting, we want to be very sure that it is set up so it operates right at the point where the clutch first disengages. |
| 37:12 | And just while we're on that topic, this is completely the opposite of what we want if we're using a clutch switch for launch control. |
| 37:19 | So the two are at odds. |
| 37:21 | If you wanna do both with clutch switches, you're actually best to install dual clutch switches, one at the top of the pedal travel, and one at the bottom. |
| 37:27 | Alright sorry for labouring on about that but it is really important. |
| 37:31 | It's a really common area to go wrong. |
| 37:34 | So we've got our clutch switch set up, let's actually go online with our ECU. |
| 37:39 | There's a couple of aspects here basically just around what sort of signal the ECU is seeing. |
| 37:45 | Whether it's gonna go to ground when our clutch is active or whether the signal's gonna go high when the clutch is active. |
| 37:51 | What we'll do is we'll just bring up our run time values here. |
| 37:54 | And on the right hand side we've got our digital inputs and what we can see here is our digital input six is our clutch switch. |
| 38:02 | You can see that's currently saying off, push the clutch down, and we can see that our clutch is now active. |
| 38:07 | So we know that our input is working. |
| 38:10 | Now there are a variety of ways of setting this up. |
| 38:14 | And really a lot of this as I've kind of touched on, comes down to your own personal preference. |
| 38:18 | You can, through the link G4 Plus, use a timed cut based on your clutch switch. |
| 38:24 | And I personally prefer to use a really simple method that I've found incredibly effective and really easy to adjust. |
| 38:32 | And that's simply using a secondary rev limiter. |
| 38:35 | So let's have a quick look at how I've got that set up. |
| 38:38 | What we'll do is we'll head across to our general purpose limiters and for this purpose I'm using GP limit two. |
| 38:45 | This gives you the ability to select the type of limit mode that's going to be used in this case we are using ignition cut, probably a no no for a lot of engines as I've already touched on. |
| 38:56 | It's important as well with the Link G4 Plus it gives these options of start up, lock outs and delays, we don't want any of those active. |
| 39:03 | Alright so that basically just enables the function, now we need to have a look at how I've got that set up. |
| 39:09 | We'll go to GP RPM limit two. |
| 39:11 | And on face value this might be a little bit hard to understand. |
| 39:14 | We've got a three dimensional table, on the horizontal axis here we've got our clutch switch position. |
| 39:20 | Just a simple zero or one, active or non active. |
| 39:23 | And we'll see we've currently got a little yellow cross here that shows us where we are. |
| 39:28 | I'll just push the clutch and we see we jump from one column to the next. |
| 39:31 | Then we've got our throttle position. |
| 39:33 | Now on face value this might be a little bit hard to understand why we would need throttle position on that axis. |
| 39:40 | And the problem is that if you want to use flatshifting for a circuit car, what you're going to also be doing is often heel and toeing on the downshift, so what this means is that while we are braking using the toe of our right foot, we're also going to be blipping the throttle on the downshift using our heel in order to match revs on the downshift. |
| 40:01 | This is important if you wanna avoid compression locking your car. |
| 40:04 | The problem is if we set this up in a really basic setup where we're ignoring throttle position and we're only simply looking at whether the clutch switch is active or engaged, engaged or disengaged I should say, then the problem is that the secondary rev limiter is going to be active when we're trying to blip the throttle with our heel and we're going to only be able to rev the engine up or match revs up to whatever our secondary RPM limit is. |
| 40:32 | And that's going to be problematic because generally we're going to be wanting to rev well above that. |
| 40:37 | So what I've done there is I've incorporated throttle position, and we can see that essentially I'm only using this flatshift control where we've deemed to be above 80% throttle. |
| 40:48 | So the numbers in this three dimensional table are our RPM limits. |
| 40:53 | I've got everything there in most of the tables set to 10000 RPM. |
| 40:58 | Don't think that I'm gonna try and rev our 350z out to 10000 RPM, the way that rev limits work in the Link G4 Plus ECU is that the ECU will always use the lowest active RPM limit. |
| 41:10 | Which in this case will be our main engine RPM limit of 6500. |
| 41:15 | What you can see though is I've set that above 80% throttle when our clutch is active, we're going to be limiting to 5000 RPM. |
| 41:25 | So the principle behind this is a little bit, how would I put it, a little bit over bearing in terms of we're always assuming that we are gonna be shifting from maximum RPM, so from our rev limit. |
| 41:40 | In this case around about 6500 RPM. |
| 41:42 | What we wanna do is basically understand that when we shift from 6500 RPM, the RPM is gonna drop when we select the next highest gear. |
| 41:52 | And we want to set our rev limit somewhere around about there. |
| 41:56 | Now it's not possible to be absolute with this. |
| 41:59 | Because obviously the gear ratios or the split between gear ratios differs as we go through the gearbox. |
| 42:05 | So we're not always looking at the same RPM drop. |
| 42:08 | But that's OK with the synchro mesh box, we also don't need to be absolutely perfect. |
| 42:13 | All we're trying to do here is choose and RPM limit that's approximately where the engine's gonna end up once it's selected the next gear. |
| 42:20 | So that's as simple as our setup is there. |
| 42:24 | Alright so let me just head back across to my notes for a second here. |
| 42:32 | So there are a few considerations that we'll just reiterate here, and then we're gonna go into a practical demonstration. |
| 42:40 | I'll mention here that once we go through our practical demonstration, we are gonna be going into questions and answers so if you do have any questions, this is a pretty good time to start asking them in the comments. |
| 42:50 | So the considerations first of all we'll deal with for a synchro mesh box like our 350z. |
| 42:56 | As I've just said, we wanna try and target the RPM, if we are gonna be using a secondary rev limiter at least, we wanna target the RPM for the next gear, as I've just touched on, this doesn't need to be too accurate, we've got a fair amount of wiggle room in there. |
| 43:10 | Again forcing the shift is going to end up wearing your synchros. |
| 43:15 | It's going to end up with you rebuilding your gearbox so just because you've got flatshift set up, doesn't mean that you're Fernando Alonso out there being able to pull through the gears in no time. |
| 43:27 | The harder you pull on the gear lever, the more damage you're gonna end up doing to your synchros. |
| 43:31 | So a relatively smooth and controlled shift is really the order of the day if you don't wanna be rebuilding your gearbox after every race meeting. |
| 43:38 | It's also, if you are gonna be using timed cut, it's important to remember that the cut times are going to need to be quite long with a synchro mesh box compared to a dog engagement gearbox. |
| 43:52 | It's common for the cut times or the shift times in a synchro mesh box to be 100 plus milliseconds, maybe as much as 200 milliseconds, obviously this is gonna depend on the gearbox and the driver. |
| 44:04 | On the other hand with a dog box, if you are using a timed cut, and the cut is too long, so this is in an instance where you don't have the ability to use a closed loop system. |
| 44:18 | If the cut time is too long, then the gearshift is going to be jerky So essentially you're gonna get to a situation where the next gear is selected, it's been selected and the power is then reintroduced and what happens then is that the dogs will be driven against each other and this tends to be quite harsh through the gearbox. |
| 44:39 | If you have your cut timed too short of course the problem there is that you can end up very quickly destroying your dogs. |
| 44:50 | What we'll do actually as well, I'll just quickly show you some data. |
| 44:53 | If we jump across to my laptop screen again. |
| 44:57 | And this is some data from a Motec M150 ECU using the shift strategy that we just looked at. |
| 45:07 | So at the top here we've got our engine speed and we've got our throttle position versus our throttle pedal. |
| 45:14 | This particular engine, drive by wire, so I just wanna demonstrate to you there how we can use the ECU for that downshift throttle blip. |
| 45:20 | Again getting a little bit beyond our topic today but just so you can see what's going on here. |
| 45:26 | So here we've got our shift request. |
| 45:28 | This is actually a paddle shift system but it's essentially exactly the same inputs to the ECU as if we were using a gear lever so let's just zoom in on a little bit of data here. |
| 45:40 | So through this section here the driver is at full throttle and is upshifting so you can see the driver's foot pedal and the throttle body position are both at 100%. |
| 45:54 | And then we can see here, this is where the driver is essentially pulling back on the gear lever, requesting the upshift. |
| 46:00 | So what's happening here is that the ECU is instigating an ignition cut. |
| 46:04 | We can see that occurring here, this is our gearshift ignition cut. |
| 46:07 | So our ignition cut begins at 80% and then as the shift is completed, that cut is then removed slowly, so this again reintroduces our engine torque nice and slowly. |
| 46:21 | And we can see here in our logging, the ignition cut count, so every time an ignition cut is used, this number will increment. |
| 46:31 | So we can see through the area of the gearshift the ignition cut is constantly incrementing. |
| 46:38 | The other point here is that the Motec ECU is closed loop control. |
| 46:41 | So down the bottom of this data I've got our gearbox position voltage. |
| 46:46 | So this is the voltage from our gearbox position sensor. |
| 46:48 | And the cut actually is used, if I just zoom in. |
| 46:53 | So our cut here which is at 80%, our maximum cut, will only stay there until the next gear is deemed to be selected, which is where we get up to this voltage around about here, and then we start seeing that cut being removed. |
| 47:10 | So this is the advantage of a modern system that uses closed loop control. |
| 47:14 | It's applying our maximum amount of cut right up to the point where the next gear is deemed to be correctly selected. |
| 47:21 | Now let's also move along here and we'll just have a quick look at a downshift. |
| 47:25 | So this is where the driver has now backed off and is wanting to downshift into a lower gear. |
| 47:32 | So you can see here the throttle position so orange is the driver's foot pedal position. |
| 47:36 | So you can see that the driver is completely off the throttle at this point. |
| 47:39 | The green is the throttle body position. |
| 47:42 | You can see here the driver has shifted down, has pulled the down paddle, or in other words pushed forward on the sequential lever and that has used a throttle blip, in this case the throttle has been blipped up to about 62% in order to match revs to the lower gear. |
| 48:02 | Likewise we can also see the gearbox voltage moving. |
| 48:06 | Alright so what we're going to do now is we're gonna start up our 350z. |
| 48:14 | Are we? We are. |
| 48:17 | That was really close, looks like we might need to put our battery on charge there is we don't wanna have problems with our 350z not starting for our webinar, that would've been super awkward. |
| 48:28 | What we're gonna do here is we're gonna go through a quick demonstration on our dyno here of how this all works and what actually happens so we'll be able to log exactly what's going on inside the ECU and see the results of it. |
| 48:41 | Now on a rolling road dyno like our Mainline dyno, and you can also do this on an inertia dyno, you can to a degree test flatshifting. |
| 48:49 | You can also to a degree test gear shifting if you're looking at a sequential or paddle shifting gearbox. |
| 48:56 | It's still not quite the same, it doesn't quite replicate real world conditions. |
| 48:59 | So it's always something which we need to validate and really prove out on the road or the racetrack via datalogging. |
| 49:07 | But for today's demonstration it's gonna do absolutely fine. |
| 49:10 | So we've already gone through the setup in our 350z in our G4 Plus ECU. |
| 49:15 | We know that our clutch switch isn't quite ideal and I'm hoping that I'm gonna be able to demonstrate that to you as a potential problem to look for in our data. |
| 49:23 | So we've just got our datalogger recording. |
| 49:26 | What I'm gonna do here is I'm gonna go through a shift from third gear into fourth gear. |
| 49:33 | Actually I won't turn that fan on because everything is quite cold. |
| 49:38 | So we're gonna actually do a dyno run to replicate this. |
| 49:45 | And hopefully everything's gonna work quite well. |
| 49:49 | So what I'm gonna do is I'm just gonna be using the shift lights here on the dash to just indicate when I need to pull the next gear. |
| 49:57 | I'm gonna stay flat on the throttle and we're simply gonna be punching that clutch. |
| 50:03 | I'm gonna do it reasonably quickly but not quite at race pace. |
| 50:07 | Hopefully so it's going to really show that potential problem that I was talking about with the position of our clutch switch. |
| 50:13 | Alright so let's head across to the dyno screen. |
| 50:16 | It's gonna be an interesting look to the dyno plot but let's just watch that during our run here. |
| 50:37 | Alright. |
| 50:41 | So if you are gonna be using a dyno to do this it is pretty important to make sure that you've got your ramp, start, and finish speeds set up to actually suit the road speed range that the car is actually gonna be going through. |
| 50:57 | But that's all worked quite nicely. |
| 50:59 | We can see the big dip in our power obviously where I punched the clutch there and changed into the next gear. |
| 51:05 | Let's head across to our laptop and we'll have a look at our logging here and I'll just zoom in a little bit so we've got a better idea of exactly what's going on here. |
| 51:17 | OK so yeah we can see a little bit of it. |
| 51:20 | What I'll do is actually start by bringing up a few more parameters that, we'll get rid of a couple of parameters that we don't need to look at, and we'll bring up another couple of parameters that we probably do wanna look at. |
| 51:33 | Let's just get rid of all of that there, that'll be fine. |
| 51:35 | So we've got our throttle position, which is gonna be important. |
| 51:38 | The other thing I want to bring up here is our digital input six state I think it is, no. |
| 51:47 | I know what I need sorry, clutch should bring that up. |
| 51:55 | Clutch status, that should work. |
| 51:57 | OK so we're gonna actually be able to see exactly where I am punching the clutch. |
| 52:03 | That's not working at all because it isn't in there. |
| 52:06 | I think we've probably got a problem there with the logging speed. |
| 52:09 | Alright you're gonna have to trust me here. |
| 52:12 | Let's have a look and I'll see if I can talk through what's actually going on though because this is one of the common problems we will see. |
| 52:19 | Alright so if we look at our RPM here, this is where the shift was completed. |
| 52:26 | And we can see here exactly what I was talking about, we've got this blip in our RPM, this jump in our RPM where the clutch switch doesn't, the clutch disengages but we haven't actually got the clutch switch signal coming into the ECU, the ECU isn't seeing that clutch switch to actually bring in our rev limit. |
| 52:49 | So this is where we're gonna end up with that flare in our RPM. |
| 52:54 | And as I've said, we also can end up with a flare at the other point here. |
| 52:59 | So that's what we wanna watch for and it should be pretty clear if your clutch switch isn't quite activating at the right time. |
| 53:06 | Obviously our set of data right below that we've got our throttle position, we can see that I've stayed at full throttle right through this. |
| 53:15 | The other aspect, that seeing as we've got this data here, I'll just bring up, that is important to note here is if you are looking at your air fuel ratio during a flatshift, you're going to see it spike lean. |
| 53:28 | Which is exactly what we've got here. |
| 53:31 | Remember we were instigating an ignition cut. |
| 53:33 | And when we do this, we're ending up with an unburned cylinder full of fuel and air going through out into the exhaust. |
| 53:41 | And it's actually the oxygen, the unburned oxygen that the O2 sensor or lambda sensor is reading. |
| 53:48 | So we're going to end up with a false lean reading. |
| 53:51 | Don't worry about that, it's not real, what we wanna do is have a look at the data once the next gear has been selected and everything has settled down. |
| 54:00 | Alright so hopefully that brief test there gives you some indication of what you should be looking for. |
| 54:07 | I should also mention actually if we just jump back into our data here, and I'll just have a quick look, how you can use your data logging to check your shift points or your RPM limits if you are using that technique. |
| 54:21 | What we wanna do is have a look at the sort of RPM that we're getting down to in our next gear. |
| 54:27 | Now we can see that we are sitting at about 5000 RPM in fourth gear there, when we shift from third into fourth. |
| 54:34 | As I've said, it's gonna vary depending, the RPM drop for the next gear is going to vary depending on what gear you're going in and your ratio split, so you're not gonna be able to be perfect here. |
| 54:45 | But with a synchro mesh box and that technique, it's not critical. |
| 54:48 | Alright I'll head across and we'll have a look at our questions. |
| 54:50 | If you do have any more, please ask those now. |
| 54:59 | Comet has asked, how much does a single and dual disk matter? So talking about the clutch there. |
| 55:06 | Really the only important aspect there in terms of the clutch is that it can handle the torque. |
| 55:12 | Particularly if you're talking about a dog engagement gearbox, the clutch really doesn't become a factor once we've got the car out of, moving initially in first gear, after that we're not gonna need to use the clutch for our upshift. |
| 55:26 | Still common for a lot of drivers to use the clutch for the downshift. |
| 55:30 | So really it does come down to just torque handling and this really isn't a consideration, this is a consideration irrespective of whether we're flatshifting or not. |
| 55:40 | One thing I will mention there though is that particularly if we are looking at instigating a throttle blip to match revs on a downshift, even if we're doing this manually, it can be helpful to go through to as much trouble as we can to reduce the inertia or moment of inertia of any of the components on the engine. |
| 56:01 | Basically the flywheel's one of those big ones there. |
| 56:04 | If we can fit a lightweight flywheel it's gonna be lighter, it's going to have a lower moment of inertia, this allows the engine to actually accelerate and decelerate quicker. |
| 56:13 | Makes it quicker for us to match revs in the next gear. |
| 56:16 | When we blip the throttle, the engine can physically change RPM quicker. |
| 56:21 | Shaun has asked, what's the best method for adding a momentary cut to engine ignition fuel or both? So I've sort of talked about this, I'll go into it in a little bit more detail. |
| 56:30 | It really depends on what you are trying to achieve. |
| 56:34 | The key is to understand that in some engines an ignition cut can be potentially dangerous. |
| 56:41 | As I sort of mentioned during the body of the webinar. |
| 56:43 | That's the part that you do need to be careful of. |
| 56:45 | So if you've got an engine that has a known weak valve train, I would steer clear at all costs of an ignition cut, definitely wanna go with fuel and that's going to be the safest anyway. |
| 56:59 | In a turbocharged application, particularly the data from our drag car that we looked at, I tend to favour an ignition cut there, albeit we've got an engine with a valve train that is built to handle what we're trying to throw at it. |
| 57:13 | The advantage here is that because we are passing unburned fuel and air into the exhaust system, we're also matching this with quite a lot of ignition retard. |
| 57:21 | This will tend to ignite that unburned fuel and air in the exhaust, and it's sort of a momentary anti lag I guess you could call it. |
| 57:28 | The exploding fuel and air charge can help drive the turbocharger and again just go that little way to reducing our lag on a gearshift. |
| 57:36 | More relevant or important, the bigger your turbocharger is and the slower it is to respond. |
| 57:44 | Shaun's also asked, can you set the cut time via the strain gauge engagement if you don't have gearbox sensors? So yeah this is kind of the open loop technique. |
| 57:53 | So if you don't have a gearbox position sensor or you don't have an ECU that can perform closed loop cut where it's actually looking for the next gear to be engaged before removing the cut timed is your only option. |
| 58:06 | and I've really reiterated already the potential pitfalls that you can come into if you are using a timed cut. |
| 58:13 | The key point there is that this is different between a dog engagement gearbox and a synchro mesh gearbox. |
| 58:24 | With the synchro mesh as we've already discussed, we're gonna need to use the clutch. |
| 58:29 | So we can use timed based off the point where the clutch switch is first engaged. |
| 58:34 | But we can also kind of get that semi closed loop operation essentially where the cut is active the entire time that the clutch switch is active. |
| 58:42 | So that's something to keep in mind there. |
| 58:45 | If you are using a strain gauge gear lever then you're going to need to use a timed cut and really what you're going to need to do there is base your cut time around the longest shift. |
| 58:57 | Always pays to be a little bit conservative here. |
| 58:59 | A longer cut is never going to hurt anything, a shorter cut definitely has the potential to damage your gearbox. |
| 59:08 | Comet has asked, in your MAP or VE I've noticed dead zones between manual shifting. |
| 59:16 | Not 100% sure exactly what you're referring to there so maybe if you wanna clarify it in the questions and if I can I will clear that up for you. |
| 59:26 | Nick has asked, what issues could I run into when applying this to a track car that has sequential fire ignition ECU? There's not really any potential problems, other than those that we've already talked about around cut time. |
| 59:42 | So the problems for a track car would be around the ability to match revs on the downshift which we've already discussed. |
| 59:52 | Regardless whether you're sequential or batch fire, when you are performing a fuel cut, so really you're talking there sorry you're actually talking about ignition. |
| 01:00:02 | So regardless whether you're sequential ignition or you are a waste spark or even a distributor style ignition system, the ECU still has the ability to cut spark. |
| 01:00:14 | So yeah it's still quite possible to get that to work, no real issues that I can see there. |
| 01:00:21 | Emanuel has asked does the rev limit cut slow the engine enough to flatshift to synchronise gearbox speed? So yes it's going to, when you're using a rev limit style which we looked at there. |
| 01:00:36 | So the rev limit is based on, or the amount of cut is going to be based on where the current engine RPM is relative to the RPM that you've got in that cut table, the limit tables. |
| 01:00:50 | So in our case, we're shifting from about 6500 RPM, our secondary rev limit was set to 5000 RPM. |
| 01:00:58 | So essentially we're above our cut point, there's a little bit more to it, but for the simple example here, we'll assume that any time we're above 5000 RPM, a 100% ignition cut is going to be applied. |
| 01:01:10 | So this is going to allow the engine RPM to drop down to that point as quickly as it physically can. |
| 01:01:16 | Still got all of those things to consider around the inertia of the components in the engine. |
| 01:01:21 | So the engine RPM can't physically change instantly. |
| 01:01:23 | And certainly if you're really lightening quick on your shift, it is still possible that you're going to be able to engage that next gear before the engine RPM has actually matched but that's just something that no amount of electronics is going to be able to get around. |
| 01:01:39 | Alright that looks like it's taken us to the end of our questions there. |
| 01:01:43 | So if anyone has further questions that crop up after this webinar has aired, please ask those in the forum and I'll be happy to answer them there. |
| 01:01:53 | Thanks to everyone for joining us, I'll look forward to seeing you all next time. |


