190 | Simple HP Tuners Changes
Summary
While the primary reason for using the HP Tuners software is to allow the fuel and ignition to be optimised, there’s a range of other simple operations that can be performed such as removing VATS, changing the speedo calibration and removing CELs. In this webinar we’ll discuss some of the common changes you may want to make.
| 00:00 | - Hey guys, Andre from High Performance Academy, welcome along to another one of our tuning webinars. |
| 00:05 | Now this time we're going to be focusing on the HP Tuners software. |
| 00:09 | And it's a software package that we've used extensively in both our webinars as well as our worked examples in our practical reflash tuning course. |
| 00:18 | However we're not gonna be focusing on the heavy lifting side of HP Tuners here, the actual tuning side of things. |
| 00:25 | Instead what we're going to be looking at is some of the simpler functions that the HP Tuners software is still very very powerful at achieving. |
| 00:35 | So we're talking here about things such as changing our gear ratios based on a different final drive, different wheel and tyre combinations, looking at our diagnostic functions, checking and clearing diagnostic trouble codes and those sorts of things. |
| 00:49 | So these are things that even if you are taking your car along to a professional engine tuner and you're having them do the hard work of actually tuning the fuel, the ignition, et cetera, then as a home enthusiast, these are still functions that you may want to familiarise yourself with so you can get the most out of that HP Tuners package. |
| 01:12 | As usual we are going to be having a question and answer session at the end of the lesson. |
| 01:18 | This lesson is probably going to be a little bit shorter than our normal format so I would urge you if you do have any questions about what I'm talking about during the webinar, or anything generally related to the topic, please get in there pretty quick and ask those in the comments, the guys will transfer those through to me and we'll answer those at the end. |
| 01:38 | Alright so one of the first things we're going to talk about here is VATS which is essentially GM lingo, I'm not gonna be focusing solely on GM I'll just mention here, but VATS in this case is GM lingo for their security system. |
| 01:55 | Now the reason this is important is obviously the LS series of V8 engines in particular is incredibly popular for engine swaps. |
| 02:05 | Now there are a variety of options when you are fitting a GM LS whatever into a kit car or another donor chassis, you can of course go with an aftermarket standalone ECU but given the power of the factory ECU, and the cheap availability of aftermarket harnesses designed with the hot rodder in mind, this is still an incredibly cost effective way of getting your engine up and running in no time. |
| 02:32 | Probably fair to say it's a cheaper alternative to an aftermarket standalone and it's certainly going to cut down on your tuning time, particularly if you've got a relatively basic engine or you're only looking at simple modifications. |
| 02:45 | So the problem with this is if you are looking at an engine swap, the VATS system will prevent you from getting the engine up and running. |
| 02:52 | Basically the immobiliser system if you want to look at it like that, will prevent the engine from starting. |
| 02:59 | OK so what we can do is simply disable this. |
| 03:03 | So let's head across to my laptop screen. |
| 03:05 | Obviously I'm not gonna be able to deal here with every single possible engine that HP Tuners can tune or can operate, we're looking here at our 2006 VE SS Commodore. |
| 03:20 | So in this case we need to go across to our OS or operating system icon here in our tool bar and this brings up a bunch of information here, a bunch of options, and what we're looking at here is our VATS patch one and VATs patch two. |
| 03:35 | You can see at the moment this is a relatively stock calibration, and in this case because we are operating in the factory vehicle, these are both set to enabled. |
| 03:44 | Now if we scroll over or mouse over here, what we end up with is down the bottom a little description of what this will do. |
| 03:51 | So essentially as you can see it says to disable select disable option and then you need to perform a rewrite entire. |
| 03:58 | So it's important to just differentiate there, you need to use the write entire function as opposed to just the normal way you would write if you were performing a fuel or ignition calibration change. |
| 04:11 | That can be achieved by clicking on the little write vehicle icon here. |
| 04:15 | I'll bring that up, I'm not actually going to perform a write, but you can see that at the moment, the option for writing the E38 ECM that we're using here is write calibration. |
| 04:25 | So this is typical and generally will take around about maybe 35, 45 seconds, or there abouts. |
| 04:31 | If we click on that drop down menu, we need to here click on write entire. |
| 04:36 | So we'll close that down because we aren't going to be writing that today. |
| 04:39 | Now that's not the only place you will find that VATS option though, so it really does depend on the particular generation of ECM that you are tuning. |
| 04:50 | Another place that you may find that is under the system, dunno why I drew it like that, under the little system drop down icon there, and you'll find that under the general tab. |
| 05:01 | So obviously not available here in our particular example as we've already seen, it is located in the OS tab. |
| 05:09 | So pretty simple, and that will then allow you to get your engine up and running if you are doing an engine transplant. |
| 05:17 | Probably one of the next most common modifications that will be made is a situation where you've either fitted a set of wheels and tyres with a vastly different rolling diameter to stock, or potentially you've swapped to a different final drive. |
| 05:36 | So there's a whole bunch of repercussions or implications on that. |
| 05:39 | Particularly to do obviously with the accuracy of the speedo, but also we are basing our shift points for our automatic transmission around speed so we wanna have all of that accurate. |
| 05:52 | So we'll just close down this little window at the moment, we can see that we've got a speedo tab here. |
| 05:58 | We can click on this and we've got, at the moment we are on our calibration tab here. |
| 06:04 | We've got all of the information here in terms of our gear ratio and tyre size and also our sensor calibration over here. |
| 06:14 | However HP Tuners makes this even easier because if we click on the edit menu, and we come down, we'll see that there is an option here for gear tyre wizard, let's click on that and we can simply enter the new diameter of our tyres. |
| 06:31 | So in this case we can see that the current or stock value is 26.22 We can enter our new value, also we've got our final drive ratio, you can see the stock there is 2.92 Now if we click on auto scale which the little radio button for auto scale is currently active, then what we can end up doing is basically adjusting all of these parameters automatically. |
| 06:56 | So you can see that down below this we've got little tick boxes for adjust speedo calibration as well as to scale the transmission parameter. |
| 07:03 | So this makes it really easy because all of that heavy lifting is done for us in the background. |
| 07:09 | However if you want to make a smaller change here you can, or a simpler change, you can select manual change, manual scale and then you can simply enter a multiplier and that will automatically make those adjustments for you. |
| 07:23 | So should be relatively quick and easy to get your speedo reading correctly for those sorts of common changes or common modifications that you're going to be making. |
| 07:34 | Alright the next aspect we're going to look at here, we're going to click back into our system drop down menu, and you can see that the next tab across from general is our fans, we're gonna click on that, again here our options are going to depend on the particular generation of ECM that we are tuning. |
| 07:53 | Some are relatively simple where there may be one or two stages of fan that are simply switched on at a particular engine coolant temperature. |
| 08:02 | Or in our case we have a pulse width modulated output. |
| 08:07 | So if we click here on our desired percent versus engine coolant temperature, we'll just click on that and open up, we've got a two dimensional table here, and we can see we've got our engine coolant temperature on the horizontal axis and essentially the numbers here are our fan duty cycle. |
| 08:24 | Now the interesting thing to take away from this is essentially the fans really aren't fully on until we're over about 103 degrees centigrade, I apologise to those of you out there working in fahrenheit, but for today we are working in degrees C. |
| 08:40 | So that's getting pretty hot and this is quite common with a factory engine. |
| 08:46 | We see that the factory calibration, the factory engineers like to get the engine running quite hot. |
| 08:52 | And there are some advantages to doing so in terms of fuel economy and emissions. |
| 08:57 | However from our perspective, basically anything that raises the engine operating temperature can in a performance application, make the engine also a little bit more prone to suffering from detonation. |
| 09:08 | We don't really want that. |
| 09:10 | So it's always a good idea if we just knock this down a little bit. |
| 09:12 | And I might like to have my fans switched basically fully on around about 95 degrees centigrade. |
| 09:20 | Now the caveat that I'll add in here is that the fans can't really do too much if you've got a very high temperature thermostat fitted. |
| 09:30 | So generally this would be something that we could incorporate or have a little bit more control over if we are fitting also a lower thermostat, a lower temperature thermostat to our cooling system. |
| 09:41 | So this will allow us to basically set up the engine to run generally at a slightly lower temperature. |
| 09:49 | Now the sort of gains that we're likely to see from this are likely to be quite minor but just worth mentioning that you do have the control there and certainly if you've got an engine that is very prone to suffering from detonation, then that's a viable aspect that you might want to be looking at. |
| 10:08 | Alright so there are a few other things we can do here but I'm really just focusing on the key things and really hopefully for those of you who are maybe also just getting started out with HP Tuners, the aim is to open your eyes that there is a little bit more to it than just tuning the fuel and ignition. |
| 10:27 | In particular, although I certainly wouldn't say that this is simple options, we'll just have a really quick look here, we also have the ability to completely control our automatic transmission. |
| 10:37 | So if you are running a six speed automatic transmission, then you've got the ability to control all of the shift scheduling, the shift pressures, the shift timing, basically every single aspect of your automatic transmission control. |
| 10:53 | This isn't the aim of the webinar here today and as I've said, this is far from simple, it's a pretty complex task on its own. |
| 11:00 | What I do want to just mention is that if you are careful with these values and the changes you are making, there are some really massive improvements that you can make to the performance of your engine. |
| 11:13 | Now I'll give you a really quick example here, a number of years ago we developed basically exactly the same vehicle that I'm sitting in right now as a project for my old workshop and at the end of that project we had basically fitted bolt ons to the engine, and a large cam, was still naturally aspirated, and we ended up with it producing around about 420 kilowatts at the flywheel. |
| 11:35 | We basically validated the performance of that engine at our local drag strip. |
| 11:40 | And one of the really interesting aspects with it was when it was very very standard, we took it to the drag strip and I think it had an air filter and that we about it. |
| 11:52 | And we were running somewhere in the region of about 14.1 second quarter miles. |
| 11:56 | Obviously with such simple modifications to the engine, I wasn't able to do anything to improve the engine performance while we were at the drag strip. |
| 12:04 | So instead because I'm still competitive, I wanted to go faster than 14.1, I looked at increasing the shift speed or sharpening up the shift performance, and the result of this was over the course of about five or six runs, making small iterative changes to the shift speeds and shift points. |
| 12:21 | I managed to get that 14.1 down to about a 13.3 So we're talking about almost a full second without making any more power. |
| 12:29 | So just let that sink in and understand that these automatic transmissions can give you a huge improvement in performance. |
| 12:37 | I will also say they need to be treated with a huge amount of care because otherwise you can end up creating a very expensive basket case that's gonna cost you a lot of money to get repaired. |
| 12:47 | Alright we'll get back onto our core topic though. |
| 12:50 | We've looked at our VCM editor software there and some of those basic aspects inside of the editor. |
| 12:56 | What we're going to do now is switch over to our VCM scanner software and understand that while our scanner software gives us a lot of control or a lot of ability to scan or data log and find out exactly what's happening while our engine is running and that's so essential when we are reflashing any late model vehicle. |
| 13:17 | What it also does is it gives us some additional functionality beyond just scanning. |
| 13:22 | So we're gonna go over those functions here. |
| 13:24 | The first of which would be our diagnostics. |
| 13:29 | So particularly if you've got a trouble code, a check engine light come up on the dash, you can use the scanner to read and clear those fault codes. |
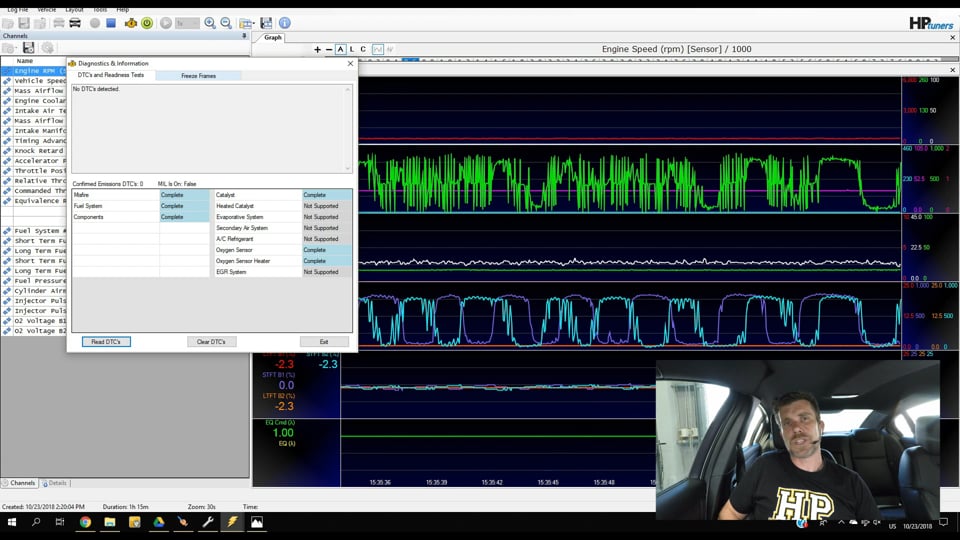
| 13:39 | So that's as simple as coming up to our little check engine light icon up on our tool bar and clicking on that. |
| 13:46 | And if I click on that, yeah right, that'll bring up our diagnostics and information tab there. |
| 13:51 | Then it's as simple as clicking on our read DTCs button on the bottom left hand corner and as we can see here, this has come up and said we've got no diagnostic trouble codes detected so ideal, that's exactly what we're hoping to see because there isn't anything wrong with our engine but of course sometimes there may be something goes wrong, maybe you've got a sensor that goes bad, maybe something has gone outside of the factory realms and you will have a trouble code come up on your dash, so this is the place to go and find out exactly what those trouble codes are. |
| 14:23 | What you're going to end up with is a list produced here. |
| 14:27 | What you're going to end up with is the specific number for your diagnostic trouble code, as well as a brief description around what that is. |
| 14:34 | Now while sometimes this may be the result of an actual problem with a sensor or an actual problem with your calibration. |
| 14:42 | Other times what it might be is that you've made a bunch of changes and you've forgotten to disable one of the diagnostic trouble codes. |
| 14:50 | A simple example of this may be where you have deleted the catalytic converters and you've forgotten to disable the catalytic converter fault code, so that'll being up a catalytic converter efficiency fault code, from memory I think it's P0420, so we'll actually have a look at that. |
| 15:08 | Of course once you've read those fault codes, you can then act on them and then you're going to want to clear them. |
| 15:14 | It's a good idea to just take a screenshot or a mental note of what those trouble codes are before you clear them and then we've of course got the clear DTCs button, that will do exactly what it suggests it will do. |
| 15:26 | Now what we'll do is we'll just head back across to the VCM editor and see what we can do with this information. |
| 15:31 | So again obviously sometimes you are going to simply find you've got a faulty sensor that needs to be replaced, other times as I've said, you may have forgotten to do something. |
| 15:40 | So we can come across here to our engine diagnostics tab and we're over on the right hand side at the moment on our DTCs. |
| 15:48 | So you can see there is a massive list here, what we'll do is we'll just come down to the one I was talking about, so let me see here, alright so P0420, my memory was pretty good. |
| 16:00 | We've got catalyst system efficiency below threshold for bank one. |
| 16:04 | So you can see that I've already taken some action here, this car actually has a high flow set of catalytic converters but for a couple of other reasons, currently got these disabled. |
| 16:13 | So what we can see is we've got the ability here under our error mode on the right hand side, we've got no error reported sitting there, but if we double click on this, well actually I'll open up the drop down menu, you can have no error reported MIL which is you check engine light, on first error on second error, or no MIL light. |
| 16:33 | Now it's important as well to understand that in some instances you're actually going to want to have that option set to no MIL light. |
| 16:43 | Now the reason for this is particularly if you are using a speed density patch, then what you need to do is fail the mass air flow sensor. |
| 16:52 | So this is an aftermarket patch that allows you to perform what's called a MAFless tune, you can remove the factory mass air flow sensor and the ECU or ECM will then revert to a speed density or volumetric efficiency based fuel model. |
| 17:06 | OK the thing is though that the ECM won't do that if you go through to your mass air flow sensor output and set that to no error reported. |
| 17:17 | Sure you won't get a MIL light or check engine light up on the dash but the ECM needs to actually see there is an error so it can drop back into the speed density subsystem. |
| 17:27 | So in that case you would select no MIL light, the ECM will still detect that error, it'll still do what it needs to do, but it won't actually bring up that error code on the dash to annoy you. |
| 17:40 | Alright so we're going to move into questions and answers pretty shortly, I did say that this was gonna be a little bit shorter than our normal webinars, so this is an ideal time if you are wondering about something I've talked about so far or you've got any questions generally on this topic, please jump in and ask those in the comments and I'll do my best to answer them shortly. |
| 18:01 | The next aspect, we're just gonna head back across to our scanner again, let's just bring up our diagnostics and information tab. |
| 18:09 | Alright we'll close that back down and the other aspect we can do, we do have the ability to run some special controls or special functions, so to the right of the little diagnostics icon we have this little vehicle controls and special functions icon. |
| 18:26 | We'll click on that and we're gonna go through a few of them here. |
| 18:29 | Again the options that you're gonna have available are going to depend a little bit on the particular ECM that you are tuning. |
| 18:36 | For example in some instances if we click here under the engine and idle tab, you can adjust your idle speed control target directly from the scanner. |
| 18:47 | If we then head across to our fuel tab here, we've got the ability to control the operation of the engine, for example we can set our commanded close loop on or off. |
| 19:02 | We can reset our long term fuel trims or turn our long term fuel trims on or off and just to demonstrate this, let's just have a quick look on our scanner and we can see we've got our short term and long term fuel trims there. |
| 19:15 | To be fair, everything is looking pretty good there, we're sitting at around about minus 2% error but we can see the long term fuel trims there are both sitting at minus 2.3 What I'll do is I'll click on long term fuel trim reset and we can see that's exactly what happens there. |
| 19:32 | We can also disable injectors depending on whether or not that's something you may want to do. |
| 19:39 | What we'll do is we'll head across to our fuel system tab here, and we can use this to function operate the fuel pump. |
| 19:47 | We also, if you've got an automatic transmission, under the automatic transmission tab, there is a huge amount of control here, I'm not gonna get too deep into this. |
| 19:57 | You do have the ability to perform an adaptive learn and reset the adaptive learning. |
| 20:03 | If we head across to the gear tab you can also use this to lock the transmission in a certain gear. |
| 20:09 | Now I just wanna mention this as well because I've had a few questions about how we run these automatic transmissions on the dyno. |
| 20:16 | And in this case with a 6L80E transmission, the six speed automatic transmission, that we've got fitted to this particular vehicle, we do have a manual mode and that's how I run the car, generally what I'm going to be doing is performing my ramp runs on the dyno and my steady state tuning for that matter in fourth gear. |
| 20:34 | And basically once you've locked the transmission in fourth gear in the manual mode, it won't kick down, it doesn't kick down, it's actually really great. |
| 20:42 | The other option is on some of the earlier four speed automatic transmissions, these were a little bit less sophisticated and these do tend to kick down, actually regardless whether you try using the scanner to lock the transmission in a specific gear. |
| 20:57 | What I did with this, and I'll just share this little tip, is that I'd run those particular engines in third gear on the dyno, and you'll find that if you're trying to settle at around about 2000 or 1800 RPM at the start of a run. |
| 21:11 | If you go all the way through to full throttle it will kick down into second gear and it's gonna ruin your day, you're not gonna get a lot of good data by doing so. |
| 21:18 | Now the technique I adapted was basically you can find the point, watch your throttle position in the scanner, you can find the point where the transmission does just start to kick down and basically that's your limiting factor. |
| 21:32 | You might get to something like about 80% throttle or thereabouts. |
| 21:35 | Now obviously it's not ideal, you aren't at 100% throttle but bear with me because this is a technique that does work really well. |
| 21:43 | Then the point is you're gonna start your ramp run and you'll be able to find that almost as soon as you start performing that ramp run, you can start to gradually increase your throttle opening and again depending on the particular application, you might find that by the time you're at around 2800 RPM, maybe 3000 RPM, you'll be able to smoothly go to full throttle without it kicking down. |
| 22:03 | Takes a little bit of testing to find out exactly what points you can do this, but then you can be pretty consistent. |
| 22:09 | And the difference between 80% throttle and 100% throttle down in that low 800 to 1000 RPM of the rev range, really doesn't have a huge impact on your tuning so little tip for you there. |
| 22:22 | Alright guys well that's basically the sort of simple introduction to some of those functions in both the VCM editor and VCM scanner. |
| 22:30 | Nothing particularly earth shattering there, but I know there are a few tuners that have actually been using HP Tuners for a number of years and just simply don't understand or don't know that these little functions and tricks are there. |
| 22:43 | So can really be quite helpful if you know how to use them. |
| 22:46 | We'll head across now and I'll have a quick look at our questions, if you do have any more questions, please feel free to ask those now. |
| 22:53 | First question comes from Ryan who's asked, how do you wire the wideband to HP Tuners and be able to log it? That sir is a great question and it is one that we've had repeatedly. |
| 23:04 | I don't think I've done anything magic here, but I know that I was pulling my hair out getting this to work. |
| 23:12 | So there are a couple of ways depending on what version of the HP Tuners interface you are running. |
| 23:19 | For example if you have the old MPVI interface that I'm actually still using here, then the pro version, you could actually wire a wideband directly into the interface. |
| 23:30 | Now that'll get it into the scanner as a analog voltage input, you can then scale it to suit. |
| 23:40 | What I've personally found by looking at the HP Tuners forum, I'm certainly not alone. |
| 23:45 | A lot of people are having problems with voltage offsets. |
| 23:49 | And that can really mess with your actual accuracy of your wideband air fuel ratio reading. |
| 23:56 | So for that reason I've gone away from that technique and I'm using a Innovate LM2, it's actually suction cupped to the windscreen in front of me right now and I'm outputting that into the laptop via serial. |
| 24:08 | It's actually not set up at the moment because I didn't really need wideband to do this. |
| 24:14 | So what this does is the wideband air fuel ratio information is transmitted over a serial link, use a USB to serial cable, bring it straight into the laptop, and essentially when you start the scanner software it'll poll the USB ports on your laptop and look for that information. |
| 24:29 | If it's there, it'll be displayed. |
| 24:30 | So integrity of the information is guaranteed. |
| 24:33 | There are a few tricks to getting this though and this is where I've seen on HP Tuners there's a massive long thread and basically about 50% of the people say they were having success with this and about 50% of the people weren't. |
| 24:45 | So in the case of the LM2 which is the only one I can talk of with personal experience, the key point is that there is a USB port on the top of the LM2 that you use for programming the LM2, using the LM programmer software. |
| 25:00 | It was reasonable to assume that that was also going to work to get your information into the VCM scanner software. |
| 25:07 | However it simply doesn't. |
| 25:09 | Instead you need to use the little four pin plug that goes into the side of the LM2, I'll just grab it out actually while I'm talking. |
| 25:18 | And so this is the serial out plug. |
| 25:22 | This goes to a conventional D9 serial plug and then you use a conventional serial to USB adaptor and you can then bring that into your laptop. |
| 25:32 | From there all you need to do is scale the information and it's worked really well. |
| 25:37 | Sorry for the long winded answer there but I know a lot of people have been asking about that so I thought I'll just get into a little bit more detail. |
| 25:43 | Jacob has asked, can you explain what is better out of a MAP sensor and a mass air flow meter and why? Yeah OK so a pretty broad question there Jacob. |
| 25:53 | I think that a lot of tuners, particularly those who have maybe come from an aftermarket standalone tuning world, tend to favour the manifold absolute pressure sensor and think that mass air flow sensors are junk. |
| 26:07 | Hence I see a lot of people, a lot of tuners ditching the mass air flow sensor when realistically there's no need. |
| 26:13 | So what we need to understand is that we're trying to tell the ECM how much air is entering the engine, and that's really the key piece of information the ECM needs. |
| 26:24 | The mass air flow sensor does this directly, it basically measures the mass of air passing through the sensor and tells the ECM exactly what mass of air is entering the engine. |
| 26:35 | Provided that the calibration of the sensor is correct, particularly on a standard or mildly modified engine, they are incredibly effective, they're very accurate, and this is why we see the majority of OE manufacturers use them, allows very very tight control of your fuel delivery. |
| 26:51 | The MAP sensor on the other hand is a bit of an indirect route. |
| 26:55 | What it does is it measures the manifold absolute pressure using the ideal gas law, it essentially is calculating mass air flow rather than directly measuring it. |
| 27:05 | And it's also prone to a number of errors based on temperature et cetera. |
| 27:09 | Barometric air pressure, there's a whole range of things that can go to basically making your reading, your mass air flow sensor calculation I should say, a little bit inaccurate. |
| 27:20 | So that's where the speed density system can fall down. |
| 27:24 | Also from our perspective it makes a lot more work. |
| 27:27 | Because we've now got a large volumetric efficiency table, a speed density table, and we need to tune or adjust all of those points relative to engine load and engine RPM. |
| 27:37 | If we've got a properly calibrated mass air flow sensor on the other hand, if the ECM knows exactly what mass of air is going into the engine, it's really easy for it to calculate what pulse width to deliver to the injectors in order to achieve a specific air fuel ratio. |
| 27:50 | So again pretty long winded answer there, I'll try and get to the point though. |
| 27:54 | Basically it's really gonna depend on your application. |
| 27:57 | In early GM vehicles, particularly the gen 3 LS1, the factory mass air flow meter was a little small and it was restrictive. |
| 28:05 | So on those engines, performing a speed density patch, getting rid of the mass air flow sensor was good for around about 15 wheel horsepower so obviously happy days, definitely we're gonna wanna get rid of the mass air flow sensor. |
| 28:17 | Gen 4 and onwards though, the mass air flow sensor really isn't a restriction and unless you're planning on going for a significant power adder or maybe a very large aggressive cam that does play havoc with the mass air flow sensor due to reversion pulsing, I would tend to favour the mass air flow sensor. |
| 28:34 | Darius has asked, is it possible to set up electronic boost control using the OEM GM ECU? OK so if you've got a factory GM ECU, to the best of my knowledge at the moment, there isn't a patch that allows aftermarket electronic boost control. |
| 28:50 | What you need to understand is that obviously in the LS world in particular, the engines were either naturally aspirated or supercharged so hence boost control wasn't really an issue. |
| 29:02 | The other thing is that in my own experience, the owners of these vehicles, far and away favour superchargers over turbochargers so hence boost control is often less of an issue. |
| 29:14 | I think in my career to date I've only tuned a handful of turbocharged LS V8s using the factory ECU whereas I've tuned literally dozens if not hundreds of supercharged engines. |
| 29:28 | So yeah that's probably about all I can really add to that. |
| 29:32 | Alright guys that's taken us to the end of our questions there so if you do have any more questions, please ask those in the forum and I'll be happy to answer them there. |
| 29:42 | Thanks to everyone for joining us and I look forward to seeing you all next week. |


