193 | Drag-Specific Tuning Secrets
Summary
Optimising the power delivery of a powerful drag car can mean the difference between crossing into the other lane and claiming a world record. In this webinar we’ll look at some of the special techniques we used to claim 3 import world records on the drag strip. We will be looking at functions such as boost control, launch control, timer based trims, driver warnings and driver controls and how we apply these using the MoTeC Mx00 series of ECUs.
| 00:00 | - Hey guys it's Andre from High Perfromance Academy, welcome along to another webinar. |
| 00:04 | This time we're going to be delving into some of the secrets behind tuning a world record level drag car. |
| 00:13 | Now this is one of my own personal passions, basically from the start of my career I've been heavily involved in import drag racing. |
| 00:22 | Although these days being located in Queenstown in the south island of New Zealand, and probably somewhere around about 1500 kilometres away from our best drag strip here in New Zealand, I've taken more of a back seat to drag racing but that hasn't dampened my enthusiasm for it. |
| 00:39 | Ine of the reasons that I am so passionate about import drag racing or drag racing in general I should say, is that when it comes to testing the output from an engine, there really is no better place. |
| 00:52 | I think probably everyone's heard or seen of a dyno sheet somewhere on the internet that seems possibly a little bit too good to be true and we're all probably aware that it is relatively easy in some instances to end up getting unrealistic results from a dyno. |
| 01:12 | Some people do this on purpose, sometimes we can just see dyno sheets from certain dyno manufacturers that just tend to read a little bit higher and skew the results we're seeing. |
| 01:23 | When it comes to the drag strip though there is no way to fake those results, and at the end of the day if you know what you're looking at, the mile an hour in particular is going to tell you a huge amount about the performance of your engine. |
| 01:38 | So for me primarily as an engine builder and an engine tuner, I found the quarter mile was really the absolute test for the engines that I built and tuned. |
| 01:49 | Now a lot of you probably are already aware of our background, what we did before we started or founded High Performance Academy but for those who aren't I just wanna give you a really quick history lesson I guess. |
| 02:02 | And for about 13 years prior to founding High Performance Academy, I owned and ran a workshop here in New Zealand, it was called Speedtech Motorsport or STM for short. |
| 02:13 | So I'll just take you through a couple of the projects that we are probably most proud of I guess. |
| 02:18 | So let's head across to my laptop screen. |
| 02:20 | The car on the screen at the moment is my old shop car so this is a Mitsubishi Lancer Evo 3. |
| 02:27 | For those in the U.S. market they were never delivered over there but relatively common in Japan, New Zealand, and even Australia. |
| 02:36 | So this was the final iteration of the car as we're looking at it here. |
| 02:40 | At the point we finished with that car it held the world record as the fastest Mitsubishi Evo four wheel drive, it went as quick as an 8.23 at 180 mile an hour. |
| 02:51 | Was making around about 1100, maybe 1050 wheel horsepower at that point. |
| 02:58 | Running about 54 psi of boost on methanol fuel. |
| 03:02 | Revved to 10500 RPM. |
| 03:04 | Actually after we retired it or after the last time it ran on the drag strip, we did wind the power up a little further and the ultimate incarnation it was making just under 1200 wheel horsepower so still a number I'm incredibly proud of. |
| 03:19 | We'll also head over and have a look at another car that you're gonna see some data from shortly, this is an Evo 9 that we built for a customer. |
| 03:26 | So after we retired our shop car, we jumped into this project. |
| 03:30 | It was affectionately known as project DS9. |
| 03:33 | It was an Evo 9, used a 2.2 litre stroked 4G63. |
| 03:38 | Produced 1001 wheel horsepower. |
| 03:41 | Our focus with this particular car wasn't really about power, we were focusing more on making sure every horsepower that we produced could be put to the track. |
| 03:49 | The aim with this car was to beat what was then the late model Evo four wheel drive world record that was held by AMS Performance in the United States. |
| 03:59 | And so that we could compete on an even playing field with those guys, we specifically chose to run a pertroleum based fuel so this actually ran on VP Racing Q16. |
| 04:10 | Anyway long story short, at the time we retired that car it had done exaclty what we intended, it had gone as fast as an 8.34 at 169.7 mile an hour. |
| 04:22 | So as I say we'll have a look at some data from that car shortly. |
| 04:26 | And I'll just give you another quick tour through some STM history files. |
| 04:31 | These have just been thrown together, they're a little bit out of order but probably just give you again a little bit more insight into where exaclty I'm coming from in my experience to talk to you about drag racing tuning. |
| 04:43 | So again another shot obviously of my old drag car. |
| 04:47 | This car that is in the background here actually was my old street car and it's pretty hard to see there, it's a DX Corolla. |
| 04:57 | And this was powered in the end by a turbo 4AGE with a silver top 20 valve head. |
| 05:03 | Made 500 wheel horsepower out of what was basically a stock engine. |
| 05:07 | And that actually went 10.5 I think it was at about 134 mile an hour on the quarter. |
| 05:13 | This is a shot of what we're trying to avoid, so we're gonna be talking a lot today about power management or torque management so that we don't end up with a car leaving the line and pointing at the other lane or worse still, pointing at the wall. |
| 05:29 | So that's the Evo 9 project DS9 that we're gonna be looking at the data from. |
| 05:33 | Another shot of this leaving the line just a little bit straighter this time. |
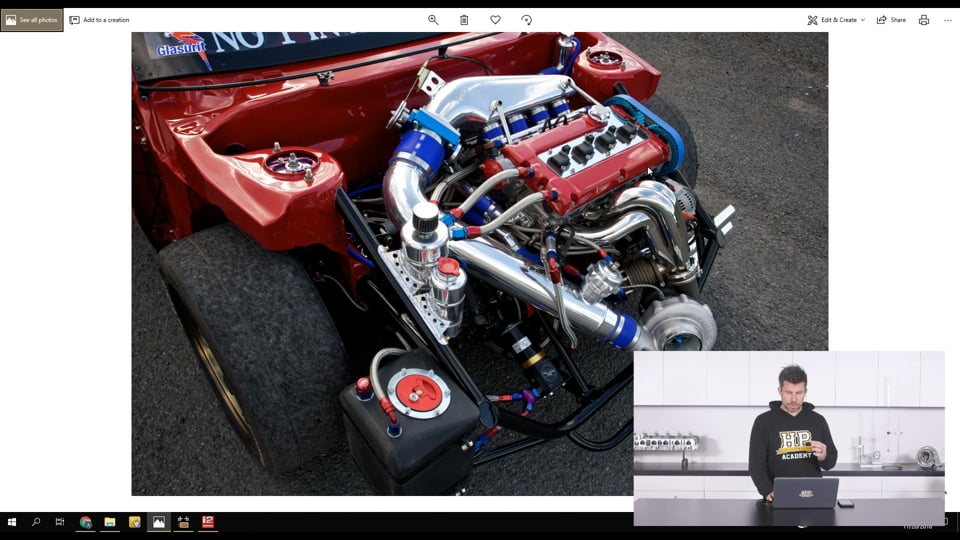
| 05:37 | This is another car that I worked on for a customer and good friend of mine, Simon Steffek, this was a Mitsubishi Mirage that was converted to four wheel drive and 4G63 power. |
| 05:49 | For those who are eagle eyed you may be able to spot the fact that there is no intercooler on this car. |
| 05:55 | But we can actually see here on the charge pipe from the turbo to the inlet manifold, there are actually a couple of 1600 cc injectors there. |
| 06:06 | So this ran on methanol fuel and is quite a common technique when running on methanol. |
| 06:12 | Intercoolers aren't essential and we're using a spray of methanol there just to cool that inlet charge. |
| 06:19 | This is another shot of Simon's car there in competition at Masterton Dragway. |
| 06:25 | Another shot of my old car and here is another one we built this time, a WRX. |
| 06:30 | Just to show that we weren't really focused solely on the 4G63. |
| 06:33 | Probably best known for the 4G63 but have dabbled in just about anything and everything. |
| 06:39 | So again a shot of what we're trying to avoid, massive wheel spin off the line is not going to help your 60 foot time and that's really one of the keys to a good quarter mile time, you really need to get the car to hook up well straight off the start line. |
| 06:56 | Right and I'm going to come back to this one actually so we'll leave it for the moment. |
| 07:00 | We'll come back and talk about this particular photo a little bit further into our discussion. |
| 07:07 | Alright so with the kind of quick history lesson out of the way there we'll jump into what we're trying to do when we are tuning a high powered drag car. |
| 07:18 | Gonna talk about some of the tricks that I employed. |
| 07:21 | None of them are particularly special but of course to those who are new to tuning drag cars, some of them may seem a little bit unusual. |
| 07:32 | And really when it comes to tuning for drag racing purposes, there are a couple of aspects we're trying to focus on. |
| 07:40 | One of them is making sure that we get the best possible performance out of the car so we're looking at optimising the amount of power that we can put to the track. |
| 07:51 | But another aspect that is every bit as important is making sure that the engine is going to remain reliable so what we're talking about here is some strategies that we can employ for engine protection. |
| 08:03 | And there are a few ways we can do this, we can monitor various aspects on the engine and we can use these to bring up driver displays so particlulalry if you've got a dash or dash logger fitted to the car, this is quite a common technique. |
| 08:21 | What we'll do is monitor something such as maybe our exhaust gas temperature. |
| 08:26 | And then if that gets outside of bounds then we're going to be able to bring up a warning on the dash to indicate to the driver something isn't right. |
| 08:34 | It's incredibly important as well to understand that when we've got a car that's running faster than maybe a nine second quarter or thereabouts. |
| 08:44 | There's a lot going on in a very short amount of time and really the ability for the driver to monitor a variety of gauges and decide if something isn't quite doing what it should be doing is all but impossible. |
| 08:57 | Really the only thing the driver is going to be focusing on is shift light and making sure that the car stays on the track. |
| 09:06 | So what we wanna do is basically give the driver as little information as they need and the trick here with some of these dash loggers is that we can indicate a driver warning. |
| 09:18 | Often this is done through either an external light or even through the shift light module, and this brings the driver's attention to the fact that something's gone outside of bounds and then they can shift their attention to the dash, take notice of that display, and then decide what to do with that information. |
| 09:33 | Now that all sounds great in theory, but I'm gonna give you two sort of scenarios where you may actually think maybe it's not the best way of doing it. |
| 09:43 | So one was for a customer of mine, we're actually gonna look at some data from this car shortly, was an R32 Nissan GT-R that at one point held the world record for the fastest four wheel drive outright. |
| 09:56 | I think it ran as quick as 7.41 by, well it's actually still around, it's coming back to the drag strip shortly we would hope. |
| 10:04 | So this was running an RB26 engine. |
| 10:08 | And the time I was involved with it, it was produdincg somewhere around about 1400 to 1500 wheel horsepower. |
| 10:14 | Again times have moved on, cars are much faster but at the time this was obviously the fastest and that's still a huge chunk of power for an RB26. |
| 10:24 | Now as we can expect to see from time to time, this engine did suffer a mechanical failure at the drag strip at one point. |
| 10:32 | And we were running at a drag strip, it'd been running at that point, mid to high sevens at about 185, 188 mile an hour, and it went and did a couple of runs and the final run I watched it do, it ran a seven eight but it was only at about 150 mile an hour. |
| 10:52 | So again for a tuner or someone familiar with drag racing, when you see a drop off in mile an hour like that, that's instantly quite alarming. |
| 10:59 | Generally that means something's gone wrong or the driver's had to get out of the throttle. |
| 11:03 | So that car came back to the pits and actually everything looked fine. |
| 11:06 | But it turned out that it had actually had a mechanical failure and it had thrown a connecting rod out the side of the block. |
| 11:12 | Now I straight away went through and had a look at some data from that and found out that around about the 1000 foot mark the oil pressure had dropped to essentially zero, the reason for that was that the conrod had cut straight through the main oil gallery. |
| 11:26 | Despite that, in the data, the driver had actually stayed at full throttle for the rest of the run so I quizzed the driver about it because I know that I had set up a warning on the dash to bring on the warning light and indicate to the driver that the oil pressure had dropped. |
| 11:41 | I asked the driver, he said oh yeah I saw the shift light come on, the warning light come on, I should say, but the car was still going, I was beating the guy in the other lane so I stayed flat. |
| 11:49 | So that's the sort of mentality that you are facing with a lot of drag racers, even though there might be some pretty expensive machinery on the line, that desire to win is really critical. |
| 12:00 | And my second example actually comes from my own experience so I've got no one to blame here but myself. |
| 12:05 | About the last time we actually raced my old Evo I'd had a problem with the boost control system. |
| 12:12 | To try and keep a long story short here, what I'd done is reverted to using our Motec to control boost. |
| 12:18 | In the midst of doing that I had overlooked the fact that there had been an update, a major update in the Motec software, and essentially what I'd done is gone out for my next run, commanding what I thought was minimal boost, the reality was it was actually commanding almost maximum boost. |
| 12:35 | So I left the line and everything felt really good, pulled second gear and the car was really hooking up well, and at that time the warning light came on for high EGT. |
| 12:46 | And of course I chose to stay in it because the car was going well. |
| 12:49 | And within about a split second the windscreen was covered in water, it had lifted the head and torched a massive hole out between the cylinder head and the block. |
| 12:58 | So yeah the whole point of this discussion is basically if you are going to be using passive driver displays, just understand that they may not be overly effective. |
| 13:08 | My own personal preference moving on from what I've learned is that I now employ these safety strategies as a cut or some safety strategy in the ECU to automatically implement whatever I'm trying to do. |
| 13:21 | For example if the EGT goes too high, then I'll bring in a lower rev limiter to protect the engine, something of that nature, exactly the same with our oil pressure warnings. |
| 13:32 | So I just wanna talk about what parameters I think are really important to be monitoring there. |
| 13:37 | And of course you can monitor just about everything under the sun. |
| 13:41 | But we wanna focus on the best use of your money or your budget when you are monitoring things in a drag racing application. |
| 13:49 | So the first one I'd probably look at would be individual cylinder exhaust gas temperature. |
| 13:55 | Now these are really important from a tuning standpoint anyway. |
| 13:59 | Once we're starting to really push an engine to its limits, the room for error, or the safe tuning envelope starts to get very very narrow. |
| 14:09 | We're going to see a cylinder to cylinder air distribution difference on absolutely any engine but of couse when we're looking at a factory engine or one that's only moderately modified, the sort of air fuel ratio variation that we see as a result becomes almost irellevant to some degree. |
| 14:27 | But yeah as we start leaning on things and getting righ on the absolute limit, these small discrepancies can end up with one cylinder running lean enough to do damage. |
| 14:37 | So really important to monitor that. |
| 14:39 | Another really good one, particularly on high boost turbocharged engines is to monitor the coolant pressure. |
| 14:44 | From my own personal experience, with our 4G63 drag program, basically we could make almost as much power as we wanted, the only factor that held us back was the head to engine block integrity. |
| 14:59 | Basically the head gasket sealing. |
| 15:02 | So if you aren't aware that the head gasket is leaking, it can very quickly cause some significant damage. |
| 15:08 | And by monitoring the coolant pressure, it gives you an early warning that the head gasket is lifting of the head is lifting that the combustion pressure is making its way into the coolant jacket and this can let you get out of the throttle, abort a pass, and potentially prevent some quite costly damage to your engine. |
| 15:29 | On top of that there's the obvious as well but I will mention them, we obviously want to be monitoring our air fuel ratio or lambda. |
| 15:37 | We wanna be monitoring our manifold pressure and we wanna have safe bounds in our strategy for a overboost cut out if our boost pressure gets out of control. |
| 15:48 | And then of course RPM as well, things are happening really quickly. |
| 15:52 | These engines can pull RPM very very fast and it's important to make sure that you have a rev limiter strategy in there that is going to protect your engine in the case that something allows the engine to over rev. |
| 16:07 | Alright so we've talked there about our engine protection strategies. |
| 16:10 | What we're going to do now is talk about some of the techniques that we can use to improve the performance of the car. |
| 16:18 | That's obviously one of the key aspects, once we know that the engine is reliable after the run, we wanna look at what we can do in order to improve performance for the next run. |
| 16:30 | And really when we've got a powerful car this is really a fine balancing act on managing the amount of torque that is put to the track from the start line through to the finish line. |
| 16:44 | Of course on a lower powered car this probably is almost irrelevant. |
| 16:48 | Once the car gets past the 60 foot line, if you've got a low powered car you can basically put as much power to the track as the engine makes. |
| 16:55 | But this becomes progressively harder once we make more and more power and I think a lot of spectators sit back and think that drag racing is easy. |
| 17:04 | But once you're starting to run in the eights or faster, it gets progressively more and more difficult and it's a constant battle from day to day and even throughout the day, the track changes dramatically, the weather conditions change, the amount of grip available on the track will change. |
| 17:21 | And we're constantly making subtle refinements to the calibration in the ECU to try and get the most out of the car and get the best possible results. |
| 17:31 | Alright so one of the obvious areas that we can do this is with our boost control strategy so how we control boost as the car goes down the track. |
| 17:45 | So what we'll do is we'll just head across to my laptop screen for a moment. |
| 17:52 | Just make sure I am looking at the right data here. |
| 17:56 | Yeah I am, OK so we're looking at some data here from the black Evo 9 that we've already looked at, so this is DS9, this is actually the record pass, so this is where it broke the world record. |
| 18:09 | All of the data here is in I2 but of course you are going to be able to also apply what we're going to talk about to just any system, doesn't have to be Motec. |
| 18:20 | So at the top here we've got our engine RPM in red so we can see this is also using Motec's drag racing analysis strategy. |
| 18:29 | So what we can see here is there are some vertical lines down through this log file. |
| 18:35 | So the first one that I've just highlighted there that is the start line, that's the start of the run, the next line here is the 60 foot mark and again I've sort of mentioned this but the 60 foot point, there's such a huge emphasis on improving our 60 foot time so this allows us to see exactly what's going on. |
| 18:53 | Then we've got our 330 foot, that's not a very good line, we've got our 330 foot mark here, our 660, our 1000 foot and so on and so forth. |
| 19:04 | So just allows, particularly when you're comparing one run over another it allows a very accurate analysis so you can see exactly why one particular run was faster or where you gained time. |
| 19:17 | Anyway for this particular piece of data, all we wanna focus on here is our manfold pressure which we can see in blue. |
| 19:24 | So here what we're doing is employing a gear dependent boost strategy. |
| 19:29 | Nothing particularly unique about this, we can use gear dependent or alternatively what we can do is use gear dependent plus speed dependent or just speed dependent on its own. |
| 19:40 | The basis around this is obviously the engine torque is being multiplied through the gear ratio that we're running in so first, second, third or fourth in this particular case. |
| 19:52 | And what we're trying to do is adjust the amount of boost pressure in each gear, so that we're maximising the amount of torque that can actually be put from the tire to the ground. |
| 20:02 | So what we find is that obviously as we go through the gears and that multiplication becomes less, we can produce more engine torque without the car wheel spinning. |
| 20:12 | So what we can see here is that right at the start line we're running around about, sorry for those who work in imperial units, we are gonna be talking in kPa here, so we're running around about 250 kPa so these are absolute numbers as well so that's 150 kPa of positive pressure. |
| 20:31 | We then step up through first gear here, we end up running 324 kPa. |
| 20:39 | In second gear where we can feed in a little bit more boost, we're running 350 kPa. |
| 20:45 | In third gear 385 kPa, and then finally the boost peaks, our maximum value here 410 kPa or 310 kPa of positive boost pressure before it tapersoff a little bit higher in the run. |
| 21:00 | So this is probably one of the main levers that I had to pull from a tuning perspective when we were at the track is looking at how the car performed going down the track. |
| 21:12 | Was it hooked up, if it was hooked up, could I feed in a little bit more boost pressure? And this was a really fine balancing act. |
| 21:20 | Actually what I'm doing at the moment is filtering that RPM signal. |
| 21:25 | So let's just get rid of that filtering, and we can actually see on this run here we've got a little blip in our RPM trace in third gear. |
| 21:37 | That shows that the car just lit up and wheel spun slightly and the racetrack that we were at for this particular run, there is a slight bump around about half track and this is exactly what the car hit and wheel spun. |
| 21:50 | So what that shows me there is I'm right on the absolute edge there in terms of the amount of power that we can put down through third gear. |
| 21:59 | What we could see as well is in fourth gear, even we've got a little blip right at this point so again there's no real ability for me to put any more power to the track in third and fourth gear. |
| 22:13 | If we come back down, first gear as we often see here is a bit of a mess, we've got a shambles of the car wheel spinning and clutch slipping to try and get off the line as well as it can. |
| 22:25 | Second gear, probably could have just fed in slightly more boost pressure there. |
| 22:30 | Now so that you've got some idea of what this all looks like, I'm going to again, give me one second here I'll just get my laptop set up. |
| 22:41 | I'm going to show you a video of this particular car running. |
| 22:46 | And I'm gonna apologise because this video is from several years ago. |
| 22:52 | Our technology in terms of filming was nowhere near where it is right now. |
| 22:58 | And I think this is March 2010 so we're eight odd years ago now and it does look like it's filmed on a potato. |
| 23:06 | I assure you that it isn't. |
| 23:08 | But let's just head across to my laptop screen. |
| 23:10 | We'll try and play this, I know it's not gonna be perfect so the guys are also gonna drop into the comments or to the notes later, the links for these videos so you can come and watch them at your leisure. |
| 23:21 | So let's just watch this anyway and I'll try and narrate it. |
| 23:26 | Right so this, we've got three angles of this shot as well so this is filmed from the back of the car, car's on the launch control there, you see it bounces off the line and moves around but for the rest of the run it's actually pretty well hooked up. |
| 23:39 | Also what we're seeing there is that it actually gets a little unsettled as it goes through second gear. |
| 23:48 | This is the in car, what you'll notice here is that the driver doesn't actually need to use the gear lever, we'll talk about that in a second. |
| 23:55 | So he's got a button on his steering wheel and it's an air shifter through a sequential system. |
| 24:01 | So all he needs to do is focus on controlling the car which is not that easy. |
| 24:05 | You can see particularly in the shut down area here, he's really struggling to get control over that car. |
| 24:11 | And again we've got another shot from the rear here just showing exactly how much that moves around. |
| 24:16 | And again just how quickly everything happens there. |
| 24:19 | So again you can rewatch this video, we'll get those into the comments so that you can watch. |
| 24:27 | Now as I mentioned it is all about managing that power delivery so we'll just while we're on my laptop screen here, we'll just show another shot of this car. |
| 24:37 | And this is what it looks like when you get it wrong. |
| 24:40 | So this is feeding a little bit too much power into the car. |
| 24:43 | I think as it transitioned into second gear, and you'll see the effect of that. |
| 24:48 | Again it leaves the line pretty straight, hooks second gear, and oh actually it might have been third gear, and you'll see how much that moves around. |
| 24:57 | So this is what we're trying to avoid, this is what we're always trying to balance, so what we'll do is we'll head across to our data and I'll just show you the data from that, might not actually be exactly that run but it's another one where it's gotten loose. |
| 25:11 | And this data was such a throwaway I didn't even bother turning it into a run. |
| 25:17 | But we can see this particular section here is where the car is on the two step limiter building boost before the launch. |
| 25:23 | There's not a lot of grip so what we can see is that as soon as the driver lets go of the clutch, it sits up on the rev limiter at 10000 RPM. |
| 25:33 | So it's just sitting there wheel spinning. |
| 25:35 | Despite that the driver stays at full throttle. |
| 25:38 | This green trace here is the throttle. |
| 25:40 | He's got out of the throttle at this point, the car's hooked up, he's peddled the car a little bit, peddled the throttle a little bit, and got back into full throttle, and then it's ended up lighting up and wheel spinning again. |
| 25:52 | So pretty ugly run and this is exaclty what we wanna try and avoid. |
| 25:56 | The problem with the data when we're viewing this as well, is that for a run that's this ugly it can actually be quite hard to decide exactly what's happened, what's upset the car, and what course of action to take. |
| 26:11 | The reason for this, and this is quite easy to overlook, is that the amount of power that we can put through the tire with a car that is well hooked up right from the start line compared to a car that ends up breaking traction where the driver has to pedal out of the throttle and get back into it, that is very very different so if you have to get out of the throttle, and get back into it, affectionately known as pedalling the car, then your run is basically a throwaway and you're going to often find that as you get back into the throttle and the car transitions back up onto the boost, that in turn is going to then overpower the tires again and you get into a situation where you're basically in and out of the throttle the whole way down the drag strip. |
| 26:56 | So we've talked a little bit there about gear dependent and speed dependent boost. |
| 27:00 | While I'm just talking about pedalling the car there, another consideration we may want to make is including some throttle position based control of the boost as well. |
| 27:10 | This is really common in circuit racing, less so in drag racing. |
| 27:14 | And the problem with a turbocharged car is that the power delivery versus throttle position is incredibly non linear and what this means is that essentially the engine will be probably making up to 80% or 90% of peak power even when the driver has backed off all the way to maybe 50% throttle or even a little bit less. |
| 27:34 | So it makes it very hard for the driver to control the power with the throttle. |
| 27:38 | So by tapering the boost off as the driver rolls out of the throttle, this can really help the driver control a car that is a little bit loose or right on the limit. |
| 27:50 | But of course as soon as you've rolled out of the throttle, your time is probably not going to really count for much but as drag racers we're always trying to beat the person in the other lane so this can be the difference between a win or a loss. |
| 28:04 | Alright so we've talked about our boost control here but I wanna just show you what that actually looks like in our ECU. |
| 28:11 | So let's head across to my laptop screen. |
| 28:13 | Again I'm using Motec here, the two cars that I'm using for our examples both used Motec but again you can really relate this to just about any ECU. |
| 28:24 | So let's head into our boost control. |
| 28:28 | And what we wanna do is have a look at our aim boost. |
| 28:32 | So this is what is quite a simple strategy here, we've got a three dimensional table which is just relative to our gear. |
| 28:44 | This is a four speed gear box again in this particular car. |
| 28:47 | So we've got the gear on the vertical axis, we've got our engine RPM on the horizontal axis and the numbers in this table are simply duty cycle being fed to the wastegate. |
| 29:00 | So this is a personal preference with mine. |
| 29:03 | I wouldn't say that I would still apply this in absolutely every application. |
| 29:07 | But my personal preference is actually to run open loop boost control in a very high powered drag car. |
| 29:14 | Now there's a couple of reasons that I do this. |
| 29:16 | As anyone who has tried to tune closed loop boost control before would probably be aware, it is incredibly finicky. |
| 29:24 | You have to get your PID gains very very finely tuned to get good control. |
| 29:30 | And in a street application or a lower powered application, it's probably not that big a deal if our boost varies by maybe 1.5 or maybe two psi while we're trying to get on top of that. |
| 29:41 | If we're running, 60, 70, 80 or 100 psi of boost pressure, we wanna be pretty damn sure that our boost is exactly on our target. |
| 29:47 | If we go over by a couple of psi, that could end up damaging our engine. |
| 29:52 | So for this reason, the other aspect there is that our boost is going to vary based on our atmospheric conditions day to day or even during the day as those conditions change with the heat and atmospheric pressure. |
| 30:06 | So for this reason I prefer open loop, I may be on my own here but I prefer open loop. |
| 30:11 | What I'm doing again is looking at that data after a run down the strip and because I'm looking at gear versus RPM, makes it really easy if for example I see at 9500 RPM in third gear, I can take a little bit more boost, I can go to, oh that's actually 10500 RPM, let's come back here. |
| 30:30 | I can go to exactly that site and I can feed in a little bit more duty cycle into that table and I can chip away at that as we go through the day of drag racing and get my boost control exactly where I want it. |
| 30:44 | So that's why I personally prefer to use open loop. |
| 30:47 | Now I just wanna head back to our data for a second here. |
| 30:51 | And what we're going to do is also this really comes back to the engine protection side of things. |
| 30:59 | I haven't mentioned this yet but we'll come back to our world record holding data or run here. |
| 31:06 | And at the bottom in red we've got our lambda, our air fuel ratio or lambda value and we can see that for the most part this is tracking around about 0.82 lambda which we're sort of aiming somewhere between 0.80, 0.82 in this particular application. |
| 31:22 | What we can see though is once we get past the 1000 foot mark it is quite subtle but we see the lambda start to lean out a little bit. |
| 31:29 | First of all heads to 0.83 and then just before the driver backs off going across the finish line, we get up to 0.841 Fortunately didn't do any damage but that is definitely leaner than I'd like to be running at close to 300 kPa of positive boost pressure. |
| 31:46 | Now the reason for this, so I've got this data up on the screen as well, and this is just a really good indication of the way you need to be looking at all of the data and trying to understand what it shows you, is if we look at our purple trace here which is our fuel pressure, we can see that for the most part our fuel pressure is stepping up as we go down the drag strip and as we increase our boost. |
| 32:08 | So essentially our differential pressure is remaining the same. |
| 32:11 | Until we get to the 1000 foot mark and you can see our fuel pressure takes a dive here. |
| 32:16 | And the reason for this is we were right on the limit of the entire fuel system here and basically this is why we couldn't push any further with that car. |
| 32:27 | The fuel system and the fuel pumps really couldn't cope and we see that that fuel pressure drops off and this particular ECU, the way it was set up wasn't accounting for fuel pressure so that's why we see our lambda start to move a little bit leaner than we'd like to see. |
| 32:42 | And if we're looking at our EGTs which is our bottom trace here, we've got our EGTs all measuring in degrees centigrade. |
| 32:49 | We see that our EGTs also start to take a uphill angle after that lean out as well. |
| 32:57 | So if the drag strip was a little bit longer, probably would have been picking up some broken engine components off the track so something we were probably quite lucky to get away with there. |
| 33:09 | Alright so what we'll also look at here is our launch strategy so this is all about getting our maximum boost to the track or a maximum power to the track and with a turbocharged car this is also a fine balancing act because we also want to be able to get as much boost as we can. |
| 33:30 | With these big turbochargers they are laggy, they take a lot of time to respond and for this reason we want to try and often run more boost, particularly through first gear than maybe the engine can handle. |
| 33:42 | So we show you a couple of ways, sorry more than the track can take, not that the engine can handle, so we'll show you a couple of aspects there so first of all looking at our data again. |
| 33:52 | We can see this area of our data log which is before the car has launched. |
| 33:57 | And this is where the driver is on the two step launch control. |
| 34:02 | So we look at our RPM here and we can see that that's sitting nice and consistent there bouncing around at about 7250 RPM. |
| 34:09 | And what we can see is that during this period our ignition timing is retarded beyond TDC so our timing is four degrees after TDC at this point. |
| 34:21 | So we're actually igniting the fuel air charge after the piston's gone past TDC. |
| 34:25 | Now this is incredibly effective at both building exhaust gas temperature as well as building boost pressure. |
| 34:32 | So we can see in our boost trace here that what this has resulted in, while it does move around a little bit, we were sitting at around about 240 kPa, around about 20 psi of boost pressure. |
| 34:42 | And then as soon as the driver leaves the line, the ignition timing reverts at this point to our table values, in this case we've got 28 degrees. |
| 34:53 | Alright so we're using that launch control strategy, our two step to help get the turbo up on boost. |
| 35:00 | Now with a 2.2 litre engine with a Garrett GT 42 turbo there's absolutely no way we'd be able to get enough boost just on a secondary rev limit. |
| 35:09 | We need to retard the timing to help build that boost. |
| 35:12 | What we're doing is creating the combustion event happening later in the engine cycle out into the exhaust manifold, that's creating enough exhaust gas energy to spool that turbo. |
| 35:21 | Let's have a look and see what that looks like inside our tuning software. |
| 35:25 | So what we're using here, there is a two step or dual RPM function here. |
| 35:31 | So this is on a digital input that is run off a clutch switch here. |
| 35:36 | So if we look this, we'll look at our parameters. |
| 35:38 | There's a couple of things we wanna take into account here. |
| 35:41 | So first of all we've got our low RPM limit. |
| 35:46 | This is simply our launch control limit, and we can see that's set to 7200, so this is another one of those levers that we've got to adjust or pull when we're at the track tuning this car, depending on the amount of grip on the start line we can increase or reduce our RPM for our two step limiter. |
| 36:04 | The next one we've got there is our RPM rise rate, you can see that's set to 5000. |
| 36:08 | Now I'm gonna get into exactly how that works shortly but for now let's just park that, we'll just basically state that all that does is it limits how quickly the RPM can rise when that limiter is turned off, it's quite important as we'll see. |
| 36:22 | And then we've got our ignition retard. |
| 36:25 | Now we can see that in this case I'm not actually using that function there. |
| 36:29 | We've got that ignition retard set to zero. |
| 36:32 | The reason that I don't use the ignition retard in this particular function is that it's fixed. |
| 36:37 | We're retarding the timing by a fixed amount and in my own opinion that's not particularly useful. |
| 36:43 | So what I'm doing instead is I'm retarding the timing in another way. |
| 36:48 | So we've got our main ignition table over here on the right hand side, we've got the numerical numbers in the table here, and we've got a range of compensations inside the ignition set up. |
| 37:02 | We'll go to comp one and this is a compensation that I have set up based on whether or not the clutch switch is active. |
| 37:09 | So at the top there, we've got two step on or off, zero or one. |
| 37:13 | So we can see that our comp when the clutch switch is off, obviously zero, it's not doing anything. |
| 37:19 | And I've set up manifold pressure as the load axis for this table. |
| 37:23 | So what I'm doing here is I'm adjusting the amount of retard based on the boost pressure that I'm achieving. |
| 37:31 | So what we can do is we can start when the engine is still in a slight amount of vacuum with only 10 degrees out. |
| 37:38 | So this means that when we activate the two step limit, if we're just sitting there at idle, the engine isn't going to stall, we're not actually gonna pull any timing at idle. |
| 37:46 | But once we go to full throttle, and we get up to 9500 kPa, that's when we start pulling timing. |
| 37:52 | Then we can see we're quite agressive here, this actually isn't a great table to show it. |
| 37:56 | I'm pulling about 32 degrees to get the effect that I want. |
| 37:59 | But what we can see here is once we go past 250 kPa which is my target boost, I'm actually reducing that retard so we're adding the timing back in. |
| 38:09 | We go from 32 degrees of retard back to 28 degrees so what we can do by using the numbers in this table and manipulating them, we can get some sort of level of control over our boost pressure, in order to get the boost that we want. |
| 38:24 | Quite a common scenario we see with people using this sort of ignition retard, boost control is the boost kind of starts building and building and building and then it kind of becomes self sustaining and we actually see the boost rise out of control. |
| 38:38 | We don't want that, we wanna be able to leave the line every time with the same boost pressure so that the engine is making the same power so that all of our strategies for our launch control are the same time after time. |
| 38:50 | Now we'll also show you as well in our aim boost, another aspect that we've got to work with for our launch control is we can see that in gear position zero we still have a wastegate duty cycle value. |
| 39:03 | You can see I've got that set to 24%, so we can basically adjust the boost pressure, the amount of control on the wastegate so that's another aspect that we can use to control that boost pressure on the start line. |
| 39:18 | Alright so I've mentioned there, we'll just head back to the datalogging, I've mentioned there we're trying to use more boost pressure than the engine can really, or the car can put to the track normally. |
| 39:30 | And particularly through second gear here. |
| 39:32 | The reason we're trying to do this is because if we had to run a little bit less boost in second gear just to get the car hooked up, what that would mean is that when we hook third gear we can now increase the boost, it's gonna take a lot longer for that boost pressure to roll up to where we want it to be. |
| 39:48 | But we can see even with flat shifting here, there is quite an amount of time that it takes for that turbo to spool up, big old lazy turbocharger on a realtively small engine. |
| 40:00 | So what we wanna do here to reduce particularly this gap here as much as we can as we want to run more boost pressure in second gear than we could probably get to the ground under normal circumstances. |
| 40:14 | So this again comes down to torque management. |
| 40:16 | If we're making a certain amount of boost pressure and we want to reduce the torque, one of the tools we have at our disposal there is to adjust our ignition timing. |
| 40:26 | And I've got our ignition timing being displayed here, let's just move this graph up so we can see what's happening. |
| 40:34 | Now it does look like it's all over the place here. |
| 40:36 | We've got our ignition timing here through first gear where we're not really making too much boost. |
| 40:42 | Sitting let's say at about 27 degrees. |
| 40:44 | What you can see, also I'll mention there on each of the gear shifts we've got an ignition retard event just to help smooth the torque reintroduction to help settle the car on the gear shifts so we can see that's our first to second shift and we've got the same on our second to third shift. |
| 41:01 | And then third to fourth. |
| 41:04 | What we're looking at though is this particular section here where the car is in second gear. |
| 41:11 | And what we can see is that the timing has actually been retarded so we're only running about 11 to 12 degrees through there despite the fact we've got 350 kPa boost pressure. |
| 41:22 | So this is another trick that we've got at our disposal is tuning or trimming the timing based on either gear or based on time. |
| 41:31 | So let's have a quick look back in our tuning software. |
| 41:34 | We'll see how exaclty I've done that. |
| 41:36 | In this case it was relatively simple, I'll show you a more advanced one in a second. |
| 41:40 | We'll go down to our ignition compensations and what we wanna do is look at gear comp. |
| 41:45 | We can see we've got a two dimensional table here, ignition trim versus gear and all you can see here is I'm pulling eight degrees out when the car is in second gear. |
| 41:54 | So it just allows me to run that little bit more boost, we're trimming the torque using our ignition timing and then the advantage with this is that when we feed that timing back in, in third gear, we've already got a lot more boost there than we would have otherwise had so it just reduces the lag that we're gonna see as we spool that turbo back into third gear. |
| 42:15 | Alright so what I'm going to do is show you a slightly more advanced version of that strategy. |
| 42:20 | So let's head across and we'll show you, this is another car that I was involved with, I mentioned before the Heat Treatments Nissan R32 GT-R This was, pretty sure this was actually the first time we broke the 4WD world record in pretesting for the jamboree over in Australia at Willowbank Raceway. |
| 42:41 | So this was private testing. |
| 42:43 | We'll just quickly show this one pass, so that's just the burnot warming the tires up. |
| 42:50 | And then we'll have a look at some data and see exactly what I was doing to try and manage the torque. |
| 42:59 | So you can see at that point there a little puff of smoke it actually did wheel spin slightly and hopefully you'd have been able to see that the car was quite loose going down the strip there. |
| 43:10 | Again if you wanna have a better look at this video, we'll make sure that's available afterwards as well. |
| 43:16 | Alright so what we'll do is we'll head back across to my laptop tuning software and we'll have a quick look at what I'm doing with the Heat Treatments car. |
| 43:27 | So there's two functions here, first of all in second gear I'm doing exaclty the same thing that we saw with the Evo, second gear we're pulling four degrees timing out. |
| 43:38 | However what I've also done with the Heat Treatments car, I'll just have a look at this one first. |
| 43:44 | I've set up a timer based on the two step switch. |
| 43:48 | So this timer starts when the two step switch is released and it will reset when that switch is reactivated so the two step switch is just at the base of the clutch. |
| 43:59 | So we can see that the X axis for this timer is, as you'd expect, time. |
| 44:04 | And what we've got here is a ignition retard based on time from the start line, so we can see one second into the run which is just before the 60 foot, I start pulling a little bit of ignition timing, we've got one degree, two degrees, three degrees, and finally at 1.75 seconds through to 2.25 seconds, we're pulling four degrees. |
| 44:26 | Now that's gonna work in conjunction with that gear based trim as well. |
| 44:30 | So we at some points are pulling up to eight degrees of timing out of the engine there. |
| 44:37 | So this allows just a little bit more sophistication and a little bit more control of your torque management compared to if we were just solely going to use a gear based trim. |
| 44:49 | What we'll do is we'll also have a quick look at the data from that particular car. |
| 44:54 | With the Heat Treatments car, this uses a proper drag racing gearbox, this is a Liberty air shifted five speed clutchless box. |
| 45:05 | Only useful for drag racing, basically what it allows is complete seamless upshifts, no requirement for any torque reduction so it's not like a conventional circuit racing sequential dog box where you need a torque reduction from the ECU to allow the shift to complete. |
| 45:24 | Basically completely seamless so what we can see here as well is our boost pressure control. |
| 45:31 | So with this particular car we are still stepping the boost up as we go down the strip. |
| 45:39 | But there is a big difference with this particular car. |
| 45:43 | Not something that's going to be too relevant to most import drag racers. |
| 45:48 | But as we start getting more and more serious what we find is that with these manual transmission cars, tend to run what is referred to as a slider clutch or a slipper clutch. |
| 45:59 | And this is a special clutch designed for drag racing. |
| 46:02 | And it has an adjustment for both the base amount of pressure that will be applied to the clutch plates as well as some centrifugal weights that can be applied which make the clutch lock up either more or less as the engine RPM increases. |
| 46:15 | And this is beyond the scope of our talk today and it's not an engine tuning aspect but with these slider style clutches or slipper clutches, it's really important to give the clutch a really consistent amount of power, if we change the power through the ECU then it's going to have a dramatic effect on the way the clutch locks up and that can really skew our data completely. |
| 46:40 | Alright so we've talked about our boost control, I just wanna also show you the last example that I had wasn't that great. |
| 46:49 | We'll jump back into the laptop software, and we'll just look at the two step setup on the Heat Treatments car because this is a better example of what I was trying to explain. |
| 46:58 | We've got exactly the same setup for our two step ignition retard. |
| 47:03 | We can see that we're really aggressive here right up to around about 340 kPa we're pulling 38 degrees of timing from the main timing map. |
| 47:14 | And then once we get up to that point, at 350 kPa we're only pulling 28 degrees and then if we go above this you can see we're only pulling 15 degrees. |
| 47:24 | So what we end up with is a situation where the boost ends up fluctuating around about that 340, 350 kPa, as it goes up the ignition is added back in so we don't get as much exhaust gas energy to spool the turbo so the boost tends to drop away. |
| 47:40 | So it's quite a good way of getting a reasonably good control over the boost pressure on the start line and again as I've sort of mentioned, it's really important to get that consistent if you want to get good consistent results with your launches. |
| 47:56 | If your boost pressure is different from one run to another, you're never going to be able to decide on exactly what the reason was for the car going well, was it the RPM that you left the line at or was it the fact that the boost pressure was different? Alright we're going to move into some questions really shortly so if you do have anything related to this, please feel free to ask those questions in the comments now. |
| 48:24 | What I wanna do though is just show you one more video here, again we'll make this available. |
| 48:30 | So this is from the same Heat Treatments car and this is just another indication of when you've gone too far and you've overpowered the track. |
| 48:40 | So we'll just watch what happens here and then I'll talk you through it. |
| 48:52 | Alright so obviously a pretty wild ride and in hindsight Reece probably would have been better to abort that run and call it a bad day at the office and get out of the throttle but for some reason he decided to persevere and stick with it, he got to the end of the strip without hitting the wall, but it was a pretty fine thing. |
| 49:12 | What we can see though, and we'll just go back to the start of the run here. |
| 49:16 | Basically, and this is quite common with drag racing, we'll just go back to the point where the car actually launches. |
| 49:24 | This is so important to get the car to hook up from the moment it leaves the line and this is easy to overlook. |
| 49:32 | If the car is loose from the time it leaves the line, then the rest of the pass you're going to be basically playing catch up and it's again what I was talking about earlier, the situation where if you overpower the tires and you have to pedal on the throttle, when you get back into the throttle, the boost comes back on, you're likely to overpower the tires again. |
| 49:51 | So we'll just watch as the car leaves the line. |
| 49:54 | You see that it bounces in the rear, so as soon as it sets up that bouncing in the rear, it's unsettled and it's unloading the rear tires, and as soon as it's unloading the rear tires, basically the rest of the run is just an abortion. |
| 50:08 | And this particular point here where the car turns hard right, this is on one of the gear shifts. |
| 50:14 | So again this is an important aspect with a manual gearbox, this is why we're now seeing a lot of the faster cars move to automatic transmissions which are much smoother on the gear shift. |
| 50:27 | With a manual transmission we see quite a sharp change on the gear shift and this is often enough to unsettle the car and cause the tires to break traction so that's exactly what happens there and the rest is history. |
| 50:41 | So what I wanna do is show you another technique that we can use there. |
| 50:46 | And what I'll do is I'll start actually, let's head back, I did say that I'd talk about this photo in a little bit more detail. |
| 50:52 | So this is one of the products that we created through my old shop Speedtech Motorsport. |
| 50:58 | And this was kind of a product that we created out of necessity more than anything else. |
| 51:05 | We actually ended up creating it and then selling it as a product all around the world which blew us all away because it's incredibly niche. |
| 51:11 | So this only worked for the Evo 4-9. |
| 51:13 | You needed a dog engagement motorsport style gearbox and then the lever mechanism that you can see in here, this was an Ikea shifter so Ikea is a Japanese product, basically converts the H pattern gearbox into sequential. |
| 51:33 | So what we did was we made this aluminium base that you can see here, bolted underneath the Ikea shifter and it used an air ram which we can see here. |
| 51:45 | And basically then it turned the whole system into a air shifted gaerbox. |
| 51:51 | The reason we created this was the black Evo 9 project DS9 that I've talked about, the owner of that car basically jumped right in the deep end with this project. |
| 52:02 | The fastest he'd ever gone on the quarter prior to us building this car for him was I think about a 12.5 or a 13.5 so we've gone straight from that point to a car that was capable of running initially at least in the mid nines. |
| 52:15 | He had quite a bit of trouble with that which probably comes as no big suprise. |
| 52:19 | And when we were testing the car, I jumped in it, did a couple of passes down the strip and made sure everything was fine, was shifting great. |
| 52:26 | He jumped in it and really couldn't get his head around the clutchless shifting with the sequential. |
| 52:32 | It always had the sequential lever in it, it had a strain gauge on it and all you had to do was leave the line, drop the clutch and from there just pull back on the lever when the shift light came on, didn't need to back off the throttle, didn't need to use the clutch. |
| 52:44 | He really struggled with that to the point where a couple of times he hung it up on the 10500 RPM rev limiter for an extended period of time and that's not real good for these engines so he did a bit of damage as a result. |
| 52:56 | So we developed this air shifter, so basically it's just like playing playstation, there is a button on the steering wheel, all you have to do is press that, that sends a signal to the Motec ECU to provide a gear change ignition cut so it momentarily cut igntion to allow the dogs to unload and the gear change to take place, and it then also sent a signal to a solenoid that powered up that air shifter which then moved the gear lever. |
| 53:23 | So it all became really seamless, as soon as we did that the car was incredibly reliable and just went faster and faster. |
| 53:32 | So I'll just show you how we're using that strategy though. |
| 53:35 | We'll just jump into the data again and we'll have a quick look at the world record pass. |
| 53:42 | And what we can see is, I've already mentioned it but on the shifts we are using ignition cut but also we're using ignition retard. |
| 53:51 | And the reason we're using that retard is with the ignition cut it's only momentary, somewhere in the region of maybe 50 to 80 milliseconds, and when the ignition is reintroduced, obviously all of the power comes back on and that can be enough to unload the tires and cause wheel spin. |
| 54:07 | So what we're seeing here is, although it's very brief, we'll play around with this quite a bit depending on the particular car. |
| 54:15 | What we can do is create some ignition retard and then ramp the ignition timing back in to smooth the reintroduction of torque there. |
| 54:23 | So that makes a really big difference when you're walking on the tightrope with a tire that doesn't really have enough grip for what you're trying to do. |
| 54:31 | Alright the very last thing I'm going to talk about there is probably the worst kept secret in drag racing circles. |
| 54:40 | And that is the clutch slipper. |
| 54:43 | I'd like to think that I actually came up with this by myself but chances are there were a bunch of people who were also developing this at the same time as me. |
| 54:55 | Anyway it was something that was really really popular for, and still is popular with a lot of drag cars. |
| 55:03 | Now just while I've been talking here, this is a really bad way of doing it, but let's just jump across to my laptop screen, this is one of the commercial products that now is available from Magus Motorsport. |
| 55:15 | And we can see this here. |
| 55:18 | What it consists of is a little solenoid which controls the fluid flow for your clutch system and then we've got this little valve here that basically acts as an adjustable restrictor in the clutch line. |
| 55:32 | So with that out of the way, what it essentially allows us to do is control how quickly or slowly the clutch is released. |
| 55:39 | So the idea behind this is that the driver can side step the clutch, and instead of the clutch just banging straight up and engaging fully, often this will either involve the car bogging in quite hard or maybe lighting up and wheel spinning. |
| 55:55 | What it does is it controls and smoothly releases the clutch so it creates a controllable consistent and repeatable amount of clutch slip through first gear. |
| 56:04 | That is absolutely critical in getting fast consistent standing starts in a drag car, even more critical when you've got four big sticky slicks on a four wheel drive drag car. |
| 56:18 | And with the black Evo 9 that we've been looking at there, the fastest 60 foot that ever did was a 1.260 Now I think if my memory serves me correctly while we've now got a few Evo, late model Evos that are now running in the high seven area, the 60 foot we got with that car still is just about as good as any of those cars so we really put in a lot of effort, making sure that the 60 foot was as good as we could get. |
| 56:47 | So the idea there is we slip the clutch so that the car is not wheel spinning, the tires stay hooked up, but we don't end up with the engine bogging. |
| 56:54 | So it's all about trying to smoothly transition from standing start where our RPM should essentially be zero if the clutch was engaged and the wheel aren't turing, to the point where we're at the end of first gear and the RPM and the wheel speed are in sync and the clutch is fully locked up. |
| 57:16 | A lot can be gained if we get that right. |
| 57:18 | But there are some problems around that which is the result of the engine RPM initially being able to flare quite dramatically. |
| 57:28 | So let's head back to my laptop screen again and we'll see what that kind of looks like. |
| 57:33 | So this again is that world record pass, and we can see this is the point here where the clutch has actually started, or the driver has let go of the launch control and the clutch has started to move off the floor. |
| 57:47 | We see the RPM rise. |
| 57:50 | But the clutch actually hasn't started to bite so the car actually isn't moving. |
| 57:54 | So this is the problem with that system and we need to control that and that is where I'm using the RPM rise rate, let's just go back to our dual RPM. |
| 58:08 | This is actually for the Heat Treatments car but anyway we saw the RPM rise rate I had in the Evo 9 was set to 5000 RPM per second. |
| 58:19 | So basically what this means is that when we come off the two step, if the clutch plates don't immediately start to grab, the RPM isn't going to zing straigh up to our rev limiter. |
| 58:29 | What it's going to do, the ECU's going to control that RPM rise rate. |
| 58:33 | And it's really what we wanna try and do of course is get the point where the clutch switch disengages and the clutch plates start to engage synchronised but that's not always absolutely perfect and we don't always get that absolutely right. |
| 58:50 | So there in a nutshell is probably some of the key things that I've learned over a career of about 18 years. |
| 58:58 | Now particularly in the import drag racing industry again probably for a lot of people who are competing actively in drag racing, nothing I've talked about here is really too much magic, there really isn't any magic in this. |
| 59:13 | It is a case of looking at the tools available to us through our ECU and our tuning, and deciding how we can manipulate those tools, which ones we can use in order to achieve the best possible outcome and all of this really comes down to sometimes thinking a little bit outside of the box. |
| 59:30 | Gets us the best possible result. |
| 59:33 | I will just mention before we move into questions that if you are considering using a clutch slipper, be aware that you are going to end up burning through some clutch plates. |
| 59:45 | We obviously are purposefully slipping the clutch. |
| 59:47 | In my own drag car using a triple plate Quarter Master clutch, we would be throwing out that clutch after about 10 passes down the strip. |
| 59:58 | The clutch plates would just be completely rinsed, complete throwaways. |
| 01:00:02 | So that's a cost you definitely need to factor in. |
| 01:00:06 | Also as an upside though, because the shock loading on the launch is reduced, this is also a lot easier on your drive train components. |
| 01:00:15 | Alright our first question comes from Matt who's asked, at a rough guess, how much would the entire STM Evo 3 drag program cost including everything? Matt I never added it up. |
| 01:00:27 | I don't wanna know. |
| 01:00:30 | What I can tell you is that at that point in my career, every single spare cent was being poured into my drag racing. |
| 01:00:38 | I didn't have much of a social life, and I wasn't doing anything outside of drag racing, it is a very expensive occupation, if you wanna be doing it at that level. |
| 01:00:51 | We're also very lucky to have a number of people backing us in terms of our sponsors who were making it possible for us to do what we're doing. |
| 01:01:00 | So yeah I really don't know what it cost us in total. |
| 01:01:05 | The other thing, which is pretty common that you need to factor in is that the car wasn't built from a bare shell into what you saw, the photo I showed you right at the start of today's webinar. |
| 01:01:17 | This was an iterative build that sort of grew and changed over the course of about four or five years of drag racing so that did make the hit a little bit easier to stomach but there was still a huge amount of money that went into that car. |
| 01:01:37 | If you wanted to start from scratch and build a car to that level, I would say you would probably need to be budgeting somewhere around about USD$150000 to USD$200000. |
| 01:01:49 | I'm talking here if you wanted to take a late model Evo and beat what is now a 7.7 world record. |
| 01:01:56 | You're probably gonna be needing to play in that sort of sandpit. |
| 01:02:01 | Daniel Hoi has asked, what fuel are you using for a 0.5 lambda on the Heat Treatments car? So that ran on methanol fuel so yeah they run very very rich on methanol fuel. |
| 01:02:11 | It's not uncommon to be running in the range of 0.6 maybe 0.55 to 0.65 Very dependent on the particular engine you're tuning and also the boost level. |
| 01:02:24 | From my recollection with that car we ran it generally just slightly richer than about 0.60 Craig has asked, would using a DCT dual clutch transmission change the overboost setup in the lower gears? Haven't really played around with too many dual clutch transmissions at that sort of power level. |
| 01:02:49 | What we find is that most factory dual clutch transmissions don't tend to take four or five times more than factory power output that well. |
| 01:03:00 | So generally we're switching to an aftermarket transmission. |
| 01:03:05 | At that power level I guess the exception to that rule would be the R35 GT-R. |
| 01:03:09 | What we find with a well set up dual clutch transmission is that the shift speed is incredibly fast. |
| 01:03:15 | Faster than what we saw with the sequentially shifted, or air shifted manual box but I think you're still gonna have exactly the same sort of problem that we encountered as well. |
| 01:03:28 | Obviously the faster you can get that shift, the less time the engine is, less time the engine's torque is reduced for so you won't see the boost pressure drop off quite to the magnitude we saw on the datalog file from that DS9 car so that's another point I should make there. |
| 01:03:47 | Craig's also asked, I'm not sure how fast the air shifter shifts? The shift time was dependent on the gear shift. |
| 01:03:55 | So this wasn't a closed loop system which we'd use these days where it was physically monitoring the gear position and only cutting for the amount of time required. |
| 01:04:06 | All it was doing was providing a timed cut. |
| 01:04:08 | And particularly with that Ikea shifter on the second to third shift, in the H pattern box, that's an across gate shift which is quite slow and time consuming. |
| 01:04:18 | So I think the shift time was somewhere around about maybe 90 or 100 milliseconds for that second to third shift and we're down around 60 milliseconds for the other shifts. |
| 01:04:30 | Daniel has also asked, on the percent by gear chart you mention a four speed trans, is the zero in the chart used for the trans break. |
| 01:04:39 | No so zero in this case is just the neutral position. |
| 01:04:42 | So because this is a manual transmission not an auto there is actually no trans break. |
| 01:04:47 | But because we've got that zero or neutral position in the table that allows us to set the wastegate duty cycle when the car's on the two step on the launch control. |
| 01:04:59 | And that's just one more of those aspects we can adjust, between that, RPM and ignition retard, to get the boost pressure that we want on the start line. |
| 01:05:08 | Alright guys that has taken us to the end of our webinar. |
| 01:05:10 | Bit of a long one there so hopefully everyone's still awake and enjoyed that lesson, enjoyed that webinar. |
| 01:05:18 | As usual for our HPA members if you do have any more questions related to this topic, please ask them in the forum and I'll be happy to answer them there. |
| 01:05:26 | Alright guys thanks heaps for joining us and I look forward to seeing you all next time. |


