197 | Installing Aftermarket Stud Kits
Summary
Aftermarket head studs and main studs are a common upgrade in any performance engine build. Most engine builders don’t think too much about these products but there are a few steps you should take before installing your studs that will ensure you get the best possible results.
| 00:00 | - Hey guys, Andre from High Performance Academy here. |
| 00:02 | Thanks for joining us for another one of our member's webinars. |
| 00:06 | Now today we're going to be talking about a topic which on face value does seem pretty simple. |
| 00:12 | We're going to be covering off the process of installing a set of studs when you're building a performance engine. |
| 00:19 | Here we're going to be focusing on our Subaru FA20 engine that's in front of me, and we're gonna be looking at the process being applied to installing a set of head studs. |
| 00:28 | Of course this same process can be replicated when you're installing any type of stud. |
| 00:34 | Whether it's a head stud or a main stud and actually a lot of what we're going to talk about today is just general good practice for the process of cleaning and preparing an engine block prior to starting the building process anyway. |
| 00:49 | Now if you don't get this right, what it can do is affect the amount of clamping force that we're achieving from the stud. |
| 00:56 | So while it is subtle and again probably most people think it's pretty straighforward, we do need to go through this process if we wanna make sure that we are actually clamping the components together, getting the amount of clamp out of those fasteners that the manufacturer intended. |
| 01:12 | Particularly when we're dealing with a head stud kit, this is going to be important on a high boost turbocharged engine to prevent the head from lifting and causing head gasket integrity issues. |
| 01:22 | As usual, at the end of our webinar, we will be having a question and answer session so if there's anything generally related to today's topic that you'd like to ask or anything that I cover today that you'd like me to delve into in a little bit more detail, then feel free to ask your questions in the comments and the guys will transfer those through to me. |
| 01:43 | Alright so let's just start with the fundamentals, what we're actually trying to do. |
| 01:48 | As I've said, this isn't a terribly taxing task. |
| 01:51 | But we do need to understand what we're trying to achieve and why. |
| 01:55 | So really the key here is making sure that the threads that we've got in the block are clean and are in good condition. |
| 02:03 | Particularly with a high mileage engine, we're likely to find that there's going to be an accumulation of corrosion, crud, dirt, burnt oil et cetera, that's going to end up finding its way into those threads. |
| 02:18 | And what that's going to do is it's going to affect the friction between the threads and the studs and in worst case scenario it's also going to potentially end up damaging the threads in either the block or the fastener so not what we want. |
| 02:33 | So we wanna make sure that those threads are clean. |
| 02:36 | Likewise we need to make sure that the fasteners or studs that we are going to be installing into those holes are also in good condition. |
| 02:43 | This is one that is often overlooked and while when we are dealing with brand new fasteners straight out of a box from the likes of ARP for example, we'd like to think that these are all in pristine condition. |
| 02:56 | That's not always the case so we need to be careful, be mindful there and have a look at them. |
| 03:03 | Particularly if we are reusing studs and if those studs have seen a few engine rebuilds then this is where we're much more likely to end up seeing our fasteners being damaged. |
| 03:14 | Once we've got everything cleaned, we also need to understand correctly how to install the studs in the block and this is an area where I see quite a bit of misinformation and confusion, again really simple as we'll get into. |
| 03:28 | Alright so what we're going to do is start with the process of inspecting and cleaning the studs. |
| 03:35 | So as I've said, what we're looking for here is any sign of damage to our studs. |
| 03:39 | So particularly when you get your studs, these ones are from ARP, often there will be a plastic sheath around the studs. |
| 03:48 | So if that's the case then that's ideal, it's really difficult to damage a stud in that case. |
| 03:54 | But if they are all loose like the one I've just pulled out of here, particularly in transit they can end up knocking against each other and while they are a hardened steel it is still possible for the threads to become damaged so what we'll do is we'll just get this out of the way here. |
| 04:08 | And we'll bring in our little iPhone camera so we can have a better look at what we're talking about. |
| 04:14 | So in this case here, let's see if we can actually get this visible, yep there we go. |
| 04:19 | So this is the coarse thread that is gonna go into the block and what we're looking for is any sort of blemish on the sharp ends of our thread here. |
| 04:30 | So if there's any bruising to any of those, in which case right now we can see there is not. |
| 04:35 | So this is good to go. |
| 04:36 | Likewise we're also looking for any sign of contaminants that are in the threads of our stud. |
| 04:42 | Of course it's also a good idea to check both ends, we can see on the end that our nuts are going to go on, this is a much finer thread. |
| 04:51 | Now this is also, hopefully you can see this at home. |
| 04:54 | These have been used for a dummy assembly and what we've actually got is a little bit of ARP assembly lube still in the threads where those nuts have been tightened down. |
| 05:04 | So this is the sort of product that we're going to want to clean out and make sure that we've got rid of all of that lubricant from the studs before we actually go any further. |
| 05:15 | So we wanna go through, make sure that all of our studs are clean. |
| 05:18 | As a good practice this is a good time to also make sure that you've got the correct amount of studs, you've got the correct number of washers and also the correct number of nuts. |
| 05:27 | Generally if something is missing, it's probably not on the manufacturer's end. |
| 05:33 | Their counting system is pretty stringent, so chances are I'd be looking underneath your bench or maybe blaming your engine machinist. |
| 05:40 | But there's nothing more frustrating than having everything there, going to assemble the components and then finding out that you're missing something. |
| 05:47 | So once we know that everything is clean and accounted for there, the next step is to go through and clean out our stud holes. |
| 05:55 | I should actually, I'll go back one step there. |
| 05:57 | I've said that we are looking for any damage on the threads of our studs. |
| 06:02 | And in general, and particularly if you're dealing with anything performance related I would be recommending that if you've got any damage on the threads, that you do seek to replace that particular stud. |
| 06:17 | We don't really want to take any chances. |
| 06:19 | On lower powered engines or if you've got very minor damage to a thread, sometimes it can be possible to clean that up. |
| 06:28 | And what we're going to do there is just use a needle file just to remove any burnish off those threads, sharpen those back up, and we also wanna make sure that once we've done that, that the stud will still thread cleanly into its mating hole. |
| 06:42 | Or if it's on the other end where the nut is going to be located, that the nut will still tighten down onto that stud with absolutely no friction. |
| 06:51 | If that's not the case, if it's becoming difficult to tighten that stud down or tighten the nut onto the stud, this is another clear indication that there is still some damage to those threads and as I've said, because you've got extra friction there, this is going to affect the amount of torque or the amount of clamping that you're going to achieve from that stud for a given amount of torque. |
| 07:12 | So while you may have torqued that to the manfacturer's recommendations, it's a really good chance that you're not actually going to get the correct amount of clamp load from the fastener. |
| 07:22 | Alright so now we'll move on to cleaning down our holes in our block. |
| 07:27 | Now this is a step that a lot of people overlook, particularly they assume that if they've had their block in at an engine machinist then the engine machinist should have done this or alternatively that the block is already in good condition and they don't need to bother. |
| 07:43 | And I reckon this is probably one of my key rules with performance engine building in general is never make any assumptions. |
| 07:50 | Ultimately regardless what the machinist has or hasn't done, my opinion is that the final say still rests on the person actually assembling the engine components. |
| 08:01 | So don't assume, check, make sure that you're comfortable for yourself that everything is absolutely correct. |
| 08:09 | So the process we're going to go through here is we're going to clean out the holes in our block using a tap. |
| 08:16 | Now there are a couple of ways we can do this. |
| 08:18 | There are specialised thread chasing or thread cleaning taps. |
| 08:23 | Certainly if you've got access to one of those, that's a great way of doing it. |
| 08:27 | They are designed to clean out the threads without removing any excess material. |
| 08:33 | Most people in my experience at the hobbyist level aren't gonna have access to thread chasing taps. |
| 08:40 | So the technique that we teach in our course, the technique that I use myself, is instead to use a fresh, clean tap, to do that job. |
| 08:50 | So there are a couple of things to understand when we are using taps or selecting taps. |
| 08:56 | The first thing we need to understand is that we need the correct tap for whatever thread our fastener is. |
| 09:03 | So this is an ARP stud for our Subaru FA20. |
| 09:06 | And it uses an 11 by 1.25 millimetre thread. |
| 09:11 | So obviously if you're gonna be running a tap through your holes, you want to make sure that you are using the correct tap. |
| 09:16 | A little bit of research there to find out what the thread is, is going to be your first step. |
| 09:22 | If you end up running the incorrect tap through your threads, you're going to do some very difficult to recover damage to those threads so don't make that mistake. |
| 09:30 | Now we've got our tap set here, let's just jump across to our remote camera here. |
| 09:38 | So this is a fairly comprehensive, our iPhone camera I should say, this is a fairly comprehensive tap set. |
| 09:43 | These are all metric. |
| 09:45 | You're probably going to ultimately want a metric and an imperial tap set in order to cover all of the different options. |
| 09:52 | And what we're looking at here, just about out of camera shot, we've got two 11 millimetre taps. |
| 09:58 | We've got 11 by 1.25 and 11 by 1.5. |
| 10:02 | So again really important to make sure that you get the right one there and also the metric fine or 11 by 1.25 can be a tricky tap to souce as well. |
| 10:14 | Doesn't finish there with the correct thread though. |
| 10:17 | We also need to use the correct tap. |
| 10:20 | So let me just grab our two 11 by 1.25 millimetre taps and I'll show you the difference. |
| 10:28 | There are a variety of different taps, I'm just gonna put both of these in front of our iPhone camera here. |
| 10:36 | So the one that I've got here in my left hand is what's referred to as a starter tap. |
| 10:43 | The one that is in my right hand here, this is referred to as a bottoming tap. |
| 10:48 | Now hopefully what you can see is that the shape of the end of the taps is quite dramatically different between the two of them. |
| 10:56 | The starter tap, which we'll just have a look at in a little bit more detail here, has quite a taper on the end of it. |
| 11:05 | Let's just see if I can point in the right place. |
| 11:07 | It's got quite a taper on the end of it and as its name suggests, this makes it easier to get that tap started. |
| 11:14 | And what we can see though is that we don't actually have any cutting occur. |
| 11:19 | A tap really doesn't start until we're around about 15 millimetres down the tap. |
| 11:24 | So the problem with this is if you are tapping a blind hole such as for a head stud, you're going to do almost nothing to the threads right down in the botom of that hole. |
| 11:36 | And those threads are actually really important because that's where our stud is going to bottom out. |
| 11:41 | So on the other hand if we switch over to our bottoming tap. |
| 11:45 | Let's just get that on camera, see if we can get our phone to focus, there we go. |
| 11:50 | So we can see that we've got a much shorter taper on the bottom of this. |
| 11:54 | Makes it harder to get started but we do have an existing thread here that we're going to be running that into so it's not too challenging. |
| 12:01 | And you can see that we're basically cutting good threads right from the start of that tap. |
| 12:08 | Alright so for our purposes here, we do want to be using the bottoming tap. |
| 12:12 | As I've said, otherwise we're not going to be affecting the threads right at the bottom of that hole and that's going to be a problem for us. |
| 12:21 | Just make sure I've got the right tap after saying that we need to make sure we've got the right tap. |
| 12:27 | OK so there are a few more considerations we need to make here. |
| 12:30 | It's a good idea to start by just giving the hole a good clean down to start with anyway, particularly when you get your block back from the machinist, it should already have been hot washed but that's not always the case. |
| 12:44 | And it's likely or possible that there could be swarf or dirt remaining in the hole loose that's easy to remove. |
| 12:52 | And my favourite way of removing that sort of grime, and I use this for a variety of different tasks on our engines anyway, is just to use a set of engine cleaning bottle brushes. |
| 13:03 | These particularly ones I've sourced from Jegs, they come as a kit. |
| 13:06 | I think it's a Moroso product but you can buy them from a variety of sources. |
| 13:10 | As you can see, they come in different sizes to access different holes. |
| 13:15 | So what I'm going to do with one of these is basically use them in conjunction with some brake clean and just basically get any loose material out of the hole before we start running our tap through them. |
| 13:28 | It's a good idea when we're doing this as well to have a good supply of compressed air so we can blow all of that grime out of the hole. |
| 13:34 | Once we do this, now it's actually time to start using our tap. |
| 13:39 | We'll see this demonstration very shortly. |
| 13:43 | But another area that a lot of people overlook is when we are using a tap, it's a good idea to make sure that you are using a specialist cutting oil. |
| 13:51 | Now this will make sure that the tap isn't going to do any damage to your threads, it's going to give you a sharper finish to the thread and generally just lubricate that tap as it's being installed. |
| 14:05 | So once we've gone through that, you're going to end up finding that there's quite a bit of crud built up generally in the flutes of that tap. |
| 14:12 | You're gonna remove that tap, there's also going to undoubtedly be some crud left in the bottom of our hole, our blind hole, which we also need to remove and to do that I'm gonna use brake clean and again some compressed air. |
| 14:27 | So we'll see exactly how we can go about that. |
| 14:30 | So we'll go through a demonstration now and after the demonstration we are gonna jump into a Q&A so this is a good time if there's anything I've just discussed, that you'd like me to talk about in more detail, this is a relatively straightforward topic to understandably the webinar isn't going to be overly long. |
| 14:49 | So if you've got any questions, ask those in the chat and we'll get to those shortly. |
| 14:54 | Alright so I've got my compressed air here, we're just going to run our tap through this particular hole here. |
| 15:01 | Obviously the process I'm going to apply would just be a rinse and repeat on every other hole. |
| 15:06 | So before we get started, we can just blow the hole out. |
| 15:12 | Now it's a good idea, particularly if you have got a pretty dirty block, while you're doing that, it's a good idea to take a rag and just block that hole so you're not going to end up blowing debris into your eyes. |
| 15:25 | Probably also a good point that when you're doing this it's a good idea to use some protective glasses. |
| 15:32 | I'm not doing that today but do as I say, not as I do. |
| 15:36 | Alright so we've made sure that there's no dirt or debris in that hole for the moment. |
| 15:40 | We're going to take our tap, it's also a good idea, and if you're doing this on the entire engine, obviously you're going to be tapping each hole individually, you're gonna find that you'll get that build up of debris on the flutes of the tap. |
| 15:55 | You can just blow that down with compressed air as well to remove any of that debris, don't want to introduce any more debris into the hole than you have to. |
| 16:05 | Alright so we're going to take our tap and I'm just going to apply a light spray here of our cutting oil. |
| 16:13 | The particular product that I'm using here is a CRC product called CDT cutting oil. |
| 16:18 | But depending on where abouts you are in the world, you're likely to find that under a variety of different brand names. |
| 16:25 | It doesn't really matter, most automotive supply shops or machine warehouses will be able to supply something suitable. |
| 16:32 | OK so now it's time to actually run our tap through our holes and this actually presents a problem because as you can see, not that particular stud, as you can see here, our stud is incredibly long and we actually find that our threads don't start until we're well below the deck surface. |
| 16:49 | So if we look at that, I'm not gonna get very far through that if I'm going to be using a conventional handle for my tap. |
| 16:59 | So let's actually just have a quick look at that. |
| 17:02 | Conventionally this is the sort of handle that you are going to use for your tap. |
| 17:07 | It's going to hold the tap in place and I'll just get that connected. |
| 17:12 | And makes it really easy to turn the tap both ways, tighten it and loosen it. |
| 17:17 | But of course we're not really gonna be able to do very much, we're gonna be able to tap about the first five millimetres of that thread and that's about it. |
| 17:26 | So a little trick that I use when I'm doing this sort of job is to find a quarter inch drive socket that is a good fit for my tap. |
| 17:36 | So I'm actually going to use this socket and an extension and a little quarter inch strong arm in order to run my tap through the block as opposed to the components actually supplied by the tap manufacturer. |
| 17:48 | Now when we're doing this as well, you're going to find that your tap is probably likely to fall out of your socket. |
| 17:56 | It's not the end of the world, you can use a magnet to retrieve it from the stud hole. |
| 17:59 | What I've actually done here is I've placed a small amount of blue tack in the end of the socket and that's just going to support our tap. |
| 18:08 | It's a good idea here just to start that tap gently by hand. |
| 18:12 | Remember because we are using a bottoming tap here, there isn't a lot of lead in on those threads so we should be able to wind that easily into the block by hand. |
| 18:21 | There shouldn't be any undue resistance, we wanna make sure that we've got that started and it's nice and concentric with the hole. |
| 18:28 | So we've got that started, I'm gonna take our extension here and we're going to take our strong arm and just going to gently wind that into the hole. |
| 18:37 | Now depending on the condition of your threads, how much dirt and grime there is, is gonna depend how much effort's going to be required here. |
| 18:47 | It shouldn't take a lot of effort. |
| 18:50 | So you can see I'm basically using my finger to turn this, it's not difficult at all, and that's pretty typical. |
| 18:57 | So if you are struggling then something is probably wrong. |
| 19:00 | What I'm also doing as you'll notice here is I'm turning the tap in around about a full turn and then I'll turn it back a quarter turn. |
| 19:08 | And what that does is it cleans the threads out and it gets all of the debris located into the flutes on the tap. |
| 19:16 | Alright so we'll feel once we get down to the bottom there and we can remove our tap and this is the point where you can kind of see what all of that work was all about because as we remove the tap, you'll see how much grime is left in the thread so let's just get that out and hopefully our little blue tack will stay intact. |
| 19:37 | No it didn't but I can still pull it out. |
| 19:40 | Alright let's just get our iPhone camera set up again over here. |
| 19:44 | And you can see how much debris we've removed there. |
| 19:51 | So quite significant. |
| 19:53 | Even though that block has been cleaned down roughly, there's still a fair amount of material that's been removed there. |
| 20:01 | So that's our first process there, we've run our tap through the holes. |
| 20:04 | Now we obviously need to thoroughly clean that out. |
| 20:07 | So what I'm going to do here is just use a brake clean product and then I'm going to use our compressed air. |
| 20:13 | So it's a good idea to do this a few times. |
| 20:15 | I'm just going to spray some brake clean down that hole. |
| 20:17 | This time I am gonna use my rag otherwise I'm gonna end up with brake clean in my eyes. |
| 20:21 | So I'm going to take my compressed air gun, get that into the stud hole, and then just cover the stud hole with our rag. |
| 20:27 | And blow that out. |
| 20:37 | So it's a fairly easy process there. |
| 20:39 | So at this point we've got our stud hole cleaned out and we're ready to actually install our studs. |
| 20:45 | Of course we're going to repeat this for all of our stud holes before we actually go through with the assembly. |
| 20:53 | Alright so at this point we need to install our studs and this is another area that I hear a lot of mixed ideas about the correct way of doing so. |
| 21:02 | Some people will go and install these studs using a Loctite product and that is not necessary. |
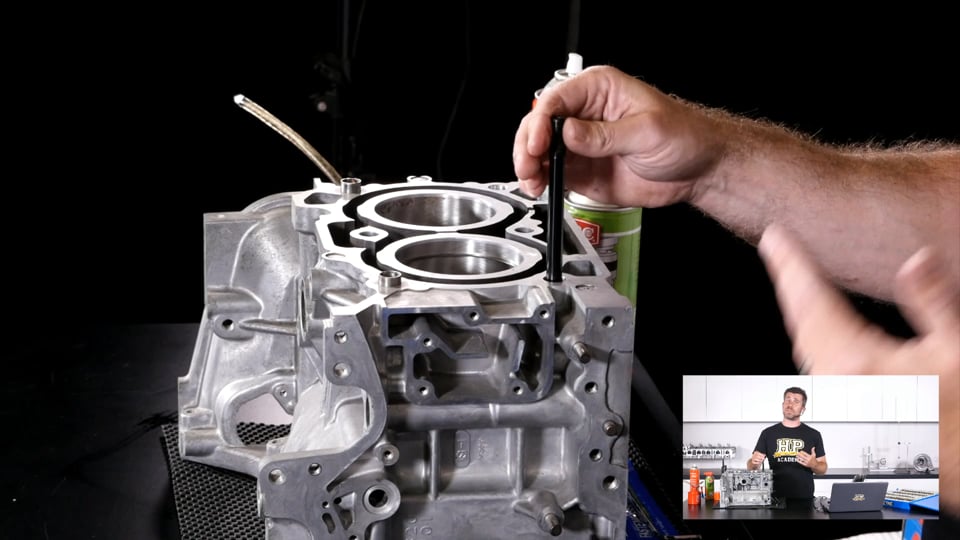
| 21:10 | What we are going to do here is basically wind the stud into the threaded hole in the block and we're just going to do it up just slightly beyond finger tight. |
| 21:20 | Before I do this though, I do like to apply a light lubricant to the threads of the stud, and this is just going to again help protect the threads on the stud as well as in the block from any damage. |
| 21:33 | It's gonna make it easier to remove this stud at a later point during dissasembly. |
| 21:38 | Before I put this in though, I just wanna mention one other point here. |
| 21:41 | Let's just bring our iPhone into the shot again and we'll have a quick look at this. |
| 21:49 | So this is two stud designs here and again I'll try and get them in the shot. |
| 21:55 | So the upper stud is a fairly conventional stud and what we see is that there's no real extension on the end of that stud. |
| 22:03 | The problem with this is that when we do this up into the block, we tend to end up tightening it down on that bottom stud. |
| 22:11 | So the stud at the bottom here, this is my preference when we're looking at aftermarket studs, a little bit beyond our topic today but just worth mentioning anyway. |
| 22:21 | And what we can see is that there is an extension on the base of that stud. |
| 22:24 | So when we're actually tightening that into the block it's that little extension on the end of the stud that's actually going to bottom in the stud hole, and what that's going to do is it's going to ensure that we've got even stress placed on all of our threads. |
| 22:38 | So just a point there, you can't really do much about it if you've already got your studs. |
| 22:45 | In some instances you're also not going to have too many options in the aftermarket, you're going to probably be stuck with what is available. |
| 22:53 | But we are seeing this design of stud available in quite a few applications now. |
| 22:58 | Alright so with our stud, important to make sure that we're putting the right end into the hole and usually this is going to be pretty straightforward to work out. |
| 23:07 | Quite often the threads will be different from one end to another but also at least as far as ARP go, there usually will be a little in hex, machined into the end of it so that you can use a allen key in order to tighten that down. |
| 23:25 | Alright so what I'm gonna do here is just apply a small amount of lubricant to my threads and you can use just about any lubricant you want here. |
| 23:35 | One of the things I'm doing, any time I'm building an engine, I've always got a oiling can which you see here of clean mineral based engine oil available. |
| 23:44 | I use it for a variety of tasks, so that's always a good way of lubricating our stud. |
| 23:51 | I'm going to now get that started and with our threads cleaned down, it should be a really easy task as we can see here, to wind that down there's absolutely no friction there which is exactly what we want. |
| 24:04 | We should be able to wind that all the way down to the bottom of the stud hole and this is a good point to make anyway, if you ever are tightening a fastener down and you can't tighten it with your fingers like this, that indicates you've got a problem. |
| 24:17 | Now some of you out there probably are also pointing, maybe considering the fact that I am tightening this stud using my fingers. |
| 24:25 | In some instances that is something we don't wanna be doing. |
| 24:29 | Some of the higher grade studs that we will be using, some of the H11 Tool Steels, maybe the ARP Custom Age 625 do suffer from hydrogen embrittlement, so it's really important with those studs to make sure that you don't contact them with your skin. |
| 24:45 | In this case you really wanna be using rubber gloves when you are tightening those studs in or any time you're handling them for that matter. |
| 24:52 | Otherwise they can actually end up failing prematurely or fatiguing prematurely. |
| 24:56 | So we've got that in there, this particular material is just ARP's entry grade 8740 so it doesn't suffer from hydrogen embrittlement. |
| 25:06 | Alright so I'm going to take my allen key here, place that in the end of the stud and all I'm going to do there is just tighten it slightly beyond finger tight. |
| 25:17 | We don't need to be cranking this down too hard. |
| 25:21 | There's no advantage in doing so. |
| 25:23 | All you risk doing is ending up damaging the end of the stud. |
| 25:27 | So once we've got that tightened, our stud is installed, and we're ready to complete the rest of our assembly. |
| 25:34 | Now while we were talking really today here about cleaning out our stud holes or preparing our stud holes and our studs for assembly, I will just follow this off with when we are tightening down in this case our cylinder head, it is really important to use the correct assembly lubricant for our fasteners. |
| 25:51 | And what you're going to find here is that when you're used to or familiar with dealing with rebuilding factory engines, almost inevitably the assembly lubricant that is from the workshop manual will just be a clean engine oil. |
| 26:06 | Obviously because it's easy to find. |
| 26:10 | However with aftermarket studs we're almost inevitably going to be using a moly based assembly lubricant. |
| 26:17 | In this case, the ARP stud kits are all supplied with this little sachet of their moly based assembly lubricant so you do need to make sure you use that. |
| 26:27 | And the reason why that is important is that when we are tightening down any fasteners, what we're generally going is using a torque value. |
| 26:35 | And we're tightening the fastener down to achieve that specific torque value that that manufacturer has recommended. |
| 26:43 | The problem with that is it's actually an indirect way of achieving a certain amount of stretch in the fastener. |
| 26:50 | It's the stretch that's important. |
| 26:51 | You can think of these studs a little bit like a very very stiff coil spring. |
| 26:55 | What we're trying to do is stretch them apart so that they provide a clamping force to hold our components together. |
| 27:01 | If we don't get the correct amount of stretch, either too little or too great, we're not going to achieve the correct amount of clamp. |
| 27:08 | Particularly if we over stretch our fasteners, they can be permanently deformed, that's not ideal either. |
| 27:15 | So it really comes down to getting that correct torque value. |
| 27:19 | The problem is that the torque value really comes down to the friction on the interface between the nut and the threads on the fastener. |
| 27:29 | Also the interface between the nut and the washer. |
| 27:33 | So what I'm getting at here, is by using a different lubricant, it really vastly changes the relationship between stretching the fastener and the torque that you apply. |
| 27:43 | So that's why it's so important to use the lubricant that the fastener manufacturer has recommended. |
| 27:50 | Alright we'll just take a quick look and see if we have got some questions, and we have. |
| 27:55 | This is a great time, if you've got any more to continue asking them. |
| 28:00 | Craig has asked, is there a coating on the ARP studs? To be honest, I'm not actually sure what the finish on those studs is. |
| 28:12 | I am not a metallurgist so I can't really say with any certainty what that, actually what that finish is. |
| 28:20 | If the stud is damaged, would it be safe to use if it's repaired? OK this really comes down to a conscience call on the part of the engine builder. |
| 28:29 | The considerations I'd be looking at is how badly damaged is the stud? Also we wanna really consier where abouts is the damage located? Then the last aspect is what is the application that the engine's going to be used for. |
| 28:44 | So if we're talking about a low power engine where probably the stud kit is overkill in the first place, then a minor blemish or slight bruise on a thread, particularly if it's one that is located perhaps above where the nut will be tightened down, yeah probably no problem at all to reuse that stud or repair that stud as I kind of touched on earlier. |
| 29:07 | Use a needle file to dress down any damage there so that your nut will still go on nice and smoothly. |
| 29:14 | Of course on the other hand if the damage is significant or you're really pushing the boundaries then there's absolutely no point taking any risk. |
| 29:22 | And the thing you need to always weight up is the cost of a stud, replacement stud or at worst case a replacement stud kit, can end up pretty minor compared to for example a conrod bolt failing, if you're talking about fasteners that are on the most stressed part of the engine. |
| 29:38 | Or for example here if our head ends up lifting, if we torch a head gasket, we torch a cylinder head and the block, that's going to be some expensive damage and a replacement stud or stud kit could've looked like a pretty cheap option. |
| 29:51 | Magic Mike has asked, bit ghetto but anything extra to consider when replacing head bolts with studs with the head still on or in situ one at a time? OK so no like this is a less than ideal scenario however we live in a world where sometimes we deal with situations that aren't perfect. |
| 30:11 | We've done this ourselves through my old workshop a number of times, dealing with particularly 4G63s and upgrading them to an L19 head stud. |
| 30:20 | This is done with the head in place. |
| 30:22 | So this makes it all but impossible to do exactly what we've just done there and run a tap through all of those threads. |
| 30:29 | So here what we're doing is basically using the best possible solution. |
| 30:33 | We're going to clean out those threads as well as we can, using our bottle brushes, our engine cleaning brushes, we're going to clean them out using brake clean, blow those out, get them as clean as possible and then we're going to hope that the condition of those threads is still sound. |
| 30:49 | Now when we are doing this though, as I've kind of touched on here already, you do build up a feel for whether the condition of the threads in the block is normal, as I've said you should be able to install those studs with little to no force. |
| 31:02 | So if you're really struggling to tighten the stud down, this is indicative that there is a problem, you need to stop and you need to address that, otherwise you're going to end up with a bad result. |
| 31:15 | Anthony has asked, so is it a good idea to magnetise the tap? Not something that I would suggest. |
| 31:23 | So another solution, if you're talking about removing the tap from the block, the tap can be picked up with a magnet, so you don't actually need to magnetise the tap itself. |
| 31:37 | But if you want to make the tap stick to your socket, that I used there, yeah absolutely I guess you could feel free to do that. |
| 31:48 | For me, blue tack's a nice simply easy solution and as I've just shown you, there's an alternative way of retrieving the tap if it does end up falling off and down your stud hole. |
| 31:59 | Patrick has asked, where do we find that tap set? Probably, I don't know where in the world you are joining us from Patrick, so we're in New Zealand, it's probably a little bit pointless me pointing you to a particular supplier. |
| 32:13 | But good quality tap sets like this will be available anywhere in the world from quality machining supply stores. |
| 32:20 | So you're not talking here about general mechanical suppliers, you're talking about those who supply to the machining trade. |
| 32:29 | So look up one of those in your own area and you should be able to find some good quality tap and die kits from them. |
| 32:37 | Jay has asked, do the torque specs change when building a boosted engine using ARP head studs? No the torque specs for the studs are based on the material being used and the size of the studs. |
| 32:55 | So when you purchased those from ARP, yep you're going to get an information sheet. |
| 33:00 | I'm using ARP here as an example but of course this will be the same for all manufacturers. |
| 33:07 | So this will give you the recommendation on the torque as well as in this case they give you the torque procedure. |
| 33:13 | So that doesn't vary regardless whether you're naturally aspirated or boosted. |
| 33:17 | A little trick that I will mention here is this is what we were doing back with my 4G63 drag program, back when we were racing and building these engines for drag use. |
| 33:30 | The limiting factor on the 4G63 really was in terms of sealing the cylinder head to the block so that was the hard part of the job. |
| 33:39 | We could basically make as much power as we wanted as long as we could hold that boost inside the engine. |
| 33:45 | And what we find, at least with the stud kits we were using there, ARP's recommendations or I guess specifications, they use a torque rating of 75% of the yield strength so this gives a little bit of room for movement there, and we were actually increasing the torque rating very slightly over and above ARP's. |
| 34:07 | The point to mention here is if you torque the fastener beyond the yield point, it will be permanently deformed so we don't wanna be doing that. |
| 34:16 | That's really one of the areas where using an aftermarket stud kit is nice in comparison to a lot of factory torque to yield fasteners which aren't reusable. |
| 34:25 | As long as you're not torquing the aftermarket stud beyond its yield point, it is reusable. |
| 34:33 | Alright guys that has brought us to the end of, no sorry we've got one more question there. |
| 34:41 | Are there horsepower specific studs? Pretty broad question, the answer there is that the horsepower actually isn't that relevant. |
| 34:52 | Your studs are trying to seal against cylinder pressure and while the cylinder pressure is relative in some way, shape, or form to our engine power, there is too many variables in between. |
| 35:04 | So it's a little hard to give you a specific answer there. |
| 35:07 | For the most part, if we are dealing with light to moderately modified engines, then off the shelf stud kits are more than adequate. |
| 35:17 | It's really when we're looking at the very high boost turbocharged engines, in the drag applications that this does become a little bit more problematic. |
| 35:25 | And in this case what you'll find is that there are a variety of materials that these studs are made out of. |
| 35:31 | I've already talked about them a little bit, there's ARP's 8740 and ARP 2000 is their sort of lower entry products which are still generally a great step up over a factory bolt. |
| 35:45 | And then if you're really going to be pushing boundaries, what you'd generally do is step up to some of the more advanced materials such as L19 or Custom Age 625. |
| 35:54 | So these are a much stronger steel that can provide a lot more clamping force. |
| 35:59 | Of course they come at a higher price point as well. |
| 36:02 | So without a little bit more detail around your question, I can't really give you much more of a specific answer. |
| 36:08 | Jay has asked, is there a limit on the number of times a head stud can be torqued? I.e. at what point if at all do you replace them or can you just measure them and monitor them for stretch? OK so basically you've answered your own question there. |
| 36:21 | With an aftermarket stud kit that is being tightened below the yield point, as I've mentioned, it's not going to be permanently deformed. |
| 36:29 | So as long as the stud remains in good condition, and what I'm talking about here is the thread condition, then they can be reused. |
| 36:38 | In a lot of cases, when we're looking at very high spec engine builds, these parts would be lifed and even when they are still looking like they're in good condition, they may be replaced as a matter of course after a certain number of freshen ups and again really this just comes down to often the cost of the stud kit is basically a drop in the ocean compared to the overall cost of the engine so no stone is left unturned and the risk just isn't worth the reward in reusing those parts. |
| 37:06 | Right so that does bring us to the end of our questions so thanks to everyone who has joined in today, hopefully everyone's learned a little bit more about what is a fairly mundane topic but of course as usual there are still a few little things that we can pull out of there and focus on to make sure that we get the best possible results. |
| 37:23 | As usual for all of our members, if you do have any questions relating to this webinar, after it's aired, please ask those on our forum and I'll be happy to answer them there. |
| 37:32 | Thanks for joining us, look forward to seeing you all next time. |
| 37:35 | Now for those who are watching on Facebook today, this is just a little insight into what we put on for our HPA gold members every week. |
| 37:43 | Our HPA gold members have the ability to review these webinars in our archive. |
| 37:47 | Currently got over 190 hours of existing webinar content covering topics from engine building to engine tuning and also high performance aftermarket wiring for cars. |
| 38:00 | If you are interested in learning more and becoming a gold member, you can become a gold member for just USD$19 a week, sorry a month, try and get that right, USD$19 a month, that's a much better deal than every week. |
| 38:11 | And that'll also give you access to our private member's only forum which is the best place to ask your specific tuning, engine building, or wiring questions. |
| 38:22 | You will also get three months of free gold membership with the purchase of any of our courses. |
| 38:28 | Alright guys thanks again and hope to see you online soon, cheers. |


