199 | Optimising Your Tune Using Short & Long Term Fuel Trims (STFT + LTFT)
Summary
While the best method to accurately adjust your VE table and/or MAF calibration is to use a wideband AFR meter, a technique many tuners rely on instead is the fuel trims. In this webinar we’ll discuss the pros and cons of both techniques and see how to set up a histogram to capture the data you’ll need. For this webinar we’ll be using the HP Tuners software on a VE Holden fitted with a 6.0 litre LS2.
| 00:00 | - Hey guys it's Andre from High Performance Academy. |
| 00:02 | Welcome along to another one of our webinars. |
| 00:04 | This time we're going to be touching on a topic of how we can use the short term and long term fuel trims to help us optimise the calibration in our engine. |
| 00:15 | And in this case we are dealing with late model GM vehicles. |
| 00:19 | In this case we're in our 2006 Holden Commodore running a six litre L98 engine. |
| 00:25 | Very similar to the six litre LS2, and we're going to be using HP Tuners to make our tuning changes. |
| 00:33 | Now first of all I need to deal with what is a short term and long term fuel trim and why can they be beneficial to us. |
| 00:41 | Well this is the built in closed loop control system. |
| 00:45 | The car is fitted with narrow band O2 sensors or narrow band lambda sensors in the exhaust system and the ECU can monitor the output of these sensors. |
| 00:55 | And this gives the ECU some information about what the air fuel ratio that the engine is actually running is likely to be. |
| 01:03 | Now this allows the ECU to then make tuning changes. |
| 01:07 | It can add or subtract fuel in order to get the air fuel ratio back on track. |
| 01:13 | One important aspect to note here though is that the vehicle that we're dealing with here, as with most of the GM vehicles, is fitted with what's reffered to as a narrow band O2 sensor or a narrow band lambda sensor. |
| 01:27 | And this straight away means that there are some limitations on how useful that sensor is for our pusposes in the aftermarket. |
| 01:36 | The narrow band O2 sensors are only useful, as their name implies, across a very narrow range or narrow band of air fuel ratios. |
| 01:45 | Specifically they are very accurate at 14.7:1 the stoichiometric air fuel ratio for our pump gasoline. |
| 01:53 | Leaner or richer than the stoichiometric air fuel ratio, they are essentially useless to us. |
| 02:00 | So this is the first important point to take away from this webinar, is that you cannot hope to use a narrow band air fuel ratio sensor to fully tune your engine. |
| 02:11 | It's going to be completely useless to you when you're at wide open throttle under power enrichment where you're going to be targeting a much richer air fuel ratio than stoichiometric. |
| 02:20 | You're just going to have no idea how rich you are away from stroichiometric, you're just going to hopefully know from the sensor that you are in fact richer than stoich. |
| 02:30 | So that's the first thing, it's really important to understand in order to properly calibrate your vehicle, properly calibrate your ECU, you are going to need a wideband sensor. |
| 02:40 | And this sort of brings us to a question of if we're going to need the wideband sensor anyway, why worry about our short term and long term fuel trims? And this is a good point. |
| 02:52 | Once we've got a wideband air fuel ratio sensor set up and input into our scanner, then we can use this and this is my preferred techique and this is the technique that is taught in the worked examples on our practical reflash tuning course. |
| 03:09 | This is undoubtedly the most accurate way. |
| 03:11 | Of course as we've just touched on, once we're in power enrichment, it's essentially the only way of seeing what our air fuel ratio actually is. |
| 03:19 | So this is the way I recommend to go about producing your tuning or calibrating your engine. |
| 03:26 | However we are gonna touch on this technique of using short term or short term and long term fuel trims today because I know this still a technique that a lot of tuners use and it has some merit, provided you understand of course the limitations which is what we've just talked about, completely useless to you when you are in power enrichment at wide open throttle, targeting that richer air fuel ratio. |
| 03:52 | Now there are a few other downsides that are argued over using short term and long term fuel trims versus a wideband. |
| 03:59 | One of these is the nature of the short term and long term fuel trims in that they are working in response to an error. |
| 04:08 | So you find that if you're looking at what the short term and long term fuel trims are doing, they're always cycling round moving rich or lean, chasing the errors that are there. |
| 04:19 | The other aspect is that the closed loop control strategy is used to purposefully cycle the air fuel ratio very slightly rich and lean across the stoichiometric air fuel ratio point to actually make the catalytic converters work. |
| 04:32 | So there is some latency essentially if you're going to be using the short term and long term fuel trims. |
| 04:38 | It is argued that this is another reason we shouldn't be using them. |
| 04:40 | Personally in my own experience, it becomes a moot point. |
| 04:43 | The reason for this is that it is impossible no matter how much time we want to spend or how good you are at your job, it's impossible to get a situation where the tune is that accurate that the closed loop control is just doing nothing. |
| 04:59 | That closed loop control is there to pick up the pieces when there are small day to day variations with the way the engine's running. |
| 05:06 | Even you'll find with a completely stock vehicle, straight off the showroom floor, from GM, you're going to find that on a hot restart, the ECM relies quite heavily for a few moments on the closed loop trims to get the engine running at stoich after that hot restart due to heat soak issues et cetera so the closed loop control system is always going to be doing some work. |
| 05:30 | And generally, we'll talk about this in a little bit more detail, generally I'm trying to get a tune where my closed loop trims are as close to zero as possible. |
| 05:41 | Ideally I'd like to be in the region of about plus or minus 3%. |
| 05:45 | The most I'd really tolerate before doing some work in the calibration is gonna be about plus or minus 5%. |
| 05:52 | So I should also mention we are gonna have a demonstration of a couple of techniques of using this here on our Mainline dyno and of course as usual we are gonna be having the opportunity for questions and answers so if there's anything that I talk about today or anything related to this particular topic please ask those in the comments and the guys will get those through to me. |
| 06:12 | Alright so I've mentioned short term and long term or short term only. |
| 06:17 | So in stock form the GM ECM uses both short term and long term fuel trims. |
| 06:24 | And essentially the way these work is that the short is an instantaneous change based on an error that exists. |
| 06:33 | So if for example we're targeting our stoichiometric air fuel ratio and we're running too rich, the short term fuel trim will remove fuel in order to drive us back to our stoichiometric air fuel ratio target. |
| 06:44 | What happens though is that if that short term fuel trim stays negative for a significant period of time, the ECM essentially decides that there is some error in the mapping at that point and it starts applying a long term fuel trim that basically takes into account what the short term fuel trims are doing. |
| 07:03 | So if we watch what happens over a period of time, we'll start with possibly quite a large negative short term fuel trim, and then over time the long term fuel trim will take over from that, getting our short terms back to zero. |
| 07:15 | So essentially we should be seeing our short term fuel trims if everything's working well, cycling pretty close to zero. |
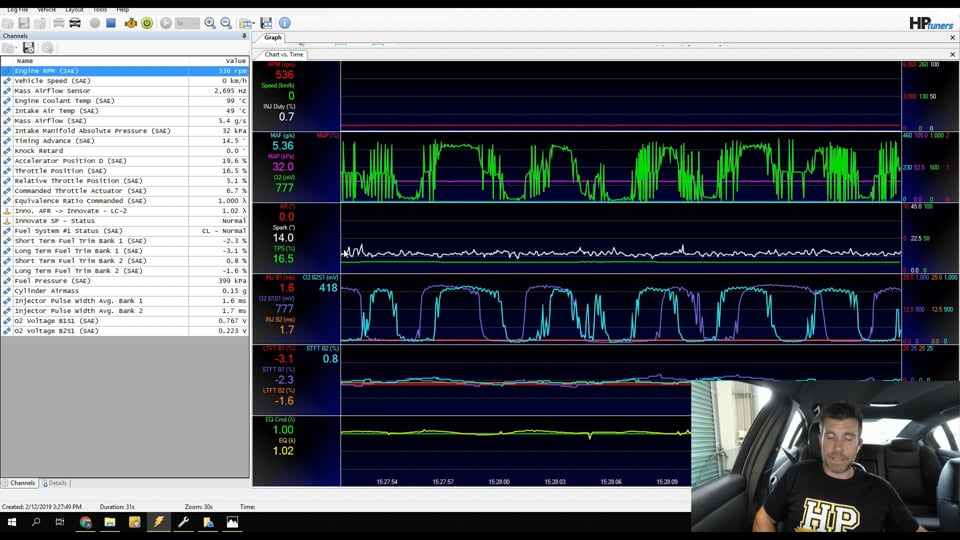
| 07:22 | And what we can do here is, let's just have a quick look at how this actually looks in our scanner, we'll head across to my laptop screen, we'll just get the scanner up and running. |
| 07:31 | We're still sitting here at idle at the moment so you can see we're sitting at about 550 RPM. |
| 07:38 | We'll actually get the car running shortly. |
| 07:40 | We've got the voltages out of our O2 sensors here. |
| 07:45 | And a narrow band O2 sensor is a sensor that essentially outputs a voltage between about zero and one volt. |
| 07:51 | Don't really need to worry too much about that. |
| 07:53 | The ECU or ECM is basically taking in that data and deciding on what that means in terms of the air fuel ratio. |
| 08:02 | The data that we're interested in here is our short term and our long term fuel trims. |
| 08:08 | We've got four pieces of data here because we have short term and long term fuel trim for both banks being that this is a V8 engine. |
| 08:15 | So for example if we look at bank one, long term fuel trim at the moment, bank one is in red and you can see that sitting at minus 3%. |
| 08:23 | And the short term fuel trim we can see is moving around. |
| 08:26 | This in sort of a purply colour for bank one. |
| 08:30 | And you can see it cycling between about minus 3% there and it also goes slightly positive. |
| 08:36 | It didn't quite, but you can see my point is the short term fuel trim is quite close to zero and you can see that the long term fuel trim for that same bank has stayed pretty stationary the whole time we've been running. |
| 08:47 | Now below this I also have a wideband sensor coming into the car here, into the scanner, and this is our Innovate LM2. |
| 08:58 | This is coming in via serial. |
| 09:00 | So what we're scanning here is two parameters, we're scanning our commanded lambda, so this is the lambda target that the ECU is actually requesting. |
| 09:08 | And then of course we've got our wideband air fuel ratio telling us what we've actually got. |
| 09:13 | So if we've got a situation like this, we don't need to use our short term and long term fuel trims but for the purposes of today's demonstration we're just going to see exactly how that works. |
| 09:22 | What I'll do, just while we're on this screen here, let's just get the car into gear here and we'll apply a little bit of RPM and a little bit of load so we can see how those trims move around once we come up in the RPM range, and we've actually got the car essentially now about 1500 RPM in fourth gear. |
| 09:41 | Very light throttle, so this would be probably pretty indicative of where we would be at cruise. |
| 09:47 | And again if we look at our short term and long term fuel trims, you can see the long term fuel trims, nice and stable. |
| 09:53 | You can see the short term fuel trims doing exactly what I've said, cycling backwards and forwards across that zero point. |
| 10:00 | And if we look at our measured air fuel ratio or lambda below this, you can see that it is cycling back and forwards across that lambda one point, across the stoichiometric air fuel ratio point, again this is to do with making sure that the catalytic converters are going to work efficiently. |
| 10:18 | Alright so that's what's basically going on inside our ECM there. |
| 10:22 | Just a really quick look at our scanner, we're gonna be having a lot more detailed look at this really shortly. |
| 10:28 | Let's just head back across to my notes though for a second here. |
| 10:33 | OK so you've got the choice as I've sort of mentioned here, of using the short term plus the long term or just the short term fuel trims only. |
| 10:41 | Traditionally at the start of my career when I started tuning the GM vehicles using HP Tuners, what I would do is disable the long term fuel trims and I would rely on just using the short term fuel trims to help me with my tuning if I was gonna use the trims for our closed loop area of operation. |
| 11:02 | There's no strict need to do that, you do have the option of using another math channel which takes into account the sum of the short term and long term fuel trims for each bank. |
| 11:14 | So that's the two options there. |
| 11:17 | What you need to understand is that if you do wanna use the short term fuel trims only, you do need to disable the long term fuel trims. |
| 11:25 | Otherwise you're going to end up with completely insaccurate data. |
| 11:29 | So we'll have a quick look at how we can do that. |
| 11:31 | And we'll head across to my laptop screen and at the moment I am on the fuel tab here and we've come across to our O2 sensors. |
| 11:39 | There's a couple of ways you can do this but a really quick and easy way is if we just see here we've got the long term fuel trims, minimum engine coolant termperature and maximum engine coolant temperature. |
| 11:49 | So basically by maxing out our minimum engine coolant temperature there, we're going to prevent the ECM ever using the long term fuel trims, it will disable those and work solely on the short term fuel trims. |
| 12:06 | OK so once you've got that decision made you can flash that into the ECM if you want to, otherwise as I've said, we can use both the short term and long term fuel trims. |
| 12:17 | The other aspect to understand here is the operation of the late model GM ECM. |
| 12:24 | So what these ECMs work off primarily is a mass air flow sensor. |
| 12:30 | Pretty common, pretty popular with most OE manufacturers so the mass air flow sensor is a popular choice because it directly measures the mass of air entering the engine and if it's reporting that accurately to the ECM, it makes it very easy for the ECM to decide what pulse width to deliver to the injectors in order to achieve a specific target air fuel ratio. |
| 12:52 | However under transient conditions, sharp throttle openings, et cetera, there is a little bit of latency in the mass air flow sensor in terms of operation. |
| 13:03 | So GM have incorporated a speed density sub systems as well. |
| 13:07 | So this is more the sort of technique that a lot of aftermarket standalone tuners are familiar with where we've got a three dimensional volumetric efficiency table based on manifold absolute pressure and RPM. |
| 13:20 | So depending on the generation of GM ECU that you are tuning, this can be dealt with in a couple of different ways. |
| 13:28 | On the very early Gen 3 LS1 this was a built in VE table, a speed density table. |
| 13:36 | They've transitioned the later model ECMs to what's referred to as a virtual volumetric efficiency system. |
| 13:44 | So the important thing to understand is that if you want to retain the way the stock ECM operates and calibrate everything correctly, we've got two separate systems that we need to calibrate. |
| 13:56 | We need to calibrate the mass air flow sensor and we also need to calibrate the virtual volumetric efficiency sub system or speed densty sub system to make it simple. |
| 14:04 | Let's just jump back into my laptop software here and we'll just have a quick look. |
| 14:08 | If we drop down out edit menu we can see that we have an option called virtual volumetric efficiency. |
| 14:14 | So this actually makes it really easy, with the late model GM ECMs, there isn't a built in speed density table as we saw with the LS1, the Gen 3 engine. |
| 14:24 | And instead they use a virtual volumetric efficiency system where the VE table is essentially calculated on the fly based on a bunch of coefficients and values. |
| 14:37 | So from our perspective this made it really hard to calibrate. |
| 14:40 | So, this is a fair while ago now, HP Tuners included a virtual volumetric efficiency editor which is this here. |
| 14:49 | The reason that GM have taken this approach which seems on face value to be pretty tricky and a lot more complex than it needs to be is it opens them up to a lot more flexibility to deal with engines with variable cam control et cetera, where the volumetric efficiency of the engine is constantly changing based on cam position or inlet runner control et cetera. |
| 15:09 | So the other aspect with this is that you do need to understand that to calibrate correctly the speed density subsystem, you need to disable the mass air flow sensor, likewise to calibrate the mass air flow sensor correctly, we need to disable our speed density subsystem. |
| 15:27 | It's all explained in detail in some of our worked examples as well in our practical reflash tuning course for those who are going to want a little bit more information on that. |
| 15:37 | One last thing I'll just mention as well is that a lot of people will choose to apply a speed density patch. |
| 15:44 | So this is some custom code that HP Tuners have written that essentially rewrites the way the PCM works or the engine control module works. |
| 15:52 | And incorporates now a conventional VE table just like we're probably familiar with seeing in a standalone aftermarket ECM. |
| 16:02 | So this eliminates the virtual volumetric efficiency subsystem. |
| 16:06 | Seems like I'm having a lot of trouble saying virtual volumetric efficiency today. |
| 16:10 | Let's see if I can keep it on track for the rest of our webinar. |
| 16:14 | Alright so we've talked about our short term, long term fuel trims, we've talked about the fact that you can choose to incorporate both or disable your long term fuel trims and just tune on short term only. |
| 16:24 | What we're going to do now is have a look at how we can go about doing this. |
| 16:30 | We'll just have a look at how we can set up our histograms, we'll look at some driving techniques and we'll have a look at what we're actually aiming for when we're making our tuning changes. |
| 16:39 | Following this we will move into questions and answers to we've got a little bit to go through here but this is a good time to ask any questions you may have. |
| 16:48 | Alright so what we're going to do is head back across to our scanner. |
| 16:52 | We'll get our engine back up and running on our dyno. |
| 16:55 | And we'll start scanning. |
| 16:58 | I'm not going to, just to make things simple here, I'm not going to be performing a full tune where we're actually swapping between the MAF and the speed density subsystem, we're just going to make some assumptions here. |
| 17:12 | So at the moment we are on our chart or our time logger which shows all of our parameters but it's not particularly useful to make tuning changes based on this. |
| 17:22 | And again we'll just get up and running, so we've got a little bit of load on the car, 1500 RPM, fourth gear. |
| 17:28 | And we are seeing our trims move around. |
| 17:33 | Now one really important aspect when we are using, or when we're doing any tuning, regardless whether we're using our fuel trims or we're using a wideband to make our tuning changes. |
| 17:43 | Before we start scanning and gathering data, it's a really good idea to allow our engine to stabilise all of the temperatures. |
| 17:50 | So in particular here we're looking at our engine coolant temperature and our inlet air temperature. |
| 17:57 | I apologise to those of you joining us from the US market but we are working in metric units here. |
| 18:02 | So we're at 96 degrees centigrade in terms of our water temperature. |
| 18:05 | Probably a pretty typical operating temperature for our LS. |
| 18:09 | Our air temperature though, 45 degrees, is quite high. |
| 18:13 | And that's probably not typical of what we'd see out on the open road. |
| 18:18 | So it's a really good idea to allow all of our temperatures to come back and stabilise to give us really accurate data. |
| 18:24 | It's a really easy trap to fall into where you've had the engine running for several minutes, this can happen on the dyno or it can also happen if you're road tuning and you're doing this on the side of the road. |
| 18:35 | You've got the hood closed, everything's heat soaked and all of your temperatures are through the roof. |
| 18:42 | So what you'll find is that after you restart the engine and start driving, the first few minutes after you start driving, you're going to potentially have some pretty unrealistic trims getting everything back into line while all of the temperatures come back to normal operating conditions. |
| 18:57 | So it's really really important to allow that to occur. |
| 19:01 | Now given that it's quite hot here today I'm probably not gonna get too much better than what we've got now but it's a point just to note there. |
| 19:09 | It's a really easy trap to fall into. |
| 19:11 | It can end up being really frustrating 'cause you'll end up chasing your tail and you're going to end up with a calibration that's just not right. |
| 19:18 | The other aspect when we are gathering data using our short term and long term fuel trims, or for that matter our wideband it's really important to be very smooth with your throttle inputs. |
| 19:29 | Now this can be a little bit trickier if you are road tuning because often you're going to be going through the gears, you'll often have to start and stop the vehicle, and that really does effect the quality of your data if you're not careful. |
| 19:43 | On the dyno it's much easier because we can stay in a fixed gear. |
| 19:46 | And the reason that this is important is because we don't want to instigate any transient enrichment that can affect our results. |
| 19:55 | So it's all about being as smooth as we can on the throttle and avoiding any gear changes, that's gonna give us the most solid data. |
| 20:02 | Alright so while I've been talking we've let everything stabilise as much as it's going to. |
| 20:06 | Our graphs here, our chart logger is not that useful for what we're going to actually be investigating today. |
| 20:12 | So I'm just gonna drop this down out of the way. |
| 20:14 | We're going to have a look at another way of representing our data which is with our histograms. |
| 20:19 | Now we've got a bunch of histograms here, these are incredibly useful, probably one of the most powerful aspects of the VCM scanner software. |
| 20:27 | And they are incredibly flexible, you can basically set these up to do almost anything you want. |
| 20:33 | So the one that I'm on at the moment, I've just called it fuel trims SD or speed density, you can call it whatever you want. |
| 20:40 | But essentially this is set up with a very basic speed density table. |
| 20:43 | This isn't quite accurate to our actual break points but you'll get the picture. |
| 20:49 | What I've done here is I've set this up with manfold absolute pressure on our vertical axis and we've got our engine RPM on the horizontal axis. |
| 20:57 | And what we're doing is just filling this table, this histogram with data as we're driving. |
| 21:05 | So you can see at the moment I'm sitting at 35 kPa and about 1600 RPM. |
| 21:10 | And we can see that the value there's quite stable there, we're looking at 3%. |
| 21:15 | Now what we need to do is go a little bit deeper here and have a look at the actual setup for this histogram. |
| 21:21 | Now if you haven't set one of these up, don't worry too much, I'm also gonna show you how to do this really shortly but for the moment let's just have a look at the setup here for our fuel trims SD. |
| 21:31 | So you can give the graph a name so that this is gonna make sense to you. |
| 21:35 | Particularly useful if you're gonna come back to the scanner setup at a later point and you can't quite remember exactly what the histogram you've set up was to do. |
| 21:44 | And then we've got the parameter that we're actually going to be adding into this histogram. |
| 21:50 | So this is, as you can see, long term plus short term fuel trim. |
| 21:54 | LTFT plus STFT and you can see in brackets it says MAF. |
| 21:59 | So HP Tuners again have made this really easy for us. |
| 22:02 | They have a built in MAF channel that just simply provides the data that we need there. |
| 22:07 | Our long term plus short term fuel trim. |
| 22:09 | So we'll see again how to select that parameter really shortly. |
| 22:12 | Now the units for this is it's a percentage trim, makes a lot of sense. |
| 22:16 | And we can also choose how many decimal places we wanna represent this to. |
| 22:20 | At this point I've got it set to one decimal place. |
| 22:23 | Now so we can get just a quick snapshot of where our numbers are in the big scheme of things, visually we can also set up some colouring or shading on this histogram so we can see there that if we get up to a value of positive 25, which means that the short term fuel trims and long term fuel trims are adding fuel in, we're gonna be colouring that red. |
| 22:45 | So the darker red we get, we know that we are naturally lean and that the closed loop control system is adding fuel. |
| 22:53 | Likewise if the closed loop control is removing fuel, we're going to start to go green so it makes it really easy to see a quick snapshot of that. |
| 23:00 | Then we have our axes, so here we can see for our column axes we've got engine RPM and then we've got also manifold absolute pressure. |
| 23:11 | And what we can do here as well is just copy and paste the labels from the particular table we're tuning. |
| 23:19 | So for example if we head back across to our editor we'll go to our volumetric efficiency editor and we can see our manifold absolute pressure break points here and what we can do is we can right click and we can go to row axis and copy labels. |
| 23:35 | We'll head back across to our scanner, and this is a much simplified example. |
| 23:40 | So we'll highlight those, we'll delete those and control V, we'll paste in our new setup. |
| 23:46 | So now we can close that down and we can see we've got a much higher resolution table. |
| 23:51 | So it's important to make sure for accuracy that the table values are matching the break points, sorry the histogram is matching the break points in our table. |
| 24:00 | And the beauty of that is if we've got those break points matching, we can use the special paste function, so we can essentially copy and paste the errors that we've seen from this histogram directly into our speed density table and automatically correct for those errors. |
| 24:14 | Alright so now let's have a look at what we can do to actually make, to gather some data. |
| 24:21 | So the first thing I'd suggest is again just based on what I've already mentioned, we don't want to be gathering data or datalogging while the engine is coming up to temperature or you're getting rid of heat soak. |
| 24:32 | So a really good way once we've got everything up to temperature, we're happy with everything, we can just stop our scanner and we can restart it. |
| 24:38 | It will basically refresh our histogram and start scanning from scratch. |
| 24:42 | Now what we wanna do is, here obviously we are looking at the process of filling in our speed density table. |
| 24:50 | We'll look at our mass air flow sensor next. |
| 24:52 | So at this point we're gonna assume that we are operating solely on the speed density subsystem, we've disabled our mass air flow sensor, and what we wanna do is essentially drive through this table and gather as much data as we can. |
| 25:03 | There are a few caveates here. |
| 25:05 | You'll remember that we can only use this when we are in closed loop. |
| 25:09 | So we wanna stay away from the low points where we're actually going to transition into power enrichment. |
| 25:15 | That's really important. |
| 25:16 | And we wanna fill out as much of this table as we can. |
| 25:18 | So let's just stay at our 1600 RPM break point here and just by applying more throttle, we can see I can move up that column. |
| 25:27 | I just skipped through a few points and what we wanna do, hopefuily you can see, while I'm talking here, I'm just gonna allow the histogram to just sit on a cell until that cell becomes stable. |
| 25:38 | And once it's stable I can just apply a little bit more throttle and we can come up and increase our load, move into other points. |
| 25:46 | Now if we skip over any, that's fine too, we can always come back and we can just gather a little bit more data. |
| 25:53 | Now at the same time, I'm going to be using the load bearing capability of our dyno here, just to maintain an engine RPM that's reasonably consistent. |
| 26:02 | Little bit of work to do here when we are dealing with an automatic transmission because of course we don't have a fixed road speed to engine RPM as we would with a manual transmission. |
| 26:16 | Now also if you ever miss out any spots here, you can see we're looking for trends here. |
| 26:21 | So we can see at 55 kPa we had a value of 4% so we had a 4% trim there. |
| 26:27 | Then I actually skipped across our 57.5 kPa zone kind of up to 60 kPa, so we can see either side of 57.5 kPa, we've got about a 4% trim. |
| 26:38 | But when we were at 57.5 kPa we actually ended up moving back to our 1200 RPM zone. |
| 26:45 | So we don't have accurate data there so straight away that would be an alarm bell. |
| 26:48 | We've got 4%, 4% and in between those two cells, 2.8%. |
| 26:53 | So we can just back off the throttle very slightly and we can come back into that cell and you can see as soon as I do that, exactly as I guessed, we can see that that value now starts to increment. |
| 27:04 | It's actually still not quite as bad as I'd expected. |
| 27:06 | But that's always a good thing to keep your eye on and look and see if you're getting any inconsistencies. |
| 27:12 | So let's continue here and we'll come up to the point where we actually start transitioning into open loop or power enrichment. |
| 27:22 | You can see at this point we actually, yeah we're not too bad here, we're about 1% so we'll keep going up, and all I'm doing here again is just holding everything stable until I see a relatively consistent value in the histogram and then I can increase my load again. |
| 27:38 | So we're coming up to 80 kPa now, I'll keep going up, again I wanna get to a point where we do actually transition into our power enrichment. |
| 27:48 | This is obviously what we wanna stay away from, getting pretty close to that now up to about 95 kPa. |
| 27:53 | And right we've done that now we've transitioned into our power enrichment. |
| 27:58 | So let's just stop our logger here and we'll see what we've actually got. |
| 28:03 | Alright so first of all what we wanna do is have a look at what happened prior to that, and we're seeing some pretty smooth, pretty consistent data in general. |
| 28:12 | We can see down here in the lower regions we're seeing around about 3% to 4% error, not bad but probably could use a little bit of work. |
| 28:21 | Once we get up past about 65 kPa, that error drops much closer to zero. |
| 28:26 | And generally I wouldn't bother chasing my tail too much, if I'm seeing an error around 1%, you're going to see some inconsistencies run to run. |
| 28:36 | That's pretty damn good. |
| 28:37 | In terms of what we're looking for as well is any outliers. |
| 28:42 | So again here I can see at 77.5 kPa I had this outlier of -4.2%. |
| 28:48 | So that's potentially an unrealistic value and I'd probably either ignore that or go back and gather some more data. |
| 28:57 | We definitely wanna see what's happening there and make sure that was realistic. |
| 29:01 | So looking at our graph as well, we can see at this particular point here, this is where we transitioned from our closed loop control into power enrichment, right at this 95 kPa point. |
| 29:15 | And we can see as soon as this happens, our short term and long term fuel trims essentially drop to zero. |
| 29:21 | We actually can end up with our long term fuel trims continuing to add a little bit of fuel which is exactly what we've got here with bank one. |
| 29:28 | But in general, that's what's going to happen. |
| 29:32 | Our trims are gonna drop out so we just wanna be careful of this because if the ECM has transitioned into open loop mode or power enrichment and you're not aware of it, you're going to be making unrealistic changes to your data. |
| 29:45 | So this is essentially the process we go through. |
| 29:48 | We're just gonna be gathering data over as much of the speed density table as we can and hopefully you're also going to see a fairly consistent pattern emerge. |
| 29:58 | If you see really erratic numbers where one cell is a positive trim, the cell right next door is a negative trim, again this is indicative that there may be some problems in the data that you're gathering. |
| 30:09 | Now another little tip here is you can also look at the quality of the data that you've got here. |
| 30:15 | So looking at our histogram we can see that we've got a range of ways of displaying the data. |
| 30:21 | At the moment you can see I've got this little A highlighted, and this is the average value. |
| 30:27 | So basically it averages all of the hits that it gathers for a particular cell while the engine's running. |
| 30:32 | We can also look at the maximum value and we can look at the minimum value. |
| 30:36 | Average is a pretty good way of looking at it but you also want to know that you've got good quality data. |
| 30:42 | So if we come across and we click on C here, this will show us the number of counts. |
| 30:46 | So basically shows us how much data we've gathered. |
| 30:49 | And realistically we want as many hits in a particular cell as we can get so that we know that we've got nice consistent data. |
| 30:56 | Generally I'd be trying to get at least a couple of hundred hits here. |
| 30:59 | And we can see that for the most point we've got that. |
| 31:02 | There will be a couple of instances where you can see that we kind of just jump across, so here we've only got 168 hits. |
| 31:09 | Still not bad but particularly if you are performing your tuning out on the road it can be much more difficult to get a lot of hits in a particular cell. |
| 31:18 | So once you've got all of this data, let's head back to our average. |
| 31:23 | What you can do is copy the entire data here, so control C and you can go back into your editor and then you can use the special paste function. |
| 31:35 | So if we right click here. |
| 31:37 | Paste special and you can multiply by percent. |
| 31:44 | So basically this will multiply by the exact percentage that was in your histogram. |
| 31:49 | So in other words if you find that the short term and long term fuel trims are adding 5%, 5% will be added to your VE table. |
| 31:57 | This isn't a bad way of going fo your first round of modifications to your speed density system however once you get a little bit closer you may want to choose the multiply by percent half which does exactly what you'd expect, it makes half of the error change. |
| 32:12 | This just allows you to creep up on it. |
| 32:14 | Now I will caution you that this is a case of garbage in garbage out. |
| 32:19 | That paste special function is useful as long as you've got good data. |
| 32:23 | But it is only going to paste, or make the changes that are in the histogram. |
| 32:28 | So for example here, let's see where we could go wrong. |
| 32:31 | First of all we can see we've got this outlier that we've already talked about, that may or may not be realistic. |
| 32:36 | Secondly while we could only get down to around about 32 kPa here on the dyno, we may actually end up operating a little bit further down in these lower load areas on the road at part throttle. |
| 32:50 | So by using this, the special paste function, this isn't gonna make any changes to these areas of the table so generally I will use a combination of the special paste function and a little bit of a hand blending. |
| 33:03 | So for example here I'm seeing a fairly consistent trend so what I might end up doing back in my speed density table is highlighting these lower load cells and making a change of around about maybe 2% to 2.5% as well. |
| 33:15 | And I'm sort of working on the basis here that if I've got a fairly consistent situation where we're a little bit lean and the closed loop system is adding fuel, there's a pretty good chance that that's going to extend out into the areas that we couldn't quite get on the dyno. |
| 33:29 | Alright so that's one way of using our histograms there. |
| 33:33 | We've looked at how we can use them to configure our speed density system. |
| 33:36 | We're gonna have a look now at how we can use them to do the same for our mass air flow sensor. |
| 33:41 | So first of all we're gonna have to set up another histogram. |
| 33:44 | So we can right click and we can go into our graphs layout. |
| 33:47 | And what we're going to do is click here on the little icon which will add another table. |
| 33:53 | So let's do that. |
| 33:58 | Right we'll add a table and we're going to call this, let's call this fuel trim MAF. |
| 34:07 | OK so we need to choose a parameter, we can do this just by clicking on the parameter and there are all of the available PIDs in here. |
| 34:15 | What we want to do is cycle down to the bottom and we'll see we have our available MAF channels. |
| 34:20 | So these are all done for us, all of the hard work has been done and we just need to select the correct one. |
| 34:25 | So what we want to do is open up our fuel trims, let's just scroll down a bit. |
| 34:29 | And what we want to do here is choose our long term fuel trim plus short term fuel trim. |
| 34:35 | There's a few other options in there but this is the one we want to operate here. |
| 34:38 | And we're going to again scan this, log this in to one decimal place. |
| 34:43 | And we're going to add our shading again so let's just add in, for a high value of 20, if we click on the colour we can choose a colour, let's make that red just for a little bit of consistency, and for a low value of minus 20 we're going to choose our same green. |
| 35:00 | We'll click OK and we need our column and row axes. |
| 35:04 | Now in this case the mass air flow sensor calibration is only a two dimensional table. |
| 35:09 | So we have our column axes, we're gonna click on add parameter and what we're going to do is enter mass air flow and what we're looking for here is our mass air flow sensor frequency. |
| 35:21 | So let's click on that. |
| 35:23 | And we can select that parameter. |
| 35:25 | So now we've got our axes set up but we need our break points. |
| 35:28 | So this is exactly what we've already looked at. |
| 35:30 | We'll head back across to our editor, close down our virtual VE editor, we're going to go to our air flow tab and we can see our MAF calibration is here. |
| 35:39 | We'll click on that and what we wanna do is right click and we want to go down to column axes, copy labels, head back across to our scanner. |
| 35:50 | And we can right click, paste those labels in, and that has now set up our histogram. |
| 35:56 | So it really is quite easy, I know that a lot of tuners are a little bit put off by the histograms but they really are incredibly powerful. |
| 36:03 | They're not overly difficult to set up so it does pay you to learn how to do exactly that. |
| 36:11 | Alright now we've got our histogram set up there, let's start our scanner. |
| 36:16 | So exactly the same situation goes here. |
| 36:19 | We want to allow all of our temperatures to stabilise before we start scanning data. |
| 36:24 | And we can see here we're sitting at idle so we're sitting at 2700 hertz, that's the output from the mass air flow sensor and we can see we've got that 3.2% trim. |
| 36:34 | So exactly the same situation here, what we'll do is we'll click ourselves through into fourth gear. |
| 36:41 | And just again to reiterate, we don't wanna be scanning data while we're doing this because we're likely to have inaccuracies come through. |
| 36:49 | So what I'll do is I'll just get us up to a point where we are operating and we can bring our RPM down a little bit and we can then stop our scanner and restart it. |
| 37:02 | And exactly the same situation goes here, what we wanna do is just gather as much data as we can for as many points in our histogram as we can access. |
| 37:11 | We wanna make sure that while we are doing this, we're being nice and smooth on our throttle. |
| 37:16 | Now with our mass air flow sensor, we do need to use a combination of RPM and our throttle to access as much of this table as we can. |
| 37:24 | Again making sure that we don't transition into our power enrichment. |
| 37:28 | That's going to affect or basically cause us to have garbage results. |
| 37:34 | So by increasing our throttle we obviously increase the air flow into the engine. |
| 37:38 | Of course we do get to a point where at higher throttle settings we will transition into power enrichment. |
| 37:45 | So we can use this combination of our throttle setting, I'm just gonna hold our throttle consistent at the moment, and now by increasing our RPM on the dyno we can see that we reach higher into our rev range, or into our mass air flow sensor frequency range. |
| 38:03 | Now another little tip for you here as well is that when you're performing a ramp run, when you're settling the car at low RPM, you're going to quickly get an idea of what sort of frequency range you're seeing during power enrichment during wide open throttle operation. |
| 38:21 | So of course when we're looking at the closed loop using our short term and long term fuel trims, we're only interested in that closed loop operation, so we can focus our efforts on the area below that region, below where we swap into power enrichment, what we're actually going to be tuning using our wideband. |
| 38:38 | So there you go, that's some insight into short term and long term fuel trims, how they work, what their upsides are, what their downsides are. |
| 38:45 | It is, just one more time I'm going to reiterate though, that we can't use these to tune the full throttle operating area. |
| 38:52 | So they are limiting to that point. |
| 38:54 | At some point to properly tune the engine, we are gonna need a wideband air fuel ratio sensor. |
| 39:00 | So by far and away my personal preference is to have a good quality wideband coming into the scanner. |
| 39:07 | Something that we can physically scan, we can then use that data in our histograms, we can use another MAF channel which is our air fuel ratio error, that's really powerful, and that's going to allow us to tune the ECU properly in both open loop and closed loop modes of operation. |
| 39:23 | Alright guys we'll have a quick look now at our questions. |
| 39:26 | If you've got any more, please continue to ask them. |
| 39:31 | Michael has asked, when adding a wideband sensor, what's the optimal location to place it and whether or not you have a catalytic converter, does that impact the decision? OK so it's really going to depend on what you are going to be doing here. |
| 39:44 | So in the perfect world, with a V configuration engine, it'd be nice to have a wideband sensor in each bank. |
| 39:52 | And in that basis we could then average those values and get a true average of what's going on inside the engine. |
| 40:00 | The reason for this is that with a V configuration engine it's possible to have one bank of cylinders operating richer or leaner than the other. |
| 40:07 | In most instances though a single wideband is more than adequate. |
| 40:11 | It'd be good in that instance if you had the wideband fitted somewhere where it was sampling all of the cylinders, again for that same reason. |
| 40:19 | You're going to be getting a good average of what's going on in each bank of cylinders. |
| 40:24 | There is a lot of debate about pre and post catalytic converter sensor location. |
| 40:29 | I've tested myself and the difference in air fuel ratio sensor readings that you're likely to see pre and post cat, is so small as to be negligible. |
| 40:40 | I really don't believe it's a significant consideration. |
| 40:43 | And as with a lot of this, comes down to fitting the sensor physically where you actually have room for it. |
| 40:50 | Connor has asked, how do you have the Innovate LC2 connected to HP Tuners? Common question I get here and this took actually a lot more work than I had anticipated. |
| 41:04 | So first of all we're actually using the LM2 not the LC2, although the same technique should work for the LC2. |
| 41:10 | Only difference is that the LM2, it has a visual display on it so you can actually suction cup that, it's on the windscreen in front of me, suction cup that on the windscreen and you can see that while you're driving the car. |
| 41:23 | So what I'm doing is outputting, taking the output from the serial output on the LM2 controller and then we're taking that through a USB to serial adaptor straight into a USB port on my laptop. |
| 41:38 | And when you do this, when you first start the scanner, provided you've added the Innovate LC2 or LM2 parameters or PIDs into the scanner, those will just show up. |
| 41:51 | I went through hours of testing and playing around to try and get this to work and the reason that I couldn't get it to work and I think a lot of people have trouble is that there is a micro USB connector on the LM2 body at the top of it, we use this typically for programming. |
| 42:06 | For some unknown reason that will not work with the VCM scanner. |
| 42:10 | You have to use the Innovate serial output on the side of the LM2 and I'm using the Innovate cable there to my serial to USB adapter so that worked quite well. |
| 42:21 | I know that the VCM scanner also supports a wide range of other widebands. |
| 42:28 | The key reason I'm doing it like this rather than wiring it into the interface and bring it in as an analog voltage is when it comes in as serial it guarantees the integrity of the data, there's no chance of any ground offsets causing the air fuel ratio data inside of the scanner to be innacurate so that's really important. |
| 42:50 | Jay has asked, I believe the standalone ECU I will soon run is a Hondata. |
| 42:54 | it has a selectable percentage for the fuel trims. |
| 42:56 | What percentage is good to start and end up with and should fuel trimming be turned on while performing an initial tune or is it turned on after the initial air fuel tune is complete? OK a few good questions in there so generally what we'll find is that most factory ECUs, and the Hondata, I kind of really class this as a reflash because it is a system that makes the factory Honda ECU tunable. |
| 43:19 | You'll find that the fuel trims are limited to plus or minus 25%. |
| 43:24 | And basically if you go outside of that range, it will bring up a check engine fault code for system too rich or system too lean. |
| 43:31 | Frankly if you need to be at plus or minus 25%, my opinion is you've got some pretty serious problems, you're only likely to get to that sort of region if something has actually failed. |
| 43:41 | In general for our purposes with a well tuned engine, I would be quite comfortable limiting the short term and long term fuel trims to something a lot tighter than that, maybe plus or minus 10% or 15%. |
| 43:53 | We will still often see the need to use quite a wide range of trim during those heat soak periods, so after a hot restart or something. |
| 44:03 | So don't tie it down too tightly or you won't get the true benefit of that closed loop control strategy. |
| 44:10 | You've also asked about whether the fuel trim closed loop should be turned on while performing an initial tune. |
| 44:15 | There's two schools of thought here. |
| 44:17 | Personally in the Hondata system I will turn it off. |
| 44:19 | And that's allowing me to see the actual error that I've got. |
| 44:23 | The reason I say this, is there's two schools of thought is you can do it either way. |
| 44:28 | The important aspect is just to understand whether you've got your closed loop trim turned on or off. |
| 44:33 | The reason for this is it's really easy to leave closed loop on, looking at your air fuel ratio and going well hey I've done a really great job here, everything's tracking target really nicely, and you're ignoring the fact that there may be a 15% trim in there to get the air fuel ratio where it needs to be. |
| 44:48 | So yeah two ways of doing it, leave it on and use your trims to make adjustments to your fuel table, or turn it off and then you're actually seeing the true error that's there. |
| 44:58 | No strict right or wrong way to deal with it. |
| 45:00 | Jealous, I think it is, has asked, how do you address an issue of the air fuel ratio dipping towards lean on transition to power enrichment mode when there are no power enrichment tables on a stock ECU? Ok so the exact example here is for UpRev with Nissan. |
| 45:16 | That's a tough one. |
| 45:19 | So first of all what you need to understand is when it comes to transient enrichment, you're not always gonna see a perfectly flat air fuel ratio curve as you mash your foot to the floor. |
| 45:32 | And we've got a number of webinars that actually cover transient enrichment tuning on a range of aftermarket ECUs and we cover this in a bit more detail there. |
| 45:38 | But essentially it's much more important to make sure that the engine response is crisp and smooth. |
| 45:46 | So this is what I'm looking for when I'm tuning transient enrichment. |
| 45:49 | I'm looking for a nice crisp response when I make a sharp throttle input. |
| 45:55 | And if that's happening then I'm going to be much less worried about what my air fuel ratio plot does and almost always with an engine that responds crisply, I'm gonna see a lean spike initially followed probably by a slight rich dip before everything stabilises. |
| 46:12 | If everything's smooth and comfortable and responding how I want, I'm gonna be happy with that. |
| 46:17 | Now in terms of your specific example, I've done very very little tuning on UpRev unfortunately on the Nissan. |
| 46:23 | I have touched on it but the examples that I was dealing with were very very basic changes. |
| 46:28 | So I'm not too sure about how in specifically the power enrichment, sorry the transient enrichment is dealt with and what tables you've got there to adjust. |
| 46:38 | It's likely that if you've got transient enrichment issues, then I'd say you've probably got an issue around the mass air flow sensor scaling at that point when you transition into open loop operation, I'm just not 100% sure there. |
| 46:54 | It'd just be a case of really thoroughly looking at your logs and seeing exactly what's happening just prior and just post the area where you move into open loop. |
| 47:03 | Kevin's asked, would a rapid drop in ambient temp while street tuning cause inaccuracies by changing the short term trim due to the drop in temp? OK so what we do need to understand here, I know I've laboured this point, so I'll just get into it a little bit more. |
| 47:16 | Of course the factory ECM has the ability to compensate for changes in our ambient conditions. |
| 47:23 | This is obviously one of the advantages of modern EFI. |
| 47:26 | So technically regardless of the conditions it should be able to do a pretty adequate job of making changes. |
| 47:32 | Where we do tend to see a little bit more inaccuracy is the hot restart issue. |
| 47:39 | So this is more of an issue than maybe your ambient air temperature dropping while you're out tuning. |
| 47:44 | The hot restart issue is very very difficult for the factory ECM to really do much worthwhile about. |
| 47:51 | The reason for this is short of measuring fuel temperature in the rails or maybe ambient temperature in the engine bay while the engine is operating, the ECM doesn't know when its powered up, how long the engine's been stationary for, how hot it was when it was shut down, so it doesn't know the extent of the heat soak situation so it makes it really difficult to accurately account for this. |
| 48:13 | So it's really that initial restart after heat soak that we really wanna get rid of. |
| 48:21 | Of course you don't wanna end up with intake air temperatures that are completely unrealistic but within the normal operating realms of intake air temperature and engine coolant temperature you should see relatively stable operating conditions. |
| 48:35 | Barry has asked, how much sensor dead band do you recommend using closed loop? OK so in terms of the GM situation I don't actually typically make any changes to the dead band allowance, or basically I don't make any changes to the closed loop operation. |
| 48:56 | I've never really seen any issues with the way the closed loop operation works with the GM vehicles. |
| 49:02 | This is obviously gonna be something that will differ across a wide range of different platforms so I can't really give you an answer that's going to be across the board unfortunately. |
| 49:13 | Alright guys that has taken us to the end of our questions. |
| 49:15 | Some really good ones in there. |
| 49:17 | Hopefully everyone has enjoyed today's lesson, hopefully everyone's learned a little bit more about short term and long term fuel trims and how to use them to help you with your tuning. |
| 49:26 | As usual, for our HPA members, if you've got any questions after this webinar has aired live, please ask them in the forum and I'll be happy to answer them there. |
| 49:35 | Thanks for joining us everyone, I look forward to seeing you all next week. |
| 49:39 | Now for those who are watching today on Facebook, this is just a little insight into what we put on every week for our HPA gold members. |
| 49:46 | Our HPA gold members get to watch these webinars live, they also get to rewatch these webinars in our archive where we've got around about 200 hours of existing webinar content right now. |
| 49:57 | So there's some amazing content there covering topics on engine tuning, engine building, and performance wiring. |
| 50:03 | It's one of the fastest ways to expand your knowledge on a huge range of topics. |
| 50:09 | As well as to stay up to date with the latest products and techniques out there in the tuning industry. |
| 50:15 | As well as access to our webinars, you'll also get access to our private member's only forum which is the best place to get fast reliable answers to your specific engine building, tuning and wiring questions. |
| 50:27 | Now if you are interested in learning more, you can become a gold member for USD$19 a month. |
| 50:33 | But you will also get three months of free access to our online community with the purchase of any of our courses. |
| 50:39 | Alright guys thanks again and I look forward to seeing you all soon, cheers. |
Timestamps
0:00 - Introduction
0:30 - What are STFT and LTFT?
1:10 - Wideband vs narrow band
3:50 - Pros and cons
6:10 - STFT + LTFT or STFT only
10:35 - How to disable LTFT
12:15 - Understanding GM ECUs - SD vs MAF
16:45 - What you should aim for
19:15 - Driving techniques
20:00 - Demo of SD histogram
33:25 - Demo setting up MAF histogram
39:30 - Questions


