205 | How to tune Cold Start
Summary
Achieving perfect cold start performance is one of those aspects that makes the difference between a poorly tuned car and one that has factory-like performance. Getting your cold start tuning dialled in however can be tricky so in this webinar we’ll discuss how cold start works, why the engine’s requirements are different when it’s cold and how you can address this in order to get the cold start parameters dialled in properly in a time efficient manner.
| 00:00 | - Hey guys it's Andre from High Performance Academy. |
| 00:02 | Welcome along to another one of our webinars. |
| 00:04 | This time we're going to be discussing getting good quality cold start tuning. |
| 00:09 | Specifically today we are gonna be using the Haltech Elite 2500 ECU that's fitted to our 2008 Subaru STi. |
| 00:17 | We'll been using this for our specific discussion but of course everything that we talk about today is going to be applicable to a wider range of ECUs, so there's going to be a lot to take away regardless what specific ECU you are personally interested in. |
| 00:31 | As usual we will be having questions at the end of this webinar so if there's anything that I talk about that you'd like me to dive into in a little more detail, or anything generally related to this topic, please ask those in the comments and we'll deal with those at the end. |
| 00:46 | Now with the cold start tuning in general, I think this is an area that a lot of tuners really struggle with an I think a lot of it comes down to maybe just not having a complete understanding of what's going on, the fundamentals behind it, and not understanding what levers essentially we've got available to us in order to make the necessary adjustments and get the cold start working perfectly. |
| 01:10 | And what I'm trying to do here when I am tuning any vehicle is to do my absolute best to replicate the sort of quality cold start performance that we get from a factory car. |
| 01:22 | So I'm talking here about a car that regardless whether we're in the middle of summer with ambient temperatures in the mid 30 degree centigrade vicinity or alternatively we're sub zero and there's snow on the ground, we should be able to essentially reach in through the window, not touch the throttle at all, turn the key and that car should start up, it should idle crisply and it should hold a stable idle as it warms up and while it's doing this it should maintain great control over the air fuel ratio. |
| 01:51 | So this is essentially what we're trying to achieve and I kind of use this as my benchmark or line in the sand, have I got the results that the OE manufacturer is looking for? And of course what you're trying to achieve here also does need to be considered along the lines of what's the car going to be used for? If it is a daily driver, clearly yes we would like this sort of performance. |
| 02:13 | If it's a dedicated drag car and you've got an engine with agressive cams and massive turbocharger then perhaps maybe we're not going to be quite so interested or concerned in the quality of the cold start. |
| 02:25 | But even then, with a competition car, it's always nice if we can turn up to an event and actually start the car while it's still sitting on the trailer in order to be able to back it off at the beginning of the event. |
| 02:36 | So cold start, even at the extremes of our motorsport applications is still something that has some kind of relevance. |
| 02:44 | Now what we do need to understand for a start is why we need to make adjustments to our engine tuning when the car is cold. |
| 02:52 | This really is our base understanding. |
| 02:55 | If we've got a good idea of what we're trying to achieve, of course as usual it always makes it easier for us to go through the correct adjustments to get everything working. |
| 03:03 | And really the key here is that when the engine is cold, when we're injecting fuel into the engine, what we're going to find is that a portion of that fuel is actually going to wet out against the port walls. |
| 03:15 | So in other words we're not getting all of the fuel that the injector is delivering being delivered into the combustion chamber in a finely atomised form that makes it nice and easy to combust. |
| 03:27 | And when we've got that fuel wetting out against the port wall, what it's going to do is end up pooling, and we actually get our fuel being introduced sometimes in liquid form. |
| 03:36 | And that's actually much more difficult to combust that you may think. |
| 03:40 | So conversely when the engine is up to operating temperature, when our port walls are nice and hot, what tends to happen here is that when the fuel is injected against those hot port walls as well as the back of the intake valve that's also hot, the fuel is basically vaporizing off there, it's going to be going through a phase change from liquid to vaport and this makes it really easy to combust because it's being drawn into the combustion chamber in that vapour form very very easy to burn. |
| 04:08 | So in order to get around this, when the engine is cold, we're going to need to make up for the fact that a lot of the fuel entering the cylinder is going to be in a non combustable form or in other words a form that's not as easily combustable so we need to add additional fuel. |
| 04:25 | So that's our first thing, we know that we're going to need to add additional fuel. |
| 04:28 | We may also find that particularly during the cranking phase of engine startup, when the engine is cold, we may need to add fuel further above and beyond what we actually require once the engine is started. |
| 04:42 | Now in conjunction with this, just to make things a little bit trickier, we also are almost certainly going to need some additional air bypass in terms of our idle speed control settings. |
| 04:53 | In order to maintain a sensible idle speed when the engine is warming up. |
| 04:57 | So we've got a few factors here that are adding up to give us a little bit of work to do in what can be quite a short timeframe. |
| 05:06 | Now the other aspect to consider here is that every single engine is different. |
| 05:11 | So we can't hope to take settings that have been tuned and have given us perfect results on one particular engine and then transfer those across to a completely different style of engine and expect to get exactly the same results. |
| 05:24 | So there is always going to be some tuning to do specific to your engine. |
| 05:29 | And you may even find that a subtle change such as taking out the factory injectors and fitting a larger set of injectors, this actually on its own can have an impact on the required cold start setting. |
| 05:41 | So there's a little bit to go into this, there's a little bit to understand. |
| 05:44 | Alright so first of all, now that we've got a basic understanding there, we'll go into the conditions that are going to be affected in terms of your engine's operation by cold starting. |
| 05:56 | So the first one is our required cranking enrichment. |
| 05:59 | So when our engine is cold compared to when it's at a normal operating temperature, we are going to need to increase our cranking enrichment. |
| 06:08 | So this is the amount of fuel being delivered by the injectors while the engine is at a cranking speed. |
| 06:14 | Generally let's say that's going to be something less than maybe 300 to 400 RPM. |
| 06:19 | So this is what's required to initially get the engine to crank over, catch, and start up for the first time. |
| 06:27 | Beyond this, once the engine is initially started, we're generally going to find that our ECU will have a post start enrichment. |
| 06:34 | So this is an additional amount of fuel that is injected for a period of time after the engine initially starts. |
| 06:42 | Then we move into our warmup enrichment so these are normally the two dimensional or three dimensional tables relative to initially coolant temperature, that's our main driver here. |
| 06:52 | But we may also include load as well. |
| 06:54 | Then we've got our idle requirements. |
| 06:56 | As I've mentioned, we need to there bypass more air but we may also need to also increase our actual idle target. |
| 07:07 | And then the final aspect which we're not really gonna touch on today, is that our transient enrichment for aspects such as acceleration enrichment, these may also need to be adjusted relative to our coolant temperature. |
| 07:20 | So what we're going to do here, let's just head across to my laptop screen. |
| 07:23 | And we're gonna have a quick look at these parameters as they stand here in our Haltech Elite 2500. |
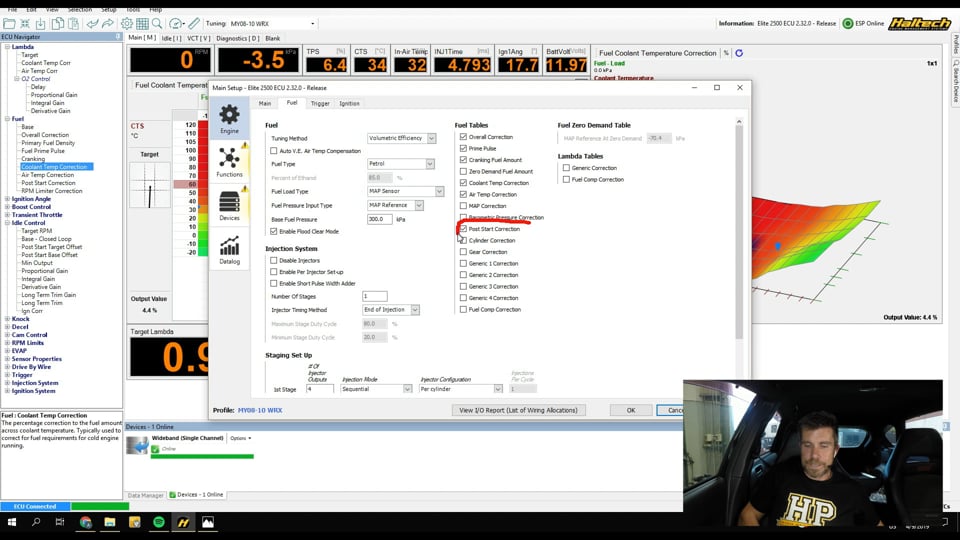
| 07:30 | Now the first place I'm actually going to take you to here is our main setting or our main setup. |
| 07:36 | And if we go across to our fuel tab, you're going to find that in the Haltech Elite we can enable or disable some of these parameters. |
| 07:44 | So for example here, the first aspect that we've got is prime pulse, I'm gonna talk about this in detail in a second. |
| 07:52 | This is used for adding an additional amount of fuel as the engine initially begins to turn over to prime it. |
| 07:59 | Then we've got our cranking fuel so this is our cranking enrichment, the additional fuel that is supplied while the engine is cranking. |
| 08:06 | And then we've got our post start enrichment. |
| 08:10 | So basically you can choose here whether to enable or disable these tables, depending on your particular application. |
| 08:17 | And if we have a quick look through these here, we've got initially we'll have a look over in our fuel menu here, we've got our fuel prime pulse. |
| 08:26 | So remember this is a primer, this is just as we initially start to turn the engine over, and then we drop down here to our cranking enrichment. |
| 08:35 | Both of these, the primer pulse and the cranking enrichment, if I can move it around, are in two dimensional tables here by default relative to our coolant temperature. |
| 08:47 | Then we move down to our post start correction which we find down here further in our menu structure. |
| 08:53 | Now this is a three dimensional table, we've got our coolant temperature on the vertical axis here and you'll notice here that we've got engine run time on our horizontal axis. |
| 09:06 | So this is the amount of additional fuel relative to the time the engine has been running and the temperature that it's at. |
| 09:14 | Now this is, we're obviously talking today about cold start enrichment. |
| 09:18 | But this table is actually used for two functions. |
| 09:20 | It can be used for cold start, that's what we're looking at today, but it actually is also beneficial sometimes to help reduce the effect of heat soak. |
| 09:30 | If the engine has been run up to operating temperature, it has been shut and left for a period of time and then it has been restarted. |
| 09:36 | Under these conditions it's quite common to find that at high engine temperatures after the initial restart, we may find that our engine runs lean for a period of several seconds. |
| 09:48 | So this will be up in the top area of this table. |
| 09:50 | And what we can do there is add some additional fuel in there to help eliminate that aspect of the engine's operation. |
| 10:00 | Alright so those are our fueling requirements there, I also mentioned our idle speed control so if we come down to idle control here, there's two aspects we're going to look at. |
| 10:12 | First of all we've got our target engine RPM. |
| 10:14 | So this is our desired idle speed. |
| 10:18 | And what we're doing here is replicating the sort of idle speed targets that we see with a factory ECU. |
| 10:24 | So we've got three dimensional table here, doesn't need to be, we've got the main parameter that we're interested in of course is our coolant temperature. |
| 10:33 | And we see that when the engine is cold down at 20 degrees C or below, we're looking for an idle speed of around about 1250 RPM. |
| 10:42 | Of course at normal operating temperature we've dropped that down to a more realistic idle speed of 800. |
| 10:48 | So the reason we want to do this is that particularly if you've got an engine that is a little bit modified, maybe it's got some aggressive cams in it, you may find that the engine won't idle particularly happily at 800 RPM when it is cold but it may be more than happy to idle there when it's up to operating temperature. |
| 11:08 | And so just by increasing the idle target when the engine is cold, we've got a better chance of getting good operation of the engine, we've got a better chance of getting stable operation. |
| 11:18 | So that goes hand in hand of course with our, or actually before I move on, I'll just mention here that this particular base map that we're operating off, has got vehicle speed as a vertical axis or a load axis here. |
| 11:30 | As I've said, don't need to necessarily have that, typically we'd have this idle target table set up as a two dimensional table. |
| 11:39 | And we'll move down to our base closed loop positon. |
| 11:42 | So this is in this case for our '08 STi we are using drive by wire throttle for our idle speed control. |
| 11:51 | In this case we've got another three dimensional table, we've got our coolant temperature on our horizontal axis as we'd expect, and in this case we've got our air conditioner position, whether our air con is active or deactivated on our load axis, just so we can step up our idle opening, our throttle body opening in order to cope with that. |
| 12:11 | And if we look across to the graphical representation of this, pretty much as you'd expect within this weird little dip that I've just noticed, but let's disregard that little guy for the moment. |
| 12:21 | Basically we need more throttle opening or more air bypass down when the engine is cold compared to what we see when we are up at operating temperature. |
| 12:33 | So this is in conjunction with the fact that even to maintain the same idle speed when the engine is cold, we're going to need additional air bypass. |
| 12:41 | But not only that, as we've just seen, we are also targeting a slightly higher idle speed. |
| 12:47 | So getting all of this sorted is obviously going to take a little bit of work. |
| 12:51 | We need to go through some considerations of what you need to keep in mind here when you are tuning cold start on any ECU. |
| 13:01 | Because if we don't know the correct technique to go through and we don't know how the ECU works, it's very easy to end up baking in errors in our fuel table or our correction tables, that are going to end up giving us poor results. |
| 13:15 | So the first thing to consider here is that in most instances and definitely in the case of our Haltech Elite 2500, all of these warm up and cranking enrichment parameters work as multipliers or adders over and above our main volumetric efficiency table. |
| 13:33 | So hopefully what you can understand there is that this means to have any chance of our corrections working properly, the first thing we need to do is go through and make sure that our main volumetric efficiency table is correctly tuned. |
| 13:47 | Now the other aspect with that, let's actually just head across and have a quick look at our VE table while we are doing this, we'll head across to our fuel base table here. |
| 13:56 | So we've got our three dimensional VE table, we've got it displayed graphically over on the right hand side. |
| 14:02 | And what we can do here obviously is do the best job possible of tuning this VE table and we've got a reasonably smooth shape to that table off on the right and probably what I'd expect to see from an ECU that has been tuned, there's nothing too ugly going on in there that makes me think something is wrong. |
| 14:21 | But the problem we've got here is right now we're sitting here with our ECU powered up but the engine isn't running. |
| 14:27 | So we are sitting at -3.7 kPa, we're a bit above sea level here which explains the low air pressure. |
| 14:35 | And we're obviously at 0 RPM. |
| 14:38 | Now the problem is this is the area that we're initially going to be accessing when we first crank the engine. |
| 14:43 | Now obviously as the engine RPM builds and our vacuum builds, we're going to end up moving back into vacuum and our engine RPM's gonna come up a little bit so we might track something like that little arrow that I've just put in there. |
| 14:56 | But we can't tune properly, this area of our table in steady state. |
| 15:01 | It's not possible to fully load the engine at 0 and 500 RPM on our dyno. |
| 15:06 | But that's not to say we can ignore these areas and the key here is if you look at this area of our table on the graphical display on the right hand side, what I've done here is I've extrapolated the results that I've got from steady state tuning down into the lower RPM and also to the lower load areas of the table and this means that they might not be absolutely perfect but we generally see a relatively smooth trend in our VE table. |
| 15:33 | So we're going to be there or thereabouts in terms of the numbers in these areas that we can't stready state tune. |
| 15:39 | So that's the essential first step, we want to make sure that our VE table is properly tuned before we start doing our cold start enrichment and we wanna make sure that those are extrapolated back into the areas that we haven't accessed there. |
| 15:54 | So that's our very first part. |
| 15:56 | Now probably doesn't take a rocket scientist to figure out that this is going to create one large scale problem in that once we have got our VE table correctly dialled in, we've now got an engine that is hot. |
| 16:07 | Hence we can't do cold start enrichment tuning. |
| 16:11 | And this is exactly the point that I wanna make here. |
| 16:13 | If we want to get good quality cold start enrichment, then we're not gonna be able to do it all in one shot with our tuning process. |
| 16:22 | We're actually going to need to separate this out. |
| 16:25 | And through my old shop when I was tuning cars for a living, when a customer dropped off a car for tuning, we always held onto that car overnight, and this gave us the opportunity on the first day to get the tuning dialled in on the dyno, we'd then take the car out and do any road testing to make sure everything was dialled in correctly in terms of that main fuel table. |
| 16:45 | Then we had the opportunity to keep the car overnight, this would allow us to let the engine completely come down to a cold operating temperature, and the next morning we could address the cold start areas. |
| 16:57 | And it can be tempting to try and do this inside of one day. |
| 17:01 | But even if you leave the engine not running for a period of several hours, the block and the cylinder head and the cooling system will retain quite a lot of temperature. |
| 17:12 | So actually if we jump across to my laptop screen right now, our ambient temperature here at the moment is probably in the mid teens and we can see that our coolant temperature is currently sitting at 33 degrees C. |
| 17:22 | Despite the fact that this engine now hasn't been operating for a couple of hours. |
| 17:27 | And in order to actually do this webinar, I also left our dyno fan on for a period of quite some time. |
| 17:34 | So 33 degrees, we're way too hot to be able to do any meaningful cold start tuning here. |
| 17:39 | We need to be down to our ambient temperature. |
| 17:42 | So overnight this also brings out the next point is that you also have a relatively tight timeframe in order to do this. |
| 17:49 | Obviously as soon as we start the engine it is going to start heating up. |
| 17:53 | So we are really fighting against time here because we've got all of our warm up parameters that need to be dialled in. |
| 18:00 | At the same time we also need to dial in our idle speed control so our base idle speed control duty cycle to make sure that our idle speed is on target. |
| 18:08 | So this can be quite a frantic time and particularly if you are novice in terms of tuning it's probably safer just to accept that you are gonna need to take a few cracks at this in order to get good results. |
| 18:22 | On that note as well, we do need to consider that sometimes, despite our best efforts, our ability to do our job perfectly and get great results across all sorts of cold start operating temperatures can be hampered by our ambient temperature. |
| 18:38 | So what I'm getting at here is if you live in a part of the world where you get quite a large swing in ambient temperatures between summer and winter, if you are tuning a car in summer, you may not be able to get down to anything like the sort of temperatures you'll get in mid winter. |
| 18:53 | So right here in Queenstown in New Zealand, in the middle of summer, probably the coldest we're likely to see is the low teens in the beginning of the day. |
| 19:02 | On the other hand when we get into winter it's quite possible some mornings to have the coolant temperature reading -5 to -10. |
| 19:10 | So in this instance if we are tuning the car in summer, there's no way to accurately tune those areas that we're going to be accessing in winter. |
| 19:19 | And this is important to understand. |
| 19:20 | Particularly if you are doing this professionally for other customers and you are in that scenario, it's really important to set the customer's expectations sensibly. |
| 19:31 | So in other words tell them that hey it's the middle of summer right now, I'm not gonna be able to guarantee that your car is going to start perfectly once we start getting into winter. |
| 19:39 | But I've done my best and if you find that the car isn't starting properly in winter, just understand that this is why. |
| 19:46 | Please bring the car back to me, I'll be more than happy to make any small adjustments. |
| 19:51 | We did that for no charge as well through my old business. |
| 19:54 | Obviously you're at your own discretion as to how you decide to deal with that. |
| 19:57 | And what that's going to do is it's going to set up the customer's expectations and if the customer gets to winter and that is the scenario they end up with, they're going to already know that you've warned them against that and they're not going to be calling you names and saying that you don't know how to tune properly. |
| 20:13 | They've already been pre warned so that's really important. |
| 20:16 | OK now there are a couple of other aspects once we actually get into the tuning here that we can't always tune accurately using a wideband. |
| 20:26 | Obviously we rely on our wideband air fuel ratio meter for the most part for our tuning. |
| 20:32 | Particularly when we are dialling in our volumetric efficiency table. |
| 20:36 | And we can use this for some of the warm up or cold start enrichment tuning. |
| 20:40 | But we can't use this for the cranking enrichment in particular. |
| 20:45 | We're not going to get a good reading from our wideband air fuel ratio meter during that cranking portion of the cold start. |
| 20:53 | So we need to address this as well and just understand this. |
| 20:57 | And some of this needs to be done by trial and error, simply making adjustments to those parameters and seeing whether it makes the car, the engine, start faster and crisper or whether it labours and it makes it harder to start. |
| 21:11 | We'll talk about some of the techniques of adjusting those numbers shortly. |
| 21:14 | The other thing when we are using a wideband air fuel ratio meter, clearly when we only have a small window to get our air fuel ratio sorted out and under control and our cold start tuning done, we wanna make sure that our wideband air fuel ratio meter is up to speed, warmed up and ready to read before we start the car for the first time. |
| 21:35 | In this case with our Haltech Elite, we'll just jump across here to our laptop again. |
| 21:42 | We can see we've actually got a WBC1 wideband controller, CAN based wideband controller fitted to this particular intallation. |
| 21:49 | So we've already got lambda reading there at 1.06 despite we haven't started the car. |
| 21:54 | In some instances you're going to find that the wideband controller will not function until the engine is actually operating. |
| 22:01 | Some wideband controllers will not operate the heater until it's detects engine RPM. |
| 22:06 | And in this case you may need to go through and override it so that it will run when the engine isn't operating. |
| 22:12 | The reason that some wideband manufacturers do this is because disabling the wideband heater while the engine isn't running can help prolong sensor life but of course that's kind of at odds with our tuning requirements for cold start particularly here. |
| 22:29 | The other aspect which I found myself in a lot where I was using an Innovate LM2 portable wideband for a lot of my customer tuning. |
| 22:37 | We'd suction cup this to the windscreen and it was powered by the accessory cigarette lighter adapter in the car. |
| 22:44 | Of course during cranking that accessory power is disabled. |
| 22:47 | And what this means is that once the car starts up, the Innovate LM2 actually needed to go through a reboot and a warmup and that could take up to 10 or 15 seconds so we lose all of that data. |
| 22:58 | So during that period of cold start, it's always a good idea to hardwire the wideband so you are getting that information straight away when you do need it. |
| 23:09 | The other aspect to consider here is for a volumetric efficiency based ECU such as our Haltech Elite, or that is the way we're running it at the moment, we do need to consider that during cold start we may want to target a richer air fuel ratio than what we would target when the engine is at operating temperature. |
| 23:29 | So let's have a quick look at that, let's jump across to the laptop screen. |
| 23:32 | So we'll come up here to our target lambda screen. |
| 23:36 | And at the moment we've got a pretty basic target lambda table here. |
| 23:40 | And we can see in particular the area that we're going to be operating in around idle, we're targeting lambda 1. |
| 23:47 | Nothing particularly unusual here. |
| 23:49 | If we come down however to our coolant temperature correction. |
| 23:53 | We'll have a quick look at that table. |
| 23:55 | So we've got a three dimensional table here, we've got our coolant temperature on the horizontal axis of course and we've got our load in terms of manifold pressure on the vertical axis. |
| 24:06 | So you can see in particular down in the cold start regions when we're at 0 kPa or in vacuum, I've actually targeted a slightly richer lambda. |
| 24:15 | So in particular here if we were running at 20 degrees C we would be targeting 0.95 so what we see here is we're subtracting 0.05 so we need to sort of consider how that works in conjunction with our target table. |
| 24:31 | We know that our target table was sitting at about lambda 1 so that would be 0.95. |
| 24:37 | And the reason we may want to do this is that a lot of engines may not idle particularly happily or particularly smoothly if we target lambda 1 when they are stone cold. |
| 24:47 | So just by targeting a slightly richer lambda target until we're up to maybe 30 or 40 degrees C, this can help smooth out the idle. |
| 24:54 | So in a volumetric efficiency based ECU, you just need to understand that we don't want to make changes to our target lambda by correcting, by doing that in our fuel correction tables. |
| 25:07 | Needs to actually be done in our target lambda correction. |
| 25:11 | So once we've got that dialled in, we're ready to move on there. |
| 25:14 | So what I wanna do here is just go through each of the parameters in turn that we have access to here in the Haltech Elite. |
| 25:23 | So again we'll just go back through these. |
| 25:26 | So our first one here in our fuel table was our fuel prime pulse. |
| 25:31 | Now personally this is a parameter that I don't really use very often. |
| 25:38 | Particularly for a predominantly factory engine where we've got the injectors mounted quite close to the intake valves, this isn't a parameter that is often necessary. |
| 25:48 | It is something that could be helpful if you've got a long intake manifold where you may be using throttle body injection, maybe an IDA style injection throttle body which is very common on the likes of rotary engines. |
| 26:02 | So the injectors are now fitted a long way away from the intake port. |
| 26:05 | So that fuel prime pulse can be used just to add some additional fueling when the ECU first detects engine RPM and that just will spray a short pulse of fuel down the ports just to help with the ability to get the engine firing up quicker because we've got that transport delay between the fuel being supplied by the injectors and it making its way into the ports. |
| 26:29 | So as I've said, in this instance it's not one that I often use and of course if you want to enable or disable any of these, you can do so by selecting the relevant tables here in your settings. |
| 26:41 | The next one we'll go through here is our cranking enrichment. |
| 26:45 | So this is one that we will be making some adjustments to. |
| 26:49 | So this again as I've mentioned, we can't unfortunately tune it using a wideband air fuel ratio meter. |
| 26:56 | This is really only active when the engine is deemed to be at cranking RPM. |
| 27:01 | And as we can see here, the numbers in this table, these are all percentage modifiers over and above the numbers in our main VE table so that's important to understand here. |
| 27:13 | The numbers I've got at the moment are our default values. |
| 27:17 | So particularly when we are adjusting this as I mentioned, this really is done by kind of trial and error. |
| 27:23 | So for this reason it's always a good idea to first of all, when you are gonna make a change, make a reasonably large change to this table. |
| 27:31 | So I would make a change initially of about 50%. |
| 27:35 | And the reason we want to make a reasonably large change is if you're only making a change of maybe 5% or 10%, it can be really difficult to get a good read or a gauge on whether that change actually had any real effect. |
| 27:45 | So we're making a big wholesale change, you should be able to see a noticeable effect on the engine operation. |
| 27:53 | The other aspect with this table and to be fair with a lot of the cold start enrichment, is one of the things we wanna stay away from is running excessive numbers in any of these tables. |
| 28:06 | The reason for this is that it is very easy to end up fouling our spark plugs if we overfuel the engine during startup. |
| 28:12 | So most of these should be easy enough to do because once the enigne is actually up and running, we've got the benefit of using our wideband air fuel ratio meter to decide whether we're too rich or too lean. |
| 28:24 | But particularly during cranking or if you are using the pre crank prime, then this is an area where it is easy to introduce too much fuel. |
| 28:31 | And particularly if you are doing repetitive cold start running, or cold starting I should say, without letting the engine come up to operating temperature, if your numbers here are too large, then it's quite possible that you're going to end up fouling the spark plugs and that's going to be a real problem for you. |
| 28:51 | What I'd say with this table as well, just while we're on it, is we wanna tune obviously for clean and fast starting, that's what we're aiming for. |
| 29:01 | I've just mentioned you don't want the numbers to be too big. |
| 29:04 | If the engine initially won't fire up, when we are trying to crank it, if you're really struggling to get the engine to fire up, obviously once you've gone through and you've got your volumetric efficiency table dialled in, then it's probable that this table is going to be too lean. |
| 29:21 | So this is where we wanna make those adjustments to start with, going up in perhaps 50% increments. |
| 29:27 | Once you've actually got to a point where you've noticed that change, you can start dialling that back. |
| 29:31 | And we wanna get to a point where our numbers are minimal but we've still got crisp starting. |
| 29:35 | Now also I'll mention on this table of course we have got a wide range of numbers relative to our coolant temperature. |
| 29:43 | And it's not a case of necessarily needing to go ahead and change every single cell. |
| 29:49 | So we don't need to go through and try cranking it at every single cell. |
| 29:54 | As you can see, graphically off to the right we've got a reasonably smooth shape to this table. |
| 30:00 | So generally it's enough if we are getting our engine to start crisply, maybe around the 10 to 20 degrees C vicinity and then of course we're gonna be doing it on a lot of hot starting at 70, 80, 90 degrees C. |
| 30:13 | As long as we've got good results at both of those points, generally it is enough to perform a linearisation between those two points. |
| 30:21 | Basically just making sure we've got a smooth table shape in between those areas. |
| 30:28 | Right so once our engine is in initially started, what we're going to end up doing is falling back to our post start correction. |
| 30:35 | Now interestingly though this post start correction does work in conjunction here with our coolant temperature correction. |
| 30:44 | So all of these become additive. |
| 30:46 | And actually what you can see down here is currently I am looking at the channels of interest here. |
| 30:52 | We've got our cranking fuel, we've got our post start correction, and we've got our coolant temperature correction values all active at the same time. |
| 31:01 | So this can help us just get an idea of where the specific corrections are coming from, the size or magnitude of those corrections and if we are too rich or too lean, we can decide where we're going to make those changes. |
| 31:14 | The point with this is with our post start correction, you'll remember that this is a correction that is relative to the run time. |
| 31:26 | So what we can do here is, let's say we're starting at 20 degrees C, initially we're going to see that we're adding 39% additional fuelling, and we can see as we move out to the right, this tapers off and by the time the engine's been running for about 30 seconds, we're back to zero here. |
| 31:43 | Now over that 30 seconds of engine run time, we're going to find that the coolant temperature probably hasn't changed very much. |
| 31:51 | We're probably still going to be in exactly the same cell of our coolant temperature correction. |
| 31:58 | So let's just open that up here. |
| 32:00 | And this is where it's important to understand the interaction between these two. |
| 32:02 | So remember we were at, we were considering here 20 degrees. |
| 32:06 | Let's just have a quick look at our full low range. |
| 32:10 | We were looking at 20 degrees. |
| 32:12 | And we're probably gonna be sitting down here around about -50 kPa at idle. |
| 32:17 | So we see we've got 12.5% additional fuelling at this particular point. |
| 32:21 | So what we're looking for is that point where our post start enrichment has decayed to zero. |
| 32:27 | We're still sitting at this same point. |
| 32:29 | Looking at that point what our air fuel ratio is and how that compares to our target. |
| 32:34 | And this is going to give you an indication of whether our coolant temperature correction table is correctly configured or whether we've got, if we've got an error, whether that came from our post start correction. |
| 32:45 | So it becomes an iterative process, correcting or making changes in either our coolant temperature correction table or our post start correction. |
| 32:54 | Ideally what we're trying to do is initially get our fuel coolant temperature correction table dialled in. |
| 33:01 | And once we've done that we can then use our post start correction table to correct any errors we've got after our initial startup. |
| 33:08 | And by going backwards and forwards between the two, we can get nice accurate control of our air fuel ratio, making sure that our engine is doing exactly what we want. |
| 33:18 | So it does sound like it's a little complicated. |
| 33:20 | It's really not but it definitely can be time consuming because of course to do this properly it does require multiple attempts at cold starting the engine. |
| 33:30 | Fortunately we are left high and dry here and the default values that come in the base maps from Haltech and other ECU manufacturers for that matter, are generally going to be a reasonably good place to get started. |
| 33:45 | They're never going to be absolutely perfect but rather than making wholesale changes to our cold start correction, we're probably going to be in the ballpark already with the base numbers and then it's just a case of making small manipulations to those numbers in order to get us correct. |
| 34:01 | Now I will also just come back to our fuel coolant temperature correction table here. |
| 34:08 | And I wanna talk about the fact that we have load on our horizontal axis here. |
| 34:13 | Now the point to understand here is that the additional fuel enrichment that is required is also relative to the load on the engine, or in other words, realistically it's relative to the air flow into the engine. |
| 34:29 | So what I mean here is the wall wetting and the amount of fuel that's dropping out of the charge and making its way onto the port walls and entering the cylinder as a liquid that's not as easily combustable, that's going to be more dramatic at very low loads where there's low air speed. |
| 34:47 | If we're at very high air flows, then a lot of that fuel is tended to draw into the cylinder much more easily. |
| 34:55 | So this is why we said, if we look at our table here, if we look at our 20 degrees C warmup, we see at -100 kPa load we've got 13.5% enrichment. |
| 35:04 | Whereas at, out at 150 kPa of positive load, we've got that dropping down to just 6%. |
| 35:13 | So again depending on how fussy you wanna be, it's a good idea if you've got access to a dyno to actually choose a few key points on this table, and we can correct them at a couple of loads. |
| 35:25 | So for example here at 20 degrees C, I'd probably wanna get our coolant correction dialled in at idle where we've got vacuum. |
| 35:35 | And then I may also load the engine up and choose to do this at maybe 50 kPa of positive boost pressure. |
| 35:42 | Obviously we don't wanna end up putting huge amounts of load on a stone cold engine. |
| 35:46 | And again we can use something of a linear interpolation between those points. |
| 35:50 | And if we choose to do that at maybe 20 degrees C and maybe also out at 50 or 60 degrees C, this is gonna give us enough data points to really do a pretty good job of filling out that table. |
| 36:02 | While we are on this table as well, actually this is a point I should have mentioned earlier, one of the things we wanna do, before we even start tuning our engine, and we cover this in our practical standalone tuning 10 step process, is ensure that we haven't got any corrections that are going to be active that will influence our tuning. |
| 36:22 | What I mean here is in our coolant temperature correction table, obviously in normal circumstances, we're gonna be operating somewhere in the 80 to 90 degrees C vicinity. |
| 36:32 | So we wanna make sure that there aren't any crazy corrections we've got in this table here that we may not know about that could end up influencing or affecting our ability to do a good job of tuning our VE table. |
| 36:43 | This is exactly what we should see here. |
| 36:46 | From 80 degrees up to 100 degrees C, we have zeroes in that table. |
| 36:50 | But I have been, in a couple of instances, where I've been tuning engines where we had a correction that looks something like this. |
| 36:57 | So we've got 5% correction from 0 kPa up into positive boost at 80 degrees C. |
| 37:04 | And generally what we're going to be doing when we're on the dyno is we're going to be sort of operating in this area here between 80 and 90 degrees C. |
| 37:11 | As the engine warms up we move out of that correction up to the point where we've got zero correction being applied and then of course as we allow the engine to cool down, whilst the fan cools the engine down, we drop back into that 80 degree C zone. |
| 37:26 | So if we don't know what's happening here, what we get is this really frustrating and hard to figure out situation where our air fuel ratio is constantly changing and we're having to make constant corrections in our VE table. |
| 37:38 | We'll need to richen it up, lean it out, richen it up, and it's really frustrating, so save yourself the effort there or the frustration I should say, and make sure that the numbers in your coolant temperature correction table are safe and sound. |
| 37:54 | Alright we will go into some questions really shortly so if you've got any questions on this topic, now is a great time to ask those in the comments, the guys will transfer those through to me and we'll deal with those in a second. |
| 38:06 | I just want to really reiterate now we've looked at everything, we've looked at all the parameters, I just want to reiterate the process that you wanna go through here. |
| 38:15 | So you've got that really locked down in your mind, the correct steps to go through. |
| 38:19 | So of course the first step, I'm just gonna mention that one we just looked at there, before we even tune our VE table, we wanna make sure that we haven't got any crazy corrections going on in our warm up enrichment that could affect our normal operating temperature zones. |
| 38:35 | This really does go for our air temperature correction as well, we wanna make sure that all of those are dialled in correctly. |
| 38:40 | Beyond this, we wanna go through the actual process of accurately dialling in our volumetric efficiency table. |
| 38:46 | And we wanna do that everywhere, and remembering again we wanna extrapolate the shape of that table down into those areas we can't get to. |
| 38:54 | And specifically the areas that the ECU will be accessing during cranking and initial start up. |
| 39:01 | Just to give us the best chance possible of having safe numbers or accurate numbers I should say in there that do truely represent the VE of the engine. |
| 39:09 | Now I have been using VE tuning here as our demonstration but of course exactly the same principles do cross over to an injection time based ECU. |
| 39:20 | We still wanna make sure that our fuel injection time table is nice and smooth and consistent and we extrapolate those table numbers out into those areas during the cranking place that you can't get to. |
| 39:33 | The you wanna make sure that you've selected the cold start parameters or settings that you want or correction I should say that you want. |
| 39:42 | And really this comes down to do you want to use that pre crank prime option in the Haltech Elite, or do you have an engine that doesn't warrant or doesn't require that. |
| 39:52 | And hopefully I've dealt with where you may find an advantage from that. |
| 39:56 | Now once you've got your settings, we're going to start generally, unless you've got a very good reason to not do so, with the default settings that the ECU manufacturer has provided. |
| 40:06 | Chances are these are at least going to be enough to get you in the ballpark and get you up and running where you can make changes. |
| 40:14 | The next step of course is to go through the initial startup of the enigne. |
| 40:18 | We need to make sure at this point, the engine is completely cold and the first thing we're looking to adjust is our pre crank prime and our cranking enrichment in order to make sure that we get crisp intitial startup. |
| 40:29 | Remember with these parameters, we wanna make large wholesale changes to these parameters so that we can actually assess the effect of the changes we're making. |
| 40:39 | Our aim is always to get crisp start up with the smallest numbers that we can possibly achieve in this table. |
| 40:45 | Beyond this, we're going to then be moving into our post start enrichment and our coolant enrichment, our coolant correction tables. |
| 40:55 | Remembering that the post start enrichment is a table that only stays active for a certain period of time. |
| 41:03 | So particularly if you've got an engine that starts up initially fine and then you find that it tends to cough and splutter and maybe wants to stall, then this can be a correction that can be fixed, somthing that can be fixed, using our post start enrichment. |
| 41:18 | Remembering again that all of these tables though are multipliers or adders on top of each other. |
| 41:23 | So that post start enrichment table is active at the same time that your coolant correction table is active. |
| 41:30 | So you still need to have your base coolant temp correction table set up sensibly and correctly in order for your post start enrichment table to be working properly. |
| 41:42 | And the key there is to try and assess what's happening in terms of your air fuel ratio once your post start has decayed and you're actually working solely off that coolant temperature correction table. |
| 41:55 | Then the other aspect to consider there is that while we're doing this we are also adjusting our base idle duty cycle table in order to get our, make sure that our idle speed is on our target. |
| 42:09 | Now this does sound like a lot to take in, it sounds like there's a lot going on here and to be fair there is a fair bit to do but once you're a little bit more familiar with the process, you do tend to be able to move backwards and forwards between these tables, making the necessary corrections relatively quickly. |
| 42:27 | Particularly with regard to controlling your air fuel ratio in comparison to controlling your idle speed. |
| 42:33 | Very easy to jump backwards and forwards between your fuel corrections and your base idle duty cycle table to get your idle dialled in quickly. |
| 42:41 | Even that being said though, it's still possible that you're going to need to go through a couple of iterations to get this correct and that can be frustrating just on the basis that you're not going to be able to do all of that on one day. |
| 42:54 | Often once you've gone through the cold start operation, you're gonna need to allow the engine to completely cool again, perhaps overnight and give yourself another chance of doing it the next morning. |
| 43:04 | And lastly just to again reiterate, you've still got that issue that you may deal with if you are tuning a car in the middle of summer that your corrections may still need a little bit of touch up work when it comes to the middle of winter. |
| 43:17 | But if you go through all of that process, you do spend the time, then you should be able to achieve the results that do match the OE style cold start performance and for me this is a sign of a really well tuned engine and particularly you'll find that engines that don't cold start properly, it's a good indication that the tuner either doesn't understand exactly what's going on and what they're going or also potentially hasn't really been interested in taking the time to do their job properly. |
| 43:47 | Alright we'll jump into our questions now, if you've got any more, please continue to keep them coming. |
| 44:01 | OK our first question comes from David who's asked, is there any suggestions or recommendations for injection timing during cranking? OK that's actually a really good question there that you've mentioned there David and I've purposefully stayed away from injection timing because it is a reasonably complex topic that probably is best dealt with by viewing some of our previous webinars in the archive. |
| 44:26 | If you search in the archive for injection timing, you will find that for both DI and port injected engines. |
| 44:32 | However, yes it is a consideration for our cold start and the reason for this is we find that in most OE applications, you're going to find that the injection timing is set up for what's called closed valve injection where the fuel injection is behind the closed intake valve. |
| 44:49 | That might not seem particularly sensible on face value. |
| 44:53 | You'd think that maybe you wanna inject the fuel when the intake valve is open. |
| 44:57 | However what we do need to understand is that with port injection, at some point we're almost certainly going to be injecting some amount of fuel against a closed valve anyway. |
| 45:07 | The benefit of this technique is that when the engine is up to operating temperature, the intake valve is very hot, as is the port wall. |
| 45:13 | So while the fuel is injected against that closed valve, what it does tend to do is vaporise and go through that phase change from liquid to vapour, making it really easy to combust when it's drawn in on the next intake stroke. |
| 45:25 | Now when everything's stone cold though, this may not work quite so well. |
| 45:30 | And you can potentially get some advantage from changing from a closed valve injection strategy to open valve injection during cold start. |
| 45:38 | I'll be completely honest here, this is something that I have not spent a lot of time playing with or perfecting myself. |
| 45:45 | What I'm presenting here and what I'm discussing is from some OE white papers, SAE white papers that I have read on the topic. |
| 45:54 | Vince Rodriguez has asked, for E85 do you also adjust timing for cold start? In terms of ignition timing, this is actually a topic that came up on our forum just recently. |
| 46:05 | And that answer is I don't typically make any tuning changes to the igniton timing. |
| 46:13 | However I do know that this is something that a lot of OEs will encorporate in their strategy for cold start. |
| 46:20 | And I'm talking here above and beyond the initial massive ignition retard that is used to light off the catalytic converters. |
| 46:27 | Once that's done and dusted and the catalytic converter is up and operating, you often find that OEs will actually quite significantly advance the timing during cold start operation. |
| 46:37 | I've personally never seen any real benefit or need for it. |
| 46:40 | But certainly it is something that you are free to experiment with and just see if it gains you any advantage for your own application. |
| 46:49 | David has asked, it looks like there are two coolant corrections, one is the lambda aim and the other is the fuel coolant compensation. |
| 46:56 | How do those act on the Haltech Elite? So hopefully I have answered that there. |
| 47:02 | We've got, because it is a VE based ECU, everything is based on lambda target, that's important to understand. |
| 47:10 | So we've got our main lambda target table and then we've got a coolant correction. |
| 47:15 | So that's actually correcting our lambda target, so the target that the ECU is aiming for in terms of lambda. |
| 47:21 | But then in order to actually achieve that then we have our coolant temperature correction. |
| 47:26 | So the two work hand in hand. |
| 47:28 | This is actually an area that a lot of people new to VE based ECUs will mess up so what they'll do is they'll know that they want the engine to run a little bit richer during cold start operation. |
| 47:39 | But instead of trying to do that the correct way by adjusting the lambda target coolant correction, they'll just sort of fudge the numbers by adding some additional fuel into the coolant correction tables. |
| 47:51 | So fuel coolant correction correctors tables. |
| 47:55 | And this will achieve the correct aim but particularly if you were to use closed loop air fuel ratio control O2 control, then of course that's going to undo any of your work there because during that cold start operation if the O2 control is active, it's going to be simply targeting or correcting to get back to the target lambda table value. |
| 48:17 | Hopefully I've managed to explain that, sounds a little bit complex, but it is relatively easy. |
| 48:23 | Bruce has asked, is the same tuning strategy applied for direct injection engines, do we need to make some changes? No essentially, despite that fact that yes the fuel is injected directly into the cylinder, the strategy is essentially identical there and we've got basically the same parameters to adjust. |
| 48:44 | With direct injection, obviously we're not going to have any fuel wetting out against the port walls but we do have cold cylinder walls, a cold combustion chamber, during our initial start up so we do essentially still get the same effect there, although with direct injection, we do have much better control, or the OE has much better control over the distribution of fuel within the combustion chamber. |
| 49:07 | But from my own experience we still need cold start enrichment. |
| 49:10 | It just may not be anywhere near the magnitude of what you'll need on a port injected engine. |
| 49:16 | AMSB has asked, interested if you guys can share whatever tricks the OEMs are doing to minimise the toxic cold cat converter smell. |
| 49:23 | Not necessarily thinking of how best to keep an OEM cat converter alive for 100s of 1000s of miles but things like if you should trade a few hundred RPM higher idle for a mixture closer to stoich? Or whatever wacky things the OEMs do with timing to warm a cat up quickly without damaging it. |
| 49:42 | OK so I actually touched on this before we got started with the webinar. |
| 49:45 | In New Zealand we live in a fairly unique situation where we don't actually have emissions testing. |
| 49:53 | And I know we're quite unique in that instance. |
| 49:55 | Particularly in the US and the Australian markets as well as Europe, emissions compliance is really essential. |
| 50:00 | So what I'm getting at here is for a lot of our tuning we haven't needed to be quite so careful with making sure the catalytic converter is alive, well, and working, and certainly in the case of our STi here, the catalytic converter has been removed, we don't need it, it's not in the exhaust system. |
| 50:19 | That being said, so the strategies that an OEM will work through here, what they're trying to do is initially get a lot of heat into the catalytic converter to light it off and get it operating as quickly as possible. |
| 50:30 | The cold start operation is one of the trickiest parts for the OE manufacturer to get on top of in order to minimise emissions. |
| 50:38 | Particularly during the cold start you've got a lot of excess hydrocarbons in the exhaust so we really want our catalytic converter doing its job as quickly as possible. |
| 50:48 | So the strategy there, and you've really touched on it, what they do there is to increase the engine RPM. |
| 50:53 | And they couple this with quite significant ignition retard, and that builds a lot of heat in the exhaust system which helps light off that catalytic converter and gets you back to the point where the cat is working. |
| 51:05 | Not 100% sure if I can really give guidance on minimising the toxic catalytic converter smell though. |
| 51:13 | Don't know if I can really help you there I'm sorry but hopefully maybe that's a little bit of information around your question there. |
| 51:18 | Alright guys that has brought us to the end of our webinar. |
| 51:23 | And as usual if you've got any questions that crop up after this webinar has aired, please feel free to ask your questions in the forum and I'll be happy to answer them there. |
| 51:32 | Thanks to everyone for joining us and I hope to see you online again soon. |


