207 | Getting the Perfect Idle
Summary
Solid and stable idle control is one of those aspects of a tune that makes a real difference to the drivability of a car. It is however an aspect that is often overlooked or incorrectly tuned, leading to unstable idle and stalling. In this webinar we’ll discuss what you need to know to get a rock solid idle and what hardware is required.
| 00:00 | - Hey guys Andre from High Performance Academy. |
| 00:02 | Welcome along to today's webinar. |
| 00:04 | We're gonna be talking here about idle speed control. |
| 00:07 | And we're going to be using our Subaru STi fitted with a Haltech Elite 2500 for this demonstration. |
| 00:14 | Although some of the aspects that I'm gonna be discussing here are really a lot more general and are going to be applicable to a wide range of ECUs, a wide range of idle speed control systems. |
| 00:24 | So don't think that you need a Subaru STi and a Haltech to get value out of this webinar. |
| 00:29 | Now I should also mention that this webinar follows on closely on the theme from last week's webinar which was cold start tuning on a Haltech Elite 2500. |
| 00:39 | So if you're watching this in our archive, please feel free to go back and check out that webinar as well, you can search for that and these two will go nicely hand in hand. |
| 00:49 | As with all of our webinars, we will be having questions and answers at the end so if there's anything that I talk about today, please feel free to ask those questions in the chat and the team will transfer those through to me. |
| 00:59 | So first of all, it's important to understand what we're actually trying to achieve and really again just similar to our cold start here, when it comes to idle speed control, what I'm trying to achieve is an OE quality idle control. |
| 01:12 | And this can make the difference between a car that really does drive just like factory, a car where we can reach through the window and turn the key and even in sub zero temperatures it's going to start and idle perfectly. |
| 01:26 | And that can be the difference between that sort of control and a car that's constantly stalling, surging, the idle's oscillating and is just generally nasty and horrible to drive. |
| 01:39 | So this is what we're trying to achieve. |
| 01:41 | And if we can get this sort of quality, it's really going to make a big difference, particularly if we are tuning for customers as well. |
| 01:47 | Because this is one of the noticeable aspects to a customer when they get their car back from a professional tuner, if the idle quality isn't like it was on the factory ECU, then they're really gonna notice that and it can be quite frustrating. |
| 02:01 | And getting this right, the extra time that we're gonna put in, can easily end up saving us time in the long run when we're not getting cars coming back to us for remedial work in our tune. |
| 02:13 | Alright so we need to obviously understand how we can go about achieving this OE quality idle control. |
| 02:20 | And first of all we need to understand that in order to achieve idle speed control, good quality idle speed control, we're going to need some means of bypassing additional air around the throttle plate, or basically getting more air into the engine. |
| 02:37 | And we want to be able to manipulate or control very accurately the amount of air going into the engine in order to control that idle speed. |
| 02:43 | Traditionally the most common techniques of doing this would be with an idle air control valve, often called a bypass air control valve, there's a variety of acronyms for that, basically all the same sort of thing. |
| 02:57 | Or a stepper motor. |
| 02:59 | So those are probably the two key ways that we used to see idle speed control being funcitoned. |
| 03:06 | These days with the majority of modern cars coming out with drive by wire throttle bodies, we're now seeing the drive by wire system directly being used for idle speed control. |
| 03:16 | Interestingly there were a few examples right on that crossover where drive by wire throttle started getting adopted where drive by wire was included but an additional air bypass system was also included for idle air control. |
| 03:30 | So some systems, particularly on that cross over you may see both. |
| 03:33 | These days with our aftermarket ECUs, we're more than likely just going to use drive by wire. |
| 03:40 | It's proven to be pretty effective in most instances. |
| 03:43 | I will mention though that if you are fitting a very large drive by wire throttle body then you may start to struggle with your idle control. |
| 03:51 | The reason for this is with very large throttle bodies, we're getting quite a significant change in the air flow through the throttle body when we make a very small change to the throttle body opening so just keep that in mind. |
| 04:04 | If you're sort of starting to get up to throttle bodies in the 90 to 100 plus millimetre range, that's an issue. |
| 04:12 | Now our requirement for idle air bypass is going to depend on the operating conditions of the engine. |
| 04:20 | For example we're going to need additional air bypass when the engine is cold. |
| 04:25 | We're also going to need additional air bypass when extra load is placed on the engine. |
| 04:30 | So it's common to have, within our ECU idle ups or modifiers for things such as our air conditioning, when that switches on or off. |
| 04:39 | It's also common to have these for power steer or even when addiitional load is placed on the alternator, the charging system, this will have the same requirement for a little bit of additional air bypass so we'll often see these sorts of modifier tables inside our ECU. |
| 04:57 | And utilising these is gonna give us much more stable control as our operating conditions change. |
| 05:04 | We're then going to normally have a PID control algorithm that's going to be there to basically modify that air bypass if there's an error between our target idle speed and the measured RPM. |
| 05:16 | Now we're gonna talk a little bit at the end of this webinar about what PID is. |
| 05:19 | I know that it is a control strategy that a lot of tuners, even very experienced tuners struggle with and we're gonna try and give you a bit of an explanation so it makes a little bit more sense as to what the three gains in the PID algorithm actually mean. |
| 05:36 | We also are likely to find the addition of idle ignition control in most modern ECUs to help us get more stable idle speed control, we'll go through a demonstration of how that works a little bit further into the webinar. |
| 05:51 | So that's basically the list of what we're going to need and how it works inside of our ECU. |
| 05:56 | And what we're going to do now is head over to our Haltech software and we'll have a quick tour so you can see what that actually all looks like. |
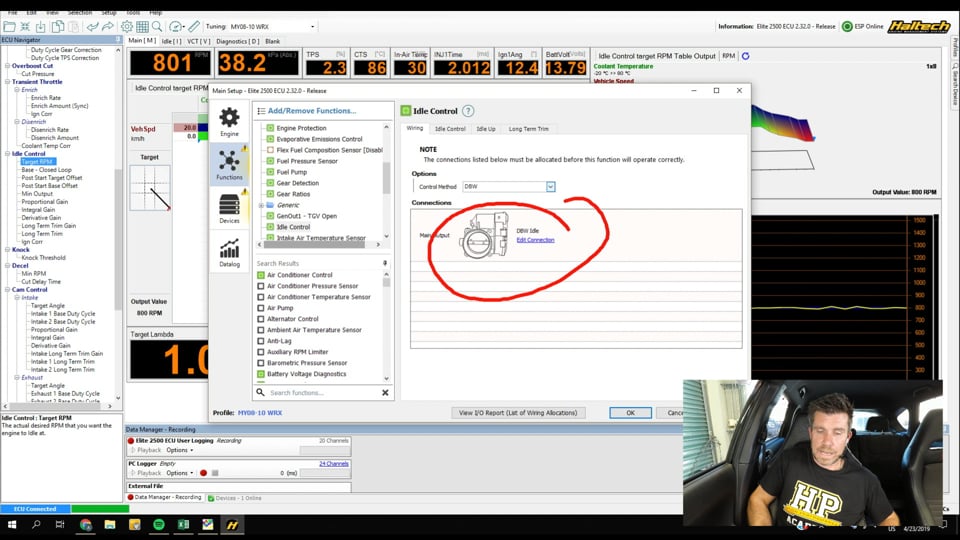
| 06:04 | So what we're going to do is actually start by going to our settings and we are looking here at our idle control function. |
| 06:12 | So obviously in the Haltech Elite we need to enable the idle control function for a start and we're got our control method here. |
| 06:20 | So you can see that this is set to drive by wire, no big surprises there. |
| 06:24 | If we look at our drop down menu here, we've got the ability to set this up as a two or three wire solenoid. |
| 06:32 | We can use ignition only. |
| 06:34 | We've got actually no air bypass, we're gonna talk about that in a little bit more detail. |
| 06:38 | And then we've got the ability to set up a stepper motor. |
| 06:41 | So that's the very first place to start is making sure that we've got the correct actuation method set up. |
| 06:46 | And then of course if we aren't running drive by wire, we need to make sure that our stepper or our solenoid is correctly wired up to our ECU. |
| 06:54 | That's a really common area I saw a lot of people go wrong where they would bring us cars to be tuned, probably greater than 50% of the time, just I guess murphy's law, the idle bypass control system would be wired up the wrong way, particularly if it was a stepper or a three wire solenoid. |
| 07:13 | And that would be really frustrating because we'd have to go through and diagnose why the idle control system wasn't working and then correct the wiring or the setup in the ECU. |
| 07:22 | Next we've got our actual idle control settings so we'll head across here. |
| 07:26 | So we do have the ability to use closed loop or open loop. |
| 07:30 | Closed loop control in general once it's set up properly, is definitely the way I would suggest doing it. |
| 07:38 | There's really no reason to go with open loop unless you don't understand the PID control tuning which is actually relatively straightforward. |
| 07:47 | Closed loop simply means that if there is an error between our target idle speed and our measured idle speed, the ECU can increase or decrease that air bypass in order to drive towards that target. |
| 07:58 | So it's just going to give us more stable control over a variety of conditions than if we aren't using it. |
| 08:04 | I'm not gonna go through every single aspect here but one thing I do wanna mention is that we've got our drive by wire max position. |
| 08:12 | So obviously this is only relevant for drive by wire idle control systems. |
| 08:15 | And basically what it does is it scales our base idle position table which is really important to understand. |
| 08:23 | So basically what this means is that when we have a value of 100% in our base idle position, base closed loop target table, solenoid position table, we're going to end up with 10% throttle opening. |
| 08:37 | And we do need to understand that in some instances this may not be enough, particularly if we've got a large cam'd engine where we need to increase our idle speed, particularly when the engine is cold. |
| 08:48 | We may not be able to get enough air bypass with 10% drive by wire throttle opening, in which case obviously we're going to end up with a low idle speed so we may want to come back and adjust this. |
| 09:00 | We'll move across here as well and have a quick look at our idle ups as well. |
| 09:03 | So at the moment the only one we've got here active is our air conditioning idle up. |
| 09:10 | So this really comes back to what I was saying earlier when we've got additional load being placed on the engine, we need to modify our idle control system in order to make sure it stays as stable as possible. |
| 09:20 | So this simply says that when our air conditioning is active, we're going to end up with a 4% step in our idle position and this is also going to offset our target idle speed by 40 RPM. |
| 09:32 | So it's actually going to increase our target idle speed here by 40 RPM. |
| 09:36 | And obviously we can increase, we can bring these in for a variety of functions such as power steer or electrical load. |
| 09:44 | Something that is unique as far as I've found to the Haltech Elite series is their ability to also include long term trims. |
| 09:53 | So I've got this enabled at the moment. |
| 09:55 | Basically what it does is it self learns what the base idle position should be, and once you've gone and driven the car a bunch, as we'll see you can, it will fill out the long term trim table. |
| 10:06 | You can then apply this to your base solenoid position and it should improve everything so just basically getting everything closer straight out of the gate. |
| 10:15 | Alright so that's a quick tour of the actual nuts and bolts behind the idle speed control and once we've got it enabled it brings up all of these menus that we've got over here on the left hand side. |
| 10:28 | So I just wanna quickly walk through those, we'll come back to some of these in a bit more detail. |
| 10:33 | So the first one that we've got on at the moment is our target idle speed. |
| 10:36 | We can see we've got this here. |
| 10:38 | It's a three dimensional table, we've got our coolant temperature on the X axis and our vehicle speed on the vertical axis. |
| 10:45 | We're gonna talk about why the vehicle speed is in there shortly. |
| 10:49 | But this is just basically just setting what we want our target idle speed to be. |
| 10:55 | Moving down we've got our base drive by wire throttle position. |
| 11:00 | So this is our base that we're going to work from. |
| 11:04 | Essentially this is also referred to as a feed forward table. |
| 11:07 | So this is basically what the drive by wire throttle position is going to jump to for a given operating condition before any closed loop control is brought it. |
| 11:18 | So what we wanna do is really get this as close as we can get it so that our idle speed is as close to target as possible and then we're going to use our closed loop control to pick up the pieces if we do have any small errors creep in. |
| 11:30 | So the more accurately we can tune this the less our closed loop control strategy is going to need to do and generally the more stable our idle speed is going to be all 'round. |
| 11:40 | So we can see that again this is three dimensional, we have got this table set up relative to our coolant temperature on our X axis and we've got our air conditioner, whether that's active on our vertical axis. |
| 11:51 | So really again this just comes into allowing us to step up our idle drive by wire position based on our air conditioning operation. |
| 12:02 | OK we've got a couple of other modifiers here that we're just gonna briefly talk about, we've got a post start target offset. |
| 12:09 | So this allows us for a brief amount of time to offset our base idle position just to help with our start up. |
| 12:16 | So we can see that at initial crank over we're actually targeting an increase of idle speed of 100 RPM and that tapers away to zero after about five seconds of operating. |
| 12:28 | And in order to try and achieve that, our next table down here is our post start base offset. |
| 12:32 | So this offsets our drive by wire or our solenoid operating point for that same period of time. |
| 12:39 | So we've got the same axis, just again to try and get everything to work nicely together. |
| 12:45 | Moving down we've got our proportional, our integral and our derivative gains. |
| 12:49 | And then we've got our long term trim. |
| 12:52 | So this is the long term trim system that I was talking about that Haltech use. |
| 12:58 | It's applied to quite a wide variety of the Haltech's operation and we can see basically it replicates the base position table and it just simply makes changes to the base position based on the RPM and in this case the air conditioning operation. |
| 13:14 | And over time, as I've said, this should end up smoothing out our idle speed control, getting it nice and accurate. |
| 13:21 | Alright so there's a quick run down of the basis of that idle control system. |
| 13:27 | Now we're gonna talk about what we need to actually do in order to correctly tune it. |
| 13:33 | And I think probably the first place that I see a lot of people go wrong is that their goals are completely unrealistic. |
| 13:40 | What I mean by this is that they're trying to make an engine idle slower than it's comfortable doing. |
| 13:47 | So this is a problem because the ultimate or the correct idle speed is going to depend on your particular engine. |
| 13:54 | So for example with a stock LS2 six litre V8, we may be able to quite happily achieve an idle speed of 500 to 550 RPM, the engine will be very very happy at that RPM. |
| 14:09 | If we try and do this with the majority of stock standard four cylinder engines though, we're probably going to have a really poor result. |
| 14:17 | The engine's going to be unhappy at 500 RPM, it's porbably going to be very prone to stalling, particularly when we give the throttle a punch and we come up to a set of lights and we put our foot on the clutch. |
| 14:27 | So for a four cylinder engine, probably much more likely to see the target idle speed in stock form fall somewhere in the region of maybe 750 to maybe 950 RPM. |
| 14:38 | It's really a case of just seeing how your engine performs at a variety of idle speeds, we can also use the factory idle targets as a bit of a guide to what the factory found worked well. |
| 14:49 | Now there is another spanner that gets thrown into the works here, is that when we start modifying our engines, suddenly we may also need to modify our idle targets. |
| 14:59 | And this in particular comes in when we make changes to the cam profile. |
| 15:03 | So for example if we take out the factory cam on our LS2 that idled happily at 550 RPM, we've got the really aggressive cam with a lot of duration and a lot of overlap and a lot of lift, all of a sudden the engine becomes very inefficient at low RPM, we've got a lot of reversion pulsing occurring, and often with that sort of cam, in order to get good idle control, we may need to step up our idle speed targets to 750, 800, 850 RPM, just depends a little bit on the cam. |
| 15:33 | Same thing happens with our four cylinder, it's not uncommon to end up with a cammed four cylinder engine idling in the 1100 to 1300 RPM vicinity. |
| 15:41 | My old drag car with cams that were in around the 300 degree advertised duration vicinity idled at about 1800 RPM. |
| 15:50 | So there is not fixed idle speed that you can go and apply to every job and expect to get good results, you need to be a little bit sensible there. |
| 15:57 | And if you aren't sensible, if you don't get this first step right, you're really gonna waste a lot of time chasing your tail, getting really frustrated with an inferior result. |
| 16:06 | Because you're essentially trying to achieve the impossible. |
| 16:08 | The other aspect here is that our target idle speed may need to or want to change with relation to engine temperature. |
| 16:17 | The reason for this is that particularly when the engine is cold, we're not getting good atomisation of the fuel, the engine doesn't run as well, and we may find that the engine runs smoother with a slightly lifted idle speed. |
| 16:30 | So let's just jump back into our laptop software again, we'll head back to our target idle RPM table here and we'll see exactly what we've got going on here. |
| 16:40 | So again for the moment, just regarding our vehicle speed axis, what you can see is that down in the zero to 20 degrees C vicinity, we've got a target idle speed there of about 1350 RPM. |
| 16:53 | Then when we're up at our operating temperature where we are now, we can see that we're targeting around about 800 RPM. |
| 17:00 | So this is probably pretty typical and normally I'd be at or pretty close to my hot target idle speed by somewhere around about 60 degrees C. |
| 17:10 | OK so the next aspect, before we actually get into tuning our idle speed control, is we also need to make sure that our tune is on point. |
| 17:20 | The reason for this is that we can end up trying to mask problems with our tune by adjusting or needing to make adjustments to our idle speed control. |
| 17:30 | So what I'm getting at here is that the fuel delivery and the ignition timing both make a difference to our engine's operation in the idle area. |
| 17:39 | So if we've got an engine that's tuned poorly, maybe it's under advanced in terms of ignition timing, maybe we're running it too rich or too lean, this is all going to affect the way the engine idles, particularly if the engine is running too lean, you're going to have a lot of problems with your idle quality. |
| 17:56 | So before we really worry about this, we wanna go through, just make sure that we've got our fuel delivery or our VE table dialled in accurately, that our trim is on point. |
| 18:05 | We can see here if we just jump back to our laptop, we have got closed loop control operating at the moment, and at the moment our trims at idle, we've got about 5% trim, it's probably a little bit higher than I'd normally like but you can see that our target lambda and our measured lambda are on point. |
| 18:21 | So basically everything's doing exactly what I'd expect and as we've actually been talking here, we can see that trim's just shuttled back down to about 2% to 3%. |
| 18:30 | So that was possibly just the engine fan switching on and off as I was talking there. |
| 18:34 | So we know that our fuelling is on point in that idle area. |
| 18:39 | Remember of course that if we are targeting higher and lower idle speeds based on our coolant temperature, then we need to explore a little bit more of our VE table, make sure that all of those areas are dialled in. |
| 18:51 | OK we also need to make sure that our fuelling has been tuned properly for our cold start because this is an area where our fuel delivery does need quite a lot of modification and again based on what I've just talked about. |
| 19:09 | If this is wrong during a cold start you can have an impossible job trying to get your idle speed to mask those problems with our fuelling perhaps being way too lean when the engine is started at maybe zero to five degrees C. |
| 19:21 | So again if you do want a little bit more information about that, check out our other webinar on the cold start performance in our archive there. |
| 19:31 | OK so I wanna talk about another feature here that goes in conjunction with our idle speed control and this is idle ignition control. |
| 19:39 | And I'll show you this for a start, let's head back across to the laptop screen and we'll head down to the bottom here which is our ignition correction. |
| 19:48 | So this is a three dimensional table here and what it's used to do is basically modify the ignition timing being delivered to the engine based on errors in our target idle speed. |
| 20:00 | So what we've got on our horizontal axis here is the idle control RPM error. |
| 20:06 | So how far away we are from our target RPM and this is an interesting aspect that Haltech add in here. |
| 20:14 | As you can see I'm actually not using it but this is the rate of change of our RPM. |
| 20:17 | So I'm gonna just ignore that, you could easily set this up just as a two dimensional table. |
| 20:22 | And it's important to actually mention here, this control parameter, you'll notice it's idle control RPM error. |
| 20:29 | So we're not looking at just RPM. |
| 20:31 | This is the error between our target idle speed and our measured RPM. |
| 20:34 | And the reason that's important is because this allows this idle ignition control function to work really nicely across the entire operating temperature range. |
| 20:44 | Remember we've just talked about the fact that we're likely to increase our target idle speed when the engine is cold. |
| 20:49 | It was common in years gone by to use engine RPM as the X axis for our idle ignition control function. |
| 20:58 | And of course that means that it can only really work properly at one fixed idle target RPM. |
| 21:04 | So by using idle control RPM error, the actual idle target is taken into account with this table. |
| 21:13 | Alright so let's have a look at the numbers in this table and what we can see here is that when we're right on our target idle speed, we're doing nothing to our ignition timing, it's sitting at zero, no trim is being applied. |
| 21:24 | However, oh not that one, however as we move to the left here, what this means is that our idle speed is falling below our target. |
| 21:32 | And for example when we are 50 RPM below target, we can see that we're adding eight degrees as we move further to the left, we can see by the time we're at 300 RPM below target, we've added 15 degrees. |
| 21:43 | Then if we move to the right here, this is where our idle speed is above our target. |
| 21:49 | And we can see here for example at 50 RPM above we're removing five degrees. |
| 21:54 | When we get out to 200 RPM and above, we've pulled 14 degrees out. |
| 21:58 | So the principle of this technique is we're looking at adjusting the amount of engine torque being produced. |
| 22:07 | It's really no different than the way we tuned the ignition timing in steady state on our dyno. |
| 22:11 | Of course when we're at idle though we can't measure the amount of torque being produced. |
| 22:15 | But when we advance the timing towards MBT our engine produces more torque and at idle what this means is that the idle speed will increase. |
| 22:25 | Conversely if we retard the timing away from MBT our engine produces less torque and our idle RPM drops. |
| 22:32 | So by using this, by advancing and retarding the timing, we can change the amount of engine torque and we can get really fine, really fast adjustment to our idle speed. |
| 22:42 | So it's a good way of working in conjunction with our PID control for our actual solenoid opening, our stepper motor or our drive by wire throttle. |
| 22:52 | This tends to give you a faster change or a faster result in terms of chasing down an idle error. |
| 22:59 | And we can also get much more accurate control when we use idle ignition control in conjunction with our air bypass system. |
| 23:10 | Now I should also mention here that this feature on its own can be used to a degree with engines that have no idle air control valve system fitted to them. |
| 23:22 | So this is something we might see on dedicated race cars. |
| 23:25 | Often the idle control system is removed just in terms of making the whole installation simpler, removing one more thing that could potentially go wrong, and of course with a dedicated race car, often we're not as worried about the cold start performance of the idle control. |
| 23:41 | Basically we're going to be idling the thing until it's up to temperature. |
| 23:44 | And from there on the idle control, as long as we're there or thereabouts, probably we're going to be OK with that. |
| 23:51 | So we can get a reasonable amount of control over our idle speed by just incorporating idle ignition control on its own. |
| 24:00 | What we do need to understand is that this may work quite well when the enigne is up to operating temperature, but because we've got no way of bypassing additional air in when the engine is cold, we're still gonna find that the engine will struggle to idle on its own when it is cold started and it may need the throttle held open for the first few minutes after it's started up before it can idle by itself. |
| 24:22 | Now a little tip here if you are tuning an idle control system where you've got no idle air control valve on this sort of engine, it's a good idea to set your hot operating RPM a little above your target. |
| 24:35 | So let's say we were targeting 1000 RPM at normal operating temperature. |
| 24:39 | I might adjust our idle air control valve under normal MBT ignition timing, or thereabouts, to a point where we've got an idle speed of perhaps 1200, maybe 1250 RPM. |
| 24:51 | And then what I'm going to do is incorporate ignition control to pull that back down to our target. |
| 24:56 | So the point here is that we're going to potentially be operating with maybe only five or six degrees of ignition advance at hot idle. |
| 25:03 | But the fact that we've got additional air bypass there is gonna do a better job of getting our engine to idle when it is cold. |
| 25:10 | So it's just kind of bridging the gap here. |
| 25:12 | There is a limit here, if we are retarding our timing too far, then you're likely to produce a lot of heat in the exhaust manifold at idle. |
| 25:20 | So generally I don't like to sustain the ignition timing at idle, much less than about five degrees, just as a bit of a rule of thumb. |
| 25:29 | Lastly a key when we are using idle ignition control is that the numbers in the idle ignition control table here are a modifier to our base ignition timing table. |
| 25:40 | So what this means is that in order to be able to get control of our idle speed using this technique, we need to make sure that our base ignition timing values aren't set to MBT. |
| 25:52 | If they're already set to MBT we can only really retard the timing from there. |
| 25:56 | If we advance it further we're not gonna get any further increase in engine torque. |
| 26:00 | So this means that the system isn't as effective. |
| 26:03 | So let's just have a quick look at that here. |
| 26:05 | What we'll do is we'll go across to my laptop screen and we're going to have a look at our ignition angle base table. |
| 26:12 | Have a look at this and we can see in the area that we're operating here, we're set to about 18 degrees. |
| 26:17 | Now that's probably a little bit more advanced than I'd actually normally set this, probably more often I'd be in the range of maybe 14 to 16 degrees. |
| 26:27 | We'll probably find that, obviously it's engine dependent. |
| 26:30 | The MBT timing here may be somewhere in the region of maybe 24 to 28 degrees or thereabouts. |
| 26:36 | So if we're in the region of 14 to 16 degrees it gives us a reasonably good amount of power to both advance the timing and increase our idle speed as well as to retard it and reduce our idle speed. |
| 26:47 | So if you're already at MBT, you're not gonna get great results. |
| 26:51 | Right I'm gonna talk now about probably one of the most common issues that I get asked about and this is preventing stalling when you're coming up to a stop, maybe up to a set of traffic lights and you're depressing the clutch. |
| 27:04 | Now there are a variety of issues that can cause this and some of them are actually unrelated to our idle ignition control. |
| 27:12 | I wanna touch on one for a start that's probably not really that much use to aftermarket engine management systems but it's really prevalent with OE systems using a mass air flow sensor. |
| 27:24 | And this is where we've got a turbocharger with a mass air flow sensor on the inlet to the turbocharger. |
| 27:30 | Quite often if we lift off the throttle, we're going to end up with a small amount of air coming back through the turbocharger, passing back out through the mass airflow sensor and this can cause huge problems with our engine operation as we come to a stop. |
| 27:46 | Basically the mass air flow sensor is metering too much air or more air than is going into the engine. |
| 27:53 | And we end up momentarily running very very rich. |
| 27:55 | So this can cause really frustrating problems that really are almost impossible to tune around. |
| 28:00 | The key to look at here, oh the other thing, this will happen if you've got an atmospheric venting blow off valve as well on a mass air flow sensor metered car. |
| 28:09 | So key things to look there is when you're datalogging, look at what's happening to the output from the mass air flow sensor as you come up to a stop. |
| 28:15 | Are you seeing a spike in your mass air flow sensor reading as you come to a stop, as you get off the throttle, as you get on the clutch. |
| 28:24 | Those sorts of things will indicate you've got some reversion pulsing coming back out through the mass air flow sensor. |
| 28:30 | While it's an inherent flaw, sometimes you can improve this by simply extending the length of the intake tubing between the mass air flow sensor and the turbocharger. |
| 28:39 | Obviously if you've got a vent to atmosphere blow off valve, you're gonna have problems, it's pretty hard to get around, they're not well suited to a mass air flow sensored system. |
| 28:50 | The other aspect is have you got problems with your over run fuel cut or deceleration fuel cut off system? This is where the ECU is completely switching off the injectors on over run. |
| 29:02 | Now sometimes it can take a moment to really re establish proper engine operation after the injectors are re enabled. |
| 29:10 | So we wanna make sure that our deceleration fuel cut off or over run fuel cut off RPM threshold is high enough above our target idle speed. |
| 29:18 | If we're targeting maybe 1000 RPM idle, I'd probably want my over run fuel cut to be disabled by 1600 RPM or thereabouts. |
| 29:27 | So if you're very very close to your target idle RPM, then this can have problems with stalling. |
| 29:34 | Then the other aspect is that you can increase your target idle, so you can idle up your target idle RPM and change your base when you're above a certain speed. |
| 29:46 | So let's just jump back to the laptop screen again and we'll have a quick look at that. |
| 29:52 | So this is, if we come back to our target idle speed here. |
| 29:55 | We can see this is why we've got vehicle speed here incorporated as a vertical axis. |
| 30:02 | So essentially when the engine is, or the ECU is detecting wheel speed, the idle speed target is slightly higher. |
| 30:09 | This could also be included in our base position table. |
| 30:13 | You can see here we're using air con, there's nothing to stop you using road speed or ground speed as an axis there. |
| 30:20 | And you can do exactly the same thing. |
| 30:22 | So basically what we can do is step up our target idle speed and/or our base position very slightly when the engine, when the car is rolling. |
| 30:32 | And we wanna balance this because obviously we don't want a big flare in our RPM. |
| 30:38 | If we go too far we're essentially gonna have cruise control where the car will drive along by itself, we don't want that. |
| 30:44 | But we can just manipulate those values. |
| 30:46 | So we can get a nice drop down to our target idle speed without it dropping down below the actual idle speed target that we're going to be aiming for. |
| 30:55 | Alright so we're gonna go through for some questions and answers really shortly, so this is a great time, if you have got any questions about this topic, please ask them in the chat. |
| 31:06 | The team will transfer those through to me and we'll jump into those shortly. |
| 31:08 | I'm gonna go through a quick process that you can apply to tuning idle speed control. |
| 31:15 | And again while we're looking at Haltech here, this broadly can be applied to any aftermarket ECU. |
| 31:20 | So I wanna start at the very beginning by making sure, before we even tune the vehicle, that all of our base settings for our idle speed control are adjusted correctly and that they do make sense. |
| 31:31 | In particular here we wanna make sure that our target idle speeds are sensible, based on what we've already discussed during our lesson today. |
| 31:38 | We also want to check here that our idle speed control system is actually functioning as we'd expect. |
| 31:45 | So I've already mentioned this here, quite common to have a stepper, or a three wire solenoid wired up in reverse polarity and basically the ECU in closed loop mode here will be trying to add idle speed, but in reality what it's actually doing is shutting down the idle control. |
| 32:01 | Pretty quick and easy to figure out something's not quite right there, but it's gonna waste time nonetheless. |
| 32:07 | Once you've got those basics set up and you know everything's working as you'd expect, we wanna go through and tune our fuel and our igniton, get our cold start dialled in. |
| 32:16 | So these are all the things I've already mentioned, these will affect the quality of our idle control system and the ability of our idle control system to do a good job, get those right before you try fixing or putting a bandaid on your tune with your idle speed control system. |
| 32:31 | Once we've done this, we wanna actually start with our idle speed control strategy. |
| 32:35 | Now sometimes this is gonna be a little bit time consuming because the reality here is what we need to do is start with the engine cold and we need to allow it to warm up and we need to get our idle base position tables set up correctly through the entire engine operating envelope. |
| 32:54 | So this can take a few iterations to get it correct. |
| 32:57 | What we wanna do is initially start with our closed loop disabled. |
| 33:02 | So we wanna actually set the ECU to open loop mode. |
| 33:05 | So there's a couple of ways of doing that here. |
| 33:07 | Let's head across to my laptop screen. |
| 33:09 | What we can do here is head across to our proportional, our integral and our derivative gains and we can zero these tables out. |
| 33:16 | That's one way to do it. |
| 33:18 | Alternatively if we head back to our settings here, and we head back to our idle control, you can see we've got the ability to set our mode from closed loop to open loop. |
| 33:28 | So the reason we're doing this is that we want to see what we're actually achieving in terms of idle speed without any closed loop interaction masking errors there. |
| 33:40 | And what we're trying to do is basically allow the engine to come up to operating temperature, and we're gonna be adjusting our base position table at each operating temperature point until we've got our target idle RPM correct. |
| 33:50 | So let's have a quick look back at our laptop software here. |
| 33:53 | We'll go back to our base closed loop table here. |
| 33:59 | And basically we'd just be starting with the engine cold, maybe down in the 10 degrees C vicinity. |
| 34:05 | And we're just gonna sit here watching our target idle speed versus our measured idle speed. |
| 34:11 | And an important point to note here, you can see over on the right hand side I've actually set up a graph logger that shows idle target RPM versus our actual RPM. |
| 34:20 | So this is a really neat easy way of just watching those two parameters and their interaction as the engine's warming up. |
| 34:26 | And basically we're gonna have plenty of time here to do this, we're just going to make adjustments as the engine operating temperature increases to each of these zones until we are on target. |
| 34:36 | And again just to reiterate, the closer this base position table is, in open loop mode, the better our closed loop control is going to be. |
| 34:46 | Once you've got all of that set up, then we can also go through and include any of our idle ups. |
| 34:55 | So here what we'd be doing is setting our air conditioning to switch on and off, making sure that our idle speed stays nice and stable, our power steer, if we're using it, maybe switch on some of the accessories such as the headlights, et cetera, to end up loading up the alternator. |
| 35:09 | So making sure that everything is working as well as we can get it working in open loop mode, once we've done that, we can then go and enable our closed loop control. |
| 35:20 | Now this is a case of then going through and enabling our PID control and optimising those values. |
| 35:28 | So we're gonna talk in a moment about PID, the gains and what they mean so you've got a better real world analogy of exactly what those gains do so you can have a better idea of how to go about programming them. |
| 35:41 | Finally once you've got your closed loop mode working as well as it possibly can, with the base position table set correctly, our PID gain set correctly, we can then go enable our idle ignition control. |
| 35:54 | Now we wanna do this last because if we enable this earlier on in the piece, essentially this is going to be working in conjunction with our other factors and it can end up masking problems in our control strategy. |
| 36:08 | So that's why it's really important to do that last. |
| 36:11 | So when everything's working correctly, we should get pretty good idle control. |
| 36:14 | We'll head across to my laptop screen and just see exactly what we've got going on here, hopefully this doesn't make me look like a complete idiot. |
| 36:21 | But what we're looking at here is our yellow trace which is our RPM, our blue trace which is our idle target RPM. |
| 36:29 | So what I'll do is quickly give the throttle a blip here, so we obviously see our RPM climbs and it comes back down. |
| 36:35 | We can see there, we've got a little bit of a blip there, not uncommon. |
| 36:38 | But we see that we drop down pretty quickly there onto our target idle speed. |
| 36:42 | So this is what I'm trying to achieve, generally I'd like to have my idle RPM sit a little bit higher and then drop down rather than the other scenarios where it drops down below our target and then comes back up. |
| 36:56 | What I'll also do here is I'll just switch this off so we can see the interaction when we restart the car. |
| 37:04 | So let's go ahead and do that now. |
| 37:10 | So what we can see here is that our blue trace for our idle target has stepped up, and we can see that that drops down. |
| 37:16 | We can see our idle RPM initially climbs up and then it drops down quite nice and quickly right onto our target. |
| 37:22 | So again, pretty well replicating what we'd likely see with a factory style car. |
| 37:28 | And again just makes it that much nicer, particularly for a road car to drive, particularly if you are daily driving it in a lot of different conditions. |
| 37:36 | So we've got everything working, that's basically what we should be able to see. |
| 37:41 | Alright so we'll jump into those questions really shortly. |
| 37:43 | The last aspect I'm just gonna deal with here is our PID control algorithm. |
| 37:48 | So I know that this is an area that confuses a lot of people. |
| 37:51 | And PID is something we're gonna see a lot in our aftermarket ECU tuning. |
| 37:55 | It's basically a closed loop control algorithm that can be applied for a variety of things. |
| 38:01 | We may see it applied to idle speed control which is obviously our example today. |
| 38:05 | It's also very common for boost control, it's used for variable cam control as well. |
| 38:11 | Basically anywhere where the ECU has got a target and it's measuring the actual control, the actual measured point and then adjusting to suit. |
| 38:22 | So we've got three elements in a PID control algorithm. |
| 38:27 | We've got a proportional gain, we've got an integral gain, and we've got a derivative gain. |
| 38:32 | And I just want to explain this in a real world analogy. |
| 38:35 | I didn't make this up, I'm actually stealing this from Mark McCoy at Motec Australia, I think it's probably the easiest to understand analogy that I've ever heard. |
| 38:45 | So first of all, let's assume that we've got a car, it's sitting on a flat level piece of ground and we're sitting in the driver's seat, and what we're trying to do is get the car to a point, in the distance we've got a flagpole that we're trying to reach. |
| 39:00 | So our first gain is our proportional gain and we can consider this to be the same as our throttle. |
| 39:07 | So basically the proportional gain works in relation to the size of the error. |
| 39:12 | So the larger the error, the more response we're going to get from that gain. |
| 39:16 | So in other words if we put our foot on the throttle, if we use a lot of throttle we're going to really quickly come up to our flagpole. |
| 39:23 | But at this point we can't use the brakes so of course if we use a lot of throttle, we're going to fly straight past that point that we're trying to reach. |
| 39:30 | We're going to have to select reverse, and we're going to oscillate backwards and forwards until we finally get onto our control point. |
| 39:35 | So a lot of proportional gain is good to get us to our target really qucikly. |
| 39:41 | But without derivative and integral gains which we're going to talk about next, we're going to end up with a lot of oscillation about that set point. |
| 39:49 | So now we're going to add in our derivative gain. |
| 39:53 | So this is a gain that works in relation to the rate of change of error. |
| 39:58 | So the more quickly the rate of change of error is, or the rate of change is changing, sorry, let's try that again. |
| 40:07 | The more quickly our error is changing, the more effect our derivative has got. |
| 40:13 | So this really could be likened to our brake pedal. |
| 40:16 | And now using proportional gain, our throttle as well as our brake pedal, we can use quite a lot of throttle to accelerate us towards our target really quickly and then as we come up to our target we can apply our brakes and this is going to help us get to our target without over shooting. |
| 40:33 | So hopefully a bit of a sensible or more relatable explanation for proportional and derivative gains. |
| 40:41 | Our last element is our integral gain. |
| 40:43 | And this is a gain that responds in effect with regard to time. |
| 40:49 | So basically with the PID control algorithm if we are only using proportional and derivative gains on their own, we're gonna get close to our target but we can never actually get right onto our target. |
| 41:01 | The reason for this is as we get closer to our target, the effect of the proportional gain gets smaller and smaller. |
| 41:08 | So we're never going to be able to quite get there. |
| 41:10 | So the integral gain then works to get us onto our target. |
| 41:13 | If we've got any remaining error left, and as I've said that works over time. |
| 41:17 | So again hopefully an analogy that's a little bit easier to understand. |
| 41:22 | Alright we'll jump into our questions now. |
| 41:24 | Actually before I mention that, when we are making changes, I can't really do justice to a full how to tune PID at the end of this webinar but what I will just give you is a couple of little pointers here. |
| 41:36 | So a good starting place is when we are making changes, we want to start by making quite large changes so you can really assess the effect of that change. |
| 41:47 | So if we've got a proportional gain of, in this case maybe 60, I wouldn't make a change to 62 or 64. |
| 41:55 | Start by doubling it, go to 120. |
| 41:56 | Now that's a dramatic change and it's going to very quickly show you the effect of that change. |
| 42:03 | So when I'm making changes to PID gains, I'm going to start by doubling them, and this will let me get into the ballpark quite quickly. |
| 42:09 | And once I'm in the ballpark then I can start making smaller changes to fine tune them. |
| 42:14 | But if you only make small changes, it's going to be a really subtle effect and it can be quite hard to pick up. |
| 42:20 | Alright we'll head across to our questions now. |
| 42:22 | If you do have any more, please feel free to keep asking them. |
| 42:25 | Adam has asked, can you please discuss throttle plate modifications, e.g. enlarging the hole in the LS1 throttle plate blade when a cam is installed? Pros and cons, what is the best practice? What effects it has on idle and how to select the size of the hole? OK yeah this is a touchy subject. |
| 42:44 | What you're going to find is that most professional tuners won't actually drill holes. |
| 42:50 | It has been a while now since I've done much in the way of LS1 tuning with cams. |
| 42:55 | More along the lines of LS2 and onwards with drive by wire throttle. |
| 43:00 | Although I know that a lot of tuners still choose to drill a hole through the later throttle plates, even in drive by wire, and the reason that they're doing this is that they don't understand the correct parameters that they need to change. |
| 43:12 | What we'll find is particularly in drive by wire throttle cars, there is a limit, off the top of my head I think the maximum throttle opening in a stock calibration is something around about 27%. |
| 43:23 | That's plenty for a stock car but when we add a cam, particularly in cold conditions, it isn't. |
| 43:30 | So we get a condition where it taps out against that maximum value and our idle speed is low. |
| 43:35 | So the tuners don't know what to change, instead they drill a hole through the throttle body. |
| 43:40 | Much more elegant solution there is to actually choose the correct table inside our calibration. |
| 43:45 | I can't, off the top of my head remember that now, I don't have that in front of me. |
| 43:51 | If you've got questions on this, ask it in the forum and I will point you in the right direction. |
| 43:55 | But basically we can increase that maximum throttle opening, we can get perfect drive by wire throttle control even with a large cam. |
| 44:03 | As I've said, I can't really talk much about the LS1 throttle plate where they are cable throttle. |
| 44:12 | But I cam pretty confident in saying we can basically acheive exaclty the same effect where can get good idle speed control without drilling holes in our throttle plate. |
| 44:24 | Freaks89 has asked, for engines fitted with aftermarket cams, is there a rule of thumb as to what the idle speed should be? Unfortunately there isn't because the size of the cam has such a dramatic effect on this so for an LS for example we talked about stock idle speed maybe being in the vicinity of 550 maybe 600 RPM. |
| 44:41 | For a mild cam we may only need to step that up to maybe 650, maybe 700 RPM. |
| 44:45 | With a very large cam we may need to be closer to 850 to 900 RPM. |
| 44:51 | So it really is cam dependent. |
| 44:53 | While it does sound a little bit tricky, you'll know when your engine is idling comfortably, it's going to feel smoother, it's going to sound better, and just everything will generally be easier to tune at that point. |
| 45:08 | So if you are adjusting your idle speed, you'll get to a point where if you are going too low, the engine won't be smooth and it will tend to be quite erratic in its operation. |
| 45:20 | That's a pretty good indication, add another 50 to 100 RPM and try again and see how it goes. |
| 45:25 | Rory Lock has asked, is it necessary to have an idle air control valve with a drive by wire throttle body? OK so as I mentioned in the webinar itself, it's not necessary although at that changeover where drive by wire was just becoming common, we did see both systems used simultaneously. |
| 45:43 | Genearally with the few engines that I have tuned that are set up like this from the factory, I'll actually disable the idle air control valve and I'll simply use drive by wire throttle control. |
| 45:54 | I've never had an issue with doing that. |
| 45:57 | Fox 9 has asked, at what point is a high RPM delta at idle too high? I'm not quite sure I actually get the angle of your question there, so maybe if you want to elaborate on this. |
| 46:13 | So we're talking there obviously RPM delta, change in RPM. |
| 46:16 | But yeah I'm not quite sure that I get the angle of your question so maybe try and clarify it. |
| 46:23 | Fox 9's also asked, how is the idle base duty interpreted during startup? Are there changes that need to be made to the idle duty during cranking and post start, and how do we determine these values correctly? OK that's a good question and one that I probably didn't address in enough detail. |
| 46:38 | So inside of the software we do have a post start idle up. |
| 46:46 | So basically as soon as the engine has started, we can increase our idle air bypass. |
| 46:53 | And basically this is kind of tuned by just a trial and error basis. |
| 46:57 | We're going to start the engine, look at the RPM and how it responds immediately after startup and are we getting a situation where that RPM is flaring above our target or are we getting a situation where it drops below our target and then it sort of stumbles and we manage to catch up. |
| 47:14 | And basically depending on what situation we've got, we can make adjustments to that table to get the right results. |
| 47:21 | And what we're looking for is a nice stable RPM where it starts up a little higher than our initial target and then drops smoothly as we saw with that little demonstration I did. |
| 47:32 | Freaks89 has asked, I'm having a hard time with my engine idling cold when loaded with the transmission in gear. |
| 47:40 | It starts bouncing up and down and the whole car shakes, any thought on this? I have mild cams. |
| 47:47 | So there is a problem, and this is in conjunction with an automatic transmission, I'm gonna guess you're talking about an auto trans here, an automatic transmission with a large cam or even a mild cam where we do need to target an increase in idle speed. |
| 48:02 | The reason for this, or the reason we see a problem with this is because the factory torque converter has generally got a fairly low lock up RPM or stall speed. |
| 48:12 | So it's quite tight and basically as we try increase our idle speed, we're getting closer and closer to the point where that torque converter is actually at stall speed and basically that means we're getting a situation where we're putting drive through the transmission. |
| 48:27 | So there's a couple of things we can do there to help us. |
| 48:31 | One is obviously we want to basically balance out, try to get our idle speed as low as we can get it because that's going to work better with a tight torque converter without having problems with our engine not running properly, not running smoothly and wanting to stall. |
| 48:47 | So there is a balancing act there. |
| 48:49 | The other aspect that can actually be quite beneficial here is to retard the timing in that idle area and off idle area. |
| 48:56 | So what we're doing there is basically dulling down the torque response to the engine. |
| 49:01 | So we're basically purposefully detuning it. |
| 49:04 | And this can particularly help reduce some of the lope or surge that we see just off idle with a really large cam. |
| 49:10 | So I'd suggest trying a couple of those little tricks there. |
| 49:14 | Trevor has asked, what is the acronyms PID and MBT? Fair enough, that's actually a pretty good question. |
| 49:22 | So PID stands for proportional integral and derivative. |
| 49:25 | So this is our closed loop control algorithm and obviously I've just mentioned what those particular gains are. |
| 49:32 | MBT is a tuning term, this stands for minimum torque timing for best torque, or maximum brake torque timing. |
| 49:39 | And essentially if we're performing a spark sweep test at a fixed operating point, we're going to find MBT because this will be the ignition timing that produces peak torque on our dyno. |
| 49:51 | Either side of MBT as we advance beyond MBT or retard it below, we're going to see our torque drop away on both sides. |
| 49:59 | Trevor's also asked, how do you tune individual throttle bodies? Probably a question that's a little bit broad for this particular topic. |
| 50:08 | We do cover this in some of our other member's webinars so probably a good idea to search our archive there. |
| 50:16 | Only thing I'll just mention here is when we are tuning individual throttle bodies, important to understand that we need to use alpha N or throttle as our load axis for fuel and ignition, manifold pressure no longer works. |
| 50:28 | Alright that's brought us to the end of our questions. |
| 50:30 | Hopefully everyone's now got a little better insight into getting good quality idle control. |
| 50:36 | As usual for our members if you've got any further questions after this webinar has aired, please ask them in the forum and I'll be happy to answer them there. |
| 50:42 | Thanks for joining us, and I look forward to seeing you all next time. |


