220 | How to Construct Ignition Leads
Summary
One of the common tasks you’ll be completing when making changes to a distributor or coil-near-plug ignition system is to make up custom ignition leads. Doing this yourself instead of relying on off the shelf leads that may not be exactly the right length will result in a neater installation and it’s not difficult to achieve. In this webinar we’ll find out what you’ll need to know and what tools are required to make your own quality ignition leads.
| 00:00 | - It's Andre from the High Performance Academy here. |
| 00:02 | Welcome along to another one of our webinars. |
| 00:04 | Now today we're going to be discussing the techniques involved with making a reliable high quality set of custom ignition leads. |
| 00:12 | Now often this is something that you won't need to consider, particularly if you are dealing with a factory car and you're making no changes to the ignition system. |
| 00:20 | Of course these days we see a lot of cars using a direct fire coil on plug system. |
| 00:26 | However if you're dealing with an older vehicle that uses a distributor, maybe you're dealing with an engine that originally had a distributor and you're converting to a coil near plug system, then making up some custom ignition leads is going to be important to you because you're not going to be able to purchase what you need straight off the showroom floor, straight from an auto parts supplier. |
| 00:50 | Basically you're not going to be able to get the correct lengths. |
| 00:53 | I've seen a lot of people where they are trying to make do with some off the shelf lead sets and particularly if you're taking pride in the way your engine bay is laid out, this generally ends up looking pretty ugly because inevitably the lengths of those leads aren't going to be correct. |
| 01:10 | So today we're going to have a look at a couple of techniques involved. |
| 01:13 | This is a relatively straightforward process and today we are going to be using some MSD leads for our demonstration. |
| 01:21 | Essentially the techniques that we're going to be looking at though are applicable to just about any aftermarket lead set, the way we're going to go through constructing them will remain the same. |
| 01:31 | So there'll be a few little tips and tricks that I've picked up that I'm going to pass along. |
| 01:35 | As usual, if you do have any questions, please feel free to ask those questions in the chat and the team will transfer those through to me. |
| 01:44 | Alright so what we need to first of all cover off is the type of materials used for constructing igition leads. |
| 01:52 | And generally we can break these down into three different types. |
| 01:55 | We're going to have a carbon core lead which is essentially what we're going to find a OE style ignition lead is made up from. |
| 02:04 | Then for aftermarket performance leads like the MSD leads that we are using here, we're more likely to end up with what's referred to as a spiral core. |
| 02:14 | And lastly the third type of lead, probably not something we're ever going to want to use in the EFI world, is the solid core lead. |
| 02:22 | So these three types of lead, we need to sort of break down why there are those three types and what those differences mean. |
| 02:28 | So essentially what we're trying to do with our ignition lead is we're trying to provide a nice clear path for our electrical energy to make its way from the coil of our distributor through to the spark plug. |
| 02:40 | The more electrical energy that makes its way to the spark plug, the larger the spark is going to be, the less chance we've got of having an ignition misfire. |
| 02:50 | So that's what we're trying to do. |
| 02:52 | However we do need to balance that aim with reducing electromagnetic interference or RF interference that is really prone with the ignition system. |
| 03:03 | Basically when we create a spark or send electrical energy through our ignition lead, it creates a lot of electromagnetic interference and if that electromagnetic interference is too great, it can interfere with the rest of the electrical systems in our car. |
| 03:17 | You can end up even getting noise on our stereo if you are listening to the stereo in the car. |
| 03:25 | So carbon core, the OE style, really this is going to make sure that it gets rid of the majority of that EMI, we're not going to have too much trouble with that. |
| 03:36 | But it is quite high resistance and the higher the resistance, the lower the current that's going to flow through those ignition leads. |
| 03:42 | So getting rid of that electromagnetic interference does hurt the spark energy slightly. |
| 03:49 | The performance aftermarket leads like the MSD there, using the spiral core, kind of gives us the best of both worlds. |
| 03:55 | These are relatively low resistance, the MSD leads are somewhere in the region I think of about 40 to 50 ohm per foot. |
| 04:03 | So it's going to do a pretty good job of delivering high spark energy. |
| 04:07 | However the spiral core construction does do a great job job of reducing our EMI so not going to have any problems with a modern EFI system. |
| 04:16 | The last ignition lead, the solid core, now on paper that might sound ideal. |
| 04:21 | Generally these would be a solid core of something like copper or stainless steel. |
| 04:25 | So there's going to be very minimal resistance, it's going to allow high current flow through the core. |
| 04:32 | Going to give us good spark energy but they also do a great job of radiating a huge amount of electromagnetic interference so there is really no place for these style of leads on modern EFI equipped vehicles. |
| 04:45 | Probably the only place that you might see these is on an old hot rod or something of that nature where there are no EFI systems, maybe carburettors and a point style ignition system. |
| 04:58 | So yeah if you think that in terms of resistance, less is better, yes but that's not the entire story. |
| 05:06 | We do need to consider the electromagnetic interference as well. |
| 05:11 | Alright so once we've talked about our core styles and basically for our performance applications, the spiral core style is what we're going to be using, these are available from a range of different manufacturers as I've said. |
| 05:25 | The kit that we've got here from MSD is pretty typical. |
| 05:29 | This is an eight cylinder set and it just comes with what should be ample length for most applications. |
| 05:38 | Obviously this is designed around a V8 application. |
| 05:40 | And you can see that the end is also pre cut, pre stripped and then we can simply cut and manufacturer our leads to suit our own requirements. |
| 05:51 | While we are doing this, we do also need to understand that there are a couple of different boot styles or terminations that we can use on the end of these leads. |
| 06:01 | And again there is a little bag of terminals and boots that is supplied from MSD so that you can basically make these up to suit your own system. |
| 06:12 | So if we have a look at the terminals under our overhead camera here, we've got two styles here. |
| 06:19 | This particular style is a single crimp style and the other one that we've got here which is for an HEI style or straight onto your spark plug end, that is a double crimp system. |
| 06:32 | So we're going to have a look at crimping both of those up as we go through our webinar. |
| 06:38 | And we've also got, if we again look at our overhead camera here, we've got a couple of different boot styles. |
| 06:43 | I think we've got a couple more there but you get the picture. |
| 06:46 | So basically we're going to need to choose the correct terminals to suit our particular application. |
| 06:52 | And that's also going to determine what boots we're going to be using. |
| 06:55 | So for example here what we can find is that the two styles of distributor cap that we might be dealing with, one uses an HEI style post which is essentially the same as the end of our spark plug. |
| 07:09 | So the terminal needs to actually clip down over the end of that post. |
| 07:15 | The other one which is quite popular is where there is an internal receptacle in the spark plug cap and the terminal, like this one here, needs to actually slide down inside the distributor cap. |
| 07:29 | So really important to make sure we are using the correct style so that we're going to get good positive engagement and we're going to get good continuity through into our ignition lead. |
| 07:41 | Alright so the other thing which really should go without saying but probably often overlooked is that routing of our ignition leads is really important and in particular making sure that we keep our ignition leads away from any source of heat. |
| 07:57 | So I've actually got a good example of what happens, actually I might have a look at this under our macro camera here. |
| 08:05 | This is a ignition lead that has been exposed to way too much heat on our LS. |
| 08:12 | So this is a good example of what not to do. |
| 08:14 | And understandably if you're going to be exposing your ignition leads to that sort of level of heat, they're not going to last too long, you're going to have reliability problems and you're going to end up having your system break down with ignition misfires. |
| 08:27 | So the leads that we're actually making up are for our FD3S RX-7 project and I just want to sort of go through and show you what that looks like. |
| 08:38 | So we'll jump across to my laptop screen. |
| 08:40 | So this is a shot of the engine bay here and it is a little bit hard to see but we are using a set of four IGN1A coils that are mounted there underneath the upper inlet manifold. |
| 08:53 | So these are a pretty popular coil choice in the aftermarket. |
| 08:57 | Relatively well priced, put out a huge amount of spark energy and we've mounted them in this location because we like the stealth look there. |
| 09:06 | But they're actually also basically the same location as where the stock coils go. |
| 09:11 | So what we've got here is that our fabricator has made up a mounting plate for those coils to mount them there. |
| 09:19 | It's pretty tight space to fit them in but there is still plenty of room. |
| 09:23 | Now while that's a little bit hard to see here, this is the end of our IGN1A coil. |
| 09:28 | So this is the end, the post where our ignition lead is going to clip onto and this is the HEI style which is essentially as I've mentioned, the same as the end of our spark plugs. |
| 09:39 | So this dictates basically which ends we're going to be using on our leads. |
| 09:44 | And what we're going to be doing with this, for those who are familiar with the rotary engine, we've got our spark plugs actually located down here, which is the opposite side of the engine to the exhaust which makes it really nice and easy because understandably there's no chance of problems there with heat damaging the leads. |
| 10:05 | So what we're going to be doing with our leads is we're going to be running them in a U shape, so they're actually going to run towards the back of the engine bay and then they're going to run down and clip onto our spark plugs. |
| 10:16 | Now a couple of considerations here, obviously I've mentioned the heat. |
| 10:20 | So if you're not lucky enough to be this far away from a heat source then we do want to be a little bit smart about where we are routing the ignition leads to make sure that they do stay away from the heat source. |
| 10:31 | If it's impossible to stay away from the exhaust manifold, much like the LS, then there are also heat sheaths that are available that you can slip over the ignition leads while you're making them up. |
| 10:43 | And that'll do a great job of protecting the lead and making sure it's not going to be damaged while it is operating. |
| 10:49 | The other thing that's worth considering here as well is the other aspect that can damage our ignition leads is if they are run across any sharp edges that can end up abrading through the leads. |
| 11:01 | So it's always a good idea to make sure that your leads are secured and there's no relative movement between the leads and any sharp components that will end up damaging them over time. |
| 11:13 | Alright so once we've got an idea of where our leads are going to go, we can obviously measure them up and cut them to length. |
| 11:21 | And we're going to get into a quick demonstration here of some of those techniques. |
| 11:26 | One thing I will mention, this really goes for any engine but making sure that your lead set is numbered correctly is quite important. |
| 11:34 | The reason for this is particularly on the rotary engine where there is a leading and trailing plug for each rotor, we want to make sure that our lead is accurately labelled so there's no chance of confusing the leading and trailing. |
| 11:48 | It's a very easy way to end up damaging a rotary engine which is very very sensitive to almost any level of detonation. |
| 11:56 | Alright so what we'll do is we'll take one of our leads here and basically we've got the centre core which I'll show you, we'll have a look under our macro camera. |
| 12:07 | So we can see the spiral wound core in the centre. |
| 12:11 | When we are trimming the leads it's really important to make sure that we don't cut into that spiral core. |
| 12:18 | What we want to do instead is just make sure that we are cutting into the silicon insulation because if we cut into that spiral wound core, it's very easy to actually damage that core and that will reduce the lead's ability to do its job properly. |
| 12:33 | So if I've got my side cutters somewhere, there we go. |
| 12:38 | I like to just cut these using a pair of flush cut pliers because it's going to give a nice finish there. |
| 12:45 | So we're just going to cut those to whatever length we need to make them for our lead. |
| 12:52 | Obviously it's a good idea as well, we don't want these leads to be tight, it's a good idea to make sure that we are providing a little bit of surplus length there just to work with so they're not going to be tight once they are installed. |
| 13:04 | Now once we've done that, we want to then install the boot onto our lead. |
| 13:09 | And this is quite tricky, I'm not going to do this live because it generally requires about three or four goes and a fair bit of grunting and often the use of a few expletives in order to get the boot properly installed. |
| 13:22 | But there are a few tips that I do want to give you. |
| 13:24 | So if you just go and try and install one of these boots onto the end of the lead, you're going to get nowhere quickly. |
| 13:32 | The rubber onto the silicon is very very grippy and it's just simply not going to move. |
| 13:37 | The ultimate solution here is you want to use what's referred to as a dielectric grease and what we want to do, I've got some down here, we want to simply apply a generous amount of our dielectric grease onto the end of our lead. |
| 13:52 | And then we can take our boot and we can slide it onto that lead. |
| 13:59 | As I've said, I'm not going to do it here but that's the process we're going to go through. |
| 14:03 | Now the dielectric grease, the important part with the dielectric grease, excuse me for a second, is that it doesn't conduct electricity. |
| 14:12 | So it's basically going to prevent any chance of the spark basically jumping out so it's going to do a good job of protecting the lead electrically and making sure that the spark does go where it's supposed to. |
| 14:27 | So be cautious there, you don't want to be using a rubber grease or something of that nature which may do a pretty good job of allowing you to get the boot into location but you do end up with the potential for problems further on down the track. |
| 14:43 | OK so a lot of you I know probably will not have dielectric grease on hand. |
| 14:48 | And you're probably not going to go running out and purchasing dielectric grease for the purposes of just making up one set of ignition leads. |
| 14:56 | There are a couple of alternatives. |
| 14:57 | The one that I have used in the past with quite good success is to use a can of brake clean. |
| 15:05 | Another one that will work just as well is a contact cleaner. |
| 15:09 | Now the aim with both of these products is that you can spray them on and they do evaporate quite quickly. |
| 15:16 | So the point here is that you can spray it on, it's going to make the silicon and the rubber boot quite slippery, making it relatively easy to get into location but once you've actually got the boot in location, the brake clean or the contact cleaner will then evaporate, it's going to leave no residue there so there's nothing to affect the electrical continuity inside of that lead. |
| 15:43 | So a little tip there that does work pretty well. |
| 15:46 | So I've got my lead here with my boot already pre installed so we'll just have a quick look at that. |
| 15:53 | It's a good idea to pull that boot back a fair way up the lead so you've got a reasonable distance there at the end that you can work with and then once you've got your terminal crimped on at the end, then you can slide that boot back down using the same technique, either our dielectric grease or our brake clean will do the job. |
| 16:13 | So the next aspect here is that we do need to strip some of the insulation away around that spiral core and I've already just mentioned the importance of not cutting into that spiral core. |
| 16:26 | So there's a couple of ways we can do this. |
| 16:29 | First of all, when we purchase the lead set from MSD, we're going to get this little block here which can work as a cutting guide and it also will work as a crimp tool which we can use in our vice to actually crimp the terminals down on our lead. |
| 16:47 | So we'll just have a quick look under our overhead camera here. |
| 16:49 | It's a relatively simple tool, we've got the two piece construction there. |
| 16:53 | Obviously this is the crimp part of the tool so by installing our terminal, our lead end inside of there and then installing it into our vice, we can crimp it down. |
| 17:05 | We've also got these two guides here, depending on what size lead you are working with and we can then cut to suit. |
| 17:12 | So what we're going to do is have a look at that process. |
| 17:15 | So we're going to get our ignition lead here, I'm just going to install it into our guide there. |
| 17:23 | And we'll do this under our overhead camera, hopefully I'm going to be able to do this neatly. |
| 17:29 | So what we're going to do, there's two positions here depending on which terminal you are working with. |
| 17:33 | So for the single crimp we need a longer stripped section so we come right back up to the end here and we're just going to run around the lead there with our knife, just cutting through the silicon insulation. |
| 17:48 | We don't need cut the whole way through there, what we can find is that once we've actually cut that through, it should, although with the wonders of live streaming it didn't work. |
| 18:01 | Once we've cut that through we should find that it actually quite easily will tear off, so I'll just try that again. |
| 18:10 | Cut a little bit deeper, make sure that I've done my job properly. |
| 18:13 | And we will use a pair of pliers just to extract that, so bear with me. |
| 18:22 | And I've done a horrible job there. |
| 18:24 | Don't worry, we're going to have a look at another example of that in a second, so we should not be seeing any of that fibreglass wrap there which I've just shown you but what we should be seeing is a nice clear section of our spiral wound core. |
| 18:36 | Now I'll just cut that off and we'll start again. |
| 18:41 | The other section that we may want to be dealing with, if we are using our double crimped terminals which we will be doing here today, is we'll get this back into our little guide. |
| 18:51 | And there is a second section, it's a little bit hard to see actually I'll just pull it out for a moment and we can see there is a little step here and that's going to be our guide if we are using the double crimp terminals because we don't need as much of our lead stripped away, as much of our insulation stripped away. |
| 19:14 | So we can use that little guide as we've just seen. |
| 19:17 | The other way we can do this, and this is probably what I'd recommend, particularly if you're considering that you might end up building more than one set of ignition leads, you can also purchase a specialist crimp tool that's going to do all of the operations for us from MSD. |
| 19:33 | So we'll have a quick look at that under our overhead camera. |
| 19:37 | And these are a ratchet style crimp tool, they serve three purposes here. |
| 19:42 | We've got, in the middle here, this is actually a cutter so what we can do is use that for stripping away the insulation around our spiral would core. |
| 19:54 | Then we've got at the back of the tool here, the crimp tooling or die for crimping onto the silicon insulation around our lead and at the end here if we are dealing with a double crimp style terminal, we can crimp down onto our spiral wound conductor in the core of the ignition leads. |
| 20:17 | So let's just grab our lead here and what we'll do is we'll just strip through a small section here, so I'll just get this located, again we don't need very much when we are stripping, when we are using the double crimp terminals. |
| 20:35 | We'll get that out of the way. |
| 20:37 | And the crimp terminal that we're going to use, let's just have a quick look at that under our macro camera here so we can see what we're dealing with. |
| 20:44 | So we've got the rear section of the terminal, this is going to crimp onto the silicon of our ignition lead and then we've got the second part of the crimp terminal, this is going to crimp down onto the conductor in the middle of our ignition lead so it's important to understand how that works. |
| 21:06 | Now MSD actually recommend, if you don't have the crimp tool, you can crimp down into that spiral wound core using a pair of pliers. |
| 21:17 | Probably going to do the job but definitely neater to use the correct tool for the job, you're going to guarantee that you are getting the right result. |
| 21:24 | So I'm just going to trim this up because I have managed to still end up with some fibreglass strands in there, making it look a little bit ugly. |
| 21:31 | So what we're going to do is we'll take our crimp terminal and also you're going to find that initially you'll struggle a little bit to get these located properly in the crimp tool so it's actually quite helpful, if you grab a pair of pliers and you just gently bend the end of the terminal in slightly, that'll help you get it started. |
| 21:54 | What we'll do is we'll take our lead and I'll try and do this under our overhead shot here. |
| 21:59 | What we're going to do is take that lead and we're just going to get it located so that it is, our spiral core, let's try that again, nothing's really working for me today. |
| 22:13 | There we go, so we've got our spiral core that is located in the end here. |
| 22:17 | We'll have a look at this under our macro shot once we've actually got it crimped. |
| 22:21 | We've got our length is correct there and we've got our silicon jacket is correctly located there in our crimp. |
| 22:28 | So we'll just hold that and we'll get our crimp tool into location. |
| 22:32 | Once I've got it in location I will, probably have to back that off to do it. |
| 22:41 | Once we've got this in location I will crimp it under the camera so you can actually see what I'm doing. |
| 22:51 | Alright so we've got everything located there. |
| 22:53 | And what I want to do before I actually go through this crimp operation is just double check that we've got the conductor in the right spot, we are going to be crimping onto the silicon jacket properly and we can go through our crimp operation. |
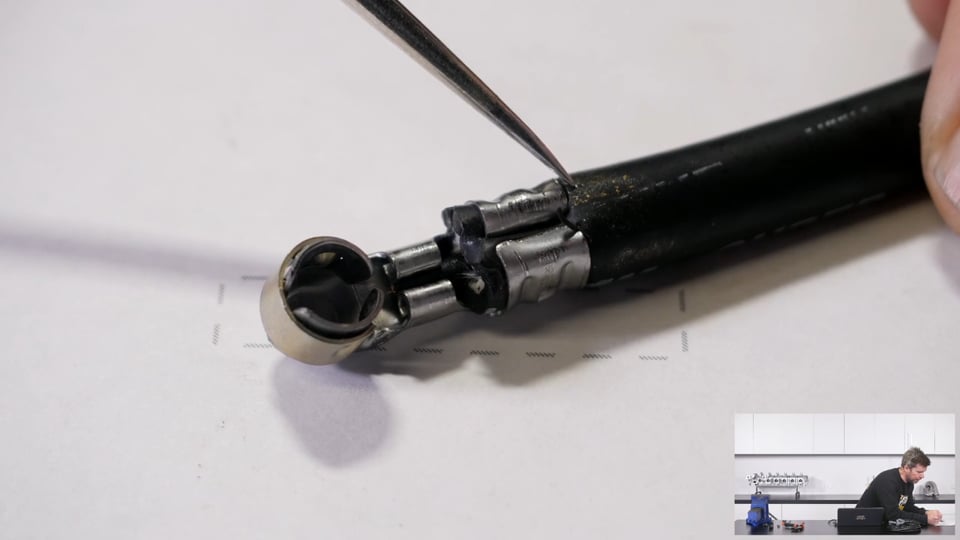
| 23:07 | Having a look at our finished product, we know that we're happy with that and now what we can do is complete the crimp operation using the ends of the tool. |
| 23:18 | So we're just going to locate the end of the tool there, our second crimp operation and that's going to crimp down onto our conductor, I'll go through that now. |
| 23:27 | Now let's have a look at that finished lead under our macro shot. |
| 23:32 | So a little bit hard to see all of the detail here but we've got the end crimped down on our silicon so that's going to actually support everything. |
| 23:42 | You can call this strain relief, it's going to support the silicon outer. |
| 23:46 | And then we've got our internal crimp there which is crimped down onto our spiral conductor. |
| 23:53 | So that's going to be a nice reliable crimp there, a nice reliable terminal. |
| 23:58 | And the process now is that we can just use our brake clean or our contact cleaner or our dielectric grease and we can then slide that boot back down and get it in location over the end of our terminal. |
| 24:13 | So that's one example there. |
| 24:15 | The other one we're going to have a look at is our single crimp style. |
| 24:19 | So in order to use one of these terminals, we need to strip away a little bit more length of our silicon jacket. |
| 24:28 | So we'll just go through that now. |
| 24:30 | Again I'll just use the MSD tool for stripping this back. |
| 24:36 | And the reason we need that extra length with this style of crimp or terminal is that we do need to actually bend the inner conductor back on itself so we'll just pull that off now. |
| 24:54 | And again if we've got any stray strands of that fibreglass, we can just trim those off with our flush cut pliers. |
| 25:01 | And what we're going to do here, we've got our stripped length of conductor, we'll have a look at that under our overhead camera. |
| 25:08 | And what we want to do is we're just going to bend that back on itself and that's going to end up located in our terminal like that. |
| 25:15 | So you want to make sure once that's located as well that we do have full engagement of that spiral conductor in the core with our terminal. |
| 25:24 | So I've got that how that's going to end up being located. |
| 25:28 | What we'll do now is we'll just go through the same process here with our crimp tool. |
| 25:35 | In order to use that again, it's a good idea to start by just bending the end of that terminal in slightly so that's it's going to be easy to locate into our crimp tool. |
| 25:45 | Get that onto the end of our lead here, this gets a little bit tricky. |
| 25:50 | We really need an extra set of hands but hopefully it'll work for me. |
| 26:00 | I'll just get that located in the correct spot, make sure that we're happy with everything and we can just crimp down. |
| 26:11 | The beauty of it being a ratchet style crimp tool is it does ensure that we're always going to get the correct amount of tension in that crimp. |
| 26:19 | Everything's done there, let's just have a quick look at that under our macro camera. |
| 26:25 | So if we look at the back there we can see that we've got the end of that little spiral core just poking out. |
| 26:31 | So this gives us confidence that we've got full engagement with our terminal. |
| 26:36 | Turning it over we've got our crimp, that's crimping down nicely into the silicon outer on our lead. |
| 26:43 | So again that's going to give a good amount of mechanical strength there and some strain relief to our ignition lead. |
| 26:49 | And again we'd be ready to pull that boot down into location. |
| 26:53 | So really, not a particularly difficult process to complete but having the ability to do that at home does give you a lot more flexibility in how you develop your ignition systems for your project cars. |
| 27:06 | Now while I haven't used this here in my vice today, hopefully you can understand that using the little plastic crimp tool that comes with the MSD lead kits is pretty self explanatory. |
| 27:18 | What we do is simply assemble that, get it stuck in our vice there, and there's two little wings that locate it on our vice and then we can just simply close our vice, it's going to have exactly the same effect as our crimp tool. |
| 27:32 | Just a little bit more time consuming to use, doesn't have the ability there to crimp both operations of those double crimp terminals either. |
| 27:41 | Again MSD do recommend that you simply use a set of pliers in order to perform that crimp. |
| 27:50 | Right we'll have a quick look and see if you've got any questions. |
| 27:53 | If you've got any more, please feel free to continue asking them. |
| 28:03 | Looks like we haven't. |
| 28:06 | Obviously a pretty simple explanation and I guess everyone pretty much got the idea there. |
| 28:12 | Alright if you do have any questions that crop up after this webinar has aired, please feel free to ask your questions in the forum and I'll be happy to answer them there. |
| 28:22 | Thanks for joining us everyone and hope to see you all again soon. |
| 28:25 | Now for those who are watching today on our YouTube channel, this is just a little insight into what we put on every week for our HPA gold members. |
| 28:33 | Our gold members get to review these webinars in our archive at their leisure where we've currently got over 220 hours of existing webinar content covering topics on engine building, wiring and engine tuning. |
| 28:46 | This is one of the fastest ways to expand your knowledge as well as to stay up to date on the latest tools, techniques and trends in the tuning, engine building and wiring industry. |
| 28:55 | You'll also get access to our private member's only forum which is the best place to get reliable answers to your specific questions. |
| 29:03 | If you are interested in learning more, you can become an HPA gold member for USD$19 a month. |
| 29:08 | However you will also get three months of free gold membership with the purchase of any of our courses. |
| 29:14 | You can check all those out at hpacademy.com/courses Alright thanks team, hope to see you online again in the near future, cheers. |


