238 | Engine Design Considerations
Summary
When you’re considering the options for a new engine build there’s a lot to think about and multiple potential options to explore. You’re also going to be spending a lot of money and naturally you want to make the best decisions possible to net you the best results the first time around. In this webinar we take the opportunity to talk through our own design considerations to replace our recently destroyed race engine for our Toyota 86.
| 00:00 | - Hey guys it's Andre from High Performance Academy, welcome along to another one of our webinars. |
| 00:04 | Now this time we're going to be talking about some of the considerations that you should have in mind when it comes to building or developing a new engine. |
| 00:12 | And this doesn't really matter if you're developing an engine for a project car or in our case if you're developing a race engine for a specific racing class. |
| 00:22 | As with just about anything when it comes to cars, it's a good idea to actually sit down before you shell out any of your hard earned cash and actually formulate a solid plan and this can save you so much headache and heartache further down the track, making sure that you're actually doing the best job possible with your particular budget and your particular restraints to get the sort of outcomes that you want from your project build. |
| 00:48 | So as usual we're going to be having questions and answers with this particular webinar at the end, if there's anything I talk about or anything just generally related to the topic, please ask those in the chat and we'll get to those at the end. |
| 01:01 | I'll give you a brief rundown and I think probably most of you who have been following us for any length of time now will probably be pretty well aware of one of our racecars which is our black Toyota 86 that we've been racing for around about 12 to 18 months now and we purchased it fitted with a fairly heavily modified four litre Toyota 1UZ-FE. |
| 01:26 | So that's the car, if we'll jump across to my laptop screen for a moment. |
| 01:29 | This is basically what everything looks like inside of the engine bay, well at least it did until we ended up with a fairly catastrophic engine failure on our hands. |
| 01:42 | Now on face value, if we were to build a car from the ground up to compete in the class that we ended up racing this in, this is probably not the engine that we would have chosen. |
| 01:53 | We were in a situation, just to give you some background on this, where we kind of inherited this project from one of our customers. |
| 02:00 | And it is a great project, don't get me wrong, the car is pretty quick and it's a huge amount of fun so definitely not a bad deal by any stretch of the imagination. |
| 02:10 | But one of the considerations we needed to make was when we're looking at our new engine, was basically working out what's going to be the most competitive package. |
| 02:20 | The other aspect we need to consider here is what are our options that are going to give us the best bang for your buck? Now most enthusiasts that I've ever dealt with have some kind of budget, everyone's budget is slightly different but chances are you don't have a bottomless pit of money to go throwing into your project so understandably what we want to do is maximise the results that we're going to get in terms of performance from the engine, reliability, competitiveness with whatever we are doing with the car, for the amount of money that we've got to spend. |
| 02:54 | And this is where it gets tricky because understandably, particularly if you are starting with a clean sheet of paper, you can have just about limitless options to explore so we're going to go down some of those during today's webinar. |
| 03:08 | Now I want to focus first of all on one of the key aspects for us which is optimising our chances of being competitive in the class that we're racing in. |
| 03:19 | So for any racecar this is really a key consideration and the class or the championship that we're racing in is the South Island Endurance Series. |
| 03:29 | Now I know a lot of people have been giving us a bit of grief over the term endurance given that we're racing in a one hour race which is borderline not a lot longer than most spring races. |
| 03:40 | So I just want to clarify, we don't make the rules, it's called an endurance race, that's what we're entered in and we need the car to perform for one hour of racing. |
| 03:50 | When we go to these race meetings, we generally end up with one full day of testing where we're basically allowed out on the track from 9am in the morning 'til 5pm at night so we've clocked up a lot of mileage even in the testing, then on the race day we go into a practice session, a qualifier and then a one hour race. |
| 04:07 | Stepping up in the future we also may want to use this car for a three hour endurance race which is run as part of the same series, just to get us a little bit more track time. |
| 04:16 | So that's what we're actually competing in. |
| 04:19 | But of course like any race series, there are a variety of classes that run within that one hour endurance race. |
| 04:26 | And this is where things get a little bit awkward because we actually find ourselves in what is essentially the top class or actually there is a class for GT3 racecars, so we're not in that so we end up in the second from top class. |
| 04:39 | So this class is for engine capacities of 3.5 litres and above. |
| 04:44 | So we're at four litres, we're kind of at the bottom end of that range and it makes it really hard to be competitive when we've got two competitors in our class both running fairly well built, fairly healthy GM seven litre LS7 V8 so when you've got a capacity disadvantage of three litres right from the get go, these guys have almost got double the capacity we've got and they make anywhere from 600 to 700 horsepower from these LS7s. |
| 05:13 | We're really on the back foot from the get go. |
| 05:15 | So this would be, our first consideration if we were building a car to race in this class and we basically didn't have an engine, it would make sense to consider either maybe going with a smaller engine, maybe pulling that capacity back a little bit and staying at the pointy end of the 3.5 litre class or alternatively if we're already above the 3.5 litre break point, well we may as well go for gold and if we can get a little bit more capacity in there. |
| 05:44 | There are some caveats here, it's not quite as simple as there's no replacement for displacement but all other things being equal, if we can build an engine with more capacity, generally that's going to give us the potential to make more power. |
| 05:59 | Alright so what we'll do is we'll just go through a bit of a list of what we want out of this new engine and this is probably the first place to start. |
| 06:10 | So to be in with any chance of being class competitive, we ideally need 600 plus horsepower at the flywheel. |
| 06:20 | The reality is we've kind fo come to the conclusion that's probably a little bit optimistic, I don't think we're quite going to get there. |
| 06:26 | The other factor which really doesn't weigh into today's lesson too much is that there's no point building an engine that's all singing, all dancing, making 800 or 900 horsepower and then you can't get that power to the track. |
| 06:39 | And this is where we are basically walking a bit of a tightrope. |
| 06:43 | We don't want to end up going to a wide body kit on the car so we're basically restricted to about a 255, 260 wide slick so on an 18 inch rim, that's about as much rubber as we can get comfortably under the guards. |
| 06:59 | So that's going to be our limitation. |
| 07:00 | So again there's no point making all of the power in the world because we're probably not going to be able to put it to the track. |
| 07:06 | Our engine capacity, so we are in that 3.5 litre and above class. |
| 07:10 | And again as I just mentioned, obviously it would make sense if we can get some more capacity into this engine. |
| 07:17 | And particularly if we were looking at maybe another engine swap this would open ourselves up to maybe looking at those LS swaps as well. |
| 07:25 | Personally, while I love the LS engine, nothing wrong with it, I think the LS swap has been well and truely played out and our car is already so developed around the 1UZ block that it's just going to be such a major job to reengineer it so we're going to be sticking with the UZ based engine. |
| 07:45 | Now I'll also mention here that there is, and I think this really works all around the world, there is a forced induction multiplication factor. |
| 07:53 | So what this means is that if we've got a two litre turbocharged four cylinder engine for example, here in New Zealand that multiplication factor is 1.7 times the engine capacity. |
| 08:05 | So I think that brings us to 3.4 litres so what this means is we could actually run a two litre turbocharged engine and we would still be in the class B which is the up to 3.5 litre class. |
| 08:16 | So that's an interesting point there because that would probably be an easier way for us to be class competitive. |
| 08:24 | Might not give us the power to be competitive in the 3.5 litre and above class with these LS7s but if we're going for class honours, that actually would be a pretty smart way of going about it. |
| 08:37 | Some other considerations that are particular to our application, and this is around fuel consumption. |
| 08:43 | And obviously if you're building a street car or drag car or you're into sprint racing where the fuel consumption doesn't really matter, this isn't a concern but for us it's a major one. |
| 08:54 | The issues we've got here is that currently the car runs a factory tank, albeit we've got a fairly elaborate system with fuel pumps and anti surge tanks et cetera to make sure that we can use the majority of the fuel there. |
| 09:08 | It's a 50 litre fuel tank capacity, basically by the time we take into account fuel surge, we are able to use around about 45 litres of that fuel. |
| 09:18 | So we need to be able to make sure that we can complete a one hour race with just one pitstop. |
| 09:26 | We do have one mandated pitstop during the one hour race where we have to perform a driver change. |
| 09:31 | We've already worked out that the driver change takes longer than refilling the tank so basically that is our limitation. |
| 09:40 | Now because of this, it means that straight away, ethanol blends are off the table, so we can't run, or at least the higher blends of ethanol, we can probably run somewhere around about E20 but the advantages of that blend and the complexity of having to blend fuel every time we go to the track kind of weigh in there so E50, E85, it's just not possible. |
| 10:02 | This is going to get worse as well if we want to use that car in a three hour race because we, I think in a three hour race we have two mandated stops but we would need to be stopping about every 40 minutes or there abouts for fuel and obviously that's going to end up costing us a huge amount of time. |
| 10:19 | And this is something that I really haven't given that much though to over my career, only more recently getting involved with endurance racing. |
| 10:27 | It was really brought home to us at one of the last meetings that I was racing at at Ruapuna, and we've got a fuel burn calculation that goes on inside of the MoTeC dash and that's transmitted via telemetry and I think at the Ruapuna racetrack we were using around about two or 2.1 litres of fuel per lap. |
| 10:49 | And to give some perspective on that, we're making about 450 horsepower. |
| 10:54 | We also saw some of the telemetry from the Audi R8 LMS GT3 car that actually won the three hour race and in the three hour race the Audi R8 LMS runs unrestricted so it's making around about 600 to 650 horsepower depending who you want to believe and that was using 1.6 litres per lap. |
| 11:17 | So massive difference considering this Audi's making essentially 200 horsepower more than we are and is using a fraction of the fuel so it's a huge consideration. |
| 11:27 | Now of course a lot of this comes with modern engine design, direct injection et cetera, there's not a lot we can do about some of those aspects but definitely considerations. |
| 11:37 | Alright getting back to our requirements here. |
| 11:39 | Basically this fuel dictates that we're going to be running on our local 98 octane pump gas and this ultimately is going to limit the amount of compression that we can use or if we are forced induction it's going to limit the amount of boost pressure that we can run as well. |
| 11:56 | So straight away this kind of becomes an artificial limitation for our power levels, particularly if we are talking about a turbocharged engine, we're going to run into the knock limit before we've reached the potential power limit for the engine due to our pump fuel. |
| 12:12 | So just coming back, I already mentioned this but we made the difficult decision that we didn't want to swap to a completely different engine design, even though we know full well that we are probably putting ourselves on the back foot here sticking to the 1UZ based engine family but again we just don't want to reengineer the entire car from the ground up. |
| 12:32 | So this basically set us up, we know at this point the 1UZ engine is going to be the way we want to go. |
| 12:39 | Now straight away a lot of you are probably thinking well why don't you add forced induction and well fair enough that would be a very easy way to get us up to that 600, 650 horsepower vicinity and it's definitely not a stretch for a well built 1UZ-FE, numerous examples out there making that much power if not a hell of a lot more. |
| 12:59 | So there are a few considerations, oh just for those who are wondering there, because we are 3.5 litres and above, even if we added forced induction with that 1.7 times multiplication factor, we're still in the same class so there's no upper limit to the engine capacity for that class so we'd be absolutely fine. |
| 13:18 | But the downsides with this is that forced induction actually is incredibly complex and when we added forced induction to the FA20 in our other Toyota 86, I actually spent around about 12 months then redeveloping the rest of the cooling system to basically make the rest of the car keep up. |
| 13:39 | So you're going to have a huge amount of reengineering to do to get intercoolers into the front of the car, then make sure that the radiator and oil coolers can still handle the amount of heat rejection that is required, obviously taking an engine from 450 horsepower, up to 600 horsepower plus putting a big intercooler in front of the radiator, that's a big impact on the cooling capability. |
| 14:03 | The other aspect is just the complexity of the package. |
| 14:07 | It makes it a lot more difficult to work on, particularly if we go turbo you've got the exhaust manifold packaging, the turbocharger, whether we go single or twin turbo and just all of the oil and water lines to those turbochargers. |
| 14:21 | And the other option of course is a centrifugal style supercharger. |
| 14:26 | We did consider that as well. |
| 14:28 | Either of those options, there's still complexity with a centrifugal supercharger and then what we're also doing is adding a lot more weight to the front axle line. |
| 14:36 | So we're already heavier than the FA20 stock engine with that 1UZ-FE and we don't want to add any more weight to the car because that will affect its handling balance. |
| 14:48 | Budget, as I kind of touched on earlier. |
| 14:50 | So everyone's got one, we're no different here, in particular this is not our ultimate final racecar for this endurance series. |
| 14:59 | For those who have been following us, we have been talking a little bit about our thoughts around another build for next season or the season after. |
| 15:09 | So at the moment what we want to do is make our existing car more competitive than it currently is and get the most out of it without going and spending an exorbitant amount of money. |
| 15:18 | So the aim here, we want to improve The reliability, obviously we don't want to have another catastrophic engine failure and we want to try and be class competitive with that engine. |
| 15:27 | Now another consideration for me personally, and this is one that's really easy to overlook. |
| 15:32 | Whatever we do with this engine, I want to make sure that I can source replacement parts easily and quickly and I don't want them to cost a stupid amount of money. |
| 15:42 | As we get further into this, we're going to talk about the options on crankshafts here and this is one of the reasons why I don't want to go to the likes of a custom billet crankshaft and we don't want to go to the trouble of sleeving the block. |
| 15:55 | So that's our basic considerations there. |
| 15:59 | Alright so this means that we are stuck with our 1UZ-FE platform and basically what are we going to do here, how are we going to extract more power? Before we jump into that actually, what I want to do is just give you a quick run through of what actually went wrong with our engine and this is a little bit tricky to diagnose given how catastrophic the engine failure is but let's just jump across to my laptop screen for a moment. |
| 16:24 | And so this is what we've got on the side of the block here for I think it was number one cylinder, I can't even remember now, doesn't really matter. |
| 16:33 | So obviously you shouldn't be getting an inspection hole in the side of the block that looks like that. |
| 16:38 | Interestingly though we can see that the connecting rod is still together, including the fact that it's still got the wrist pin sitting quite nicely in the pin boss. |
| 16:46 | This is another shot through the side of the block, again showing that not all is well in that particular cylinder. |
| 16:54 | And at this point, this is about as much as we knew. |
| 16:57 | I'd kind of concluded that the most likely scenario is that we ended up with a valve dropping. |
| 17:04 | This particular engine was built to a budget and was built to a particular specification, it still retained the stock Toyota cast pistons so once a valve drops, the cast piston basically falls to pieces and the rest is history. |
| 17:16 | Interestingly from the other side here, we've got the connecting rod and while it is definitely bent, I don't think it's going to do another turn, the connecting rod is still free to rotate on the crankshaft. |
| 17:29 | So when we're diagnosing engine failures, we want to see if the failure has been a result of the big end bearing seizing. |
| 17:36 | Now generally you're going to see the connecting rod snap when that's the case and punch out through the side of the block. |
| 17:42 | And you'll also see that the caps will be black because of the heat that's caused due to the friction. |
| 17:49 | So this is a couple of bits of that engine that ended up on the track I think or maybe on the undertray. |
| 17:56 | Because the engine failure happened pretty high in the rev range, it's Chernobyl'd the entire engine and this is what we've got sitting inside of the throttle body. |
| 18:05 | So there's absolutely debris everywhere, including up inside of the air box or plenum as it actually happens to be. |
| 18:13 | So what this also means is it's fair to assume there's absolutely nothing recoverable from this engine. |
| 18:18 | In the time that it took for the car to come to a stop, the engine just shut off completely. |
| 18:23 | That's debris' going to have been distributed through all of the rest of the cylinders so if we're really lucky, maybe the valve covers might be in one piece. |
| 18:32 | This is the head of one of the valves here which is kind of what, as I say, I think has been the culprit there. |
| 18:40 | So really important, before we get involved with considering a new build, getting to the bottom of what's actually failed because if you can't get to the bottom of that, you run the risk, the very expensive risk of basically repeating your existing failures and no one wants an engine failure, it's the last thing that we want however sometimes they do happen and it really is important to spend the time and try and deduce what's actually gone wrong. |
| 19:07 | As I've mentioned, when you've got such a catastrophic failure like this that's happened at high RPM, sometimes that's not particularly easy. |
| 19:15 | But where we got to with this, talking to the company that originally built this engine, and it's not disrespect to them because this was built as a fairly basic street car engine so it's not really designed for what we're doing with it. |
| 19:29 | But there are some problems which I'll talk about in a bit more detail, around the valve train and in particular the valve springs for the 1UZ-FE heads. |
| 19:41 | Alright so how do we make more power, first of all, so power and reliability are the two key things that we're trying to get. |
| 19:48 | How do we get more power out of our new engine? So the first one, which I've kind of already touched on here is there is no replacement for displacement, except forced induction which we've already taken off the table. |
| 19:59 | So getting some more capacity into the engine was our first consideration. |
| 20:04 | And there are a few options when it comes to doing this. |
| 20:08 | The first of these, and again we'll just jump across to my laptop screen, is that we're going to be starting our new build with a 3UZ-FE engine block. |
| 20:17 | So this is our donor engine sitting here, it's just straight from a wrecking yard, it's in pretty reasonable condition from what we can tell. |
| 20:24 | So for all intents and purposes this is almost identical to the 1UZ block. |
| 20:29 | The block itself, the block casting is in fact identical as are the cylinder heads. |
| 20:33 | The difference comes from the bore diameter so this particular engine runs a 91 mm bore versus 87.5 off the top of my head for the four litre and basically it is a larger diameter factory sleeve in this block. |
| 20:51 | So this gets us a bit more capacity in this respect. |
| 20:55 | Now that's not as far as we wanted to go though. |
| 20:58 | 4.3, 300cc of additional capacity, not a bad starting point. |
| 21:02 | And if we can retain the same sort of relationship between power and capacity that we've got at the moment and I know that's not always going to be the case, that should give us around about another 30 horsepower straight off the bat so a pretty good place to get started, actually I think it's probably more like about 40 horsepower but anyway there or there abouts and that's going to definitely be an advantage. |
| 21:25 | So if we can get more capacity into this engine then happy days, so how can we do that? Well the first option of course would be to go to a larger bore diameter. |
| 21:33 | Unfortunately there's a limit to how far we can bore and hone the existing sleeves. |
| 21:39 | We can go to a second over, 1 mm or 40 thou oversize but that's about it before we start getting to a situation where the sleeves are too thin and that creates its own reliability problem. |
| 21:52 | We can of course go to an aftermarket sleeve and then basically within reason we can do whatever we want. |
| 21:58 | That's how the TRD Grand Am engines are built as well, they use an aftermarket sleeve. |
| 22:02 | Now this kind of gets me back to the problem I'm facing where I want to keep whatever we do repeatable, relatively low budget, so if we get into a situation where we have another failure, we can source another block and get up and running quickly. |
| 22:16 | The sleeving process is one that is a bit of a catch 22. |
| 22:21 | On one hand, yes done correctly it can improve the strength of the factory sleeves, it can give us a bigger bore diameter which is really the key here, so that's all well and good but more often than not we actually see issues with sleeves being installed where after the engine has been run for a while, a sleeve will drop and cause a leaking head gasket so there's huge potential for reliability issues around sleeving if it isn't done right. |
| 22:49 | And here in New Zealand we don't have a lot of machine shops that are equipped with really high end CNC equipment that is so common in the U.S. for doing this job. |
| 22:59 | The other aspect is sleeving an engine like this is no small job and it obviously does end up getting quite expensive. |
| 23:06 | So therefore the turnaround time to rebuild another engine if we had a failure, plus the cost, put that out of the question. |
| 23:13 | So basically we're stuck with the existing bore diameter plus our 1 mm oversize, so a 92 mm bore. |
| 23:20 | So that's our limitation there. |
| 23:22 | Obviously the only other lever we have available to pull when we're looking at capacity is to increase our stroke. |
| 23:29 | So this is the other path we went down so this is obviously a sensible way within reason of increasing our capacity. |
| 23:36 | Obviously as we increase our stroke, we increase the piston velocity, piston speed at high RPM so there's a limitation there. |
| 23:44 | We can also get into a situation where our rod to stroke ratio becomes sub optimal so it's not like we can just choose any stroke we want and go for it. |
| 23:53 | The more pressing issue though is how we get that stroke improvement. |
| 23:58 | In stock form, the 1UZ and the 3UZ share a common crankshaft with an 82.5 mm stroke. |
| 24:08 | Of course one option would be that we go with a billet crankshaft and again just like the sleeved block, this gets us back to the problem where we're creating a very expensive crankshaft, depending who you get to make one of these cranks, you could be anywhere in the region of maybe $5000 to maybe $7000 to create one of these crankshafts and the time to actually turn one around as well. |
| 24:32 | If you had a failure you're definitely not going to be able to get a replacement crankshaft in a very short amount of time. |
| 24:39 | So that put that out of the question. |
| 24:41 | So we're at a point where we can basically stick with the stock stroke crankshaft, the 1 mm over bore that takes us just a touch over 4.3 litres off the top of my head, maybe 4.34, 4.35 litres or thereabouts. |
| 24:54 | However what we did investigate and this is probably the path we're going to go down, is offset grinding the big end journals on the factory crankshaft. |
| 25:05 | So let's just jump back across to my laptop screen and we'll see what that kind of looks like. |
| 25:11 | So this is a crankshaft here, I just stole this off the internet. |
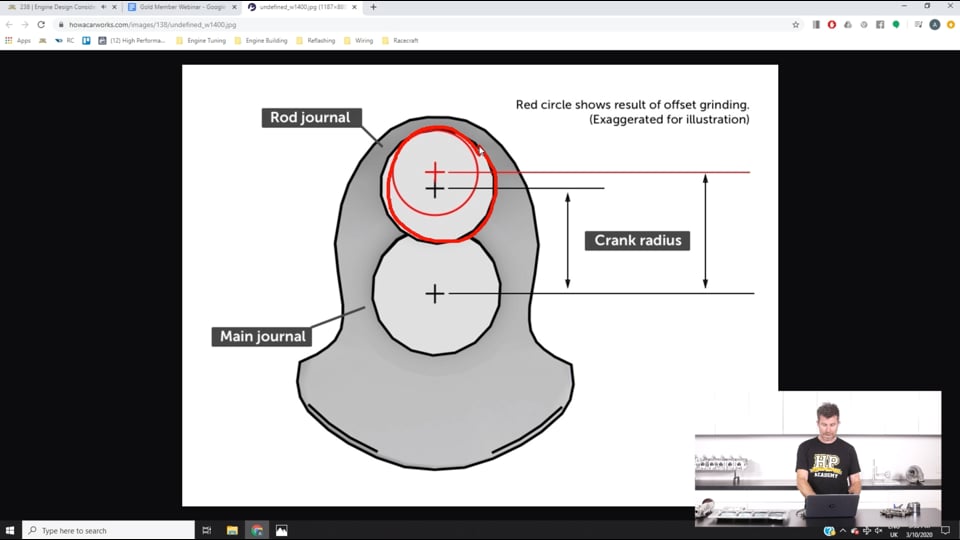
| 25:15 | We've got the main crank journal here and we've got our big end crank journal. |
| 25:21 | So the black big end journal there is the stock journal and we can see here the distance between the centre of the crankshaft, the centre of the main journal and the centre of the big end journal, that defines our stroke and the stroke is obviously, it's double this because we're looking at the crank in the top dead centre and the bottom dead centre position. |
| 25:48 | So what we can do, if we can find a suitable big end bearing journal diameter that's smaller than stock, what you can do is offset grind. |
| 25:58 | So basically as you can see here, the offset grind retains the crankshaft journal, the maximum distance from the main and what it does is it offsets the centre of our big end journal so all of the material is simply removed as we can see here down in this area and it just gives us a longer stroke by virtue of doing that. |
| 26:20 | So we can see the increase there. |
| 26:22 | So that's graphically what's going on. |
| 26:24 | Now again, there's no free lunches in this world and offset grinding the crankshaft can be effective to a degree but it actually brings in its own set of issues and it's actually shown quite nicely on this graphic here. |
| 26:38 | What we can see is that there is this nice overlap here between the main journals and the big end journals. |
| 26:45 | So this is what we'll see with a lot of crankshafts, obviously dependent on their big end and main journal diameters and their stroke but this is normally what we'll see is some kind of overlap here. |
| 26:54 | Now this plays quite an important part with our crankshaft in terms of improving the crankshaft rigidity. |
| 27:00 | So what we can find is that by offset grinding the crankshaft, yes we get our increase in stroke, we get our increase in capacity, that's all well and good but it's not going to be that helpful if now our crankshaft ends up flexing and over a season of racing it ends up cracking and breaking. |
| 27:15 | And talking to Nelson from Hartley Race Engines who we're partnering with for some of the components for this new build, they've actually experienced exactly that, they've done a lot of development on these engines and they actually found that if you offset grind the crankshaft too far it will fail. |
| 27:34 | To put some numbers around what we were looking at here, let me just pull up my notes so that I am talking about accurate information. |
| 27:43 | So the 1UZ, 2UZ, 3UZ crank journal diameter, the pin journal diameter is 52 mm, and I'm sorry I am going to be talking here in metric numbers. |
| 27:53 | What I found and one of the common big end journals that is used is the Honda big end journal, I'm not sure why that's happened, we'll actually see that's used quite frequently even on some of the U.S. domestic market V8 engine builds. |
| 28:09 | So the Honda big end journal is 45 mm in diameter. |
| 28:15 | Now the reason that's important is that you can't just go and grind the big end to any diameter. |
| 28:21 | What we need to be able to do is find a source of off the shelf big end bearings that are good quality and that means that we don't have to go and reinvent the wheel there. |
| 28:32 | Unless you are pretty well off financially or you're planning on building thousands of these engines, it's going to be pretty difficult to get a bearing manufacturer to make a custom big end bearing for you. |
| 28:44 | So that's the first consideration, we need to be using something where there is an easy availability of off the shelf parts for our bearings. |
| 28:51 | So that's been a common go to anyway, the Honda big end journal. |
| 28:56 | So what that means is we've got a 52 mm journal diameter stock, we've got a 45 mm journal diameter from the Honda, so we can offset grind the crankshaft. |
| 29:06 | What it actually means is that it moves the centreline of our big end journal 3.5 mm further away from the crank centreline, so basically half of that. |
| 29:16 | But again because we're talking about the distance at top dead centre and bottom dead centre, it gives us a 7 mm increase in stroke. |
| 29:25 | This is all sounding really good so far and if we run the numbers through with the capacity there using the Honda big end journal and a custom rod, obviously we're going to need 91.5 mm bore, so a 20 thou oversize just to clean up that bore, that gets us out to 4.7 litres so we're pretty excited about this, this is probably where I'd like to be and short of going to a sleeved block, this was about as far as we were likely to be able to get. |
| 29:51 | 700cc capacity, that should have been, again just working on the basis of power per litre, if we could maintain that, moving up to a bigger capacity engine, that should have given us probably pretty close to another 100 horsepower, maybe 90 horsepower. |
| 30:06 | So I'd have been pretty happy with that. |
| 30:09 | However our hopes and dreams were dashed there when we talked to Nelson Hartley and found that at that sort of an offset grind, no we were going to have reliability with the crankshaft. |
| 30:20 | Obviously we don't want that. |
| 30:22 | What they have told us though is that they've had really good success grinding the big end journal to just a touch over 50 mm or two inches, there is, I can't remember, I think it's a Chevy bearing size that works on that. |
| 30:34 | So it gives us about a 2 mm increase in stroke all things totalled and that would get us out to just under 4.5 litres, I think it's about 4.46 litres with a 1 mm oversize bore so a long winded explanation but that's where we're going with that so a couple of fundamental problems with this is the first one is that it's going to dictate that the rotating assembly in terms of pistons and rods is going to be custom. |
| 31:02 | So what we're going to be doing, we'll be using an H beam rod through, for no other reason that I've had really good success with them in the past. |
| 31:10 | Haven't actually decided exactly where we're going in terms of manufacturer but basically that allows the rod big end journal to be designed with the correct journal diameter and locating tangs for the big end bearings that we're going to be using and the overall length of the rod can be set up to suit. |
| 31:30 | Now I mentioned the term rod to stroke ratio as well just earlier. |
| 31:36 | So given that we're only going with a relatively mild increase in stroke, this is not such a consideration for us. |
| 31:43 | But what we want to do is get as long a rod into the engine as we can, we don't want to basically go with just shortening the rod if we can. |
| 31:53 | So what we tend to do there is actually move the wrist pin up in the piston. |
| 31:58 | So this is generally what we'll see as quite a common technique with stroker engines, we're going to go with a longer stroke with the same length connecting rods so of course the rod ends up further up the piston at top dead centre. |
| 32:12 | So what we can do is just move the wrist pin boss further up the piston. |
| 32:15 | Quite often that will actually end up cutting through the oil control ring which isn't a big concern, what we can do there is just use an oil rail support ring that sits at the bottom of the oil rail groove and just supports that oil control ring. |
| 32:32 | So that's the basic combination that we're going to be going through there. |
| 32:37 | So that gets us as I've said, almost up to 4.5 litres so it's a pretty good place to start in terms of getting as much capacity out of this engine as we can. |
| 32:45 | In terms of the pistons, we are also going to be adding some more compression. |
| 32:51 | As I mentioned, because we are limited to running pump fuel, this is basically the limiting factor for how much compression we can add in and this is a bit of an experiment. |
| 33:02 | In the perfect world if we were a well funded race team we'd probably build several engines with different specifications in terms of the compression ratio, dyno test them and find out which works best. |
| 33:12 | We don't have that luxury which most enthusiasts also don't so we have to take a bit of a stab in the dark here. |
| 33:18 | Now this really comes from a little bit of my own experience as well as talking to others that are very familiar with this engine and basically what we've settled on is about a 12.5:1 compression is probably going to be about as high as we want to go. |
| 33:33 | Going much higher than that, maybe 13:1 we're probably almost certainly going to be knock limited on 98 octane pump gas. |
| 33:41 | And that's going to have us pulling timing out to stay away from the knock threshold. |
| 33:46 | And I like to basically have an engine for a endurance race application where we don't need to worry about the thing being absolutely on the edge because if something gets hot, maybe you get stuck in traffic and you're not getting airflow through the radiator or you end up on a very hot day, the last thing we want is to be right on the knock threshold and end up running into detonation and relying on a knock control strategy to save that so 12.5:1, that's where we're going to be going there. |
| 34:18 | So we should see a little bit of improvement there from raising the compression, our old engine was 10.5:1 so that's not going to be night and day but obviously with the capacity that's all going to work in our favour. |
| 34:31 | The next aspect is that we want to also try and improve the volumetric efficiency of the engine, so basically the ability for the engine to fill its cylinders with air on the intake stroke and also get rid of the exhaust gases on the exhaust stroke. |
| 34:45 | So there's a few considerations to make there. |
| 34:48 | So let's just jump back to my laptop screen for a moment. |
| 34:53 | The first of these considerations is around the exhaust manifold design. |
| 34:58 | So we are a little bit compromised here because the exhaust manifolds on the car at the moment are too small in both the primary runner diameter as well as the actual collector here, so this actually runs to a 2.5 inch or 63 mm exhaust, ideally this should be three inch and we need to step up the primary size. |
| 35:19 | So in the perfect world we'd like to remake the headers. |
| 35:24 | Whether or not we actually get to that, and particularly in our first iteration is up to the amount of time we've got available. |
| 35:31 | At this stage I would say we're probably going to start running the car with the existing headers and then try and rebuild these at a later point. |
| 35:38 | And the problem we've got is that we are quite tight for room in this chassis so there is a limit to what we can do and what we can fit in and going much bigger could actually be a bit of a challenge. |
| 35:52 | Again we need to understand that this engine was originally built for a modified street car so it was never really designed around a 500 plus horsepower high RPM V8. |
| 36:04 | At the same time, we are also going to be improving the airflow into the engine, so this is in form of the intake system, and if I can just find, yeah we'll jump back across to my laptop screen. |
| 36:15 | So the intake system on the car at the moment consists of a Holley EFI LS plenum upper, it's got a custom lower section to that, which I'll just show you there with the little inlet trumpets on it as well. |
| 36:31 | So this gets to be a little bit tricky, we're actually going to have to do some back to back testing and find out what works here. |
| 36:37 | So we're going to be going to a set of individual throttle bodies, retaining the drive by wire and we're going to be back to back testing compared to this existing manifold, albeit before we run this up on the new engine we'll probably do a pretty thorough job of cleaning out all of the debris, probably don't want that going through our freshly built engine. |
| 36:56 | This will give us the ability to see which performs better. |
| 36:59 | In particular the ITBs, we've got the ability to choose the butterfly diameter to suit the engine, probably be looking at about 48 to 50 mm there given what we're trying to do. |
| 37:10 | And we can then also adjust the trumpet length to help tune the power delivery and whereabouts in the rev range we see peak power. |
| 37:18 | Given that we run a six speed sequential gearbox behind this that's quite close in the ratios, we don't need to use a particularly wide powerband. |
| 37:26 | We generally stay between about 6500 and 9000 RPM for most of the operation. |
| 37:33 | So the last aspect here is our cams and our valve train. |
| 37:40 | So what we want to do here, is this is kind of two fold, this actually comes into our next aspect as well as improving reliability. |
| 37:50 | As I mentioned, the heads that we had on the old engine that let go, used a stock valve so we're going to be going to a Supertech 1 mm oversize valve. |
| 37:59 | This in its own right will give us a small improvement in airflow. |
| 38:03 | Then the other aspect is, and this is sort of a minor aspect but we need everything in our favour here, is we'll be going to a titanium retainer, just removing a little bit more mass from that valve train. |
| 38:15 | The problem with the valve train as I touched on is that we can't fit in a dual valve spring there so we are restricted to a single beehive style valve spring. |
| 38:27 | At this point as well, the engine that we had in the car was built and developed around about I think four years ago and there's been several iterations in terms of the CNC porting that was done on the heads as well as the cam profile. |
| 38:40 | So we're hoping that we can see a small improvement by stepping that up a little bit as well. |
| 38:46 | So all of these iterative improvements should add up to give us the sort of results that we are aiming for. |
| 38:54 | Lastly, and this is something I just want to dive into a little bit here, we were also aiming for a bit of a reduction in some of our frictional losses inside of the engine and this is why we've got this dry sump system here on the workbench. |
| 39:09 | So we trialled this, this is off a TRD Grand Am engine and unfortunately it's not going to work in our application. |
| 39:16 | One of the problems is the location of the dry sump pump itself is just going to be essentially unworkable. |
| 39:24 | I'll just go over why we were looking at this option. |
| 39:27 | Really it comes down to the fact that this is a four stage dry sump pump, the one that we're currently running is, sorry it's actually a five stage, there's a four stage scavenge plus one pressure. |
| 39:36 | We were running a three stage pump which is two scavenge and one pressure. |
| 39:40 | Now the advantage of stepping up to the four scavenge stages is it does a better job of evacuating the oil and blow by gasses from the crank case and in turn this allows us to pull a vacuum in the crank case and long story short there is the potential then to run a low tension ring package which reduces some of the frictional losses. |
| 40:02 | Unfortunately that was a hit and a miss because it's not going to work in our application so we are back to square one with our existing three stage dry sump system but it's just worth mentioning. |
| 40:15 | Alright so that covers the ways we're looking at getting improvements and gives you a bit of a rundown on my thought process that's gone into this. |
| 40:24 | It's definitely not the only way of approaching it but we are hopeful that it is going to give us the results that we're after. |
| 40:32 | I also mentioned we want to improve reliability, we don't want this happening again and this really, as I've already mentioned, this comes down to figuring out in the first place, what actually went wrong, what broke and how do we stop that happening again. |
| 40:45 | Again as I mentioned, it's a little hard to be pinpoint accurate but we think that we've dropped a valve so the aspect here is trying to reduce some of the mass in the valve train so this is the idea here of going to the Supertech valve which is slightly lighter than the factory valve, going to the lighter titanium retainer to get mass out of that valve train. |
| 41:05 | This means that it's easier to control the valve at high RPM in particular. |
| 41:10 | The other aspect though that comes along with this is the valve springs. |
| 41:14 | As I mentioned, we can't get a double valve spring into this cylinder head particularly easily so we're restricted to a single beehive valve spring and what we're probably going to do here is end up lifing these valve springs. |
| 41:27 | We still actually need to strip down the engine and see if we've got a problem with potentially something like a broken valve spring which would be a clear and obvious reason for that failure. |
| 41:37 | But the valve springs, no matter what their application, over time they basically do get soft for all intents and purposes, that's the best way of describing it, so you'll see a good example of this is, if anyone's watched V8 drag racing, the likes of pro stock or something like that, they will replace the valve springs quite frequently after only a handful of passes because they basically lose their tension and they get soft and they can't control the valves anymore. |
| 42:07 | So just be a simple precaution there and a relatively cheap precaution compared to replacing our engine. |
| 42:15 | Right we're going to go into some questions and answers really shortly, so I've got one in there at the moment, this is a good time to mention if you've got anything that I talked about you'd like me to go into detail on, please ask those and we'll jump into them shortly. |
| 42:33 | Now I just want to talk a little bit about one of the aspects which is how to design a piston. |
| 42:40 | So this is a problem for us because the 1UZ, 2UZ, 3UZ engines aren't that well supported in the aftermarket so particularly they're not an engine that's very common or popular in the U.S. so we don't see many off the shelf piston kits for example for these engines. |
| 42:57 | Here in New Zealand we've got a few companies that are using these engines for stock car engines so they've gone and developed their own piston designs with different manufacturers. |
| 43:08 | We're going to be working with JE on this particular job and I think we're going to detail the process of developing a piston. |
| 43:15 | So what this really comes down to is obviously the diameter of the piston, that's easy, we can just give them a specification on that, same with the compression height which is the heigh between the top of the piston crown and the centreline of the wrist pin. |
| 43:30 | That's also pretty straightforward. |
| 43:32 | Where things get a little bit trickier though is profiling the crown of the piston. |
| 43:36 | Obviously we want a specific compression ratio which I've mentioned here, 12.5:1. |
| 43:40 | We need to take into account the stroke, the bore diameter, the head gasket thickness and also the cylinder head capacity or cc's of the combustion chamber in order to calculate what sort of dome volume we need on that piston in order to get to our desired compression ratio. |
| 44:00 | So that's all well and good, that stuff's pretty straightforward. |
| 44:03 | But we do need to keep in mind as well the pockets that will be required to clearance the valves. |
| 44:11 | So we're going to be going through that process a little bit further on. |
| 44:14 | Fortunately we are a bit lucky here in that Nelson from Hartley Race Engines has actually a full 3D model of the piston and the piston crown so basically we can provide that to JE and this will speed up the process because they can develop the crown straight from that 3D model. |
| 44:34 | Not always going to be the case though and there's not a lot of benefit from getting a piston manufactured at some fairly high level of expense for a custom piston and then finding out that you don't have sufficient piston to valve clearance. |
| 44:50 | Obviously that's not going to work too well. |
| 44:52 | In this case, we can also use the existing factory pistons as a bit of a benchmark in terms of the required piston pockets et cetera to get clearance there. |
| 45:03 | And obviously we need to still add some dome volume in order to get that capacity, the compression ratio up to where it needs to be. |
| 45:13 | Alright so hopefully that's given you a bit of a rundown. |
| 45:16 | It's basically be a bit of a brain dump on my part but hopefully this has been useful, just giving you a bit of a step by step guide on how my thought process has worked here getting us to a point where we're basically ready now to strip our donor engine and get it off to machining and start getting some of these custom parts made. |
| 45:35 | For now, we'll jump into our questions and we'll see what we've got. |
| 45:44 | Right our first question from Cole, if you do offset grind the crank, will you get two done at the same time so you have a spare should the worst happen? Obviously there are a few considerations for this. |
| 45:54 | That's a good question, this probably isn't something we'll do. |
| 45:58 | It would make sense of course to do this. |
| 46:01 | The reason is that the offset grinding process actually isn't a particularly major job. |
| 46:07 | So it's not something that we're going to be sitting waiting for a month for a machinist to do that, it's relatively run of the mill standard work for our machinist so the sort of turnaround time for that would be relatively quick and just run in line with the rest of the engine machining. |
| 46:26 | So basically it's not going to put a big slow down on the project if we were in a situation where we had a failure. |
| 46:35 | James has asked, is it worth the cost to upgrade the oil pump gears, such as billet gears versus an OEM gear. |
| 46:41 | Good question there, so this really is going to come down to your particular engine so in our case we are running the dry sump system, even if we aren't going to be going to the Dailey Engineering five stage pump, we've already got a Barnes three stage pump on there. |
| 46:56 | So not much of an issue for us. |
| 46:59 | There are, if you're running a factory oil pump then yeah, this becomes a major consideration and a lot of the oil pump gears are known to fail. |
| 47:08 | The Nissan RB is a classic example, basically you rev an RB26 beyond 8000 RPM and the sintered material for the oil pump gear just shatters and it's game over. |
| 47:21 | Loss of complete oil pressure at 8000 RPM. |
| 47:24 | Normally doesn't work too well for the poor little RB26 so yeah if you've got an engine where there's a known problem with the oil pump gear reliability and there are ready off the shelf options in terms of billet gears then yeah, RB's another classic example where there is a number of off the shelf aftermarket oil pumps available now so you're a bit spoilt for choice. |
| 47:49 | Darius has asked, will you use an EGT sensor to try and squeeze every horsepower out while tuning? That's a good question, we have considered fitting EGT to the car, now I'll be a little bit controversial here, I've used exhaust gas temperature for individual cylinder tuning for years, this was kind of the go to back when I was more heavily involved with drag racing, we weren't seeing the ready availability of individual cylinder lambda like we do today, it was still very expensive to do that so EGT was the way. |
| 48:19 | Problem with EGT is while yes it does give you a guide to the air/fuel ratio in the cylinder, there are so many other factors that will actually affect the ultimate EGT and we've actually demonstrated this quite thoroughly on our other Toyota 86 development car which has both individual cylinder EGT and lambda. |
| 48:37 | When you've got the engine tuned for an absolutely perfect lambda across all four cylinders, we end up seeing about a 25°C variation from hottest to coldest in terms of EGT. |
| 48:49 | So the EGT does still have its benefits, we had a couple of situations last season where we were chasing an ignition misfire and particularly at a race meeting, you don't want to be wasting a lot of time fault finding this and I found this from my drag racing days as well, very very easy to pinpoint which cylinder a misfire is occurring from because you'll see the EGT goes cold. |
| 49:09 | So long winded answer to your question, yep we will probably be adding them. |
| 49:14 | My personal preference would be individual cylinder lambda, the reality with the tight headers that we've got and the lack of space, I probably just can't see us having enough room for them. |
| 49:25 | Ken has asked, so even though you'd be using a dry sump oil system, would you still want to knife edge the crank for lighter and slightly more aerodynamic rotating assembly? Yes, absolutely, that's actually a good point Ken I hadn't talked about. |
| 49:38 | So knife edging the crank is a pretty common hot rodding technique, just helping to reduce or make it easier for the crankshaft to cut through the air, whatever, oil film, oil mist that's in the sump. |
| 49:55 | You do need to be a little bit careful with a V configuration engine because the overall balance of the engine components is really important and in a V configuration engine like our V8 here, it's not just a case of balancing the crankshaft to zero and then balancing the rods and pistons individually, the rod and piston weights actually get put together to calculate what's called a bob weight and this is physically attached to the crankshaft big end journals while the crankshaft is being spun up and balanced in the balancing machine. |
| 50:26 | Now it's very easy to end up removing too much material from the counterweights of the crankshaft, where you get yourself into a situation where you now actually need to add weight back into the crank to maintain balance. |
| 50:37 | And the only way of doing this is to actually machine holes into the counterweights and insert little pieces of heavy metal such as mallory which is much more dense than the normal steel that the crankshaft is made from. |
| 50:51 | Long winded answer again, that becomes incredibly expensive. |
| 50:55 | So the answer is yes you can knife edge the crankshaft but you need to be a little bit mindful of the overall balance of the crank to make sure you don't get yourself into that situation where you need to add heavy metal. |
| 51:10 | John has asked, if you were to remove the limitations of the racing series and of accomodating the 86, would it be possible to build a high performance 2UZ with the ion block or are they too geared towards trucks? So the 2UZ was a consideration fleetingly, we don't actually see these here in New Zealand but the advantage of course with the 2UZ is the 4.7 litre capacity. |
| 51:31 | The problem is that the 2UZ block is incredibly heavy compared to the alloy block, given it's a cast iron block. |
| 51:40 | I forget off the top of my head, I forget the specifics but off the top of my head I think that the weight difference is about 40 kg or 80, 90 odd pounds so it's reasonably significant and definitely not something we'd want to do if we had a way around it. |
| 51:57 | So it's all about balancing the overall performance of the car, it's not just a case of trying to make as much power as possible. |
| 52:05 | If we end up doing this but sacrificing the handling of the car then we can actually find that we're going to go backwards and particularly over an endurance race, if you ended up wearing your front tyres very quickly as a result of this, then that's not going to work too well for us. |
| 52:24 | Manitou Black has asked, what advantages do gas ported pistons have? So gas ports, they can be either vertical or lateral and what they do is they just allow a direct path for the combustion pressure to get in behind the top compression ring and force it out against the cylinder wall. |
| 52:42 | Most people thing that it's the radial tension of the ring that actually does the job of sealing but under the power stroke, it's the combustion pressure that forces the ring out and makes it seal. |
| 52:53 | So those gas ports just allow the gas to get there a lot easier. |
| 52:58 | You need to be a little bit mindful, we use the vertical and horizontal gas ports on a lot of our drag engines which ran on methanol fuel because it burns very cleanly. |
| 53:09 | If you're running on a gasoline based fuel in particular, you will run into problems with the vertical gas ports getting plugged up with carbon. |
| 53:15 | That's why we see a lot of pistons these days will incorporate lateral gas ports which is horizontal across the top of the ring. |
| 53:22 | Does a reasonably good job but not as susceptible to getting clogged up with carbon deposits. |
| 53:34 | Ken's just mentioned that Ross make an off the shelf piston for the 1UZ engines so yeah that's a good point. |
| 53:41 | I probably shouldn't have said no one makes off the shelf pistons, there are pistons for these engines but definitely a lot rarer than if we were dealing with a 4G63 or an SR20 for example. |
| 53:54 | Ken's also asked, is there really any difference between a three angle valve job versus a five angle job? Look this is probably getting a little bit beyond my own personal level of experience. |
| 54:05 | I've purposefully over my career stayed away from getting involved with the likes of head porting and this kind of plays into the head porting as well, the valve angles, there's a lot of technology that goes into this and a lot of companies that specialise in head development have done a lot of work on three angle versus five angle valve seats and what those angles should be. |
| 54:27 | So short of doing a back to back test, honestly Ken I probably couldn't give you an answer there that would be accurate. |
| 54:36 | Alright team that's brought us to the end there, some great questions in there, again hopefully everyone enjoyed that lesson. |
| 54:41 | Hopefully everyone's got a little bit more insight into some of the things you should be keeping in mind and some of the ways we can extract a little bit more power out of a particular engine combination, particularly in naturally aspirated engines like we're dealing with here, we actually do have our backs up against the wall because it's not as simple as adding a bigger turbocharger or turning the boost up another couple of psi. |
| 55:04 | It's often, power gains in naturally aspirated engines are fairly hard won. |
| 55:09 | Thanks for joining us and hopefully we'll see you online again for our next webinar. |
| 55:15 | Remember if you've got any questions after this webinar has aired, please ask them in the forum and I'll be happy to answer them there, cheers. |
Timestamps
0:00 - Introduction
1:00 - Our racecar engine build
2:20 - Best bang for your buck
3:05 - Optimising chances of being competitive
5:55 - Our requirements
15:55 - What went wrong with our engine?
19:40 - Stuck with the 1UZ - how do we make more power?
37:35 - Valve train
38:50 - Reduce frictional losses
40:30 - Improving reliability
42:35 - Piston design
45:35 - Questions


