247 | Introduction to ECUFlash
Summary
Open source reflashing software can be a very cheap way of modifying the calibration in your late model car. The downside with open source software is that often there’s a limited amount of help available and the definitions may not be complete. In this webinar we’ll be taking an introductory look at the ECUFlash software which is popular in both Mitsubishi and Subaru tuning communities.
| 00:00 | - Hey guys, Andre from High Performance Academy, welcome along to another one of our webinars. |
| 00:04 | This week we're going to be talking about reflashing and specifically here we're going to be going through and introduction to the ECUFlash software. |
| 00:13 | Now this is popular for both Subaru as well as Mitsubishi tuning, does work in a wider range of vehicles, that's probably where it is most commonly used. |
| 00:23 | And what we want to do is start at the very start here by talking about what reflashing is. |
| 00:30 | If you've been hiding under a rock for a while and you haven't hear that term. |
| 00:33 | Now this is just an alternative way of tuning your engine compared to the more traditional way, 20 odd years ago when I first got started in tuning, if we wanted to make tuning changes to the ECU, what we would do is simply take the factory ECU unplug it, throw it away and we would wire in an aftermarket standalone ECU. |
| 00:53 | That would give us complete control over all of the inputs and outputs to the engine, basically complete control over how it runs. |
| 01:01 | Now we can obviously still do that, the aftermarket standalone ECU market is still very much alive and well. |
| 01:08 | However understandably over the last 20 years we have also seen our late model factory road cars become increasingly complex. |
| 01:16 | The problem with this is that now there are multiple electronic modules controlling different parts of the car's operation. |
| 01:24 | We may have an engine control unit, we may have a transmission control module, ABS units, we may also have different electronic modules to control the gauge cluster and all of these modules require communication between those different electronic units via typically a two wire CAN bus. |
| 01:43 | So what this means is that we can still remove the factory ECU and replace it with an aftermarket standalone but now unless we've got the right ECU that's specifically set up for the task, we've interrupted that CAN bus and basically our other auxiliary modules may not work. |
| 02:00 | And this means we may be able to get our engine running but if we've got an automatic transmission, chances are, the transmission won't change gear, maybe our gauge cluster won't display RPM, speed or coolant temperature and maybe our air conditioning won't work. |
| 02:14 | There's a variety of different problems. |
| 02:16 | What we have seen as a solution to this is it's becoming increasingly popular with late model cars and I'm not solely talking here about Mitsubishi and Subaru, this goes for the wider range of factory vehicles, it's becoming increasingly popular to leave that factory ECU in place and instead of fitting an aftermarket standalone, what we'll do is just modify the factory calibration data in the ECU. |
| 02:40 | In essence this gives us the ability to tune the factory ECU the same way the calibration engineers do so at the factory. |
| 02:48 | Now there are a few advantages in doing this, primarily one of the big advantages, it's nice and clean and easy and in most part, particularly if we're dealing with open source software, don't worry about that, I'll talk about that next, we can do this for very very little money out of our pocket compared to the likes of replacing the factory ECU with a standalone. |
| 03:09 | Obviously depending on the model of ECU we're talking about, we might be talking $1000-$1500 USD for an ECU, maybe another $500 to $1000 USD to actually get it wired in then obviously we need to tune it on top of that so it becomes quite a big expense so retuning the factory ECU can be very very cost effective. |
| 03:27 | The other advantage here is that rather than a standalone which is designed to run literally thousands of different engines, the factory ECU for a given car is quite often developed specifically with strategies in place to run that particular engine. |
| 03:44 | Understandably with the might of a major manufacturer behind the design this often means that we can actually get better drivability, better operating conditions with a factory ECU than a lot of the standalones. |
| 03:59 | Not always but that is definitely a consideration. |
| 04:04 | So what can you expect if you are reflashing your vehicle? Obviously again it's going to depend dramatically on the sort of vehicle that you're tuning and the range of modifications that you have made to it. |
| 04:16 | Just to give you some idea, and this is by no means the limitation here. |
| 04:21 | If we jump across to my laptop screen, this is basically the pre and post tune on our factory version 11 Subaru STi. |
| 04:29 | Now it's not 100% factory, before I get into this, it is fitted with a three inch turbo back exhaust and because the factory turbo wasn't particularly healthy we switched that out with a slightly larger Kinugawa bolt on turbo. |
| 04:43 | Now that being said, we were still running or still are running the factory fuel system, injectors and fuel pump and that's the limiting factor at high RPM. |
| 04:51 | So what we can see, the particular point that I've got labelled here, 295 horsepower at the wheels in stock form and 323 horsepower at the wheels with our tune. |
| 05:03 | This part here, during spool up unfortunately a little bit misleading. |
| 05:08 | One of the problems with Subaru vehicles, given the length of the exhaust manifold, the exhaust runners up to the turbocharger, they do need to get a decent amount of heat into the exhaust runners to get good spool up response from the turbocharger. |
| 05:22 | That blue run there in factory trim was just a single run, we didn't have a lot of heat into the turbocharger so that's why we've got this massive discrepancy here. |
| 05:32 | That's not particularly real but still there are gains essentially everywhere. |
| 05:37 | Now unfortunately for some reason I haven't actually got the before and after fuelling curves but this one here, the yellow curve that I've just run a line through, this was about where we ended up. |
| 05:48 | No idea actually why I've scaled that down to zero, doesn't make it any easy to see. |
| 05:52 | And around about 0.78 lambda which would be pretty typical for this sort of engine running on pump gas. |
| 06:00 | This is around about 22 psi peak tapering down to around about 15 to 16, 7500 RPM just to stay under that injector head room. |
| 06:09 | But the factory calibration, we basically ended up seeing the air/fuel ratio drop down here into the very low 0.7 vicinity so a lot of the gains that we got in that particular vehicle came from a small increase in peak boost, a little bit more timing because we weren't knock limited in stock form. |
| 06:31 | And actually leaning out the excessively rich factory mixture. |
| 06:35 | So this is sort of what we could expect on a relatively standard car. |
| 06:39 | Of course if you want to get a little bit wilder and start looking at larger turbochargers with a fuel system that can cope, the sky is pretty much the limit on where you can go. |
| 06:51 | Now moving on, I've used that term open source here for the software that we are using. |
| 06:58 | And I wanted to spend a moment talking about the two options we have. |
| 07:02 | The first one is a commercial system. |
| 07:04 | So if you've been following us for any time you've probably seen that we've got a lot of worked examples in our Practical Reflash Tuning course as well as member's webinars covering HP Tuners, in our worked example library we also cover EcuTek and COBB. |
| 07:18 | Now those three names that I just mentioned, COBB, EcuTek and HP Tuners, are all what is referred to as a commercial tuning package or commercial reflashing package. |
| 07:28 | They are made by a manufacturer who is out there literally to make money from selling tuning solutions to us in the aftermarket world. |
| 07:36 | Understandably, they want to make some money from doing this so you'll pay in a variety of ways. |
| 07:42 | Sometimes you will pay for the software that you use, sometimes, in the case of HP Tuners, you'll pay for the tuning module that we use between our laptop and the car itself and then on top of that, once you've purchased that, which is around about the $300 USD mark, you're also going to need to purchase credits or licenses to unlock each of the ECUs you want to tune. |
| 08:03 | Other platforms such as COBB, they will charge you to become a COBB dealer, if you want to do this on a commercial basis and then they will sell you COBB Accessports, and these are a tuning solution that then goes with the car. |
| 08:16 | The Accessport does have the advantage of providing a graphical display for the owner of the car, can do some logging functions, it can clear diagnostic trouble codes. |
| 08:25 | The other advantage is that it can be used to store multiple maps so maybe you want to have a race gas map and a pump gas map and you can switch between the two on the fly so those are the sort of solutions and the costs for tuning on those solutions very much depend on the solution that you are looking at. |
| 08:44 | On the other hand the open source tuning community, this is basically a community that's developed by enthusiasts, obviously there's some pretty smart enthusiasts out there, some of them who have the skills to basically reverse engineer how factory ECUs work and provide a interface that allows us to then go ahead and retune. |
| 09:05 | Now most but not all of the open source software packages out there are either free or very very close to free, maybe there'll be a nominal cost. |
| 09:15 | In this case, the EcuFlash package that I'm talking about is free. |
| 09:20 | It does however require a hardware interface which is a couple of hundred bucks, I'll talk about that a little bit further on. |
| 09:26 | Now there are advantages or pros and cons on both open source and commercial. |
| 09:32 | First of all the cons, obviously the negative with a commercial software package is inevitably it's going to end up costing you more money than an open source solution. |
| 09:42 | And again this comes down to these commercial operators that are there to make money and I've had people ask why it's so expensive to reflash on a commercial system such as HP Tuners. |
| 09:53 | And the reality is twofold, first of all you do need to understand these companies are there to make money but I think a lot of people also overlook that there's actually quite a lot involved in reverse engineering factory ECUs, doing all of the development work and these guys are paying a team of fairly highly paid engineers to do all of this work. |
| 10:12 | So it doesn't come for free so don't think they're just being greedy, there is a lot of work that goes on behind the scenes to give us a relatively polished solution that we can then use. |
| 10:22 | The biggest advantage typically with commercial software is that it should be relatively stable and it should come with good support so there's two aspects to that. |
| 10:33 | First of all let's talk about the support. |
| 10:35 | And this becomes particularly important if you are relatively new to tuning, particularly if you're relatively new to reflashing. |
| 10:43 | Understandably the factory ECU is quite complex and there may be literally thousands of different parameters and tables available for us to adjust. |
| 10:53 | If we've come from a aftermarket standalone tuning world, some of the strategies used in factory ECUs may not on face value make too much sense either. |
| 11:01 | What I'm getting at here is it can be a little bit daunting for a novice enthusiast coming into the world of reflashing knowing what to do and how to approach the tuning job. |
| 11:11 | And this is where commercial systems have their advantages in that typically they'll be provided with a complete instruction manual, maybe a tuning guide which will give you step by step instructions to the process you should be following as well as descriptions of what the different maps do and which you need to adjust, which you don't and how to approach the tuning process. |
| 11:32 | Often you'll also have the ability to get either phone or email support so this can be really invaluable in particular if you're lost. |
| 11:40 | That comes at the price that I mentioned though. |
| 11:43 | In the other hand with the open source community, you're talking about freely available software. |
| 11:48 | There is a fairly vibrant community on various forums discussing all of the tuning aspects but it can be a little bit of a needle in a haystack trying to find a specific answer to your question, particularly in a timely fashion on one of those forums. |
| 12:05 | So you're going to miss out on that hand holding that you'll get often with a commercial package. |
| 12:12 | The other aspect is the definition which is so important to the ability to do our job properly. |
| 12:18 | So the definition file I like to consider as a road map to the raw hexadecimal file that we download out of the ECU. |
| 12:26 | That hexadecimal file in its own right is essentially useless to us and the definition basically says where abouts inside of that raw hexadecimal file the different maps are, what size they are, where the axes are etc. |
| 12:40 | And if we don't have that, basically we're blind, we don't know what to do we don't know what maps are available and we don't know how to make any adjustments.. |
| 12:48 | And this is where again commercial systems we can rightly expect the definitions will be complete and they will be accurate, allowing us to do our job. |
| 12:57 | That's not always the case, there are exceptions, particularly with new vehicles that come out but generally it's safe to say that the commercial platforms do a better job more quickly often that the enthusiast market. |
| 13:11 | Open source on the other hand, you're going to find that the definitions for popular ROMs, particularly because a lot of the enthusiasts are in the US domestic market, if we come back to Subaru and Mitsubishi, no problem finding really complete definitions there so that's easy. |
| 13:28 | Sometimes when we're, particularly here in New Zealand where we get access to Japanese Domestic Market models for Subaru and Mitsubishi, this can be a little bit hit and miss and sometimes we won't have a definition which makes it a little bit more difficult to do our job. |
| 13:42 | Anyway assuming that we've got a suitable definition that is complete, this then allows us with the open source software to do really everything that we can do with a commercial system. |
| 13:55 | Before we get into the sort of tour through the software, it's also worth mentioning here just briefly, limitations when it comes to reflashing because this is another topic that comes up and the reality here is that the limitations of the reflashing software have changed dramatically just over the time I've been involved with tuning. |
| 14:15 | It used to be that if you wanted to do anything particularly serious with your factory engine, maybe add a turbocharger, larger injectors, more aggressive cams, then you were probably almost certainly going to get a better result by moving to a standalone compared to reflashing. |
| 14:34 | These days that's not the case and both in the commercial and open source world, we've got some smart people that are developing what is generally referred to as a software patch and basically this is some code that rewrites the way the factory ECU operates. |
| 14:51 | So this really gives us a black box in essence and the black box can do anything that the person writing the code thinks of. |
| 14:58 | So really removes almost any of the limitations on the factory ECU capabilities so we're seeing the ability to remove the mass airflow sensor completely and run on speed density, we can add turbos or superchargers to naturally aspirated engines, improve the resolution of maps, add launch control, sometimes traction control, literally the sky is the limit so it does really blur the lines, there isn't so much a power point or level where we can draw a line in the sand and say if we want more than x amount of power then we must have a standalone. |
| 15:31 | There are still instances where standalones are my preference and basically the key one there is if I'm building a full racecar, particularly one of the key things is if I want to get really good data from the ECU in terms of logging and I want to get that through to maybe an aftermarket dash as well for processing, this is the point where moving to a standalone can make a lot more sense. |
| 15:55 | Yes there is definitely the ability to do datalogging from the factory ECU but certainly it can be more limited than an aftermarket standalone. |
| 16:03 | And then there's also some of the motorsport specific functionality that we struggle to get in a factory ECU such as closed loop gear cut control, maybe antilag. |
| 16:13 | Yes I know that can be done to a degree with open source as well but generally in my experience not as well as you can do it in the aftermarket world so those are the sort of considerations that we would be making. |
| 16:25 | The other aspect is it can be tricky, although again, sometimes not impossible to add additional inputs to the factory ECU or outputs, maybe you want to add a second row of injectors so those sort of things, that's where you may be better looking at going to an aftermarket standalone. |
| 16:43 | The reality though is probably 95% of those out there modifying cars aren't looking at that, most modified cars probably still fall into the lightly modified street car bracket and that's a great place to really seriously consider reflashing as an option. |
| 16:59 | Alright so now we've got a bit of a background out of the way and we sort of know what we're talking about, we'll dive in a little bit more to the Subaru specifics. |
| 17:07 | So I am going to be talking Subaru but almost everything that I talk about here does transition across onto Mitsubishi and some other platforms as well. |
| 17:17 | It just so happens that the worked example that we're doing is on a version 11 STi so obviously that's what we're talking. |
| 17:25 | In terms of the software, the common options, the common go tos include EcuFlash which we're looking at today, RomRaider which we're going to have a dive into, particularly because I do use the RomRaider logger. |
| 17:35 | There is also a commercial software available called ecuEdit. |
| 17:40 | I kind of feel like it bridges the gap between commercial and open source because while it is a paid for option, it is still quite cheap. |
| 17:49 | I think off the top of my head, around about the $150-$200 USD so for most enthusiasts that's probably not going to break the bank. |
| 17:58 | The reality is that no matter what platform you are tuning on you're going to be able to transition between one and another really easily and that's because the layout of the software is really driven by the ECU itself. |
| 18:13 | So what I'm getting at here is the maps that we have access to essentially look the same. |
| 18:17 | And just to show you that, let's head across to my laptop screen for a moment. |
| 18:21 | So this is the EcuFlash software that we're going to dive into in a little bit more detail shortly. |
| 18:27 | Over here on the left hand side we've got a bit of a drop down menu structure of all of the tables that are available. |
| 18:32 | At the top, just the first one that we've got here is our boost control target and we've got our target boost, we can open that up and look at that in a 3D table. |
| 18:41 | Alright let's close that down and we'll just quickly head over to RomRaider and I've got the same calibration loaded up, the same ROM loaded up. |
| 18:50 | Looks on face value pretty much the same, no surprises there, obviously the menu structure isn't expanded but if we open up that top one we can see we've got boost control target, we've got target boost as our first table, if we open up that, it looks a little bit different but it's just the layout of the actual software and the colours they've used, the actual parameters, the layout of the tables and where we access them, exactly the same. |
| 19:14 | And we could say exactly the same for ecuEdit as well so essentially no matter which one of these platforms you're personally interested in, you're going to be able to work on all of them. |
| 19:25 | Alright so worth just spending a few moments here and talking about what we're going to need in order to reflash a late model Subaru vehicle. |
| 19:33 | Obviously the software package is the first thing so regardless which way you go, RomRaider and EcuFlash both free, I know there's a lot of people that prefer to use RomRaider. |
| 19:42 | Personally I still use EcuFlash because even if you are using RomRaider, you'll be using EcuFlash for the physical reading and writing. |
| 19:52 | In an interesting twist I still use RomRaider for my logging although there are some other logging options as well. |
| 19:58 | So that's your software, again free unless you want to jump up to ecuEdit. |
| 20:01 | If you're thinking are there any advantages with ecuEdit then yes, in a way you do get more complete definitions in my own experience, particularly for some of the JDM vehicles that we get here in New Zealand that aren't as well supported in the open source community. |
| 20:18 | The other thing that is nice with ecuEdit is there is generally a fairly thorough description of each of the maps so you've got an idea of what the map that you're looking at does and how it integrates with the rest of the strategy which can be helpful. |
| 20:32 | It's not by any means a user manual but for most people you'll probably be able to get by with that map description. |
| 20:41 | The next product you're going to need is a Tactrix Open Port 2.0 cable which is this one here, let's just get this under our overhead camera. |
| 20:50 | So this is just a little OBD2 adaptor, OBD2 to USB and we've got the USB cable that's going to plug into our laptop so nothing particularly flash there. |
| 21:03 | You can purchase that, if you Google Tactrix, you'll find out were you can buy that and I think off the top of my head it is around about $200 USD so this is important because we need that interface to download the ROM file out of the ECU to flash it back into the ECU plus that's also our interface to our laptop for logging so key there. |
| 21:27 | You've got to be a little bit careful with these as well as I've found in the past. |
| 21:30 | Where this locates, particularly on the Subaru is dangerously close to the driver's foot pedals and the little USB cable where it goes in has a tendency to get kicked and it turns out to be quite fragile so you do want to watch that. |
| 21:46 | Now also depending on the actual vehicle you are flashing, you may also require a range of flash connectors. |
| 21:55 | Now I've only got one of these here, we'll just have a quick look at it under the overhead camera. |
| 22:00 | So depending on the vehicle as I mentioned, there will be potentially some connectors under the dash that you're going to need to jumper in order to put them into flash mode. |
| 22:10 | So this is for an earlier Subaru. |
| 22:13 | There's another one that I've got for Mitsubishi, there's another one for Subaru, in the case of our version 11 STi, it's actually pretty easy, there's a green two pin flash connector that sits in the passenger's footwell so all we need to do is connect that when we want to read or write to the ECU. |
| 22:29 | These are maybe three or four bucks each, I don't think they're a huge amount of money so it makes a lot of sense to purchase, I think there's only three or maybe four of them available through Tactrix, depending what you're planning on doing it's a good idea to get all of them that area available when you are purchasing. |
| 22:47 | Now the other thing that your'e going to want to invest in is a wideband if you haven't already. |
| 22:53 | There are a wide range of options on the market. |
| 22:55 | I have just purchased this Innovate NTXL gauge, I'll get that under the overhead camera there. |
| 23:04 | Still not actually mounted as you can see 'cause otherwise I wouldn't be showing it to you but the advantage with the NTXL gauge is you can buy a normal gauge pod and actually mount it somewhere on your dash where you've got that in your peripheral vision and it's nice just as a sanity check, obviously when we are driving the car we want to be concentrating on controlling the car but it's just nice as a sanity check to be able to glance at it occasionally, particularly under high load and just make sure the air/fuel ratio is on target. |
| 23:31 | Now how do we get the wideband into our ECU? So that's obviously the other aspect here. |
| 23:39 | There are a couple of options but in terms of using the logging functionality, what I do is I use this cable here, I'll try and get that under our overhead camera. |
| 23:51 | So this is an option from Innovate, it uses their little four pin serial connector so that just plugs into the output on the back of that gauge. |
| 24:00 | Obviously goes to a D9 serial cable, I'm using an ATN USB to serial adaptor and then that plugs straight into the side of my laptop. |
| 24:08 | This is something I've actually been asked about repeatedly both inside of our webinars as well as in our forums because I use the same strategy to get the data into HP Tuner's VCM scanner. |
| 24:19 | So it's something that I think probably a few people still don't understand is an option. |
| 24:26 | On the back of that gauge, there are two wires, I'll just show you in there, which is an analog voltage output. |
| 24:35 | So you can output this into a datalogger or you could repurpose some of the inputs on the factory ECU in some options to bring your data in that way, your air fuel ratio data in that way. |
| 24:47 | What you can do is very limited depending on the car you're flashing but that's an option. |
| 24:53 | And anyone who's followed us for a fair while will know that I am pretty well opposed to analog voltage air/fuel ratio controllers. |
| 25:00 | While they can do a reasonable job, personally the sensitivity to small ground offsets effecting the accuracy of the air/fuel ratio data for me is just a no deal. |
| 25:11 | They're too fussy and too finicky to set up and get accurate data and the problem is that when we've got an air/fuel ratio number displayed on the laptop screen, no matter how inaccurate it is, because we've got that number we tend to trust it and believe it so it can actually be really dangerous. |
| 25:26 | When we bring that data in via a serial to USB adapter, the integrity of the air/fuel ratio data is guaranteed so that means that the numbers we're seeing on the laptop screen are accurate. |
| 25:37 | Now I will mention here that the front air/fuel ratio sensor on the version 11 Subaru is actually already a wideband AFR sensor so a lot of tuners do use that and just trust it. |
| 25:51 | I'm not personally so keen. |
| 25:53 | While it is a wideband air/fuel ratio sensor, Subaru in stock form only really use this at or very close to stoich and the accuracy once we get up to the air/fuel ratios we tend to target for wideband operation is a little bit marginal. |
| 26:10 | It's not too bad, in a back to back test we found it reads around about 0.2 to 0.3 air/fuel ratio points richer. |
| 26:19 | That's kind of the wrong way though because that gives you a false sense of security so you tend to pull fuel out so even if you just use a wideband to see where your factory air/fuel ratio sensor calibration is, still highly recommended anyway. |
| 26:35 | So the other part of the puzzle there is knock detection and again those who have followed us for a while will know that I'm a pretty supporter avid of audio knock detection. |
| 26:48 | There's a variety of different options here, the one that I have used for our worked example, get it under our overhead camera there, is the Link G4+ Knock Block. |
| 26:57 | Really simple little device, we've got input here for two knock sensors. |
| 27:02 | This just goes to a knock sensor that is mounted on your block, then we've got an output here that we can hook up to a pair of ear buds and that's all I use is just some normal ear buds like this and I put them under a set of grade 5+ Peltor ear defenders. |
| 27:19 | It allows me to really accurately detect knock over background engine noise. |
| 27:23 | So I would highly recommend investing in that. |
| 27:26 | It'll look cheap compared to an engine rebuild because you've resulted in detonation to, damage to all of your pistons. |
| 27:35 | That being said, particularly in most late model factory ECUs, there will be a knock control strategy. |
| 27:44 | No different to Subaru, they've got a really pretty sophisticated knock control strategy, you can log those parameters and as long as you obviously understand what you're looking for and what you're looking at then this can be a really good guide to the health of your ignition tuning. |
| 28:00 | However I still like to validate that the knock control strategy is correctly picking up detonation before I trust it implicitly. |
| 28:07 | The reason for this is it's come from too many factory cars that I've tuned and they're almost separated into equal proportions, ones where they've been picking up false knock and retarding timing where there is actually no knock going on, often referred to as phantom knock and the other one which is probably actually a bit more dangerous is where I can audibly hear the engine knocking quite aggressively and the factory knock control strategy's completely ignoring that. |
| 28:33 | Alright so now that we know what we've got, oh we also need a logging solution so we're going to dive into that in a bit but before we get into that, let's now jump into our software in a little bit more detail. |
| 28:46 | So we'll head back across to our EcuFlash software. |
| 28:50 | I've already got a stock calibration loaded up here. |
| 28:53 | And that's what we've got over here on the left hand side, I'll just actually shut down this menu structure a little bit so it's a little bit easier to work around. |
| 29:01 | Unfortunately one of the interesting aspects with EcuFlash is when you open up a ROM, everything opens up like this and you kind of end up only needing to deal with a few key areas. |
| 29:16 | I'll leave it at that for the moment. |
| 29:17 | We'll start up the top here with our ROM info so probably a little bit hard for you to be able to see here but this is some key information about the particular ROM that we've just downloaded so let's assume here that we've just done a read out of our ECU so we can see our make is Subaru, it's an Impreza, the market is JDM, it's an '09. |
| 29:39 | The key point here, the one that we'll often be needing to know is what's referred to here as our internal ID. |
| 29:46 | In this case it is AZ1G500F. |
| 29:51 | So this is what's referred to as the ROM ID. |
| 29:53 | And this is what we need if we don't have a definition. |
| 29:57 | So quite often what you'll do is you'll download, do a read from the factory ECU and it'll come up at the end of that read, which takes about 45 seconds or a minute or so and it'll say that you don't have the definition for that ROM file which then makes it completely useless to you. |
| 30:12 | So it will give you the internal ID though, that ROM ID and quite often on an enthusiast forum, you get lucky sometimes if you do a search for that particular ROM ID, you may find another definition in there that you can load up and then use so remembering again, definition, kind of the road map for this ROM file. |
| 30:33 | Now even if we've got a ROM file that is defined, one of the first sanity checks I'll always do and again this is kind of that aspect of dealing with open source, I'm never really 100% trustworthy of exactly what I've got, is it's a good idea to load up a couple of the maps and just have a quick look and make sure that they make sense. |
| 30:53 | So let's have a look here at our primary open loop fuelling. |
| 30:57 | So we've got a couple of maps here, we'll have a look at our primary open loop fuelling target map. |
| 31:04 | So what we want to do is pick a couple of maps and basically just make sure that the numbers in here are sensible.. |
| 31:10 | So we can see, hopefully you can see these numbers at home but we've got the vertical axis here is our engine speed. |
| 31:16 | We want to look and see that the numbers in those axes make sense. |
| 31:20 | So we're spanning from 800 to 7600 RPM, it's nice and smooth, perfect, everything makes sense here. |
| 31:27 | Engine load, and this is an aspect that's pretty typical with most factory ECUs is they're basing the engine load off a mass airflow sensor. |
| 31:34 | There's a few ways of representing it here, it's grams of airflow per revolution. |
| 31:38 | We're spanning between 0.25 and 3.4 grams per revolution. |
| 31:43 | Happy days, that all works out as well. |
| 31:45 | And then we've got our actual air/fuel ratio targets in here and these are, as you'd expect, simply the air/fuel ratio targets that the ECU will be commanding. |
| 31:53 | We can see down here in the light load area we've got a whole bunch of 14.7s so this is the closed loop region and then as we transition up here sort of through the high boost area and we'll drop back down, probably going to take a path something a little bit like that through this table. |
| 32:11 | We can see that particularly at high RPM, high load, the factory calibration actually targets some incredibly rich air/fuel ratios, down as much as 10.5:1, even some 9.6s in there so as I mentioned earlier, one of the gains we can see with these Subaru ECU, the factory calibration is incredibly rich. |
| 32:32 | Leaning out that can give us a gain. |
| 32:35 | Now the next question I quite often get asked is well why is the factory calibration so far off and it's a good time to just talk about that briefly. |
| 32:42 | What we need to understand here is the calibrations are being generated for vehicles that are going to be delivered all around the world, they're going to be driven under vastly different atmospheric conditions from sub zero through to searing heat in a desert. |
| 32:57 | They're also going to be operating on a very wide range of different fuel qualities, octane ratings etc. |
| 33:04 | So the idea here is that Subaru are pretty conservative and don't want anything to go wrong, they want to get through 100,000 km warranty period without engine failures so they go very much on the side of caution. |
| 33:18 | So we can lean that out, we can make the tune a little bit more aggressive, given that we are tuning for the specific fuel and the real world conditions we are seeing and we can get a gain in power and torque without sacrificing necessarily our reloability. |
| 33:34 | So we don't have to give away reliability just to make more power. |
| 33:38 | So that's our first table we've looked at there, we've got an idea of the fact that our definition is in fact valid or accurate. |
| 33:46 | Generally I'd have a look at a few more maps to have an understanding of how everything's working. |
| 33:52 | It's a good time to sort of dive a little bit more deeply though into how a factory ECU like Subaru controls the fuel delivery. |
| 34:00 | And in reality, particularly again for those coming from the aftermarket standalone world, there's actually some advantages here. |
| 34:06 | I know that a lot of people are very keen on quickly ditching a mass airflow sensor at the first opportunity but the reality is that in a lot of instances, the mass airflow sensor actually makes our job very easy provided we understand it. |
| 34:21 | In a lot of applications there's absolutely no power to be gained by throwing the mass airflow sensor away, people think that they are restrictive and while I can't say that all mass airflow sensors offer no restriction, in general, particularly for lightly tuned vehicles, you're not going to pick up 20 wheel horsepower just by getting rid of the mass airflow sensor. |
| 34:41 | So what we want to do, let's close that down here and what we're going to do is come back down a little bit further to another table that's really key or another set of tables that are key here which is our mass airflow and engine load so we'll open those up there. |
| 34:56 | So first of all we have our MAF scaling. |
| 35:00 | So we'll open that up, so this is our mass airflow sensor scaling, let's also just view this graphically which will make a little bit more sense. |
| 35:09 | We can spread that out a little bit hopefully, no it's not going to let me. |
| 35:15 | OK we won't spread that out, that's probably fine just the way it is. |
| 35:17 | So the mass airflow sensor on the Subaru is a 0-5 volt output, some vehicles these will be a frequency output but Subaru use a 0-5 volt and essentially this calibration table here just does a conversion between a voltage and a mass airflow. |
| 35:35 | So for example if we highlight one particular area here, if we were to see a value of 2.23 volts or the ECU was seeing a value of 2.23 volts, the stock calibration that means that the mass airflow is 26.08 grams per second. |
| 35:51 | Now this is really one of the first places we need to focus our efforts when we're tuning. |
| 35:56 | If we have this mass airflow sensor scaling correct then everything else is going to be really really easy because the ECU will accurately know what mass or air is entering the engine and if it knows that, there's also some injector scaling parameters and provided of course they're also accurate, it knows exactly what pulse width to deliver to the injectors to get a specific mass of fuel being delivered. |
| 36:21 | And why that's important is that that's what comes from our open loop fuelling table so let's close that down again for a second, bring that up. |
| 36:29 | So that's why in this table here, we can just request a specific air/fuel ratio, if our mass airflow sensor scaling is correct, within reason that's going to be what we are going to get. |
| 36:40 | So rather than an aftermarket standalone where we've got a big 3D table of numbers for our VE or fuel table and we have to define each one individually to get our target, with the factory ECU, get our mass airflow sensor scaling correct and the rest all starts to fall into place nice and easily. |
| 36:57 | The other aspect here is the ignition table, the numbers in our ignition table or where we're operating in our ignition table will also be defined by our mass airflow so that mass airflow sensor calibration, critical to both parameters there. |
| 37:11 | We also have another couple of aspects here, so we've got a MAF limit, so we'll open that up. |
| 37:19 | So in stock form we can see that the maximum value from our mass airflow sensor that the ECU will accept is 300 grams per second. |
| 37:27 | No problem for a factory calibration, particularly once we start adding a larger turbocharger, increasing the boost pressure, we're quite likely going to need to increase that. |
| 37:39 | There is also an engine load limit which we'll open up here, we've got a couple of those. |
| 37:44 | And this basically defines the maximum engine load so we can see those numbers out here. |
| 37:49 | On that table, runs out to 3.4 grams per second. |
| 37:53 | Basically there'll be a hard cut at four grams per second. |
| 37:56 | Probably not going to be too much of an issue but even on our very lightly modified Subaru STi, with the larger Kinugawa turbocharger targeting around about 22 psi, we were finding that our maximum load exceeded 3.4 grams per revolution, we're out to about 3.5. |
| 38:17 | You can rescale these tables though. |
| 38:19 | Not such an issue for our air/fuel ratio target table, what happens is that if we move out to the right here the targets from 3.4 grams per revolution will be just extrapolated out and generally if we're at that point we're probably not going to need to target much richer as we go higher in our load but that is a problem for our ignition timing which we'll have a look at in a second. |
| 38:42 | Right so that's our main air/fuel ratio table, we can also view that graphically as well to get a bit of an idea of what that all looks like and you can see again, this is a factory calibration, pretty choopy, there's some really weird shapes in that table so quite interesting to see how a factory calibration is actually laid out. |
| 39:02 | Now there is also another table that this works with as well which is our primary open loop fuelling failsafe so we'll just open that up. |
| 39:11 | Essentially same style table, what we can see, if you can remember those numbers, the targets now are significantly richer. |
| 39:18 | So this is a table that is used if the ECU is detecting excessive knock activity. |
| 39:24 | Now there's a parameter which I'm going to go over in a second in a bit more detail called the ignition advance multiplier or IAM value. |
| 39:31 | And basically this is a number between zero to one in this ECU that defines how much knock activity has been detected. |
| 39:39 | And in this case, if I can find that here, the primary open loop fuel map switch, bit of a mouthful but basically what this means is if that ignition advance multiplier value falls below 0.25, it's going to fall into that failsafe map. |
| 39:54 | Now again this is the sort of thing that a factory calibration engineer does because the engine's going to be operated under so many different conditions. |
| 40:03 | Because we've got the benefit of tuning for the specific fuel conditions etc that we're operating on, we should never be getting anywhere close to an IAM value of 0.25, if we have, we've done something severely wrong, we've really got lost with our calibration and we need to go back and correct whatever's going on with our ignition timing. |
| 40:24 | Alright we'll close that down there, so that gives us a bit of an idea of our fuelling there. |
| 40:29 | Actually while we're on our mass airflow, I just want to also talk about some weirdness that Subaru include and this is something that I don't really understand how an OE's design strategy works. |
| 40:45 | Now this is something that's been hanging around in the Subaru vehicles for generations now which is an inherent design problem with their mechanical side of their fuel system. |
| 40:56 | There's a lot of blog posts about this, if you want to learn more, I would go to COBB's website and search in their technical articles about Subaru fuel system, you'll probably find it under there. |
| 41:10 | And otherwise I'll put it into our forum as well, a link to it. |
| 41:13 | But basically because of the metal hardlines that are used in the fuel system, the way the fuel pressure regulator is referenced off one intake manifold right down by the intake valves, intake runner I should say, quite close to the intake valves, what we get is a couple of problems. |
| 41:29 | First of all we get some pulsation in the fuel pressure caused by the vacuum reference and then because of harmonics in the fuel system, to do with the way the injectors open and close as the fuel's being used. |
| 41:41 | This creates some oscillations in fuel pressure which affects the amount of fuel that the injectors can deliver. |
| 41:48 | And it's a quite widely known problem with the late model Subarus, even in 100% stock form they suffer from erratic drivability. |
| 41:57 | Personally I'd never accept it in a car that I tune although we've got 100s of 1000s of these cars out there on the road every day, they offer this erratic drivability between about 2500 and about 3200 RPM, particularly under light load. |
| 42:12 | Great news is that this actually gets significantly worse when you fit larger injectors as well. |
| 42:18 | So in Subaru's infinite wisdom, rather than actually addressing the problem head on and fixing the fuel system, they stuck a big old bandaid on it which is these two tables here which is our engine load compensation cruise and non cruise. |
| 42:30 | Let's have a look at one of these tables here. |
| 42:33 | So this is a 3D table, we've got RPM on our vertical axis and we've got manifold pressure this time on our horizontal axis. |
| 42:45 | And looking at the table graphically gives you a pretty good idea here of what's going on. |
| 42:52 | There's some real ugly stuff going on in here, particularly 2800 RPM under light load, negative seven up to zero psi, we're seeing trims of 21% or thereabouts. |
| 43:07 | So this is Subaru's bandaid fix and what it does is it makes our job a little bit more difficult because when it comes to tuning these vehicles, seems to be more prominent on the '08 onwards but when it comes to tuning these vehicles, not only do we have to tune our mass airflow sensor scaling, we also have to calibrate the load compensation tables as well. |
| 43:28 | If we don't do our job properly here, we're going to end up with drivability problems so this does add quite a lot more complexity to tuning on a Subaru vehicle. |
| 43:39 | Now I'll just mention here as well, actually probably easier if we look at it in our next set where we're looking at our ignition advance. |
| 43:45 | What we're going to find is that quite often in a factory ECU, there are going to be multiple tables. |
| 43:51 | So here for our engine load compensation we've got cruise and non cruise. |
| 43:55 | Descriptive enough but really when exactly do we know we're using cruise and non cruise? For the most part what we can find is that a lot of these tables will actually be generic and the same. |
| 44:08 | For example here if we come down to our ignition advance, we've now got four tables that are labelled base timing. |
| 44:16 | We've got primary cruise, reference cruise, primary non cruise and reference non cruise. |
| 44:21 | AVCS related, AVCS is the variable cam control system in the Subaru. |
| 44:26 | Fortunately if you're wondering what on earth tables should you be making your adjustments to, these tables are actually in the stock calibration all the same so don't worry. |
| 44:36 | Looking at one of these tables here, relatively straightforward to understand. |
| 44:40 | We've got RPM on our vertical axis, and engine load again on our horizontal axis. |
| 44:46 | This is one of those situations where you do need to be mindful of your load maximum values and rescale as required. |
| 44:54 | As I mentioned we're running just off the edge of this. |
| 44:57 | 3.5 to 3.4 probably there or thereabouts, it's probably not the end of the world but anything beyond this, remember that what's going to happen is as you fall off the edge of this table, that's going to extrapolate that same number out and to the right so you may end up over advanced. |
| 45:14 | Now looking at the numbers in this table though, it's quite eye opening. |
| 45:19 | Let's say, again I sort of drew a line before of where we're going to be operating, let's kind of get that in there so we kind of know what's happening. |
| 45:27 | And we're sort of doing something that looks probably a bit like that through the table. |
| 45:34 | For the most part, during this spool area, we're seeing negative timing values and for anyone who's tuned a Subaru engine on a standalone ECU, you'll know that you're definitely not going to be running negative values in your timing. |
| 45:48 | And this is again how Subaru decided to do their ignition control. |
| 45:53 | It's a little bit complex and I find in particular it requires a little bit of work at my end when I am recalibrating these. |
| 46:02 | So this, as its name implies is called the base timing map. |
| 46:05 | So this is essentially the minimum timing that the ECU will run. |
| 46:08 | It's calibrated very very conservatively, essentially you're not going to be having any problems with knock using the numbers in this table. |
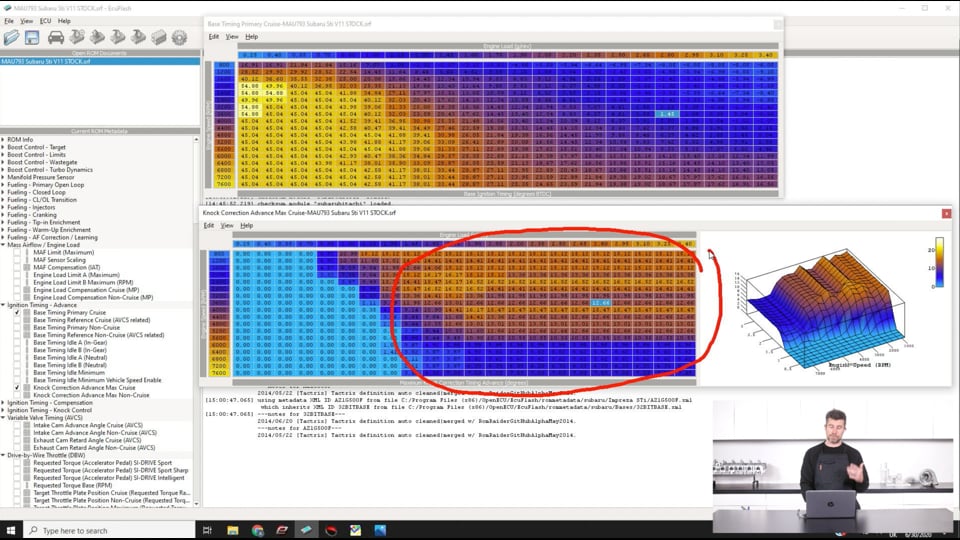
| 46:16 | Now this works with another couple of tables which we've got down the bottom here, we've got knock correction advance max cruise and max non cruise. |
| 46:24 | Again these tables actually happen to be the same, let's pull one of these up here. |
| 46:29 | Try and do this properly and let's just also show this one graphically so we can see what's going on. |
| 46:38 | So you can see, just from the shape of this graph, a little bit haphazard, there's spikes and dips in there and we can see the numbers in this table here, particularly once we're above about 1.1 to 1.4 grams per revolution, we start to see some quite big numbers in here, particularly through this mid range here. |
| 46:57 | Seeing advance numbers of 15 to 16 degrees or thereabouts. |
| 47:01 | So how does this work? So these two tables work in conjunction with the ignition advance multiplier value. |
| 47:10 | So the base number, the base table here as I mentioned, this is the minimum advance that the ECU will operate at initially. |
| 47:18 | Then what it will do is it will take, wherever it's operating, let's just try this here, let's say we are operating at 2.8 grams per revolution and we are in that particular cell there, I think we are 3600 RPM. |
| 47:35 | OK so we've got 1.45 degrees, now let's find the same cell here, 2.8 grams per revolution and 3600, we've got 12.6 degrees. |
| 47:46 | Right so depending on the amount of feedback, the amount of knock activity that's been going on, will depend on what our ignition advance multiplier value is going to end up at. |
| 47:57 | In a properly tuned ECU that's experiencing little to no detonation, we should always see the ignition advance multiplier sitting at 1.0. |
| 48:06 | That's a great health check just to have a quick look at what the IAM value is sitting at. |
| 48:11 | By the way, for anyone who's come from a COBB background, in COBB it's referred to as DAM, dynamic advance multiplier, same thing essentially, different name. |
| 48:20 | So let's say we're sitting at 1.0, what we'd do here is we know that our base timing is 1.45 degrees, let's call it 1.5 degrees, what it's going to do is take the same value from our knock advance table, 12.6 degrees, let's call that 13 degrees, it's going to multiply 13 by one, obviously still 13, and it's going to add it to 1.5 degrees. |
| 48:41 | Our total delivered timing in that instance would be 14.5 degrees. |
| 48:45 | That's how that IAM value works. |
| 48:47 | Let's say we've had a little bit of knock activity and what's happened is that the IAM value has dropped back or retarded, decayed back down to let's say 0.5 because of that knock activity. |
| 49:00 | In this instance for the same point, we'll take 13 degrees, multiply that by 0.5, obviously 6.5 degrees there and then it's going to add that in to our base value so we're at eight degrees so that's how the IAM value varies the amount of timing that is being delivered. |
| 49:19 | Now the problem with this base table is again because we can see, we've got these big troughs and peaks here, and particularly on a sensitive dyno, if you run a factory Subaru engine up on that dyno completely unmodified you're quite often going to see peaks and troughs in the torque curve as the timing is generally not that smooth as a result of this. |
| 49:42 | So what I prefer to do, and this is one of those areas where a lot of this comes down to personal preference. |
| 49:47 | There is no right and wrong way that you must go about tuning these but my own personal preference is that what I do is take this table here and I'll sort of make the values a lot less aggressive so we might do something like this, highlight the majority of this table and we'll change the value to six degrees. |
| 50:06 | So now instead of being able to add up to 13 degrees or 15 degrees in places, it's limited to six degrees. |
| 50:13 | Obviously the up shot of this is now our total timing when it's added on the top of this is going to be much more retarded. |
| 50:19 | So as a result we need to go back and advance our base table further as well. |
| 50:24 | Now what this does, again this works because we are tuning the ignition tables specifically for our fuel and our application, we don't need anything like the amount of control that the factory knock strategy has. |
| 50:36 | If we're well tuned, six degrees of potential retard or advance, that's absolutely ample. |
| 50:42 | It's going to give us a smoother result and in turn a car that's a little bit nicer to drive but it really is important to understand how the ignition advance multiplier works, otherwise you can be very very lost when it comes to tuning the ignition control on a Subaru vehicle. |
| 51:02 | Alright we're going to jump into questions and answers, I haven't really mentioned this so far but we are going to have questions. |
| 51:09 | You guys probably by now have figured that out so if you've got any questions on anything we've talked about, please start asking those now. |
| 51:15 | Before we get into our questions though, I do just want to go through logging and this is the other really key aspect to reflashing and getting good results. |
| 51:24 | We need a logging solution that can let us see what's happening inside of the ECU while it's running because while there are some exceptions, in most instances when we are reflashing, we can't make live tuning changes. |
| 51:38 | What we need to do is actually shut the engine off, and then flash the changes into the ECU which can take anywhere from 10 or 15 seconds up to maybe a minute depending on the ECU. |
| 51:49 | So this can on face value seem a little bit limiting. |
| 51:52 | But if we've got a good logging solution then that makes it actually really easy to see what's going on. |
| 51:59 | Again, there are a variety of logging solutions available, the one that I'm just going to show you through here which I use is the RomRaider logger. |
| 52:07 | So we've got that opened up here and basically what we can do from our parameters out here, these are all of the PIDs that are available to log and we can basically put together a list of all of the parameters that we want to log. |
| 52:23 | As you can see, as I scroll through, this list is quite extensive. |
| 52:27 | And on face value you might think, well let's just log everything, that way there's not way we've missed out on something and that seems like a sensible approach, the only problem is that there is a limited amount of bandwidth so the more parameters we log, basically it slows down the logging rate. |
| 52:43 | So we want to be quite specific in the PIDs that we choose to log and what this will mean is that we're likely to find we'll have a different set of logging parameters depending on whether we're tuning let's say fuelling or ignition timing, if we want to look at AVCS cam control position or we want to look at our boost control, that will require a different set of PIDs. |
| 53:06 | If we come over here to the tab for external sensors, this is where I mentioned we're bringing in our wideband into the ECU, into the laptop I should say, directly. |
| 53:17 | So you can do that here. |
| 53:19 | Innovate wideband is right here, you can select to display that in AFR units or in lambda, you can actually select that via your plug ins as well. |
| 53:29 | If we come down to our Innovate wideband and that will then ask you to select which COM port it's on. |
| 53:36 | And then that will populate out here on the right hand side with all of the parameters that you've chosen, while the ECU is operating you'll be able to see the live values as well as the minimum and maximum values. |
| 53:48 | That's useful to a point but looking at all of that data live and making sense of it can be a little bit tricky. |
| 53:54 | So this is where the other aspect is we can log to a file. |
| 53:59 | So we'll be doing this when we are on the dyno doing a ramp run. |
| 54:03 | We'll start the logger before the ramp run and finish it once we come back down to idle and this allows us to review that data at our leisure. |
| 54:11 | Now we can review the data directly inside the RomRaider logger. |
| 54:14 | Again this comes down to personal preference, nothing specifically against the RomRaider logger, just because I do use it for a range of other tasks I prefer to review the log files in MegaLogViewer HD. |
| 54:28 | So we'll head across to MegaLogViewer HD and I've got a log file here set up that was from the racetrack, I think we're doing some cruise logging at the racetrack. |
| 54:41 | So there's obviously a lot of data that you can choose to display, I'll just quickly go through it, up the top here we've got our RPM and our throttle opening. |
| 54:49 | So you can see that for the most part, other than these couple of little instances here, we're basically at part throttle, not a lot going on here. |
| 54:57 | We've got our air/fuel ratio and our target air/fuel ratio, final base fuelling here being displayed as well so we can see how close we were to our targets. |
| 55:07 | And it looks like there's a little bit of work to do at a glance there. |
| 55:11 | Next down here we've got our engine load and our mass airflow so logging that engine load allows you to see exactly where you're operating inside of any of those tables and I don't know if I've gone through too far in the RPM here but for that particular point there, maximum load was 3.98 grams per revolution. |
| 55:37 | And obviously that dictates where we are on the table so what we need to do there. |
| 55:43 | We've also got our air/fuel ratio correction and learning our short term and our long term fuel trims just to see what's going on and again the activity from those shows we've got a bit of work to do at this point. |
| 55:56 | The last set of graphs here is our knock feedback and in this instance it's doing everything that I'd expect. |
| 56:02 | Our ignition advance multiplier is constantly sitting at a value of 1.0, we've got our feedback knock correction and our fine knock learning both basically doing nothing which is great. |
| 56:13 | Now one of the advantages with using a package like MegaLogViewer HD is it gives you the ability to analyse your data in a bunch of different ways. |
| 56:21 | This is powerful to a point looking at it in a graph form like this and definitely after a ramp run on the dyno, because we're looking at a relatively small amount of data this would be how I'd go through and analyse it. |
| 56:33 | However particularly if we're looking at a bunch of cruise data, we're trying to dial in our mass airflow sensor scaling or our load comp tables, we've got a couple of other options so we'll come across here to our histogram and we can see up a histogram, and again if you've watched any of our webinars on HP Tuners, we rely on this very heavily for the GM tuning so no different here. |
| 56:57 | We can set up a 2D or 3D histogram. |
| 57:00 | This one here is for our mass airflow sensor scaling so you can see I've got our mass airflow sensor voltage on the vertical axis here. |
| 57:09 | Now interestingly I've added RPM in here on the horizontal axis and you might be thinking that sounds a little bit weird given that mass airflow sensor scaling, it's a 2D table, RPM generally doesn't come into it. |
| 57:21 | The reason we've done this is because of the problems with the load compensation, the fuel system problems that I've mentioned on the Subaru vehicle. |
| 57:31 | What we find is that our mass airflow sensor scaling might be absolutely fine at let's say 2000 RPM where we're outside of the range where that fuel system oscillation or harmonic comes in. |
| 57:43 | It might also be fine at 4000 RPM and above, again outside of that harmonic range. |
| 57:47 | But then if we come down into the meat of that issue, 2500 to 3000 RPM, we'll find that the trims can be quite significant and this is one of those complexities with the Subaru ECU we need to understand, where we need to make our changes. |
| 58:03 | Is the error a result of the mass airflow sensor scaling or is it a result of the load compensation tables. |
| 58:09 | And that we can see here is while this isn't very representative data, here at 1800 RPM, other than a couple of key spots, we've got relatively small errors. |
| 58:19 | Then again at, if we look at 4200 RPM, we've again got relatively small numbers. |
| 58:26 | In the meat of that area though where we have got a lot of data we can see we've got some numbers up in the six, eight 10% vicinity so the point is that to fix those errors there without affecting the other ranges, we'll be doing that in our load compensation table. |
| 58:44 | So we can also choose the parameter that is going to be logged into this histogram. |
| 58:51 | So this is to make it basically useful for us. |
| 58:54 | For this particular piece of data we were operating in closed loop mode so what I've chosen for our Z axis, so these are the numbers in the table, is a math parameter called total trim. |
| 59:06 | So what I'm doing essentially with the total trim is just adding our short term and our long term fuel trims so we can see the full magnitude of the trims being applied in order to get us onto our target. |
| 59:16 | On the other hand, if we were doing this under wide open throttle conditions in open loop, I would use another math parameter where we were taking our measured air/fuel ratio and comparing that to our target air/fuel ratio, basically calculating the error there. |
| 59:30 | So hopefully you can see from that, using something like MegaLogViewer HD, doesn't have to be that package but using something like that does make it very very powerful, very very quick at dialling in our calibration and gives us a really good snapshot of what's going on inside the ECU. |
| 59:48 | And provided you've got a good understanding of the principles or how the ECU works, the principles behind reflashing and how to use the scanner, then reflashing actually becomes a very quick and cost effective solition. |
| 01:00:02 | Alright now we'll jump into our questions and answers and if you've got any further questions, please keep them coming. |
| 01:00:16 | Atomic Car Review's asked, could you please tell us if any of the OBD2 performance chips are worth trying or is all this stuff, eBay performance chips a myth or useless? I can't say they're all useless, I can say that they're probably worth about what you would pay for them. |
| 01:00:35 | Some may be better than others and again there's just so many out there, it's really really hard to tell. |
| 01:00:40 | I would tread very carefully though because while they may look cheap on face value, if they're going to blow up your engine, you can guarantee you're going to struggle to get any reimbursement out of the seller on eBay, you're going to be left on your own paying for an engine rebuild and that's all of a sudden going to make that cheap reflash or chip or whatever it may be start to look really really expensive. |
| 01:01:01 | At a minimum, try and find out some other customers who have used that particular tuning solution and get their own experiences before you lay down your hard earned dollars. |
| 01:01:10 | I know that not everyone wants to tune their own vehicles but I have just seen too many people be burned by this in the past. |
| 01:01:18 | Ken has asked, will this work on older cars such as my '92 240 with an SR20 red top or Gen 2 RB25 DET? Not this particular solution, no. |
| 01:01:30 | What you can use is very dependent on the generation of the car. |
| 01:01:36 | The SR20 and the RB25, there are tuning solutions available similar, Nistune is basically a daughterboard that makes the factory ECU tunable. |
| 01:01:48 | In all honesty given my own experience with Nistune, and yes it can work, given the relatively cost effective solutions in terms of aftermarket plug and play ECUs for both of those vehicles, I would go that way in a heartbeat, you'll get a better result. |
| 01:02:05 | Again you're dealing with relatively old factory ECUs, they don't have the complexity of these current ECUs so you'll get a better result with a modern standalone than trying to reflash your factory, add a tuning solution to your factory ECU. |
| 01:02:22 | Lat question here comes from Rillo who's asked, what other open source software works with Tactrix? I actually couldn't give you a full run down there. |
| 01:02:32 | I think there's some information on this on the Tactrix website but basically it's just a generic OBD2 to USB device so I would suggest it's probably going to be compatible with quite a wide range. |
| 01:02:43 | In particular I know that it does also work with ecuEdit as well. |
| 01:02:48 | I've got another question just come through from Chris who's asked, how do you find the factory narrow but mostly wideband O2 readings compared to proper LSU? OEM sensor usually runs out at 11.4 from memory. |
| 01:03:03 | Ah yeah I did touch on this Chris but useful to a point. |
| 01:03:07 | From memory actually on the version 11 it actually did read richer than 11.4 'cause in stock form it was running in the high nines to mid 10s. |
| 01:03:17 | But yeah again just to reiterate, I've found about a 0.2 AFR reading richer than my actual wideband air/fuel ratio sensor so I know a lot of tuners rely on them, personally I would always want to validate the readings with an actual wideband sensor so that you know where you are. |
| 01:03:36 | Once you know where you are then it's probably reasonable to base your tuning off that but you know what sort of area you're building in. |
| 01:03:42 | Alright that's brought us to the end of our lesson and as usual if you've got any further questions after this webinar has aired, please ask them in the forum and I'll be happy to answer them there. |
| 01:03:51 | Thanks for watching. |
Timestamps
0:00 - Introduction
0:20 - What is reflashing?
2:45 - Advantages of reflashing
4:00 - What can you expect?
6:50 - Commercial vs open source
13:55 - Limitations of reflashing
17:00 - Subaru specific reflashing
19:20 - Required equipment
28:40 - Software tour
40:30 - Subaru fuel system design flaw
43:35 - Software tour continued
51:15 - Logging
1:00:10 - Questions


