250 | Engine Block Preparation
Summary
A factory block is understandably fine for a stock application but when the power and rpm starts to increase significantly from stock, there are some key modifications you can make to help with reliability. In this webinar we’ll cover off what you should be doing and how to achieve it.
| 00:00 | - It's Andre from High Performance Academy here, welcome along to another one of our webinars. |
| 00:04 | And this time we're going to be looking at engine block preparation. |
| 00:08 | And we're going to be talking about what that is, what it entails and what you need to know. |
| 00:13 | This is one of the key aspects when it comes to building any factory or performance engine. |
| 00:18 | What we want to do is obviously going to depend a little bit on the extend that we're modifying the engine to. |
| 00:25 | There's some basics here which probably anyone building engines is going to be able to understand pretty easily and then there's a few slightly less obvious aspects that I want to touch on here. |
| 00:36 | Just taking a little bit of additional time here and often some of the stuff we're going to be talking about here will be more time than actually spending any money on it. |
| 00:44 | This can give you an engine that's going to last longer and deliver better power with more reliability than if you skip through this and just do the absolute bare minimum so I'm a big believer in going through and spending the time here and being really thorough when it comes to block preparation. |
| 01:02 | So the term block preparation, what does that even mean? And it can vary depending on exactly what we're building and what needs to be done. |
| 01:10 | For example here I've got a 20 volt 4AGE engine block which is a cast iron block. |
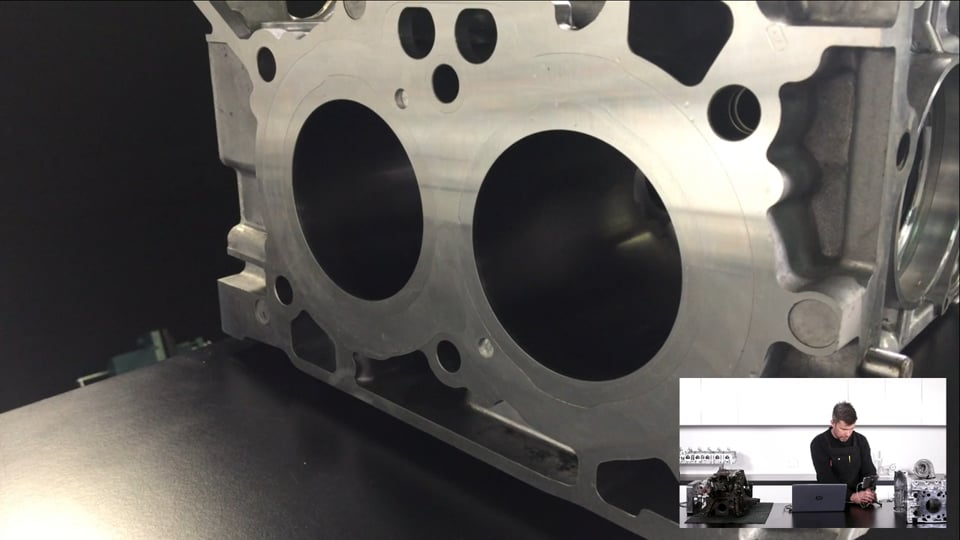
| 01:15 | Over here we've got our Subaru FA20 block which is a cast aluminium block. |
| 01:20 | Vastly different in terms of the construction techniques, the materials and of course the processes that we're going to need to go through when we are preparing the block. |
| 01:31 | So we're going to talk through that. |
| 01:33 | So the first aspect here, when it comes to block preparation, this actually begins before we even send the parts through to the engine machinist for the machining processes to be applied. |
| 01:45 | Quite often we're going to be dealing with a donor engine or we're going to be pulling an engine out with unknown origins that we really need to check thoroughly and make sure that for a start it's even in a condition that will warrant a rebuild. |
| 02:01 | Some of this starts with just a visual inspection. |
| 02:05 | Before we can do this we really do need to get the block stripped down pretty close to a bare block like we've got here with our 4AGE. |
| 02:12 | In particular, with a visual inspection we're going to want to make sure that the deck surface of the block is in good condition. |
| 02:20 | Some engines, let's say one in particular that I'm well aware of, the Nissan RB26 block is very prone for cracking on the deck surface. |
| 02:29 | So that's one of the first things we want to do before we go to the trouble of stripping the block further, we can do this as soon as we've got the head off. |
| 02:36 | We can just clean off any remaining head gasket material using the likes of green scotch brite and a little bit of brake clean and we want to inspect around all of the holes in the deck surface of the block and make sure that there isn't any visible cracking. |
| 02:52 | Now that's not to say that there isn't some cracking present that we may not be able to see with the naked eye but generally, at least with the RBs, when they crack, it's pretty apparent and would generally be sufficient to abort that block and go no further with it. |
| 03:07 | Not a lot left to learn. |
| 03:09 | The other aspect we want to look for is any damage to the block. |
| 03:14 | So particularly if we have got a block that's come from a wrecker and it's come out of a crashed car, what we want to do is make sure that all of the bolt on bosses for the block, particularly the wings where the block bolts up to the gearbox, want to make sure that nothing there is broken off and again if you overlook this, you can end up going quite a large amount of money on a block that then may need to be scrapped. |
| 03:39 | Not much use having a block for example that we can't reliably bolt up to the gearbox, that's not going to work too well so these are some of the subtle things that are really beyond just the basics of building an engine that can be easy to overlook. |
| 03:55 | The other aspect that is worth discussing here is just inspecting the block for wear in terms of the bores. |
| 04:03 | This depends really here on what you're going to be doing with the engine. |
| 04:08 | Normally if you are going to be boring and honing the block to a 20 thou or first oversize, you can normally clean up quite a bit of damage but what we're going to be looking for is particularly in the bores themselves, we want to see if there's any noticeable scoring. |
| 04:25 | Really easy way to do this is just to run your fingernail across the bore surface and normally on the thrust face is where you're going to find that damage and if you can feel that scoring with your fingernail then that could be problematic. |
| 04:39 | Quite often you'll find that what looks pretty ugly to start with, when you run your fingernail across it, you can't actually feel it, that's a pretty good indication that that's going to clean up. |
| 04:49 | At the same time, we actually fell into this trap when we were building our SR20VE turbo engine for our 350z. |
| 04:56 | We ended up getting a donor SR20 block, we knew that that had some water damage in the bores and this is quite common again with wrecking yard engines where, if they've spent a lot of time outside, sometimes they'll end up getting water into the bores and this water can end up causing some problems. |
| 05:15 | Obviously it's going to cause corrosion on the bore surface. |
| 05:17 | Now on face value we knew that that was there but we did expect, considering we were going to a 20 thou oversize piston that it should be sufficient. |
| 05:26 | Turned out that it was a little bit deeper than we thought and even at first oversize, that scoring, sorry the corrosion damage to the bore was still present. |
| 05:35 | Given what we were aiming to do with that engine, that wasn't going to cut it for us so we ended up having to scrap that block and start again. |
| 05:42 | Likewise if you've gone through our practical engine building course and seen our LS worked example, that was another aspect where we ended up with a pretty poor condition donor engine that was a high K wrecking yard engine. |
| 05:56 | Again, water damage in the bores. |
| 05:59 | Particularly given the LS1 block where we can't really bore the block, the sleeves are too thin, that only gives us the ability to have our machinist remove a very small amount of material while honing it to get a fresh hone pattern, and again we ended up with some visible marking in the bores there. |
| 06:15 | Although in this instance while it looks ugly, we can't actually feel any imperfections in the surface so I'm actually pretty confident that's not going to be an issue. |
| 06:24 | Given that though, if i was building this for a customer, again I would have scrapped that engine block. |
| 06:30 | What we're prepared to put up with in house is a little bit different than what I would be happy to let out of the workshop. |
| 06:37 | Next thing we want to do is get a little bit deeper into this and we want to find out if our engine block is at a standard bore size. |
| 06:46 | So what we're talking about here is our bore diameter, at this point we don't need to get too fussy here, we don't need to break out the bore gauge and the micrometer, to see if we are on a standard size we can just simply use a pair of digital vernier callipers and it should give us a pretty good guide. |
| 07:02 | While you might also have some markings on the top of a factory piston, indicating that they are 0.5 or 20 thou oversize, it's always a good idea just to confirm and make sure that the block is what you think. |
| 07:14 | If it's already at first oversize, going any further to clean up the bores and get a fresh hone pattern on it, going to a second oversize, we're now one mil over, this has two effects. |
| 07:25 | First of all, it means that we're unlikely to be able to bore and hone the block further to freshen it in the future and also particularly if we are really starting to push the limits, at one mil oversize, we can get into a situation where we are starting to reduce the bore thickness to a point where flex and cracking can be an issue. |
| 07:46 | Alright so that covers everything that we've got on the top surface of the block there. |
| 07:50 | The other aspect we want to have a good look at as well is our bottom end. |
| 07:55 | Turning the block over, we want to inspect the cradle or the main bearing caps. |
| 08:01 | One of the problems we may find is particularly in an engine that has suffered a bearing failure, we can find that the heat created by the friction involved with a bearing failure can actually end up distorting the block itself, sometimes quite dramatically to a point where it's not recoverable. |
| 08:20 | So a good point to look for here is on our bearing caps or the cradle, look for some blue discolouration on those caps. |
| 08:27 | That's generally going to be pretty indicative that everything's got very very hot and while it can be potentially recovered, it's definitely going to require a lot more work, it's going to involve a lot more cost from your machinist and at that point it may be easier, particularly if you haven't got an engine that's difficult to source, to scrap that block and again start again. |
| 08:48 | That's another aspect that's important to mention is that if you are sourcing just a bare short block for a particular build, make sure that it comes with matched cradle or big end main bearing caps. |
| 09:04 | Quite often we'll end up with a block like this that has no caps on it. |
| 09:08 | We can't mix and match the caps, well we can correct this but again it's going to add a lot more cost and a lot more hassle with the fact that the engine block and the caps will need to be line bored and lined honed so make sure that the caps exist, otherwise know that you're going to be in for a significant amount of expense. |
| 09:26 | At this point you can also inspect, if you want to get a little bit more detailed, the bores with a mic and a bore gauge and what we're looking for here is any out of round and any belling or taper from top to bottom. |
| 09:42 | We're going to probably find that that's not going to be too big of an issue if we are going to be having our machinist bore and hone the block which would be pretty typical with most builds but again if you are dealing with an engine block like the LS1 where we can't bore this, we're relying on removing a very small amount of material so using the dial bore gauge, what we want to do here is essentially take our micrometer, if we're fitting an aftermarket piston we're going to measure the gauge point on the piston skirt using our micrometer. |
| 10:15 | Once we've done that we can then zero our dial bore gauge in the micrometer and then using our micrometer, dial bore gauge, that's definitely not going to fit in our 4AGE bore, our little dial bore gauge is going to show us exactly how much piston to cylinder wall clearance we've got. |
| 10:32 | This is going to show us essentially how much wear we've got in the block already, how much material can be removed by our machinist in order to clean up and provide that fresh hone pattern. |
| 10:41 | Hopefully we're going to have a few thou of material to play with there that's going to allow us to get a really good starting point for the rebuild. |
| 10:49 | The other aspect with this as well which is a little bit trickier, it's very unlikely you're going to be able to do this yourself but particularly if you are dealing with an engine where you're going to be pushing it to the absolute limit, you may want to have your engine machinist check the bore thickness using ultrasonic testing equipment. |
| 11:12 | This used to be very very rare and if you're dealing with a normal machinist that just machines and rebuilds factory engines, they're probably unlikely to have this but most performance based machinists will have access to an ultrasonic tester. |
| 11:29 | And what you can find here and this gets a little bit tricky as well, you can find that core shifts in the way the engine blocks are cast mean that if you've got five different engine blocks, we may have quite significant variation in the bore thicknesses. |
| 11:42 | Obviously if you've got the luxury of choosing between five, you're going to choose the block that has the thickest bores. |
| 11:49 | This used to be a really significant issue back in the earlier days, maybe the older small block chev for example, the technology in the casting wasn't quite as good as what we have access to now. |
| 12:03 | So late model engines there's less of an issue with this but it is still a consideration, particularly when you are really pushing the limits. |
| 12:12 | Right the other thing, I did say we'd finished on the top surface of the block but we are not. |
| 12:17 | The other thing that you may want to check is the surface condition of the block. |
| 12:22 | This is something that most home enthusiasts would probably leave to their engine machinist but it isn't that difficult to do, if you've got a decent machined straight edge, you can check diagonally across the block surface and you'll actually find in the workshop manual it shows you where to make your measurements, using a heavy weight machined straight edge and some feeler blades you can actually check for any surface irregularities in the block. |
| 12:50 | Not a huge deal but it is nice to know this because we will almost certainly be having the deck surface of the block machined or decked as it's normally referred to as a machining process and that's going to give us the correct surface finish on the block to suit our head gasket and also make sure that any irregularities are removed out of that, giving us the best chance possible of getting a good head seal. |
| 13:14 | Alright so let's talk now, we've basically at this point, we've done our simple checks, we've done our basic measurements, our visual inspection on our donor engine and we know that we've got an engine block that is worthy of at least persevering with. |
| 13:29 | We've then got the part which we're going to be out working which is the machining. |
| 13:34 | Now generally there's a range of tasks that we will complete, the specifics on all of the different potential machining operations will depend on exactly the engine you are dealing with. |
| 13:46 | But almost certainly we're going to be boring or at least honing the engine block to suit our new pistons. |
| 13:52 | Even if you are keeping your existing pistons you're generally going to at least be having the block honed so that you've got a fresh hone pattern for our new rings to bed on. |
| 14:04 | On top of that, the machinist will also apply a small chamfer to the top of the bores. |
| 14:10 | So this is just a very light chamfer, only runs down a couple of millimetres and it's just enough to help us when we are installing the pistons into the top of the bore to help the ring to go into the bores nice and cleanly without getting caught up on the edge but again that's not something we generally need to worry about, that's something that our machinist will be doing. |
| 14:31 | Now one of the common techniques that I do recommend in most instances when it comes to honing or boring and honing the block is to use a torque plate. |
| 14:41 | This one here is one that we've had made up for our Subaru FA20 and essentially it is just a really solid and quite heavy chunk of steel. |
| 14:51 | it's been CNC machined and obviously it's not going to work too well on a 4AGE but if we just go to our overhead camera, you kind of get the idea, that's going to go on the deck surface of the block. |
| 15:03 | It gets bolted on using the exact hardware that we are going to be using when we bolt our cylinder head down. |
| 15:10 | You technically should also be using the same head gasket as well, the head gasket can affect the distortion in the bores. |
| 15:16 | And what this is going to do is replicate the distortion that will be in the bores when the cylinder head is bolted down. |
| 15:24 | The idea of course here, using the deck plate, what we're trying to do is make sure that when the engine is actually assembled, our bores are as close to round as we can get. |
| 15:34 | It's not much use if the bores are perfectly round, sitting here on the bench with the cylinder head removed when the bores are going to distort and maybe pull quite significantly when that head is bolted down. |
| 15:49 | We don't really care about it sitting here without the head on, what we want is to replicate all of those forces and get the best possible result. |
| 15:57 | Now how much the bores will distort is going to be very dependent on the particular engine you are building. |
| 16:04 | Where the head bolts are kind of siamesed into the bores you can expect quite a significant amount of distortion. |
| 16:13 | On the other hand, if we just switch over, try and get this arranged here, if we switch over to our iPhone camera for a second here. |
| 16:20 | This is the top of a Subaru FA20 block, this is a stock one and you can see that this is what's referred to as an open deck block. |
| 16:27 | The sleeves, the bores are completely separate to where our head bolts go. |
| 16:33 | So with a block like this, generally we don't expect as much distortion when the head is installed but still there's no downsides with having the torque plate on during the boring and honing process. |
| 16:47 | One step further than this, and this is something I haven't had done myself, but there is another process which is referred to as hot honing and this is where coolant at higher temperature, normal engine operating temperature, maybe 80-90°C is run through the water jacket on the engine, during the honing process. |
| 17:06 | So this is again getting our, trying to get one step closer to having the absolute exact operating conditions the engine will see when it's at temperature and being operated. |
| 17:18 | Some intricacies around that though because of course as the engine block heats up it's also going to grow so things like the piston to cylinder wall clearance that we're targeting cold at room temperature will be quite different to what we're targeting if we are hot honing the block and that's something that engine machinists that have that technology will have done the hard work to know what a hot clearance works out to at cold and vice versa. |
| 17:44 | OK so we've dealt with our boring and honing process and the chamfering, we've talked about the torque plate, next we're going to talk about line honing and line boring. |
| 17:53 | And this is something that is always going to be necessary, particularly with a cast iron block like our 4AGE here. |
| 18:01 | Unless there is a real problem with the block, like I mentioned before, where there has been a bearing issue, something that's actually distorted the block, it's unlikely that there's going to be significant distortion and it's probably going to be just fine, always worth checking that as well. |
| 18:18 | You can check your ring journals, making sure that they are on the correct size and that they are perfectly round. |
| 18:23 | Again using a micrometer and a dial bore gauge so always worth doing these little checks and making sure everything is looking OK. |
| 18:32 | The bigger issue is for the likes of our Subaru FA20 here, so let's just, actually we'll go with our iPhone camera into the back of it there. |
| 18:42 | So this is actually as supplied back from our engine machinist. |
| 18:46 | So you can see that it's got the bearings already installed in it. |
| 18:49 | One of the problems that we've got with the FA20, and this also goes for most alloy blocks is that because the material is not quite as strong as cast iron, when we install ARP fasteners or basically any aftermarket main bolts through these casings, the extra clamping force will tend to distort the block so it's very easy to tell with a Subaru engine block, EJ series or FA series, if you go and put a set of ARP main bolts in the case, torque them down to ARP specification, you simply won't be able to turn the crankshaft or if you can, it's going to be very difficult and that's because it's distorted the main bearing tunnel. |
| 19:29 | So with an engine block like this it's really important to have the machinist line hone it. |
| 19:36 | That line honing process basically just gets our main bearing tunnel back onto the correct size and makes sure it's all perfectly true. |
| 19:43 | Out of shot behind me I've actually got a Honda B18C engine and that's exactly the same situation, that's an alloy block using a cast iron cap. |
| 19:52 | With the ARP fasteners again that distorts so really important to ensure that that is all on size, exactly the same with our SR20 which is detailed in our worked example there. |
| 20:05 | So line honing is generally enough to clean up very small distortions like we'd expect in that situation. |
| 20:10 | If you're going to fit an aftermarket bearing cap or you're swapping bearing caps because you've got no option, from a different engine, you're probably going to have to go one step further which is the line boring process. |
| 20:23 | So this is very similar to what we do with our bores. |
| 20:26 | If we need to remove a significant amount of material then we start, or our machinist will start by boring and then once the bores are within sort of a close tolerance to our finished size, it's finished off with a hone which gives us the right surface finish in the engine block case for the bearings to run against. |
| 20:46 | So this is something we struck in our Toyota 2JZ worked example where we fitted a set of Titan main bearing caps to the 2JZ block, factory 2JZ caps are known to fail at around about 900 wheel horsepower. |
| 20:59 | The Titan caps unfortunately we were really quite disappointed, the sizing is just so far out it's not funny. |
| 21:07 | They're supplied about 2.5 mm smaller in diameter than stock so there's a significant amount of material that needs to come out. |
| 21:15 | Interesting enough, because we went through this process with the engine machinist during the Toyota 2JZ build and the line boring and line honing processes, maybe not as dialled in and as scientifically accurate as you may think. |
| 21:30 | There's a little bit of an art to that to get everything on size and make sure they're all perfectly concentric and again this is where dealing with a quality machinist that's got a lot of experience in this will pay dividends. |
| 21:43 | The next process that we'll deal with is decking the block surface. |
| 21:47 | So as I've already mentioned, this is what's going to clean up the block surface, any irregularities there. |
| 21:54 | Generally we're only removing a very small amount of material, maybe a couple of thousandths of an inch. |
| 21:59 | Just enough to get back to the right surface finish so this also makes sure that the deck surface is parallel to the sump rails and also that the deck surface is, basically making sure that our bores are perpendicular to the deck surface. |
| 22:15 | One of those checks that makes sure that everything is where it should be, part of that blueprinting process. |
| 22:22 | Also just want to mention, just because I've got the opportunity to talk about this here with our two FA20s. |
| 22:28 | One of the options that is pretty commonplace now on open deck blocks is to use a deck plate to basically convert it to closed deck. |
| 22:39 | So what I'll do, we'll just come back and have a quick look again at our FA20 stock engine block here. |
| 22:45 | Just see if I can get my iPhone camera to be a little bit more stable, that should do it. |
| 22:49 | So obviously again we've already looked at this but we've got nothing linking the bores to the outside of the block. |
| 22:56 | Now that's not an issue in a stock powered engine but it quickly becomes an issue when we're running very high boost pressure. |
| 23:02 | What this can do is the cylinder pressure can actually make the bores essentially move around very slightly. |
| 23:09 | And this can have an effect on our head gasket sealing and then also we can get into problems with our bores splitting. |
| 23:15 | Alright so what I'll do is I'll just turn this around and we'll have a look here at the what we've done on our other FA20 block. |
| 23:23 | So it's probably a little bit hard to see, there is a very fine line that runs around here. |
| 23:27 | What we did, Zac who used to work for us has a CNC mil at home which is quite fortunate, mainly for us. |
| 23:37 | And what he did was scanned the FA20 block and basically designed a model in Fusion 360 and then ended up running a CNC mil right around and cut a nice finish on that block. |
| 23:51 | Then basically used that same model to create this deck plate. |
| 23:55 | There's about a 1 thou interference between the deck plate and the block. |
| 23:59 | That just gets lightly pressed in and obviously as you can see there it gives a lot more support to the bores. |
| 24:08 | So this is a great way of improving the strength on a factory open deck block. |
| 24:13 | Albeit it is going to be reasonably expensive. |
| 24:15 | There are companies out there as well, the name escapes me but there's a company at least in the US that specialises in doing these deck plates for a number of popular engines. |
| 24:31 | What I'll try and do is remember that and link that in our forum as well. |
| 24:36 | I just want to mention as well, I think these have fallen from favour a little bit but back many years ago when I was running my old workshop, a common upgrade for the Honda B series engines was a block guard. |
| 24:50 | It's similar to the deck plate but slightly less sophisticated. |
| 24:56 | The block guard is designed to basically just push into the cast finish between the bores and the outside of the water jacket. |
| 25:05 | I'm not a big fan of those, they don't give the support that the deck plate does so they don't really do the job that you're hoping for in the first place, definitely not as well. |
| 25:14 | The other thing is, because of the irregular surface and the variation from one block to another, very like to end up creating some localised distortion so particularly this is a problem for those who want to just take the cylinder head off and drop a block guard into place and then put the head back on. |
| 25:31 | Not such an issue if that block guard is in place and then you're having the block bored and honed. |
| 25:37 | Alright we've getting through to the end here so I'm going to go over one more topic and then I just will jump into some questions and answers so this is a pretty good time to mention, if you do have any questions, please start asking them. |
| 25:49 | There are some additional steps, so we've talked sort of about the pre checks before we send the block off to the machinist, we've talked about the machining processes that you're going to get your machinist to apply but then once we get the engine block back from the machinist, we've still got some work ahead of us. |
| 26:02 | So one of the first things that I always do is I thoroughly debur all of the surfaces of the block. |
| 26:10 | So what I'm talking about when I'm talking about deburring here, let's say again if we jump across to our overhead camera and we're looking at the deck surface of our 4AGE. |
| 26:18 | So what we're going to find is when the engine machinist has decked this surface, we're only removing a small amount of material but what we will end up with is some small burrs around all of these openings here. |
| 26:31 | So we've got our water jacket, we've got our oil passages, our oil return as well as our head bolts holes. |
| 26:39 | And what we want to do is make sure that none of those little burrs of material can break off and go through the engine and it can end up causing some really costly damage. |
| 26:47 | It's really really easy to deal with this. |
| 26:51 | I simply use something like a battery powered die grinder. |
| 26:56 | This one is a Dremel with a little carbide burr on the end of it. |
| 27:00 | And all we need to do, if we go to our overhead camera again, is we can just run this gently across the irregular surfaces. |
| 27:06 | It doesn't require much effort and we're just going to apply a very light chamfer, just removing any of those little burrs that are left there. |
| 27:15 | Really important and should go without saying, when we are doing this, we need to be very very careful because if you slip and that skips across the deck surface of the block, you're going to end up potentially costing yourself a lot of time and money because you're going to have to have that decked again to clean up that mistake. |
| 27:32 | So once we've done this, the next thing we want to do is also deal with the sharp edges on the outside of the block. |
| 27:41 | So again if we can come to our overhead shot. |
| 27:43 | So while it's not super critical and this isn't really about the engine reliability itself, we're going to end up with quite sharp edges around the outside here, this goes for the sump rails as well, basically any of the sharp finishes. |
| 27:56 | Just, I like to, as a matter of course, go through and break these down with a slight chamfer as well and this just helps you stop from cutting yourself if nothing else when you are dealing with the engine, it's very easy to do that on a sharp machined surface. |
| 28:11 | The more important aspects really come on the underside of the block and so that I don't have to struggle here and flip this thing over, I've got a couple of photos that I want to show you. |
| 28:23 | So this is actually out of our engine building course, this is the Toyota 2JZ block so there's a couple of things we can see here. |
| 28:30 | This is one of the main bearing caps and we can see this is a parting line in the casting. |
| 28:38 | Not necessarily a problem, these will vary dramatically from engine to engine. |
| 28:42 | In some instance we can get some quite thin sections where all it takes is a little bit of pressure with a sharp screwdriver or something similar and you'll actually be able to break away some of that casting flash. |
| 28:55 | Now obviously this could be really dangerous because particularly in a high performance engine there's going to be a lot of vibration and flex that isn't going to be there in a factory engine, some of that casting flash can break away and go through the engine, again causing you damage. |
| 29:09 | It's a little hard to see and you've got some more of this in the background here so I like to just thoroughly examine the inside of the engine block, looking for any of this casting flash and anything I see like that, I'm going to remove. |
| 29:22 | A couple of ways we can remove that, we've got a air powered pneumatic die grinder here, again this has got a carbide cutting bit on it, a burr. |
| 29:33 | These are also available, I'll try this under our overhead shot here, we've got a variety of different shapes here so some of them are square on the end like this one here and then we've got some more rounded ones, just depending on where you want to get to. |
| 29:50 | So it makes pretty quick work of removing all of that material. |
| 29:53 | The other option is to simply use a power file. |
| 29:59 | A power file, as you'll see in a second, this one's got no belt on it so it's not actually going to file anything but gives you a better surface finish. |
| 30:07 | Limiting factor here is you can't always get the power file into some of the tighter spots that you can with a die grinder. |
| 30:14 | So just a good idea to just take the time and thoroughly check your engine. |
| 30:17 | Now we don't need to get a polished finish to the inside of the engine block, I have seen the occasional photo back in the hot rodding days more so than now, where people have really probably put in 40 hours of work and got a polished finish to the inside of the engine block. |
| 30:33 | That's nice and there may be some advantages particularly in terms of oil return back into the sump but it's definitely not essential and you sort of get to a level of diminishing returns from all of that work. |
| 30:46 | So if we have a look here again on my laptop screen, this is using that power file to just remove that casting flash from the parting line there and this one actually shows a little bit more prominently some of that additional casting flash we can see hidden away in the engine block. |
| 31:00 | So again just a good idea to spend the time and make sure that you've got all of that removed. |
| 31:06 | On that note, it used to be probably not common but it used to be a technique where people would use a special paint on the inside of the engine block which was designed to reject oil. |
| 31:19 | Basically helping the oil return to the sump quicker. |
| 31:22 | Now I haven't personally used this. |
| 31:24 | I can't say that it's not a good idea but again in my opinion it gets down to the sort of diminishing returns, you're sort of starting to get down towards the sort of half percent improvements for the effort so it's not something I've done personally on any of my high performance engines but if you do want to take the time, I'd research that, make sure you're using a suitable product and it can potentially give you a benefit. |
| 31:50 | The other thing, the last thing I'll talk about here is when you've got the engine block disassembled completely bare, there can be some benefits in spending some time cleaning up the oil galleries in terms of their transitions in and out of the oil pump depending on the design in and out of the oil pump housing. |
| 32:08 | So I'll just try and get our iPhone here for a second so we can see this. |
| 32:12 | A little bit tough to really make out but we've got our oil feed out of the main oil gallery and this one actually isn't too bad but sometimes these will be on a 90° or a very sharp angle and spending some time in there with the die grinder can help improve the oil flow. |
| 32:31 | I won't dwell on that too much, if you do want to learn more about that, we've got a complete webinar that covers that, you can find that in our archive if you just search, I think oil improvement or engine block oil or something of that nature should find you that webinar. |
| 32:46 | Obviously the last part though, once you've done all of your work there, you're going to end up with debris and grinding dirt, dust throughout the whole engine so it should go without saying there a thorough cleaning, removing all of the gallery plugs for all of the oil galleries and making sure everything is spotlessly clean, is essential and with engine building you cannot have an engine that is too clean so it's really important to be completely thorough there. |
| 33:14 | Right we'll jump into our questions now so if you've got any more questions, please keep asking them. |
| 33:27 | First question comes from Franco who's asked, building my first engine, if the engine will sit for a while before being used, how do you keep the cylinder walls from forming rust? OK so depending on exactly how long the engine is going to sit for. |
| 33:40 | Actually before I get onto that, I will also mention that one of the last steps, once everything's done and dusted with a cast iron block, we also need to paint the outside surface of the block to prevent corrosion. |
| 33:52 | If you're dealing with an alloy block obviously that's not important so I just use a high temp satin black engine paint, the paint obviously designed for that purpose. |
| 34:01 | Alright sorry back onto Franco's question. |
| 34:04 | So yeah if it's not going to sit for too long, it's sufficient just to have a really thorough coating of a good mineral based engine oil that you've put into the hone pattern of the bore. |
| 34:14 | What you'll find is essentially the second that you clean the machining oil off the bores, you're going to start having the potential for corrosion to form. |
| 34:23 | Particularly in humid areas. |
| 34:25 | So you really want to get lubricant onto those cylinder walls straight away. |
| 34:30 | On the other hand if you're going to have the engine sitting for a long period of time, I think I may have some here. |
| 34:38 | Yes I do. |
| 34:39 | That was a good guess, this product here, CRC Soft Seal. |
| 34:43 | This is a great product for protecting your parts. |
| 34:46 | It basically forms a quite thick waxy finish that you can spray onto the surface of your cylinder walls. |
| 34:53 | Also this is really good for protecting conrods or crankshafts as well so if you're going to be having a crankshaft sitting around and you're not going to be dealing with it for a while, it's a really good product to protect those surfaces. |
| 35:07 | I will say that while it does an excellent job for what it's designed for, it is an absolute pain to clean off so if you're only going to have the parts sit around for a couple of weeks or even a couple of months, probably I would be just quite generous with the engine oil rather than using Soft Seal. |
| 35:23 | Next question from Torstine I think it is, what should I do to the engines when they'll be stored for a long time? They are complete, I don't want them to rust on the inside. |
| 35:34 | So if you've got an engine that is already assembled, this gets a little bit trickier. |
| 35:38 | A good option here is to remove the spark plugs, you can buy, there's a product for marine engines for winterising them, basically it's a lubricating oil spray that you can spray down through the spark plug holes and then just turn the engine over by hand, that's about the best you can hope for. |
| 35:59 | The problem becomes more of an issue with engines that have been just freshly assembled, so they've never run, they don't have an oil coating over the crankshaft etc, you can still end up with rust forming on the crankshaft inside of the engine block. |
| 36:12 | So again if you're going to be assembling the engine and you know it's not going to run for a while, it's a good idea to be really thorough with a lubricant on all of the crankshaft surfaces. |
| 36:23 | Kevin has asked, I'm interested to hear any insights of vapour honing, blasting for engine blocks and cylinder heads, what are your thoughts on the vapour honing and blasting? Vapour honing, not a term I've heard. |
| 36:34 | If I'm on the right track here, vapour blasting where you're using water with glass media in it for actually cleaning up the surface of the block, if that's what you're talking about then yes we have done that on all of the alloy blocks, I can't probably show you our B18C easily because it's out of shot here. |
| 36:54 | But that's the process we went through on that. |
| 36:56 | Really really good, it basically will take an ugly old cast block that's looking pretty tired with corrosion, rust marking etc on it and bring it back to something that looks like it just rolled off the showroom floor. |
| 37:10 | So very different to sand blasting as well so sand blasting, yes it's going to remove the dirt and debris but what it tends to do is actually open up the pores on the alloy surface and essentially once you've done that, even just touching it with your hands tends to make it dirty again so vapour blasting, I think there's a few other terms that are used for that, is a technique that is quite helpful if you can find someone to do it. |
| 37:37 | Nicko has asked, is dry sleeve insertion common practice for cylinder bore repair? Yes ish, it sort of fixes one problem and it creates another, it's probably not something you're going to find is particularly common practice in performance engine building, might be used on a road car engine to recover an engine block or in a block where they're getting quite rare and you can't get a donor engine that's in any better condition. |
| 38:08 | The problem with using a sleeve insert is that the interference fit when the sleeve is pressed in will generally tend to create distortion in the adjoining bores. |
| 38:20 | So like I say, you sort of fix one problem and it creates another. |
| 38:23 | Ideally I would probably not go down that path unless you absolutely had to. |
| 38:29 | Josh has asked, where can I find a decent straight edge for checking deck flatness? Good question, it's probably actually easiest to have a machinist make one up for you. |
| 38:43 | So using something like a flimsy stainless steel ruler, not good enough. |
| 38:48 | What we want to do is start with something that's really solid. |
| 38:50 | Probably somewhere in the region of a six mil thick piece of steel plate and then have the machinist basically machine that to a V so it's got a nice sharp point, making sure obviously the machinist can make sure that that is perfectly straight so that's probably what I'd go through there. |
| 39:07 | Because it only needs to be steel, it's not going to be overly expensive to get one of those made up for you. |
| 39:15 | Joseph's asked, any experience with Alusil? None at all, I'm assuming Alusil, I think is a term, something similar to Nikasil where you're applying a coating directly on top of the bores. |
| 39:28 | Used in a lot of late model engines meaning that they don't need inserted sleeves inside the bores and the rings can essentially run straight on that surface finish. |
| 39:39 | You can have your bores recoating so obviously if you're going to bore and hone the engine block then they need to be recoated. |
| 39:48 | I've heard sort of mixed tales on whether or not that works well so I think it would really come down to the company that you're dealing with to reapply that coating. |
| 39:58 | Next question, although it's recommended to go to a machinist, what's the most accurate way for a home enthusiast to clean and hone a cylinder and/or deck the surface? Decking the surface 100% cannot be done without the correct machinery so yeah you don't have an option there, nothing you can do. |
| 40:16 | Running a flat file on the surface of your block is going to end pretty badly, pretty quickly. |
| 40:23 | I do not hone my own blocks because I want to know that I've got the right finish and the right results. |
| 40:28 | There are hones that you can run off a drill, again that probably falls into the same category in my own opinion, as using a file to deck your block, probably not where I'd be going with that. |
| 40:41 | Void has asked, is there a different deck surface finishes? I've heard of issues with sealing MLS gaskets because of the surface not being fine enough, in particular BMW N50 and N52 engines. |
| 40:51 | Yes absolutely so there is, the way of measuring the surface finish is called an RA value which I think off the top of my head stands for roughness average. |
| 41:02 | Problem with that is that it's not that useful because in my own experience, at least here in New Zealand, the majority of machinists don't have the equipment to actually give them an accurate RA rating for their finish, so that isn't overly helpful but what you're going to find is that machinists normally have spent decades in the trade so they've actually built up experience over those decades knowing what sort of surface finish they do need to apply for a given head gasket so just because they can't actually measure the RA value of the surface finish that doesn't mean that they can't give you the right results. |
| 41:37 | Head gasket manufacturers will specify an RA value for the best possible results as well. |
| 41:46 | Samil has asked, curious on your opinion of block fill such as concrete as part of the block prep? Ah yeah actually I did mean to talk about that so thanks for bringing that up. |
| 41:54 | Hit and miss. |
| 41:57 | I did use a solid filling compound on a few of my blocks, in particular the engine in my own drag car because we were running on methanol so we got rid of the water through the block completely so we solid filled the block right up to the deck surface. |
| 42:13 | Couple of things to consider here. |
| 42:16 | First of all it's really important that you are using the correct material. |
| 42:20 | The one that I used was a Moroso product, it was designed specifically for solid filling blocks. |
| 42:27 | The idea with it is that you wan't to make sure it has the same thermal expansion coefficient as the material that you're using and obviously that differs between alloy and cast iron as well so really important to make sure you've got that right. |
| 42:41 | The problem comes with a lot of people I know will part fill the engine block. |
| 42:46 | Where they've still got a street car and they still want coolant in the block. |
| 42:49 | So obviously that results in you filling the bottom part of the water jacket partially. |
| 42:55 | And in my opinion I don't think you're achieving that much by doing so. |
| 43:00 | The reason for this is we need to sort of think about where the main cylinder pressure occurs and that's sort of generally somewhere relatively close to TDC so by the time the pistons got down near the bottom of the bore, we're going to have relatively limited cylinder pressure there and of course that's where you're going to get down to that area that is solid filled so I just don't think the value is there unless you're in a position where you can fill it right to the top, that's only going to work for very very specific types of motorsport such as drag racing particularly if you are on methanol. |
| 43:35 | KT's asked, I have an H22A Euro R long block from a JDM import, many people do the balance shaft delete, in an NA street tuned build, does doing this hurt the life expectancy of the engine? No it does not. |
| 43:49 | So we also removed balance shafts on all of our 4G63 builds. |
| 43:54 | Assuming that you're also having the engine components balanced, I haven't noticed any reliability downsides to doing so. |
| 44:04 | Next question, Pabriti I think it is has asked is it good performance advice to use graphite coating pistons for two stroke engines? Hard for me to answer that, I do not deal with two stroke engines, never built one in my life so I can't speak to the specifics of two stroke engine requirements unfortunately. |
| 44:27 | Alright that's all the questions we've got there so thanks to everyone who has joined us, thanks for all of those questions and if you are watching this in our archive and you've got any more, please ask those questions in the forum and I'll be happy to answer them there. |
| 44:40 | Thanks a lot and we'll see you all next time. |
Timestamps
0:00 - Introduction
1:30 - Visual inspection
6:35 - Measuring bores - Stock or oversize?
7:45 - Main cradle/caps inspection
10:50 - Ultrasonic bore thickness testing
12:15 - Checking deck surface for straightness
13:15 - Machining work
25:45 - Deburring
31:45 - Porting oil galleries
33:15 - Questions


