261 | Idle Speed Control - ECU Master
Summary
Solid and stable idle control is one of those aspects of a tune that makes a real difference to the drivability of a car. It is however an aspect that is often overlooked or incorrectly tuned, leading to unstable idle and stalling. In this webinar we’ll discuss what you need to know to get a rock solid idle, what hardware is required, and how to approach the tuning on the ECU Master EMU Black.
| 00:00 | - Hey team, it's Andre from High Performance Academy here, welcome along to another one of our webinars. |
| 00:05 | Today we're going to be looking at the idle tuning options on the Ecumaster EMU Black ECU, obviously it's fitted here to our Version 11 Subaru STi. |
| 00:16 | However what we're going to learn is going to be broadly applicable regardless what you've got your EMU Black ECU fitted to. |
| 00:23 | Idle speed control, in my opinion, it's one of those really important aspects, particularly for a street driven car that really separates a well set up and well tuned ECU from one that's maybe not quite where it needs to be. |
| 00:38 | My aim is always to replicate the sort of performance we're likely to see from a completely stock factory car where essentially regardless of the temperature, regardless of the engine temperature and ambient temperature I should say, we can reach in through the door, turn the key, the engine's going to start and it's going to idle stably, it's not going to be stalling when the fans switch in or the air conditioning switches in. |
| 01:02 | It's not going to stall when we clutch in and come up to a set of lights and come to a stop. |
| 01:08 | Those are the sort of things for a street driven car that can be really really frustrating. |
| 01:13 | As usual, at the end of today's lesson, we will go through some questions so if you've got anything on anything that I talk about today, please feel free to ask those questions in the chat, we'll jump into those at the end. |
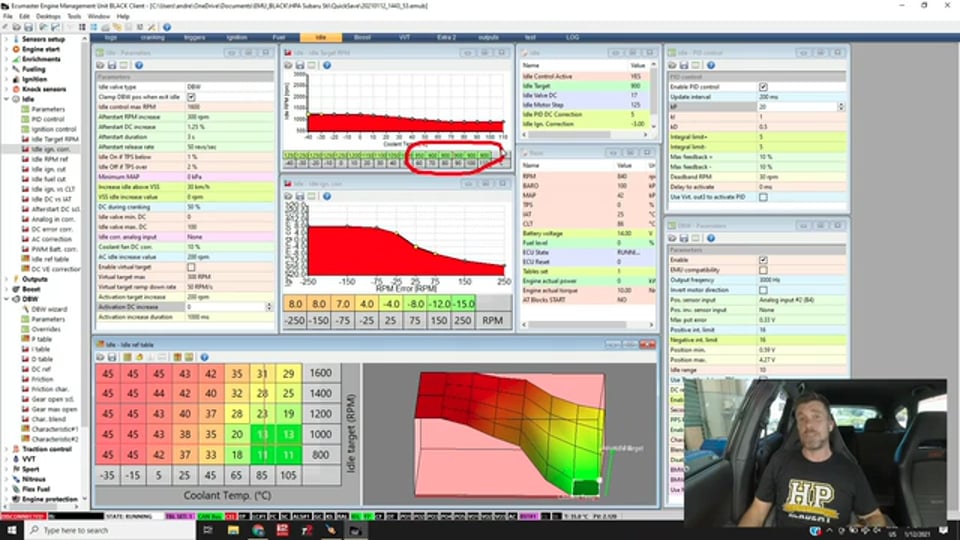
| 01:25 | For a start we'll just quickly jump across to the laptop screen for a moment. |
| 01:29 | And we'll see what we've got going on here, we've got our RPM here which is sitting around about 900 RPM which is my target. |
| 01:38 | In particular here what I wanted to show you though is ignition timing. |
| 01:42 | So we can see our ignition timing here is moving around. |
| 01:45 | This is our idle ignition control which is an important aspect of what we're going to be learning about here, we're varying the ignition timing while the engine is idling, if we come across to our graph here, our logger. |
| 01:59 | No I do not want to clear that log, I will just stop that I should say. |
| 02:02 | We can see here this blue parameter which is our idle ignition control, we can see that jumping up and down in response to errors in our idle speed. |
| 02:10 | So that's just a quick glimpse at what's actually happening with our ECU up and running here at idle and don't worry about any of those parameters, if you don't understand them, that's exactly what today's lesson is for. |
| 02:22 | Before we get too far into things though, let's just take a step back and talk about why we need idle speed control in the first place. |
| 02:30 | And what we're trying to do is control the idle speed so it's stable, irrespective of the operating conditions. |
| 02:39 | For example, at cold start up, when everything is cold, we're going to need to first of all most likely raise the idle speed target from what our normal idle speed will be and we're also probably going to need to bypass additional air around the throttle plate in order to achieve that idle speed. |
| 02:57 | As the engine warms up, we can pull our idle speed targets down and we're going to need less air bypass. |
| 03:04 | However that's only one aspect, the other consideration we've got here is that as the electrical loads change, so maybe as our fans switch in and out, maybe as the load on the engine through the air conditioning changes, that will apply more load to the engine which will, unaided, affect the idle speed so we need to be able to control that. |
| 03:25 | Then there's other aspects such as just varying levels of heat soak in the engine bay, there's literally 100s of different parameters that can affect our idle speed and if we want to maintain consistency with our idle speed, we're going to need a way of combatting that. |
| 03:43 | So options available for how we can control it. |
| 03:48 | There's a variety here and starting here would be nothing. |
| 03:53 | That might sound ridiculous given what I've already talked about but it isn't an uncommon option, I would only relegate this to a race only engine and we do see this quite regularly, I tuned literally 100s of engines through my last business where they came to me with no idle speed control functioning and there's a couple of reasons why this might be the case. |
| 04:15 | First of all some basic ECUs don't give a lot of control around idle speed, some may not give it as an option at all so obviously if you've got no electronic way of controlling the idle speed, then you have simply no option. |
| 04:27 | However there are also problems with some factory idle speed control solenoids or stepper motors which are known to be problematic and sometimes particularly for a race application where we don't really care maybe quite so much about idle speed control, it's better to actually ditch that, simplify the wiring, simplify the installation and have one less thing to go wrong. |
| 04:48 | These days, personally even with a race only application I'd prefer to have idle speed control functioning but it's a personal preference here. |
| 04:58 | Downside is with a racecar that has this sort of installation, when you get to the racetrack at the start of the day and you're unloading the car from the trailer, it's probably not going to idle on its own very well and you're going to need to nurse it for the first few minutes until the tempereatures start coming up. |
| 05:15 | Then it'll probably idle pretty low, once the temperature actually gets to operating conditions, you'll be good to go. |
| 05:20 | But again for a racecar, that might be absolutely suitable. |
| 05:23 | Now even with these applications these days though there are other options we'll talk about as we go through this which is incorporating idle ignition control. |
| 05:32 | On its own, idle ignition control is not enough to give us rock solid stable idle speed over a variety of different conditions but it's absolutely a big help. |
| 05:43 | And particularly if you've got no idle speed control solenoids, stepper etc, no way essentially to get additional air into the engine from a cold start, what we can do with idle ignition control is purposefully set our warm or hot operating idle speed a touch higher than normal, that'll probably mean that when we cold start the engine, it'll idle lower than we want but it may at least still idle by itself and then we're going to use the idle ignition control strategy to help pull the idle speed down as the engine warms up. |
| 06:14 | The idle ignition control, I'll talk about it a little bit more as we go but basically it uses the ability to advance the timing towards MBT to increase our engine torque which has the effect of increasing idle speed. |
| 06:28 | Conversely if we're idling too high we can retard the timing away from MBT, reducing torque and reducing our idle speed. |
| 06:36 | So those are our two really simple options. |
| 06:38 | The idle ignition control's important though beccause we can incorporate this and add this over and above our other options where we are using idle air bypass. |
| 06:46 | So options there, we can use a solenoid, we can use a stepper motor or these days using the drive by wire throttle body itself for idle control would probably be one of the more popular options. |
| 07:00 | Often you're going to use the system that was brought out on your type of vehicle, your type of engine and every OE manufacturer seems to have their own idea on what's the best option there. |
| 07:12 | No clear winner in my opinion other than probably if you've got drive by wire no real need to add additional air bypass, nice and neat, nice and simple system and it works exceptionally well but basically you're going to be limited there but the hardware fitted to your engine to start with. |
| 07:28 | You get a little bit more flexibility if you are adding idle speed control to an engine that never previously had it. |
| 07:35 | There's a variety of options there, probably one of the ones that I've used most frequently is the Bosch standalone idle speed control solenoid. |
| 07:42 | And that can be plumbed pretty easily pre throttle body to the plenum or post throttle body. |
| 07:48 | What we're obviously trying to do here if you haven't cottoned onto it is we need to get air around the throttle plate, if we're running a non drive by wire throttle, by bypassing that throttle plate, we're adding that additional airflow which is what the engine needs to increase the idle speed. |
| 08:05 | Alright so considerations around the tuning process. |
| 08:07 | And I think it's fair to say this is where there is room for a few errors here. |
| 08:15 | In particular one of the problems is that before we really get started with our idle speed control tuning, it is important to have our VE or volumetric efficiency fuel table, or for that matter our fuel table if we're running non VE engine tuned properly so if we head across to my laptop screen for a moment. |
| 08:34 | For the particular point we were running at, we're sitting down here at around about 40 odd kPa and around about 900 RPM. |
| 08:44 | So what we want to do is make sure that these cells here in our VE table are correctly tuned, correctly dialled in to give us our target air/fuel ratio. |
| 08:55 | Again this is probably one of the more common mistakes I see people making. |
| 08:59 | If the engine is reasonably rich it'll probably still idle OK but particularly as we lean the air/fuel ratio out, if you start to lean the air/fuel ratio out particularly leaner than stoichiometric, you're probably going to find that the engine's going to start hunting, it's not going to idle very smoothly and you're going to really struggle with the rest of the tuning process because you've got a fundamental flaw which is that your air/fuel ratio is wrong. |
| 09:25 | So that's the first place we need to start. |
| 09:28 | We also want to consider our warmup or coolant temperature and air temperature corrections as well. |
| 09:35 | Basically we want to make sure that irrespective of our coolant and air temperatures the air/fuel ratio is tracking pretty close to our target so that we're not going to again get into a situation where we're excessively rich or excessively lean. |
| 09:48 | So that's the first place to get started and we really do need to tune the fuel and ignition tables independently before we worry too much about our idle speed control, that's probably a pretty important place to start. |
| 10:01 | The next one, if we head across to our ignition tab, we're in the same area, unsurprisingly of the ignition table as we were with our fuel table, 40 odd kPa, 900 RPM. |
| 10:13 | And this is particularly important if we are going to be incorporating idle ignition control. |
| 10:20 | We want to choose an ignition timing that is a fair way off MBT. |
| 10:25 | The reason for this is if we tune the idle ignition timing to MBT, it doesn't really give us the potential to add torque so just to explain how this works, what I'll do is I'll try and draw a horrible picture here on my notepad. |
| 10:39 | And what we're going to find, let's just draw, let's try and do a better job of that. |
| 10:46 | OK so if we've got our torque on our vertical axis and, let's try again, use the right button would probably get us a better result. |
| 10:55 | We've got our torque on our vertical axis and we've got our ignition timing on our horizontal axis, what we'll generally find is that our torque versus ignition timing tends to look something like this and this point here is MBT, minimum timing for best torque or maximum brake torque timing depending on who you talk to and how you want to, what you want to call it. |
| 11:18 | So what we want to do when we're setting our ignition timing for idle is we really want to be somewhere down around about here, down on that downslope before we reach MBT. |
| 11:30 | And the reason we want to do this is it gives us quite a good amount of scope to advance the timing up to MBT, gaining that torque from theoretically somewhere here to here. |
| 11:41 | Obviously no numbers there but you get the idea, and conversely we also get the ability to retard the timing down from MBT and again that will give us our torque decrease down to here. |
| 11:53 | So this torque, as I've already mentioned, as we increase the torque that tends to have the effect when we're at idle of increasing the idle speed when we retard the timing that gives us the ability to reduce the engine torque, reducing the idle speed. |
| 12:07 | And the great thing about this is it's exceptionally fast, we can very very quickly affect the ignition timing, the ECU can do this for us in milliseconds and that will have an instantaneous knock on effect to our engine torque and therefore also our idle speed. |
| 12:24 | On the other hand when we are using an air bypass, which will still be necessary as we'll talk about, we'll find that there is a little bit more latency to this system so particularly when we're using both together, idle ignition control over a well tuned idle air bypass or drive by wire throttle table, then this gives us the best of both worlds, we've got a really really good way of getting rock solid stable control. |
| 12:47 | Alright so that's my horrible drawing for today. |
| 12:50 | The point of that discussion though is that we want to choose numbers down here that are on that down slope. |
| 12:56 | Now of course we don't know specifically where MBT is anyway, might be somewhere in the region of perhaps 20 to 30°. |
| 13:04 | Generally in most instances I find that values of about 16 to 18° for our base ignition table, which is what we've got here, they're going to do a pretty stand up job, giving us the ability to both advance the timing towards MBT and retard it away. |
| 13:20 | So of course every application's different but my point here is if you're close to MBT, the idle ignition control strategy isn't going to work. |
| 13:28 | Now while we are on this page here, on our ignition timing I do want to also mention we do have the ability to play a few tricks. |
| 13:35 | This is something I did before idle ignition control was common. |
| 13:39 | So you can see here on our vertical axis our break points are fairly broad. |
| 13:44 | Not really going to work too well for my demonstration but we can close these up if we wish. |
| 13:51 | So let's say for example, we were targeting 1000 RPM idle speed. |
| 13:55 | So you can see here that our ignition timing at that target idle speed is 18°. |
| 14:02 | Now if we put in a break point here of 900 RPM instead of 500 and maybe our next break point up here, instead of 1250 RPM, maybe that was 1100 so we get nice close break points here. |
| 14:14 | What we can do then is artificially achieve the same effect as our idle ignition timing, maybe we would want to change the timing as the RPM drops to maybe something like 24°, maybe as we increase our idle speed we might want to pull a little bit of timing out, maybe down to 14°. |
| 14:34 | So this sort of passively gives us some of that idle ignition control. |
| 14:37 | We do need to be a little bit mindful, particularly what we do up in this area here 'cause the chances are we will transition through this as we get onto the throttle and let the clutch out so particularly if we were using really aggressive retard in here, maybe we're taking that back to 8 or 10°, the torque is naturally going to fall away as we start moving and that's going to make the car a little bit difficult to get going, a little bit hesitant, it's not going to feel nice. |
| 15:04 | So not necessary on the EMU Black just because we do have the idle ignition control function but just worth showing you that that is something that we do have the ability to do there. |
| 15:16 | Alright so the other things we need to be realistic with is our idle target speed. |
| 15:21 | So let's just actually go through to our idle setup here. |
| 15:25 | And one of the first places we really need to start is working on our idle target table. |
| 15:31 | So this is a 2D table of our engine coolant temperature versus our idle speed target. |
| 15:38 | So we can see for this particular application, down around 0°C I'm targeting 1250 RPM and then we've got this flat interpolation down so that we get to 900 RPM by the time we're at 70°C and again really just important to choose realistic targets that we know that our engine is going to actually be able to achieve. |
| 16:01 | In this instance we can take the factory idle speed targets as a pretty good guideline, around about 850 or 800 RPM even is realistic for a stock Subaru engine however where people do come unstuck is a situation where we've added maybe an aggressive cam to a factory engine and when we do this, because it adversely affects the engine's volumetric efficiency at low RPM, the engine's not really running that happily and we'll generally find that when we go to an aggressive cam, we need to increase the idle speed to get our engine running happily. |
| 16:37 | So we can chase our tail and waste a lot of time if we've got a really big aggressive cam and we're still trying to make the engine idle too low and I actually got myself into this situation years ago, I was tuning a very very aggressive cammed Toyota 3UZ-FE that was built by TRD in the US for the Grand Am series. |
| 16:56 | I had no documentation on this engine. |
| 16:58 | Started it. up and I was trying to get it to idle around about the 1200 RPM mark and I could get it to idle there but it wasn't comfortable, you could tell it really wasn't that happy idling at that RPM and occasionally or quite regularly as I backed off from a ramp run on the dyno, it would want to stall so in the end I settled on a 1700 RPM idle and magically everything just worked at that point and it wasn't actually until the customer came and picked up the engine, they provided me the TRD handbook that went with that engine, would have been super helpful if they'd done that when they dropped off the engine but looking through that, they actually had a target idle speed of 1800 RPM so I ended up pretty much right on the money but those are the sort of frustrations you can get into if you aren't being realistic with your idle speed targets. |
| 17:43 | So particularly again if you've got an engine that's been previously tuned and you have moved to an aggressive cam then that's an area where you are going to need to definitely need to make those changes. |
| 17:55 | Alright so let's talk through what we've got displayed here, I'm not going to go through every specific parameter here, just the key ones that are important. |
| 18:03 | So we've got our idle speed parameters, we can find this also over in our idle speed parameters in the tree setup here so if that's not displayed, double click on that, that will bring that up so you can see it. |
| 18:17 | And starting at the top we've got obviously the first part is our idle valve type. |
| 18:22 | Obviously here, we've got drive by wire but if we look at our drop down menu, we've got a range of options that are going to cover most of the OE applications that you are likely to find. |
| 18:33 | When we are running drive by wire as well there is one little idiosyncracy here which we find in our drive by wire parameters which I've also brought up. |
| 18:43 | Again if you don't know where that is if you go to drive by wire, you'll find the parameters over here in the menu structure on the left hand side. |
| 18:50 | I'm not going to go through any of this here except for this one parameter which is relevant for our application which is our idle range. |
| 18:59 | So you can see that's 10. |
| 19:01 | What this basically does is it converts the throttle opening into a 0-100% duty cycle range as far as the idle speed control circuitry or idle speed control algorithm is concerned. |
| 19:16 | So what this means is that, if we come back over here, this table here which we'll dive into in a second, this is our basically our base drive by wire opening table, numbers of 0-100%. |
| 19:29 | A number of 100% in that table would give us the full opening of 10%. |
| 19:33 | So that's what we've got here. |
| 19:35 | It's important with drive by wire applications to choose this sensibly. |
| 19:39 | If we choose this number and it's too low, what we're going to find is that we run out of range when the engine is cold. |
| 19:46 | So we're not going to be able to achieve our cold start idle speed target, we may find that the engine when it's cold idles too low. |
| 19:53 | On the other hand, if we increase this too much we're going to get into a situation where the idle control strategy has too much authority, particularly when we enable closed loop control and it's also going to mean that we don't have good resolution there so basically a 10% change in our duty cycle table has a much bigger impact if the range that it's working through is 50% of our throttle opening versus 10% so that's just something that's important to mention. |
| 20:20 | Now that I've covered that off, just to remove confusion, we'll get rid of our drive by wire parameters. |
| 20:26 | Alright so we'll look at a few of these other parameters here, we do have the ability with drive by wire here to clamp the drive by wire position when we exit the idle speed. |
| 20:36 | So that's just limits the drive by wire position until we go back into idle speed control. |
| 20:42 | Also got the ability to set a maximum RPM under which idle speed control will function. |
| 20:48 | So we need to set this sensibly. |
| 20:50 | Generally I like to be around about 500 RPM above my actual idle speed target, that tends to work quite well. |
| 21:00 | One of the areas or two of the areas that we tend to see issues with idle speed control, one of them is after the engine is initially started and the other one is when the idle speed control system becomes active. |
| 21:14 | So let's have a quick look at, first of all, our afterstart setup here. |
| 21:18 | So what we've got is the ability after start to increase our RPM target momentarily by in this case 300 RPM and that is also going to require a duty cycle increase. |
| 21:31 | So basically how much additional throttle opening do we need in order to get this? In this case we've got a number of 1.25% in there, probably not quite accurate but that's how that works. |
| 21:42 | That afterstart duration is going to run for 3 seconds and then after the duration has timed out the afterstart RPM increase is going to be reduced at whatever rate we set in here. |
| 21:54 | So just allows everything to stabilise momentarily on a start and then it's going to drop into the idle control strategy. |
| 22:03 | Now the other aspect we have here which sort of goes into the second part of that is down the bottom we've got our activation target increase. |
| 22:10 | So this is when the idle speed control becomes active. |
| 22:13 | So if we're driving along and we come to a stop, this is when the idle speed first becomes active. |
| 22:19 | We've got our, again, target increase, duty cycle increase which interestingly, we've got at zero, let's just set that to 2% and then that's going to stay active for 1000 ms so again this just helps smooth out the dips that we can often see when the idle speed control first becomes active. |
| 22:37 | Alright so couple of other aspects here, and we'll get into a bit of a demonstration of this. |
| 22:43 | Over on the right hand side we've got our PID control. |
| 22:46 | This is really important, this is our closed loop control but while it's important, what we actually want to do when we are setting up our idle speed control initially is we want to disable this. |
| 22:57 | What I'll do while we're talking here is we'll just get our engine up and running so that we've actually got live data. |
| 23:06 | Just make that change again that we just had in there. |
| 23:09 | So what we want to do is basically make sure initially that when we are tuning our idle speed control, we want to make sure that our PID is deactivated so this means that we're running in what is referred to as open loop. |
| 23:24 | Open loop mode basically the ECU is sending out a fixed value to the output, in this case our drive by wire throttle, irrespective of what the actual idle speed is. |
| 23:34 | Closed loop on the other hand, it's looking at our idle speed target, it's looking at the error between our current idle speed and our target and if they're not the same, it's going to do something to our output in order to drive us towards our target. |
| 23:47 | So we see this closed loop control strategy being applied in a wide range of aspects on our ECUs, we've got closed loop control for fuel, closed loop control for boost and in this case our idle speed control so it's nothing particularly different. |
| 24:01 | PID stands for proportional integral and derivative gains. |
| 24:07 | Now I'm not going to be able to get too deep into the tuning of this because that warrants a webinar in and of itself but shortly I'll give you a bit of a rundown on what those three gains actually mean and a bit of a real world analogy as to how you could liken them so that it makes it a little bit easier to understand if you can understand them it becomes infinitely easier to tune them. |
| 24:27 | But regardless of what our closed loop control strategy is, regardless if it's boost or it's idle speed control or fuelling, we actually want to start with that closed loop control disabled. |
| 24:39 | The reason we want to do this is we need to start by dialling in what's referred to as our open loop or reference base duty cycle table, which is this little guy down here. |
| 24:50 | We've also got that being displayed graphically here in a 3D graph. |
| 24:54 | So if we just head back to our fuel table for a minute and we are, let's just play our log here. |
| 25:04 | We've got our idle speed here which is actually sitting really nicely pretty close to our target. |
| 25:10 | Also worth mentioning here while we're talking about idle speed, being a little bit realistic about what we can expect. |
| 25:15 | If we're targeting 900 RPM, is it realistic to expect our idle speed to sit at 900 RPM plus or minus 5 RPM? Absolutely not, it's always going to fluctuate. |
| 25:25 | Generally in most instances, if I'm within perhaps plus or minus 25 RPM of my target, I'm going to be pretty happy and we can see that while we're looking at our idle speed, for the most part that's pretty well what it's doing, maybe just a little bit outside of that range but I'd be pretty happy with what's going on there. |
| 25:41 | Now just important to just be realistic about that because again if you're trying to achieve the unrealistic you're going to chase your tail, waste a lot of time and get really frustrated so just being realistic about what's going go happen there. |
| 25:56 | Let's head back across to our idle speed target table here. |
| 26:00 | So what we can see is hopefully you can see, there is actually a red cross hairs on this table and it's showing us where abouts we are active in this table at the moment. |
| 26:10 | Of course we're 900 RPM so we're directly interpolating between the two break points on our right hand axis. |
| 26:17 | So the idea here is what we want to do is actually make break point, target changes. |
| 26:21 | So let's just change our values here to 1000 RPM. |
| 26:25 | And you can see our cross hairs jumps up here. |
| 26:30 | We could go back to our previous logger or our previous graph, sorry our previous tab but we are actually able to monitor these channels live here on the right hand side. |
| 26:41 | So we can see now that with our 1000 RPM target we're actually sitting a little bit low. |
| 26:47 | We're actually closer to about 900 to 920 so what we can do to rectify that is we can add a little bit of duty cycle here. |
| 26:56 | We can see by adding 2% we've jumped up to 980, let's try another one. |
| 27:00 | Another 2, take that up to 17% and we're pretty much on our target again, plus or minus my 25 RPM hysteresis or 25 RPM range that I'm going to be happy with. |
| 27:17 | So that's the process there, what we're trying to do is basically tune each of these cells to get realistic values. |
| 27:24 | Let's just try jumping up again to our 1200 RPM site and we'll see what we've got here. |
| 27:29 | So we'll come up to 1200 RPM, pretty good there, by the time it settles, yeah we're sitting pretty much right on 1200 RPM. |
| 27:37 | So it's really easy to change the RPM targets. |
| 27:40 | A little bit more difficult to change the engine coolant temperature so to properly fill this out in three dimensions, probably going to take a couple of cracks at this, we will need to do this from a cold start. |
| 27:50 | While we are doing this as well, also worth just popping back and having a look and making sure that our fuelling in particular is still staying on target, it's actually pretty good because if we increase our idle speed dramatically away from where we've tuned we could find a situation where the air/fuel ratio becomes excessively rich or excessively lean and obviously that's going to, in itself influence our results so let's just bring our target idle speed down now to 800 RPM. |
| 28:19 | Drops down into this cell here and we can see probably a little bit high there. |
| 28:27 | Actually no not too bad. |
| 28:29 | Do need to be mindful here while we're doing this, the reason we just had a fluctuation there was the fan switched in and out so that's one of those electrical loads that's going to influence your tuning there so let's just bring our idle speed back to our original target of 900, we should be pretty well there or thereabouts which, yes we are. |
| 28:47 | So this is the first place to get started is making sure that this closed loop table is dialled in as accurately as we can. |
| 28:54 | The reason for this is that if our closed loop table is dialled in accurately, then what this is going to mean is that there's less work for the closed loop control strategy to do. |
| 29:05 | The less work our closed loop control strategy's got to do, again the better our idle speed is going to be. |
| 29:11 | And again this is exactly the same regardless of what system we're talking about. |
| 29:15 | If we're talking about boost control, the closer our base duty cycle table for our wastegate is to get us to our target, when we enable closed loop control, the less error there's going to be the less work that closed loop strategy's got to do and the better everything's going to work out. |
| 29:31 | Alright so that's the basis there of what we're trying to do. |
| 29:34 | Now as we've been talking here, and it's just happened again, we can see if we look at our idle speed, it's jumped up to about 1000 RPM there so this is an aspect of our fan so we can see here, we've got this parameter here for our coolant fan duty cycle correction. |
| 29:52 | So when that fan switches in, the moment it's increasing the drive by wire by 10% of our maximum operation so in other words 10% of 10% or 1%. |
| 30:03 | So that's probably a little bit dramatic because we're getting about a 1000 RPM flare so probably realistically what I want to do there is just change that down to something a little bit less, maybe around about 5%. |
| 30:15 | At the same time we also have the parameter here for our air conditioning idle increase value so in this case it's asking for an additional 200 RPM when our air conditioner cuts in. |
| 30:28 | Interesting process there, personally I think it makes more sense to ask for a duty cycle correction because when the air conditioning cuts in, it's actually applying more load to the engine because it's being driven off a belt so there will actually be a higher load on the engine which requires more duty cycle to get to the same idle speed but it's two ways of getting to the same effect so pretty well it's going to work but maybe not the most intuitive way of doing so. |
| 30:59 | Now a couple of other things we do need to consider here, we've gone a bit out of order but that's OK, you'll get the idea. |
| 31:05 | This parameter up here so we've got our idle on if TPS is below X, idle off if TPS is above X so what we want to do is make sure that we are only going into idle speed control when we actually want the idle speed control to be active so this is another area that can trip people up. |
| 31:24 | If you've actually got the idle speed control strategy trying to work, when you're actually trying to drive the car. |
| 31:30 | As you apply throttle and the RPM comes up, what's going to happen is that the idle speed circuitry or idle speed control strategy's going to be pulling down the duty cycle as far as it can and then generally when you put your foot on the clutch again and get off the throttle, it's going to then actually cause the engine to stall so that's a really common scenario that I see so we want to make sure that when we are trying to drive the car the idle speed control strategy isn't active. |
| 31:55 | So we've got this setup here that the idle speed is on if the TPS is below 1%, it's off if we're over that. |
| 32:02 | We can actually add a minimum manifold pressure value into that as well if you want but in this case I haven't got that. |
| 32:08 | We can also select here to increase our idle above a certain vehicle speed and increase the idle value. |
| 32:18 | I'm not doing this, we don't actually have a speed input set up on this particular application. |
| 32:23 | Moving down, we've got our ability to set a duty cycle, obviously in this case a drive by wire throttle opening that's going to be used during cranking. |
| 32:31 | What we want to do here is choose something that's going to help give a crisp quick startup. |
| 32:37 | It ca be beneficial here to use a little bit of additional air bypass to achieve this and then we've got our ability to have a minimum and maximum duty cycle for our idle speed control circuit. |
| 32:50 | This is useful if you've got more range than you need, probably more of an aspect we're going to have with a stepper motor or a idle solenoid and what you can do is clamp that range so it's only going to give you the range that you actually need to get good control and that's going to again help with our closed loop control strategy, once that's enabled, making sure that it's not going to end up way out of the ballpark. |
| 33:11 | Now if everything's tuned properly it shouldn't anyway but it's just one more aspect we have available there. |
| 33:16 | Alright so I think we've covered the main aspects here so we can see also our statuses of what's going on up here. |
| 33:24 | So we've got our idle control, we can see yes that is active, we've got our current target, we've got our current idle valve duty cycle so obviously idle valve duty cycle, at this point that's 80% of our maximum drive by wire throttle opening. |
| 33:38 | Important to monitor this and again just with the drive by wire, once we're setting this up, we're obviously going to start probably by just taking a broad guess at what the range is likely to need to be. |
| 33:49 | This might need a little bit of fine tuning once we come into this. |
| 33:52 | So if we're getting down to the point where we're down around 10% or less or we're getting up above 90% we're going to need to start looking at changing those values. |
| 34:02 | Here we can see what our closed loop control strategy is doing so obviously our PID duty cycle correction is disabled so that's sitting at zero. |
| 34:11 | We do however have our idle ignition control active so that's ticking away there and you can see at the moment it's pulling out 4, 4.5°, it's always moving around which is exactly what we want it to be doing. |
| 34:22 | So let's have a look at how that works. |
| 34:25 | So this here is our idle ignition correction. |
| 34:29 | Now if you are missing any of these tables or parameters when you're looking at your Ecumaster tuning software, you can bring any of these in just by using the relevant parameter table that you want here in the left hand side. |
| 34:43 | So pretty easy to double click and bring these in. |
| 34:45 | There are a few others as well that I haven't or won't really touch on here that you can bring in, we've got idle ignition versus coolant temperature, idle duty cycle versus our intake air temperature so lots of little additional tables we can use to manipulate the results to get as stable control as possible. |
| 35:06 | Looking at this table though we've got the axis for this table is our RPM error. |
| 35:12 | So this is the error between our target and our measured RPM so that's good because in earlier systems I see from some manufacturers, this was just a target based or a table based on the current idle RPM. |
| 35:25 | So didn't really work that well because of course we're going to have our idle target change as the engine warms up so having an error based just solely on what our RPM is doesn't work that well. |
| 35:37 | This bases our error on the target that we've got from this table so it really works quite nicely. |
| 35:44 | And what we can see here is the values, sorry actually highlighted the wrong thing there, this of course is that RPM error axis, the one that I highlighted is the one that I wanted to talk about which is our idle ignition timing. |
| 35:57 | So this is the values that are going to be added or subtracted from our base table values so these are not absolute values. |
| 36:04 | We can see that as our idle speed drops, as our error becomes positive and our idle speed is lower than target, we're adding a little bit of timing there, let's be a little bit mindful of how far we go here, there's no danger of making the engine knock or anything like that, but we're going to get to a point where it simply doesn't do anything. |
| 36:22 | So we've added 8° there on top of my 18° base value so that's going to get us hopefully on this engine pretty close to MBT. |
| 36:33 | Now on the other hand as we move to the right here and our idle speed goes above our target we can see that we're pretty aggressively pulling the idle speed down, the ignition timing down to reduce that idle speed. |
| 36:47 | Technically when I am setting up this reference table here, I would actually start with our idle ignition correction zeroed out as well because otherwise we still kind of passively have this working in the background influencing our idle speed so we really want to know that this table here is set up with no manipulation from the ECU as well. |
| 37:11 | Alright so at this point we've got to a position where we should be having really good stable idle speed control anyway, even without any closed loop control and now it's time that we can bring in our closed loop control strategy. |
| 37:25 | So we'll do that by clicking on enable PID control. |
| 37:30 | And that brings in our idle speed closed loop control and hopefully should keep us a little bit closer to our target. |
| 37:37 | So there's a few things we need to factor in here. |
| 37:40 | So first of all update interval, so how often is the system going to update? In this case 200 ms so every 0.2 of a second. |
| 37:48 | This is going to need to be chosen depending on your system because as I've mentioned already, there is a little bit of latency in an idle speed control system, 200 ms probably a little bit slower than it needs to be so let's bring that down to 100 ms. |
| 38:01 | What we're going to get into a situation here is if we are setting that idle update interval too tight we're not going to get enough time for the engine to actually respond to a change in our idle air bypass and actually show the effect of that before the ECU's going to look again go hey no it's still too slow, I'm going to add more air bypass, is it fast enough, no our idle speed's too slow and we get into this situation where we're going to set ourselves up with this oscillation where the ECU's chasing its tail so needs to be updated based on some realistic values for the system we are tuning and generally for idle speed control, it is relatively slow. |
| 38:40 | Then we've got our proportional, our integral and our derivative values so I'm actually just going to drop our proportional down here. |
| 38:49 | Going to have a bit of a discussion around these in just a moment so I'm going to leave these for the time being and we'll come back to them. |
| 38:56 | We've got the ability here to have a limit for our integral component. |
| 39:00 | So that integral component, I just said I'll talk about it in a moment but seeing as we've got to this I will mention this, the integral component looks at the error over time and either adds or reduces to our duty cycle to drive us towards our target. |
| 39:13 | The problem with this in some instances is we can get a situation which is called integral windup so if we get to a situation where the ECU can't actually get us to our target, what's going to happen if we don't have a limit is the integral component's going to continue to increase or decrease, it's not going to have any effect on our actual idle speed but then we get to a situation where all of a sudden we can get idle speed control again, that integral component's going to be so wound up in one direction or another, often it can result in stalling. |
| 39:40 | Good example of this would be if our idle strategy wasn't set up so that it was trying to operate, which I mentioned before, when we are actually trying to drive the car so we've got a little bit of throttle on, obviously our idle speed is going to be higher than our target so the proportional, integral, the PID control, that integral component's going to be constantly pulling duty cycle out, trying to get us back to our idle speed which is completely nonsense because we've got the throttle open, then when we close the throttle, the integral component's going to be wound towards the bottom limit, it's going to pull all that duty cycle down, almost certainly we're going to get a stall. |
| 40:12 | So the integral components, really useful but we do want to limit its effectiveness, in this case plus or minus 5%. |
| 40:20 | Likewise we can also control the minimum and maximum feedback from that PID control. |
| 40:25 | And again if you've got your open loop setup correct, we shouldn't need a lot of control here. |
| 40:31 | Plus or minus 10% should be absolutely fine and then we've also got our deadband RPM which is what I'm mentioned already. |
| 40:39 | What this means is that when we are within plus or minus 30 RPM of our target, the ECU is going to consider that to be on our target, it's not going to try and make any corrections. |
| 40:50 | And we can actually see right now, if we look first of all at what our idle RPM is doing, as I talk there the fan just kicks in. |
| 40:58 | Prior to that fan kicking in we were sitting within about 15 RPM of our target so it was really good and we could see that our PID correction there was sitting at zero, obviously now the fan's working so we've got a little bit more work. |
| 41:12 | So you can just watch what's happening there and how it's moving around. |
| 41:16 | Alright let's talk a little bit about these PID gains. |
| 41:19 | So most people don't understand these and I'm just going to explain them. |
| 41:24 | While I'm doing this I'll just mention that this is sort of getting towards the end of our webinar so it's a great time if you've got any questions on anything that we've talked about, please ask those in the chat, we'll jump into those in just a moment. |
| 41:35 | So these are the bits that confuse a lot of people, proportional, integral and derivative gains and not just in idle speed. |
| 41:42 | As I've already mentioned, this is used in a range of control strategies. |
| 41:44 | So we need to understand what these actually reference. |
| 41:47 | So our proportional gain first of all, this is a correction that is based on how far away from our target we are. |
| 41:57 | So the further our idle speed is away from our target, the larger the correction applied will be based on a proportional gain. |
| 42:04 | So you can sort of think of this factor here, the value 10 here as the gain so basically it will multiply out whatever our error is by our gain and that's going to give us the magnitude of the correction in terms of duty cycle that is applied. |
| 42:21 | So the larger our error, the quicker we want to drive ourselves towards our target. |
| 42:27 | However if we have a proportional gain that's too high, what we're going to do is find that the magnitude of correction applied is so large that what happens is then the idle speed's going to overshoot its target, it's going to go the other way. |
| 42:41 | Then we get away from our target again and basically the same thing happens, the proportional component reverses, pulls a whole lot of duty cycle out, our idle speed drops down and we get into the situation where we've got this ugly oscillation around our target point. |
| 42:53 | Again quite common to come across and that's we're going to get if our proportional component is too high. |
| 42:59 | Now to help us with this we've got the next component I'll talk about out of order which is our derivative. |
| 43:04 | So this is in relation to the rate of change of error. |
| 43:09 | So the higher our rate of change of error is, so the quicker we are moving towards our target, this is kind of like a clamping effect or a damping effect and it's going to help actually remove or slow down the rate of change so using just proportional gain, it limits how aggressive we can be with that control strategy before we get into that oscillation situation I just talked about. |
| 43:32 | However because the derivative's kind of like a braking or a damping effect, we can get away with using a high proportional for quicker response and then the derivative component's going to help stop that oscillation so that two kind of work hand in hand. |
| 43:46 | The integral component though is the last of them, as I've mentioned this works when there's an error over time. |
| 43:53 | The problem with just using proportional and derivative is the closer we get to our target, the less the error is so mathematically proportional and derivative gains alone will never actually get us to zero because as we get closer to our target, the magnitude of those corrections just becomes so small it has no effect. |
| 44:13 | So that leaves us with a small error, hopefully it's only going to be maybe 20 or 30 RPM and that's where our integral component comes in and that will do the work to drive us to that last little bit so that's the effect of them, the proportional component, really powerful when there's a big error but we want to use some derivative to give us a braking or damping effect so we don't overshoot and oscillate and then we're going to use the integral component to pick up the pieces there and just remove any remaining error. |
| 44:42 | The PID values from the default file from Ecumaster I've actually found to be a pretty good place to get started so if you do want more information around these we will have a webinar more specifically on PID control algorithms at a later point so I won't go into it too much deeper but one last aspect here I did promise, just before we get into our questions, a real world analogy of what these are because again even with what I've just explained, I know it can be a little bit hard getting your head around what these actually mean. |
| 45:15 | So this is an example that MoTeC use in some of their documentation, I just found it so easy to understand that I've reused it a few times since so I'll give credit to MoTeC. |
| 45:25 | Let's say we are on a straight piece of road in a car and what we want to do is get to a set of traffic lights that's in the distance. |
| 45:34 | So you can think of our gains, first of all our proportional gain, that's our throttle. |
| 45:38 | So if we apply a little bit of throttle, that's going to creep us up the road and we're going to get up to the traffic lights but it's going to be a pretty slow process if we don't use much throttle. |
| 45:48 | On the other hand if we use a lot of throttle, that's going to be the same as high proportional gain, that's going to really quickly get us towards our traffic lights but of course at this point we've got no brakes so what we're going to do is simply overshoot the traffic lights, we're then going to need to wait until the car comes to a stop, we're going to need to put it in reverse use the throttle and that's that oscillation I talked about, we're just going to be cycling backwards and forwards across that traffic light. |
| 46:12 | So if we then add derivative gain into the mix, this is the effect of now being able to use the brake pedal as well. |
| 46:19 | So we've got the ability to use the brakes, we can use quite a lot of throttle to get us up to the traffic lights but then as we come up to the traffic lights we're going to be able to apply the brake pedal and that's going to allow us to quickly get us to our target without that overshoot. |
| 46:33 | Now the integral's a little bit more complex to explain with that analogy but you could think of this as now putting that road on an incline and we're going to find that if we use the handbrake for example we can hold ourselves still on that incline without needing to use the throttle or the brake but hopefully that little analogy there gives you a better idea of what's actually happening inside that PID algorithm and at this point we will jump into our questions. |
| 47:13 | OK Lootenny has asked, I’m tuning my turbo Focus the stock computer and SCT zAdvantage, alright I'm going to stop right there, I will just mention that we are with these webinars maintaining a really strict focus on the platform that we're talking about so I'm not going to stray away from Ecumaster in this particular instance. |
| 47:36 | Next question comes from Jeepnrun who's asked, my stock tune for my Toyota has a oddly high idle RPM over 1500 RPM during very cold coolant temperatures. |
| 47:44 | Why such a difference from the normal 800-900 RPM and is this important to keep on custom tunes or can it be reduced? No that would be absolutely higher than necessary. |
| 47:55 | There's normally no need to have more than about a 200 to 300 RPM variation from our normal hot operating temperature to what we'd have at very cold temperatures so yeah you could absolutely reduce that and you should still be able to get really good idle speed control. |
| 48:12 | Bjorn's asked, I remember plugging between my EMU Black and my OEM ECU via plug and play adapter and playing with those idle parameters to mimic cold starts. |
| 48:20 | My end result was an OEM style cold start. |
| 48:23 | Yeah absolutely I mean that is ultimately the long term result we are trying to achieve. |
| 48:28 | Every tuner's a little bit different, I tend to be a little bit fussy about this stuff because in my opinion, it really does make such a difference and this comes from as well, running a tuning workshop where I really wanted to give the best results to my customers but also I don't really like cars coming back to me for repairs or fixes on a tune where something isn't quite right so I like to get it right the first time. |
| 48:50 | And these are those subtle little aspects particularly if you are tuning for customers it's going to make the difference between doing the job properly and maybe the person tuning in the next town over who doesn't really take as much pride in their work. |
| 49:03 | Suhas has asked, can you just brief out what's the difference between stepper motor idle control and E-Throttle? How does the E-Throttle differ from 20 year old stepper motor? I heard that there is delay in response in E throttle but I have seen superbikes idle or respond properly and for the ITB setup do you suggest traditional sensor or E-Throttle? OK a few questions in there. |
| 49:24 | First of all, any way is going to work, what we need to do is get more air into the engine to increase the idle speed and get less air into the engine to reduce the idle speed, it's that simple. |
| 49:36 | How we do this, really it doesn't matter. |
| 49:38 | Some of it's personal preference, some of it's what we've got available to us. |
| 49:42 | We do tend to see problems with some of the older idle stepper motors. |
| 49:49 | Mitsubishi were very very well known for problems with their stepper motors on the range of their engines, they stuck to the same stepper motor across a wide range, tended to get a little bit gummed up with carbon and crud and generally didn't give the most reliable results. |
| 50:05 | So other than that I mean if you've got one that's operating properly, they just work, there's nothing really wrong with it, I wouldn't say one option is necessarily better or worse than another. |
| 50:15 | If you're retrofitting idle speed control, stepper is probably a little bit more clunky to fit. |
| 50:22 | Generally for the likes of Mitsubishi there it is built into the throttle body so it just makes sense to use this. |
| 50:27 | E throttle through, there is no delay, this is kind of the E throttle or drive by wire myth, it is just simply not relevant. |
| 50:35 | Some of the older systems, there was some lag or latency built into the system but this was actually more a case of the control strategy as opposed to the mechanical abilities of the throttle so no the drive by wire is absolutely valid and it's certainly, if possible, something I've got access to, it is 100% what I'd be using for idle speed control. |
| 50:59 | For ITBs, this is a little bit trickier though, would you use a traditional stepper motor or idle speed control motor or an E throttle? Here E throttle probably is a little bit simpler. |
| 51:09 | The reason for this is if you are going to use an air bypass, then you're going to actually need to bypass air into each of the individual throttle bodies so you're going to need some kind of balance tube. |
| 51:20 | The other aspect here that gets a little tricky is that because on a ITB setup, you're probably going to be running it Alpha N where throttle position is the load axis, this relies on a constant relationship or a fixed relationship between airflow through the throttle bodies into the engine and the throttle position versus RPM. |
| 51:41 | Of course if you are bypassing air around the throttle plates that's not going to be relevant so you're going to need another way of richening the air/fuel ratio when you add that air bypass so few considerations there, trying to not get off track here. |
| 51:54 | Answer to that is E throttle directly actuating the throttle bodies, it's a nice simple solution and it's going to give you rock solid stable idle control. |
| 52:02 | Bjorn's asked, went on the EMU Software on my cousin's EVO 7 running on an EMU Classic and went through the idle target RPM table, idle reference table and also the idle RPM reference table. |
| 52:18 | This one was due to the RPM holding for a few seconds. |
| 52:21 | The real question is though, though the two idle tables parameters were changed, it didn't alter the idle at all, why could this be? Could it be that the tune was ignition based? OK difficult to answer here, it could be that you still had your closed loop enabled and it was basically undoing your results. |
| 52:40 | Basically it could also be a result of a idle stepper, I've just talked about the problems with some of the Evo stepper motors or Mitsubishi stepper motors, could be a idle stepper that wasn't functioning so the test for this is basically to disable the idle control and physically move the idle stepper position in those tables. |
| 53:02 | Make sure that it's actually responding and showing a change in RPM. |
| 53:06 | If it's not doing that then there's something mechanically wrong or wiring wrong with your system. |
| 53:13 | Jeremy's asked, what's the best way to stabilize the idle speed? I'm hoping that this webinar has given you all of the information that you need. |
| 53:22 | But you're going to want the correct air bypass, the correct closed loop control, then ultimately really the quickest way of course is using that idle ignition control. |
| 53:36 | Trials2Bmx has asked, can you do idle control with only drive by wire throttle and timing? Yes absolutely. |
| 53:43 | Turbo has asked, first time tuner, I am attempting to tune the idle on my propane powered honda d16 using vapour injection. |
| 53:51 | The engine likes about 19 degrees advance to idle but idles at 1400. |
| 53:56 | If I try to reduce the idle with timing anything less than 18 degrees the idle becomes unstable. |
| 54:00 | However I do go really extreme and idle at -30 degrees, the ECU idles at 900 RPM and doesn't skip a beat. |
| 54:06 | I don't think using that amount of retard to reach target idle is right. |
| 54:09 | Is this telling me something, any advice? OK I can't speak to this one from personal experience simply because I do not have any experience using propane. |
| 54:21 | Different fuels will require different amounts of ignition timing to achieve MBT which is probably what your engine is trying to tell you. |
| 54:30 | You may find that MBT is much more advanced on that fuel than what we've talked about during today's webinar. |
| 54:37 | I definitely would not suggest idling at 30° after TDC, while yes this may stabilise your idle speed, you're going to end up with massive amount of exhaust gas temperature being produced and probably your exhaust manifold is going to end up glowing red hot so probably not what I'd suggest. |
| 54:57 | More than that unfortunately I probably can't give you too much guidance inside of this webinar I am sorry. |
| 55:03 | Alright we're going to leave it there for today, thanks to everyone who has joined us, thanks for all of those questions, if you are watching this in our webinar archive at a later point, if you've got any more questions, please feel free to ask those in the forum and I'll be happy to answer them there. |
| 55:17 | Thanks for joining us and I look forward to seeing you next time. |
| 55:21 | Now for those who are watching on our YouTube channel today, this is just some insight into what we put on for our HPA members every couple of weeks. |
| 55:29 | If you are interested in learning more and becoming an HPA gold member, this gives you the ability to rewatch these webinars in our archive where we've currently got over 250 hours of existing content, as well as get access to our private member's only forum, you can purchase gold membership for just $19 USD a month. |
| 55:46 | However you will also get 3 months free gold membership with the purchase of any of our courses and you can find all of our courses over at hpacademy.com/courses. |
| 55:57 | Alright thanks again and hopefully we can see you online again soon, cheers. |
Timestamps
0:00 - Intro
2:20 - Why do we need idle speed control?
3:40 - Options for controlling it
7:10 - No option really better than the other
7:45 - What are we trying to achieve?
8:05 - Tuning considerations
17:55 - Software features walkthrough
22:40 - Tuning process
41:15 - PID discussion
47:10 - Questions


