263 | Idle Speed Control - Adaptronic
Summary
Solid and stable idle control is one of those aspects of a tune that makes a real difference to the drivability of a car. It is however an aspect that is often overlooked or incorrectly tuned, leading to unstable idle and stalling. In this webinar we’ll discuss what you need to know to get a rock solid idle, what hardware is required, and how to approach the tuning on the Adaptronic Modular ECU.
| 00:00 | - Hey team, it's Andre from High Performance Academy, welcome along to another one of our webinars and in this webinar we're going to be discussing the idle speed control configuration and tuning on the Adaptronic Modular series of ECUs. |
| 00:14 | Today we are using our FD RX7 for the demonstration but essentially everything you're going to learn here is going to be applicable irrespective of what you've got your Adaptronic Modular connected to. |
| 00:28 | As usual we're going to have questions an answers at the end of the lesson so if there is anything that you'd like me to go over in a bit more detail, then please ask those questions in the chat and we'll get into those at the end. |
| 00:39 | We'll start at the very start which is why do we need idle speed control? And the reality here is it does depend on your application. |
| 00:47 | There are a lot of dedicated racecars, both circuit or drag where simplicity is key and we don't really strictly need idle speed control, basically once the car's off the trailer and warmed up, that's going to be it and sometimes less is more. |
| 01:05 | Less things to potentially go wrong and particularly a lot of the OE idle speed stepper motors can be prone to failure. |
| 01:14 | I know the Mitsubishi 4G63 stepper motors are a little bit hit and miss with their reliability so yeah for a dedicated competition car, not that necessarily your idle speed control's likely to be the cause of a DNF, anything we can do to simplify systems, sometimes at the expense of drivability, can be worthwhile. |
| 01:34 | Flipside of that though for me personally, if I'm tuning a street driven car, I really want to replicate the sort of drivability that we get in a factory car straight off the showroom floor so idle speed, it's just like cold start performance for me, I really want to be able to reach in through the door, regardless of the temperature, regardless whether the engine's hot, cold or indifferent and I want to be able to start the engine and have it idle with out me needing to touch the throttle. |
| 02:01 | That's one of those things that for me, kind of indicates that the tuner's actually taken their time, done a good job and if you are tuning for customers, you're likely to end up getting a better reputation as a result and as an added bonus you're probably not going to have as many cars coming back to you to sort out niggly little problems like this. |
| 02:19 | Alright so that covers what it does or why we may want it but let's go a little bit deeper and see why we actually need the idle speed control system in the first place. |
| 02:29 | Basically the idle speed control system is a way of bypassing additional air or varying the amount of airflow into the engine under idle conditions to maintain a consistent idle speed. |
| 02:42 | Now if we don't do this, what we're going to find is that at cold start for example, the engine with no idle speed control is going to idle very very low or potentially stall. |
| 02:54 | Alternatively we may find that when things like our thermofans kick in, our air conditioning kicks in, or we use power steering, that also may result in the idle speed dipping and the engine stalling so as the operating conditions for the engine change, so does the amount of air bypass required in order to get the engine to idle consistently. |
| 03:18 | On top of this we also need to understand the different ways we can get additional air into the engine. |
| 03:24 | One, obviously nothing at all, just don't worry about it and we'll set our idle speed with a idle stop screw or something of that nature, no electronic intervention at all. |
| 03:34 | I've already discussed the pros and cons of that. |
| 03:35 | The next one would be exactly the same but with the addition of idle ignition control. |
| 03:41 | And while today's task is talking about idle speed control, we will cover idle ignition control as well and I've actually found in the past for the handful of racecars that I've tuned with no idle speed stepper or solenoid and just using a fixed bypass, idle ignition control can actually get you a pretty good result. |
| 04:02 | So how this works, the premise is that as we increase the ignition timing towards MBT, the engine makes more torque which means that at idle the idle speed will pick up. |
| 04:14 | Conversely if we retard the timing further away from MBT, the torque will drop and the idle speed will be reduced. |
| 04:20 | So if we purposefully set an idle speed that at a hot running temperature for our engine is probably just a touch higher than we really want, let's say we're targeting 1000 RPM hot idle. |
| 04:31 | If we set that idle speed at 1100 to 1200 and then we use our idle ignition control to retard the timing back to maybe a few before TDC, that'll pull our idle speed probably back to about where we actually want it but then it'll give it the advantage of during a cold start where we really need more air bypass, we've got a little bit more and by using advanced ignition timing close to the MBT, that can be enough, it's probably still going to idle a little bit low but it might not actually need to be nursed by the driver using the throttle for the first few minutes while it warms up. |
| 05:06 | So those are the 2 non idle speed control methods of idle speed control but we're getting into the actual techniques we're going to talk about today now which is an air bypass around the throttle butterfly. |
| 05:17 | This would be usually either a stepper motor or an idle solenoid. |
| 05:22 | Basically there are differences in how the 2 operate but for all intents and purposes, a variable air bypass that's going to get more or less air past the butterfly and into the engine, quite often with an OE throttle body that system will be integrated directly in the throttle body. |
| 05:39 | Alternatively sometimes there will actually be an external bypass around the throttle butterfly from the intercooler plumbing or the intake pre throttle, back into your intake manifold itself. |
| 05:50 | The last option, which is what we're using today is drive by wire which is where the air bypass is directly controlled with our throttle butterfly operation. |
| 06:00 | For me this is quite a neat solution considering I probably tune more cars now with drive by wire than without, means we don't need any additional hardware, when set up correctly it also works really really well. |
| 06:12 | Now we also just need to talk briefly here before we get into some demonstrations, on the differences between open loop and closed loop. |
| 06:21 | I take it for granted that most people understand this but it is a simple term that I know a lot of people still don't actually have comprehension on. |
| 06:29 | So open loop, this is the 2 different modes we all use for idle speed control, open loop means that the ECU is going to output the same result or same output to whatever's controlling the idle speed, irrespective of the actual idle speed. |
| 06:42 | So regardless whether we're targeting 1000 RPM and our idle speed's actually 1200 RPM, or it's 800 RPM, the ECU's going to do nothing to try and correct that error, so that's open loop. |
| 06:54 | On the other hand, closed loop which is what we really want to set up here, is where the ECU is monitoring the idle speed, it's comparing that to the target and then it's got a feedback PID control algorithm that can then modify the signal being output to whatever's driving the air bypass in order to try and drive it towards our target. |
| 07:12 | That works really well when it's set up correctly but it does require you to understand a little bit about PID control. |
| 07:20 | Probably the other thing that I'll mention here that is so often overlooked and again this should go without saying but I'll say it anyway, before we try getting into the intricacies of idle speed control tuning, it's really important to make sure that you've done your job properly and the basics of your control strategy are already dialled in. |
| 07:39 | So what I mean by this is we need our fuel and our ignition tables dialled in. |
| 07:45 | So let's just head across to Eugene for a moment, the tuning sofware. |
| 07:49 | I've probably talked enough for the moment. |
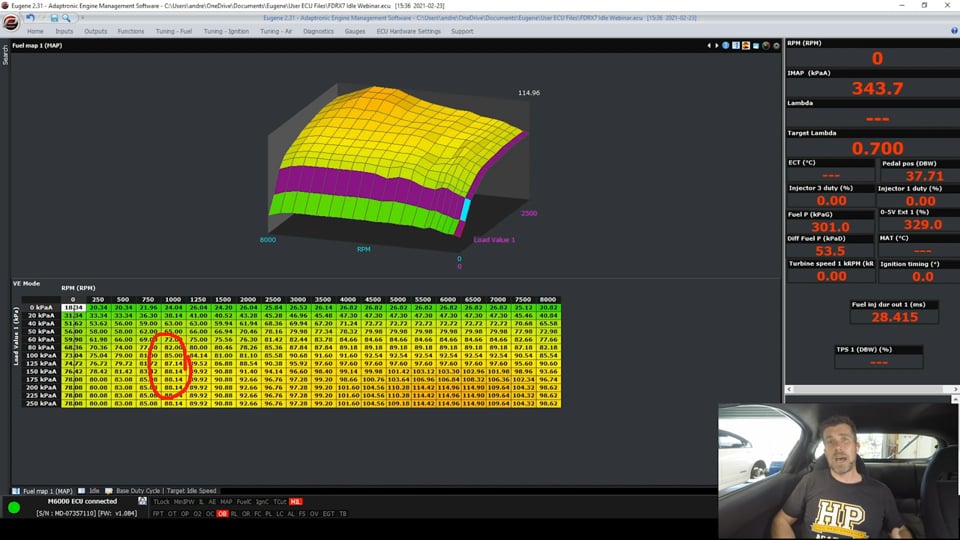
| 07:51 | So what we'll do is we'll first of all come across to our main VE map. |
| 07:55 | So particularly what I see a lot of trouble with is people when their engines are coming back down to idle, so I'm probably going to be in this area here, and the engine will tend to stall as it comes back down to idle. |
| 08:08 | And quite often that will actually be as a result of areas around here at high load and low RPM being either too lean or even excessively too rich. |
| 08:19 | So that can cause issues. |
| 08:21 | If we are dropping from maybe higher RPM, so maybe we're operating out here and we step off the throttle or clutch in, what we're going to find is that first of all the manifold vacuum's going to drop down quite low and then of course the RPM's going to trail back like this so again these overrun areas of our map are really critical, making sure that these are correct. |
| 08:42 | Some of these can be quite tricky to dial in accurately on the dyno as well but it is really important to have all of those mapped accurately before we really start trying to fix idle speed control problems with the idle speed control system. |
| 08:57 | Likewise if we head across to our main ignition map, probably a little bit less to worry about here but again we just want to make sure that in these areas we've got nice smooth transitions in our ignition table, don't have any massive holes that could end up tripping us up or causing us problems so it's just getting those basics correct before we worry about trying to fix the problems that we've created elsewhere with our idle speed control system. |
| 09:26 | Right so the premise here is that first of all we need to set up our idle control circuits or idle control system and how that's going to actually operate. |
| 09:37 | So to get to this, we can come up here to our tuning - air tab, there's a lot of options here, I'm actually going to go out of order for a moment and just deal with one function here that is peculiar to our drive by wire throttle. |
| 09:53 | So if we come across to E throttle, we'll see one parameter here that is relevant to our idle speed control, and this is an important one if you are using drive by wire throttle control for idle speed control. |
| 10:05 | You've got this function here, this parameter called idle authority which you can see we've got set there to 6%. |
| 10:13 | Basically this sets the spanning for the duty cycle numbers that we'll be using for the rest of our idle tuning. |
| 10:20 | So basically we're going to have an idle speed control duty cycle that will vary between 0 and 100%. |
| 10:26 | 6% throttle opening will be achieved when we're at 100% duty cycle on that so that's really important to understand. |
| 10:34 | What we want to do is choose this number so that when the engine is cold and we need maximum air bypass, we're not tapping into that, we don't want to be constantly hitting that 6% maximum. |
| 10:46 | Likewise if we set a number that's too high, maybe we set that at 20%, what it's going to do is adversely affect the resolution that we have for our idle speed control. |
| 10:56 | And by resolution what I mean is that if we make a change of 1% duty cycle, it's going to be a larger step in our throttle position opening compared to if the maximum idle authority was set to 6 or even 10%. |
| 11:10 | So yeah just basically making sure that when the engine is cold started, we are sitting somewhere below that maximum idle authority value, otherwise we can just bump that up. |
| 11:22 | Important to also understand though if we bump that up once we've tuned our base idle speed control duty cycle tables, that's going to affect the entire table so we really want to get this right at the start. |
| 11:33 | The good news is that when we go about setting our idle control we're going to generally do this from a cold start and this allows us to sort of see that worst case scenario where we're going to need maximum idle opening. |
| 11:46 | So enough talking about that, let's head back to our tuning - air and we'll come across to our idle settings and talk about a few of these. |
| 11:53 | So we can set a minimum duty cycle if desired. |
| 11:59 | I'm not 100% sure why Adaptronic have chosen to include this as a feature. |
| 12:04 | I don't see a need for this too often but you can set this if you want. |
| 12:09 | If you're going to use this, it could be beneficial in helping prevent the idle speed control dipping unnecessarily but there are ways around that, I'm going to talk about that in a few moments. |
| 12:21 | So whether or not you choose to use that, it is up to you. |
| 12:24 | I've got that set to zero. |
| 12:26 | We also have a tick box here that allows you if you need to or want to to close the idle valve on boost. |
| 12:33 | Again this is going to come down to the particular installation that you're dealing with there. |
| 12:39 | In most instances I would say that's probably not necessary. |
| 12:42 | We've got a couple of tables here, we've got a table here which I'm going to deal with a little bit later which is our post crank idle table but we're going to start with our base duty cycle and target idle speed. |
| 12:55 | So we'll click on that. |
| 12:57 | And this is the first place we really want to get started and we actually really want to be starting with our target idle speed table. |
| 13:04 | The key point here is choosing a sensible idle speed that our engine can actually achieve. |
| 13:12 | This is something I see a lot of tuners get wrong and I've actually made this mistake myself in the past. |
| 13:18 | Basically trying to force an engine to idle at an idle speed that it's not comfortable with. |
| 13:23 | Now if you've got a largely stock engine then understandably choosing the stock idle speed targets would be a pretty good place to start. |
| 13:30 | Where things do get a little bit more complex though is when we start making pretty significant changes to the engine that will affect its volumetric efficiency. |
| 13:37 | Case in point would be fitting a really large aggressive cam profile that uses a lot of overlap and a lot of duration. |
| 13:45 | What that's going to do is require us to bump up our idle speed targets, otherwise the engine's really not going to be that happy running. |
| 13:53 | I've got exactly this scenario off to my right out of camera shot we've currently got our VE SS Commodore on the dyno. |
| 14:00 | I'm in the middle of tuning a worked example for a course. |
| 14:05 | We've gone from a stock cam to a very aggressive cam, about 290° duration and the stock idle speed on the L98 or LS2 is 550 RPM. |
| 14:15 | We've needed to bump that up to 850 RPM to get the engine to idle smoothly. |
| 14:20 | So this is something that is really easy to overlook if you don't have experience with cam upgrades. |
| 14:25 | And it can drive you crazy because you just won't be able to get the engine to idle at a smooth and consistent idle and you're going to have problems with stalling as well so choose a sensible idle speed for a start. |
| 14:38 | We can also see that this is a 2D table, we've got the ability here, up to 20°C, I'm targeting 1300 RPM and then we've got just a smooth linear interpolation down to 1000 RPM by the time we get to 70°C. |
| 14:55 | Typically you're going to find that most engines will want to idle a little bit higher when they're cold, the engine doesn't operate that nicely when it's cold, particularly the fuel delivery, we need additional fuel as well because the fuel is going to be pooling out on the cold, condensing out on the cold port walls and the intake valves so yeah little bit more idle speed and a little bit more fuel is generally needed at a cold start. |
| 15:20 | Then we come up to our base duty cycle table here. |
| 15:24 | So actually in this instance we can see that we've got values here up to 20°C of 100% duty cycle. |
| 15:33 | Now if that was the actual case, this is kind of always a work in progress this particular car so don't even know from one moment to the next exactly what state of tune I'm going to find it in when I do present a webinar but if we're seeing numbers like this, 100% duty cycle and we're still struggling to meet our 1300 RPM idle speed, then this is the perfect situation where we would want to increase that idle authority duty cycle, sorry the idle authority that we just looked at under our e throttle, bump that up by another percent or thereabouts to make sure that we are tapping into this maximum value there of 100%. |
| 16:10 | But we can see the general trend here is that as the engine coolant temperature increases, that drops down and by the time we're up at 80°, our normal operating temperature, we're down to about 30%. |
| 16:23 | So this would be pretty typical and obviously while today we are talking about the drive by wire system, really once we've got the hardware configured, regardless whether it's drive by wire, it's a stepper motor or it's a idle speed control solenoid. |
| 16:39 | The premise, the process we go through of tuning these tables is exactly the same so not a lot different there. |
| 16:46 | Now we also have, if we come back to our tuning - air, we do also have under our idle settings, we do have some other options here for idle up. |
| 16:58 | So let's just head, we'll find that over here. |
| 17:02 | We've got our idle up and click on that. |
| 17:07 | So we've got the ability here to idle the engine up or increase the idle set point for aspects such as electrical load. |
| 17:15 | So we've got the ability to define 2 electrical loads here. |
| 17:18 | We could use a digital input here for the likes of our air conditioner or our power steering. |
| 17:25 | We've actually got a separate one for power steering and air conditioning but we can bring in additional loads here and step up our idle speed targets as required. |
| 17:32 | Here we do have our power steer so a lot of power steering pumps, will have a idle step up switch on them. |
| 17:40 | If we wire this up to the ECU we can make use of this. |
| 17:44 | This one here for our air conditioning, exactly the same deal generally, we're going to have an output from our aircon request that will go to the ECU that can then request a step up in our idle speed. |
| 17:56 | So with all of these we'll generally want to step up the idle speed a little bit, maybe 50 to 100 RPM and that may also require a little bit more duty cycle to achieve that. |
| 18:06 | So for example here, if we look at our aircon, we can see that the extra effort for aircon, we're going to step up our idle speed duty cycle by 9% so we can just tweak those numbers once everything else is dialled in to make sure that as the aircon switches in and out or our thermofans switch in and out which we've got down here, that basically the idle speed is not dipping unnecessarily and it's going to stay as stable as we can. |
| 18:35 | Basically the idea here is we want to have everything as stable as we can in open loop mode before we enable closed loop control. |
| 18:43 | This way we're going to give the closed loop control strategy as little work to do as possible. |
| 18:49 | Basically the easier we can make life for the closed loop control strategy, the better job it's going to be able to do of maintaining our idle speed. |
| 18:58 | We do also have a tab here, we aren't using a stepper here but we do have some parameters here for our stepper setup which will be specific to the stepper motor you are using and Adaptronic can give you some information that will be relevant to the particular stepper motor setup you are using. |
| 19:17 | There are also base maps that are available for a lot of the common engines that use stepper motors which you can use as a reference there. |
| 19:25 | Righto so we'll back up to our base idle, we've looked at our base duty, we've looked at our base idle speed, the other one we want to quickly look at here is our post crank idle. |
| 19:38 | So we'll click on that and bring that up. |
| 19:41 | So this allows us to use a little bit more duty cycle to our idle speed control circuit, whatever that may be, during the initial startup. |
| 19:49 | So once the engine has started. |
| 19:51 | So we've got 2 axes here, on the horizontal axis we've got time since the engine has started and then on the vertical axis we've got our engine coolant temperature. |
| 20:00 | So what you can see here is that basically for about the first 10 seconds of operation, I've got a little bit of additional duty cycle going in here, we can see that it holds, in this case at 80°C for an example, it holds at 30% additional for 1 second then steps down quite quickly to 10% and then to 3%. |
| 20:20 | Important to help us get the engine to idle once we initially start it but we do want to be a little bit mindful that we don't have numbers out here at 40, 50, 60 seconds of operation because otherwise that could end up playing havoc with the rest of your idle tuning. |
| 20:39 | Right so a couple of things we do also need to talk about with the idle speed control system is when we don't want the engine to go into idle speed control. |
| 20:49 | So what we'll do is we'll just come across to our closed loop control and at the moment we've got this little flag ticked here for enable closed loop. |
| 20:59 | I'll talk about that in a moment but the parameter that we've got here that's useful is neutral timeout. |
| 21:05 | So provided you've got an input on your ECU that's going to be useful for this, it'll be a clutch switch potentially or a neutral switch, either will do the job. |
| 21:14 | You can hook one of those up to a input on the Adaptroinic ECU and define it as a clutch/neutral switch and basically what that does is it helps the closed loop control system do a better job. |
| 21:27 | So the situation we may have, that happens quite often is if you're driving your car up to a set of traffic lights and maybe you're in first gear, you're at 2000 or 3000 RPM and you're coasting up to the set of traffic lights with your foot completely off the throttle. |
| 21:43 | Now at this stage the idle speed circuit, purely looking at idle speed, sees the RPM at 2000 RPM for example, well above our target of maybe 1000 RPM so what it's going to do is try and close the idle speed control circuit, the stepper or the solenoid in the drive by wire in order to get us down to that RPM. |
| 22:02 | Of course what the ECU doesn't realise is that the reason that the idle RPM is so high is because we're coasting and the wheels turning through the gearbox are actually driving the engine speed. |
| 22:14 | So the problem is that what it'll do over time is it'll step the duty cycle own to a point where it reaches 0 or our minimum set point and then when we get on the clutch, clutch in because we've come up to our traffic light, what's going to happen is immediately the engine's going to stall or at very best it's going to dip down to a very low RPM and then slowly recover over time. |
| 22:33 | So we don't want that situation happening so that's where our neutral timeout parameter comes in so basically we can define a time there after the neutral switch has become active or the clutch switch has become active before the ECU will go into closed loop control so in this case, 3 seconds just gives the RPM a chance to stabilise before the ECU's going to try and intervene and actually set that up so quite important there to make sure that we've got that set sensibly. |
| 23:06 | If you do have that idle or clutch switch, really worthwhile coming into and getting involved with that, making sure it's wired. |
| 23:14 | The next aspect here we've got is our proportional our integral and our derivative gains. |
| 23:21 | So PID control algorithm is basically the backbone of most closed loop control strategies. |
| 23:28 | This is a system that is not just found in our automotive systems, it's basically across all sorts of industry. |
| 23:36 | So the 3 gains there, this isn't going to be a lesson on PID control, we're going to do another one of those for our members at some point in the near future but the proportional element of this is an effect that is proportional to the size of the error. |
| 23:51 | So basically the larger the error between our target idle speed and our current engine speed, the more effect, the more the system will be driven towards fixing that error. |
| 24:03 | The problem with proportional gain on its own is that first of all, we're not going to be able to get to our idle speed target purely with proportional gain. |
| 24:11 | The reason for this is that as the idle speed gets closer to our target, the error becomes smaller, so the effect of our proportional gain becomes less relevant or less powerful, basically the smaller the error, the less proportional gain a component we've got working in our favour. |
| 24:28 | The next element, I'll move out of order here, I'll cover the differential gain because the proportional and derivative kind of work together. |
| 24:37 | The derivative gain is relative to the rate of change of error. |
| 24:41 | So if our RPM is coming up towards our target very quickly, the derivative gain has a braking effect or a damping effect there to stop it overshooting and oscillating. |
| 24:50 | And this is one of the biggest problems we see with poorly tuned PID control algorithms is that if we use too much proportional gain, we're going to end up with fast response to an error but a system that's unstable and our idle speed's going to be constantly oscillating or hunting. |
| 25:08 | So we use derivative gain in conjunction with our proportional gain to try and get, first of all good quick response which we'll get from using a lot of proportional gain. |
| 25:16 | But the derivative gain there is a braking effect to stop us from overshooting and oscillating so the 2 work hand in hand there. |
| 25:24 | The third element though is our integral gain and I've dealt with this out of order because as I've mentioned, proportional and derivative kind of work hand in hand. |
| 25:34 | Both of those 2 elements though on their own as I've mentioned, they can't get us right onto our idle speed target because as the error is reduced, so is the power of those elements. |
| 25:45 | The integral gain is our last gain and this works over time to basically pick up the pieces so this is a slower moving gain and basically it will remove that error that is still present over time. |
| 25:58 | Adaptronic do in a lot of their base maps give you some starting values here for a lot of common engines which is a pretty good place to start. |
| 26:06 | You can generally get a pretty good sense of what range of numbers you can work with. |
| 26:11 | What I generally recommend is increasing the gains to a point where the system becomes unstable and does start oscillating. |
| 26:19 | Once you've got that situation occurring, then you can back off those gains a little bit until you get good fast response without that oscillation. |
| 26:29 | Right the other element that goes hand in hand with this as I've already mentioned here is the idle ignition timing trim. |
| 26:36 | So if we click on that table here, this gives us the ability to trim our ignition timing based on the error in our idle speed. |
| 26:45 | So this is really a really powerful way of working in conjunction with our base closed loop idle speed control system to help improve the response because the idle ignition control happens very very fast so what we've got here is our 2D table. |
| 27:01 | The top axis is idle RPM error so the other nice aspect here is this is basically relative to our idle speed target. |
| 27:12 | So it's not a specific number, as our idle speed target changes, the error is still going to be relevant to that new error so when we've got an error of 0, obviously we are right on our target. |
| 27:26 | And what we can see here is that as we move to the left here and our error becomes negative, this means that our idle speed is below our target and we can see that what we're doing here is trimming positive values into our ignition timing, we're adding timing, getting us closed hopefully to MBT. |
| 27:43 | On the other hand as we move to the right of this table, the error numbers become positive, this means that we have become, we are above our target idle speed, so what we're doing there is we are retarding the timing. |
| 27:57 | Now this does need to be treated with a little bit of care. |
| 28:00 | First of all, what we need to understand is that for this to work we need our base idle ignition timing to be somewhere retarded from MBT so that we can both advance or retard the timing in order to get this effect. |
| 28:16 | If we were idling right on MBT, we'd have the ability to retard the timing and reduce torque but if we advance the timing, we're not going to increase the torque so we won't see that increase in our idle speed so that's one factor that we do need to consider. |
| 28:30 | For a piston engine, I'd probably be selecting a base ignition timing of somewhere around about 15 to 16°, that's probably going to be a pretty good place to start. |
| 28:42 | We'll be able to retard the timing back from that and we'll also be able to advance the timing, depending on the engine design, MBT may be somewhere in the low to mid 20s. |
| 28:51 | That gives us a reasonable amount of power. |
| 28:53 | The other aspect is just to monitor what our actual overall ignition timing is doing at idle. |
| 28:59 | Because what we can end up with a situation is where we're using way too much idle speed air bypass which is resulting in naturally too high of an idle speed and then we're relying on our idle ignition control to pull that back which results in us often idling with our ignition timing very retarded. |
| 29:16 | If we do this over an extended period of time, we can end up creating a lot of heat in the exhaust manifold and the engine bay so generally I don't like to idle for sustained periods of time with a piston engine, much more than about 5° before top dead centre so if you're doing that then I would be readdressing the rest of the idle speed control parameters to get us back to that situation where we are pretty close to maybe 15, 16° under most instances and then we're just relying on the idle ignition control to bring us back if we vary away from our idle target. |
| 29:50 | Rotaries, a little bit different because we generally idle with a much more retarded ignition timing but the same premise does still carry over. |
| 29:59 | Alright so that's basically covered everything we need to understand but we also need to go over the tuning strategy. |
| 30:09 | I'm going to do into this and then we'll go into our questions and answers which is a good time to remind you if you've got any questions on any of this, please start asking those now. |
| 30:20 | So how do we go about tuning our idle control in general? So what we're going to do is we'll come back to our idle settings. |
| 30:29 | The best place to start in my opinion is to actually start by disabling our closed loop control and while I'm doing this we'll just get ourselves up and running here. |
| 30:39 | Probably going to need to get that window up so we can hear. |
| 30:43 | So what we want to do, at the moment we've got our closed loop disabled and we've got our parameters being displayed here. |
| 30:50 | So we can see basically everything we need to understand basically in this table here. |
| 30:54 | We've got our current idle speed and we've got our target idle speed. |
| 30:57 | So we can see that our idle speed at the moment is a little bit low. |
| 31:00 | If we come over here, we'll be able to see our engine coolant temperature, also a little bit low at the moment. |
| 31:06 | So we're still warming up but what we want to do is basically make sure that we're as close to our target with our base duty cycle as we can. |
| 31:15 | So if we come across here to our base duty cycle, we can see, it's just in the middle here, there's a blue line that will show us where abouts we are in this table. |
| 31:24 | And what we want to do is go through here and basically we can increase our values here as we require or decrease until we're close to our target idle speed which at the moment was about 1000 RPM. |
| 31:35 | So generally what we'll do is we'll do this from cold start and we want to make sure that at each of these cells, our idle speed control is pretty solid, we want it within probably +/- about 25 RPM of our target before we instigate any closed loop control. |
| 31:52 | And again, getting this right just is going to make sure that our closed loop control system doesn't have too much work to do. |
| 32:01 | The less work we give it the better a job it can do. |
| 32:03 | Now another aspect, just to kind of reiterate what I was talking about. |
| 32:07 | This engine is currently pretty heat soaked because I was running it before this webinar began. |
| 32:13 | We can see here our target lambda at idle, 0.918, rotaries also like to run a bit richer than piston engines. |
| 32:20 | At the moment we are actually running quite lean at about 0.97. |
| 32:25 | That in itself is going to affect the quality of the idle speed. |
| 32:29 | So basically what I'm getting at here is if we allow this heat soak to dissipate and we can see that gradually that air/fuel ratio is starting to actually track down towards our target. |
| 32:39 | What we'll generally find is that if we're quite lean, that will result in a low idle speed and we're going to need to use excessive duty cycle to get to our idle speed. |
| 32:48 | So again just to reiterate the point that getting our base fuel table, base ignition table on the money before we start trying to optimise our idle speed control, that's really really important. |
| 33:02 | So once we've got our, we probably also, just to reiterate, want to start by making sure that our idle speed targets are sensible as I explained. |
| 33:12 | We're then going to set that base position in open loop. |
| 33:15 | Once we've done that we can then come back and we can set our closed loop or enable our closed loop control. |
| 33:23 | So we'll go ahead and do that. |
| 33:25 | When we enable our closed loop control, that gives us access to our other parameters here and what we can do then is see what's actually happening. |
| 33:33 | So first of all, we've got our closed loop is active, it shows those flags there and we can see now what's actually happening in terms of our idle effort. |
| 33:42 | So this particular parameter that I've just circled here, idle effort closed loop is what the idle control strategy is currently doing. |
| 33:52 | So it's actually adding at the moment, I've purposefully got these tuned a little bit out of whack so that we've got a little bit of work for the ECU to do. |
| 33:58 | So we can see that this parameter here, this is the idle effort in open loop so that's the number from our base duty cycle table that we just looked at, 30%. |
| 34:07 | That's resulting in an idle speed that in itself is too low so then the ECU is adding in this case 20% to that and the final duty cycle that's been given out to our drive by wire throttle is in this case 53% so if we look at this, our actual throttle position at the moment, sitting about 3.5% so that kind of stacks up with remembering our maximum idle authority was 6%. |
| 34:33 | So we can monitor what's going on there, how everything's performing. |
| 34:36 | If I saw something like this though, what that would suggest to me is that the base duty cycle table needs some work. |
| 34:43 | We shouldn't be seeing anything like this amount of positive work from our closed loop control strategy so we can monitor this as well and then learn from this and then go back and modify our open loop duty cycle table. |
| 34:58 | Ideally we really want to see our closed loop effort swinging backwards and forwards past 0, again the less work it's doing, the better job we will be getting with our idle speed control, better result we'll be getting with our idle speed control. |
| 35:12 | Likewise if we just have a quick look out here to the right at the moment, we've got our ignition timing. |
| 35:17 | We can see that that's moving around there which is our idle ignition control in action. |
| 35:22 | So we'll close that down and we'll have a look at our questions now so just to really quickly reiterate that process, first place to get started, make sure you've got your mechanical setup dialled in. |
| 35:34 | Whatever you've actually got for controlling the idle speed, that needs to be obviously wired up and functioning. |
| 35:40 | If you've got the ability to have a clutch switch or a neutral switch, make sure that's set up. |
| 35:44 | Go through, tune your fuel and your ignition tables properly, get all of those dialled in first. |
| 35:47 | As well, you also want your cold start tune dialled in so that that's not going to be impacting or errors there aren't going to be impacting on your idle speed control during cold start. |
| 35:59 | Once you've done that, set your idle speed targets sensibly then in open loop mode you want to go through and optimise your duty cycle table so you're as close to those targets as possible. |
| 36:12 | You can then enable your closed loop control and I haven't talked about that though, we do also at that point you can go through and optimise or tweak those PID control gains and again this isn't really a lesson on PID control tuning but the idea there, I would start with the recommendations for your particular engine from Adaptronic. |
| 36:32 | Initially I'd start with the proportional gain, that has the biggest effect on our control. |
| 36:38 | The process there I use is to start by doubling the gains. |
| 36:42 | So if we had a value of 1%, I might start by going to 2% then 4%, then 8%. |
| 36:48 | The reason we're doing this is doubling the value gives us a really quick idea of the sort of scope or range of numbers that will work before we get into that situation where we get unstable and start oscillating. |
| 37:02 | As soon as we get to a point where the idle speed is starting to oscillate and we've lost control over it, halve that proportional gain value again and you're going to be in the ballpark. |
| 37:11 | Likewise we're going to be doing the same with our derivative and our integral gains. |
| 37:14 | And we'll quickly be able to get a sense of what sort of numbers are going to work well, give us good stable idle speed control. |
| 37:21 | For now, let's get into our questions. |
| 37:31 | Got a couple of questions on the pre show which I will deal with after this. |
| 37:37 | We've got a couple of questions here from Suhas who's asked, first of all, what considerations do you suggest for getting stable idle when running on E85? Look realistically on E85, I don't find any differences in what I'm going to be doing with my idle. |
| 37:55 | The fuel itself, other than cold start strategies, when the engine is actually at normal operating temperatures, assuming of course you are providing the required extra fuel to get us back onto our air/fuel ratio targets, really in terms of idle speed control, I don't tend to need to make changes to my idle speed control from pump gas to E85. |
| 38:17 | The only tricky area with E85 really in that regard is cold start performance. |
| 38:23 | Particularly if you are living in a colder climate, it can be a little bit tricky but that sort of gets really away from idle speed control itself. |
| 38:30 | Really everything that I've just talked about for idle speed control on pump gas will cross over to E85 as well. |
| 38:40 | Suhas has also given a bit of information, to tune a PID I follow these steps, set all gains to zero, increase the proportional to get a response to a disturbance is steady oscillation. |
| 38:51 | Increase the D gain until the oscillation goes away or it's critically damped. |
| 38:57 | Repeat steps 2 and 3 until increasing the D does not stop the oscillations. |
| 39:02 | Set P and D to the last stable oscillations. |
| 39:04 | OK so everyone's got their own techniques. |
| 39:06 | As I mentioned, I will do a specific webinar on this. |
| 39:11 | What you're talking about there, not too different to the strategy that I use and kind of just want I talked about. |
| 39:18 | The proportional gain is the element that's going to give us the biggest effect or response and result to an error. |
| 39:26 | So that's where we do want to start. |
| 39:29 | So that's why I talked about starting with a proportional gain and doubling that value until we get to a point where we start getting unstable and we start oscillating. |
| 39:36 | That is what we will get if we use too much proportional gain and we use this strategy to make sure that we've got a sense of what range of numbers are workable for that system. |
| 39:47 | It's going to vary depending on whether you're tuning idle speed control, cam control, drive by wire throttle control or boost control. |
| 39:54 | It's also going to vary from one ECU to the other. |
| 39:57 | So that's important to understand, there are no magic numbers that we can put into every ECU and expect great results. |
| 40:04 | Once we've got to the point where we've got the proportional gain resulting in some oscillation, we don't necessarily give up there, that doesn't mean that we've got the wrong numbers because bringing in that derivative gain can dampen the oscillation but still allow a fast response. |
| 40:18 | So if we back off the proportional gain to a point where we don't have any oscillation or overshoot, we will get control but generally that's going to result in a slower response to that error than what we could get. |
| 40:30 | And it's a little harder to do with idle speed control, my favourite for demonstrating this is cam control because we can sit in steady state and we can ask for a change in cam target so we'll step between 10° and 30° backwards and forwards and we can really quickly see the result of changing our proportional, integral and derivative gain values. |
| 40:50 | So basically going backwards and forwards between our P and our D gains to get as fast a response as we can, without that overshoot, and then we'll gradually add in our integral gain to remove that remaining error that will inevitably be there. |
| 41:04 | Just like the proportional gain, if we go too far with our integral element, we will still end up with an oscillation so it's really, it does scare off a lot of people but it's not that scary. |
| 41:17 | Vikrant has asked, how critical is brake booster vacuum consumption to idle speed control? Unless you want to sit there pumping the brakes, the reality is that it doesn't make that big of a difference. |
| 41:31 | And you will be able to demonstrate this, even on a factory car that uses a plenum and a vacuum assisted brake booster, if you pump the brakes you're actually using up that reservoir of vacuum that needs to be replenished so yeah you will see that the idle speed will drop. |
| 41:45 | It's not something that I have ever accounted for in my own tuning so yeah it's not a common situation where I would see an issue. |
| 41:53 | The issue will become a little bit more prevalent though as the plenum volume drops off. |
| 41:59 | So particularly if you're running a brake booster straight off the back of individual throttle bodies, you may see a more pronounced effect of that but generally as I say, under normal circumstances it's not something that will actually impact the idle speed control enough to worry about. |
| 42:15 | KGmotorsports has asked, will boost pressure open stepper motor when set to close on boost? No a stepper motor is driven to a position so that won't actually be pushed open by boost. |
| 42:28 | Now depending on the exact plumbing of this, it would be a situation where we could have a problem if you've got your idle speed control system plumbed to atmosphere and it's not completely sealed. |
| 42:40 | That would be more likely, I've seen with some solenoids they will leak. |
| 42:44 | The Bosch idle solenoid doesn't seem to fully close. |
| 42:48 | So that's OK under vacuum but of course under boost pressure it's not going to be ideal, you're going to actually end up with a boost leak so that's only a problem if you're venting it to atmosphere. |
| 42:58 | If you're actually taking the air bypass feed from the other side of the throttle body, from your intercooler plumbing, then it really doesn't make any difference. |
| 43:05 | But idle stepper motors, I've never personally seen one that would be forced open under boost. |
| 43:13 | Boost V8 chevy has asked, can idle speed control affect boost? They suggest to not dial in the solenoid to minimum close. |
| 43:23 | Sort of follows on really from the last question here. |
| 43:29 | Every situation's going to be slightly different. |
| 43:32 | I've never seen a situation where, if we've got the idle speed control solenoid plumbed back into the system, so it's closed loop, it's not venting to atmosphere, it's really not going to be a relevant aspect there because we're simply bypassing around the throttle butterfly so the only situation I would see an issue here is if you have an atmospheric venting or atmospheric pickup for your idle speed solenoid so yeah I can't really add too much more to that, not something I see very often. |
| 44:02 | Last question is from Firefighter who's asked, for an H6 motor is looping okay for a cold start? I'm not sure what you specifically mean here by looping. |
| 44:18 | Sorry I'm not going to be able to answer that, I don't think I'm probably going to have time for you to add to that either, I apologise. |
| 44:24 | Now for any of our members watching this, if you do have further questions, please ask them in our forum and I'll be happy to answer them there. |
| 44:32 | Thanks for joining us and hopefully we can see you next time. |
Timestamps
0:00 - Intro
0:35 - Why do we need idle speed control?
3:15 - Options for idle speed control
6:10 - Open loop vs closed loop
7:20 - Get the rest of your tune dialled in first
9:45 - Idle authority parameter
11:45 - Idle settings
12:40 - Target idle speed
16:45 - Idle up
19:30 - Post crank idle
20:40 - When to go into closed loop?
23:15 - PID control algorithm
26:30 - Idle ignition timing trim
30:20 - Tuning process
37:30 - Questions