264 | Engine Protection Strategies - Adaptronic
Summary
An important, yet often overlooked benefit of modern ECUs is their ability to provide built in engine protection strategies. In this webinar we’ll look at some of the most common options and see how they can be implemented using the Adaptronic ECU on our FD RX7.
| 00:00 | - Hey team, Andre from High Performance Academy, welcome along to another one of our webinars. |
| 00:05 | Now this time we are going to be diving into the engine protection strategies available on the Adaptronic Modular ECU. |
| 00:12 | This is one of the aspects that most aftermarket standalone ECUs now offer but I seldom see tuners taking advantage of all of the protection strategies that are there. |
| 00:24 | And it can very easily end up saving you an engine so it is something that you do need to consider or at least you should be considering. |
| 00:33 | Particularly if you've fitted a decent array of sensors to your engine that will let you monitor various parameters that could end up indicating a danger scenario. |
| 00:41 | Now we aren't going to be doing this live in the car because there's really no advantage here, I can't really demonstrate the range of protection strategies so we decided to present this in the studio but you'll get a solid understanding here of how these strategies work and why you may choose to use or not use them as you see fit. |
| 01:02 | First obvious question here is why would we want to use engine protection strategies? Probably goes without saying, to protect your engine, there's kind of a hint in the name there. |
| 01:13 | The reality though is with just about any performance engine, there is a lot going on in a very short amount of time and while in the older days we may have relied on an array of analog gauges for the driver to monitor and decide that maybe the oil pressure wasn't quite right or something was getting a little bit hot, these days it's much much easier to rely on our ECU to do this for us. |
| 01:36 | First of all. the ECU is not going to forget. |
| 01:39 | The ECU can watch all of the parameters multiple times a second and it can instantly perform whatever control strategies that we've programmed it to do to safeguard our engine. |
| 01:50 | So much easier and more reliable to allow the ECU to do this. |
| 01:54 | However there are also some considerations here where maybe we may not want to allow all of these control strategies and we'll talk a little bit more about this as we go but in some situations, particularly in a race application if you are road racing, circuit racing, a significant interruption to your power can actually unsettle the car, particularly mid corner or on corner exit and that could actually potentially be dangerous. |
| 02:22 | So you do need to weigh this up and factor this in. |
| 02:25 | And interestingly we were in a very similar scenario to this not that long ago with our Toyota 86 project car. |
| 02:34 | So we're involved in a sprint race at our local racetrack Highlands Motorsport Park. |
| 02:39 | We ended up with the, a problem that we had found with our fuel system which was resulting in fuel surge. |
| 02:48 | And as a result of this, we've got a safety strategy in there to provide a fuel cut or a cut to the engine if the fuel pressure drops below a certain point. |
| 02:58 | Now this is obviously to protect the engine from running lean. |
| 03:01 | However what we ended up with was very bad surge coming out of a hairpin. |
| 03:07 | I had a car directly behind me, as I came out of the corner and started to accelerate, the car behind me which was much faster went to accelerate and overtake me, expecting me to accelerate out of the corner however ended up with the cut occurring and that ended up with the car actually just touching the rear corner of the bumper so obviously there are some implications here and again really important to understand those. |
| 03:32 | Now as far as our Adaptronic goes, we've got the ability to have a range of engine protection strategies based on the sensors that we have installed. |
| 03:44 | So depending what you've actually installed, what the ECU is able to monitor, understandably this gives the ECU more and more potential in order to provide protection strategies. |
| 03:55 | So we'll head over to the Adaptronic ECU now, software now, Eugene. |
| 04:00 | What we're going to do, we're going to find the engine protection under functions here which is the tab we're on and then on the very left hand side, we'll find engine protection/rev limit. |
| 04:11 | So the range that I've got available here includes as we can see, rev limit and overboost. |
| 04:16 | Now these would be applicable essentially regardless of your application. |
| 04:21 | Those basically in my opinion are the bare minimums. |
| 04:25 | Then we've also got oil pressure and temperature. |
| 04:28 | We've got fuel pressure, now both of those will require sensors which again should go without saying. |
| 04:34 | In order to monitor the oil pressure we're going to need an oil pressure sensor, likewise for our fuel pressure. |
| 04:40 | These days with the price of good quality sensors coming down in my opinion it really is a no brainer to install these sensors during the setup. |
| 04:48 | The other aspect here particularly for a road driven car that's going to be driven on a racetrack, the lateral G force involved often results in oil surge that we'll never see on the road. |
| 05:00 | This is probably the number one destroyer of engines that I see in terms of bearing problems and it can be avoided if we're monitoring the oil pressure. |
| 05:09 | Even if you're not using engine protection strategy, you can monitor it and actually see what's going on and you can decide to do something to rectify the situation before it does get out of hand. |
| 05:19 | Moving down we've also got lean out margins, so basically a lean air/fuel ratio protection strategy provided you've got some form of wideband input to the ECU. |
| 05:29 | In this case we've got a MoTeC lambda to CAN module bringing air/fuel ratio data into the Adaptronic ECU via the CAN bus, nice and easy. |
| 05:39 | We've also got over voltage protection. |
| 05:42 | Not something that I see a real need for too often but we've got that there in case something goes wrong with the regulator on our alternator and we end up with an overcharging situation, it can be dangerous although I think in probably 20 odd years of tuning, I've only seen that situation in a couple of instances. |
| 06:02 | But there it is anyway. |
| 06:03 | We've also got 2 exhaust gas temperature sensors installed. |
| 06:06 | So we have EGT or exhaust gas temperature protection and finally we've got a turbine speed sensor attached to our Borgwarner EFR 8474 turbo. |
| 06:17 | So that gives us the benefit of turbine speed protection. |
| 06:22 | So I'm going to through each of these individually and just talk about how they work and what we need to know. |
| 06:28 | The very first one and the top of this list is our rev limiter which is what we're on right now. |
| 06:34 | This is something that we really should be addressing during the configuration stage of our ECU setup before we actually even get the engine running. |
| 06:43 | It's so often overlooked and particularly if you're dealing with an unknown base map or maybe one of the ECU manufacturer's base maps, you've got no idea necessarily how this is configured and where the RPM limit is set and it might not seem like a big deal when maybe you're just planning to start the car for the first time and let it idle. |
| 07:04 | Let's be honest, what could go wrong at idle? However, it's quite possible that you can find that you've got a massive vacuum leak that you weren't aware of. |
| 07:11 | Maybe the throttle body is jammed partially open and if you don't have the RPM protection or RPM limit set up right from the get go, you could very easily damage your engine very quickly, even during your first startup so I always plan on having this set up before I start the engine for the first time. |
| 07:28 | If I've got an unknown quantity I may even start with the RPM limit set up quite low. |
| 07:34 | Maybe I've got an engine that I'm expecting to run to 7500, I might start with that limit set at 4000 or 5000 RPM. |
| 07:41 | Just while I'm getting up and running and then I'll move it back up to where I expect. |
| 07:45 | Let's look at our options in here, so the key ones here, that's just understanding the implications of the type of cut we are using and unfortunately there are actually pros and cons with both of these. |
| 07:57 | You can choose to use an ignition cut and a fuel cut and they do exactly what they sound like. |
| 08:03 | Now using an ignition cut is going to ensure that we are getting a full cut on the particular cylinder or rotor that we are, that is being applied to at the time and by randomising that across the number of cylinders or rotors, the ECU can then control the RPM really accurately. |
| 08:22 | The problem with this, particularly on turbocharged engines is that we will be passing unburned fuel and air out into the exhaust system and particularly if this is happening at high RPM which is probably will be with a rev limit, we can get into a situation where that unburned fuel and air actually explodes in the exhaust system which is kind of like a 2 step or anti lag strategy. |
| 08:43 | Why this can be dangerous though is that the pulsations or pressure spikes that it causes in a piston engine can pop valves back off the seats. |
| 08:53 | In a stock rotary engine it can be enough to damage the seals in the engine itself. |
| 08:58 | So we need to be very mindful of this. |
| 09:02 | My general preference when weighing up the pros and cons of each is to use a fuel cut, unless I've got an engine with a valve train or an engine that's built where I know that it will handle an ignition cut. |
| 09:15 | Ignition cut on the other hand, it's going to be essential for a drag car where we do want to use a 2 step style launch control, if we're using fuel cut you're not going to get the boost building capability of using an ignition cut. |
| 09:26 | So fuel cut on the other hand, downsides with this, OK we're going to be cutting all of the fuel injection to a particular cylinder or rotor. |
| 09:34 | However there will still be some level of fuel film left on the port walls, the back of the valve etc which can still be drawn into the cylinder. |
| 09:42 | Typically, in my own experience this isn't going to be rich enough to actually support combustion so it's one of those things that most people worry about that the reality in my own experience just isn't a concern. |
| 09:55 | But I just wanted to mention that. |
| 09:56 | The mixture is essentially going to be so lean from just that fuel film that it won't actually burn so it actually does work very very well. |
| 10:04 | It's just as accurate as a ignition cut. |
| 10:06 | The downside though is that when the fuel delivery is reinstated after we come off the limiter, there will also be a very brief amount of time just like a transient enrichment event where that fuel film does need to be built up on the port wall. |
| 10:21 | So we do tend to see a very slight lean air/fuel ratio immediately after we come off the limiter so that is a consideration. |
| 10:29 | Again pros and cons with each, just understanding those as you make your choice. |
| 10:34 | We've also got the ability here to have a rev limit versus coolant temperature. |
| 10:38 | So let's bring this up here, you can view and edit that table. |
| 10:41 | And basically how you set this up is completely up to you. |
| 10:47 | We've got a 2D table, simply our rev limit versus our engine coolant temperature. |
| 10:52 | Now quite often what I will choose to do is down at very low coolant temperatures, I'll bring the RPM limit down a little bit, maybe instead of in this case 7800 RPM, I might have maybe 5000 RPM just to prevent the engine being driven too hard while it is warming up. |
| 11:11 | If you are doing this for a customer you need to be a little bit mindful of just letting them know what you've done. |
| 11:16 | Otherwise you're likely to have the customer come back as has happened to me in the past, complaining that the engine misfires when it's cold. |
| 11:23 | Answer of course is treat your car with a bit more respect when it's warming up and you won't have that issue. |
| 11:29 | So the other option is just to leave it flat like I've got it there but we can see here at 120°C I have pulled that rev limit down to 5000 RPM. |
| 11:37 | Just to safeguard the engine a little bit. |
| 11:40 | Basically prevent it from being driven too hard when it is overheating. |
| 11:44 | Quite likely we may actually want to be a bit more conservative than that. |
| 11:47 | Maybe pulling it down to 3000 or somewhere thereabouts. |
| 11:51 | Another thing we do need to be mindful of here is between 103°C and 120 which is those 2 break points, we will actually have a linear interpolation between 7800 and 5000 RPM. |
| 12:03 | So basically we're not going to go straight from 7800 RPM limiter, down to 5000, it will smoothly decrease as that coolant temperature adjusts. |
| 12:13 | Alright we'll just head back over here again to our rev limiter setup. |
| 12:18 | We've got a couple of other parameters here to do with our rev limiter setup. |
| 12:22 | The first of these is our additional RPM for 100% power cut. |
| 12:26 | Pretty self explanatory. |
| 12:28 | Basically we need to choose an RPM which then defines the limiter range. |
| 12:33 | The numbers from that table, the 2D table we just looked at, those are basically the start of our RPM limit function so as we come up to that point, we've got 0 limiting active, between the RPM start point and our, in this case 200 RPM additional we're going to move from 0% cut to 100% cut so basically we're just introducing a smooth cut progressively as we increase above our initial RPM limit. |
| 12:59 | Technically we shouldn't be able to push past, other than a mechanical over rev we shouldn't be able to push past in this case 7800 plus 200 RPM or 8000 RPM. |
| 13:10 | This does need to be chosen carefully though because it's this additional RPM that actually defines the upper range of our rev limit. |
| 13:19 | So if you've got the rev limit table set at the absolute maximum you want the engine to rev to, you're still actually going to rev past that so you may want to bring your RPM table down a little bit and then just manipulate the additional RPM parameter until you've got that working out where you want it to be. |
| 13:39 | Last of those parameters there, we've got the RPM limit during engine protection mode so this is simply the RPM limit that's going to be applied if any of the engine protection strategies come in. |
| 13:49 | We've got that at 2000 which is probably a little bit lower than I typically would go. |
| 13:53 | The reason for this is other than oil protection, oil pressure protection which isn't actually covered by this, we've got a little note that explains exactly that out here to the left. |
| 14:04 | Basically other than oil pressure dropping to nothing, in which case we'd really want to cut the engine to protect it, basically this allows us at 3000 RPM, we're probably not going to be able to drive the engine hard enough to damage it and we're going to be able to limp it back to the pits or get it back somewhere where we can actually diagnose and find out what's going on. |
| 14:24 | Alright so that's the very first of our options there and again, just an absolute no brainer, got to have a rev limit. |
| 14:32 | Next one that we'll look at here is our over boost setup and again on a turbocharged engine, in my opinion this is probably a no brainer, we really need to have this. |
| 14:41 | Just point out here that each of these as we come into them when they are freshly chosen, they won't show any parameters and we need to tick on that little enable safety tick box. |
| 14:54 | So our overboost selection, we've got two options on how this can work. |
| 14:59 | We can choose the MAP value so a specific manifold absolute pressure value. |
| 15:04 | Or we can choose an amount of boost above our target that we will allow. |
| 15:11 | Now how you want to do this is really dependent but most people traditionally have set up our boost cut as a specific value so let's say we've expected to run a maximum boost of 20 psi, we may set the boost cut at 22 or 23 psi, giving us just a little bit of margin. |
| 15:29 | However particularly as we've moved into engines that are running flex fuel or running dual fuel with vastly different boost pressure targets, this becomes a bit of a problem. |
| 15:41 | Let's take a flex fuel vehicle for example that runs maybe a maximum of 18 psi on pump gasoline but on maybe E85 it's running 40 psi, that sounds extreme but it's certainly not unheard of, particularly for some of the more highly tuned drag engines that are also daily driven. |
| 16:02 | So the problem of course there is if you're going to set an absolute number you need to have that set above the boost pressure you're going to run on E85. |
| 16:10 | What now happens if we end up with a malfunction of our wastegate control system when we're running on pump gas, we're going to end up blasting well past what is safe on the pump gas because the boost cut won't come in until we get to 40 plus psi. |
| 16:25 | So in this instance we can choose to use our boost pressure above target option and then of course as its name implies, that will set a boost pressure above our target value which will be varying based on our ethanol content, giving you the confidence that regardless what your ethanol content is, you are protected by your over boost strategy. |
| 16:46 | Now how that boost pressure cut actually comes in, we've got 2 parameters here. |
| 16:51 | We've got overboost allowed with a delay, maybe not that intuitively named. |
| 16:56 | And an overboost allowed instant. |
| 16:58 | So basically we quite often see with a boost control strategy, there will be a slight overboost as we first come up on boost and then the boost pressure will drop and settle. |
| 17:08 | So depending on your particular preference and how highly tuned your engine is, you may be OK with the boost pressure overboosting by maybe 1-2 psi for a brief instant before settling. |
| 17:20 | So that's what our overboost allowed delay is, it's a higher setting, in this case you can see, sorry actually we've got this around the wrong way here, but basically it allows us to set a set point that we allow the engine to overboost to for a brief period of time. |
| 17:37 | I think from memory in the Adaptronic settings this is 1 second. |
| 17:42 | However then we've got an instantaneous cut if we go above a certain value, in this case 240 kPa there. |
| 17:49 | The second we hit 240 kPa we will end up cutting. |
| 17:53 | So just gives us that little bit of protection there, we can have a slight overboost if we desired that without cutting, it'll allow it to settle back, but if we have sustained overboost or we hit a certain level we're going to end up with that cut coming in straight away. |
| 18:09 | Moving through, we've now got our oil pressure and temperature. |
| 18:13 | So this needs to be dealt with a little bit carefully. |
| 18:18 | Because oil pressure cuts really really important, they can really safeguard your engine but you do need to be mindful when you are setting them up because the oil pressure is going to be very dependent on our oil temperature. |
| 18:32 | And why this is a problem is that often when we're on the dyno, particularly with a large fan right in front of our radiator and our oil cooler we may not actually see representative oil temperatures compared to what we'll see on a racetrack after 5 or 6 laps of hard racing. |
| 18:49 | So what this means is that the actual oil pressures we'll see on a racetrack can actually come down a little bit so if you're setting your oil pressure cut very tight to what you're seeing on the dyno versus the RPM. |
| 19:02 | This is where we can get ourselves in trouble so it's always a good idea to either provide a reasonable margin of error for how far below the actual oil pressure we're setting the cut on the dyno. |
| 19:14 | Or alternatively get some actual solid data from what the car is doing on the track. |
| 19:18 | Generally my rule of thumb is I like to see about 10 psi of oil pressure per 1000 RPM. |
| 19:26 | And we could then set the oil pressure cut significantly below this to protect it. |
| 19:32 | So really we're most interested in what's happening above maybe 3000, 4000 RPM which is where the car's being driven hard. |
| 19:39 | 4000 RPM, technically we should probably expect somewhere around about 40 psi. |
| 19:45 | Might set that cut down at 25 or 30 psi just allowing a little bit of that margin for error but it is something that will catch out a lot of tuners if they aren't thinking about the relationship between oil pressure and temperature. |
| 19:59 | Let's have a look at the graph here anyway. |
| 20:04 | So we've got, in this case we're obviously looking at metric values, kPa, I've just talked in imperial but you can convert. |
| 20:11 | So we've got our engine RPM versus our oil pressure and basically this is the minimum oil pressure. |
| 20:18 | If we go below that point, it will bring in a RPM cut there to protect our engine. |
| 20:23 | Now if you do want to eliminate this down at low RPM, you can set this to 0. |
| 20:29 | Obviously particularly during cranking we're unlikely to have good oil pressure for a second or so so it can be sensible to set this down at 0 around about that point. |
| 20:39 | Alright we'll come back to the rest of our settings there under our oil pressure and temperature. |
| 20:46 | Obviously I've just skipped across this but we can also have an oil temperature alarm. |
| 20:49 | Basically depending on what oil temperature you're happy to run, rotary engines in particular with our FD RX7, rotary engines are very very intolerant of high oil temperatures so you can see I've got this set relatively low. |
| 21:04 | A piston engine generally with a good quality synthetic oil I'd be probably pretty comfortable with 120°C + with no real issues. |
| 21:13 | Now that oil pressure cut also comes into account with this delay here. |
| 21:19 | Which is important because we will see fluctuations in our oil pressure so we want this delay to be set to be something sensible so that it's not going to be needlessly triggering, particularly during startup where it will take a little bit of time to get oil pressure. |
| 21:32 | But in this case 1 second is probably a little bit excessive. |
| 21:35 | Probably a second with low oil pressure's going to be enough to do some pretty significant damage so probably set this down at maybe a 10th of a second or 2/10th of a second. |
| 21:46 | Again, personal preference just comes in here. |
| 21:48 | But it is again just important to consider logging some real data under real operating conditions just to see what realistic numbers you're seeing on track so that you can set that table so it's not going to needlessly come into play because I can tell you from experience there's nothing more frustrating than having a car needlessly cutting when it shouldn't be. |
| 22:08 | Alright moving down, we've got our fuel pressure setting here, our fuel pressure warning and this is one that again I think a lot of people don't use where they really should be. |
| 22:19 | It's quite surprising when you dig into what's happening with the fuel pressure in a car and sometimes you realise that it's not actually doing what you'd expect. |
| 22:28 | Now obviously having this set up relies on the fuel system being up to task to start with. |
| 22:36 | If we are already tuning around a fuel pressure that's dropping at high RPM on the dyno then that's not going to really end that well. |
| 22:42 | We're really going to expect our differential fuel pressure to be remaining pretty fixed under normal operating conditions and this is here to safeguard for either a engine that's run our of fuel and we're seeing our fuel pressure drop because of that or fuel surge which is the example I gave back earlier. |
| 23:00 | So our parameters here, first of all we've got the allowable amount of fuel pressure drop below our nominal fuel pressure. |
| 23:09 | So in this case, 50 kPa, we're allowing 0.5 of a bar of our fuel pressure drop below our nominal which obviously works in conjunction with our nominal fuel pressure which is 350 kPa. |
| 23:21 | In this case, our fuel system here is manifold pressure referenced. |
| 23:26 | So our fuel pressure should theoretically always be 350 kPa. |
| 23:31 | As we move into positive boost the fuel pressure will come up so that the differential pressure across the injector is always the same, likewise as we move into vacuum it will drop so that's just dependent on your fuel system setup. |
| 23:45 | And likewise just like with our oil pressure system we also can set up a duration so how long that drop needs to be for before it will actually provide a cut so I've got half a second in here again, a lot of this really comes down to personal preference. |
| 24:03 | When we are choosing the maximum pressure drop here as well, if we're monitoring fuel pressure which we need to be in order to use this strategy, the Adaptronic ECU as with a lot of modern VE based ECUs will actually adjust the injector pulse width in the background if the fuel pressure is dropping. |
| 24:22 | So there's obviously a limit to how much that can help but if we are starting to see a small drop off in the fuel pressure. |
| 24:28 | That's often not the end of the world provided we do have sufficient fuel injector head room and that will actually still keep us on track on our air/fuel ratio target which is a nice safety strategy that's happening in the background anyway. |
| 24:41 | With that sort of a system, again provided we've got enough injector head room, we can actually get away with a slightly larger pressure drop before we bring in our safety strategy here. |
| 24:52 | You can also choose to click on this little check setup tab here and this will take you back across to your fuel system setup where you can confirm how you've got your regulator type set, ours obviously manifold pressure referenced. |
| 25:07 | We've also got our nominal fuel pressure set there so basically nominal fuel pressure same parameter as what we just looked at. |
| 25:13 | Right we'll move down now to our lean out margin. |
| 25:17 | So this just allows some protection against the air fuel ratio becoming too lean, obviously we require a wideband to allow this to happen. |
| 25:27 | I'm in 2 minds with this because it does on face value seem like a sensible option but we again do need to be really careful here with the way that we instigate it or incorporate it. |
| 25:41 | The reason I say this is from first hand experience, years and years ago I took my old drag car from New Zealand over to Australia to race at Willowbank in Brisbane. |
| 25:50 | Part of that, I was obviously a little bit unsure about, the differences in atmospheric pressure conditions, temperature etc, Brisbane vs New Zealand, didn't have the opportunity to dyno the car in Australia so what I did for some check up passes when we got to the drag strip was set up some lambda warnings in the dash. |
| 26:08 | Now these admittedly were pretty basic warnings, there was no sort of timeframe or delay for them. |
| 26:16 | But of course what this does when you're using flat shift is it results in a very lean spike on the gear cut because we're cutting spark to allow the dog engagement gearbox to change gear so we're getting unburned fuel and oxygen going out into the exhaust where the lambda sensor reads the oxygen and it reads very lean. |
| 26:34 | So that was triggering these warnings on the dash, so these were driver warnings, I wasn't actually using an engine protection strategy in the ECU there but you can see obviously if we were using a protection strategy, that lean spike could be problematic so these are things we do need to consider. |
| 26:49 | Likewise on a transient event, a throttle tip in, we can quite often see a lean spike momentarily that's absolutely fine and definitely nothing to be worried about. |
| 27:00 | So before you go crazy with this it does pay again just to be a bit sensible, log some data and make sure that you're not going to be bringing in this cut when you don't really need it. |
| 27:10 | So the first part of this is the duration. |
| 27:13 | So I've got that set to half a second here. |
| 27:15 | That should be ample to get us around any of those aspects that I just mentioned. |
| 27:21 | A transient event or maybe a gear change ignition cut or something similar. |
| 27:26 | But basically we want to make sure that we are reading a real lean condition before we actually do anything. |
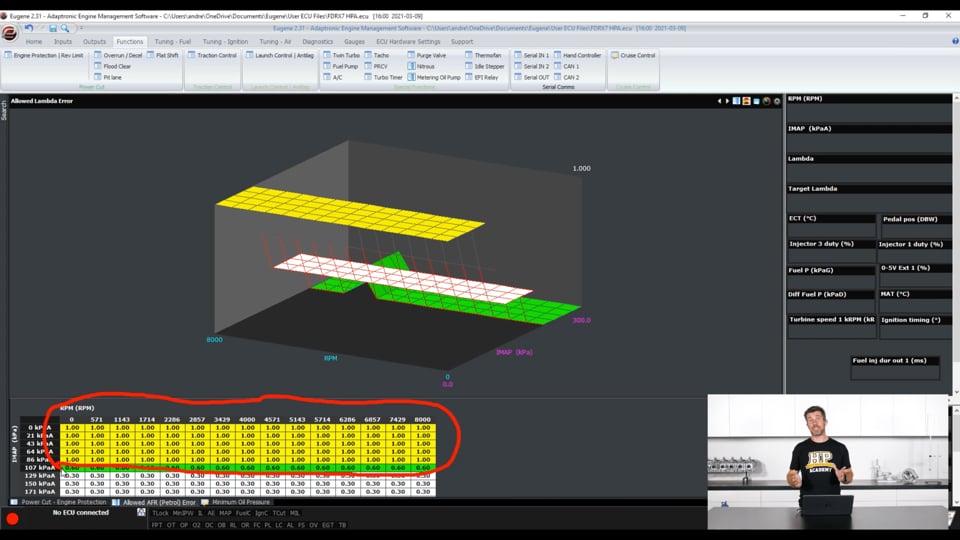
| 27:33 | This works in conjunction with our ratio, air/fuel ratio error table. |
| 27:38 | So we'll click on that and basically this allows us to define how much leaner than our target we allow the engine to run before we bring in this cut. |
| 27:49 | It's quite nice that it's set up on a 3D table so we've got, or can be at least, so we can actually have inlet manifold pressure on the axis of this table. |
| 27:57 | So what we can see here is in vacuum I'm not really too worried. |
| 28:02 | Chances of doing damage to the engine in vacuum are pretty slight so we've got quite a large error that's allowable there but as we move down this table and we move into the high boost areas, we're tightening up on the amount of allowable error. |
| 28:18 | So again just being sensible with this, checking it with some datalogging to make sure that you're actually not going to be triggering it needlessly. |
| 28:27 | Alrightly getting through to the end here which is probably a good time to just mention as well that if you've got any questions on any of this, it's a good time to ask them, we'll be getting into those questions really shortly. |
| 28:37 | Over voltage protection, won't spend too much time on this, pretty self explanatory and as I mentioned, probably not one that I've seen the need for too often but absolutely you can set that up if you desire. |
| 28:49 | We've got our EGT protection as well so again we can enable this and we can set a maximum exhaust gas temperature that we are happy for the engine to run. |
| 29:00 | Only problem with this is that exhaust gas temperature sensors do tend to be a little bit fragile, depending on the particular controller, I have seen them read, they normally read absolute nonsense when they're faulty, negative values but i they did actually fault to a value that was above your threshold, that's obviously going to bring in your engine protection and can cause a little bit of frustration when you fault find it and figure out it's just a dud sensor but of course the ECU can't do much about this, it really is a case of garbage in, garbage out so if you've got a functioning sensor, should be all good to go there. |
| 29:39 | Last one for today, turbine speed protection. |
| 29:43 | This is becoming a little bit more common now that it's become easier to fit turbine speed sensors to our turbochargers, both Garrett and Borgwarner have made it pretty easy with compressor covers that are pre drilled for the sensor. |
| 29:58 | And they also give you usually some pretty specific numbers on what turbine speed not to exceed. |
| 30:06 | Particularly with the Borgwarner EFR turbos, if you exceed that speed, you can kiss good bye to your pretty expensive turbocharger so would pay to take that into account. |
| 30:17 | That information will be provided by the turbo manufacturer, you'll be able to see as well, turbo speed on your compressor map and simply put we can enter in a maximum RPM here that the cut will be applied if we exceed that. |
| 30:32 | This does get a little bit tricky as well because once you've got a lot of these strategies set up and something cuts the engine, the next question is what actually cut it. |
| 30:43 | So if we head back over to our, actually on any of these if we were live we'll be able to see in this case, the turbine speed for turbine speed sensor one and two, we've only got one fitted here and if the turbine speed cut is active. |
| 30:59 | Likewise if we come over to our rev limiters we'll actually have the full list of all of these cuts. |
| 31:04 | So we can start getting a little bit more detailed on figuring out where exactly the problems lies. |
| 31:10 | Also a good idea to log these parameters as well because clearly you're not always going to have your laptop hooked up. |
| 31:16 | So it's really important to actually highlight what was bringing in that cut so you can actually figure out if it's a setting that you need to adjust or you've actually got a fundamental problem that you're going to need to deal with. |
| 31:26 | Alrighty lt's jump into questions and we'll see what we've got in there, bear with me. |
| 31:40 | Bjorn has asked, thoughts on those Bosch 2 in 1 pressure and temperature sensors versus a traditional oil pressure sensor ? Would you say that it's also important to have oil temp and not just oil pressure? Yeah the Bosch integrated temp and pressure sensors I reckon are a great thing. |
| 31:56 | Certainly they simplify your wiring and your hardware installation. |
| 32:00 | Obviously Bosch isn't exactly a fly by night company either so you know you're getting a quality OE part so yeah absolutely, these would be good for oil as well as fuel. |
| 32:10 | Little bit less important these days with fuel because if you are running flex fuel then the ethanol content or fuel composition sensor does also include fuel temperature so we can inherently get that from that same digital signal so it just depends really. |
| 32:24 | Would I say that oil temperature is important, yes 100% and oil temperature is one of those parameters that I think most people kind of overlook and don't worry about. |
| 32:36 | It's probably fine for a daily driver but as soon as you take a car on track and you monitor the oil temperature it can actually be pretty scary seeing what it gets up to and the problem with high oil temperatures is two fold. |
| 32:49 | First of all, as the oil temperature increases the oil pressure naturally falls away so that in itself can become a problem but if our oil temperature gets too high basically the oil is no longer able to do its job properly and then you're going to end up with potential problems with your bearings. |
| 33:08 | So synthetic oils, probably a lot better in terms of high temperature stability than mineral based oils but either way you do need to monitor that so definitely worthwhile. |
| 33:19 | Next question comes from Wedge who's asked, is there a way to set engine protection to deal with faulty or failing sensors? Yes and no, it does depend on what sensors you're dealing with. |
| 33:32 | So if you're talking about an oil pressure or a pressure sensor in general then normally yes because when we're setting up the analog voltage input for those sensors, they'll typically be a 0.5 to 4.5 volt sensor so we can set up a minimum and maximum voltage and basically if the voltage that the sensor reading it coming into the ECU is either above or below those limits, the ECU will deem that sensor to be faulty and then usually we can set a default value. |
| 34:02 | That might bring in a check engine light or a fault code or something that we can visually see to know something's not right. |
| 34:08 | But we can allow that to bypass those engine protection strategies that we've just talked about. |
| 34:14 | So not all sensors we can't do that with. |
| 34:17 | The EGT for example that I mentioned during the webinar, that's not always the case because they do some crazy things when they fail. |
| 34:25 | Likewise depending on how your wideband controller works, some will have integrated diagnostic data being fed through to the ECU which basically tells the ECU to ignore the data if the sensors is deemed to be faulty but not all of them do that so just a little bit of care is required there. |
| 34:42 | Scrowe has asked, can you use both ignition and fuel cuts? Yes you can, no reason not to do that. |
| 34:51 | And a lot of ECUs give you that option so yep, absolutely you can you both of those together. |
| 34:57 | Next question from TurboYoda's asked for any given engine, with individual thermocouples close to each exhaust port, how do you determine acceptable EGT’s and dangerous EGT’s? Yeah great question there. |
| 35:09 | The answer is that it depends which I know isn't obviously that useful. |
| 35:14 | The reason I say that it depends is because there are honestly just such a range of EGTs that we will see. |
| 35:21 | So let's look at the factors that will determine each EGT. |
| 35:24 | First of all the type of thermocouple we're using. |
| 35:27 | Generally there are 2 types of thermocouple, there are encased tip and exposed tip which are exactly what their name would suggest. |
| 35:35 | The exposed tip exposes the actual, the hot joint between the 2 dissimilar metals to exhaust gas flow. |
| 35:43 | Upside of this is faster response and a more accurate reading, the downside is that they don't tend to last that long, particularly in a turbocharged application and definitely if you're using 2 step launch control. |
| 35:55 | So the enclosed tip makes the sensor much more reliable but you actually will tend to see a lower EGT reading from that type of sensor. |
| 36:04 | Other aspects, the actual location you fit the sensor in and how far it's extended into the exhaust port. |
| 36:11 | Those will affect the exhaust temperature reading as well. |
| 36:14 | So you can see it's not actually black and white. |
| 36:17 | Other aspects that will affect our readings will include the type of fuel, we're going to run lower EGT on E85 compared to pump gas, much much lower again on the likes of methanol so what would be completely safe on pump gas, maybe in the region of 950 to 1000°C, you would have melted everything inside of your engine and be looking at an expensive rebuild if you saw those sorts of EGTs on methanol where we may not want to go over perhaps 750°C or thereabouts. |
| 36:48 | So I know, not overly helpful, one of the things I would keep in mind is we use the EGTs in conjunction with air/fuel ratio. |
| 36:55 | So the air/fuel ratio's really my main driver for tuning the fuel table but also we do have some maximums that we would keep in mind for a turbocharged engine. |
| 37:05 | With a lot of turbochargers if we run sustained EGT above maybe 950 to 1000°C we will probably end up doing damage to the turbine wheel and housing so we'd need to consider that. |
| 37:18 | Next question comes from KGmotorsports who's asked when sensors are installed directly to the engine, do vibrations affect sensor accuracy? That's actually a good question, I don't have solid data on this. |
| 37:28 | What I would say is that sensors can end up failing from vibration. |
| 37:34 | This would be an extreme situation and I wouldn't expect to see this on a factory engine using rubber engine mounts but certainly if you've got a solid mounted engine there can be some nasty harmonics created, particularly with race engines running to very high RPM, particularly if you also aren't running a harmonic damper on the engine. |
| 37:53 | So yeah definitely can cause a sensor to fail due to vibration, I just don't have data to say whether the vibration can also affect the accuracy of the sensor. |
| 38:05 | Certainly I don't think it would be unheard of. |
| 38:08 | Scrowe has asked, what would be a reasonable number to use for max fuel pressure drop in a turbocharged 13b rotary and also duration time? OK so you'd think this is a simple question. |
| 38:21 | But it's not quite that straightforward. |
| 38:23 | So what we need to do here is gather some data and see what sort of variation we are seeing and for how long? So while I said with a manifold pressure referenced regulator we should always see a rock solid consistent differential fuel pressure, that's not going to be the case, particularly if we look at what's going to happen when we go through large transience. |
| 38:47 | So particularly we're likely to see the fuel pressure spike above the nominal fuel pressure setting when we're at high RPM, wide open throttle, like at the end of a long straight and we jump off the throttle, same thing happens at the end of a ramp run on the dyno. |
| 39:01 | Basically we've jumped off the throttle, we've been at high boost, we've got high fuel pressure and then we're also using all of the fuel because the injectors are pulsing, then we close the throttle, the injectors stop pulsing. we're going to see a momentary spike in fuel pressure. |
| 39:14 | We see the opposite thing when we tip into the throttle and our boost climbs, we'll see a momentary drop in our fuel pressure so it's all about just making sure we understand what the typical and acceptable variations in our fuel pressure from those sort of instances are. |
| 39:29 | Generally in most instances I would expect that to be no more than about 20 or 30 kPa and probably for no more than 2-3/10th of a second so my 50 kPa and half a second, probably actually not a bad place to be. |
| 39:44 | The other thing as I mentioned during the lesson, we do need to factor in the Adaptronic here does do some compensation for dropping fuel pressure as well so unless we get to a point where the fuel pressure has dropped significantly, the ECU's actually going to be picking up the pieces in the background and maintaining our consistent air/fuel ratio. |
| 40:02 | And this also does come into conjunction with our lean protection if we are using that so hopefully that gives you a few pointers there. |
| 40:14 | Aconis has asked, what would be your strategy to protect the engine when it starts heavily knocking on high boost and high RPM, eg during drag car run? Probably rebuild the engine because particularly at high boost and high RPM if you've got a very high powered engine, it's probably going to be too late which is why as a general rule of thumb I don't lean too heavily on knock control for drag engines and rotary engines I also, I don't lean on knock control on these. |
| 40:43 | I'll deal with rotary engines first though. |
| 40:46 | The reason I don't actually use knock control on a rotary engine is because in order to validate the knock control strategy, we actually need to create knock so we can get the noise profile and set the background noise threshold. |
| 40:59 | Particularly with factory seals in a Mazda rotary engine, just about any level of knock can actually damage the engine so it's not really very smart to force your engine to knock just to set up a strategy that's essentially not really going to save us from anything anyway so that's my take on rotary engines. |
| 41:16 | So yeah high boost, high specific power levels, basically the higher our specific power level, and by that I simply mean power per cylinder, the cylinder pressure is getting higher to create that and basically as that ramps up, the amount of damage that a single knock event can do basically is amplified so that's why at very high specific power levels on a drag engine, the knock is probably going to do some pretty significant damage in just a few engine cycles so whether or not knock control is going to save us is arguable and again comes back to the fact that we have to actually generate knock in order to validate the knock control strategy. |
| 41:53 | Anyway, the other part of your question, how do we deal with this if we were using a knock control strategy? Really falls outside of those engine protection strategies. |
| 42:01 | Number 1, retard the ignition timing, probably pretty aggressively as well. |
| 42:05 | Some ECUs will also allow us to then add additional fuel and maybe even cut the boost down as well but ignition retard is the main driver in protecting us from knock. |
| 42:16 | The things that do create knock though, excessive ignition timing. |
| 42:20 | Now that's really a tuning thing, we should have that dialled in properly anyway but the other aspect is anything that will create a higher combustion chamber temperature and things like excessive boost pressure or a lean air/fuel ratio will do that so those other engine protection strategies sort of go hand in hand with kind of preventing the onset of detonation anyway. |
| 42:42 | Long answer to a short question but hopefully that helps you. |
| 42:47 | Manitou's asked, how does the Adaptronic onboard headphone jack compare with other audio knock detection systems? This is a great question actually and one unfortunately right now I can't answer. |
| 42:57 | The reason I can't answer that is because we've got it installed on a rotary engine, please check back to my previous answer about why I don't use knock control on rotary engines. |
| 43:06 | So the Adaptronic is unique at least as far as I'm aware in that it does have onboard knock control but also provides a headphone jack onboard the ECU so you don't need a separate audio knock detection system. |
| 43:19 | So in theory, on paper, great addition, I can't tell you how that checks out just now 'cause I haven't used it, we are expecting to have that ECU installed on a piston engine at some point in which case I'll happily put it through its paces. |
| 43:33 | Alright that's all the questions we've got there so thanks for watching there. |
| 43:37 | If you do have further questions after this webinar has aired, please ask those questions in the forum and I'll be happy to answer them there. |
| 43:44 | Thanks a lot and look forward to seeing you next time. |


