228 | Balancing Pistons
Summary
Balancing the components inside your engine can add up to an engine that operates more smoothly and lasts longer. While many enthusiasts will leave the balancing work to their engine machinist, balancing components such as the pistons is actually relatively easy to do in the home workshop without breaking the bank. In this webinar we’ll look at the tools and techniques required.
| 00:00 | - Hey guys, it's Andre from High Performance Academy, welcome to another one of our webinars and this time we're going to be talking about the topic of balancing pistons. |
| 00:08 | As usual, with this particular webinar, we're going to have a question and answer session at the end so if there's anything that I talk about that you'd like me to go into a bit more detail on or anything just generally related to the topic of this webinar, please ask those questions in the chat and we'll jump into those at the end. |
| 00:26 | Now balancing pistons, or balancing the internal components of our engine is something that I know a lot of enthusiasts that are building their own engines dont' touch. |
| 00:35 | Usually they will leave this task to the engine machinist to complete. |
| 00:39 | And there's nothing specifically wrong with that but it is a task that's actually relatively straightforward and easy to complete. |
| 00:47 | And often by completing this yourself, it does give you the ability to be a little bit more thorough, take a little bit more time, be a little bit more patient and often this can end up giving you better results in terms of the overall balance of your components. |
| 01:01 | Now of course when we're talking about the balance of the pistons, we can't consider this on its own. |
| 01:06 | It really is the balance of all the internal components that we need to consider in their entirety. |
| 01:12 | So I'm talking here about also our connecting rods and of course the rotating assembly such as the crankshaft, the harmonic dampener, maybe the flywheel, flex plate, clutch pressure plate et cetera, all of the components that are rotating, we do need to consider those. |
| 01:29 | However for the crankshaft and the components attached to the crankshaft such as our pulleys, this unfortunately is a little bit beyond our scope because it does require a precision balancing machine so these balancing machines could be anywhere in the region of $50,000 - $100,000 USD or more. |
| 01:47 | Obviously we're not going to be buying one of these for our home workshop so you're going to need to leave that particular part to the machinist. |
| 01:54 | But the pistons and the conrods which is a topic for another lesson, those are definitely components that we can deal with. |
| 02:01 | Now before we dive in too much further as well, it is worth mentioning here that the way we go about balancing these components is going to depend a little bit on the type of engine you're dealing with. |
| 02:12 | What I mean by this is if, for example, we're dealing with an inline four cylinder engine, maybe an inline six cylinder or a horizontally opposed four cylinder or six cylinder, the way the piston and conrods operate in those engines means that they essentially cancel each other out. |
| 02:29 | So this gives us a unique situation where we can essentially balance the connecting rods and the piston independently of the crankshaft. |
| 02:37 | Basically what I'm saying here is the weight of the pistons and the rods doesn't have any impact on the balance of the crankshaft. |
| 02:43 | That can be balanced on its own. |
| 02:45 | On the other hand, if we're dealing with let's say a V8 or a V6 engine, things are a little bit different here. |
| 02:52 | With these sorts of engines, the piston and connecting rod weight as well as the weight of the bearing shells, the ring set, locks, wrist pin et cetera and some allowance for the weight of the oil clinging to those components is actually calculated out and this is used by the engine machinist to calculate what's called a bob weight and that is a physical weight that is then placed on the connecting rods, sorry the crankshaft and journal, the big end journal, while the crankshaft is being spun and balanced in the balancing machine. |
| 03:23 | So really important to understand the differences there and the reason I say this is because if you are dealing with, let's say a V8 engine, you've sent all of your components out to the engine machinist, they balance the crankshaft and then when you get the components back, you make further changes to the balance of the pistons and the connecting rods, this will actually negatively impact the overall balance of your engine so you do need to just be mindful of that. |
| 03:47 | If you're going to do that yourself, make sure that you balance your pistons and rods before you send them out to your engine machinist. |
| 03:54 | Alright so what do we actually need if we're going to be balancing these components? And the answer is not actually a lot. |
| 04:01 | What we're going to have to start with is a good quality set of scales and the set I've got here is a little digital set, I'll just turn those on, we'll get under our overhead camera. |
| 04:12 | These ones will measure up to, I think off the top of my head, about 2000g, 2kg and they'll measure down to a resolution of a 10th of a gram. |
| 04:20 | It's the resolution that is quite important there as well as the ability to, or their maximum weight. |
| 04:28 | Now a couple of considerations here, you do want to be able to go down to a 10th of a gram just so you can really be quite accurate with your balancing. |
| 04:35 | The 2000g aspect, that might seem like overkill, definitely if we are balancing a piston most of our pistons are likely to be much less than that. |
| 04:45 | The reason I suggest giving a bit more headroom there is that often we're going to be using the same set of scales for balancing our connecting rods. |
| 04:53 | Not strictly our topic of conversation today but when we are balancing our connecting rods as we will see in our fixture in the back, there is a fixture that does go on top of our scales and that on its own might weight 300-500g so when we've got the weight of the big end of the connecting rod plus that fixture, if you've got a set of scales that maybe only goes up to 500g, or 1000g, you may find that you're over the maximum scale. |
| 05:21 | So build in a little bit of headroom here. |
| 05:23 | Now when we're looking for these scales, and I went through this myself, because I was trying to find a good quality set of scales that I could rely on and get repeatable readings from. |
| 05:35 | Might sound a little bit strange but these have been sourced from Ally Express and I think their grand total cost was about $20 USD delivered. |
| 05:45 | That doesn't sound like a lot of money and I know what you're thinking, how can you possibly get a good result with a $20 USD set of scales? I don't know because I don't know what goes on inside of them but what I can say is that they do work really well. |
| 05:59 | The most important aspect for our purposes here is repeatability. |
| 06:05 | What we want to be very certain of is essentially every time we place the same component on that set of scales, we're going to get the same result. |
| 06:12 | And that's where these have worked out pretty well. |
| 06:15 | I'll just show you that, hopefully they don't make a liar out of me. |
| 06:18 | So we'll take one of our wrist pins here, let's go to our overhead shot here. |
| 06:21 | And we'll make sure the scales are on and zeroed. |
| 06:23 | And what we want to do basically with our set of scales is make sure that if we weigh the same component, let's say three times, so we've got 98.0g there. |
| 06:31 | We want to see that, almost, perfect, they do make a liar out of me. |
| 06:38 | We want to make sure that they give us the same reading. |
| 06:41 | And despite my very very poor demonstration there, these actually have been really really good. |
| 06:49 | What we do need to be a little bit mindful of as well, is where we place the component on the scales but essentially there we've actually got three readings there at 98.1g so generally when we are balancing the components, I'll talk about our tolerances shortly, we're generally going to be balancing within maybe plus or minus half a gram so if I'm seeing a 10th of a gram there, it's not actually going to be a game changer. |
| 07:11 | Now there are much more expensive scales which is where I'm going with this, that are available. |
| 07:17 | You could easily pay $300-$500 USD or more. |
| 07:21 | When we started our engine building courses I had this set of scales, I also bought a $350 USD set of scales that we sourced from JEGS, specifically designed for balancing engine components, they were a complete disaster, I ended up throwing them out, we couldn't get repeatability to within 2/10 or 3/10 of a gram so nothing but trouble. |
| 07:44 | And actually the first set of scales we got from them were faulty, they were basically dead straight on delivery. |
| 07:49 | So wasn't particularly impressed with that. |
| 07:51 | These ones really have impressed in comparison, again for that price point. |
| 07:56 | Of course there are laboratory grade scales from the likes of Wedderburn as well, but of course the price does go up. |
| 08:04 | So what we're trying to do here is find a product that is cost effective for the average home enthusiast because if I'm standing here saying you're going to need to go and spend $500 USD on a set of scales before you can start balancing pistons, most people simply aren't going to bother. |
| 08:18 | Particularly if you're only building one or two engines, it just makes no sense. |
| 08:22 | So that's what we're trying to focus on here, getting a good balance between our effectiveness, or our repeatability and the actual price point of the scales. |
| 08:31 | So we've got our scales, the other components we're going to need here, we're going to need a way of removing material from our pistons. |
| 08:38 | There are a variety here, there's not strictly a right or a wrong way. |
| 08:42 | The two pieces of equipment that I use, I use an air die grinder which is this one here. |
| 08:49 | We'll just get this under our overhead camera, it might be a little bit hard to see in too much detail but what we've got here is a carbide grinding burr. |
| 08:58 | And we're going to be using that for removing the material from the piston. |
| 09:01 | Given that the piston is aluminium, obviously relatively soft, it's pretty easy to remove material. |
| 09:07 | One thing I will mention with the carbide grinding burrs, when you are grinding aluminium, it's really easy, because that material is so soft, for it to clog up the burr meaning that after a little while of grinding, basically the burr's full of aluminium filings and it doesn't do anything anymore. |
| 09:23 | So it's quite a good idea when you are grinding aluminium to use quite a coarse burr. |
| 09:28 | Now the problem with that is inevitably when you finish grinding the piston material, you're going to end up with quite a rough surface on the piston. |
| 09:37 | And I don't like leaving that rough surface because that can promote stress raises that could be the start of a crack on the piston, particularly in a highly stressed piston so once I've gone through and I've initially removed my material using the die grinder with a carbide burr, I'm going to use a little battery powered dremill here and this has just got a sanding roll. |
| 09:58 | Again we'll have a quick look at it under our overhead camera. |
| 10:01 | So this is just a fine, I think off the top of my head, this is a 120 grit sanding roll. |
| 10:06 | And I'm just going to go over it and use that sanding roll to basically smooth out any of that rough surface that I have left on the piston. |
| 10:14 | And that kind of smoothes the surface without really having much impact on the weight so you're not actually going to be really removing material there. |
| 10:22 | The other thing to consider is that when we are balancing the pistons the aluminium material, obviously relatively low density compared to the likes of a steel so this means that you are going to need to remove a reasonable amount of material in order to actually have a significant impact on the piston weight. |
| 10:41 | Alright so what we're going to do here is have a look at the general process of balancing our components. |
| 10:49 | And really while we talk about balancing the pistons, it's not just the pistons we're really concerned with, it's the overall weight of the piston assembly. |
| 10:57 | So it's the piston, it's the wrist pin, it's the wire locks for our wrist pin and of course our ring set. |
| 11:04 | In most instances we can basically negate the wire locks and we can negate the ring sets because they generally are pretty well matched across a set, so we'll just have a quick look here, we'll get our scales back in place and we'll zero them out again. |
| 11:17 | So we've got our ring set here for our JE forged pistons that are going in our Subaru FA20 so what we'll do is we'll just put a full ring set there on the top of our scales. |
| 11:28 | ANd we can see that those end up sitting at 21.3g. |
| 11:33 | And if I grab another ring set here from another piston, again place those on, 21.3g. |
| 11:40 | So as you can see there, and I could go on but basically the same situation exists, we've got essentially no difference in our ring set. |
| 11:48 | So obviously if they all weigh the same we can forget about them. |
| 11:51 | The other aspect we'll have a quick look at here is a couple of our wire locks, so we'll put two of our wire locks on. |
| 11:57 | We can see that that ends up coming in at 2.0g and we'll try another couple there, again 2.0g. |
| 12:05 | Probably no big surprise, we can expect that that's exactly going to be the case but I just want to show you there what we need to focus our energy on and what we don't. |
| 12:14 | Now most people would probably think that being that the wrist pins are CNC machined, they're all the same shape, they're all the same size, we should expect that the weight of the wrist pins should be pretty consistent. |
| 12:24 | And that is an area that I've actually found there can be some discrepancies in. |
| 12:28 | So it's important to also just weigh your wrist pins and check those. |
| 12:32 | So we'll have a quick look at these here and we'll go through the full set. |
| 12:35 | So 98.1, I actually think these ones worked out to be pretty good. |
| 12:47 | 98.0 so we've got one that's a 10th of a gram lighter. |
| 12:50 | And then our final one, 98.1 So really very minimal variation there. |
| 12:56 | Now that's not always going to be the case, you can, particularly with larger wrist pins, I've seen as much as 3/10ths of a gram variation across a full set of eight wrist pins. |
| 13:07 | And where that comes in is there is no right or wrong way of doing this. |
| 13:10 | A lot of people, where there is a discrepancy in the wrist pin, what they will do is they will find the lightest wrist pin and then they will remove material from the heavier wrist pins so that all of the wrist pins are weighing the same. |
| 13:23 | I tend to mix and match my wrist pins and my pistons. |
| 13:27 | So basically if I've got a light piston I can match that with the heaviest wrist pin. |
| 13:32 | And basically by mixing and matching like this, I'm reducing the amount of work that I actually need to do with our balancing. |
| 13:39 | Now of course with only a variation of a 10th of a gram there, we're not going to get too far by doing that. |
| 13:44 | So the next step is we've basically eliminated our wrist pins, we've eliminated our ring set and our wire locks, we can go on and measure our pistons. |
| 13:54 | Before I do that though I'll just mention if you are in a situation where you want to match the weight of your wrist pins, and you do need to remove material from them, we do need to consider where we're going to remove that material so that we can balance the wrist pin without adversely affecting their strength. |
| 14:13 | Obviously we don't want to balance or remove material from any of the components and end up with them being weaker. |
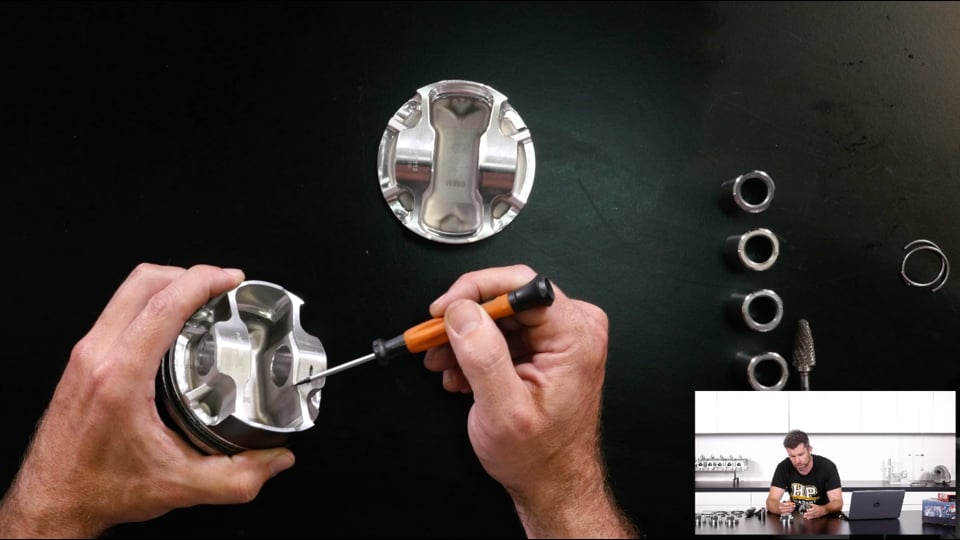
| 14:19 | So what we want to do here, I'll just get this under our overhead shot, is the area that we're going to end up removing material is from the inside radius of each end of the wrist pin. |
| 14:29 | So basically just where I'm pointing here, and we want to remove material evenly from both sides so that we're not sort of focusing all our energy on one side. |
| 14:37 | And the process of doing that is exactly the same, I'm going to start with a grinding burr on our air die grinder and I'm going to finish that off by basically polishing any marks left using a sanding roll on a die grinder as well. |
| 14:54 | In our case though we can now move onto our pistons, so what we'll do is we'll get our scales back under our overhead here and make sure that those are zeroed and we'll measure each of our pistons. |
| 15:05 | Before we do this as well, it's a good idea to make sure that you have marked all of your pistons one, two, three and four. |
| 15:12 | You can do the same with your wrist pins, that way you can keep them as a matched set and you know where everything is, where everything's going to end up going. |
| 15:21 | So our first piston there, 319.4g, we'll get our second one on, 319.5, 10th of a gram variation there, nothing to really write home about. |
| 15:33 | 318.8 so in this instance we're about 6/10ths of a gram light. |
| 15:39 | So this is a little bit light, we'll see what else we've got here. |
| 15:46 | 319.5 so in this case we've actually almost got a perfectly matched set of pistons. |
| 15:52 | We've got one that kind of ruins it for us because we've got one piston that is a little bit light. |
| 15:58 | So what we're going to have to do here is remove material from any of the pistons that are heavier. |
| 16:04 | Basically until we're within whatever tolerance we want to work with. |
| 16:08 | So in this case our variance is around about 6/10ths of a gram. |
| 16:12 | Which is a good place to talk about what sort of variance or tolerance is suitable with our piston weights. |
| 16:21 | And this is something we've posted up a little bit before on our YouTube channel and we've had a lot of people question the tolerances that we have recommended to work to. |
| 16:32 | So I try and basically control the things that I have the ability to control. |
| 16:37 | And in this case, the piston weight, I can control that pretty accurately because as long as our scales are nice and repeatable, as long as I take my time, it's not too difficult to balance the set of pistons as accurately as you want to do so in this case I'd generally try and work to about +/- a 10th of a gram. |
| 16:54 | So that's really really tight and normally people have sort of said to me, well what's the point when the mass of the oil that's going to stick to the piston is going to affect the balance after that? And yeah absolutely that's the case. |
| 17:07 | The thing is I can't control the amount of oil that's going to collect on the piston when it's operating but I can control how tightly the balance is across the set when I'm balancing the pistons here. |
| 17:19 | And the reality is it doesn't actually make much difference in terms of the amount of effort that I require and the amount of time it takes me to do this. |
| 17:27 | So realistically what I'm getting at here is for an extra few minutes work, I can get my tolerances tighter, I don't see a downside in doing that. |
| 17:36 | I've never seen an engine fail because the pistons or conrods, or components were too well balanced, it's just not something that's going to be an issue. |
| 17:45 | So for a small amount of extra effort, I see no problem with being a little bit more accurate with my balancing. |
| 17:51 | Generally I would say that for a street engine, if you're within about +/- 0.5g, you're probably within a realm of measurement or weight that's going to be perfectly acceptable. |
| 18:04 | Alright I'm going to now show you where abouts it's safe to remove material. |
| 18:09 | Following that we are going to move into some questions and answers, so this is probably a good time to mention that if you've got any questions on this, please feel free to start asking those and we'll jump into those really shortly. |
| 18:22 | So this is really important to understand where abouts we can safely remove material. |
| 18:26 | Just like I was talking about with the wrist pins, we don't want to end up removing material at the expense of strength with these components. |
| 18:35 | And obviously the pistons are a relatively highly stressed component in our engine so we want to be pretty mindful. |
| 18:42 | Now the problem here is that there are no absolutes and every piston design is a little bit different so it does require a little bit of common sense and a little bit of assessment on your part to decide where there's excess material that can be removed safely without risking weakening the piston or the component. |
| 19:01 | So we'll just get our piston back under our overhead camera here, I'll just grab a little pointer so I can do a bit of a more accurate job of pointing out some of the components here so the problem we've got with our Subaru FA20 piston here is that it has been built to be quite light so there's not a lot of excess material in this piston and that makes our job a little bit more difficult. |
| 19:24 | So first of all I'll just mention that the underside of the piston skirt here, this is, I've seen a lot of people actually drill holes into the underside of the piston skirt in order to remove material for lightening and that is the last thing you want to do. |
| 19:37 | That piston crown is really highly stressed, it's also going to be very very hot in operation and you've got a minimal amount of piston material there through the crown anyway. |
| 19:50 | This has been pretty well designed by the piston manufacturer to balance the strength versus the weight of the piston anyway. |
| 19:57 | So by drilling into that, you're going to be eroding a lot of that strength and you're going to likely end up with a failure where the combustion pressure can blow through the top of the piston so we don't want to do that. |
| 20:09 | Likewise we don't want to be removing any material from basically any of the external or top running surfaces of the piston. |
| 20:16 | Obviously anything that's going to be running against the cylinder wall, we need to maintain that nice smooth finish that the piston manufacturer has given us. |
| 20:26 | So that kind of leaves us with one option which is the underside of the piston skirt and that's exactly what we're going to be using, where we're going to be removing our material from. |
| 20:35 | So generally in a piston that's designed like this, what I'm going to be doing is using my die grinder to remove material from the inside radius here, right the way along both sides of the piston. |
| 20:47 | The important point here is to sort of work evenly on both sides of the piston so that you're removing a minimal amount of material from each side so that you don't end up removing all of the necessary weight from just one small area of the piston, obviously that's definitely going to weaken it. |
| 21:04 | So a small amount of material, evenly right the way around. |
| 21:08 | The other aspect we need to be mindful of here is one of the most stressed components on the piston is the wrist pin boss. |
| 21:14 | So we want to make sure that we maintain as much material as we can around that wrist pin boss. |
| 21:20 | That being said here, there are a couple of little protrusions here where we can focus a little bit more effort with our die grinder, removing that material without sacrificing the strength of the piston. |
| 21:32 | Now when we've got all of that right, I'll just see, I think I've got one that I prepared earlier. |
| 21:40 | Let's just have a look at this, so this one here is a piston that I've previously balanced and it's a little bit hard to tell because there hasn't actually been a lot of material removed from this. |
| 21:51 | But what I've actually done is just basically added a chamfer to the inside edge of that pin boss. |
| 21:57 | It's only removed just a few millimetres of material, again I've done exactly the same on the other side, again just a little bit hard for you to see but hopefully you can understand if we compare, if I get the piston, the other piston on exactly the same angle we can sort of see the difference between the two and you can see that radius or chamfer that I've put on there. |
| 22:14 | So I've again used my die grinder initially to remove that material and then following removing that material with a die grinder, I've used the sanding roll just to give a nice smooth finish to that piston. |
| 22:26 | So that's as simple as that is. |
| 22:28 | Some instances we're going to have a piston that really lends itself well to removing material without any impact on the strength. |
| 22:37 | So we see this piston here, which I've got is a sample piston for I think it's an air cooled Porsche. |
| 22:44 | So we can see we've got a lot more material, particularly around the wrist pin boss. |
| 22:47 | These two, or these four little bulges that we've got around this wrist pin boss here, particularly up at the top, it's a really safe place to round those off and remove material, you're not going to be getting anywhere close to the wrist pin itself and hence you're not going to end up weakening that wrist pin boss. |
| 23:06 | So you can see here if I turn it on its side, we've got a really large amount of material through here, this is sort of our minimum thickness of our material so if any failure's going to occur, it's going to occur here. |
| 23:18 | So we can do a pretty good job of rounding that off, basically taking the corner off that wrist pin boss and you can do that in four places and that's a really good way of removing material without sacrificing strength. |
| 23:31 | Now the pistons, the two pistons that I've looked at there, obviously are aftermarket forgings. |
| 23:37 | What you're going to find is that on some factory pistons, there will actually be factory balancing pads and those will sometimes be on the underside of the skirts and these are obviously there for that exact purpose so it's easy enough to grind those off as required in order to get your balance where it needs to be. |
| 23:55 | Obviously once you have done your balancing, it's going to create a lot of dirt, dust and debris that's going to end up everywhere through your pistons so as usual with any engine building, cleanliness is super important so make sure that you give your pistons a thorough cleaning before you end up installing any of those components. |
| 24:18 | Alright we'll have a look at our questions. |
| 24:22 | And I don't think we've got any. |
| 24:28 | No, no questions. |
| 24:32 | Obviously I did a great job of explaining that today so let me just actually just head across and make sure that that is the case. |
| 24:41 | Nope. |
| 24:44 | As usual for our HPA members, if you do have any questions that occur after this webinar has aired then please feel free to ask those in the forum and I'll be happy to answer them there. |
| 24:56 | Of course it is a relatively straightforward topic so there's a good chance there are going to be no questions and that's fine too. |
| 25:03 | Thanks for joining us everyone and hopefully we'll see you again next week, cheers. |


