276 | Math Channel Basics (Data Analysis)
Summary
Math channels are a critical part of all logged data analysis at a professional level. In this webinar we’ll go through what math channels are, how they work and how to make use of them in your analysis.
| 00:00 | - Welcome to today's webinar guys. |
| 00:02 | Today we are looking at building math channels in a data analysis system. |
| 00:07 | So a lot of you guys I'm sure have already got some familiarity with that data logging is and what log data is. |
| 00:15 | The idea behind a math channel is it allows us to take that log data and expand it and make it more useful to us. |
| 00:22 | So the general idea is that you've got, let's say we're logging a typical thing in the car like road speed for example. |
| 00:29 | Let's say we're logging the GPS speed of the car. |
| 00:31 | The idea behind a math channel is that we can take any channel, that speed channel for example and we can manipulate it, we can either only look at it at certain times during the lap, we can invert it by making it the reverse of itself, we can integrate it, differentiate it, all sorts of different things, there's all sorts of different tricks you can do and I want to spend today going through a couple of examples showing you guys a couple of the different tools and a couple of the different ways we would use math channels and how to get the most out of them in your logging system. |
| 00:59 | So I am going to be doing today's example in MoTeC's i2, it's just one of the, it's probably the go to tool for me, it's one I'm most familiar with but everything we're going to go through today is really applicable to almost any logging package so whether it's something at the more simple end of the spectrum, whether it's something like an AiM or a VBOX or whether it's right up the high end which is more towards PI, MoTeC and Atlas and stuff like that. |
| 01:27 | Really the philosophy behind math channels. the way you use them, the way you build them up is really the same, there's always different intricacies, maybe the language they use or the term that they use to describe them or the exact buttons you click along the way. |
| 01:41 | That's really the easy part, once you've played around with the software a little bit, it's really the core purpose of math channels I want to get across to you guys today. |
| 01:51 | So the basic idea, as I talked about at the start there is that we've got an input output relationship, so we've got our input which is our raw log data. |
| 02:00 | So whether that's steering position, road speed, throttle position, damper position, whatever it may be. |
| 02:08 | We've got the input, then we've got this math channel which we can think of for now as a bit of a black box and we've got an output. |
| 02:14 | So the idea is you take your input, you put it in the black box, you do something with it, you manipulate it and you spit something out the other end and what we spit out the other end is that math channel and that math channel is something we can treat as an entirely new log channel in its own right so all the channels, whether it's one or many channels that we're actually combining together in the input side of that math channel, they are still available, they're still, we can still use those and look at those normally in the data, the idea is we're making a completely new virtual channel, something that wasn't directly logged inside the logger but it's something we're computing inside of our logging package after the fact. |
| 02:49 | So I'm just going to give you, we are going to go through lots of examples today but I just want to give you guys a little bit of a look through the math channel editor. |
| 02:57 | I'll just explain a little bit of each part of the editor itself, the way it works in MoTeC's i2 and then we'll come back and we'll delve into, a lot of these things will become a lot clearer as we actually go through the examples but I just want to give you guys a little bit of an introduction before we get into it, just hopefully clear a little bit of that confusion. |
| 03:15 | So there's a couple of different ways you can get to the math channel editor. |
| 03:18 | You can control M is the shortcut, you can get to it from the taskbar at the top here as well. |
| 03:25 | But essentially the way it's laid out in MoTeC is that we have the option of separating our math channels out into folders. |
| 03:33 | So I've got lots of different folders here, this is the way I tend to separate out my math channels. |
| 03:40 | It's not a problem when you've only got maybe 2 or 3 math channels, you can just dump them into a single folder and you're not going to get confused. |
| 03:45 | In reality when you're working, particularly when you're working professionally, you've got usually 100s of different math channels inside your analysis project so you really, in order to be able to maintain them and keep them organised, the way I like to do it is to keep them organised into folders which his what I've got here. |
| 04:03 | So I've got sections for brakes, bump stops chassis, my conditionals which we'll go through in this lesson as well. |
| 04:10 | Just for dampers there's the built in MoTeC ones as well, there's one for tyres, powertrain blah, blah, blah, there's lot of different, you can discretise those up in as many of those as you want to but just to give you a little bit of a look through here. |
| 04:23 | This is a relatively small project that I've got, it's just that I'm using for these webinars but you can see here as I click through I've got different math channels defined, each one of these lines is a math channel in its own right so I'll just try and choose a relatively simple one to start with and I'll just give you guys a bit of a walkthrough of what's going on here. |
| 04:44 | So at the top left here we've got the name of the math channel. |
| 04:50 | So when I go through, sorry I'll just get back into that. |
| 04:53 | We've got, MoTeC is not complying because it's getting freaked out by my escape, sorry guys. |
| 05:01 | So in the top left here we've got the wheel position, which is the name of this particular math channel. |
| 05:07 | Then we've got the option to choose the quantity. |
| 05:10 | So this really, the quantity is really just describing what sort of quantity that we're dealing with, whether it's a length, whether it's a mass, power, speed, air/fuel ratio, it's just a way of basically quantifying what sort of units we're going to want to describe this with. |
| 05:27 | So MoTeC, along with all the other packages, will have lots of different ones built into it. |
| 05:31 | in this case we're using a math channel to work out the wheel position from the damper position. |
| 05:38 | So in this case we'd be using the length in distance quantity, which I'll leave that selected. |
| 05:43 | We've got the, we can select the rate at which we want this calculation to be updated. |
| 05:47 | So if I've got it set as auto which is what it's usually set as by default, that will be calculating that math channel at the rate of the input channel. |
| 05:56 | So let's say I'm doing something with the wheel speed, with the front left wheel speed, if the front left wheel speed is logged at 100 Hz, that means by default this math channel will also be calculated at 100 Hz. |
| 06:06 | There's different situations where you may or may not want to go higher or lower on the rate, oftentimes you're just leaving it as auto, you don't always need to, you're not always coming here and changing this. |
| 06:20 | One thing I would say is when you're dealing with a lot of math channels and a lot of really heavy data and a lot of numbers being crunched inside the analysis package, this is one time, if you don't need it to be calculated at really high frequency, this is one place you can lighten the processing load on your software package just by coming here and choosing a lower frequency. |
| 06:39 | Now we've got the options here, these will become a little bit clearer in the webinar as well, essentially this is the display unit, this is the unit that'll be displayed when you're looking at it inside the software. |
| 06:49 | We can choose the number of decimal places. |
| 06:51 | We can choose the colour, this is just the colour of the line like we see shown outside just behind the math channel here, this is the colour definition of the channel. |
| 07:00 | So not sure if I've talked about it so far in these webinars but a lot of the times I make quite a lot of use of colour conventions so whether it's position on the car, so front left for me is always red, front right is always green, rear left is orange and right rear is blue. |
| 07:15 | And that just means when I'm doing these positional channels it helps me understand what position on the car so that's something I use colour convention for quite a lot. |
| 07:24 | So you can see this is for the wheel position front left and I've got that coloured as red. |
| 07:27 | We've got our actual input area here which is where we actually write the math expression so in this case I'm just taking my damper position, my correct damper position for the front left corner and multiplying it by the motion ratio that I've got programmed for this car it's shown in red there and I'll come back to this in a little bit because this is, it's looking for a piece of information that's not there so it's highlighting that in red because typically I've got my, I've just got my analysis package linked to a dynamic spreadsheet which is based on my setup of the car and that's because it's using live values from the setup to do more detailed calculations in the background. |
| 08:09 | I don't have that set up here at the moment, that's why it's red but we can ignore that for now. |
| 08:14 | There's a help section which will become clearer once we start doing some examples. |
| 08:18 | Down here in this box here, this is where we've got all of our logged and math channels so everything that's logged for the car, the way MoTeC do it is it's got these little yellow squiggly lines. |
| 08:28 | That indicates that's a logged channel and the ones where it's got this little calculator looking things, that's where it's math channels that I've got defined inside my project already. |
| 08:38 | So that can be important because often you'll be compounding math channels. |
| 08:41 | What I mean by that is we'll start with a log channel, we'll end up building maybe a simple math channel and then maybe end up combining that and multiple other simple math channels into maybe a more complex math channel so it's just a nice useful indication to understand where your data's coming from. |
| 08:57 | Sometimes you've got channels that are named very similarly between a logged and a math channel. |
| 09:01 | Again it just gives you a nice way to differentiate between them. |
| 09:04 | We've got some operators here which are things like obviously subtraction, addition, multiplication, division, greater than/less than, some different boolean operators here and we'll be making a little bit of use of those today. |
| 09:16 | But essentially what I've got here which is a multiplication, I can type that in by star, the star symbol or alternatively I can just come here and click on the button, really just down to your preference, how you want to use it. |
| 09:26 | Range, we'll come back to that later in the webinar, in this section here we've got the built in functions, so these are all of the, whether it's trigonometric functions, which are shown here, which is sine, cos, tan, all the ones you guys are probably already familiar with. |
| 09:39 | Smoothing, derivatives, integrals, filters, some statistical functions which are really useful, which we'll do an example with today with maximum, mean, which is another way of saying average. |
| 09:51 | There are lots of different, basically built in math functions to do some of the heavy lifting for you which is a nice addition and the constants. |
| 09:59 | And the idea behind the constants is if you've got a value that's not going to change over time and you want to be able to reuse it within multiple different math channels, this is the place you can store that and I think I'll come back and talk about that once we've done a few math channel examples. |
| 10:12 | So right now I think the best thing to do is to jump straight in and to start doing some examples and I think that's the best way to communicate this for you guys. |
| 10:21 | So what I'm going to do to start with is do a sign correction. |
| 10:25 | So sign correction is something you end up, it's a really simple math channel to do but it is something you end up doing quite a lot. |
| 10:31 | What I mean by that is, let's say you've got a steering input and you're not happy with the direction of the steering input, maybe it doesn't line up with your sign convention. |
| 10:41 | All I mean by sign convention is that you usually choose positive and negative to mean different things so the normal convention for me is that positive values of the steering angle and lateral G force always mean left hand turns. |
| 10:54 | So whenever I see a positive value on a graph, that always means the car is turning left, so a negative means the car's turning right. |
| 11:01 | So sometimes, let's say you've got a logging system, maybe you haven't got the ability, obviously I should say the best place to fix that is by going in and changing the configuration of what's being logged. |
| 11:11 | So you want to go into the configuration of the logger itself and you want to flip the way the values are being logged so that it matches your convention. |
| 11:19 | Sometimes you don't have the ability to do that. |
| 11:21 | Whether it's because you can't log into the logger, you're maybe not allowed to log into the logger, let's say you've got spec series where the logger itself was locked and you're not able to access it. |
| 11:34 | Or maybe you don't have the tools with you to be able to do it, whatever the reason, sometimes you need to be able to flip, invert channels. |
| 11:41 | So I'm just going to go through and do a little bit of an example now. |
| 11:44 | So I'm just going to make a new worksheet here and I'll just bring up a time/distance plot just to be really clear about it and I always like to add in my speed channel first, gives me a little bit of context what's going on. |
| 11:57 | And I will add my steering channel here as well. |
| 12:04 | So we've got these 2 shown up here. |
| 12:05 | So let's say we've got the example where, so in this case, we've got a positive value shown here and we've got, I should be a bit more clear, negative there and positive there, let's say we want to flip those values, let's say for argument's sake that this is opposite of what we want. |
| 12:23 | So what I can do is take that steered angle channel and do a corrected channel based off it and that means that while this steered angle channel will still remain in the background for all my analysis for this particular car, assuming I'm not going to change the configuration of the logger, I'm always going to use the corrected channel from now on. |
| 12:39 | So let's make that channel. |
| 12:41 | So I've just got a blank folder here for webinar examples where I'll put today's math channels. |
| 12:46 | And let's go through and build this math channel up. |
| 12:49 | So I'm going to call this steering angle, I misspelt that already, angle corrected. |
| 13:03 | Now we come across to our units here and I'm going to go to the top, there should be one for angle here. |
| 13:10 | Now the default for angle is radians, I'm going to set the display unit, I want that to be shown in degrees, that's what we've got the native one being shown here in degrees and the calculation is also being done in degrees because that's what the original channel is so I'm going to set that to degrees there. |
| 13:25 | I'll leave the channel colour by default as red, I'm happy with that, I want it to be distinct from the original channel, in this case the rate is fine to stay at auto. |
| 13:34 | So the first thing we want to do, now we can type everything manually into the expression window here but I'm just going to use the search function and just find the steering angle. |
| 13:44 | So there's our steering angle channel, we can see that that's the logged channel. |
| 13:48 | Now if I just for argument's sake I'm going to just put the original steering angle on there and we'll see what that looks like. |
| 13:56 | So I'll just come out here and I'm just going to add our new, corrected channel there. |
| 14:06 | Now we can see, we've got our new channel which is shown in red here and this is the exact same thing. |
| 14:10 | So we can see essentially I've just repeated that channel. |
| 14:14 | So if we just type the original channel in there, we get the original channel back. |
| 14:17 | Now I want to invert that so I'm sure a lot of you guys can already anticipate what I'm going to do here, I'm just going to go back into the channel. |
| 14:22 | I'm just going to multiply by negative 1, so I'll just go negative 1 times steering angle, so if I come back here, this will update and now I've got the inverted, just to make that really clear I'll just actually push that up over top of the other one so you can see they're a complete mirror image of each other. |
| 14:41 | So this is something you'll be making quite a lot of use of in data analysis. |
| 14:45 | It's obviously super simple but it is an important skill to be able to know how to do and when to apply it, whether it's a steering trace which is quite common, lateral G, damper direction, whatever it is, this is something you'd be making quite a lot of use of. |
| 14:59 | The other thing that I find myself using a lot in data analysis is the idea of doing a ratio or a percentage. |
| 15:08 | So one of the most common ways you'll be using ratio calculations is in something like brake bias for example. |
| 15:16 | So this is where we want to understand how much of the hydraulic brake pressure have we got in the front axle, relative to the entire car? So what percentage front have we got compared to what the rest of the car's got. |
| 15:27 | So that's usually a metric that you'll be tracking quite a lot throughout a race weekend, it's obviously really closely linked to the balance of the car under braking and also the performance of the car under braking. |
| 15:39 | It's something that in most racecars there's a way for the driver to adjust. |
| 15:43 | So whether that's electronically, or whether it's just with a manual knob that they can twist to move the bias bar on the pedal box. |
| 15:50 | Having a way to be able to see what the actual hydraulic bias you've got in the brake system is really important. |
| 15:57 | So I'll go through here and we'll do that calculation now. |
| 16:00 | Just before I start that, let's put the, let's add our brake channels up here, so I'm just going to put a front and the rear brake pressure ontop of each other. |
| 16:13 | And you'll see here, this is part of the colour convention I use again which is red when there's a value for the front axle and a value for the rear, I usually use red on the front and blue on the back, again it just helps me intuitively understand that without having to come up to the legend and actually read what they are each time, I can understand straight away what they are. |
| 16:30 | So here we can see at a given braking event, and this is typical, obviously it depends on the combination of master cylinders, callipers, disc size, weight distribution blah, blah, blah, there's lots of different things that go into it but you're generally always going to have more brake pressure on the front axle than the rear and certainly in a conventional car anyway. |
| 16:53 | And that's obviously just because so much of the weight is being transferred to the front axle under braking, the front axle's got a lot more vertical load on the tyres so you'll typically have a lot higher proportion of hydraulic pressure in the front relative to the rear. |
| 17:05 | So what we want to do is come up with a way of saying how much brake pressure have we got in the front axle relative to the total? So let's make that channel now. |
| 17:13 | So I'm going to call this, make a new channel and say brake bias calculation. |
| 17:22 | Now in our quantity section here we should have a place to put ratio. |
| 17:27 | So there we go we've got ratio and I'm going to leave these units by default and I'll come back and I'll do an example showing why these are important in a second. |
| 17:36 | I'm happy to leave the colour as it is. |
| 17:39 | So what we want to do is we want to take the pressure on the front axle and we want to divide it by the total, so the front and the rear added together. |
| 17:47 | So let's come down to our expression editor here and we'll look at brake pressure, brake pressure front and I'm going to type in a division and then some brackets because I'm going to add the front and the rear. |
| 18:00 | So front plus the rear and that's actually something quite important to bring up. |
| 18:09 | You guys might notice that as I type these out the font and some indications about the fonts are changing. |
| 18:17 | So this is, some data systems do this, some don't, this is the way i2 deals with it in that it gives you some prompts to help you understand whether you've made a mistake or not. |
| 18:27 | So let's say I've missed a bracket off the end of this expression. |
| 18:29 | You can see all of this is shown in lower case now. |
| 18:32 | Sorry not in lower case, it's not bold, so when everything's right you'll have the channels themselves will be written in bold and that just gives you an indication that everything's right. |
| 18:42 | So when we add that bracket back in and it tells me that everything is good to go again. |
| 18:49 | So if I get rid of that there's also a little bit of a hint down here which is really nice, in this section here, it tells me there's mismatched parenthesis which just means mismatched brackets, means you don't have equal brackets on either side of the expression. |
| 19:00 | That's a real pain the way it keeps closing that, I'm going to have to start that again. |
| 19:04 | But it's OK, it's going to be quick, so brake bias, I'll have to remember to stop using that highlighter, brake bias calculation. |
| 19:16 | I'll just reset that as ratio. |
| 19:20 | I'll have my brake pressure front and let me just go back and retype what I had before 'cause I did not save that before it closed. |
| 19:32 | So you can see there that we've got everything showing up with the channels in bold so we know everthing's right. |
| 19:39 | There's another prompt that MoTeC does that you guys saw a little bit before so if I've got an error in the way I've typed something, you'll get it coming up red as well so wherever you've got something that's mistyped, you'll get a red warning and again you'll see here in this warning section, it just gives a little bit of information, it says one or more channels cannot be resolved, the red is a really helpful tool to show you where that problem is in your expression so that was just brake pressure rear and that brings it back to life. |
| 20:03 | So let's have a look at what this brake bias calculation channel looks like. |
| 20:07 | So we'll just zoom out again and I'm going to add in our newly made channel. |
| 20:15 | Brake bias calculation here. |
| 20:18 | OK so this is really messy for a start and there's a couple of things that making a channel like this makes us some really good points for that I'll get to go through. |
| 20:26 | Let's, for a start let's just zoom in on, there's one braking event, little bit so we can see what's going on. |
| 20:35 | So we've got the car accelerating here and obviously the speed trace is dropping off in this section. |
| 20:39 | We can see where the brakes are being applied to the car and we can see we've got a brake bias calculation which is being shown in this part of the legend here. |
| 20:50 | 0.63 so that's a relatively typical number and we're calculating this thing as a ratio. |
| 20:54 | It's saying roughly 60% of the braking force is being applied to the front axle. |
| 20:59 | Obviously that's varying a little bit throughout the braking. |
| 21:03 | So this is giving us what we want and this is telling us the brake bias at different points during the brake zone so there's a couple of things I want to dig into here, the first is that this calculation is being shown as a ratio and not exactly as a percentage which might be a more typical way, we might be used to seeing something like a ratio or something expressed so I'm going to show you one of the nice tricks you can do in i2. |
| 21:33 | Which is the display unit. |
| 21:35 | So one of the ways I could change this to being shown as a percentage is, let's say I could multiply the entire thing by 100. |
| 21:46 | So I'm just going to put it at this end to make it really clear. |
| 21:48 | Times this whole thing by 100. |
| 21:52 | Now we've got the brake bias calculation shown up here in 62% which is obviously the same number as what we saw before but multiplied by 100 so it shows it in terms of a percentage. |
| 22:04 | That's one way you can do it, there's a nice trick that MoTeC has built into it to handle unit conversions for you. |
| 22:11 | So if I just get rid of this 100, get rid of that extra bracket at each end. |
| 22:18 | So we've got, this is where the different, these 2 units inputs come in for us. |
| 22:22 | So this unit section here where it's the result unit, what that's talking about is what are the units of the result of this calculation? So we're doing all of our calculation here in terms of being a ratio so the true output of this is, we expect this to be what we saw before, roughly 0.6 or less than 1, it's always going to be a value less than 1, it's being calculated as a ratio but rather than multiplying by 100, if we want to convert that to a percentage, that's what the display unit is up here for and that's handling that unit conversion for us so if you've got this feature inside your software, it's definitely something I encourage you to use, it helps keep your units more consistent throughout your project, it's to let the software manage the unit conversion for you. |
| 23:10 | So if I just come in here and I can just select that as percentage for us, and I've got rid of that 100 now but it should come up with, yeah so we see again, it's done the conversion for us so now we're back to 63% and crucially the unit is correctly shown as a percentage and not a ratio. |
| 23:28 | So that's one of the things that is important to be aware of with that unit conversion tool. |
| 23:32 | The other part here I want to dig into is all this noise. |
| 23:36 | So essentially the only time we're interested in calculating the brake bias is when we're actually braking, we don't care about what, the brake bias is something that's useless to us in the periods of the lap where we're not using the brakes. |
| 23:48 | And this is something, what I'm going to go through now is something you can apply to lots of different things in data analysis, It's called a conditional statement and all that means is that you only want to evaluate or calculate these math channels sometimes. |
| 24:01 | You don't want to do them all the time, there's just going to be sometimes they want to look at this and other times they don't or maybe sometimes you want to calculate it this way and other times I want to calculate it this way and it's called a conditional because it's based on conditions that you write so when this is true do this, and when this is true do this or if this is not true do this or if this value's above this do this and if not do this. |
| 24:20 | And I'll show you how we're going to use that here. |
| 24:23 | So if we look here, we've got these values in the middle of the braking zone here and we've got our calculation being done for us in this section we've got this nice smooth, not smooth but this nice calculation that we expect to see for the brake bias. |
| 24:38 | Everywhere else in the lap where we've got no braking events going on, we've got these crazy numbers and the problem with these crazy numbers is it just makes it really hard to read what's going on. |
| 24:46 | So it's something I like to clean up and the best way to do that is to use a conditional. |
| 24:53 | So I just want to first, before we clean up I just want to dig into exactly why we've got that going on. |
| 24:57 | So you can see here if I just convert, yeah if I look in terms of points rather than in lines. |
| 25:03 | It's a little bit hard to see but you can sort of see in the areas where we're not braking, we haven't got a perfectly zero brake pressure, what's going on there. |
| 25:11 | So whether it's very small pressure fluctuations within the actual mechanical brake system itself or whether it's just sensor noise, whether it's just electrical noise happening when the sensor's just idle essentially, regardless of why we've got that noise there, you can see the front and the rear, we've got these little bobbles in there, in fact if I just zoom in, it'll make it a little easier for you guys to see. |
| 25:36 | If I just increase the size of that you can see we've got these small fluctuations here. |
| 25:40 | Because we're doing a bias calculation, we're doing a ratio comparison between 2 values, even though those values are tiny, they're insignificant in terms of the actual braking, the software's still trying to do that brake bias calculation for us all of the time. |
| 25:55 | So what we want to do is just do this calculation when we're braking and when we're not braking, ignore it. |
| 26:01 | So there's a few different ways we can implement that. |
| 26:03 | I'm just going to do a really simple way of doing that and I'm just going to modify our brake bias calculation now. |
| 26:11 | So if we come back, we can use what's called a choose statement. |
| 26:18 | And again there's a couple of different ways this can be implemented but essentially MoTeC's way of doing a conditional, they call it a choose statement and essentially there's 3 parts to a choose statement. |
| 26:28 | We say the part where we do the test or the condition, we say if this is true to do that, if this is true, this is the test, that's going to be a true or a false test. |
| 26:36 | The second part is where we say do this if true and the third part is where we say do this if not. |
| 26:43 | So I'll show you how we're going to do that. |
| 26:45 | I'm just going to add some space in here so I'm just going to write choose. |
| 26:49 | Now I'm going to write our test in here, so I'm going to say if, I'm going to say when the brake pressure is greater than let's say 2 bar. |
| 26:58 | So let's find our brake pressure channel in here again. |
| 27:01 | So if brake pressure, I'm going to put a greater than symbol, is greater than 2, I separate with a comma, so this is the first part of our expression here. |
| 27:09 | Brake pressure greater than 2, do this which is the calculation we were doing before. |
| 27:13 | Otherwise, give me 0. |
| 27:17 | Now I've added that bracket on the end so there's 3 different parts to that. |
| 27:20 | And again this is where the little help section can be really helpful. |
| 27:25 | So the great thing about this is it gives us the layout of the built in function. |
| 27:32 | So this is a function that I could have got down from here and the choose statement is one of the built in functions. |
| 27:37 | I usually find it quicker just to type them if I know off the top of my head but you can equally come down here and click on them from here. |
| 27:45 | Any one of these functions has got a help file associated with it, a small help hint and what that's giving us here is a little bit of information about how this is structured. |
| 27:54 | So this is what I was talking about. |
| 27:55 | The choose function works, you write choose, open bracket, the condition, so that's the test that we're doing, if it's true to this and the third part, if it's false do this. |
| 28:05 | And then you've got a little bit of an explanation of the terms here which is really helpful, particularly when these things become more complicated. |
| 28:11 | And often you've got an example of how they can be implemented particularly in the more complicated ones as well, I think we'll see some of those later. |
| 28:19 | So again reading from left to right, if front brake pressure greater than 2 bar, give me this calculation, if not, give me 0. |
| 28:27 | So let's see how this looks now. |
| 28:29 | Now we've updated that. |
| 28:32 | OK so this is looking a little better now, let's zoom out to our full lap view. |
| 28:37 | So now this is, for me anyway, this has become a lot more readable to what's going on, I can see much clearer about what's happening with the brake bias. |
| 28:43 | What we can see in most of these braking events here which is quite interesting is that the bias is migrating to the rear of the car in each braking zone. |
| 28:52 | So what that means is because our brake bias, our hydraulic brake bias number is getting lower as you get to the end of the braking one, so let's say, this is a good example here, actually a little bit easier if I zoom out. |
| 29:04 | You can see at the start of the braking zone, the brake bias number is higher, so there's a higher proportion of front bias and as they release the brake, as the brake pressure gets lower, there's a bit of a trend for the brake bias to reduce which means it's going more rearward on release which is sometimes something you want, sometimes you don't want, depends on the car, depends on the driver preference, all of that stuff. |
| 29:27 | But this is a really important piece of information to understand about your brake bias anyway. |
| 29:31 | So there's one more thing I want to do to clean up this channel a little bit more and that's to get rid of the zero because the zero, while it's nice that it's differentiating each braking zone for me, it's still cluttering up my plot, it's messing up the scale, it's just not really giving me what I want so I'll show you one more trick you can do with that. |
| 29:50 | So if we go back to our brake bias calculation again, so I've got the false part as 0 so when the brake pressure is less than 2 bar, it's giving me a 0 output which is why I see it zero reflected on the plot. |
| 30:00 | What I want to do is actually show nothing, I want to show no information on that plot and the idea is it'll rescale it for me and make it a little bit easier for me to see what's going on. |
| 30:09 | That'll be clearer when I go back and show, there's a couple of different ways we can do no value in i2. |
| 30:16 | Again every software's going to have their own syntax for how they describe that. |
| 30:20 | One of the ways you can do is do 1 over 0 which mathematically speaking not possible, it's not a fraction that's mathematically valid so that's just MoTeC's way of saying, do nothing. |
| 30:35 | So we can see that here, we can see anywhere where the brake bias isn't being calculated because the pressure is too low. |
| 30:42 | It's giving us no value and the really nice thing about that is you can see how much nicer it's scaled now, I can see much more shape to these brake bias plots. |
| 30:50 | I can, obviously into these plots you can always go through and manually affect the scale, whether it's manually dragging the bar or going to the plot and rescaling it manually but I find it's nice to be able to write the math channels in a way where the data scales automatically for you, you don't have to go and mess around with the plotting settings too much, I find that's a much faster way to work in the long run. |
| 31:10 | So that's one way we can get it to show nothing. |
| 31:13 | There is another way and MoTeC has got another piece of syntax that you can use and again this is MoTeC specific but it'll be easy to find whatever it is for your system, it's called invalid which is just invalid followed by an open and a closed bracket, and it gives us the same result. |
| 31:28 | There is one subtle difference that invalid is useful for is that when you're using telemetry data, so obviously everything we're looking at here is with logged data, so that's data that we've plugged into the car after it's run on track and we've downloaded it. |
| 31:42 | When you've got live telemetry data, if you're using i2 software or MoTeC's i2, then 1 over 0 does not work for telemetry data but invalid does. |
| 31:51 | So if you're doing live math channels with live data coming off the car as it's driving around the track, that's where you use invalid rather than 1 over 0 so that's one trick to be aware of there. |
| 32:02 | So I think there's been quite a few nice lessons involved in doing that brake bias calculation. |
| 32:08 | There's one more calculation I will go through with a similar application looking at something like your air/fuel ratio. |
| 32:17 | So we're going to use a couple of similar tricks here, we only want to, obviously with air/fuel ratio it's jumping around all over the place throughout a lap, a lot of the time you're only interested in air/fuel ratio, depending on what sort of things you're looking at, maybe the most common thing would be looking at what is it at wide open throttle, what is it when you're at full throttle throughout a lap? So there's a couple of different ways we can do that but I'll just go through and implement one now. |
| 32:42 | So let's type a channel name in here, actually before we do that, let me just show me what the raw lambda values look like for a start. |
| 32:52 | So let's add one of the lambda channels in here. |
| 32:56 | So the raw lambda left. |
| 33:00 | So we can see in the areas where, in fact let's add the throttle in as well 'cause that'll give us a little more context about what is going on here. |
| 33:11 | So let's say throttle pos. |
| 33:14 | So often we're interested in, like I said before, the wide open throttle lambda. |
| 33:19 | The partial throttle, certainly from a maximum performance perspective, from a drivability perspective it's useful, from a maximum performance perspective you're not usually as interested in the partial throttle lambda. |
| 33:31 | Certainly there are cases that you're interested, from a really basic perspective it's usually wide open throttle. |
| 33:39 | So we can see in this area here where we've got these table tops, these plateaus, these are the areas of wide open throttle that we're most interested in and we can see that we've got the lambda jumping around quite a lot more and doing some really crazy non sensical values in the areas where you're off throttle, where it's going really lean and stuff like that. |
| 33:56 | So the problem with that, similar to the brake bias where you usually only want to look at this in terms of it being scaled better to make it more readable to you. |
| 34:05 | So we only want to look at it in times where you've got full throttle. |
| 34:08 | So let's do that now. |
| 34:10 | So let's say we want to do wide open throttle lambda and I'm going to pretend we've only got 1 lambda sensor fitted to this car and we'll just look at one of the sensors and use it as our calculation. |
| 34:23 | So again we'll choose our unit type which there should be an air/fuel ratio one here. |
| 34:29 | It's being displayed as lambda, yes that's what we want, it's being calculated as lambda, that is what we want as well. |
| 34:35 | Again we can implement a choose statement here, so we're going to say only show me the lambda values when the throttle position is over a certain amount. |
| 34:45 | So we're going to expand the choose statement a little bit more than we had earlier. |
| 34:50 | So let's say choose, and then let's fill our choose statement up so we're going to say when throttle pos is greater than 95, so we know that the throttle position units are in terms of percentage 'cause it gives us that in terms of the brackets here. |
| 35:07 | So it's saying when throttle position is greater than 95, give me the lambda, in this case I'm going to choose lambda left, I'm going to again just pretend I only have 1 lambda sensor fitted to this car. |
| 35:21 | Obviously another way to implement this would be to do an average lambda calculation, we could be looking at adding the left and the right together and taking an average between them, there's a lot of different ways you can use math channels. |
| 35:33 | And then I'm going to use the same trick as before where I'm going to say invalid if nothing is, if that condition is not true, then give me invalid for the same reason I did it for the brake bias, it's just going to make it a little bit more readable for us. |
| 35:50 | So let's have a look at what wide open throttle lambda looks like for us. |
| 35:54 | Another group and I'm going to wide open throttle lambda, the one I just made. |
| 35:59 | So you can see here that now our lambda calculation is only being calculated at times where we've got, the only times we've got the lambda being calculated is when we are at full throttle. |
| 36:15 | These little dips here, these are when gear changes are happening which is normal. |
| 36:19 | We've got the lambda's going lean as the fuel gets cut between the gear changes. |
| 36:24 | There's lots of different tracks. |
| 36:26 | I mean math channels can get exceptionally complicated when it comes to getting really tricky with cutting in and cutting out certain calculations so we could do something here looking at when the gear cut was active, we could look at ignoring that and adding that into our math channel, that would be one way we could do that. |
| 36:43 | I'm not going to go into that today but it's certainly something you guys can explore pretty easily. |
| 36:48 | What I wanted, the one thing I did want to touch on before we finish today's lesson was to look at using the statistical calculations that we can do within the software which are incredibly powerful. |
| 37:03 | Whether that's looking at the maximum over a certain range or the minimum over a certain range or the average or whatever it is. |
| 37:09 | But before that, I just want to remind you guys, if you've got any questions about what's happened in today's webinar, whether it's about data analysis, whether it's about setup, anything to do with race engineering, chuck those through in the comments, in the chat there and I will get to those after I've gone through the last example, I'll be happy to answer as many questions as you guys have got today. |
| 37:30 | So let's use the statistical tools that we've got, so let's make a new math channel and I'm going to make it called, so let's say I want to look at the average value for the whole log file, tell me what the average lambda was every time the car was wide open throttle throughout this entire log file, throughout this entire run. |
| 37:53 | So let's start with a really simple example with that. |
| 37:55 | So I'm going to say wide open throttle, lambda, so let's say full log file. |
| 38:07 | For argument's sake. |
| 38:08 | Again, let's be consistent and use air/fuel ratio as our unit type. |
| 38:13 | So one of the tools we can make use of in MoTeC is to make use of the stat mean function. |
| 38:22 | Again we can find stat mean down here. |
| 38:26 | In our series of functions, built in functions, but we can also just type it out manually if you know what the syntax for it is. |
| 38:35 | So stat mean, this just means it's giving us the average over different conditions that we can specifiy and we'll build this up into a little bit more complexity as we go but again it's a nice help area here where it tells you some different ways you can use the stat mean function, some different examples and we will make use of this today, I'll show you some different examples of that and then just giving you some examples of how it can be implemented. |
| 38:59 | Which particularly if it's with a function that you're not really too familiar with, I find that these examples can be really helpful when it comes to building up the math channels. |
| 39:08 | So definitely worth checking out that help function if you're using i2. |
| 39:12 | So if we go back to the top of our stat mean, let's just see what it tells us, what help it gives us. |
| 39:20 | So for a start, let's start with the most simple way we can use it which is with one argument. |
| 39:25 | Typically, I should quantify that statement, in maths when you are writing out things, functions separated by commas, you've got each one of those inputs is typically called an argument, so we've got 3 different argument options here, we've got some single argument, 2 arguments and 3 arguments and I'll go through those with another example after this just to make sure you guys understand the difference between them. |
| 39:50 | But in this case, if we just put in one argument, what that's going to give us is the average value for a given channel over the entire log file. |
| 39:56 | So let's find our wide open throttle lambda, so this is our math channel that we just made before, wide open throttle lambda, we can see that's got this little math channel symbol. |
| 40:06 | And we're just going to put that in there, simple as that, OK, and we've got that and then we'll add that in as a channel to our, log file, that's the one we just made before. |
| 40:22 | And because we're calculating the average over the entire log file, it's not going to give us something particularly interesting, it's just going to give us a single value over the entire log file. |
| 40:30 | So in this case, this is not necessarily particularly meaningful but I just wanted to start with a really basic case, it's saying if we look across the entire log file, it's basically going to give us the average value of this wide open throttle lambda channel that I calculated before, in this case that's a value of 0.93. |
| 40:46 | For every time that you've got wide open throttle, that's the average lambda. |
| 40:50 | So that may be something you're interested in. |
| 40:52 | Something that's usually a little bit more interesting is looking at calculating it on a per lap basis. |
| 40:58 | So the idea there is that you calculate the average lambda at full throttle for each lap individually and the beauty of that is it gives you a way to track it throughout the run so you can see if something's changing throughout the race or throughout the stint, you can see if something's evolving, whether that means something's changing in the way your engine is physically, its measure is physically changing, maybe you've got an alternator problem or a voltage problem and your fuel pump's starting to crap out and you're ending up with a leaner mixture as a result or maybe you've even got a sensor on its way out, you'll often see, there'll be a trend as the sensor is starting to degrade, you can often pick up sensor failures by looking at the trends of it. |
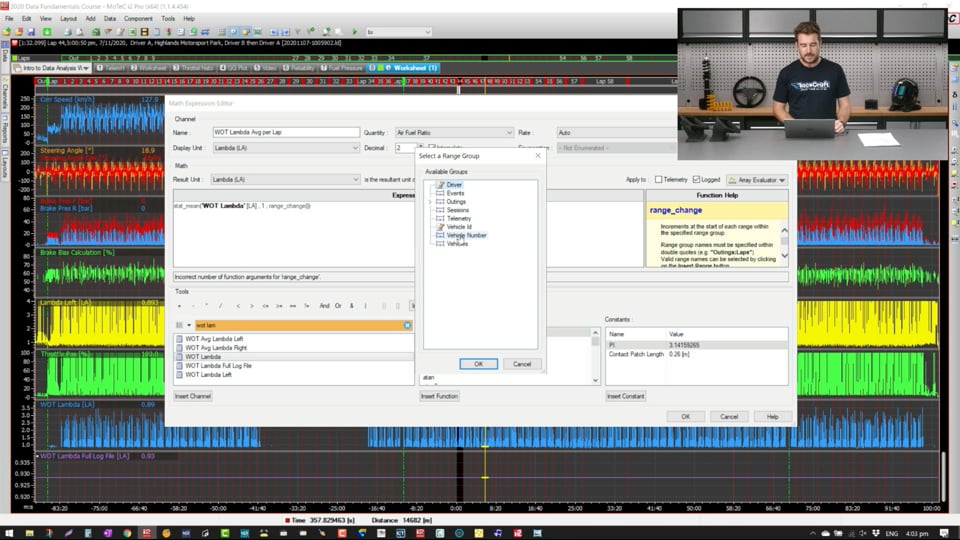
| 41:36 | So let's do that, let's make another version of using the stat mean function but in this case we're going to call it wide open throttle lambda average per lap. |
| 41:55 | Like that, same thing, let's specify it as an air/fuel ratio and we're going to use our stat mean function again. |
| 42:04 | But in this case we're going to use some of the slightly more advanced parts of it. |
| 42:10 | So we're going to use this version, third version here which is going to take 3 arguments. |
| 42:16 | So the idea here is the X represents the channel we want to do the average on, the condition gives us the option to say only calculate the average when this part is true. |
| 42:25 | So some condition, similar to what we use in the choose statement so let's say, whatever it is, whether throttle over a certain amount of brakes on, brakes off, the car's turning or whatever it is, you can make a calculation or a condition statement in there and the last part which is the part I want to focus on for this example is the reset condition. |
| 42:42 | So in this case we want to calculate the average individually for each lap and each time the car finishes a lap, each time it crosses a beacon, we're going to reset that calculation and we're going to start it again and each calculation is going to be done separately lap by lap. |
| 42:54 | So let's type that out, let's see what that looks like. |
| 42:59 | So again we're going to start with the first argument is our channel of interest that we want to do the average on. |
| 43:03 | So let's say it's our wide open throttle lambda which is this one here. |
| 43:07 | Then our second argument, this is a condition, so we could say in this case, when this is true do this, if it's not do this. |
| 43:14 | In this case we always want to be making this calculation because we've already handled the fact that it's wide open throttle in the original math channel, so in the original wide open throttle lambda channel and if that's not clear, maybe you can go back and look at the recording and have another look at how that channel works and you'll see that I've already done the conditional to say when the throttle's above this value do this, if not do this. |
| 43:35 | The condition's already handled for us, so in this case I'm going to put a 1 in here and that just means always do it. |
| 43:40 | So no matter what, this channel is always going to be calculated so that's why I'm using a 1 there. |
| 43:46 | Which is a bit of a hack, bit of a work around but essentially it says always do this. |
| 43:48 | And then the reset condition. |
| 43:52 | This is where there's a function called range change which is what they use in MoTeC, every software will have its different range change syntax. |
| 44:01 | All it really means is it says, we get to the end of this section, whether it's on a per outing or per pitstop, per lap, per corner, however you want to discretise it up, you can redo your reset condition whenever you want but the syntax for this for MoTeC is range change and then inside the range change we've got this button here to insert range so again I can type this in manually but I just want to show you the process, so these are the different, some of the different ranges that we can reset over. |
| 44:35 | In this case, if I break out the outings, I want to select laps, press OK so the syntax, this is saying each time, the reset condition for this average function is every time the range changes over laps, reset the calculation. |
| 44:51 | So from left to right, calculate the average of the channel with wide open throttle lambda, the 1 says always do this and the 3rd argument is saying at the end of every lap, reset it and start the calculation again for the subsequent lap. |
| 45:05 | So let's have a look at what our wide open throttle new calculation looks like and we'll see how that changes. |
| 45:14 | So we've got on the one hand now, per lap and we should see that evolve. |
| 45:17 | Now there is, we've got this safety car period here, you see we've got this little lull in the speed chase which is one of the reasons I like to have the speed chase up it just gives a little bit of context about what's going on. |
| 45:28 | We've got no wide open throttle happening through there so that means that we've got this really, this section where you've got no, this calculation isn't valid. |
| 45:38 | So that's giving us, it's kind of screwing with the scaling with us a little bit, there's a couple of different ways we can do that, we can sort of drag the scale manually but the way I prefer to do this, we could do this with a condition of calculating whether it's a flying lap and say only calculate this when flying lap is true but I'm just going to do a bit of a workaround for now just to save a little bit of time and just manually scale it. |
| 45:59 | So we want to ignore these zero values, so let's, and again there's lots of different ways we can handle this but I just want to show you guys the manual rescaling option. |
| 46:09 | If I put a 0.9 there, means plot's going to be, the minimum value of the plot's going to be 0.9. |
| 46:15 | We can see, it's quite interesting here, so we've got each one of these flat lines is a lap. |
| 46:19 | So that's the average value of lambda, wide open throttle lambda for each lap and we can see how we've got some interesting evolutions going on throughout the lap. |
| 46:26 | Sorry throughout the run as the lambda value is changing. |
| 46:30 | So in this case, we've got low values of lambda indicate a richer mixture, higher values indicate a leaner mixture so in this case we've actually got, certainly from this section through to this section here, we've actually got the, for whatever reason this car is actually getting leaner as this part of the run is evolving which is certainly an interesting and useful detail to understand when it comes to understanding the powertrain performance. |
| 46:57 | And certainly the reliability. |
| 47:00 | So that was just a really brief run-through into math channels, how you use them, the basic functions. |
| 47:07 | I do actually have quite a lot more to show you guys on math channels so I think what I might do is in the next webinar, I'll break it out into a separate one and we'll jump into some more complex examples that'll be helpful for you guys if you're really getting a little bit cleverer, spending a little bit more time on building your math channels up, I think they'll be useful to you guys. |
| 47:26 | So what I want to do now is just jump across to the questions and I'll see if you guys have got any questions for me that have come out of today's webinar. |
| 47:38 | We've got a question from Plohl, have you tried to sync up a video from a different source, GoPro etc in i2 Pro? I found it tricky to sync the video and the data, have you got any tips? No I don't, I haven't actually tried to sync up, in MoTeC's i2 anyway, I haven't tried to do a manual sync between a non MoTeC video source and native MoTeC data. |
| 48:08 | I've only ever, with MoTeC I've only ever used the genuine camera that goes with it for the reasons I said before, it's just essentially it just takes some of the work out for me. |
| 48:15 | I know it's obviously a lot more of an expensive unit, it's not an option for everyone. |
| 48:19 | I know there's some really good tools out there, I think, not sure if RaceRender has this option to do it or not, certainly I've used RaceRender to overlay information over top of videos and to make custom renders of multiple videos side by side and stuff like that, I'm not sure if it has the ability to do the sync for you as well. |
| 48:38 | I know there are some, I'm sure that there are tools out there to manage some of this for you. |
| 48:44 | I don't know if there is one that'll work with MoTeC's native log file structure though. |
| 48:51 | So unfortunately I don't have a good suggestion for you as far as manually syncing them up. |
| 48:58 | My personal experience is only ever using the genuine equipment with each of these different log file systems. |
| 49:06 | So I'm sorry I don't have an exact answer for you there, hopefully maybe a little bit of Googling, maybe even on the MoTeC forums, they might have some answers for you on that one. |
| 49:18 | Another question from Plohl. |
| 49:20 | Do you prefer to look at brake pressure as separate front and rear or do you find it useful to view it as total brake pressure in some cases. |
| 49:27 | Yeah the question there is, what Plohl is asking is, if I just switch across to my laptop screen again, if I go across to a single lap. |
| 49:43 | So what, in fact let me just make a new worksheet just to make it really clear what he's talking about there. |
| 49:49 | If I just put core speed and I put my brake pressure channels up here. |
| 50:03 | Brake pressure front and rear. |
| 50:07 | So the question is whether it's more useful to look at the brake pressure channels individually like this or to look at the total and all the total is is taking the front and rear and adding them together. |
| 50:18 | So in general, it depends, the reason it depends is, it depends what you're interested in. |
| 50:26 | So what I find, the good thing about using the total brake pressure is particularly in cars, when you've got an adjustable bias. |
| 50:32 | So if you've got a driver that's using the bias adjuster quite a lot throughout the lap then using the total takes some of the bias calculation out of the brake pressure trace. |
| 50:43 | So if I was to overlay 2 different drivers, so let's say I've got my, just try and make this really obvious so I know in this particular dataset that's my fastest lap and earlier on in the run I had a different driver in the car, so the brake pressure is going to be quite different so let me just hide that rear brake pressure for a second just to make it really clear. |
| 51:05 | So let's take this corner for example. |
| 51:08 | We've got 1 driver here, the faster driver in this case using a lot more brake pressure than this other driver. |
| 51:14 | Now it's true that most of these differences are going to be down to the way the car's being driven but also the thing to take into account, if I'm just looking at front brake pressure like I am in this case here, I've got a different bias calculation, if one driver's using quite a different bias, it's not going to tell me the whole story about what's going on. |
| 51:30 | It may be that, it's going to be a bit more of a moderate difference in brake pressure but nonetheless there's going to be a difference in brake pressure I'm going to be looking at. |
| 51:38 | If I'm just looking at the front brake pressure rather than the total brake pressure, it's going to be, and one driver's got different bias to the other, that's not actually telling you the whole story about what's going on so I might be saying look mate you need to up your brake pressure or use less brake pressure in this section of the circuit because this guy's faster this section of the track. |
| 51:52 | If I'm not looking, if I'm looking at the total brake pressure, it's giving me something that's a bit more independent of the bias because obviously if you take brake away from the front, it's adding to the back and therefore the total remains more constant. |
| 52:05 | So it depends on whether you're looking at a bit more from a brake system perspective or a driving perspective. |
| 52:10 | Often if I'm looking from the driving perspective, I'll be looking at the total brake pressure rather than just the front and rear individually. |
| 52:17 | So hopefully that answers your question there Plohl. |
| 52:20 | Another question from Plohl, what impacts the rear brake pressure increase as a driver releases the brake, is it hysteresis in the proportioning valves because of EBD or something else? Yeah so there are a couple of different things, OK let me take a step back, what Plohl's asking there is when I had the example earlier in the webinar, and I'll just go back to my screen again, let's see if we can bring that up. |
| 52:45 | So if I bring up my brake bias calculation that I did before. |
| 52:51 | The question is, I've got this situation where the bias is changing as the brake pressure is released and let me just get rid of that overlay just to make it a little bit clearer. |
| 53:01 | So as the driver comes and hits the brakes, we've got a brake bias, let's say at the peak pressure of roughly 66% whereas much later in the stop when there's a lot less pressure being involved, it's dropped back to 60%. |
| 53:11 | So that means we've got a 6% change in brake bias throughout that braking so that's actually a really big change, much larger that what you want. |
| 53:19 | Really ideally you want to be in the 1-2% maximum range. |
| 53:25 | I would say there's a caveat, there are systems where you do intentionally want to change the brake bias with pedal pressure and I'll come back and maybe touch on that a little bit 'cause it's maybe getting a little bit outside the scope but essentially some of the biggest things that affect the bias migration with different pedal pressure is certainly the setup of your pedal box. |
| 53:46 | So if you've got friction or differential friction in different parts of your pedal box, whether that's internal friction inside each of the master cylinders. |
| 53:54 | So typically in a motorsport application you've got a separate front and a rear master cylinder and a bias bar between them on the end of the pedal and that brake bias adjustment you're doing is moving the mechanical pivot point towards either the front or the rear master cylinder and it's changing your brake bias and if you end up with friction anywhere in that system, whether it's inside the trunion for the bias bar itself or whether it's inside the pistons, inside the cylinders or anywhere inside the pedal box, if you've got, particularly on release when you end up with, when you've got less brake pressure applied, that's typically where you end up seeing brake bias migration. |
| 54:39 | So that's definitely one part where I've seen a lot of brake bias migration issues. |
| 54:45 | It's almost always implemented by the pedal setup stiffness, friction and stuff like that. |
| 54:53 | You've also got other things, whether it's stiffness of the rest of the system, whether it's differences in stiffness in your callipers. |
| 55:01 | Obviously there's a bit of interaction, there's a hydraulic and mechanical interaction going on there but you've definitely got these different stiffnesses in the system that can add up to give you more variation. |
| 55:13 | At higher pressures it's more about deflection inside the system. |
| 55:17 | At lower pressures it tends to be more concentrated inside the pedal box itself. |
| 55:20 | Like I touched on before, there are systems when you're intentionally changing the bias. |
| 55:25 | There are a number of GT3 cars I've worked with which have systems built inside the pedal box, little adjusters that essentially what is going on is that you can preload one side of the bias bar such that when there is a lot of brake pressure being used, that pre load is overcome and the system has no effect on the brake bias and it's purely influenced based on the mechanical brake bias adjuster that you've got in the dashboard. |
| 55:50 | Whereas at lower pressure settings, you've got a pre load setting which is essentially adding pre load to the rear, just the side of the pedal box that the rear master cylinder is mounted on that's adding some pressure onto that rear side of the master cylinder to give you a more rearward bias. |
| 56:04 | So again that depends on the driver preference, depends on the track, it depends on the tyres, depends on the car, the weight distribution all of that stuff. |
| 56:10 | But particularly when you end up with higher level drivers or drivers that are operating at a higher level, you often end up wanting more rearward bias migration on release, the idea is as the, you know when the brakes are being released, that's when you're going to be getting to the turn in point of the corner and having a more rearward brake bias is going to help the car rotate into the corner. |
| 56:33 | So having that adjustment set more aggressively such that the migration moves more towards the rear on corner entry is something that you're going to be wanting with typically a more highly skilled driver and if you've got maybe a driver, a gentleman driver or someone that's less confident in the car, that's a system that you'll be wanting less and less of and it helps to increase the stabiity to have less migration towards the rear on pedal release. |
| 56:54 | OK let's see what other questions we've got. |
| 56:56 | Last question, again from Plohl, is the lambda value you've calculated different to what would be in the channel report average? No it's not, it's the same, if you start with a simple channel, so that's going back to the lambda channel I calculated before, it's the same calculation but the beauty of doing it with a math channel is that you've just got more flexibility over when and how you do that calculation. |
| 57:20 | So for example there was that case of the safety car period where I showed where the value dropped to zero because there was obviously no wide open throttle during that safety car period so that calculation kind of craps out. |
| 57:31 | So if I was to use some of the statistic functions, depending on what you're trying to cut in or cut out, when I'm using a channel report, I'll quite often, it depends on the case, in some cases you want to look at the raw value in the channel report, other cases you'll want to be able to manipulate that value first, just to control what's included and what's not included in that calculation. |
| 57:51 | Another typical example is things like temperatures and pressures. |
| 57:54 | In a channel report obviously we want to use the channel report to show us maximums and minimums throughout a run to understand if there's anything going right or wrong with the car. |
| 58:05 | One of the typical situations it'll stuff you up is where you've got pitstops. |
| 58:07 | Let's say you're in a series where you've got to stop the engine during a pitstop, so obviously the oil pressure's going to drop to zero when the engine stops. |
| 58:16 | That means your minimum value for your oil pressure, if you were to report on the raw value of oil pressure, it's going to give you, you're clearly, your minimum value's going to be during that pitstop whereas what we're actually interested in looking at in the channel report is the minimum value when the car was actually running on track. |
| 58:33 | So in that case, it's a case where I'd take the oil pressure and I would manipulate it with a math channel to ignore values when the car was in the pits or any other situation you might want to ignore, and I would report on that instead in the channel report. |
| 58:46 | OK question from Barry O'Neil, in your opinion, would this kind of data recording be necessary/feasible or beneficial in stage rallying, maybe more from a common hill climb? Yeah so there's definitely value in, when it comes to rallying and hill climbs. |
| 59:04 | Obviously when it comes to running on loose surfaces and particularly when you're not running on a closed circuit like you are typically in circuit racing. |
| 59:11 | It's a bit of a different philosophy, in circuit racing we tend to have a little bit more of a controlled environment, obviously the road surface isn't evolving as much as it is in the rally stage or in a hill climb where you've got gravel being swept and stages being cleared and stuff. |
| 59:25 | The stage can change quite a lot as cars, if you do multiple runs through the same stage particularly in something like a hill climb. |
| 59:32 | So it's probably a little bit different, the philosophy's a little different in terms of actually doing hard overlays in terms of the data but I would say the actual data itself can still be useful but this is definitely something where using the video and particularly when you can nest the video with the logged data as I had with the MoTeC example. |
| 59:55 | Again you don't need to use MoTeC, with lots of different systems out there. |
| 59:59 | Something like a VBOX is much more affordable. |
| 01:00:01 | You've got your video and your data nested together, all the synchronisation which is related to one of the earlier questions we had, all the synchronisation is handled for you, you don't need to mess around with any of it for yourself. |
| 01:00:14 | I definitely think there is value in using the video nested with the data when it comes to rallying and hill climbs. |
| 01:00:24 | In fact there was actually a question that came up in the forums, it's actually quite a long series of discussions that came up in the forums recently sort of going back and forward on the pros and cons. |
| 01:00:35 | I can't remember the RaceCraft member's name but he was actually really experienced with using, had tried a lot of different systems, looked like he was doing a really good job with his data logging, he's tried a lot of different approaches with different styles of logging, different styles of cameras and nesting them together. |
| 01:00:50 | So you should hunt through our forums and have a look for that. |
| 01:00:53 | I can't remember off the top of my head exactly where that was. |
| 01:00:56 | Let's see if I can find it for you. |
| 01:00:58 | In fact maybe it was actually in the data analysis, it'll be in the data analysis forum. |
| 01:01:05 | Let's see if we can find that discussion for you because I think that will be useful to you. |
| 01:01:10 | Yeah data logging and gravel rally stages there. |
| 01:01:12 | So that was quite an active thread. |
| 01:01:14 | I definitely encourage you to go on and check that forum post out for yourself 'cause hopefully there'll be something useful for you in there. |
| 01:01:21 | In summary, I do think it's useful, the philosophy's just a little bit different. |
| 01:01:24 | Certainly from reliability channels and everything, having the log data is invaluable. |
| 01:01:29 | But as far as understanding the ways that the car's being driven in different times, whether you're looking at setup or driving, I think the video has just as big a part to play in it as the log data does itself as well. |
| 01:01:40 | OK guys so that's all the questions I've got for today. |
| 01:01:45 | Remember we've got our Data Analysis Advanced course coming out soon as well as our Driving Fundamentals course which I think is probably something that I think a lot of you guys will be interested in. |
| 01:01:56 | And remember if you're watching this webinar after the fact, if you're not watching it live, you can always ask any follow up questions you've got in our forums, jump in there and I'll be happy to jump on those and answer those for you guys. |
| 01:02:08 | Thanks very much for today guys, I will see you in a couple of weeks for the next webinar. |
Timestamps
0:00 - Intro
1:50 - What is a math channel?
2:50 - Math channel editor walkthrough
10:20 - Sign correction
15:00 - Ratio calculations - Brake bias example
23:30 - Conditional statements - Brake bias example
32:05 - Conditional statements - AFR example
37:30 - Average per log file - AFR example
40:50 - Average per lap - AFR example
47:40 - Questions


