290 | Torque Management Techniques
Summary
Managing the engine torque and matching this to the available grip can make a massive difference to the ability for a driver to confidently control a car on the race track, In this webinar we’ll dive into some of the options that are available and how we’ve utilised these on the MoTeC M1 platform in our SR86 race car.
| 00:00 | Hey team, it's Andre from High Performance Academy, welcome along to another one of our webinars. |
| 00:04 | In this webinar, we're going to be diving into some of our options that are available when it comes to managing the torque management of our engines. |
| 00:14 | And this is a topic that I know a lot of tuners, even experienced tuners overlook and tend to basically tune the engine, it makes whatever it makes in terms of its power and torque and then they send it out the door. |
| 00:27 | And that might be fine, particularly in a low powered car but particularly in a more high powered car, it can be very easy to end up simply producing too much power and overcoming the available traction. |
| 00:41 | Not necessarily the end of the world in some circumstances, particularly maybe if you're interested in drifting then the ability to break traction and have more torque than the surface of the track can actually take can actually be an advantage, allowing you to purposefully make the car wheel spin. |
| 00:59 | However, if you are looking at something more like circuit racing or drag racing then really what we want to do where possible is usually manage the amount of torque that the enigne is producing so that we are maximising the amount of traction that the surface has available. |
| 01:15 | Now of course there are a variety of aspects that come into play here as well such as the track condition. |
| 01:22 | Whether the track is wet, whether the track is dry. |
| 01:24 | The amount of traction that is available is also going to be dependent on our gear. |
| 01:29 | Or more to the point we can put more engine torque to the racetrack as we move through the gears due to the torque multiplication effect of the engine torque in the lower gears. |
| 01:38 | So our torque produced by the engine that we can actually get to the track is a constantly moving target. |
| 01:49 | Now the other aspect here that's easy to overlook is driver preference as well. |
| 01:54 | So some drivers who are really experienced, they will be able to quite happily drive a car that has a very aggressive torque delivery, they'll be able to manipulate their pedal position to adjust the torque and manage the amount of power and torque the engine is producing. |
| 02:11 | Again to get the car around the track without excessive wheel spin. |
| 02:14 | Put that same car or engine in the hands of a novice driver who's not that experienced though and it's first of all going to be incredibly daunting, it's going to be difficult for them to prevent wheel spin and as a result of this, generally it's going to knock their confidence and they're going to end up going a lot slower. |
| 02:31 | Now in order to just get an idea of what we actually can achieve in terms of power and torque delivery, let's just jump across to the laptop screen here. |
| 02:39 | I am talking about torque management. |
| 02:42 | Just to confuse things a bit, we are looking at a print out here from our dyno screen which is power but of course for all intents and purposes, we can consider torque and power to be basically one and the same. |
| 02:56 | Power of course is simply torque multiplied by our engine RPM and then divided out by a constant so that's why we are looking at horsepower here but the same principle applies, if we are increasing or decreasing our engine torque at a given RPM, by default we are also then increasing or decreasing our power. |
| 03:16 | So this is full power runs here from our Nissan SR20VE turbo engine. |
| 03:22 | The lowest, as we can see here, the blue run, 372 horsepower at the rear wheels. |
| 03:27 | Our green run there, it's actually not at peak power at this point but essentially 475 it actually made 477 horsepower at the wheels. |
| 03:37 | So there's a massive difference, particularly if we look here, the area where we actually reach full boost, there is a massive difference between those power curves and whether we can get all of that power, all of the 475 horsepower to the ground, again is going to depend very much on the conditions of our track. |
| 04:00 | This actually isn't the full extent of what we can do with this particular engine. |
| 04:04 | We can pull the power down to a touch over 320 horsepower. |
| 04:08 | So that's a massive spread, 320 up to 475 horsepower. |
| 04:13 | This is also only taking into account what we're doing at wide open throttle, so we're not actually considering the part throttle operation there as well. |
| 04:23 | So just a little bit of insight into how we can adjust our power and torque with the same engine. |
| 04:31 | Obviously much easier with a turbocharged engine but even if you've got a naturally aspirated engine, as we go through today's lesson, we'll talk about the various tricks and tips that we have up our sleeve. |
| 04:43 | Which is the next obvious topic to talk about. |
| 04:45 | How do we adjust our engine torque or engine performance? So there is a few ways of doing this, the first one is really a little bit outside of the scope of what we're going to be talking about because it's a fairly major change but we do probably need to consider that our engine hardware set up will be a factor to take into account here. |
| 05:04 | So I'm talking here about the engine capacity, the compression ratio, a really big driver here of our torque delivery will also be our camshaft specification and our camshaft timing. |
| 05:15 | So generally what I'm talking about here is that if we are going with a large aggressive camshaft, that will generally sacrifice some power and torque and low RPM and give us an improvement in power and torque at high RPM. |
| 05:28 | Likewise, by adjusting our cam timing, advancing the cam timing in general has the trend of moving our power curve further to the left. |
| 05:35 | Basically improving our low RPM power and torque while retarding the camshaft will give us a gain in high RPM power and torque while sacrificing low RPM. |
| 05:45 | So again these are all available but of course these are more significant changes that we're not generally going to be able to make on the fly with the exception of variable cam timing engines. |
| 05:57 | Another one that's not very easy to change is our turbo specification but we do need to understand that the turbo size does have a really big impact on our torque delivery. |
| 06:07 | The larger the turbo, all things being equal, we can make more power and torque at high RPM but what this does is it costs us a lot of boost response. |
| 06:17 | So our boost threshold as well as our lag does increase so we're going to end up losing performance at low RPM as well as on our transient throttle tip in, it's going to take longer for that turbocharger to reach back to full boost. |
| 06:30 | Then the tricks that we've got up our sleeve that we can manipulate relatively quickly and easily on the fly and what we're going to be focusing on during our lesson today primarily are manipulating our turbo boost pressure, obviously only relevant to a turbocharged engine but bear with me. |
| 06:46 | The other one would be our throttle position target. |
| 06:49 | So if you're running a drive by wire throttle system, naturally aspirated or forced induction, you've got a huge amount of potential to vary the torque delivery of your engine by simply adjusting the relationship between the driver's foot pedal and the way the throttle butterfly is opening and I'll give you a quick rundown on my experience with this through my old business. |
| 07:13 | For about 3 or 4 years, I was involved as the parity manager for the New Zealand V8 TLX race series which at the time was one of the two upper echelon tin top racing series here in New Zealand. |
| 07:28 | So this was a controlled chassis class, it was a tube frame chassis and the competitors had the choice of 3 engines, they had the GM 6.2 litre LS3, they had the Ford Coyote Boss 5 litre quad cam engine and they had the option of the Nissan Altima, VK56 engine, actually I'll give you another one there as well, they also had a TRD built 5 litre based 3UZ-FE so 4 different engines, not 3 like I said, and the idea, my intention was to get power and torque parity from those very different engines which on face value might sound a little bit ridiculous. |
| 08:10 | We've got the likes of the 5 litre Toyota 3UZ-FE which revved to about 8500 RPM and made about 650 horsepower. |
| 08:20 | We had the GM 6 litre LS3 which just had a moderate cam in it which would only rev to about 6800 RPM. |
| 08:29 | So how we did this was simply through the relationship between the driver's foot pedal and the drive by wire throttle opening. |
| 08:37 | And with a 3D table of target throttle body positions versus driver pedal and RPM we could get the torque curves matched to within about 1%. |
| 08:47 | Basically for all intents and purposes, the driver shouldn't have been able to tell which engine they were driving, so that's just a bit of a demonstration or bit of a discussion about how powerful our control over the torque curve is with the drive by wire throttle. |
| 09:03 | Alright let's get back to our discussion here, so let's start by talking about what we can do if we have a turbocharged engine and obviously the first thing we can do is manipulate our boost pressure in general. |
| 09:16 | Now most people would understand, we've got the ability here to adjust our boost pressure versus RPM, most people would understand that we can have maybe a switch with two or three different boost pressure targets and that's fine. |
| 09:31 | So that gives us some broad control. |
| 09:34 | However it gets a little bit deeper than that. |
| 09:36 | One of the things that a lot of people will overlook is just how good a job a turbocharger does of making boost. |
| 09:43 | So let's talk about what I'm meaning by this. |
| 09:46 | Let's say we've got a 2 litre SR20, just given our example here, that's making 20 psi of boost at 5000 RPM and wide open throttle. |
| 09:56 | Let's just say that that coincides with 400 horsepower at that particular point. |
| 10:01 | So if the driver's at full throttle at that point, we've got 400 horsepower. |
| 10:05 | Now let's say the driver closes his throttle to 50%, now the driver probably instinctively would assume that 50% throttle is going to be there or thereabouts, about 50% of our power and torque. |
| 10:22 | However, what we'll find with most turbocharged engines is that they do such a good job of producing boost that when we pull our throttle back to 50%, what happens there is that the wastegate simply closes more in order to still try and target that 20 psi in the inlet manifold. |
| 10:40 | It's going to be making more pre throttle body but really what the engine needs to worry about is what's going on in the inlet manifold. |
| 10:45 | So basically down to maybe even 50 or 40% throttle, we may still actually end up with a full 20 psi of boost pressure in the inlet manifold. |
| 10:54 | That's not to say we're still going to get 400 horsepower. |
| 10:58 | We've got the wastegate closed, we've got more exhaust back pressure pre turbocharger, the turbocharger's going to be operating in a different area of its efficiency as well so we will reduce our power but rather than going down from 400 horsepower to maybe 200 horsepower or thereabouts, we've probably more likely gone from 400 horsepower down to maybe 360 or So nowhere near the change in torque that the driver's actually expecting by lifting to half throttle and again this can make the car really tricky for the driver to control, particularly if we're dealing with a powerful light 2WD car and more so if the conditions at the track are a little bit greasy, maybe it's wet or it's just started to rain. |
| 11:45 | So those are the considerations there. |
| 11:46 | So the first thing is with our boost control, it's not just a case of a fixed boost pressure setting, what we should be considering if we want to give the driver a nice easy to modulate torque curve, is controlling the boost pressure target relative to throttle position as well as just RPM. |
| 12:03 | So what we could do in that instance is when the driver pulls back to 50% throttle, we could be targeting our wastegate spring pressure. |
| 12:10 | So let's say that might be 8 or 10 psi just for an example. |
| 12:15 | It's not going to get us down to 0 psi and it still might not get us down to 50% of our power and torque but it's definitely going to get us a bigger drop in engine power and torque than what we were getting in our first example there. |
| 12:29 | So 3D boost target tables or wastegate duty cycle tables, really good way to give us a lot more control over manipulating the power delivery and the torque curve. |
| 12:40 | Now another aspect with that as well is even when we're considering the relationship between our power or our boost pressure and RPM, we can manipulate the torque delivery of the engine using that as well. |
| 12:55 | So let's just head back over to our dyno graphs here, this isn't the best example here but what we can see in our yellow curve here is that we've got a relatively straight line relationship between our power and our engine RPM. |
| 13:12 | Simply the power continues to climb as our RPM goes up. |
| 13:16 | Now what that's going to do is give us a relatively easy to control car, particulalry existing a corner. |
| 13:26 | So let's say we come out of a corner at 4500, 5000 RPM, we're going to be in this vicinity here. |
| 13:30 | So we're only putting out, if we look at our power curve, about 160, 170, 180, sorry 190 horsepower at the rear wheels. |
| 13:39 | So on the other hand when we end up at the end of the straight and we're shifting, we're all the way out here making our 402 wheel horsepower. |
| 13:48 | So quite a big difference as we move through that power curve. |
| 13:51 | That's going to make it easier to control the power delivery or the car at least, when we get on the throttle at lower RPM. |
| 14:00 | So this might quite quite well a light 2WD car that is really traction limited. |
| 14:06 | Now on the other hand, if we are maybe 4WD or the track's really dry and sticky, we've got nice wide slicks that are up to temperature, we can get a lot more power to the rear wheels. we could end up going with a boost curve that gives us a bit of a compromise here, something like our red line and then slowly increasing to our yellow line. |
| 14:29 | So we've got flexibility to essentially do anything and everything in between these bounds by manipulating the relationship between our boost and our engine RPM. |
| 14:38 | So to get a line like the one I've just drawn in, if we consider what our boost curve might look like, it might end up starting low like this, it might end up coming up and then it might peak and then it will probably end up dropping back down. |
| 14:53 | That'll give us that increase in torque through the mid range. |
| 14:57 | But again it's obviously just completely dependent on how much power and torque we can put to the racetrack. |
| 15:05 | But most tuners will go into tuning a turbocharged engine and will just try and achieve the boost curve that looks like a straight line. |
| 15:13 | Nothing necessarily wrong with that but depending on the application, thinking things through a little bit more, there is a little bit more that goes into this. |
| 15:19 | And by tailoring that boost curve, often we can get some advantages in the way everything works out on the racetrack. |
| 15:28 | Now the other aspect to consider here is the type of boost control that we are using so this is the wastegate setup on our NIssan SR20 so we've got a Turbosmart wastegate mounted off the exhaust manifold obvioiusly and we've got a Turbosmart which is actually just a mac 4 port solenoid here for boost control. |
| 15:51 | So the two options that we'll most often come across are the 3 port and the 4 port solenoid. |
| 15:57 | Now the difference here is the way the boost pressure is manipulated to the underside of the diaphragm and the top of the diaphragm which is these two hoses here. |
| 16:07 | With the 4 port solenoid it switches completely and what this does is it gives us the ability move the boost curve quite a lot further than we can with a 3 port solenoid. |
| 16:19 | That might be a little bit confusing so let me explain. |
| 16:21 | Let's say we've got a conventional 3 port solenoid which is what most people would conventionally use and let's say we've got a 10 psi spring fitted to the wastegate. |
| 16:30 | What this means is that even with our mac solenoid completely removed and boost pressure just being plumbed to the underside of the wastegate, the minimum boost pressure we're going to be able to see is 10 psi. |
| 16:41 | That's the point where the boost pressure will overcome that spring and it'll start opening the wastegate controlling our boost pressure. |
| 16:49 | Now that's fine, that's going to give us a relatively low boost limit and that's probably going to give us a low enough power limit as well for the vehicle to be drivable in most instances. |
| 17:02 | But let's say we now want to really see how much boost pressure we can get in, how much power we can make with the engine. |
| 17:08 | So there is going to be a limit here, we can't just go from let's say 10 psi up to 50 or 60 psi, it just doesn't work like that because we also have exhaust back pressure which is trying to help force the wastegate spring open or the wastegate valve open. |
| 17:25 | So there's a variety of factors in here but maybe a 10 psi spring might let us vary with a 3 port solenoid, between a minimum of 10 psi and maybe we might get to a maximum of 25 psi just to throw a couple of numbers in there. |
| 17:40 | So particularly for drag racing, that might not be enough. |
| 17:45 | My own car, we would leave the line at about 20 psi of boost and we were looking for 55 to 60 psi in 4th gear. |
| 17:54 | So we wouldn't get that range with a 3 port solenoid, we might have tapped out at maybe closer to 45 to 50 psi. |
| 18:00 | So that's where that 4 port solenoid comes in, it allows us to remove the boost pressure from this particular port here which allows us to get a little bit more range in our boost pressure curve. |
| 18:15 | There is a downside though with the 4 port solenoid which a lot of people don't understand and that is that we are essentially sending in a duty cycle from the ECU, 0-100% duty cycle and with a 4 port solenoid, each percent duty cycle makes a bigger change to our boost pressure. |
| 18:32 | So what we tend to lose with a 4 port solenoid is a bit of the resolution, a bit of the fine control that we get with a 3 port solenoid. |
| 18:39 | Long story short, why I wanted to explain this is we've got a 4 port solenoid on this car and we don't really need it, we're actually going to go back to the 3 port solenoid. |
| 18:48 | Where you can get away with the 3 port solenoid, I would recommend you stick to that, just gives you that finer control that you tend to lose when you go to a 4 port solenoid and the 4 port solenoids, realistically with very few exceptions are only going to be necessary for drag racing where you want that very large range of boost control. |
| 19:10 | Alright so we've talked about the boost pressure versus our TPS, throttle position input, the other one that is really powerful is using a boost versus vehicle speed or boost versus gear to control our boost target. |
| 19:29 | So again as I mentioned, we've got to take into account that we've got a certain amount of engine torque and that's then getting multiplied through the gear ratio and then through the final drive as well, so the torque at the tyre is really the defining factor that we need to understand. |
| 19:47 | There's only so much torque we can put to the tyre before we end up with wheel spin. |
| 19:50 | But because the torque multiplication factor changes as we move through the gears, we can essentially put more and more torque through the engine as the road speed or gear increases. |
| 20:03 | So to have a look at how that works, let's just jump across to some data here. |
| 20:08 | This is a Mitsubishi Evo 9 drag car that we were involved with the tuning of that held the world record for the fastest Mitsubishi Evo 4WD a number of years ago. |
| 20:19 | This went as quick as an 8.34 at 169 mph. |
| 20:23 | So the important aspects here, we've got our engine RPM up the top and we can see this particular point here, this is where the car is on the 2 step limiter. |
| 20:33 | So this is the point here where the driver has actually started releasing the clutch, we've got a slight flare in the RPM, if we look down the bottom we've got our drive speed so we can see where the vehicle actually starts to move. |
| 20:44 | So basically what we've got here is 1st gear then gear shift, we've got 2nd gear, 3rd gear and then obviously we've got 4th gear and the car goes over the line. |
| 20:54 | So looking at what we've got down here in our blue trace, we've got our manifold pressure. |
| 21:02 | So on the two step launch control we are running 250 kPa, this is the launch boost that we want so 150 kPa of positive boost pressure, about 22 psi and then through 1st gear we peak at 320 so got to take atmospheric pressure off that so 2.2 bar of positive boost. |
| 21:24 | In 3rd gear we go up to 2.5 bar then in 3rd gear we're up to 2.8 bar and then finally in 4th gear we peak at 3.1 bar. |
| 21:35 | So this was a car that was severely traction limited. |
| 21:39 | Due to the sport mod class that we ran in, we were actually restricted on the size of slick that we were allowed to use so we were actually a little bit handicapped here compared to the cars over in the US that we were trying to beat because they were running much larger slicks than us. |
| 21:56 | And even here what you can see in 3rd gear, we've got this little blip in the RPM so that's actually a little bit of wheel spin there. |
| 22:05 | So the idea with this is what we were doing is constantly reviewing the data, just like this after the car came back from a run down the strip and then we were basically rolling the dice to work out how much more boost pressure we could get into each of these gears in order to maximise the performance of the car while staying away from wheel spin. |
| 22:27 | So a situation like that, that little blip of wheel spin, much more than that and that would have really compromised our time so really powerful way, and you can see obviously the spread of boost pressure all the way from 1.5 bar up to 3.1 bar so that's the power that we can get with the ability to change our boost relative to gear. |
| 22:48 | I prefer gear but a lot of people will do it relative to vehicle speed. |
| 22:53 | Personally preference really. |
| 22:55 | Maybe if I was tuning an automatic transmission car then doing that relative to vehicle speed might make a little bit more sense but yeah that's just my personal preference on how we did that. |
| 23:07 | OK so we've covered boost control here, the range of functions that we've got available. |
| 23:13 | I'm going to go through a bit of a demonstration as well and show you some of the aspects that I've incorporated in our MoTeC M1 shortly but before we do that, we'll talk about the other aspect here which is our throttle position control. |
| 23:25 | Obviously this does expect that you are running drive by wire throttle. |
| 23:30 | Doing something with a cable throttle, while we can with the bell crank arrangement influence the relationship between our throttle butterfly opening and our throttle pedal, obviously that's not something we can influence on the fly while the car is out on the racetrack. |
| 23:46 | The first part about our throttle opening is we do need to understand that the relationship between airflow through a throttle butterfly and the throttle butterfly angle is really non linear. |
| 23:58 | What I mean by this is over the first 50% of throttle opening, we see a really steep increase in our airflow and then over the last 50%, that sort of ends up plateauing and tapering off so what I mean is if we had a car on the dyno and we were going between 0 and 50% throttle, by the time we're at 50% throttle opening, so I'm talking 45° of butterfly opening, we might have as much as 2/3 of our maximum available engine torque. |
| 24:28 | Over that next 45° of throttle butterfly opening, we're going to get the other third. |
| 24:33 | So it's really non linear and we get a large increase in our airfow as we initially crack the throttle and then particularly between maybe 90 and 100° throttle, often there's very marginal if any change in our engine power and torque. |
| 24:48 | So we need to factor this in. |
| 24:51 | And this really comes back to the same discussion I was having around boost control. |
| 24:56 | If we have our naturally aspirated engine this time at 5000 RPM and wide open throttle and we're making let's say 400 horsepower, again if we back the throttle position off to 50% where the driver may right expect around about 200 horsepower, if we are running a relationship, a linear relationship between our throttle pedal and our throttle butterfly position, we'll actually have much more than that. |
| 25:21 | So again by manipulating that relationship between our driver foot pedal position and our throttle butterfly position, we've got complete control over that. |
| 25:31 | Now that's not to say either that at 50% throttle we must have 50% of the available engine power and torque. |
| 25:40 | Obviously there's a range of factors that come in here and a lot of this will come down to simply driver preference. |
| 25:46 | But the important point here is I see a lot of tuners that are tuning drive by wire cars and they never touch the throttle target table, they just leave it at a completely linear 1:1 relationship and while yes that can result in a car that's drivable, it's going to be potentially twitchy at best and there can be some benefit from taming that down by adjusting your relationship there. |
| 26:11 | The other part with this is we can use our throttle opening or also this comes back into our boost control as well. |
| 26:20 | To adjust the peak torque value. |
| 26:23 | So you might be wondering well why would I want to do this and this doesn't necessarily come down to traction either. |
| 26:30 | A good example of this I'll give you is in the Australian domestic market, the Holden and HSV market which is essentially GM, the HSV had two models of vehicle, which were both fitted with exactly the same 6.2 litre LS3. |
| 26:46 | The high spec model had a little bit more power, 325 kW vs 317 from the lower spec model. |
| 26:55 | Now on paper that doesn't sound too much, the difference when we ran them on the dyno though, in the mid range there was about a 40 kW deficit to the lower spec vehicle. |
| 27:06 | Now this is all with exactly the same engine remember. |
| 27:09 | Now HSV did this purposefully so that they could command a premium price for the higher spec model. |
| 27:15 | There was also some other spec changes to interior trim etc but for all intents and purposes, we just want to concentrate on the engine. |
| 27:22 | Now how HSV did this was simply with the torque management table inside the ECU. |
| 27:28 | They limited the maximum torque through the mid range and we could simply go in there max out that table and lo and behold we picked up exactly the 40 or 50 kW through the mid range that was missing out so with one really simple change and a reflash, we could change that torque curve and match the power and torque of the higher spec model. |
| 27:49 | And that was all because the torque management table there simply dictated how much opening the throttle plate would give. |
| 27:58 | So the driver's sitting there at full throttle with the throttle pedal pressed as hard into the firewall as possible but of course the computer is just simply controlling and closing that throttle through the mid range so that's how an OE can do this, they'll also use this potentially for component protection and an example of this might be if they've got a known weakness in a gearbox or a differential then peak torque may be artificially reduced and as a driver, we may have no idea that that's happening. |
| 28:27 | In the aftermarket, this begs the question, if it's there for component protection, should we be increasing the torque? But obviously that's a decision that the individual needs to make. |
| 28:38 | Where we used this sort of control as well is in engines where we're trying to basically make more power and torque than the factory components inside the engine maybe are capable of. |
| 28:52 | A good example of this is maybe you've got a set of connecting rods that are still factory. |
| 28:57 | They are known to fail above a certain peak torque value. |
| 29:03 | So what we could do is artificially control the throttle opening through the mid range. |
| 29:06 | Say 4000, 4500, 5000 RPM which is where we would traditionally see peak torque. |
| 29:11 | By closing the throttle and potentially limiting our boost through there, we can control peak torque. |
| 29:17 | What we're really trying to do there, what we're talking about is actually controlling the maximum cylinder pressure. |
| 29:23 | But we get peak cylinder pressure at peak torque so basically by artificially limiting that, we can then ramp the boost and maybe the throttle position back up as we move away from peak torque because traditionally our torque curve is going to peak, then it's going to drop away so what we end up with is a torque curve that actually looks sort of more flat then right at the RPM limit it might start to drop away. |
| 29:45 | So these are the sort of controls we have at our fingertips to go through making some of these control adjustments to suit whatever we're trying to do and of course hopefully you can understand there's no black and white here, we may choose to do these things for a range of different reasons. |
| 30:02 | Alright so what I'm going to do is go through some of the ways we use what I've talked about so far with our Nissan SR20VE and one of the issues we had with this vehicle is that even with a 10 psi wastegate spring, we do get a little bit of boost creep. |
| 30:20 | Fitting a softer wastegate spring doesn't actually necessarily reduce our minimum boost pressure and we're seeing around about 13 psi of boost pressure by 7500 RPM which is the shift point so we'll come back to our power curves again. |
| 30:37 | So essentially with our minimum boost pressure we're ending up with around about 454 horsepower at the rear wheels. |
| 30:46 | So again we're getting around about 13, 14 psi at that 7500 RPM. |
| 30:52 | We can see if we hold the boost pressure at 14, 15 psi right through the rev range, we end up with our green run there which is 477 horsepower or whatever it ended up being so definitely an improvement there but obviously that doesn't give us a lot of range in order to drop the power. |
| 31:11 | We don't have the benefit of being able to reduce our boost pressure much further so we ended up near to the start of this season, we had a wet race or a forecast wet race. |
| 31:26 | The car was relatively untested and I wasn't super keep on heading out on a wet racetrack with 450 horsepower at the wheels so we needed to look at some options to reduce that power further and that's where combining our boost pressure control along with our throttle body control, throttle drive by wire mapping, gave us a lot of power to do that. |
| 31:47 | So I've got the steering wheel here off the Toyota SR86 as we call it and got a few driver controls here but the one that's key here is this little rotary switch. |
| 31:58 | So this is a 5 position switch, 0 through to 4 and this was always set up as our boost pressure target switch. |
| 32:07 | I've got traction control over here but not relevant for our conversation at the moment. |
| 32:11 | So 0 was our minimum boost, wastegate spring pressure and 4 of course obviously our maximum boost. |
| 32:17 | But again it doesn't give us the ability to vary that power too much. |
| 32:21 | In that case we actually got a bit of an in between here which isn't shown but essentially gave us the ability to vary the power by around about 50 horsepower and the minimum again I was expecting was going to be a little bit more than what we were going to be able to put to a wet track. |
| 32:36 | So let's go and have a look at our tuning software and we'll see what our options are. |
| 32:42 | So we'll start with our boost control here. |
| 32:44 | Now I will admit here, the MoTeC M1 software, on face value does look a little bit complex but don't worry too much about it, we're only going to really focus on a couple of key elements and if you aren't tuning on the MoTeC M1, everything that I'm going to talk about here is going to be probably completely applicable on just about any system. |
| 33:02 | So don't worry about if it looks a little bit confusing. |
| 33:06 | So what we want to do here is start on our boost limits and warnings and we've got this setting here which is our driver engine boost limit switch index which you can see is set to driver rotary switch two. |
| 33:20 | So this is what we're using for our boost target and that comes from that switch on the steering wheel that I just showed you. |
| 33:27 | If we head for a moment across to our vehicle setup we can see where that's coming from and we come over to our driver switch here and we are looking at our rotary switch number two and we can see the resource which essentially is where abouts is this coming from? In this situation, just because of the way I've set this up that switch is actually set up to go into a CAN based switchpad and that is on the back of the steering wheel. |
| 33:55 | The reason for that is it allows us to run all of these switches and buttons into that CAN switchpad and then we only have 4 wires coming out. |
| 34:05 | So that's an Ecumaster CAN based switchpad and then that sends out its information via CAN. |
| 34:11 | Long story short, that then goes to a MoTeC dash where it's decoded and then the MoTeC dash sends the relevant information through via CAN across to the M1 so that is why that input is a CAN message, traditionally this would be a wired rotary switch that goes to the ECU and we'd set that up on an analog voltage input but that's where that comes from. |
| 34:33 | So let's head back across to our boost control. |
| 34:36 | We'll open that back up again and there are a range of options here. |
| 34:41 | What we really want to look at here first of all is our engine boost limit. |
| 34:46 | So this is the percentage of our maximum boost and it is relative to our driver engine boost limit switch which is that switch we just look at. |
| 34:54 | So in our case we've got positions 0 through to 4, so 5 in total and we can see that's exactly what we've got here. |
| 35:01 | So this becomes a multiplier to our boost target which we'll have a look at in a second. |
| 35:06 | Obviously when we are on our boost target 0, the boost position 0, this is where we're asking for minimum boost so our multiplier becomes 0, so we're asking for essentially no boost. |
| 35:19 | When we are at boost position 4, we're asking for 100% of our boost and we can vary it in between. |
| 35:25 | Alright so that's our boost target switch. |
| 35:28 | We've also got this default, so if something goes wrong, maybe our boost switch fails, then we can set what it will default to, in this case 62.5% but you can set that to whatever you want. |
| 35:39 | Alright so we'll close that down and next we come up to our actual calibration. |
| 35:45 | So first of all, we have, let's open this and make it a little bit larger, we've got our boost target table which is this aim main. |
| 35:55 | So this is just what we're actually asking for here which works in relation to our switch because remember we're asking for a percentage of this. |
| 36:03 | 3D table here, so we've got our engine RPM on the horizontal axis, and we've got our throttle position on the vertical axis. |
| 36:12 | So again remembering this is important because it allows us to vary our boost pressure target relative to throttle position for all of the reasons we've just explained. |
| 36:21 | So in this case, this is gauge pressure, so we're asking for 100 kPa, 1 bar of boost when we're above 4000 RPM and above 90% throttle. |
| 36:32 | We can see though if we were at 40% throttle here we can see that the boost target drops down from 100 kPa to 70 kPa so 10 psi which does also happen to be our minimum boost spring pressure so again in our example we've got a relatively narrow range, we can only go between 70 kPa and 100 kPa. |
| 36:55 | Normally we would be working with a wider range, so that would give us more torque and power management control, simply within this table but it's simply depends, what we can do here will depend on what our minimum spring pressure, or our minimum available boost pressure is, dictated by wastegate size, spring pressure and also the way the wastegate is mounted. |
| 37:16 | And then the maximum boost pressure that we want to run so this probably would look like we've got a lot more control if we were running 2 bar of boost but in this case we're not. |
| 37:25 | Alright so this table here does also work in conjunction with another table which is confusingly in MoTeC lingo called feed forward. |
| 37:36 | That's this table over here, feed forward main. |
| 37:40 | All this essentially means is this is our base wastegate duty cycle table. |
| 37:45 | So on this table here we've got our aim boost pressure which came from that last table we just looked at on the vertical axis and we've got our RPM on the horizontal axis and we can see these are just simply our wastegate duty cycles before any closed loop control starts to come in. |
| 38:04 | And we can see for example here to get 70 kPa, we're down at 18.5% duty cycle, to get 100 kPa at 7500 RPM, we're at 33% duty cycle so again this is just because of that 4 port solenoid, relatively minimal variation between those two points, that's simply because we get more boost pressure adjustment per percent of duty cycle change with the 4 port solenoid. |
| 38:29 | So on top of this, this is just to get us into the ballpark, we should be tuning this base duty cycle table or feed forward table to get our boost control as close to our target as we can. |
| 38:39 | From here, closed loop control takes over, if there's any variation, to get us back onto our target. |
| 38:44 | So just remembering again though, come back to our main here. |
| 38:48 | So this is acted on by that driver boost switch which is our little switch here on our steering wheel. |
| 38:55 | So if we are at boost position 4, we're getting all of the boost target from that table, if we're at boost position 0, remembering we're multiplying this by 0% so essentially we're asking for no boost. |
| 39:08 | Then the final number from that calculation then goes into our feed forward table to give the final duty cycle that goes out to the wastegate. |
| 39:18 | So again normally that in itself gives us a fair bit of range and that in itself might be enough for most applications but like I've said, even with our minimum boost pressure that we can get with wastegate manipulation, we ended up with this situation where we just simply had way too much power for a really wet track. |
| 39:36 | So this is where our next little trick comes into play which is manipulating our drive by wire throttle setting. |
| 39:43 | So let's head over to those setups. |
| 39:46 | And what we're looking at here is our throttle pedal worksheet. |
| 39:50 | Again there's a lot of stuff going on here but you don't need to be too concerned and again it will all relate to most aftermarket ECUs. |
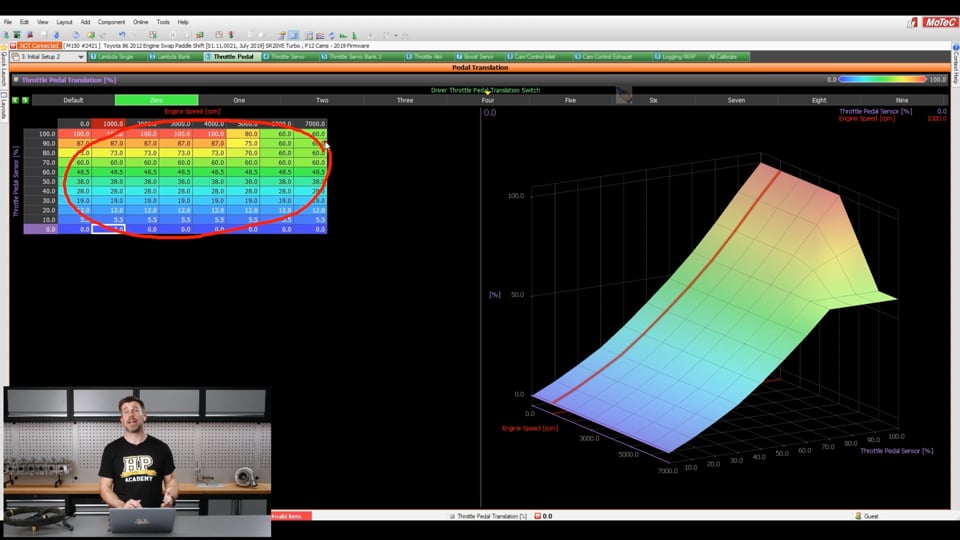
| 39:59 | What we're looking at here is our throttle pedal translation table. |
| 40:03 | So this is the relationship between the driver's pedal position and what's going to actually happen at the throttle plate. |
| 40:10 | So what we've got is a 3D table, on the vertical axis here is our driver's foot pedal position, 0-100%. |
| 40:19 | We've also got our RPM as a horizontal axis. |
| 40:22 | This table can be set up 2D or 3D depending what you want and then the numbers inside of this table are our actual throttle plate opening in terms of a percentage. |
| 40:32 | So first thing to talk about here is we've got a 4D table actually because we've got a 3D table but we have one of those tables for each of the switch positions. |
| 40:46 | So 0 through to 4, each of those switch positions has its own table so as I click through these, you can see the shape of that table changes. |
| 40:56 | Let's actually start with position 4, so this is where we're asking for maximum power, this will be dry track settings, 100 kPa of boost pressure, 15 psi give or take. |
| 41:06 | So the important thing to note here is if we look to the shape of this curve you can see again it's not linear, we don't just have a linear line between our throttle pedal position and our throttle plate position, we've got this exponential shape and you'll see as well, actually I'll just draw that back in, where we are really deviating from that linear is particularly down in this lower, this lower throttle position area or driver throttle position where if we look over here at our table, if we've got a driver's foot pedal position of 30, we're actually only asking for 19% throttle opening in the throttle plate so we're under opening the throttle plate compared to that linear relationship. |
| 41:51 | And that's just again trying to get a nice easy to modulate torque curve or torque delivery relative to the driver's foot pedal position and that's something you'll see on naturally aspirated as well as turbocharged engines, that exponential shape to the driver by wire table is pretty typical. |
| 42:09 | And it's something that I do suggest if you're tuning drive by wire, you have a play around with, you'll see the effect on the dyno in terms of measuring the torque delivery but really this is something you need to tune by actually driving the car and just get a feel for what happens here if I go from a linear relationship to this exponential relationship, what happens if I make that exponential relationship much more marked and just get a feel for what your actual preference is. |
| 42:35 | It is really quite amazing just how much change you can get from the feel of the vehicle. |
| 42:41 | A good example of this as well is Subaru do this with their SI drive switch in some of their WRX STi models, basically the SI switch or rotary dial adjusts the relationship between the driver's foot pedal and the throttle opening and this makes the car feel much sharper because in one of its positions it's simply giving you much more throttle opening at the drive by wire throttle for the same given opening of your driver's foot pedal. |
| 43:11 | Of course we're not actually making any more ultimate power and torque, once we're at wide open throttle, everything's still the same but significant difference in the feel and relationship there. |
| 43:21 | Alright so what I want to do is just step back through our lower settings here. |
| 43:25 | So obviously in this one, the key point to take away is when we're at 100% throttle, we are asking for 100% throttle opening. |
| 43:34 | Let's jump back to position 3 here and what we can see here is that above 4000 RPM, we're just starting to taper that throttle closed, just very slightly. |
| 43:47 | You can see how the edge of that just folds over a little bit and remembering here, this is simply because we can't reduce our boost pressure, we've got that boost creep that's occurring there and by closing the throttle body, that just artificially of course limits the maximum amount of boost pressure and power that the engine will produce and we can get a really large amount of control with this. |
| 44:11 | Getting things a little bit more pronounced here, we go to position 2, we can see that now particularly out at 7000 RPM, with the driver's foot pedal at 100% we're now only asking for 80% throttle. |
| 44:26 | If we go to position 1, this is where we're really starting to struggle with power and the ability to control the car so now at wide open throttle and 7000 RPM, we're down to 70% throttle opening there and then for our absolute torrential rain map, we can see that we're actually all the way down to 60% throttle above 6000 RPM. |
| 44:50 | You will also notice though that with all of these reduced power maps, I'm still at 100% throttle opening right up to 4000 RPM and that's just a factor of the torque delivery and power delivery of the engine. |
| 45:05 | If we head back across to our torque curve you can see that basically we aren't making full boost until around about this position here so if we look down at 4000 RPM, we don't have much power being produced anyway, we're only down, even with all of the boost in, we're at about 160, 170 horsepower, 4000 RPM so I'm not too concerned about that. |
| 45:29 | I want all of that there. |
| 45:31 | It's only once we start getting up into the upper realms of the power delivery that we want to start pulling that boost pressure and power back down. |
| 45:40 | So this technique simply works like you were actually manipulating the throttle yourself but what it means is it gives the driver the ability to be at wide open throttle and know that they're not going to have to manhandle the car, manipulate that throttle constantly lap after lap, corner after corner in order to control the amount of traction. |
| 46:01 | Now you might say, this is cheating, yeah you could consider that. |
| 46:05 | I'm not making up the rules here, I'm just giving you some of the capabilities that you have at your disposal if you are running a turbocharged car or a engine with drive by wire throttle or potentially both. |
| 46:18 | Right we're going to jump into questions really shortly so this is a good time to mention that if you do have any questions, now is the time to ask them. |
| 46:27 | Before we do that, one last topic which really goes hand in hand with this is why don't we just rely on traction control and don't worry about the torque management? And this is something that a lot of people believe is going to be the silver bullet for all of the problems with a powerful engine. |
| 46:46 | And yes, traction control is a great thing. |
| 46:49 | Traction control, when dealt with properly can be a really really good back stop in case you do end up with excessive wheel spin. |
| 46:57 | However, my own tuning strategy, and I know that I'm not alone in this, is that we want to rely on that traction control strategy as a bit of a safety backstop. |
| 47:06 | We don't want to be relying on it to be really heavy handed and control our torque. |
| 47:13 | The reason for this is multiple. |
| 47:15 | First of all, depending how we've got the traction control set up, we're going to be cutting fuel, or spark or potentially both to multiple cylinders in order to control the power and torque. |
| 47:27 | One of the issues with this is that it is a reactive, not a predictive system. |
| 47:32 | So in order for our traction control to come in and start doing something, we already have to have wheel spin occurring. |
| 47:39 | Now that might not necessarily be too much of a problem out of a low speed corner on a straight piece of track but even a small amount of wheel spin at high speed through a corner can potentially result in a spin which could get quite ugly at high speed. |
| 47:55 | So traction control again, just reactive, not predictive so if we can manipulate the power delivery to match the available grip that the track is offering, this in my opinion is always superior. |
| 48:10 | The other thing is, it can actually be pretty nasty on the engine. |
| 48:13 | Now this really, there's a number of factors that come into play here but an interview that I do recall from the founder of Pro Line Race Engines, when we were at PRI a couple of years ago. |
| 48:28 | Some of their pro mod V8 twin turbo engines that produce 4000 to 5000 plus horsepower, he basically went through how important it is on those sorts of engines to stay away from any sort of cut or limit because the effect on the crankshaft and components can be really catastrophic over time so particularly if you're heavily relying on traction control, it's really going to shorten the life expectancy of your engine so just something to keep in mind that I know a lot of people don't consider too much but yeah basically we want to rely on that traction control just as a safety backstop rather than sitting on the traction control the whole way around a circuit or down the drag strip. |
| 49:12 | Alright we'll jump into some questions now and see what we've got. |
| 49:20 | Looks like we've got a few questions from one of our members here Suhas who's asked, first up, how do we control the torque delivery to the wheels in a high power front wheel drive drag car with high boost pressure after incorporating proper launch control strategy? Suhas basically everything that I have just talked about, really this comes down to two things, shaping the torque curve. |
| 49:43 | So with a powerful front wheel drive drag car, what we are quite likely going to want to do is make heavy use of boost per gear or boost versus vehicle speed in order to step that boost pressure up as the car goes down the track. |
| 49:58 | The other thing with a front wheel drive car is shaping the boost curve so that we don't get maximum boost pressure at low RPM. |
| 50:06 | Let's say our turbocharger can produce full boost by 5500 RPM, we may actually get a traction advantage by bringing that boost in more softly and not reaching full boost until maybe 7000 RPM so combination of those sorts of things are what we'd want to do. |
| 50:21 | What are the differences when using open differentials and limiters, slip differentials and the impact on torque delivery? Little outside of the topic really, ultimately a limited slip versus an open differential is going to dictate how much power you can put to the track or how much torque you can put to the track. |
| 50:40 | Ultimately if you exceed the available traction you're going to end up with one wheel spinning. |
| 50:44 | One of the biggest areas of issue there for an open differential is in a circuit race application where you come out of a corner, obviously you've got one wheel is unloaded on the inside of the corner so it's much more likely that that particular side of the car, the inside wheel is going to end up spinning. |
| 51:01 | So yeah you've essentially just got less overall traction available. |
| 51:06 | What hardware is required to incorporate torque management? So drive by wire and boost control are the two techniques that we have been looking at. |
| 51:14 | There are other aspects which I haven't talked about here such as torque based ECUs which is where we are physically asking for a given amount of torque for a driver foot pedal input but essentially it's still using the same parameters, manipulating our boost pressure, manipulating our drive by wire throttle opening. |
| 51:34 | Manitou Black's asked, how would these torque management techniques compare to ignition retard or dropping cylinders if you don't have drive by wire or boost? So yeah I mean traction control really is what you're talking about with ignition retard or dropping cylinders. |
| 51:49 | I will mention though one of the techniques that we did use in a lot of the drag cars was to reduce our ignition timing through first or maybe even second gear. |
| 52:00 | So the reason we did this is so that we didn't need to drop the boost too far. |
| 52:05 | Probably easy to show you if I can, so let' me just bring this up here. |
| 52:12 | We'll just add ignition timing. |
| 52:15 | And hopefully that's going to give us a bit of a look into what's going on here. |
| 52:24 | Yeah it does OK perfect. |
| 52:26 | So what I'll do is I'll just move this up so we can actually see it a little bit easier. |
| 52:31 | So our red trace here is our ignition advance and what we want to take into account here is first of all, this section here where our ignition advance is actually retarded below zero, this is due to the two step launch control so we're retarding the timing in order to make boost. |
| 52:48 | Then we've got our ignition timing essentially through here in first gear. |
| 52:53 | The important thing to note is in first gear, we're already wheel spinning. |
| 52:56 | The car is really not hooked up at this stage but in second gear which is this gear here, what we can see is if we look at our ignition timing we've got this drop in our timing. |
| 53:08 | So what we're trying to do here is keep our boost pressure up. |
| 53:13 | The reason for this is, we can see what happens with our gear shifts. |
| 53:16 | Even though this is flat shifting, the driver's not backing off the throttle, we've still got a really big turbocharger, this was a Garrett GT4202. |
| 53:23 | So there's a lot of boost drop off, even at full throttle and then because it's a big lazy turbo, it takes a while to get back up to full boost. |
| 53:33 | So we want to maintain as much boost pressure as we can through second gear to essentially reduce the boost drop that we're going to get when we shift from second to third. |
| 53:44 | When we shift to third, that's when the car's really pretty well hooked up so we can start feeding some decent boost pressure into it. |
| 53:50 | So what we do here is we target a boost pressure, which in this case we can see 348, let's call it 350 kPa so 250 kPa of positive boost, 2.5 bar positive boost. |
| 54:02 | Now there's no way that we could put that much boost pressure to the track in second gear. |
| 54:08 | So what we do is we artificially reduce the engine torque there by retarding the ignition timing. |
| 54:12 | So you can see that drop off in ignition timing that we've got here and then our ignition timing sits through here, we're sitting at about 13° and you can see the effect of that, how much we've retarded it because when we get into third gear here, we jump up from 13° to 20°, even though we've got more boost pressure so we've probably dropped the ignition timing through second gear there by about 10° in order to reduce the engine torque and keep the car hooked up with more boost pressure which really again pays dividends when we hit third gear. |
| 54:43 | There's a caveat here though, if we're retarding the ignition timing, what we are doing is producing a lot more heat, particularly in the exhaust system so that does need to be taken into account and again this is why I wouldn't recommend relying heavily on just ignition retard. |
| 54:58 | Yep you'll get away with it for a brief amount of time, in this case what are we, we're from about 1.5 seconds there, 2:18 through to 2:19, about a full second that we've retarded the timing. |
| 55:11 | I've got no concerns about doing that for a second. |
| 55:14 | Would I do it for 1:50 around a racetrack? Probably not, you're going to end up potentially with some problems there. |
| 55:21 | So hopefully that kind of explains that, I'll head back over to our questions now. |
| 55:31 | Got a question from Jons who's asked, what are your thoughts on Powertune's traction control by a MoTeC ECU? Not entirely sure sorry what you're talking about there. |
| 55:42 | I use MoTeC ECUs extensively, the traction control through the MoTeC ECU is really really impressive. |
| 55:52 | A lot of control over the way the traction control works, a lot of adjustability as well so as I've sort of touched on, we've got another switch over here, rotary switch which allows us to control the amount of traction intervention there and it is really really good for driver confidence on a wet track. |
| 56:08 | Again, irrespective of the brand of ECU, we still really want to try and stay away from relying heavily in traction control in the first place so not sure what the Powertune aspect of your question is there, not something I have run into sorry. |
| 56:23 | Manitou Black's asked, have you used torque management with a steering angle input? No I haven't, what we do have in the MoTeC M1 is the ability to vary our traction control slip target versus lateral G force which kind of is an around about way of what you're talking about. |
| 56:41 | Obviously we're not talking about torque management versus lateral G force which would really be I think probably what you're aiming for but depending on how creatve you want to get, particularly if you've got a flexible ECU with a G force, lateral G force sensor and a compensation table you can apply to boost or drive by wire throttle, you 100% could do this. |
| 57:02 | It is worth mentioning, even though we've dived pretty deep down this rabbit hole, you don't want to over complicate your strategy here as well. |
| 57:12 | Particularly if you're doing a whole lot of things that add up, so you've got maybe boost pressure control, you've got drive by wire throttle control, maybe you're using some ignition retard, maybe some other parameters there, it can get to a point where you've got so much going on that it can be easy to forget what's actually happening, particularly if you've got a car that maybe has been parked up for 6 months, it gets to race season again and you get back in and it can take you quite a while to refresh your memory so I do try where possible to keep this as simple as possible and that would be a good recommendation for all of you as well. |
| 57:48 | Alrighty, that's brought us to the end of the questions, thanks for everyone who's joined in there and remember if you are watching this in our archive as an HPA member, if you've got any further questions please ask those in the forum and I'll be happy to answer them there. |
| 58:00 | Thanks for joining us and hopefully we can see you next week. |
Timestamps
0:00 - Why do we need to adjust torque?
2:30 - SR20VE dyno graph
4:45 - Adjusting torque | Engine hardware
6:30 - NZ V8 TLX race series throttle position example
9:00 - Manipulating boost pressure | Boost vs TPS
15:25 - Manipulating boost pressure | 3 vs 4 port solenoid
19:15 - Manipulating boost pressure | Boost vs gear speed
23:20 - Adjusting torque | Throttle position control
30:00 - MoTeC M1 example | Basic setup
39:35 - MoTeC M1 example | Drive by wire setup
46:25 - Why can't we just use traction control?
49:20 - Questions


