314 | Paddle Shift Setup - MoTeC M1
Summary
In this webinar we’ll look at the configuration of a holinger paddle shifted gearbox in our Toyota 86 race car. This will cover the basic setup as well as some of the shift strategies.
| 00:00 | - Welcome to another webinar. |
| 00:02 | In this webinar we're going to be diving into the setup of a paddle shifted gearbox using the MoTeC M1 platform. |
| 00:09 | Now the conversation today is really going to be twofold. |
| 00:13 | We will dive a little bit into some of the control strategies inside of the software. |
| 00:18 | I am more going to be focusing though on the actual hardware and physical installation. |
| 00:25 | We've done a previous webinar that goes a little bit deeper into the control strategy so if you want more information, search that out in our webinar archive. |
| 00:33 | This will be a slightly different take on this. |
| 00:37 | As usual, we will have questions and answers at the end of the lesson so if there's anything that I talk about that you'd like me to explain in a bit more detail, please feel free to do so, add those questions to the comments and we'll get into those at the end. |
| 00:54 | Now we are talking here about paddle shifted gearboxes but there are a lot of similarities between a paddle shifted and a lever actuated sequential gearbox so there's a bit of cross over here, particularly when it comes to the physically installation, the physical setup. |
| 01:11 | Obviously there are some slight differences with the control strategies inside of the ECU but I think to start with we're going to look at the basics of how a dog engagement gearbox works, whether this is H pattern or sequential doesn't actually matter. |
| 01:26 | So jump across to my laptop screen here and basically we've got a couple of gears here which are typical of a straight cut dog engagement gear and the term dog engagement refers to these little castellations here on the top of the gear. |
| 01:42 | So these are called drive dogs. |
| 01:45 | Now it's probably a little bit difficult to actually tell in this photo but there is actually a bit of a back cut on these dogs. |
| 01:53 | So what I mean by back cut is that there's an angle here that comes back and the reason we've got these little dogs or drive dogs on the gear is that there is a matching set of dogs on the selector that moves from one gear to another and basically the dogs on the selector will engage the dogs on the gear. |
| 02:16 | That back cut is important because it means that when they are engaged, essentially no amount of force on the lever, if you've got a manual lever style sequential gearbox, no amount of force or the H pattern lever for that matter, again it doesn't really matter, you will not be able to get that out of gear, it's essentially impossible because that back cut, they're locked into each other and there's no way that you can actually drag them out of gear. |
| 02:45 | One of the elements that does need to be considered with a dog engagement gearbox is a lot of the life expectancy of the dog box really comes down to driving style and these gearboxes really need to be shifted aggressively and quickly because otherwise what happens is we end up rounding the edges of the dogs and instead of having that nice sharp edge, over time that gets rounded off and when the gear becomes, or the dog becomes too rounded, that's when we can get problems with them actually jumping out of gear so that's one of the inspection points we're always looking at when we pull down a dog box to make sure that the dogs are still nice and sharp and aren't showing too much sign of wear. |
| 03:30 | Now this is what everything sort of looks like as it's installed. |
| 03:34 | So this is a helical gearbox, doesn't really matter what the actual gears are but here we see the dogs on one gear and we've got the dogs on the other gear over here. |
| 03:48 | This little mechanism that we've got in the middle here, this is our selector fork, this is what we're actually moving with our lever. |
| 03:55 | So when we want to engage one gear, we move that in this direction, when we want to engage the next gear, we move it in this direction and it's a little hard to see, there is a sliding selector that the selector will be moving, we can just see here in the bottom of the shot here, there are those little drive dogs and so those are going to engage in either gear, depending where we are. |
| 04:22 | So that's the premise of how the dog box actually changes the gear that's selected. |
| 04:27 | The advantage of it is it can provide incredibly quick shifts. |
| 04:33 | We don't need a lot of speed matching in the gearbox itself which we do require with a synchromesh road car style gearbox. |
| 04:42 | It's very difficult to shift a factory style synchromesh gearbox incredibly quickly. |
| 04:48 | The faster we shift it, the quicker we're going to wear out the synchros as well because if you think about what's happening, if we're at 7000 RPM in 4th gear and we want to shift into 5th gear, when we start out in 5th gear, instead of 7000 RPM, depending on our ratios, the engine speed may need to drop down to 6000 or 5500 RPM and that has to happen very very quickly so the synchro's job is to slow the gear set down or slow the input shift down so that it allows the speeds to synchronise and that creates a lot of friction and wear. |
| 05:27 | On the other hand if we look at this here, you can see we've got quite a wide window between the adjacent dogs so again if we're very fast with the shift, almost irrespective of the relative gear speeds we're going to be able to slide that dog in between, into that window there and engage the dogs so it can be quite abrupt, can be quite harsh but in terms of race gearboxes, it does allow for some very quick shifts. |
| 05:54 | Now there are a couple of caveats here. |
| 05:56 | As I mentioned, we've got the back cut on the dogs and this means that particularly if you are under power, if you're accelerating through a gear and you want to shift from 3rd to 4th, 4th to 5th, we need some way of interrupting the engine torque in order to allow the dogs to disengage so that we can actually move the selector. |
| 06:19 | There's a variety of ways of doing this, before the advent of modern ECUs, when we were talking about manually shifted gearboxes, H pattern or dog box, what the driver would do is load up the lever, getting ready to shift and then when the shift light came on, what they would do is simply lift out of the throttle a little bit and thus reduce the engine torque and because we've already got pre load on the lever, as soon as you lifted the throttle enough to release the dogs, the gearbox would simply shift into the next gear very very quickly and very very seamlessly. |
| 06:55 | On the other hand, when we are down shifting as well, this again really goes for, the same for a conventional synchromesh style gearbox, we do need some kind of rev matching. |
| 07:08 | This is normally done with a heel and toe blip but again with the advent of modern electronics with drive by wire throttle, that blip can now be handled through the ECU so this allows the driver to left foot brake if you want to left foot brake. |
| 07:24 | But even if you are a right foot braker, it's very very difficult to maintain absolute peak braking force and modulation while also moving your foot across, blipping the throttle to match revs, you're almost always going to get some level of brake pressure reduction, even for professional drivers so the ability to concentrate solely on braking effort is a big advantage. |
| 07:51 | Now the other thing, particularly if we are looking at a paddle shift arrangement, where the shifts are not made by us physically moving a lever between locations, it's done in this case using compressed air and a couple of actuators inside the gearbox, what this does, because the shift is very consistent and it is very fast, this actually is a great way of reducing wear and damage on the gearbox compared to manually shifting it. |
| 08:20 | The argument of course is this takes away from some of the driver skill. |
| 08:25 | Yeah I'm not really interested in that particular argument, that is just purely a personal preference, I'm looking simply at the mechanics of what's going on and the system as it works. |
| 08:39 | Alright so what we're going to do is start by talking about the hardware that is actually required for a paddle shifted system. |
| 08:48 | And this starts, excuse please the condition of the gearbox being a little bit oily at the moment, we didn't get a chance to clean it up before I snapped these photos, and we have just suffered an oil leak from this gearbox which explains it. |
| 09:04 | So again as I mentioned, this is a Hollinger SG3, so this is an inline gearbox that's used behind a front engine rear wheel drive application. |
| 09:17 | So we're looking at the back of the gearbox, this is the output shaft here, where the output yolk for the driveshaft goes. |
| 09:25 | And the first thing we need is a really good quality gearbox position sensor. |
| 09:30 | This should go without saying, most of the gearbox manufacturers will provide a contactless quality motorsport grade sensor, I have however come from a gearbox that had essentially a homemade unit and it was just a reliability nightmare. |
| 09:53 | So absolutely this is non negotiable, you need a high quality reliable contactless gearbox position sensor so this simply goes onto the selector barrel and again, this one being sequential, as that rotates, it rotates that sensor. |
| 10:12 | The reason we need this is that that provides the information that the ECU needs to know what gear we're in. |
| 10:21 | You can also log this as well and if we log this at high speed, you can actually see exactly what's going on as the ECU completes the shift. |
| 10:30 | This one, as we can see there, is Curtiss Wright, Penny and Giles probably one of the more known names in the gear position sensor industry and they also do a range of other motorsport grade sensors so just make sure that you've got something really good in that respect. |
| 10:48 | Now the other element, and this is really going to be dependent on your application. |
| 10:56 | For endurance racing, which is what we're doing with this gearbox, making sure you maintain the gearbox coolant temperature or oil temperature I should say, is really important here so we do use an external oil cooler. |
| 11:10 | The SG3 has an internal oil pump which is kind of nice from a packaging perspective. |
| 11:16 | Other than that though, you can buy external oil pumps, we've got another one in the car for the differential which doesn't have a built in pump and basically this pumps the gearbox oil forward to a front mounted oil cooler, we've got a Setrab oil cooler mounted in one of the front corners of the car. |
| 11:34 | Now if you are only doing sprint races, you might be able to get away with not needing this because it does add to the complexity of the installation and it also adds to the weight so if you are doing sprint races, probably worth maybe starting without the cooling system but monitoring the gearbox oil temperature just to make sure that it isn't getting excessive. |
| 11:57 | Now what we've got here as well, obviously not essential but we are using a pair of dry brake connectors for the oil lines. |
| 12:06 | I'll just go back a second, we can see there that these lines are also hard lines. |
| 12:11 | Just because of the packaging constraints around here, there's a lot going on in the transmission tunnel, it is quite tight in the Toyota 86 trans tunnel anyway so not a lot of room to work and this just makes sure that everything is going to be in the right location all of the time. |
| 12:29 | As an added benefit as well which I think is quite often overlooked is hard lining, particularly longer runs of plumbing, be it coolant oil or fuel, is actually significantly cheaper than using braided line. |
| 12:44 | Those dry brake fittings, as their name implies, means that we can disconnect those without dripping gear oil everywhere. |
| 12:53 | It's always been one of my pet hates, the smell of gear oil and any time you're working with a gearbox or a differential you can guarantee you're going to end up with that all over you so this just helps reduce that a little bit. |
| 13:06 | That's the matching end of those, I think these ones might be Jiffy Tite as the brand but there are a range of motorsport grade dry brake couplings as well. |
| 13:18 | Another good place for these, a little off topic though is for the likes of brake calipers as well so you can actually remove a brake caliper without needing to bleed the brakes. |
| 13:29 | Looking a little bit more at the back of the gearbox, this is the setup here that's kind of specific to the paddle shift arrangement. |
| 13:41 | So you won't have this on a normal lever actuated sequential but these are the little actuators for the shift and as I already mentioned, this is an air shifted gearbox. |
| 13:53 | Now we also need a filter for the oil when we're pumping it around if you're going to be using a cooler. |
| 14:02 | Unfortunately gear boxes do fail, they do wear, you end up with debris and you don't want to end up pumping that around the system. |
| 14:10 | So Hollinger actually includes a built in filter, sort of a cartridge style filter so that's nice and easy, alternatively you're going to need to externally plumb that into the system as well, it's something that you just need to keep in mind when you're thinking out your installation. |
| 14:29 | Now onto the air side of the system, we are using a system from MME which is a company over in Europe, they specialise in gear shift components and we've got the compressor here and then it also needs an accumulator or a storage tank which is what we've got here. |
| 14:51 | From memory as well, this actually came with simply a pressure cut off switch. |
| 14:59 | So you could wire it up, it had a conventional relay and it had a pressure switch so basically it would operate until it came up to the pressure switch cut off point and then it would shut down. |
| 15:10 | On face value that seems OK however we had no way of monitoring what that pressure was and it actually let us down or almost let us down in a race meeting last year where the relay had actually failed so we got rid of that system, we've installed a conventional pressure sensor on it, normal Honeywell style pressure sensor, 0.5 - 4.5 V. |
| 15:36 | That then is wired into the M150 ECU so that it can actually directly monitor the pressure in the accumulator. |
| 15:45 | And then we're using a CAN based output from the ECU to the PMU16 to activate the compressor channel. |
| 15:54 | We're targeting, from memory, about 850 kPa and it's got about 100 kPa hysteresis so it doesn't switch on and off. |
| 16:02 | Another thing, and again a little off topic but just in relation to this, some of the niceties with the use of a PDM or PMU, so of course every time the car's been sitting you switch the car on and the accumulator will be empty or at low pressure so it'd immediately turn on that compressor. |
| 16:22 | That compressor is actually a fairly grunty little unit and it'll pull a consistent 20 odd amps. |
| 16:28 | So if it's filling that accumulator from absolutely dead empty, it's going to be drawing a lot of current and particularly if you've got a race car with a small battery, that obviously doesn't do great things for the battery voltage so what I've managed to do because this is controlled via the PMU, PDM, power distribution module, is we've got the CAN request coming from the MoTeC ECU asking for the compressor to turn on but I'm also only allowing that to run if the engine RPM is above say 800 RPM and has been for 5 seconds so in other words the car is actually running, the alternator is charging the battery so just to make sure that we're not going to be consistently flattening the battery because of course with race cars we do end up having them sit around for long periods of time, we're turning them on and off as we're testing and setting up other functions so just something to keep in mind there. |
| 17:26 | Actually as part of that cooling system, I touched on it but we also understandably need a way of monitoring the oil temperature. |
| 17:34 | There is a nice location already in the Hollinger gearbox as you'll see with most professional racing gearboxes, for a temperature sensor so again just need to wire that up to maybe our ECU or our dash so we can actually monitor that and an interesting side to this as well, prior to the Hollinger we had a locally manufactured TTi sequential gearbox in the car and TTi are quite specific in their recommendations for maximum oil temperature, they do not want the gearbox to see more than 110°C gearbox oil temperature. |
| 18:13 | Which I feel is reasonably low but of course they're the manufacturers so you try and do what you can to meet their requirements. |
| 18:22 | We ended up actually upgrading the oil cooler size for the gearbox twice to the point where we were running a really sizeable Setrab cooler, it's properly ducted at the front of the car, we couldn't really do too much more than that. |
| 18:37 | Still we were consistently seeing temperatures in the 120 + vicinity on a hot day in an endurance event and there's nothing we could really do about it. |
| 18:47 | We retained the exact same cooling system when we went to the Hollinger, with the exception that we removed the electric pump because of the built in pump that I already mentioned. |
| 19:00 | The maximum temperature I think we've seen out of that Hollinger is about 80° so that's a massive difference for the same size cooler. |
| 19:07 | We could ultimately actually go much smaller in the cooler. |
| 19:11 | So what that suggests to me is there must be a significant difference between tooth profiles or basically there must have been a lot more friction going on internally with the TTi gearbox than what we were seeing with the Hollinger. |
| 19:24 | Right so that's the basics of the actual hardware that we require. |
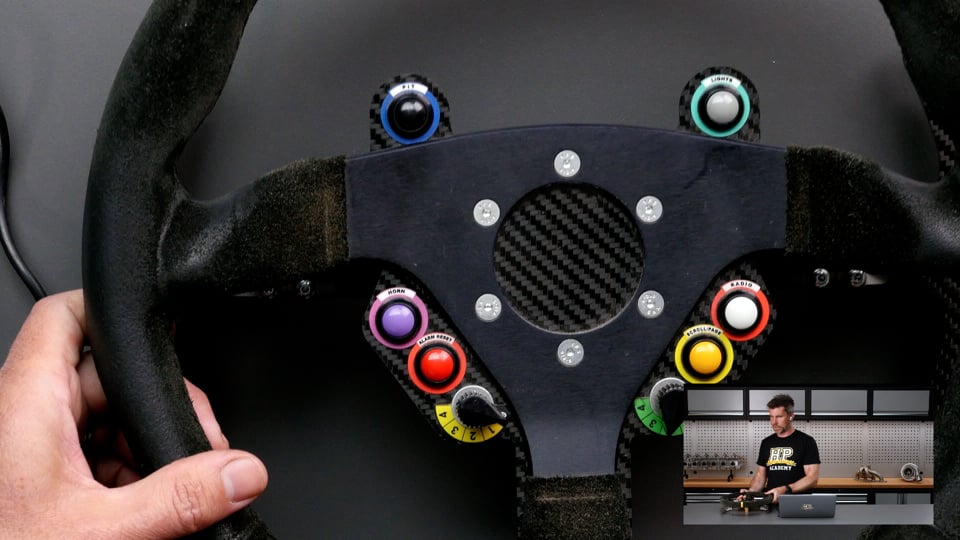
| 19:30 | Of course there are also the paddles. |
| 19:34 | So I just wanted to talk about that. |
| 19:36 | Got the steering wheel here off the car and we've got a number of controls on the steering wheel as well for a variety of things that don't really matter for the purposes of our webinar today but we'll just get that under our overhead. |
| 19:48 | So again the paddles on each side are a magnetic switch paddle. |
| 19:53 | These are from MME, the same place that we sourced the rest of our compressor and accumulator parts from. |
| 20:00 | This is also wired in through a Ecumaster CAN switchpad here which is mounted to the back of the steering wheel. |
| 20:09 | So basically everything on this steering wheel, all of the controls as well as the paddles are all going into that CAN switchpad. |
| 20:19 | Of course this could also be accomplished by direct wiring but in our case this was a nice simple way of getting all of that information through via CAN messages. |
| 20:31 | The advantage is, given as you saw, the number of controls we've got switches, multi position switches and the paddles that we've got, that would be a lot of wiring that would need to pass through that curly cord. |
| 20:43 | Instead all we actually need from our curly cord here, we have just 4 wires, it's a 4 pin DTM connector so we've got 12 volts and ground then we've got CAN and CAN low. |
| 20:57 | So one of the aspects with this, of course is that the MoTeC M1 platform doesn't natively speak Ecumaster which is totally understandable so we need a little bit of work to kind of get the two to talk to each other. |
| 21:16 | So again we'll just bring up our MoTeC dash manager. |
| 21:21 | So basically that gets wired into our MoTeC C125 dash, there's a bit of a kind of gateway if you like and I'll show you how that works. |
| 21:30 | We go into connections and communications and we'll come down here, we've got our two Ecumaster switch panel CAN messages here and our first one here has our traction and launch control. |
| 21:43 | Our part 2 here, panel 2 I should say, has our gear paddle up switch and our gear paddle down switch. |
| 21:53 | So that basically allows us to decode the CAN message from the Ecumaster CAN switchpad but then we also need to send that data out in a format that the M1 ECU can understand so we've got that down here in our M1 transmit. |
| 22:12 | So we've got a bunch of different parameters, channels being sent out there but we've got our gear paddle up switch and our gear paddle down switch so this basically sends it out on a message ID in a format that the M1 is expecting to see so it differs a little bit from how the Ecumaster is actually bringing it in but again works very very seamlessly and no problem at all working with that. |
| 22:37 | Alright what we'll do is we'll have a quick look into some of the ins and outs of the setup in the M1. |
| 22:43 | Again I'm not going to go too deep in this particular webinar, I wanted to focus more on the hardware side of things as opposed to just going deep into the control strategies. |
| 22:53 | This is probably a good time to mention that if there are any questions that you want to ask, please feel free to ask them and we'll jump into those in a moment. |
| 23:01 | Right so in the MoTeC M1, we'll just start from the start here and go into our tuning workbook which is how we're going to open the software. |
| 23:13 | Depending on the package that you're working with, everything's going to look a little bit different but in our instance we go into race functions and gear shift is where we're going to be working. |
| 23:25 | Now what we'll do is just start by talking about the setup for our gear actuator pump, our compressor. |
| 23:34 | So if we type that in. |
| 23:41 | So this is the setup for our compressor which I've kind of already touched on here. |
| 23:47 | So the output resource here, we could actually control this through a traditional relay via a wired output from the ECU. |
| 23:57 | In this case we're sending that out as PDM byte 0, mask 02 so basically it's an output bit to the PDM. |
| 24:06 | If this was to a MoTeC PDM it's very easy to set up, little bit more work in that we're obviously not, we're talking to an Ecumaster product but easy enough to still do. |
| 24:16 | So again we don't need a wire between the two products this is just a message that's getting sent on the CAN bus that the PMU can then decode. |
| 24:26 | Next we have our threshold, so our target pressure, already mentioned this, 850 kPa. |
| 24:33 | And we've got a hysteresis of 100. |
| 24:42 | Not the perfect time to end up having a coughing fit, I apologise. |
| 24:47 | Now there are also some nice features here, as a bit of a safety back up. |
| 24:51 | This system obviously becomes absolutely critical to the reliability of the shift and in turn also the reliability of the gearbox. |
| 25:01 | If we get very slow shifts we get back to the same problems that I mentioned with rounded drive dogs and all sorts of nasty stuff which we don't want. |
| 25:11 | So if the system does basically go into fault, maybe the sensor goes bad or there's a wiring issue to the sensor and it can no longer actually see what the pressure is, we can revert here to simply running the pump for 5 seconds or an on time, in this case 5 seconds and then off which in this case is 3 seconds. |
| 25:32 | Now you can have a look at your data as well from an actual track session with everything working. |
| 25:37 | Kind of get a sense of what sort of numbers make sense here but it is a nice safety backstop in case you do have a sensor failure and that system doesn't work how you're expecting. |
| 25:49 | Now one of the features that I wanted to talk about here which I think is often overlooked and ex MoTeC staff member Mark McCoy who's done a lot of work with the paddle shifting systems, when I first went to the paddle shifted system in our 86 I did spend quite a lot of time going through this with Mark and one of the things we were working on was improving the quality of the throttle blip, the auto blip on the downshift and Mark was very adamant that getting the minimum throttle position just right so that we're essentially not having the engine in heavy overrun vacuum, provides a significant advantage to this. |
| 26:37 | Basically if you have the throttle body completely closed at sort of 5000, 5500, 6000 RPM, then what happens is that when the ECU requests a blip, it takes a little time to essentially refill the plenum chamber with air, there's a latency involved with this, we're trying to do this very quickly so that we can complete this throttle blip and accurately match our RPM. |
| 27:00 | If that doesn't work, obviously we're going to have a mismatch, we can end up with compression locking and it's just not going to be really seemless and nice. |
| 27:10 | So basically we went through a few iterations of trying to tune the overrun throttle position so that we weren't heavily in overrun and there wasn't a huge amount of engine braking going on so we can do that here, I've already opened this table up, which is our throttle aim minimum table. |
| 27:34 | So this is a 2D table here, let's just full screen this. |
| 27:38 | So it's simply a 2D table relative to our engine RPM and this is our throttle aim minimum, our minimum throttle position that the ECU will request. |
| 27:50 | So you can see that this steps up from sort of 2% up to sort of 5.5%. |
| 27:55 | And again it's just trying to sort of eliminate that heavy overrun vacuum that you'll get if the throttle plate is completely closed and just by getting a little bit of an increase in our manifold pressure there, obviously we don't want to get to a point where the car is actually sort of driving like it's on cruise control. |
| 28:15 | Driver sensitivity to overrun braking, engine braking effect is quite important here so you can have a play with this and get it set up how you want, how you're comfortable with. |
| 28:27 | But this can provide quite a significant improvement in the throttle response on that blip. |
| 28:35 | This is a really important aspect of getting that downshift to be really nice and crisp and another element that goes hand in hand with this which can end up being, sort of masking what you're doing in the shift setup is also your transient enrichment, in this case fuel film in the MoTeC M1 so basically for want of a better term, acceleration enrichment. |
| 28:59 | If your accel enrichment or fuel film settings are completely out of the ballpark, you're going to end up with weirdness in your fuelling when that throttle blip is requested and that can artificially make that blip a lot more laggy than it needs to be so there's elements to this, we go 1 step deeper, obviously we also need to make sure that our efficiency table, our volumetric efficiency table is properly calibrated in those overrun areas. |
| 29:29 | So on that note, let's just go back across to our tuning worksheet and our VE table. |
| 29:36 | So what I see time and time again and irrespective of whether I'm tuning something that is a paddle shift or throttle blip that I'm trying to get really nice or not, I always go to the trouble of making sure that I have thoroughly tuned all of the zones in my VE table as well as I can access on the dyno. |
| 29:56 | Sometimes we'll need to be touching some of these up on the racetrack as well but if we look at our VE table here, it wouldn't be uncommon for us to be spending quite a bit of time down here in the sort of 20 to 60 kPa zones, 5000, 5500, 6000, 6500 RPM. |
| 30:14 | And if those zones aren't tuned correctly, if they're particularly excessively rich, what we're going to end up doing is affecting the response. |
| 30:25 | So it's a multi faceted setup here, we need to consider our efficiency table then we need to consider our fuel film tuning and then we can look at our throttle aim minimum and then finally our throttle blip and if you do all that right you're going to get a really nice result. |
| 30:45 | Alright let's head back to our race functions and our gear shift now. |
| 30:49 | What I'll do is we'll work through this and we'll just have a look at some of the different elements here. |
| 30:56 | So I'm actually starting at the bottom here but this is exactly where I want to be. |
| 31:01 | So of course as part of this with the paddle shift arrangement, we do need to define the actuator output so this for example here is our gear shift actuator up resource. |
| 31:15 | So that's wired to the little solenoid for our upshift and we can see that we are using our low side ignition 8 output there. |
| 31:23 | Our gearshift down, we've got our low side ignition 7 there. |
| 31:30 | So the setup of these needs to be correct so that we can actually physically actuate the shift. |
| 31:37 | Actually we'll come one step back as well and we'll go into vehicle and gear. |
| 31:45 | So again part of the setup here when we first install one of these gearboxes is making sure that we've got everything set up properly in the vehicle gear worksheet. |
| 31:59 | So for example for a start here, we have our gear type. |
| 32:03 | So obviously it's a sequential gearbox, our minimum gear is going to be reverse and our maximum gear is going to be 6th. |
| 32:11 | And we also need to set up our gear ratio table which is this one right here. |
| 32:19 | So really important that these are entered correctly. |
| 32:22 | This is part of the calculation or the input the ECU needs for the engine speed matching. |
| 32:30 | Basically if it knows what the engine RPM is and the gear ratio we're in, it knows what the engine RPM should be in the next ratio. |
| 32:39 | So this is important for the likes of a downshift when we're throttle blipping. |
| 32:42 | It can calculate what the RPM should be to get a specific match. |
| 32:47 | So need to make sure that that is all correct and of course we are going to end up getting this from our gearbox manufacturer as well. |
| 32:56 | The other element that we need to go through here for a start is to calibrate the gear positions. |
| 33:05 | So that's the information we've got here. |
| 33:10 | So we go through basically manually shifting, putting in an override so we can manually shift the gearbox. |
| 33:19 | This is something I'm going to be doing without the engine running. |
| 33:22 | And we want to go through all the way from our minimum gear to our maximum gear. |
| 33:27 | In this case 6th through to our reverse and this is a scale here of 0 to 100%. |
| 33:36 | We've got the Q or quick tune functionality here so basically it's just a case of rocking the car into the next gear, pressing the Q key on the keyboard and this will give us our relative position based on what our gearbox position sensor is reading. |
| 33:53 | So really important to get that right at the start, we do also have a scale and offset value down here. |
| 34:00 | So I'm not going to go into too much detail, there's a nice little help file at the right hand side which you can see here so for example our offset, the voltage at the low position and then if we go through to our scale, this is the scaling that converts the voltage into a percentage. |
| 34:19 | So basically going through this means that the ECU has an accurate understanding of what the gear position voltage is going to be for each of the gears as well as a tolerance between gears. |
| 34:31 | Obviously that voltage is always able to fluctuate and move around a little bit and even the backlash the shift barrel will allow small variations in the voltage as well so we need to go through, set this up correctly and make sure that the ECU does have a proper understanding of the gear that it's in, excuse me for a moment. |
| 34:55 | Alright we'll head back across to our race functions workbook again and our gear shift. |
| 35:02 | So we've gone through our actuator, we've gone through our compressor or pump setup, let's come back up to the top here. |
| 35:10 | And one of the nice features here with the paddle shift system which unfortunately, there's no real easy way of doing with a manually actuated sequential gearbox, is that we can actually lock out a shift. |
| 35:26 | If the driver gets a little bit too trigger happy on the downshifts and would be forcing the engine to go into an RPM above what you're happy with, you can lock that out and this table here basically defines the maximum engine RPM above which the shift will be locked out. |
| 35:46 | Easy to calculate this here based on your gear ratios as well so not very difficult to do. |
| 35:52 | We also have gear shift power on throttle position which I think is quite often overlooked or not understood. |
| 36:01 | This is simply the throttle position where we go between the overrun side of the dogs and the drive side of the dogs and why that's important is that if we're in an overrun situation vs a power on situation, the technique for unloading the drive dogs is different. |
| 36:20 | On an overrun what we actually need is a little bit of a throttle blip. |
| 36:25 | Just a little bit of throttle to unload the dogs. |
| 36:28 | Of course if we're on the drive side of the dogs, we need a torque reversal which would be an ignition cut, fuel cut, something like that, or a throttle lift which we're not going to be doing. |
| 36:41 | So that's going to define that. |
| 36:43 | Typically, I've only got a single number in here but you can also set this up as a 2D table and you can get a little bit more granular with this relative to your engine RPM if you want. |
| 36:55 | So it's just simply the situation where the gearbox changes from that drive side to the over drive side of the dogs and you'll sort of feel that clunking from one side to the other. |
| 37:15 | It's relatively easy to set up if you drive the car and actually figure out about what throttle position that's happening. |
| 37:23 | It doesn't have to be to the percentage point accurate, there is a little bit of flexibility in this as well so it's not absolutely razor precise there. |
| 37:36 | Let's move down here and the next one I wanted to talk about here is probably the crux of the whole shift setup which is our gear shift timing which can and is a reasonably complex setup. |
| 37:50 | So we've got 4 different types of gear shift, we've got an upshift with our power on and an upshift with our power off. |
| 37:58 | Then of course downshift power on and downshift power off. |
| 38:02 | Now that really comes into the power on/power off is based on the throttle position that we just looked at so that defines which of these tables the ECU is using and of course that's going to have a big effect on our shift quality. |
| 38:18 | So we've got our pre shift, our shift, our post shift, recovery and then a re arm so there's a range of elements that go into this and I won't go too much into detail on these, again we've got another webinar if you want to dive a little bit deeper into it. |
| 38:35 | One of the things I did want to explain, because this is something of a misunderstanding here, with the closed loop style of control that the MoTeC is doing. |
| 38:46 | So the actual shift part of the timing, so what we're talking about there is an upshift with the power on. |
| 38:54 | So this is a full throttle shift and again obviously we're not using the clutch, this is the ECU providing a torque reversal so that the dogs can disengage and can do this until the next gear is engaged. |
| 39:08 | So you can see we've got a number in there of 150 ms, what that actual torque reversal's going to be, we'll have a look at in a moment but that sounds like a really really long time and it is but that is the maximum amount of time that the ECU will use. |
| 39:25 | What it's monitoring is the gearbox position or the gear sensor position which we just looked at previously. |
| 39:32 | So it's only going to cut the torque for the period of time it needs until the next gear is engaged and then it will reintroduce it so you can put a large number in here, obviously you don't want to be ridiculous but you can put a large number in here and the ECU will only use what it needs. |
| 39:52 | So the important thing is to make sure that it's large enough that if there is a failure in the system that it will still work correctly, it's not going to be, you know you could put 1000 ms in here and your shift is going to be horrendous if something goes wrong. |
| 40:08 | These shifts are normally completed somewhere between maybe 40 and 80 ms so 150 we've got enough room for error there and it's going to be nice and safe without being overly optimistic there. |
| 40:26 | Post shift as well, I'll just talk a little bit about this because you can see I've got zeros in here. |
| 40:32 | So what we can do with this is ramp the torque back in a little bit more slowly if we want and this is about tuning the feel of the shift. |
| 40:40 | Particularly if we are very aggressive with the shift, which is like this and we've got a very powerful engine, what we can end up doing is making the shift feel quite abrupt, this can be enough to end up unloading the tyres and actually breaking traction as well so you can use a torque reduction with ignition retard and then ramp that back in a little bit more slowly, maybe over 50 or 100 ms just to soften the shift a little bit. |
| 41:09 | So again of course we've got those parameters for our upshift and our downshift power on and power off. |
| 41:17 | Right moving down, I wanted to talk about the torque reduction so what we've got here, let's just close that back down a little bit more, we've got our gear shift ignition cut main. |
| 41:32 | So we've got the ability to use fuel or ignition cut. |
| 41:35 | This does need to be dealt with very very carefully. |
| 41:38 | Probably this is the biggest place that you have the potential for causing some serious damage. |
| 41:46 | We do need to understand that using an ignition cut can be disastrous with certain engine types and this really comes down the valve train. |
| 41:55 | If you are using a hydraulic lifter, the gear change ignition cut can cause pressure pulses in the exhaust, particularly on turbocharged vehicles which can end up popping the exhaust valves back open which will pump the lifters up. |
| 42:10 | With a rocker arrangement, Nissan's SR20 DE for example, DET, this can pop a rocker off. |
| 42:20 | All sorts of nasty stuff can happen. |
| 42:22 | With a shim on bucket arrangement you can end up popping the shims off so unless you've got a valve train that is up to it, I would highly recommend staying away from using an ignition cut wherever possible. |
| 42:35 | Yes they sound really cool I know but doesn't really matter how they sound if your engine's going to fall to pieces pretty quickly because the shims have popped off all of the valves. |
| 42:44 | So as you'll see here, we've got 0 ignition cut being used. |
| 42:52 | We've got fuel cut which is my preference here for all of the reasons I've just explained. |
| 42:57 | So we've got our fuel cut for our downshift which is not too relevant and upshift with our engine speed match disabled and enabled, I'll talk about what that is in a moment. |
| 43:07 | You can see here I'm using 70%. |
| 43:09 | So this is another area that I guess a little bit of experimentation is required. |
| 43:16 | It's typical to see, if I look at calibrations for gear cut control, you'll normally see people have just gone in and thrown 100% cut in there which sounds sensible and it will work, of course it's going to work, that cut's all of the fuel so we're removing all of the engine torque so that's going to allow those dogs to disengage. |
| 43:40 | However you don't necessarily need to be at 100% and I'll go back to the example I gave to start with. |
| 43:48 | Before ECUs were really a thing and sequential or H pattern dog boxes were around, drivers would pre load the lever and then just lift out of the throttle really briefly and that only needed to be to maybe 50% throttle or something of that nature and that would be enough to unload the dogs and let the shift complete. |
| 44:09 | So 100% is usually not necessary. |
| 44:11 | Next question of course is if 100% is not necessary, how far can I go? Well if you go to the point where you are not introducing enough of a torque reversal, you'll know about it because the shift simply won't complete, it will not come out of gear so typically numbers around 60 to 70% are probably going to be a pretty good place to start but a little bit of experimentation for your own setup is required. |
| 44:38 | So I showed the ignition cut, the fact that I'm not using it and why. |
| 44:43 | The ignition cut does exactly the same thing, it's just a different way of providing that torque reduction to allow the gearbox, the dogs to come out of engagement. |
| 44:58 | So yeah if you've got an engine with a really robust valve train then absolutely the ignition cut is viable or you can use a combination of fuel and ignition cut. |
| 45:09 | Next, our gear shift timing retard and I don't even know if I've got any in here, I don't think I have because, I've sort of mentioned this already, Im not using any recovery on this particular engine but for our upshift here we might end up using a retard of maybe 30° so that's going to pull the timing back 30° or maybe you want to go even further than that and then it will recover that timing over the time that you've put into that previous table that we looked at. |
| 45:44 | Again just personal preference and I mean it's really not possible to stand here and say these are the numbers that you should use in your particular paddle shift setup, it's just not that easy, everything is different. |
| 45:57 | Every gearbox is different, every engine has different torque characteristics and responds differently to these parameters so the important thing is really to have an understanding of what the different parameters do, an understanding of what a given change is likely to cause and then it's a case of simply testing and trying these different parameters, different adjustments and see how they respond under particular application until you get a result that you are happy with. |
| 46:28 | Alright the last thing I think I'm going to talk about today is our engine speed match. |
| 46:35 | And, let me just, here we go, so we've got 2 parts to this, we've got our engine speed match which is here and we've also got our engine speed limit mode which is at the moment not in use. |
| 46:48 | So what we can do is enable this system and basically the ECU will enable engine speed limiting based on the type of shift. |
| 46:58 | So what I mean by this is if we are downshifting. |
| 47:03 | I kind of touched on this before, based on the gear ratio table that we've already entered, the ECU will know when we shift from 4th down to 3rd gear, what the RPM in third gear should be based on the ratios and what our RPM starts out at in 4th gear. |
| 47:19 | So then if we come back to our speed match table, so we're talking about a downshift with power off, we can target a certain percentage of that theoretically ideal speed, engine speed, in this case I've got a value of 96% in there. |
| 47:38 | So we'll target 96% of that, if you want a more detailed understanding, we can press F1 here and it will give you that. |
| 47:46 | In this case 100% targets the engine speed of the next gear, 0% targets the engine speed of the current gear so you can sort of work that out from there. |
| 47:54 | So basically what it will do is provide our cut until we get to that point and then reintroduce our engine torque. |
| 48:01 | And that can work really nicely, on the downshifts what it will do is, I said cut there, what it will do on the downshift is it will blip. |
| 48:13 | So it'll blip the throttle and it will actually bring in a limiter at that calculated RPM. |
| 48:19 | So what this allows us to do is actually be really aggressive with blip and get a really fast blip to match RPM and we don't need to worry about it overblipping or exceeding because what the ECU's going to do is bring in this RPM limit and sort of clamp us at that targeted value. |
| 48:37 | So you'll often hear race cars with these sorts of gearboxes and on the downshift you'll hear them blip and there'll be a crack out the exhaust and that's the ignition cut limiting how quickly, or what the RPM will be on that downshift. |
| 48:55 | So likewise on the upshift we've got what I tried to explain before. |
| 49:00 | Upshift power on we're targeting 98% here. |
| 49:04 | Again the values can be changed around to test and see how that actually responds and how it feels with your particular setup but what it's going to do is target 98% of the speed in the next gear, the RPM in the next gear so not quite all the way, obviously as we go up through the gears, our RPM needs to fall maybe from 7000 to 5800 RPM. |
| 49:27 | In this case we're not going to let it fall the entire way. |
| 49:30 | Before it gets to that we're going to reengage our engine torque. |
| 49:33 | Now should you be using this or not? Well it really depends. |
| 49:39 | What I would suggest is there's nothing wrong with using it, it's a very powerful system and it makes a lot of sense. |
| 49:45 | What I would suggest is that a lot of people will kind of lean on it and then be lazy with tuning the likes of their throttle blip because it doesn't really matter. |
| 49:57 | If we put numbers in our throttle blip target table of 100%, basically blipping the throttle the whole way, it'll kind of work, it'll probably sound pretty nasty because we're using a lot of cut to control that RPM but it gets the job done. |
| 50:10 | The problem, where this sort of falls over is if there is a sensor fault or something like this and it can no longer do, the ECU can no longer do the engine speed limiting like this, then the back fall system will be essentially open loop and that's not going to be very pleasant so it's not really a bandaid in my opinion for doing the job properly and actually tuning things like the throttle blip properly. |
| 50:39 | Right we'll move into our questions and answers and remember if you do want to go a little further on some of these details, I've kind of skimmed over here today, the other webinar in our archive will be worth having a look at. |
| 50:54 | I'll just head across to my notes here. |
| 51:06 | Nathan's asked, can you just use rev against wheel speed to determine gear? Do you really need the gear position sensor? Well Nathan it depends what you're trying to do. |
| 51:15 | If you simply want to display gear on your dash or in a log file, absolutely the relationship between wheel speed and engine RPM is perfectly acceptable. |
| 51:26 | Unfortunately it's absolutely not acceptable for a closed loop control strategy like this. |
| 51:32 | The closed loop really needs to accurately know exactly where the gear barrel is and I really didn't sort of talk too much about this. |
| 51:41 | As these sequential transmissions have become more common and more available and dropped a little bit in price, we've seen a lot of ECUs start offering gear change control and most of them started with just a timed system where the cut would be requested and then the ECU would just blindly cut the ignition or the fuel for let's say 100 ms. |
| 52:07 | Which kind of works but maybe your shift actually completed in 60 ms. |
| 52:12 | So you've just wasted 40 ms, doesn't sound like a lot but over you know maybe 20 or 30 shifts around a lap of a racetrack, it does start to add up and obviously we do everything we can to reduce our lap time so that's not so smart. |
| 52:26 | So that sort of a system didn't really need such an accurate understanding of the gear barrel position but when we want to do proper closed loop control, absolutely we do, it is really important. |
| 52:41 | Juan's asked, will a strain gauge require any other hardware to no lift shift a dog box? No it does, I mean obviously an ECU that's capable of flat shift or gear change control would be required. |
| 52:59 | Probably the only other thing to mention is depending on where you're sourcing the strain gauge from, there are analog and digital variants of the strain gauge so just making sure that your ECU is compatible with the type that you've got. |
| 53:13 | Spycjoe I think it is, has asked, I've got a Formula SAE car with a KTM 690. |
| 53:21 | We have air shift set up on it and it is controlled through MoTeC. |
| 53:24 | We are doing 100% fuel and 100% ignition cut and it still won't flat foot shift, what can I do? OK that to me sounds like it is not cutting as you're requesting. |
| 53:40 | Yeah probably would need a little bit more information to diagnose that more thoroughly but if it genuinely is giving 100% fuel and ignition cut, then it absolutely should be releasing the dogs and allowing that shift to complete. |
| 53:56 | Because I can't really do too much more to help you here inside of a webinar, with that particular question I would 100% recommend that you get hold of MoTeC. |
| 54:08 | I'm going to guess you're probably in the US in which case MoTeC USA will help, otherwise MoTeC Australia, always super helpful if you do have a specific question like that, that's something you definitely want to get on top of. |
| 54:25 | Turbine Research has asked, what brands of sequential transmission are well known or considered a go-to in the world of motorsports? Probably on this side of the world, definitely Hollinger would be one of the bigger name brands but Hollinger is big all around the world. |
| 54:41 | They're a very very high quality manufacturer or racing transmissions but in Europe we've got the likes of SADEV, Xtrac, Elite, Quaife, probably those would be the bigger brands. |
| 54:56 | There's a bunch though coming out of Europe as well, Drenth is another one that comes to mind, yeah there are honestly so many options. |
| 55:08 | I can't give you a complete list but the ones I've just mentioned, probably you'll find something in there that would suit most applications. |
| 55:19 | Dyno Doug's asked, when using a fuel cut, would you want to use some ignition retard to avoid potential knock from the momentary lean condition when fuel is induced again? OK so bit of a misnomer here. |
| 55:31 | The ignition retard's definitely not going to be necessary for anti knock. |
| 55:36 | When you're doing a fuel cut, there is a concern around this lean condition. |
| 55:41 | Now yes there can be an element of this. |
| 55:45 | So we've got 2 aspects to the fuel cut. |
| 55:47 | So first of all when you cut the fuel, you will still get some residual fuel from the fuel film in the port make its way into the cylinder on the next stroke. |
| 55:57 | However the very very minor quantity of fuel that's going to be in there is going to be too lean to support combustion so that's not a consideration. |
| 56:06 | The other aspect of this is when the fuel is reintroduced, some amount of that fuel initially reintroduced is going to need to go to reestablishing that fuel film on the port wall, so your first combustion event in that cylinder may be marginally lean, very very slightly but I mean at least in my experience, never enough to result in any potential for knock, it's just not something that I've ever seen a problem with and I know that this is a common concern, just not something I've every actually experienced. |
| 56:36 | So I could say that you could probably put that out of your mind as a problem. |
| 56:41 | That ignition retard is more around controlling the torque reintroduction and how aggressive or smooth that element is. |
| 56:51 | John has asked, is this the new GPRP Pro recently released by MoTeC? No this is, the one that I just showed you through is actually running in our Toyota 86 which is their Toyota GT86 engine swap paddle shift package, bit of a mouthful. |
| 57:12 | We do have a GPRP Pro firmware to test. |
| 57:18 | Unfortunately because we're middle of our race season and there is a little bit of testing that I would want to do around that, I have not made the transition to GPRP Pro. |
| 57:27 | For those who have no idea what I'm talking about, GPRP Pro is a torque based firmware that also has a background traction model as well and if you want to search that out, we do have a YouTube video, an interview with Brad Sheriff at World Time Attack talking all about that, really really interesting stuff there but a little bit beyond the scope of our webinar today. |
| 57:51 | Alright that's all the questions we have team so thank you for watching. |
| 57:55 | If you are watching this at a later point in our archive, please feel free to ask any questions on our forum and I'll be happy to answer them there. |
| 58:03 | Thanks for watching and we'll see you again next time. |
Timestamps
0:00 - Introduction
0:55 - Similarities to lever actuated sequential gearboxes
1:15 - How a dog box works
2:45 - Life expectancy depends on driving style
3:30 - Overview once installed
4:27 - Advantages
5:56 - Need to interrupt engine torque to move selector
7:51 - Paddle shifting reduces wear on gearbox
8:39 - Required hardware
19:25 - Paddles
22:37 - Set up in M1 ECU
23:25 - Compressor setup
25:50 - Improving throttle blip quality
29:29 - VE table tuning
30:45 - Actuator setup
35:10 - Locking out a shift
35:52 - Gear shift power on throttle position
37:36 - Gear shift timing
41:17 - Torque reduction
46:28 - Engine speed match
51:05 - Questions


