318 | Introduction to MaxxECU
Summary
In this webinar we’ll take a look at the Maxx ECU, understand how the software is laid out and how to make input, output and tuning changes.
| 00:00 | - Hey team, Andre from High Performance Academy here, welcome along to another one of our webinars. |
| 00:04 | And in this webinar, we're going to be having an introductory look at the MaxxECU Race ECU, essentially what we're going to be dealing with though is their software interface and most of what you're going to see today is going to work irrespective of which particular MaxxECU you're interested in. |
| 00:21 | I will mention that we do have a complete worked example in our Practical Standalone Tuning course that goes a lot deeper. |
| 00:28 | As I mentioned, this is just an introductory look so if you own a MaxxECU and you want to have a really thorough understanding of the tuning process, then I'd highly recommend checking out that worked example in our Practical Standalone Tuning course. |
| 00:42 | For a start, I'll just quickly discuss the vehicle that we're dealing with here, this is a early Honda City and it is being built up as a club level racecar and it's going to be competing essentially in sprint races. |
| 00:57 | Now the Honda City itself was never really endowed with a huge amount of power so it has been engine swapped with a Honda B18C out of a DC2 Type R Integra. |
| 01:08 | So it's producing just shy of about 200 wheel horsepower. |
| 01:13 | The vehicle itself only weighs about 700kg so power to weight is pretty stout. |
| 01:18 | On this basis, it's a naturally aspirated engine, there's not a lot of technology in it, we're not talking about continuously variable cam control, no turbocharger so no boost control, so it doesn't need a particularly sophisticated ECU. |
| 01:31 | On that basis, we are really scratching the surface of what the MaxxECU is capable of but of course it does have all of the features you would expect for those more sophisticated engines such as drive by wire throttle control, continuously variable cam control etc. |
| 01:49 | Now specifically I mentioned we've got the MaxxECU race in here, range of ECUs depending on how many outputs you need, basically what you want to control so no different to any ECU manufacturer, you can choose a unit that's going to suit your requirements. |
| 02:05 | We have also coupled this up with the Maxx PDM20 power distribution module. |
| 02:10 | I'm not going to dive too deeply into that, it's really a topic for a different webinar but it is a nice integration here, the two units talk to each other via CAN and you configure everything in the power distribution module straight from the MTune software. |
| 02:26 | So for all intents and purposes it's no different than setting up a conventional auxiliary output on the ECU. |
| 02:33 | The PDM20 I will just mention as well is really locked down to the Maxx Brand so it's not like most power distribution modules where you can mix and match your electronic suite, it's really designed to work solely with the Maxx. |
| 02:51 | Alright what we'll do is we'll jump across to my laptop screen and have a quick look through the software. |
| 02:56 | And I'm just going to work you through this software. |
| 02:57 | Towards the end, I will start the vehicle, I don't want to run it the whole time here because it's not really necessary and it gets a little bit loud but I will start it towards the end as well and just show you a couple of the features. |
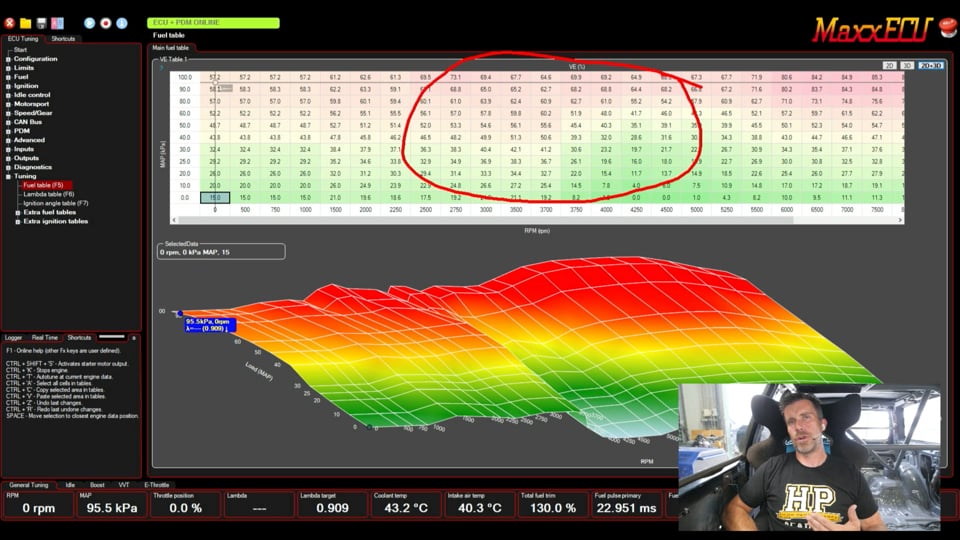
| 03:09 | So as this is set up at the moment basically we're currently offline and we've got the screen set up into a few different areas. |
| 03:18 | We've got our main table here, at the moment we are on our fuel table, this will demonstrate or show whatever table we are currently accessing or for that matter, parameters when we're setting those up. |
| 03:29 | Over on the left hand side, we've got our menu tree structure, so this is essentially how we're going to navigate through and basically find the different parameters that we want to configure or set up. |
| 03:41 | Down the bottom we've got two areas, first of all we are currently looking at our real time data, I am offline at the moment which we can fix, there we go, back online. |
| 03:54 | So this shows, as its name suggests, real time data from basically every channel or parameter the ECU is looking at. |
| 04:02 | We also can click over here on our logger and that gives us a real time logger as well. |
| 04:08 | Super handy when we are tuning either on the road or the dyno and we'll have a look at a quick demonstration of that. |
| 04:14 | We've also got our shortcuts tab as well which is quite nice, particularly for myself moving between multiple platforms quite frequently. |
| 04:21 | You tend to lose track of the common shortcuts that you're using all of the time so that just brings them all straight there in front of you, no need to look at an online help manual or anything of that nature, it's all right there. |
| 04:37 | Then right down the bottom here, we've got a number of gauge tabs, we're currently on our general tuning tab and we can see we've got RPM, manifold pressure, throttle position, lambda, lambda target, just to name a few. |
| 04:49 | Again we can configure those to suit our requirements. |
| 04:53 | Up the top at the moment we can see that we've got this little green bar that says our ECU and our PDM are both online. |
| 05:01 | BeforeI had powered the vehicle up that was greyed out and we were offline, we also weren't seeing any of that live data. |
| 05:09 | Worth mentioning here as well because this does vary from one manufacturer to another. |
| 05:14 | With the Maxx brand, any tuning changes we made are essentially flashed or written to the ECU immediately so we don't actually need to create a store, or do a store for those to be permanent in the ECU so that's just something that you do need to keep in mind. |
| 05:31 | Really nice feature as well, not particularly uncommon but I don't know why it took so long for ECU manufacturers to get on top of this is control Z will undo a change if you don't like the change that you made. |
| 05:45 | Alright so what we'll do is we'll just start by having a quick look at our main fuel table here or VE table. |
| 05:52 | So pretty conventional, we've got our vertical axis here set to manifold absolute pressure, RPM on our horizontal axis, we can view it as a 2D table of numbers. |
| 06:02 | Reasonably handy. |
| 06:05 | This, if you have already used the MaxxECU you might be noticing this is a little larger than typical and I'll explain why that is shortly but I found it much much easier, particularly when you're interpolating between cells, to view this in a larger size so I'll get into that in a bit more detail. |
| 06:22 | Over on the right hand side here we can see we've got the ability to view this table as 2D, obviously exactly as we are, 3D which I'll click on and then we can use a combination of 2D and 3D. |
| 06:35 | Personal preference here realistically, I do find that it is really helpful, even if you're not tuning using that 3D table view, to at least check that out intermittently. |
| 06:48 | The reason being that when we are viewing this table of numbers here, even though they are colour coded, it is really easy to have an inadvertent mistake in here and you might not pick it up immediately so let's say for example this particular site here, I'm going to make a change that probably we would pick up but looking at that, yes it is colour coded now, sort of a pinky colour but again you can see at an instant the change in the 3D table, it sticks out, you cannot avoid knowing that you've got an error there so just important to check that out, I'll just use control Z and that takes us back to our original setting. |
| 07:26 | So however you want to view that, it really doesn't matter. |
| 07:30 | Worth mentioning here that obviously we aren't operating at the moment, we do have this grey crosshairs so at the moment we're at about, what, 96, 95.5 kPa and obviously 0 RPM and that's just really helpful for when we've actually got the vehicle up and operating, particularly doing steady state tuning to use that to make sure that we are absolute central in the cell, that we are tuning and there is, it's a little hard to see probably, there is actually a live lambda read out there beside that crosshairs. |
| 08:03 | I didn't particularly like that function myself. |
| 08:07 | They have made some changes which I'll talk about shortly, along with the sizing, to aid this but the original software that I was using when I filmed the worked example in this vehicle, I found that was too small to really be able to make use of so no problem though, you've got multiple ways of viewing the data. |
| 08:26 | And down here in the gauge bar, I've simply got lambda, so that's our measured lambda from our internal onboard wideband controller. |
| 08:35 | Right beside that we've got our lambda target so super easy and then I can use that as my comparison so again just there's no right or wrong here, it just depends what your preference for your workflow is like. |
| 08:46 | So that's our VE table. |
| 08:48 | At the moment we've only got 1 VE table, this is a pretty simple setup and actually I will just quickly go back here. |
| 08:55 | With our 3D table as well, you can manipulate the view of this, to do this, what you have to do is actually click outside of the table, otherwise what you're going to end up doing is as you hold down the left mouse button, you're just going to end up highlighting an area of the table. |
| 09:09 | So you want to click outside that and then just holding down that mouse button and moving around you can rejig that to sort of get a bit of a sense of what's going on there. |
| 09:18 | Really good to just get a better view because, let's just see if I can do this. |
| 09:24 | If you've got it displayed like that, there's no real scale or magnitude to things, it all looks nice and flat and obviously that's not realistic so we get a little bit more shape into it, you can start to see if you've got any inconsistencies in your trends. |
| 09:39 | Just coming around here, because I'll cover this before it gets asked, we've got this step here in our VE table and this is simply our VTEC changeover point. |
| 09:49 | For this particular setup, and there's a multitude of ways of dealing with VTEC setup, if you do want to find out more, we've got a webinar in the archive specifically covering this in a lot more detail. |
| 10:00 | But in this case, all I've done is used RPM as the switchover for our VTEC changeover point. |
| 10:06 | And if we look at how Honda do this in the factory ECU, what you'll actually find is that they use load as well so it's actually windowed based on manifold pressure which is essentially load, and RPM. |
| 10:17 | So what this means, if we're only using RPM, that works out really nicely. |
| 10:22 | Right up here where we're at wide open throttle and we can see exactly that. |
| 10:29 | Let's just swing this around, we actually end up with our VE increasing through this particular point here at wide open throttle but coming back we can see that we've actually got a reduction in our VE here as the VTEC changeover point changes. |
| 10:45 | What this means is that if we really wanted to optimise this properly, we would bring in manifold pressure or throttle position as a part of this and we'd probably want to actually shift that VTEC changeover point a little bit higher at lower load. |
| 10:59 | Again, I'm not too worried about this, I just wanted to cover that off in case I get quizzed about it because I know these sorts of things do come up, why did we do it in that particular way? So while we're on the tables as well, F5, F6 and F7 are the 3 shorcut keys that you are going to want to keep in mind. |
| 11:21 | So 5 brings us back to our VE table which we're looking at, F6 brings us to our lambda target table. |
| 11:30 | This is a VE based fuel model so we do need to set this lambda target table to realistic lambda targets that we want to achieve and then we will be tuning the volumetric efficiency table in order to actually achieve those. |
| 11:44 | What this means is that if we then want to change our fuelling, we change the numbers in our lambda target table and the ECU will track, obviously on top of that there is the aspect of closed loop fuel control which the ECU also does. |
| 11:59 | What I might do is just switch us offline so we don't end up with a flat battery by the time I get to the point of wanting to actually start this later on. |
| 12:07 | F7 takes us through to our ignition table and probably nothing particularly special or unusual about that. |
| 12:14 | So that covers off the main elements there with the tables. |
| 12:19 | Let's actually go back to our fuel table and we'll have a quick look at some of the ways we can manipulate the values in here. |
| 12:26 | So if we take a random cell here for a moment, pretty easy here, we can use the plus key, that's going to make an increment of 1% VE, minus key of course is going to do the exact opposite. |
| 12:39 | If we use the shift key and then plus or minus, that's going to make an increment or a decrement of 5%, should also mention plus and minus you can use, you can also use the Q and W keys, so personal preference depending on where you like to be on the keyboard. |
| 12:56 | If you want to start getting a little bit more fussy with things though, holding down the control key and plus or minus, that makes a 0.1% increment or decrememnt so usual ways we can manipulate our data. |
| 13:08 | One of the more common ways I'll make tuning changes is by doing a percentage change. |
| 13:14 | So if we press the M key, that'll bring up our adjust by percent or I like to think of it as multiply, nice and easy there. |
| 13:21 | So we can enter the percentage change we want to make, either positive or negative. |
| 13:25 | Let's make a change there of 10% and that's exactly what we get. |
| 13:30 | Again control Z will take us back where we started. |
| 13:33 | We can also use the shift key and our arrow keys and highlight a block of cells then all of the same functionality, same changes can be made to that entire block of cells so lots of flexibility pretty much what you'd expect with any ECU. |
| 13:49 | Not too much unusual going on there. |
| 13:52 | Also mention here that once you're steady state tuning, you can use the autotune function as well, control plus the T key. |
| 14:00 | Will take into account our current target lambda and our measured lambda and make automatic correction to the VE table in order to get us onto our target so that can fast track your tuning, particularly if you are steady state tuning on the dyno, just control T once you're in the centre of the cell. |
| 14:17 | Often it'll take a couple of attempts to get it perfect, a lot of this comes down to aspects such as how good your base configuration is, how good your injector data is as well so there can still be some error in there that's present and a little bit of hand fine tuning is often still required. |
| 14:36 | Alright what we'll do is I'll come back to our real time values for a start and we'll just go through this. |
| 14:42 | So this gives you access to essentially every channel, parameter in the ECU which is great but can be a little bit daunting. |
| 14:51 | What we'll find is, let's just go through to here, we've got this particular menu option which is our trigger, so it's actually expanded at the moment, if I click to the left of that, that will close that down. |
| 15:04 | So depending on what we actually want to look at, you can expand, I'll just do that again, expand that out, or contract them down. |
| 15:12 | But again it can be a little bit confusing trying to figure out exactly what's going on here. |
| 15:17 | So what I'll do is I'll just go live. |
| 15:22 | And we can use this little search bar up here which makes things a little bit easier and quicker. |
| 15:29 | So for example, we've got our analog inputs here and this just lists them as analog input 3, 6 and 7, they are pressure sensors but it could be a number of different options. |
| 15:41 | So what we can do is just type in what we're interested in, let's see, fuel pressure, and that gives us everything that has fuel pressure in the title. |
| 15:49 | The one that we're actually interested in here is our primary fuel pressure, that has just primed so it's currently sitting at 0 essentially but I'll just turn us back off and back on. |
| 16:01 | And back on. |
| 16:04 | There we go, and we can see that that's sitting at 295 kPa so really easy way to navigate around if you've kind of got an idea of what you're looking for but not exactly. |
| 16:17 | I mean every ECU has their own naming strategy for channels and parameters so they can be a little bit tricky when you are looking at literally 100s of parameters to figure out exactly what Maxx call it for example. |
| 16:30 | So for example here if we type in trigger, that's going to give us everything related to trigger and it's going to fine tune or speed up our process of sorting out any issues relating to our trigger controls. |
| 16:44 | Alright I'll turn us back off now. |
| 16:46 | Alright so what we'll do is we'll come up to our ECU tuning menu, and I'm not going to go through every parameter here because there's no real need but I just want to get a broad view of what's available. |
| 16:58 | One of the things I would like to see with this is the ability to have a searchable bar just like the one we looked at here. |
| 17:06 | It's a fairly straightforward menu structure but I did find myself, again probably because I'm swapping backwards and forwards between platforms so frequently, I did find myself searching a little bit sometimes for a parameter or a channel that I wanted to access in this menu structure because I wasn't 100% sure where exactly it was. |
| 17:26 | So that would be nice. |
| 17:27 | Reason I say this though is because I have found Maxx to be incredibly accommodating to sensible suggestions. |
| 17:36 | I've given them a little bit of feedback so far, I deal with another couple of tuners here in New Zealand that use Maxx a lot, have done the same and they are really receptive and make changes to the software to improve the user interface. |
| 17:50 | One of those changes was the size of this table here so really nice to see an ECU manufacturer that is so responsive to their users. |
| 18:02 | What that also means for us is that the ECU and the software are going to continue to improve and basically it's going to make our life easier. |
| 18:10 | Let's start at the top here and we'll start with our configuration, so we'll just expand that out and of course we start with our engine settings, nothing particularly tricky here, we can set up whether it's a piston or rotary engine, number of cylinders, the engine displacement etc. |
| 18:27 | We can also set up our firing order in this table. |
| 18:32 | Important with a volumetric efficiency based ECU to make sure that parameters such as our engine displacement are in fact correct. |
| 18:40 | I'll miss over our ECU logging settings and our Bluetooth settings. |
| 18:44 | Interesting element of the Maxx brand is that they have Bluetooth onboard so you don't actually have to communicate with them wired. |
| 18:53 | Not a function that I've personally used myself but it is there. |
| 18:57 | MTune settings is what I wanted to come down to here, so a bunch of stuff you can talk about, you can set up your language, the units preference, table size is basically the element that I was talking about there. |
| 19:11 | So I've got that set to large. |
| 19:13 | If we set that to small, press F5 and we can see that we've definitely shrunk down our table size, so we'll come back here to our settings, we'll go back to large and F5, much bigger. |
| 19:27 | Again, personal preference but I just found that by default the cell size was quite small, and this has made it really tricky, particularly vertically, you can see that these cells are more rectangular than they are square. |
| 19:41 | So particularly vertically it was quite tricky to make sure that you were absolutely central in the cell. |
| 19:47 | Right so that's probably sufficient with our configuration. |
| 19:50 | Now come into our limits and nothing particularly unusual here. |
| 19:54 | Let's have a look at our rev limit for example. |
| 19:57 | We can set this up however we want, we can set a single value which is what we've got here. |
| 20:02 | Again this is a very simple configuration in this particular vehicle. |
| 20:06 | We can have two values with a switch activation or a table. |
| 20:10 | So if you wanted to set your rev limit up, relative to engine coolant temperature, well that's as easy as it needs to be there so you can reduce your engine rev limit and lower engine coolant temperatures, we'll just take that back to where it was. |
| 20:25 | Also a fair bit of control over the rev limiter settings or how the rev limiter's going to function. |
| 20:31 | You can see here I'm using fuel, pretty much nothing particularly unusual about that. |
| 20:37 | All of the other parameters here really go without saying. |
| 20:41 | I did want to come down and quickly have a look at our oil pressure cut here. |
| 20:46 | So at the moment that is disabled, if you have got an oil pressure sensor, we can enable that. |
| 20:52 | And then we've got some other options in terms of how this is going to work. |
| 20:56 | Set up so that it will cut until the oil pressure is OK so basically until it comes back above our desired parameter or it will shut down completely. |
| 21:09 | You've got a minimum run time and a cut delay. |
| 21:12 | Run time is how long the engine has to be running before this will come into play. |
| 21:17 | So this just stops it basically automatically going into cut because of course you're not going to have oil pressure the moment the engine starts cranking. |
| 21:26 | Cut delay, you need to be very careful of, I know of one failure that was a result of a default value and a cut delay which was being used for oil pressure starvation, safeguards I guess you'd call it, and basically I like to see this at zero because almost any amount of oil starvation can end up causing damage, particularly where lateral G forces are involved in the racetrack so I definitely, I personally wouldn't be using one second in there, but then we've got a table here of our oil pressure cut vs RPM. |
| 21:58 | Really important when you're setting one of these up, irrespective of the ECU you're using, to make sure that you've actually got logged, solid data and relate this or correlate this to oil temperature. |
| 22:10 | Can be tricky if you aren't monitoring oil temperature as well. |
| 22:13 | The reason I say this is it's all well and good setting this up on the dyno, or on a cold day with a quick lap around the track to see what the oil pressure vs RPM correlation is. |
| 22:23 | But that might be one thing at maybe 70 or 80° oil temperature, I'm talking °C here. |
| 22:30 | The oil viscosity drops off as the oil temperature increases so what might be nice and safe at maybe a low oil temperature, if you use those settings and then the oil temperature gets much much hotter, it's going to get thinner and essentially the oil pressure as a result will drop and you can end up finding yourself running into oil pressure cuts. |
| 22:50 | Even when they're not necessary, so make sure that you've A got this data, realistic data of what the oil pressure is at a normal hot operating oil temperature and also give yourself a little bit of a buffer or headroom in there. |
| 23:03 | You don't want to have these settings tight to the actual oil pressure. |
| 23:07 | Right we'll come back out of our limits, let's get into the meat of this and we'll start with our fuel. |
| 23:14 | So if we click across to our fuel general, all of the settings that we're going to need here to set up our fuel, again I'm not going to dwell on these individually here. |
| 23:24 | Fuel type, the stoichiometric air/fuel ratio is really important to a volumetric efficiency based fuel model so we can choose that from our drop down menu here. |
| 23:34 | You can also have flex fuel of course as well if you've got an ethanol content sensor. |
| 23:39 | Injector settings, so these again are really important to our VE model working properly so there is a drop down menu for a range of common injectors or of course you can put in custom calibration data. |
| 23:55 | Fuel flow settings, fuel pressure tracking here, so if you have got a fuel pressure sensor, you can enable this fuel pressure tracking. |
| 24:02 | So essentially rather than the ECU thinking that the fuel pressure is going to be a fixed 3 bar, 43.5 psi for example and hence basically calculating the injector flow based on that fixed pressure, it's actually going to look at the real fuel pressure and this means that if we've got deviations from the fuel pressure, not uncommon if your fuel pump is maybe a touch marginal to see the fuel pressure start to roll away at higher RPM. |
| 24:27 | The ECU will actually make some background compensations to the fuel delivery. |
| 24:31 | Right let's move through this, I don't think we really need to cover too much more in here. |
| 24:37 | Other than I wanted to just cover lambda control. |
| 24:42 | So we do have the ability here to use wideband lambda control. |
| 24:45 | I found that to be really really effective here. |
| 24:48 | You do want to just keep in mind how you go about tuning this because of course if you are tuning from scratch or retrimming or readjusting an existing calibration and you've got your closed loop lambda control on and you're not monitoring your short term fuel trims, then everything's going to mostly look like you're on target and in other words, you can be fooled into thinking that the VE table is correct. |
| 25:12 | So you really want to just keep that in mind, whether your closed loop fuel control is on or off. |
| 25:18 | There are some feedback conditions, so essentially some controls as to when the closed loop control will be active. |
| 25:25 | And then also we've got the controller frequency, so basically how quickly the samples will be taken and updated. |
| 25:35 | Need to be a little bit mindful of this and actually you can see in this particular calibration, down at idle, we are only sampling every couple, 2 times a second here. |
| 25:45 | Well three then two, probably shouldn't actually be around that way, let's just adjust that while we're here, there we go, that will be better. |
| 25:53 | So it's going to just take into account the transport delay from the exhaust gas coming out of the exhaust ports and making its way past the sensor, being actually detected and that being sent to the ECU. |
| 26:04 | So at low engine RPM, we want to sample a little less frequently, otherwise the closed loop control's just going to be chasing its tail. |
| 26:13 | However, at higher RPM, the transport delay is much much reduced so we can sample more frequently and that's going to give us more accurate control. |
| 26:22 | We can also control the minimum and maximum amount of trim that the closed loop is allowed to use. |
| 26:31 | Typically I like to use a little bit more flexibility or control range down in the idle areas or cruise areas and I tighten that up a little bit when we're at wide open throttle under load. |
| 26:42 | A lot of personal preference comes into this though, no right or wrong. |
| 26:45 | Come down to our ignition, so basically we've got replica settings for our main functionality in our ignition table. |
| 26:53 | Basically what type of ignition system we're running, what our ignition system delay is, in other words, what the delay is between the ECU requesting a spark to occur and that spark actually being delivered. |
| 27:04 | Lock angle, so this is really important when we are calibrating the base ignition timing. |
| 27:09 | We can click the little tick box here and lock our ignition timing. |
| 27:14 | What I might do is I will just go back online here and this time I'll write to it because I wanted that change to remain. |
| 27:23 | So nice little feature here because it can be easy to trip yourself over with this. |
| 27:29 | So one of the first functions you're going to be doing is setting your base ignition timing with that locked. |
| 27:33 | You can then select an angle which you can easily see with our timing light. |
| 27:38 | And then you're going to be calibrating the timing until it's correct. |
| 27:42 | However, it can be easy once it actually comes to tuning to forget to untick that little box. |
| 27:47 | And in this case, the MaxxECU is going to flash this little red warning that the ignition angle is locked, so hopefully that's going to prevent a little bit of wasted time. |
| 27:57 | I know I have fallen into that trap before. |
| 28:01 | If I can do it, I'm pretty sure anyone can do it so nice little feature there. |
| 28:05 | Dwell table, again nothing particularly unusual here, nothing specific to the MaxxECU. |
| 28:12 | Does have knock control as well, we haven't delved into that, given that our B18C is essentially not knock limited but we will be covering this in a future webinar for those that want to go a little bit more in detail. |
| 28:27 | Idle control, pretty self explanatory here, in this particular application, the car doesn't actually have an idle speed control motor. |
| 28:36 | It is only a race car, we don't really care too much about the idle quality. |
| 28:41 | The main driving factor behind this is actually the fact that the idle air bypass valve failed on the firewall from memory so there physically just wasn't room for it. |
| 28:51 | But what we want to do here is essentially set our idle speed targets relative to our engine coolant temperature. |
| 28:58 | Even without this, we are still using the idle ignition control functionality so you still want to set this base idle speed target to be realistic because that feeds into the idle ignition control function which is right here. |
| 29:13 | So we can have this as open loop or closed loop. |
| 29:16 | That's our first function here, and basically in this case we've got the ability to, our idle control sorry not idle ignition control, to have this open loop or closed loop depending on what your preference is. |
| 29:30 | I always start with it in open loop and then in this case, this would be a duty cycle table table relative to coolant temperature. |
| 29:36 | Get this dialled in, sort of in the ballpark and then enable closed loop and it's kind of just like the fuel tuning, we don't want to be tuning our VE table with the closed loop control taking up any errors, same with our idle speed control. |
| 29:51 | So yeah we're not using that at the moment as I mentioned but I did want to come back to idle ignition control because I mentioned it, so that is under our ignition menu item here. |
| 30:01 | So in this case we've got the option here, ours is set up to use our separate table which is right below and we've basically got a ignition angle vs idle error. |
| 30:14 | So that's why setting our idle targets is really still important even while we don't have an idle speed control motor, because that feeds in, that error feeds into this table here and then we're just using the principle that as we retard timing from MBT, we reduce engine torque and hence the idle speed will drop. |
| 30:31 | As we advance timing towards MBT, we increase engine torque and the idle speed will increase. |
| 30:37 | Quite surprisingly effective and short of the middle of winter, with sub 0 temperatures, this car will actually start and idle quite happily by itself, usually, it might make me a liar in a moment when we do go to start it but yeah it's pretty good. |
| 30:53 | And again for a race car our expectations are a little bit different than a daily driven road car. |
| 30:58 | Let's close that down, motorsport functionality, really not going to deal with that we're not actually using any of this but everything you'd expect with anti lag, launch control, rolling launch control, shift cut etc so again, can't really talk about that because we're not using it. |
| 31:14 | We've got speed and gear setup here as well. |
| 31:17 | We are using this here so we do want a wheel speed input or a driven wheel speed or driveshaft speed input. |
| 31:28 | CAN bus, going to probably do a separate webinar on this because this is quite a sophisticated feature in the MaxxECU, in that it is essentially a very sophisticated CAN sniffer. |
| 31:40 | So let's go through this, we've got our CAN settings here, we can bring in a number of inputs via CAN as you'd expect as well as OBD2 CAN depending on what vehicle you are dealing with. |
| 31:54 | What I wanted to deal with here was the CAN tools and again we'll just go online for this. |
| 31:57 | So CAN analyser, at the moment it is switched off but we can enable this, let's look at incoming and outgoing data and here we've got a full CAN analyser so if you want to start reverse engineering a factory CAN bus or something of that nature, or for that matter even just for fault finding what's going on with something, this is a really powerful way of doing it, you can also save your data as well once you've got the data that you want to look at. |
| 32:26 | Then you can also set up messages to test an output so if you want to maybe replicate factory ECU CAN message to drive a dash gauge cluster and maybe get coolant temperature or RPM on the gauge cluster, you can use the CAN sniffer, CAN analyser to basically find those messages in the factory bus and then replicate those using the test output to make sure that it is in fact working. |
| 32:55 | So let's go back to our CAN analyser and we will disable that. |
| 33:00 | So quite powerful, CAN inputs and outputs as well depending on what you are trying to do, as long as you are familiar with setting up CAN messaging, pretty much the sky is the limit with what you can do there. |
| 33:14 | Little bit more sophisticated or advanced than what we want to go through today with our webinar. |
| 33:19 | Also you can introduce a CAN keypad with the MaxxECU, so we've got a Blink Marine 8 button keypad and the functions of each of those buttons are listed here and you can set those up, for example here our start/stop and that is set up to a starter motor input. |
| 33:37 | So a lot of flexibility if you do integrate the CAN keypad with it. |
| 33:44 | On that note, keypad setup is done via this menu function here. |
| 33:48 | And there's a bunch of functionality there that really isn't too relevant to today's webinar. |
| 33:54 | Alright we'll close down our CAN bus, we'll come down to our PDM, now again I'm not really focusing on the PDM but because it is attached, this comes up as a menu option and basically what's important here is our outputs and our output functions. |
| 34:10 | So that gives us all of our outputs here. |
| 34:13 | Most of these are controlled from the ECU so the setup really, as I mentioned at the start, is no different to configuring a conventional auxiliary output on the ECU. |
| 34:24 | Nice function here is you can click the test button and that is our lift pump so that should work. |
| 34:32 | And that will run and we can see our current draw while that is operating. |
| 34:36 | I won't dive any further into our PDM though. |
| 34:41 | Let's move down to our inputs and we'll start with our trigger home inputs here. |
| 34:46 | So this is for our engine speed and position information. |
| 34:50 | Again nothing particularly special, we've got variable reluctor sensors on both inputs here. |
| 34:56 | And we can set the, whoops, keep pressing the wrong button there. |
| 35:02 | We can also set a table of our arming threshold and I'll show you in a moment how we can get that data as well using the built in oscilloscope. |
| 35:12 | Nice feature with this, not particularly unusual but some ECUs still don't have it, is the ability to flip the polarity between falling or rising edge. |
| 35:21 | Really important to have your polarity correct with a variable reluctor sensor, otherwise you are going to get timing drift and if you don't pick that up, can create some real headaches when you come to start tuning. |
| 35:35 | Trigger system is set up down here, this is pretty simple, we've got a multi tooth trigger with a home signal. |
| 35:44 | Where abouts that home signal is, it's on the cam because this is driven by a, well it's located inside the factory distributor. |
| 35:51 | Yeah so nothing particularly unusual again there. |
| 35:55 | That's our trigger input, then we've got our sensors for the likes of our intake air temperature, coolant temperature and our throttle position. |
| 36:03 | Pretty straightforward, if we come down to our lambda sensor, we've got a single sensor here, we can see that that is set up as an internal wideband control on channel one, we can also bring this in via a range of different inputs, external analog or a CAN based module, depending on what you've actually got. |
| 36:23 | Really important here, and they do give you a warning, this needs to be done before you plug your sensor in for the first time, make sure that you choose the correct sensor between the LSU 4.9 and 4.2. |
| 36:36 | And for some reason they do default to the 4.2 which I can't actually remember the last time I used one of those so pretty important to make sure you've got that right, no one likes a broken sensor. |
| 36:47 | Moving down, digital inputs, I'm not going to cover those, pretty straightforward, analog inputs as well, we've got our three pressure sensors, pretty straightforward. |
| 36:55 | And as with most of these sensors now, that is our manifold pressure sensor so this is a little different, we've got MAP sensor, and there's a pre configured setup for the factory Honda MAP sensor which we're using but if we come down to our oil pressure sensor, we've got this actually set up as a user defined and we can set a 2 point calibration, not sure actually why that's changed here, 2 point calibration, these are always between 0.5 and 4.5 volts. |
| 37:25 | Or alternatively there is a range of pre defined sensors which should cover most of what you want to do. |
| 37:34 | Outputs, our output configuration here, and again we can configure all of our outputs. |
| 37:40 | We can also, just like I showed earlier on the PDM, we can test those outputs and make sure they are working, so just a nice way of making sure that everything is functioning before you go to start the vehicle for the first time. |
| 37:55 | We've got a couple of user outputs here, one is for our VTEC solenoid and the other is for our power steer, let's have a quick look at our VTEC changeover point and we, as I already mentioned, really simple here, we are changing this on just one variable which is condition A, which is RPM and that is greater than with hysteresis. |
| 38:15 | Important with these sorts of things, plus maybe a shift light output, to incorporate some hysteresis just so the output doesn't end up rapidly switching on and off if you happen to be at the changeover point. |
| 38:28 | We've got that at 3500 RPM and our hysteresis there just 50 RPM. |
| 38:33 | Also we'll show you in real time whether the output is active or inactive. |
| 38:38 | Right moving on we do have our diagnostics tab here as well. |
| 38:43 | This is really really powerful, I'll start first of all with the injection and ignition output test. |
| 38:52 | So this is one of our steps as part of setting up an ECU for the first time is just making sure that all of the outputs are working and that they are operating on the correct channel. |
| 39:04 | So in other words, when you are functioning injector 4 that injector 4 is actually the one functioning so basically you can just click the little tick boxes here for what you want to function, in this case we've got the ignition output for cylinder 3 is ticked. |
| 39:19 | And then you can run this test by clicking the start test button and it's going to do exactly what it says up here so in this case the ignition dwell will be 3 ms, injector pulse width would have been 5 ms and also you can select how this will be functioned so really good way of testing your outputs. |
| 39:39 | What I will do just briefly, yeah I will just start the engine for a moment, let's see if it will start. |
| 39:50 | Oh look at that, perfect. |
| 39:52 | And we'll just have a quick look at the trigger oscilloscope which is F10 here. |
| 39:58 | So again not particularly unusual, a lot of ECUs these days have built in scopes so let's just click start measurement here. |
| 40:07 | And we'll click again to stop and now I'll just shut the engine back off. |
| 40:12 | So really nice way of sort of analysing what the trigger inputs are doing so we can see up here in orange we've got our trigger one, our engine speed input and then below that we've got our cam or home signal. |
| 40:29 | Now the shape of this is also useful because as we can see here, the shape of the home signal indicates that it's actually reverse polarity, so that comes back to our polarity setting here but we can just correct that. |
| 40:42 | We do see the voltage on the vertical axis and this allows us to then go back and set our arming threshold which we will just come back to up here, that's our arming threshold, and general rule of thumb, we want to set our arming threshold at about 1/3 of our peak amplitude at each of those RPM points so that just makes sure that the ECU can correctly reject noise, but isn't going to actually miss a real trigger input. |
| 41:11 | So we'll come back to our scope, so nice function to have there, really powerful, particularly when you're cranking the engine and just making sure that the ECU firstly is actually getting a valid signal and secondly to start diagnosing if there's some issues with your trigger setup. |
| 41:28 | Right we'll come back to our fuel table here and basically just wanted to talk about some of the ways we can actually make changes to the axes as well, we'll look at 4D mapping as well. |
| 41:42 | This will be the last topic so if you do have any questions to ask, now is a really good time to ask them in the comments and we'll jump into those in a moment. |
| 41:50 | So obviously we've got our vertical axis here is our load, manifold absolute pressure. |
| 41:55 | So if we come over here and right click, we can edit the particular cell, in this case 30, I'm not going to make a change, we can also click on the axis and rescale the axis. |
| 42:07 | So if I click on that we can set the lowest and the highest axis value point, we can change the number of break points or cells if we want and then essentially the ECU is going to automatically do all the hard work for us. |
| 42:22 | There's other ways of doing this as well, let's say we wanted to insert a column, or in this case a row, we can do that, insert before or after, click on that and what it's going to do is just add and automatically interpolate so I had been sitting on the 90 kPa row and it's just added one in there at 95 kPa. |
| 42:43 | Likewise we can also remove that particular column or row, just be careful between remove column or row, which is what we've got highlighted at the moment, or remove the entire axis, so we only want to remove that particular cell. |
| 42:57 | Right so we're back to where we started there. |
| 42:59 | You can also adjust the source or input for that particular axis which comes from change axis source here. |
| 43:09 | So again they've given a nice little search bar so if we wanted to search throttle. |
| 43:19 | Position. |
| 43:23 | Throttle position here we go, so we could change that to throttle position if we wanted to run Alpha N. |
| 43:28 | What else do I need to cover here? Oh 4D mapping as well, I'm not getting again too too deep into this, there's a variety of ways we can go about adding additional tables, depending on what we want to achieve but if we right click here and we come down to 4D axis, we can click add 4D axis and that will come up over here on the right hand side. |
| 43:52 | So that fourth dimensional axis, we can do a range of things with, depending on what we're trying to achieve here, we've only got two cells in this at the moment. |
| 44:00 | Let's first of all change our axis source and let's say we want to swap between two VE tables based on our VTEC changeover. |
| 44:09 | So if I type in VTEC here, we've got PDM output for our VTEC state so that should change, if my memory serves me correctly, between 0 and 1 so we don't want 0 to 100 because that's not going to work. |
| 44:25 | So then we've essentially got two tables and depending whether I click on the 1 or the 0, at the moment the tables are exactly the same but let's just go to table 1 here. |
| 44:37 | We'll highlight this block here and set it all to 10 and now as we swap between the two, we can see that we're actually moving between two tables so quite a lot of flexibility on how we go about that. |
| 44:52 | Other elements as well that just came to mind, right clicking in the table here, this gives you a range of the ways we can manipulate the data but what I think is worth talking about here, is the interpolate function, so we can interpolate horizontally, vertical, interpolate an entire area or smooth. |
| 45:13 | So this is quite powerful if you are trying to remove some ugliness from your table using the interpolate function rather than doing it manually, is going to be a big time saver. |
| 45:25 | Alright we'll leave it there. |
| 45:28 | No I did want to start the car one more time, let's just do that. |
| 45:35 | And I just wanted to show the functionality here for our autotune. |
| 45:41 | So just waiting for our lambda to come up to temperature, we can see at the moment that's sitting in warmup, and we're online now. |
| 45:50 | And we can see as I mentioned, we've got the little lambda symbol here, so it shows it, I find it a little hard to see but personal preference. |
| 45:58 | This isn't going to be a very good test because as you can see we are at idle here, sitting almost perfectly on the intersection between two cells but couple of functions here, pressing the space bar will jump to the current active cell and then CTRL T will auto tune that particular cell. |
| 46:15 | But again I'm not going to get a great result because we're right on the cusp of two of those cells, works really nicely though when you are tuning under steady state conditions and you can make sure that you are right in the centre of that cell. |
| 46:28 | Alright we'll shut that off and we will have a look and see if we've got any questions. |
| 46:34 | If you've got some more questions, this is the ideal time to ask them. |
| 46:42 | Only one at the moment, Mr Lee has asked, I've noticed that if you X out of the software, it doesn't have the typical Save/Cancel confirmation pop-up. |
| 46:50 | Did you find that a little inconvenient? I don't know that I did really, I'm pretty vigilant about storing or saving before I exit out of the software manually so I can't even think that I noticed that it didn't give that pop up. |
| 47:06 | You're absolutely right though, if you close down the software, it's pretty typical for most ECU software to sort of prompt you, hey do you want to save? I think because the store functionality is automatic, that's possibly maybe why they haven't incorporated that but again for me, I don't think it was too inconvenient. |
| 47:24 | What you'll find is there's always lots of idiosyncrasies between different brands and a lot of it comes down to familiarity so things that you initially find maybe a little bit annoying just because the last ECU that you're familiar with didn't do it that way, after a little bit of time it becomes second nature. |
| 47:40 | Of all of the ECUs that I use, I always come back to certain functions in certain ECUs that just they seem to do better than everyone else and there's no across the board winner. |
| 47:51 | So sometime maybe HPA needs to make their own master ECU with all of the cool functions that I've seen across all of these ECUs but don't hold your breath, that I can assure you is not happening any time, probably in my lifetime. |
| 48:04 | Next question, MaxxECU Race vs Ecumaster Black? Tough question, I mean the Ecumaster and MaxxECU I think in terms of functionality, tunability, user friendliness, very very comparable. |
| 48:24 | The Ecumaster Black, you've put me on the spot here because I don't have the IO lists side by side, I think if I'm correct, the Ecumaster Black is probably a little bit more limited in IO. |
| 48:36 | Certainly we had one of those in our V11 Subaru STi and I didn't have enough outputs to run all 4 variable cams. |
| 48:45 | So don't quote me on that, but I mean they're very very similar, I don't know if I could really pick a winner in terms of functionality, it would probably come down to the specific IO that you needed and probably price point. |
| 48:57 | Tixbomber's asked, is Haltech still a better option? MaxxECU seems to make a compelling argument. |
| 49:04 | It's tough, very difficult for me to say is Haltech a better option. |
| 49:12 | For a start, very different price points. |
| 49:17 | Different functionality. |
| 49:20 | You're going to get good tunability and a great result with either of them so yeah I couldn't really say that Haltech is a better option. |
| 49:27 | MaxxECU is probably a newer player to the market and I've seen them really come across in leaps and bounds recently. |
| 49:35 | Haltech's obviously an established player, they've got a great product. |
| 49:38 | They've also got a great marketing team behind them as well so that sort of aids with their popularity of course. |
| 49:46 | You can have the best ECU in the world and if no one's ever heard about and no one knows it exists, then of course it's never going to become popular so yeah there's a lot of elements that go into this. |
| 49:57 | But in terms of absolute tunability and engine functionality, the MaxxECU has really really impressed by so I think I'm expecting to see this become a more popular platform as time goes on and more people will start adapting to it. |
| 50:12 | Alright that's all the questions we've got so if you are watching this in our archive at a later point, if you've got further questions please ask those in the forum and I'll be happy to answer them there. |
| 50:22 | Thanks for watching and we'll see you next time. |
Timestamps
0:00 - Introduction
0:43 - Vehicle overview
2:50 - Software basics
5:45 - Tables
11:08 - Moving between table shortcut keys
12:19 - Manipulating fuel table values
14:35 - Real time values
16:47 - ECU tuning menu | Configuration
19:51 - ECU tuning menu | Limits
23:08 - ECU tuning menu | Fuel
26:46 - ECU tuning menu | Ignition
28:27 - ECU tuning menu | Idle Control
30:58 - ECU tuning menu | Motorsport
31:14 - ECU tuning menu | Speed/Gear
31:29 - ECU tuning menu | CAN Bus
33:55 - ECU tuning menu | PDM
34:42 - ECU tuning menu | Inputs
37:35 - ECU tuning menu | Outputs
38:39 - ECU tuning menu | Diagnostics
41:28 - ECU tuning menu | Tuning
45:28 - Autotune
46:41 - Questions


