325 | 3D Scanning is Easy
Summary
Using 3D scans in CAD is a game changer and it's alot easier and more accessible than you might think. In this webinar we'll show you how to take a 3D scan on your smartphone and also how to work with it inside a CAD program like Fusion 360.
| 00:00 | - Hey team, Connor here from HPA and welcome to this week's webinar. |
| 00:03 | The topic for this week is going to be 3D scanning and essentially how easy it is and accessible to get started and how it can be useful to you designing parts with CAD for motorsport applications. |
| 00:16 | So in this webinar, we are going to first discuss some 3D scanning topics, basically what 3D scanning is and how it's useful. |
| 00:27 | And then we are going to scan this Skunk2 magnesium valve cover that we have here for a Honda K20. |
| 00:37 | Both with program, an application on my iPhone which is obviously probably the most accessible and easy method to use. |
| 00:48 | And then we're also going to use our Peel 2-S professional, commercial grade 3D scanner here as well. |
| 00:59 | So just show the process of scanning a part for a motorsport application with both and then we're going to bring them into Fusion 360 and just show how to get set up to use them in Fusion 360 and also kind of compare the quality of the scans from the iPhone to the Peel 2-S. |
| 01:21 | So just before we get started, just discussing 3D scanning and what it actually is. |
| 01:28 | So it's really just using devices like the phone or the scanner to capture geometric data information from an object and from that the computer program, the scanner can build a 3D model and then that model can be used in our CAD software and there's kind of two main purposes that you'd use it for. |
| 01:48 | One would be a reference model to design parts around and then the other way you could use it would be for something like reverse engineering. |
| 02:00 | So turning that into a solid body model that you can then get manufactured. |
| 02:06 | In today's case we are looking specifically at using the model for reference so for example this valve cover, we're going to scan it, bring it into the computer and then this will be used along with a model of the K20 engine fitted into an engine bay in our Honda CRX race car for completeness and to be able to tell things like clearances and stuff and design any other brackets around, kind of plan out things like the breather lines that will come off the valve cover and just understand as well the ITBs will be coming out and then the clearance to the hood line of the vehicle, the inside of the hood. |
| 02:51 | So that's kind of the use that this scan will be used for, more of a reference. |
| 02:56 | You could of course scan this and reverse engineer it, it's not something I'd recommend for a product like this from Skunk2, something that you can just buy off the shelf anyway, it doesn't really justify the time of doing that and then getting it manufactured, it probably wouldn't be cheaper than the original part but in cases where you are reverse engineering something, something that for example is no longer available for purchase, it can be a great tool for that so scanning the part and then building it in CAD and then getting it manufactured yourself. |
| 03:29 | 3D scanners and devices like this are also used for things like virtually scanning things so they can be used in video games or things like that as well, that's how you get racecars or tracks as well, into the likes of Assetto Corsa or something like that if they're not build manually otherwise. |
| 03:55 | But that's a good way of doing it. |
| 04:00 | So there's two main types of 3D scanning, one would be, so photogrammetry is the method that the phones use and it's essentially taking a bunch of photos from all the different angles of the object and then it will stitch them together and build the 3D model from the photos. |
| 04:21 | The other alternative is laser or white light, or structured light scanning. |
| 04:27 | So that's where the scanner, like this one here, will project white structured light, so lines or patterns of light onto the object and from that it can tell the shape of it basically and build the model of the geometry from that information. |
| 04:51 | So that's, yeah photogrammetry is the first one we'll use with the phone or structured light in this case or white lights 3D scanning is the alternative. |
| 05:03 | And they both kind of come along with their limitations and their advantages as well so in terms of photogrammetry, using our phone, it's obviously the most accessible method, it's very cheap, most of us have smart phones now anyway and we can scan something just one our smartphone. |
| 05:23 | The downside is obviously the accuracy, the resolution is limited compared to something like a professional grade 3D scanner. |
| 05:34 | iPhone might cost $1000, let's say something like this, the modern equivalent would cost something like $10,000 so there's obviously a big gap there but 3D scanners are becoming more and more accessible and there is a big range from as cheap as an iPhone all the way up to 10s of 1000s, 100s of 1000s of dollars. |
| 05:56 | So with that, resolution of this Peel 2-S here, this is specifically designed around scanning parts that are kind of 5cm up to 50cm. |
| 06:12 | So something like this is kind of the perfect case of it. |
| 06:16 | That's definitely not the limitations, we've used this to scan a full engine bay and it's completely fine as well so it does have quite a high resolution for a scanner of this age. |
| 06:28 | The resolution is 0.1 mm and the accuracy is also up to 0.1 mm. |
| 06:34 | As opposed to an iPhone, the accuracy could be, the resolution could be, 1 mm up to 10 mm so depending on what you're scanning, that may or may not be an issue if you need that super accurate detail. |
| 06:52 | Well high resolution and you need it to be accurate depending on, obviously things like the manufacturing process. |
| 07:04 | If it's something like a billet valve cover, it's going to be a very expensive part to get made and you need to make sure that the scan that you're basing it off is very accurate. |
| 07:13 | So yeah part size as well, varies a lot, what it's designed around so this like I said, 5-50 cm is kind of like the ideal sized part for something like this but Peel also offers other ones that are suited for much larger surfaces, something that you could scan a whole vehicle with but it's not going to hit that super fine resolution and you probably wouldn't want it to anyway because the size of the file is going to get massive. |
| 07:44 | The other thing to consider is the frame size. |
| 07:49 | So when we are scanning with this, it'll capture a certain area of the part and in this case because it's designed for smaller things and it has a higher accuracy or resolution, the frame size is quite small so in this case it's about 15 x 10 cm and the the depth of field as well is about 10 cm as well so that's basically how far it can capture from here to here so we'll kind of get this area of the part. |
| 08:21 | But yeah so that's kind of the basic rundown of 3D scanners, what we can use them for. |
| 08:29 | So from that, we'll move onto starting to take some 3D scans. |
| 08:34 | So like I said, we'll start with my phone, just a moment. |
| 08:41 | So this is using an iPhone and I'm using the Trnio app. |
| 08:47 | If you don't have an iPhone, there are still other options for Android, I'd recommend checking out WIDAR or Polycam. |
| 08:54 | They are very similar applications and allow you to do that. |
| 08:59 | This is an iPhone 11 Max I think and it doesn't have LiDAR but we've still managed to get some really good scans taken with this that have been very useful. |
| 09:12 | Anyway moving on. |
| 09:14 | So this is inside, if you look on the overhead camera, inside the Trnio app here. |
| 09:20 | These are the few scans that I've taken before using my phone. |
| 09:25 | If we go to this one here, then click on ARKit for scanning the valve cover, if it's going to work. |
| 09:44 | Yep so the process of 3D scanning is really the same if you're using photogrammetry or structured light scanning and it's basically, you're trying to capture details of the object from every angle. |
| 10:00 | So if I just moved along like this and just scanned the top, it wouldn't be able to pick up the other faces of it. |
| 10:09 | So you want to move around, get every angle. |
| 10:11 | So basically from here, I can just click this record button and I don't know if you can really see but on the screen there's little blue dots forming and then it's just a matter of moving around the entire object. |
| 10:35 | We do have this valve cover on a little turntable here but I won't use it for the iPhone one just 'cause it'll kind of mess up the scan but I will use it in a moment for the one with the 3D scanner. |
| 10:55 | But I've done this already, basically move around and you can see on my phone that all the little blue dots are kind of showing the area that it's picked up. |
| 11:07 | And once you've got, you're happy with that, go finish and then create scan, yes, scan saved. |
| 11:16 | If I just go back to here, already done one earlier, and open that. |
| 11:21 | You can see that we have a scan and make sure that we've got all the areas of it there. |
| 11:33 | So it's really quite simple. |
| 11:35 | And then from that, the process is really selecting it, holding down, export scan and we can choose here from raw OBJ file, OBJ and STL and USDZ and they are just mesh files. |
| 11:53 | So in terms of 3D scanning, that's like a mesh file is a kind of surface of broken down into many different elements, divided by nodes and edges and that's how 3D scanning and 3D printing as well works using mesh files. |
| 12:13 | So from here we can just select SDL or OBJ, I'd recommend, I like to use OBJ because it will take the texture or the colours with it. |
| 12:24 | So we can just select that. |
| 12:27 | It'll load for a bit and then from there I can send it to my computer via email or Dropbox or Google Drive, sometimes Bluetooth and so on. |
| 12:40 | I've already done this, just to save time and sent it to the computer. |
| 12:44 | So that one is all done and ready to go so we'll just leave it at that for now on the iPhone. |
| 12:52 | And we'll bring that into Fusion 360 soon but first we will show doing a scan with the 3D scanner, the Peel 2-S and just basically how that compares. |
| 13:04 | So just before we get started, you might notice all these dots on here and this is a pretty common thing that you'll see with 3D scanning and it's not 100% necessary. |
| 13:17 | So basically what these are is little targets that the scanner is designed to pick up and it helps the scanner keep track of where it is as it moves around the part and position itself. |
| 13:29 | And then build the geometry from there. |
| 13:31 | With parts, like if you're scanning the exterior of a vehicle for example the door of a vehicle, if it's just a big flat surface that doesn't have any detail, as the scanner moves over it, the frame size might be too small that as it moves from one part to the next, it can't tell the difference between them so essentially it gets lost. |
| 13:54 | And that's kind of one of the main performance things when you're using a scanner is basically how well it keeps track as you're moving around the part. |
| 14:04 | So I actually did scan this earlier without the targets on it and it will scan fine because it has quite a lot of detail and the surface finish being a kind of matted silver finish is quite good for 3D scanning anyway but using the targets like this does help conisderably. |
| 14:24 | So when you're placing these targets, you basically want to have about, at least three of them within your picture frame. |
| 14:33 | So as it moves around it can pick them up and build the model from that. |
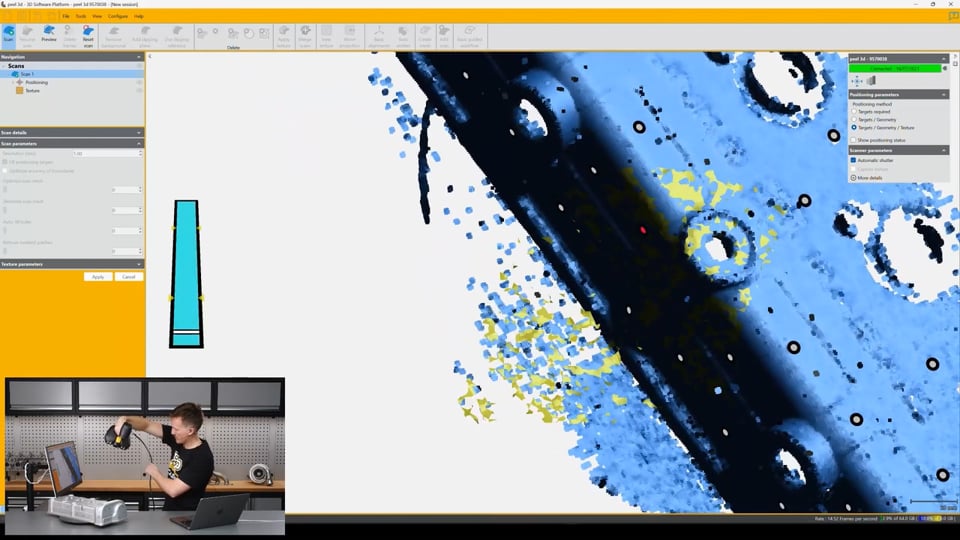
| 14:40 | So we'll get into scanning and I'll open the Peel 3D program on the computer and select new scan. |
| 14:54 | We already have our scanner plugged in and ready to go. |
| 15:00 | Just make a few changes here, on the positioning parameters on the right side here, I'll choose to select targets, geometry and texture. |
| 15:11 | Leave the automatic shutter speed on for now. |
| 15:15 | And that's basically all it is and we are ready set up, ready to go. |
| 15:19 | The scanner has already been calibrated so that's another process of getting set up with that, we won't dig into that today but maybe in the future some time we can go a little bit more in depth into using this program but today we'll just use it to take the scan and then we'll export that as a mesh and bring it into Fusion 360. |
| 15:40 | So regardless we'll get started. |
| 15:43 | Just want to stay about, 30 cm away from the scan but the scanner will tell us if we need to move closer or further away. |
| 15:55 | So just getting started there, you can see it's kind of flashing and projecting light onto the part and on the screen, on the left side, the green bar, that shows us basically where we want to be, how far away we are so if I move the scanner closer, it gets unhappy and it tells us I'm too close, also got a little red light on the back of the scanner tells me that. |
| 16:19 | And if I move too far away, it gets unhappy as well. |
| 16:25 | So we kind of want to sit about in this spot here and just try to pick it up again. |
| 16:41 | There we go. |
| 16:44 | Can be a bit fiddly for a while until it starts to build a bit of a model with the targets on it. |
| 17:04 | Once it has more targets, probably started in the wrong spot really. |
| 17:15 | There we go, it's just a bit close. |
| 17:36 | You can see it's starting to build the model a little bit. |
| 17:57 | I'm just keeping my eye on the back of the scanner and a little bit on the screen as well to move around, build up those reference points and it's also capturing the geometry, just trying to stay roughly in the right range. |
| 18:18 | You see the kind of blue on the screen, it's the geometry starting to be picked up and you can see the gaps in it and work around the part. |
| 18:38 | The inside of the holes is kind of, can be a bit tricky to get information on, especially the threaded areas but if you just work to capture it from different angles you can kind of build a pretty good idea of it and then when it's in CAD later, if you need to, you can model the rest of it to seal up the model but we'll just keep working around. |
| 19:35 | It helps a lot having those target dots once it starts to pick up quite a few of them. |
| 19:43 | It moves pretty quickly but on some parts it can be really difficult for the scanner to stay tracking. |
| 19:59 | Just move back to the side. |
| 20:03 | Spin it around a bit on the turntable. |
| 20:25 | And also once we've finished with this, we will be able to scan the inside of the valve cover as well and then merge them together later on to get a full model basically of the part. |
| 20:47 | But you can see, I don't know, what's it been, a few minutes and already with use of the targets, getting most of the model sorted and then at the end we can find the parts that we're kind of missing data on and go back over it and fill in the holes basically. |
| 21:17 | Kind of those tighter sections like that bolt hole there, just got to get a few different angles to be able to capture the surfaces of it. |
| 21:34 | Doesn't help on the top that I'm short. |
| 21:41 | The thin edges of the spark plug holes can be a bit tricky for the scanner to pick up. |
| 21:53 | But spend enough time, eventually it'll create a pretty good model of it. |
| 22:05 | That's most of the top then I'll just spin it around and get the front face over the cam gears. |
| 22:36 | And I'll leave it at that for now 'cause that's most of it. |
| 22:40 | I actually took this scan a bit earlier just to speed up the process as well which we'll use to bring into Fusion 360 but on the screen we can see we've got most of that so if we needed to start again, we could preview it first and this will today things up a little bit, don't worry about these areas that are missing around the targets, that will all be filled in in a moment but we can look say around this hole here at the back in the middle and say OK we're missing some of the surface there. |
| 23:20 | We can just, with the targets on it, go back and pick that up. |
| 23:37 | And try to capture data on that to fill in those holes basically. |
| 23:50 | And basically the same process, just work around the model and find the areas that you're missing information on and fill in those holes to try to get the best scan that you can. |
| 24:04 | But that's basically that and most of it so from here, we can stop the scan and it will just update and from there we can add a clipping plane. |
| 24:22 | Do it through three targets and select the targets on the same plane on the top here. |
| 24:30 | All far apart and then drop this down to about here. |
| 24:39 | Just to remove the bottom, hit create and that will remove that bit of the table that we captured in the scan for now and we could do the same to remove the bit of the turntable as well but that's not really necessary and we can also do that later on in Fusion 360. |
| 24:57 | In the case where we'd done something like scan this twice from each side, we can also, and we've created two scans, we could merge the scans together and do a bunch of other processes in this software as well. |
| 25:15 | There's quite a lot you can do here but for now we'll just keep it simple, we'll do a basic alignment just so when we bring it into Fusion 360, it should align with our planes, keep things pretty simple, we'll just hit line. |
| 25:32 | And then from there, it's a matter of creating the mesh, just like that, we've got our mesh, and I can go file, export mesh and save it into a folder on the computer. |
| 25:48 | I've already done this here anyway so I'll just leave that for now but that is the process. |
| 25:53 | So now I have that mesh exported and saved on the computer and I can move into Fusion 360 and start working with the meshes. |
| 26:03 | So I'll do that in just a moment, got Fusion 360 open. |
| 26:15 | So also at this point I'll just make a call for questions, if you have any questions, you'd like to put them in the chat, I'll do my best to answer them at the end but for now, we'll move into Fusion 360 and do a bit of a demonstration on using those scans. |
| 26:30 | So Fusion 360 we have a new window open and we can go to the mesh tab 'cause we're working with meshes from our 3D scan and we'll start with insert mesh. |
| 26:44 | From this, I will choose this one here which is actually the 3D scan that I took with my iPhone earlier and that's an OBJ, object file. |
| 26:55 | Still a 3D mesh and I'll open that. |
| 27:02 | And this is the scan that I took earlier with that so with the iPhone you don't get the luxury of kind of orientating it within the phone itself and the units can be, on the Trnio app anyway from what I've found, the unit doesn't really matter, you have to scale the mesh when you bring it in so we'll do that now anyway. |
| 27:25 | I'll select OK on this and you can see that we've got the wood colour of the table, that's cause this is an OBJ mesh and the texture files were captured with that and they were in the same folder that I inserted the mesh from so I get the texture as well. |
| 27:45 | So the next step from here is going to be to scale the mesh up. |
| 27:53 | What we'll do first, so take a measurement from the actual valve cover, so on the overhead camera, the measurement from, we'll just do this roughly. |
| 28:05 | The first and fourth spark plug, coil mounting points, is 283. |
| 28:17 | But if I measure it on this, just using the measurement tool from the inspect tab and I just click on the scan, I can measure it at the moment at only 2.2 mm. |
| 28:30 | So a quick bit of maths on calculator. |
| 28:38 | If I do, 283 divided by 2.2 I think that was, I got, oh no. |
| 28:56 | 128.6, so if I go to modify scale mesh and I select the three bodies here and I scale this by 128. |
| 29:23 | This is the process that you have to go through sometimes with a smartphone to get the mesh the right size but you'll see in a moment we won't have to do that so 282.7 so that's definitely close enough for this and that means that our mesh is now to the correct scale. |
| 29:44 | And we can use that for whatever we want. |
| 29:46 | And from here we could do something like use the plane cut tool and an origin plane. |
| 30:00 | Select the bodies first. |
| 30:08 | Come on. |
| 30:14 | It's not wanting to do, I need to combine the bodies and then select a cut plane and then I could remove that but we'll move onto working with the scan from the other one anyway and then we'll compare the two. |
| 30:27 | So if I do the same process, insert mesh, Skunk2 valve cover K20 and insert this. |
| 30:37 | And then it's kind of aligned with our planes anyway but I'll just rotate it up and around. |
| 30:48 | Then select OK. |
| 30:51 | So you can already see the difference between the two but we'll come back to it. |
| 30:55 | This is an STL file, so the colour isn't captured. |
| 31:00 | But you can already kind of see how much nicer and more accurate this scan is compared to the one from the phone, even though it looks pretty good with the colours and texture captured, you can kind of already see there the curve of that face coming up, it's just not as accurate, especially around these spark coil mounting holes. |
| 31:29 | But we'll come back to that in a moment. |
| 31:32 | So this one here, we inserted it, I think with the right scale but I can just check again. |
| 31:41 | From here to here. |
| 31:47 | What have we got, 282 so yeah this one already comes in at the correct scale and it's all ready to go. |
| 31:54 | So the process that I would usually use from here is to create some planes that when I bring it into an assembly file, I'll be able to line it up using those planes. |
| 32:06 | The issue here is if I go to construct and I do plane through three points for example and it won't let me select any points on it. |
| 32:19 | So the little work around here is to go into the solid modelling toolbar and use create form and then I can do the same thing, plane through three points and for example I can click three points on this surface nice and far apart and make a plane over that top surface of the valve cover. |
| 32:46 | And then once I have that, finish form and then I have my construction plane here that I can use and we'll use that soon. |
| 32:57 | Then the next, another really helpful thing is to create a section, sketch of a section through a plane of the mesh so I'll show you that now and it'll make more sense. |
| 33:12 | So with our plane created, we can hit search and type sketch and create mesh section sketch. |
| 33:22 | Choose the body and then choose the section plane. |
| 33:31 | And then we could drag this up a little bit for example and you can see here that it is creating, getting the profile around of the mesh where it's intersecting that plane. |
| 33:49 | So if I click OK there, the next step is to edit this sketch and then if we choose fit curves to mesh section. |
| 34:01 | Then I click on these. |
| 34:09 | That will basically create a curve of that mesh so we can use that in a sketch. |
| 34:18 | And then from there we could do something like model the coil plugs in and use the centrepoints of those curves to position them or something like that. |
| 34:29 | But that is a really helpful tool to be able to section through a mesh and fit something, or design something that fits perfectly with the mesh basically. |
| 34:42 | But if we finish that for now, and if we save this as, we'll say Peel 2-S Skunk2 valve cover scan. |
| 35:04 | We'll save that. |
| 35:07 | And once this saves we'll also jump over here really quickly I'll just put that same plane into this one. |
| 35:24 | Not plane long path sorry, plane through three points. |
| 35:31 | Click here, finish form. |
| 35:35 | And I'll save this as iPhone Skunk2 K20 valve. |
| 35:50 | Then with a new design open, I first need to save this so let's say K20 valve cover. |
| 36:02 | I need to save that before I can insert other parts into it. |
| 36:07 | Open up the data panel and I can get this and go insert into current design. |
| 36:20 | Basically drop that in, click OK, that's fine where it is and then I can do something like assemble, no sorry, under modify, align, and then I can click this plane here and align that with the top origin plane. |
| 36:45 | And if I had planes also on the other faces I could fully align it with the origin or if for example I had the scan of the cylinder head and I made a plane on the mounting face of the cylinder head for the valve cover, then I could make a plane on the corresponding face of the valve cover and align those two together and then it's basically just a process of dragging them into the right spot and trying to line them up with as much common features as you can to get it all positioned correctly and then you can use it as a reference from there. |
| 37:26 | Just before we finish up I will just jump back in, find that iPhone scan, insert that into the current design. |
| 37:51 | And I can do the same thing, sorry clicked the wrong thing, here align this plane to this plane and then I could move component, iPhone, kind of in place next to it. |
| 38:15 | Probably just dragged it out of alignment with that plane but anyway you can see the two ones there and you can see basically the difference that you pay for with the professional grade scanner between the two of that but that's not to say that the scan from the iPhone is completely useless, it definitely is useful, it just depends what you're using it for but the, obviously the one from the 3D scanner is significantly better but it also takes more time to get it and of course it costs a lot more money for that scanner. |
| 38:49 | So we'll leave it at that for now anyway but from that I'd say we'll finish and tidy up that scan from the Peel 2-S scanner and then Brandon can use that in his model of the K20 assembly fitted into the vehicle and then use that as a reference to model the new parts around. |
| 39:10 | So I'll jump into a few questions if there is any, just move these out of the way. |
| 39:28 | So Pete Schaaf said, what use cases could I expect from an iPhone scan? So example of this is something that we've done is I scanned the cylinder head of an SR20 VET and actually used this along with a canvas, so that's like a 2D scanned image of the mounting holes and designed a billet valve cover around that so that's a part about this big, it's a billet part that's size is an extremely expensive project and the 3D scan was used in that case to scan the cylinder head and the valve train with the valve cover off and basically get an idea of the clearances to the valve cover. |
| 40:16 | Obviously I wasn't trying to get everything really close and get the valve cover just off the cam towers or the cam gears or something like that. |
| 40:26 | It's very useful for things, even in that case, or you could scan and engine bay and design a strut tower brace or something like that. |
| 40:38 | There's a lot of uses for it, it just needs to be approached more with the caution or the understanding that it's not going to be 100% accurate down to half a millimetre or 0.1 of a millimetre in this case so you just need to understand that. |
| 40:55 | And if that means that what you're designing, you need that accuracy, then the iPhone scan's not going to work but if you can understand that and design tolerances into your design, things like slotted holes or something 'cause you know that hole I'm trying to line up with isn't going to be exactly where I want it, then it's completely useful to use a scan in that case so hopefully that answers your questions. |
| 41:23 | So another question from Puzzle, If I wanted to scan the underside of the valve cover, would I have to do two scans and join them in CAD? Not necessarily, I mean you could hang it and get around the whole thing. |
| 41:40 | In some cases I find where there's two surfaces like for example the outer surface of this and then it picks up the inner surface and it's very close, sometimes the scan can get a little bit confused and not be perfect in that way. |
| 41:56 | The way I would do it would be yeah exactly what you said, to scan the whole top face, turn it over and then scan on the inside as well and then merge the two scans in the software. |
| 42:09 | If you did this, this way, and you scanned the sides of it was well and then you turn it over and you scan it and you still scan the sides, it will be quite easy to line things up, you basically just select three common points on each scan and you'll be able to merge them together and it's pretty simple so that's the way that I would do it would be to take two scans. |
| 42:38 | I think there's a similar question here InitialDIYmods, when it comes to parts like this, is there a good way to scan the internal surface of the same model? Like maybe if you hang it, yeah, but if it's too heavy, you could flip it over and combine the two meshes in CAD? Yeah honestly you could do it in one like I said but it's probably just as easy and probably just as quick and maybe more accurate. |
| 43:04 | It just depends part to part basically. |
| 43:07 | This one here I would do two scans. |
| 43:11 | Maybe something like a bonnet of a car, if you're trying to get both sides of it, one scan might work 'cause it's a lot bigger but still, two scans is fine as well, it's quite easy to merge them together. |
| 43:27 | In the Peel 3D CAD, the program that we were in before, it's quite easy to just select those few points and it'll merge them together and in some cases it will basically do it automatically for you, in other cases you have to do it manually but it's case by case basis. |
| 43:48 | Philly Phil, is there any equivalent to the Trnio app ported to Android? So yeah I said before, WIDAR and Polycam are the closest equivalents I could find. |
| 44:00 | I don't have an Android so I haven't tried them much myself but I know Taz at HPA has had a little go with, I think the WIDAR one and seen that it works very similarly so yeah that should work, have a look at those two first. |
| 44:20 | Trnio I think costs less than $10, I'm not sure about those. |
| 44:27 | But they're fairly cheap anyway and I've used it maybe four or five times with some success so it's in my mind that's worth the money. |
| 44:38 | And then Puzzle, what other 3D scanners do you recommend? Something in the range of the Creality Lizard for example between $500 - $1500 USD. |
| 44:53 | Just a moment, just make sure I've got the right thing. |
| 44:59 | So I've seen the Creoform 3D scanners, I haven't used them much before, not sure if they have an offering in that price range. |
| 45:18 | Yeah Creoform is kind of the first name that jumps to mind of affordable 3D scanners that from what I understand, I haven't used them personally but from what I understand, they do a pretty good job. |
| 45:36 | Personally myself I've used the Peel ones and I've used Artec scanners as well. |
| 45:43 | Between $20,000 and $40,000 so there's a big gap there obviously. |
| 45:53 | But I would say in that price range that you're talking about, every year they're becoming more and more accessible so a bit of research and you'd be able to find some good answers to that. |
| 46:10 | Sam's just reminded met here, the Peel is a Creoform product and they are offering some products as well that are getting lower in the price range, I don't think quite that cheap but more and more accessible every year so there are some good scanners coming into that price range. |
| 46:29 | Jumping up to the next kind of price bracket I'd say of like $5000 USD can get you naturally a lot more but it's a significant more investment so depends what you're using it for. |
| 46:43 | Philly Phil, for those jumping straight into 3D printing, think SLS, how important is initial scan resolution to the quality of the final print? So this is like the reverse engineering kind of things. |
| 47:02 | It depends, if you're using the scan and then you're repairing, well, if you scan something and then you're filling in the mesh and then converting it into a solid body, and then you're 3D printing from there, or if you're just using the mesh straight away, it would have to be really good I'd assume to then 3D print it straight from that mesh. |
| 47:32 | Yeah I'd say the initial scan would be very important, the quality of it in that case, depending on what you're using the 3D printed part for. |
| 47:43 | If you were using it for example, you're going to scan the part and then use it as a reference to model around, so you scanned for example the valve cover and then you modelling something very similar, obviously then you'd convert that to a mesh to 3D print and it would be, the initial scan itself wouldn't be that important 'cause you would have modelled something yourself anyway essentially and just used it as a reference. |
| 48:18 | So it really depends what you're using it for and then what the purpose of the 3D printed part is as well. |
| 48:26 | I would say, if you scan something on the iPhone, for example a computer mouse, you scanned that on the iPhone and then you tried to convert that into a mesh, or convert it into a solid body or use the mesh directly to 3D print it, it would be pretty inaccurate. |
| 48:48 | But if you scanned it on the Peel scanner, it would probably come out pretty good but depends what you're using the part for. |
| 49:02 | I think that about wraps up for questions so that will finish this week's webinar and thanks for watching. |
Timestamps
0:00 - Introduction
1:22 - What is 3D scanning
1:45 - Uses for 3D scanning
4:00 - Types of scanner and their pros and cons
8:28 - iPhone scanner demonstration
12:55 - Peel 2-S 3D scanner demonstration
25:53 - Processing iPhone scan into Fusion 360
30:25 - Processing Peel 2-S scan into Fusion 360
35:50 - Comparison
39:10 - Questions


