352 | Open/Closed Boost Control Tuning - Haltech
Summary
In this webinar, we will cover the pneumatic and electronic setups required for achieving stable boost control using Haltech NSP software on an Elite 2500, specifically fitted to a Mitsubishi EVO 9. Additionally, we will explore the differences between open loop boost control and closed loop boost control, demonstrating how both function within the Haltech platform.
| 00:00 | Hey team, Andre from High Performance Academy, welcome to another one of our webinars. |
| 00:03 | This time we're going to be diving into boost control setup and tuning strategies using the Haltech Elite and their NSP software. |
| 00:11 | The car we're using today is our Mitsubishi Evo 9, which is completely stock standard and there are a few limitations here which will affect what we can actually do with today's demonstration with the boost, but it's still going to be 100% applicable irrespective of what your actual boost targets are or what type of car you're tuning. |
| 00:30 | As usual, at the end of the lesson we will have a question and answer session, so if there's anything that I talk about related to this topic, any questions at all related to boost control with the Haltech, please feel free to ask those at the end and we'll get into those once we've gone through our lesson. |
| 00:46 | Alright, so, starting at the start, boost control is one of those areas that I know a lot of tuners really really struggle with, and this can be at the worst, or at the best I suppose I should say, it can be frustrating, because poor boost control can mean that you're sacrificing the power that your car can produce, your engine can produce, can also affect how smoothly the car drives. |
| 01:11 | If you've got boost control that's oscillating plus or minus 3-5 psi, you're going to hear that and you're going to feel it, and it's not very pleasant. |
| 01:20 | But the flip side of that, the worst side of things, if you've got boost control that's not doing what it should do and you're sort of really starting to push the turbo and engine combination towards their limit, this can easily result in a failure of either the turbocharger, the engine or potentially even both. |
| 01:38 | So, it's something that we really need to get right. |
| 01:40 | And I sort of got very very fussy with boost control at a period in time where I was tuning a lot of cars that ran in a boost controlled race class here in New Zealand called SS2000. |
| 01:53 | So, they had an 18 psi boost limit and the scrutineers would place a little electronic module in each car connected to a pressure hose and basically that came up with a little red LED if you exceeded 18 psi. |
| 02:09 | Can't quite remember now what the sort of margin of overboost they allowed, but it wasn't much so; understandably I put a lot of effort into tuning those cars so we were as close to that 18 psi limit as we could get without stepping over it. |
| 02:25 | And this is another area where the dyno is useful to a degree, but quite often, and this goes for street cars as well of course, quite often I would find that I could get a boost curve that you could run a ruler through on the dyno, absolutely perfect, maybe no more than plus or minus 2-3 kPa of variation. |
| 02:48 | And then you get out on the road and as you were in and out of the throttle through a corner or changing gears, we'd start getting some weird behaviour and overboosting. |
| 02:56 | So, it is really important to thoroughly test under a range of conditions, not just a ramp run on the dyno. |
| 03:03 | Alright, let's get into some of the terminology that we need to understand and the first of these is open loop versus closed loop, this is two different ways we can set up our boost control strategy. |
| 03:12 | Pretty straight forward, open loop means that the ECU is going to blindly send out the duty cycle to the solenoid controlling boost that you put in the table. |
| 03:22 | And if you're trying to get 15 psi and it happens that the engine's actually producing 20 psi, the ECU's not going to do anything about that at all. |
| 03:32 | So, really the boost is going to depend solely on the numbers you put in that table. |
| 03:37 | Now, this is still effective to a degree, but what we do find is that our boost is going to be fluctuating quite a lot depending on atmospheric conditions. |
| 03:48 | So, temperature is going to be something that makes a big difference. |
| 03:51 | So, a hot summer's day versus a cold winter's evening, quite often when it's cold, the air's denser and you will find that your boost pressure increases. |
| 03:59 | There's a range of other aspects that can also cause these day to day fluctuations in our boost. |
| 04:06 | So, open loop, you're not going to get a rock solid number that's the same every time. |
| 04:11 | Closed loop on the other hand, what this does is looks at a target that we're actually setting. |
| 04:17 | So, we can say hey I want 15 psi and then the ECU is going to look at the target boost, 15 psi, is going to look at the actual manifold pressure that we've got, let's say that that's 14 psi and it's going to say to itself, alright we're a little bit low target so what we're going to do is now increase the duty cycle in order to get us to that target. |
| 04:37 | And when we've got this whole system dialled in nicely, it does an incredibly good job. |
| 04:42 | And it gets around those problems I was just explaining, because our boost is going to be nice and stable day and night, summer and winter, day to day it's not going to matter. |
| 04:51 | This also gives us the flexibility of adding a switch or a rotary knob so that we can actually have on the fly control of our boost target. |
| 05:02 | Now, yes you can do that with an open loop system as well, but again this will be actually targeting the specific number that we add in. |
| 05:11 | Before we dive into the software and I actually stop just talking, one other aspect with this that I do need to talk about, because this is, from my years of tuning, hands down the biggest problem I see with boost control systems, and that is where the boost solenoid is simply plumbed wrong. |
| 05:31 | And there's really no excuse for this, all we need to do is read the manual. |
| 05:35 | Our ECU manufacturers will have guidance on how to plumb up a solenoid. |
| 05:40 | Usually we're always using the same three port max solenoid, that's kind of the go to for the aftermarket tuning industry. |
| 05:49 | But how we plumb this for an internal wastegate versus an external wastegate is different, there's a couple of different variations of how these can be plumbed. |
| 05:57 | But essentially if we get this wrong, then the boost control strategy's simply not going to work. |
| 06:03 | So, that's the number one, make sure you read the setup instructions and make sure that that boost control solenoid is plumbed correctly to your wastegate and to a pressure source. |
| 06:13 | If we don't do that right, all bets are off, we're never going to be able to fix those sorts of errors or problems with the laptop keyboard. |
| 06:20 | Alright, let's jump into the tuning software at the moment, and we'll go through here and look at some of the parameters. |
| 06:27 | So, we've got here in the left hand drop down menu, the menu structure here, on the left hand side we've got our boost control menu and we can see that the boost control function has been enabled. |
| 06:40 | So, if you're setting this up from scratch, you would need to start by enabling this function. |
| 06:45 | Next we've got our mode. |
| 06:46 | So, we can see here, exactly what I was just talking about, we can have closed loop or open loop. |
| 06:51 | Today we are going to be dealing with open loop, possibly at another time we will look at an open loop strategy that mimics closed loop to a degree where we're setting up our base duty cycle table with manifold pressure on one axis and this allows us to sort of do a passive closed loop control strategy, whereby if the boost is above our target we can actually reduce the duty cycle a little bit. |
| 07:17 | So, it kind of mimics a proper closed loop control strategy but is a little bit simpler. |
| 07:22 | Then we've got our control parameter which we've got measured manifold pressure or we can have wastegate pressure or boost pressure. |
| 07:30 | So in this case, measured manifold pressure, that's going to most likely be the option for most people. |
| 07:36 | Wastegate pressure, this is if you are using CO2 control or something of that nature. |
| 07:41 | Another parameter that's really important to get right is our output frequency. |
| 07:45 | So, how fast we drive the boost control solenoid. |
| 07:49 | I generally find that most of the solenoids we use, and as I already mentioned, the majority of the time it is always the max solenoid, these work pretty well between about 25 and about, or 20 and about 35 hertz. |
| 08:00 | Much faster than that, you're going to find that the solenoid just won't be able to function and then obviously we get issues. |
| 08:07 | Much slower than that, you're going to hear it pulsing, particularly if you are venting the boost control solenoid just into your engine bay instead of back into the intake. |
| 08:18 | And you can actually sort of end up with oscillating boost, because it's just operating too slowly. |
| 08:25 | So, I would suggest starting at 30 but it's always a good idea to test and maybe try 20, 25, 35 and just see if you note any improvement from doing so. |
| 08:35 | Minimum and maximum duty cycle here. |
| 08:38 | So, you can understandably set the maximum values that and minimum values for the duty cycle that are going to be applied. |
| 08:47 | I am going to leave this for simplicity at 0 to 100, but what we will find is that with most of these solenoids, they have a bit of a dead band at the top and bottom of the range. |
| 08:56 | So, what I mean by this is you'll probably find that between about 0 and 10% duty cycle, it's actually going to make little to no change to your boost, and likewise between about 90 and 100% duty cycle, it's going to be the same. |
| 09:09 | So, you can limit the minimum and maximum if you wish. |
| 09:13 | We've got a PID integrator max and a max derivative. |
| 09:18 | So, this just allows us to control the maximum amount of change from the PID control algorithm. |
| 09:25 | And I'm going to talk about those in a moment, but let's just get through the rest of these first. |
| 09:30 | So, we've also got an overboost offset, so 4.4 psi and we can always click on these little help files, and this is where the solenoid gets disabled. |
| 09:40 | So, basically it's an overboost prevention, but that's not to say it's the only way that we want to set up our overboost protection. |
| 09:49 | So, if we start, before we go any further, we'll just enter overboost here and come to our overboost settings, so this is under our engine functions, overboost cut. |
| 10:00 | And we first of all need to make sure that this is set up, so this is just a safety strategy, we want to set this up before we start tuning our boost in case we get one of those situations where we find that the boost solenoid isn't plumbed up properly or maybe there's a problem with the wastegate. |
| 10:15 | The last thing we want is for our very first ramp run on the dyno where we will, as you'll see, be targeting the minimum boost pressure that the engine can produce, we definitely don't want to accidentally find out halfway through the ramp run that the boost skyrockets to infinity and beyond and all of a sudden we've got pistons and connecting rods exiting the block. |
| 10:35 | So, it's a very good idea to start by making sure that you've got this set up. |
| 10:39 | So, cut method, we can have fuel, ignition or fuel and ignition. |
| 10:43 | I always prefer fuel, or fuel and ignition, reason being that ignition cuts can be quite harsh on the valve train on engines that have known problems there. |
| 10:55 | Delay, need to be a little bit careful with this, this is set to 0.5 seconds. |
| 10:59 | So, I personally think that's probably a little bit optimistic. |
| 11:03 | The boost can change a hell of a lot in half a second, so I'm actually just going to zero that out and then we've got a hysteresis here, basically how much the boost needs to change before this cut will be disabled. |
| 11:15 | And then we've got our actual cut pressure. |
| 11:17 | So, I've got that set at the moment as you can see to 20 psi. |
| 11:20 | So, what we want to do, if we're just starting out getting an engine running and we don't really know where the boost's going to be, I'm just going to set this somewhere reasonably conservative, I might start a little bit lower than this. |
| 11:33 | I know with this particular engine I should be able to get somewhere around about maybe 8-10 psi on the wastegate spring pressure. |
| 11:40 | So, I might start out with this set to 15 psi, and then once we know that we do have good mechanical control we can come back and set this to where we actually want it. |
| 11:50 | I'd always suggest setting this about 2 psi higher than the maximum boost that we expect to run. |
| 11:57 | So, that's done now, we can get that out of the way, we are comfortable that our boost control, our boost cut should be set up and ready to go. |
| 12:06 | The only other thing, we've got a few other functions here, which I'm not going to cover. |
| 12:11 | There's some functionality here for CO2 boost control, scramble boost, boost trims and an arm switch but we're going to just leave that part, none of that's really going to have a massive influence on the general process of setting this up. |
| 12:26 | Ok so, we've got a range of other parameters here in the left here. |
| 12:30 | We've got, I'm just going to change these, I really don't like having my RPM on the vertical axis, so I just like visually to look at this in this particular way. |
| 12:44 | So, I'm just going to change that around but personal preference here. |
| 12:47 | So, this is our boost control closed loop base output table. |
| 12:51 | What this means is this is the duty cycle that the ECU is going to initially supply to the boost control solenoid before closed loop control is enabled where it's going to take over and make adjustments. |
| 13:04 | Now, this I think is probably one of the areas that tuners make mistakes with closed loop control, thinking that this isn't really that important and that they can just let the ECU do the heavy lifting and get the boost where it needs to be. |
| 13:18 | But the reality is with any closed loop control system, this base duty cycle or feed forward table as it's often referred to is critical. |
| 13:27 | We want to put the time into setting this table up so that it's as close to our target as we can get it and if we get that really nice and close to our target, that's going to mean that there's not a lot of error in our boost and that means that the closed loop control strategy doesn't have a lot of work to do. |
| 13:45 | So, we'll go through and see how that's done. |
| 13:47 | So, as you can see, it's a three dimensional table. |
| 13:49 | We've got RPM on our horizontal axis and we've got our boost target on the vertical axis. |
| 13:54 | I've only got two boost target points here, but you can always come up here, click our table axis setup and we could go and add more points into this table as required. |
| 14:05 | I'm trying to keep this nice and simple for the moment so our two boost points are sufficient. |
| 14:10 | Obviously, only relevant as well if we've got some way of adjusting our boost target with a rotary knob or a keypad or something of that nature. |
| 14:18 | Next one down is our closed loop target pressure. |
| 14:22 | So, again I've got this nice and simple setup. |
| 14:25 | 12 psi target right through the range, well 7 at 2000 RPM but that's below our boost threshold anyway. |
| 14:32 | So, today we're going to be targeting 12 psi. |
| 14:34 | I said there's some limitations with this vehicle in terms of the fuel system that's going to limit how far we can go, so if you're wondering why I'm targeting such a low pressure, well there you go, that's why. |
| 14:47 | Next one down, we've got our controller start delay. |
| 14:50 | So, two dimensional there versus engine RPM. |
| 14:53 | So, basically this delays the onset of our closed loop control and this can be used to help prevent over boost as we ramp up onto boost. |
| 15:03 | So, in this instance for example here, 5000 RPM, as we come up onto boost, we're going to hold the value in the base duty cycle table for one second before it converts across to closed loop control. |
| 15:16 | Probably a little bit excessive there at one second, but again you can tune these to suit your own requirements. |
| 15:23 | Then we've got our proportional, our integral and our derivative gains. |
| 15:27 | Now interestingly, by default these tables all look something like this, where we have a two dimensional table with boost pressure error on the x axis. |
| 15:39 | We've got zero for our derivative in here and I'll explain more about that. |
| 15:43 | I actually spent a fair bit of time with Haltech going over this system, and their preference was to actually make this into a single value, which we can see I've done here with our proportional and our integral gains. |
| 15:56 | So how these work, I'm going to go into the PID control algorithm in a bit of detail. |
| 16:01 | This is the bit that most people don't understand, I think it's worth persevering with. |
| 16:06 | What this does is let's say we've got a value in here of 2%. |
| 16:11 | So, this is the output change in duty cycle percent per psi of error. |
| 16:17 | So, what this means is that if we're targeting 12 psi and we actually have 13 psi, the error is one psi. |
| 16:26 | So, 2% per psi, what that would do is then reduce the duty cycle by 2%. |
| 16:31 | So, it's relatively easy once you understand that to sort of have an idea of the magnitude of change that this value is going to make to the output to our wastegate solenoid. |
| 16:41 | So, obviously it's an error of 10%, two times 10, we've got a 20% change to our wastegate duty cycle. |
| 16:50 | I'm actually going to start by zeroing that and then we're gonna come to our integral gain which, exactly the same, I've set that up as a single value. |
| 16:57 | And then the derivative gain, this is how they're set by default, where you can actually set a different gain level as the error changes. |
| 17:05 | But again, probably a little unnecessary since how it works is just a multiplier based on the level of boost error. |
| 17:14 | OK so, PID control algorithms, what are they and how do they work and what do we need to know in order to tune them? Well there's three elements here: proportional, which is as its name suggests, the effect of this is proportional to the size of the error. |
| 17:31 | So, the larger the error, the more change it's going to make. |
| 17:35 | Then we've got our derivative gain, sorry our integral gain, we'll go in order here. |
| 17:39 | So, this is based on error over time. |
| 17:43 | If we are just using proportional gain on its own, we'll never be able to get exactly onto our target because as the error decreases, so does the power of that proportional gain element on its own. |
| 17:57 | So, the integral gain looks at that error over time that's remaining and then will ramp the boost solenoid up or down to suit. |
| 18:04 | Derivative gain, which is the one I've got showing here is kind of, it's relative to the rate of change of error. |
| 18:11 | So, the faster the error is increasing or decreasing, the more power this particular element will have. |
| 18:17 | Typically, I use all three, I've been recommended by Haltech that they get really good control on the Elite and Nexus using just proportional and integral, which did surprise me, but it does actually seem to work. |
| 18:31 | Generally, what I find is that if we are only going to use proportional or proportional and integral, the size of the proportional gain that we can use gets a little bit limiting, because if we go too far, it's going to give us nice sharp quick control changes, but we'll also end up overshooting our target and oscillating which is a really good sign that our proportional gain is set too high. |
| 18:56 | But if we add in some derivative, we can have a braking effect so to speak. |
| 19:01 | Now the analogy I always give, this actually came from MoTeC, but it's just such a good way of visualising something that is a bit hard for a lot of people to get their head around. |
| 19:13 | So, imagine we've got a car and we're sitting on a piece of road and there's a set of traffic lights maybe 100 metres away from us. |
| 19:21 | And we want to get to that set of traffic lights and stop as close to the line as we can. |
| 19:27 | So, let's say we only have proportional gain, well that's effectively our throttle. |
| 19:31 | So, the more throttle we use, the faster we're going to get to the set of traffic lights, but we only have throttle, we don't at this stage have any brakes so of course if we get off the throttle, we're going to roll straight past the traffic lights, we're going to have to hook reverse, back up and we're going to sort of have this oscillation as we sort of go backwards and forwards until we get onto the line and stop, it's going to take a long time. |
| 19:51 | So now, we add in derivative and again obviously we're not going to use derivative, Haltech don't recommend the requirement or see the requirement for derivative, but for the sake of completeness, with our derivative gain, that's like now having the brake pedal available as well. |
| 20:05 | So now, we can use a lot more throttle to get up to the traffic lights quickly but we can apply the brakes and that's going to allow us to stop on the line quicker without hopefully that overshoot. |
| 20:16 | The integral one's a little bit harder to explain with this, but let's say we're now on a hill instead of flat ground and obviously the car's going to roll away, so the integral gain allows us to sort of stay on that point, think of it maybe a bit like a handbrake. |
| 20:32 | So, that's the point of those three gains. |
| 20:34 | Ok, we also have down here, we'll come back into our laptop software, long term trim. |
| 20:42 | So, this is a function that Haltech apply to a range of their control systems. |
| 20:46 | And basically what it allows us to do is sort of over time look at how well is this system tracking our target and then it can make some modifications to the base duty cycle table. |
| 20:57 | So, I'll leave this disabled for the sake of simplicity but if I do enable it, we can see we've got a button down here, apply to base table, we'll also be able to visualise the values stored in this long term trim table. |
| 21:10 | But whether you use that is up to you, it is a good way when set up correctly of fine tuning your base duty cycle table under real world conditions. |
| 21:20 | Alright, so, let's start by seeing what our boost control looks like without any control at all. |
| 21:30 | We want to always start with this and make sure that the mechanical boost control system is functioning. |
| 21:36 | The reason for this is quite often we might find that we've got a wastegate sizing issue, maybe the spring in the wastegate isn't what we thought it was and we've got a boost pressure that's way too high or maybe way too low for our purposes or a situation where our boost is just starting to spiral out of control at higher RPM. |
| 21:57 | We're going to see that quite often if the wastegate is too small or if the wastegate is taken off the exhaust manifold in a way that doesn't promote good exhaust gas flow into it. |
| 22:06 | So, why do we want to check this? Well, this is going to prove that the system is capable of controlling boost properly because that example I just gave with an improperly sized wastegate, where we end up with our boost sort of running exponential as we get higher in the rev range, we will not be able to fix that with this electronic control system. |
| 22:26 | It relies or requires a base mechanical or pneumatic control system that's actually functioning well and holding reasonable boost. |
| 22:35 | So that's the first thing we want to check. |
| 22:37 | What I'll just do as well, let's have a quick look. |
| 22:40 | We'll jump into my laptop software again. |
| 22:43 | Try and draw a nice pretty picture here. |
| 22:47 | So, if we've got a graph of our boost versus RPM, what we're sort of looking for is something that does something like this. |
| 22:58 | Now it's not going to necessarily be perfect and if you're dealing with a factory vehicle, you're almost certainly going to find that the turbo sizing is going to result in the boost tapering away at high RPM. |
| 23:08 | So, if we've got something that looks broadly like this then we're probably in pretty good shape. |
| 23:14 | We are going to be able to fix a lot but maybe not all of this taper off using our electronic control strategy. |
| 23:20 | So, if you've got something that looks like that, happy days. |
| 23:23 | If you've got a system that's sort of starting to do this, revisit that because you're not going to be able to fix that with the ECU. |
| 23:31 | Ok, so let's see what exactly we've got, we'll just get our fan up and running here. |
| 23:36 | And what we're going to do is come across to our closed loop base duty table. |
| 23:40 | And what we'll do is, I'll just copy these and actually put them up here, because I know I've got numbers that are actually going to work reasonably well. |
| 23:50 | And I don't want to be here all day, and I'm sure you don't want to be here all day. |
| 23:54 | So, we'll just zero that out. |
| 23:56 | So, you could do this or the other way I quite often do it is if it's nice and easily accessible, jump out and actually physically unplug the boost control solenoid. |
| 24:04 | Two ways of achieving the same aim. |
| 24:06 | So, what we'll do now is we'll head across to our dyno. |
| 24:10 | And on the top of the dyno screen you're going to see the boost. |
| 24:15 | I've got a reference line in there that's set at 15 psi so you'll kind of be able to get a sense of what that looks like. |
| 24:23 | At the same time we'll lock that in our Haltech. |
| 24:27 | And let's get our run underway now. |
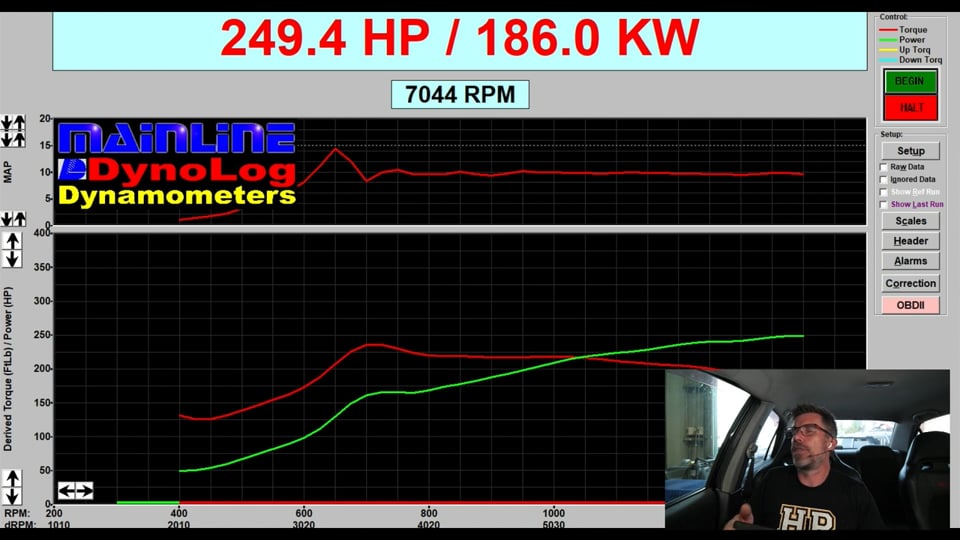
| 24:46 | Ok, so, on the screen we can see probably the world's least powerful Evo 9, 171 kilowatts at the wheels but give it a break because it was only making about 10.5 psi there. |
| 24:58 | What we can see with our dyno plot though, particularly for the boost is it's done exactly what I said, it's almost like I knew. |
| 25:05 | It's come up to about 10.5 psi through here and then by 7000 RPM it's tapered off to about 8.5 psi. |
| 25:13 | So, pretty typical with factory turbo sizing. |
| 25:15 | Let's just jump into our Haltech NSP software and I've just got a little log up here, we can sort of see what happened. |
| 25:23 | So, we can actually, when we're looking at the log file like this, and if you aren't aware, you can press F6, that will start logging, F7 will load up this playback like this and basically when we're looking at a playback, all of these values are frozen at the point of the cursor so it's no longer showing us live data. |
| 25:43 | So, we can see yeah sort of hit maybe 11 psi and then by the top of the run it's dropped off to nine. |
| 25:51 | So it's, excuse me, it's working, we've got some reasonable control of our boost, but what we will also see is if we look carefully at this little blue line, it's sort of moving around quite a bit, so this isn't as stable as I would like to see boost and given that we've got no electronic intervention at the moment, it's unlikely that we're going to be able to get an absolutely perfect flat boost curve with this. |
| 26:18 | So, that's just something to keep in the back of our minds, because there's no point beating yourself up trying to achieve some level of perfection when there's a limiting factor in the mechanical system that means that we just simply can't achieve that. |
| 26:31 | Alright, so, now that we know that we've got good mechanical control of our boost with no electronic intervention, it's time to actually set that base duty cycle table. |
| 26:42 | So, again what I'm going to do here is just paste those values back in. |
| 26:48 | I don't really need to go through this process, but it's essentially just a case of doing some ramp runs on the dyno and just creeping up on these values. |
| 26:57 | What I do is I use the playback function when I'm doing this so we'll come down to the centre of a cell and I'm just comparing my boost pressure, 11.1 psi with my target and then I can increase or decrease the duty cycle at that point until I'm happy, and then we can just sort of creep through the table, addressing each of these points in turn until we've sort of got ourselves pretty much where we want. |
| 27:23 | Now, you'll remember that I said that between about zero and 10% duty cycle, you're likely to see little to no change. |
| 27:32 | So, that's something to keep in mind, we always want to start by making small changes so that we can assess what effect that has. |
| 27:39 | We want to sort of creep up on it rather than making a 20% jump in duty cycle and finding that we've overshot our target, hit boost card or potentially got to a situation where it could be damaging to our engine. |
| 27:50 | So, that's really important to start slowly. |
| 27:52 | And once we get past that sort of dead band and we get into this sort of 10% to 15%, you're going to start to get a sense of what a change of let's say 2% to 5% duty cycle makes. |
| 28:04 | Now, that's not to say that a change of 2% duty cycle at 10 psi is going to have the same effect once we get up to maybe 20 psi, but you start to build a bit of a feel for "Ok I'm one or half a psi out here, what should I do?". |
| 28:18 | So, with this base duty cycle now set up, which again should be pretty close, remembering again we've got no, currently we've got no electronic control, sorry no closed loop control, it is solely going off the values in this table and the reason for that is you'll recall we've set our P, I and D gains at zero. |
| 28:39 | Ok, let's jump back over to the laptop, sorry the dyno screen, and we'll get rid of the run that we've just done here, hopefully we'll make a little bit more power, but that's not really the key thing we're worried about. |
| 28:51 | We'll get our engine up and running again. |
| 28:55 | And get our second run underway. |
| 28:57 | Should be pretty close to 12 psi. |
| 29:00 | And we should have a flatter curve with less of that drop away at high RPM. |
| 29:07 | And just like that we got exactly what I was hoping for. |
| 29:12 | It's almost like I've done this before. |
| 29:14 | Right, so we'll press F7 and we'll just see just how good our boost control was. |
| 29:18 | So, again we're looking at this light blue line, we can see we hit 12 psi exactly at 3300 RPM, we've got a little bit of a fluctuation here. |
| 29:27 | It looks like possibly at 4500 RPM, we've only got 11.2 psi so maybe we might want to increase that a little bit up to 36% duty cycle, but again remembering we had that little bit of a fluctuation even with no electronic intervention there. |
| 29:46 | So, again this is one of those situations where you don't want to beat yourself up too much, because if we've got some weird stuff happening just on the wastegate alone, chances are we're probably going to have some weird stuff happening with electronic control. |
| 30:01 | And case in point here is when we get to our next cell here, 5000 RPM, we're right on our target with 34% duty cycle. |
| 30:11 | So, it's a bit weird, normally with these we do see a reasonably smooth trend. |
| 30:15 | Normally because it's tapering off at higher RPM, we start with a low duty cycle, 25%, we end up with a higher duty cycle, 51%. |
| 30:24 | So, it's unusual and a bit of a red flag if I'm sort of seeing the need to chase this around dramatically like we are here. |
| 30:31 | So, for the sake of this I'll just go back to 34% but we can sort of cycle through here and I mean we're within .2 to .5 psi of our target, maybe what we might want to do here is just add one more above 6000 RPM, let's see, 11.4, 4000 RPM, sorry 5500 RPM. |
| 30:57 | Yeah we'll add another percent there. |
| 30:59 | Ok, so, we should at least be within our target here. |
| 31:03 | And the obvious question is how close do we need to get? Well, as close as we can, if we're within about plus or minus half a psi or less, I'm gonna be pretty happy with that to then start bringing in our closed loop control. |
| 31:18 | Alright, so, let's close down our playback function and we'll go and start adding some proportional and integral gains here. |
| 31:26 | So again, talking to Haltech, they recommended a good place to start here is 2.5% per psi of error. |
| 31:33 | Which I did find to be a little bit excessive, but let's just demonstrate that, because it's always good to see what too much of this looks like. |
| 31:42 | So, what we'll do now, also worth mentioning here, we do have, now that we've gone through the basics, we do have a closed loop boost control tuning worksheet here with all of the functions laid out, so this makes everything sort of nice and easy to access, it's all right at your fingertips. |
| 32:00 | Ok, so we'll get another run on the board here and we will of course log this as well, and see what we get with our closed loop control now active. |
| 32:14 | And of course we'll do this on the dyno and then we'll stop our logger and have a look at our results. |
| 32:32 | Ok, good demonstration here of what it shouldn't look like. |
| 32:36 | First of all while we're still on the dyno screen we can see this massive spike, this massive overboost that we've got here as it's come on boost. |
| 32:44 | And then it sort of oscillated a little bit and then it settled itself down. |
| 32:49 | So, this is really what we don't want to see. |
| 32:52 | This means that generally we've got too much proportional gain. |
| 32:56 | So, if you see that, I would start by reducing that proportional gain. |
| 33:00 | Let's have a quick look in our logger here and we can see this actually up here on our top right screen, we've got our boost control target, the blue is our actual manifold pressure and then the green is our boost error. |
| 33:15 | So, we can see we've got this massive overboost right at the start and our boost error, can't quite get into that. |
| 33:23 | But yeah, at this particular point we've actually hit 17 psi, so not great. |
| 33:29 | And this is exactly what I was saying, we don't want to achieve, but good demonstration here. |
| 33:33 | So, alright, 2.5% per psi, probably a little bit high so let's just drop that down. |
| 33:40 | Also the magnitude of changes that we make to these gains, these are going to be very much dependent on the application. |
| 33:50 | So, we might not know for sure, I mean there aren't, and this is a case in point, there aren't sort of a set of numbers that you can go and throw into your proportional integral gains and call your job done for every car. |
| 34:02 | These have to be tuned to suit the system and the response of that system. |
| 34:06 | So, that was only a starting point and then we need to sort of find the ballpark of what numbers actually make sense and what does a reasonable job. |
| 34:16 | So, when we're getting started and trying to find that ballpark, I generally try and make quite large changes. |
| 34:23 | Maybe as much as even doubling or halving the number initially. |
| 34:26 | And the reason I do this is a big change is going to very quickly show you if you're going in the right direction or away from the right direction. |
| 34:34 | So, make a big change, once you've sort of seen which direction you need to be going in, you can start pulling it back and make it a little bit more granular. |
| 34:41 | But let's just try this with a boost control proportional gain of 1.5% per psi error. |
| 34:47 | We will get our logger up and running again and let's head over to our dyno, and we'll see if that gets rid of our little overboost, or it wasn't even that little. |
| 34:58 | I'll get another run underway. |
| 35:14 | Ok, so much better there. |
| 35:16 | On the dyno screen everything looks really really stable and flat. |
| 35:20 | Get a little bit more granular with this inside of the actual logging. |
| 35:24 | So, let's have a look here and what we can see, nice and easy to use this closed loop boost control worksheet, workbook here, page I should say, because it gives us all the parameters that we're really interested in right in one place; and what we can see here is we hit maximum of about 13 psi. |
| 35:43 | So, one psi overboost which is a little bit more than I'd like to see. |
| 35:47 | And it is moving around a little bit, but again for the most part, if I sort of click through here, we're looking at 12.3 psi, 12.1 psi, 12.0, right on our target. |
| 36:00 | So, it's actually pretty good. |
| 36:02 | We've just got this area when we first come onto boost that looks like it's a little bit too aggressive. |
| 36:09 | It's hard to say, but I'd sort of also say we've got a little bit of oscillation going on here, I did only reduce the proportional gain there, I haven't changed the integral; so, let's try another run there with a little bit less integral. |
| 36:21 | Again, I'll just follow what I did with the proportional to start with. |
| 36:24 | My sense is that 1.5% per psi is probably a touch low, we might end up closer to two, but let's just do one more run here and just see what that change gives us. |
| 36:35 | So, again we'll get our logger up and running, head across to the dyno. |
| 36:38 | And this is probably a good point to mention, we'll jump into our Q&A really shortly, so if you've got any questions, please make sure you get those through. |
| 36:48 | Alright, we'll get rid of the last run there. |
| 36:54 | And let's see what the result of that change is. |
| 37:08 | Ok, again looks great on the dyno, but not quite as granular as we get the details when we're looking at our logging. |
| 37:17 | So, again pretty good, we've actually still got up to 12.8 psi here at 3200 RPM. |
| 37:24 | Pretty stable beyond that, we do have this slight spike here, 12.7 psi. |
| 37:31 | But this is again following that exact same shape that we saw when we weren't using electronic control. |
| 37:37 | And again just why I did that, we know that we weren't getting perfect smooth control, so we're not probably going to get an absolute rock solid number using the electronic control either; so again don't beat ourselves up over that. |
| 37:51 | What I'd say at this stage though is I would probably, as my next change, I would probably actually reduce the base duty cycle a little bit in this area, where we're just coming up on boost and that's probably in and of itself going to be enough to actually get or prevent that 0.8 of a psi of overboost that we were getting so there's a little bit of toing and froing here. |
| 38:14 | So, just to reiterate the process here, what we want to do is start by making sure that our boost control solenoid is plumbed up correctly. |
| 38:22 | We want to also make sure that we've brought in some safeties for overboost, we don't want to end up having any problems with the engine overboosting while we're getting everything set up and potentially being damaged. |
| 38:34 | Then we want to set up our parameters for our closed loop control. |
| 38:38 | We start by zeroing out the P, I and D gains so that we are essentially running in open loop mode. |
| 38:46 | Next, we're going to go through and correctly populate our closed loop or base duty cycle table, and that's going to get us as close as we can to our target before we start bringing in our proportional and our integral gains. |
| 39:00 | And again to reiterate with those P and I gains, what we want to do is start with a default value or that recommendation of 2.5% per psi, see what that gives us and then we can start making large changes, maybe double and half those until we find the ballpark where we are getting good control. |
| 39:19 | Another trick we can do, it's not very easy to demonstrate with this vehicle, when I am tuning P, I, D control algorithms, because I didn't mention before, these are used for a range of functions on our cars, idle speed control, cam control, drive by wire throttle control. |
| 39:36 | But when we are tuning any of these, what we want to do is really ask for a change in the output, so boost here, maybe halfway through the run we could ask for a step change from 12 psi to 14 psi. |
| 39:48 | Now, obviously there's some inertia and lag with that turbocharger, it can't just sort of snap its fingers and go from 12 to 14 psi, maybe it might take a couple of hundred milliseconds, 300 milliseconds or something like that. |
| 40:00 | But what we want to do is assess how quickly it ramps up and follows our target change and whether it overboosts or undershoots when it gets there. |
| 40:08 | If it's overshooting and it's oscillating, we're probably going to benefit from reducing our proportional gain. |
| 40:14 | On the other hand if it's sort of lethargic and slow to come up, we can then try increasing our proportional gain. |
| 40:21 | I will mention if you do want more detail on all of this, we do have our boost control tuning course, it goes into obviously a little bit more detail than what I can explain in a one hour webinar. |
| 40:31 | But for now let's get into our questions and see what we've got. |
| 40:36 | LGN has asked, "Is it worth running an air filter over your turbo or would the turbo guard be good enough, would a filter affect the efficiency of air?". |
| 40:45 | This is the million dollar question. |
| 40:47 | And it depends how much you value your turbocharger. |
| 40:50 | Me personally, quite a lot. |
| 40:53 | They are pretty expensive to replace, and you're going to end up with no air filter or I'm not sure what you're referring to as a turbo guard, I'm guessing you're talking about just sort of like a very coarse mesh over the intake to the turbo. |
| 41:07 | It's going to cause damage over time, even dust ingress into the turbocharger will damage the compressor blade, but also that dirt, dust, whatever is being ingested is going to make it through your engine and that's going to wear it out quicker than it will with a properly designed air filter. |
| 41:25 | So, I'm always a big advocate for running air filters. |
| 41:28 | Properly sized air filter honestly should not be reducing your turbo efficiency or your engine power by very much at all, and in fact sometimes because a lot of the air filters actually are designed to promote smooth air flow into the turbocharger, they can actually show more power. |
| 41:49 | So, yeah ,that's my take on it, but it really comes down to your own personal preference and ultimately how much budget you've got to replace the parts that can be damaged. |
| 42:01 | Devins has asked, "What do you do if you have a turbo that spools too quickly, four port and a light spring, how do you keep a small turbo on a big engine from spooling or will this require an electronic wastegate?". |
| 42:12 | Ok, bunch of questions in here really. |
| 42:15 | So, first of all let's just deal with the four port. |
| 42:18 | Four port boost control solenoids do exist, I've tried them and I don't really like them. |
| 42:23 | The idea behind it is with an external wastegate, it gives us a wider range of boost control. |
| 42:29 | Reason for this is that we can't just go and put let's say a 5 psi spring in our wastegate and then still expect to get to 35 or 40 psi. |
| 42:38 | There is a limit to the range of boost control that we can get. |
| 42:42 | And the reason for this is that we end up with quite a large amount of back pressure in the exhaust manifold pre turbocharger that is also trying to force the wastegate open and for example in a street car, if we're running 15 psi of boost pressure, it wouldn't be unusual to see 30 psi or more of back pressure in the exhaust manifold. |
| 43:02 | So, that's forcing the wastegate open and at some point it's going to overcome the spring pressure and open the wastegate. |
| 43:09 | So, with a 5 psi spring we might be able to get to maybe 15 psi, but probably not 30. |
| 43:16 | There's a lot of it depends in there, but you probably get the idea. |
| 43:19 | The four port solenoid allows us to actually remove boost pressure from the bottom of the diaphragm, which is trying to force the wastegate open and only apply it to the top so we've now got boost pressure on the top of the diaphragm, the spring also trying to force it closed and then back pressure trying to open it. |
| 43:36 | It gives us a wider range of boost control. |
| 43:38 | The downside of that strategy though is that we lose a lot of the fine resolution that we get with the three port solenoid. |
| 43:45 | Simply put, for a 1% duty cycle change, we're getting a larger variation in our boost pressure, so I've found it difficult to get really really rock solid stable control using a four port solenoid. |
| 43:58 | That's not really your question though, what do you do if you've got a turbo that spools too quickly? Well, the first place with this is to start with a spring pressure in your wastegate that's manageable. |
| 44:08 | So, if the turbo spools too quickly, there is a limit to what we can do here, we can't force the wastegate open short of your last point within our electronic wastegate, in which case we can. |
| 44:18 | But realistically if this is a major issue for you, it points to a problem with turbo sizing. |
| 44:25 | But within reason, if you put a light spring in your wastegate, maybe a five or eight psi spring, that's going to limit the boost pressure initially. |
| 44:34 | And what you can often do with that, if it's still coming on too early for your liking, you can leave the boost pressure at wastegate down low where you've got too much torque and then ramp the boost pressure up later in the RPM range. |
| 44:48 | So yeah, it's a control strategy, there's not one single sort of answer or solution for that particular problem, but yeah those are some explanations that would get you there. |
| 45:00 | Generally again, to reiterate, probably if that's a real issue for you, it's a turbo sizing issue and you'd want to step up your turbo sizing. |
| 45:08 | Alright, that brings us to the end of the webinar and as usual for our HPA members, if you're watching this in the archive at a later point, please ask any questions you have in the forum and I'll be happy to answer them there. |
| 45:20 | Thanks for watching and we'll see you next week. |
0:00 - Introduction
3:07 - Open loop vs closed loop
5:22 - Boost solenoid plumbing
6:46 - Boost control parameters
9:49 - Overboost settings
12:26 - Other parameters for closed loop
19:13 - Closed loop control metaphor
21:20 - Boost control without control
23:40 - Dyno run with mechanical control only
28:39 - Dyno run with electronic control
31:18 - Proportional & integral gains
38:14 - Summary
40:36 - Q&A


