110 | Fuel Film Quick Set up - MoTeC M1
Summary
When it comes to tuning transient fuel enrichment, MoTeC's M1 range of ECUs depart from the common technique of basing these fuelling changes on TPS movement. Instead, the M1 ECUs model the fuel film in the port and the required input from the tuner is quite different. In this webinar we will find out what the fuel film is, and how to use the simple method of fuel film tuning.
| 00:00 | - Thanks for joining us for this webinar, I'm Andre from the High Performance Academy and today we're going to be looking at the fuel film model in the MoTeC M1 range of ECUs. |
| 00:11 | Now fuel film in itself is possibly a confusing term for those who aren't aware of it or haven't heard of it before and really it's just talking about transient enrichment or acceleration enrichment and for those of you who have come from other brands of ECU, what you're probably much more familiar with is a transient or acceleration enrichment model or parameter that bases all of the additional fuelling on movement of the throttle position sensor. |
| 00:44 | In other words what we're looking at is the rate of change of throttle position and when there's a rapid throttle movement, this is what schedules the additional fuelling required. |
| 00:56 | So MoTeC are doing this in quite a dramatically different way and before we actallly get into the nitty gritty of going about the tuning of the fuel film model, we need to really understand the principles behind what's going on, we really need to understand what's going on inside the engine as to why we need acceleration enrichment in the very first place. |
| 01:19 | If we understand this, we'll have a better concept of what's going on inside the engine. |
| 01:23 | It's all going to make a lot more sense when it actually comes time to tune the fuel film model and we're going to hopefully also end up with better results. |
| 01:34 | So what I'm going to do for a start is we're just going to jump across to our laptop screen here and this is actually a slide or a still that I've taken straight out of our current EFI Tuning Fundamentals course so if you do want to learn in more detail than what I'm going to go into here about what's going on with acceleration or transient enrichment, then the EFI Tuning Fundamentals course has a complete module on this. |
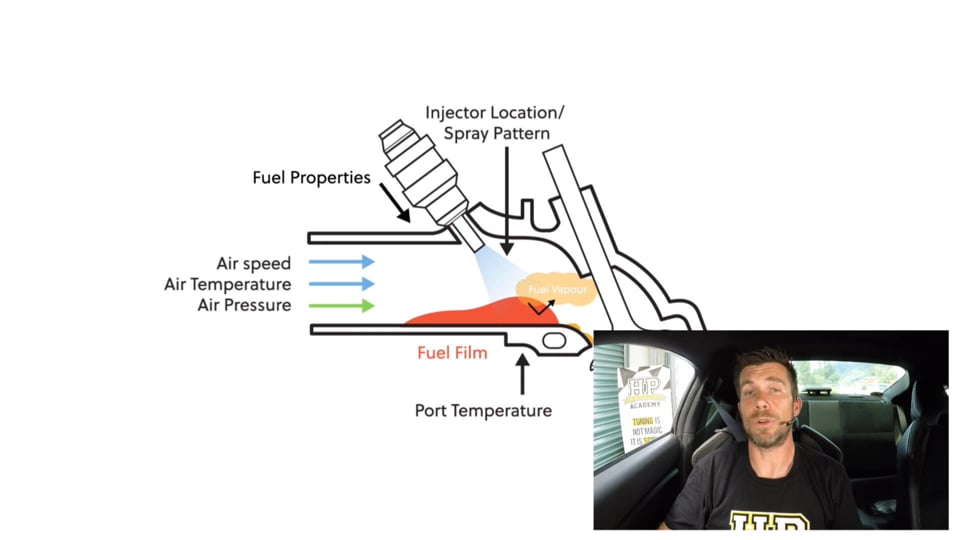
| 02:03 | This is a look at what's going on inside the port. |
| 02:08 | Now predominantly at the moment we are going to be discussing and focusing on port injection. |
| 02:14 | We'll touch very briefly on direct injection but right now the majority of tuners out there are still going to be focusing on port injection engines so here we obviously have an image of our intake port. |
| 02:28 | We have our fuel injector located in the port and then we have our intake valve here. |
| 02:35 | Now most people would consider that when the injector pulses and delivers fuel into the intake port that all of that fuel is transported straight into the cylinder where it's combusted. |
| 02:46 | Now in real terms that's actually not the case and what we end up with is a portion of the fuel which we can see here actually is deposited on the port wall. |
| 02:58 | And the amount of fuel that is deposited on the port wall is going to depend on a huge number of parameters, almost an infinite list of parameters, it can include the injector location and spray pattern, it can include the fuel pressure. |
| 03:14 | It also includes the temperature of the intake port wall. |
| 03:19 | Obviously as the temperature of the port wall increases, becomes more likely that the fuel is likely that the fuel is going to evaporate back off the wall. |
| 03:29 | And then we also have some parameters here which include our air speed, our air temperature and our air pressure. |
| 03:36 | So the premise here is that when the injector delivers fuel, some amount of that fuel being delivered goes into making up this fuel film that sits on the intake port wall. |
| 03:50 | Now under steady state conditions though what we find is that the fuel that makes up this film on the port wall evaporates at exactly the same rate that it is being topped up by the injector. |
| 04:04 | Obviously if this wasn't the case, we'd end up with a film that constantly increased in volume which isn't very likely. |
| 04:11 | So under stead state conditions, what's happening is a portion of the fuel is going straight into the cylinder. |
| 04:18 | Another portion of the fuel is going to topping up the fuel film on the port wall and then under steady state conditions, we're finding that the fuel is vaporising back off the port wall and entering the cylinder at the same rate it's being topped up and for this reason under steady state conditions, we find that the volume of the fuel film remains constant. |
| 04:38 | So our interest here when we're talking about transient conditions though is what happens to the volume of this fuel film when we make rapid changes to our throttle position. |
| 04:51 | And this is really why we need transient or acceleration enrichment in the first place. |
| 04:56 | Now while we talk about throttle position and rate of change of throttle position, it's not really the throttle position per se that has any effect on our fuel film. |
| 05:07 | What we need to understand is that when we manipulate the throttle position, we're affecting two of the key parameters that are listed here on our drawing. |
| 05:15 | We're affecting our air speed and we're also more importantly affecting our air pressure and it's the air pressure, all factors aside here, it's the change in air pressure when we open or close the throttle body that affects the size of our fuel film. |
| 05:35 | So for an example here, let's say we're driving along at 2000 RPM steady state, barely touching the throttle and perhaps our manifold pressure is sitting at perhaps 30 or 40 kPa. |
| 05:47 | We have our fuel film established, it's reached equilibrium and it's vaporising at the same rate that our injector is topping it up. |
| 05:55 | Now what we do is we go through a rapid change in our throttle position. |
| 05:59 | We open our throttle very sharply and our manifold pressure increases from 30 kPa to 80 kPa. |
| 06:06 | Now what happens in that instant is that the fuel film at 80 kPa will be larger than what we had at 30 kPa. |
| 06:17 | So for a few brief moments, what we find is that the fuel being supplied to the injector will actually be predominantly topping up our fuel film to create a larger fuel film mass which we'll see at 80 kPa and that means that less of the fuel is making its way into the cylinder. |
| 06:38 | Of course if we sit at a fixed throttle, 2000 RPM and 80 kPa, we'll find that the fuel film will grow in volume and then it'll reach equilibrium. |
| 06:46 | Once it's reached equilibrium, we get back to the same situation, the fuel is vapourising off the film at the same, the fuel is vapourising off the fuel film at the same rate that the injector's topping it up so then we find that our lambda, our exhaust lambda has come back to whatever our target was. |
| 07:05 | Now we'll touch on this again briefly shortly but obviously all of this assumes that our engine is tuned for the correct lambda in steady state conditions. |
| 07:16 | We need to have that ticked off our list before we worry about trying to tune our fuel film model. |
| 07:23 | So what's happened is we've gone from 30 kPa to 80 kPa, as we've increased our throttle to achieve that increase in manifold pressure, our fuel film volume has increased and over the time that that fuel film volume has increased, we find that our exhaust lambda has gone lean because some of the fuel is now topping up the fuel film instead of making it into the cylinder. |
| 07:45 | Likewise when we go the other way, so we close our throttle from 80 kPa and we come back down to perhaps 30 kPa, we see exactly the opposite situation. |
| 07:55 | Remember at 30 kPa the volume of the fuel film is less so as everything reaches equilibrium again we're finding that fuel is vapourising back out of the fuel film and making its way into the cylinder so this is why we see a rich condition when we close the throttle. |
| 08:13 | So this is the premise of the fuel film model which is really a more accurate way of definining what's going on inside the engine when we make rapid changes to our throttle position. |
| 08:27 | So while a lot of ECU manufacturers choose to base transient enrichment conditions off the rate of change of throttle position, it's really the manifold pressure that is the key aspect that we need to consider so really the manifold pressure is changing quickly because we have adjusted our throttle position quickly but it is the manifold pressure that's the key aspect there, the key input to the fuel film model and nothing to do with throttle position and in fact in the MoTeC M1 ECU, you'll notice that the throttle position is completely disregarded, it's not an aspect or a parameter in the fuel film model at all. |
| 09:09 | OK so now we know exactly what's going on here, we'll just go back to my notes, we'll come back off that and we want to now talk about the differences with port injection versus direct injection, I just want to briefly touch on that because this is something that will become more and more prevalent as more and more direct injection engines are being modified. |
| 09:39 | And obviously when we're supplying fuel direct into the cylinder, we can eliminate the port wetting out of the equation. |
| 09:49 | So in that respect, it might be sensible to assume that acceleration or transient enrichment just doesn't matter on a direct injection engine. |
| 09:57 | We're not ever going to get any of our injected fuel making its way onto the intake port or the back of the intake valve. |
| 10:04 | However, with direct injection engines we do still have the ability for some volume of fuel being delivered by the injector to wet out the cylinder wall or also it's possible for it to make its way into the boundary layer between the cylinder head and the piston so we've got essentially exactly the same situation occurring with a direct injection engine as we have in a port injection engine and we still need to consider our fuel film model under those conditions. |
| 10:36 | The numbers that we'll need for our additional fuel delivery will be different from a port injection engine but nevertheless we are still in the same situation where transient enrichment considerations do need to be made. |
| 10:53 | OK so now we've got an understanding of what's going on inside the engine and as I've said, it's important I believe to have an understanding of what's going on so we can better understand the system that we're trying to tune. |
| 11:07 | What we'll do now is we'll jump into our MoTeC M150 ECU here and I'll just go through a brief tour of what we're going to be looking at. |
| 11:16 | So for this particular demonstration we are looking at our Toyota 86 which is unique in so much as we have both direct injectors and port injectors. |
| 11:29 | Now because the majority of people right now will be tuning engines that are solely port injected, what we're going to do for this demonstration is consider that this engine is only running on its port injectors so that's what I've done, I've eliminated the direct injection, all of the fuel being delivered to the engine is solely coming from our port injectors. |
| 11:53 | Now just to add a little bit of complexity to my example here on our worksheets we can see we have two worksheets listed up the top here. |
| 12:05 | We have one listed fuel film primary and we have one listed as fuel film secondary. |
| 12:11 | Now in Toyota 86 speak, the port injectors are considered to be the secondary injectors. |
| 12:19 | So for today's example, everything I'm going to be doing will be focusing solely on the fuel film secondary worksheet, we will be ignoring the fuel film primary. |
| 12:28 | For you guys out there though tuning engines that are running a single set of injectors, this will all translate over to your fuel film primary. |
| 12:38 | Now when it comes to the fuel film model, as we've sort of looked at already, there's a lot of aspects that can affect the size of that fuel film and to achieve proper transient enrichment, something that works really really well, it's important to properly model the amount of fuel, the volume of fuel making up that fuel film. |
| 13:02 | Now remember that that fuel film is varying based on aspects such as manifold pressure, also air speed, so engine RPM plays a part in here, air temperature and also the engine coolant temperature or port temperature. |
| 13:17 | All of these aspects are constantly affecting the volume of the fuel film. |
| 13:22 | So for this instance it sounds like it might be a relatively difficult, if not impossible task to properly model that. |
| 13:32 | MoTeC have done a really good job in the M150 packages. |
| 13:36 | However from the tuner's perspective, this does give us a lot of data that we need to correctly enter and for this reason there are two main techniques of tuning the fuel film model, one's known as the simple technique and that's what we're going to be looking at today. |
| 13:57 | There is also a mode involved or in depth method where we're correctly calculating the actual fuel film volumes at each point in the manifold absolute pressure table however the way we're going to look at today, we're just going to look at the simple method. |
| 14:14 | We'll cover the in depth method in a later webinar however in my own experience, the simple method is probably the way that upwards of 95% of tuners are going to be optimising the transient acceleration enrichment in an M1 based ECU so this method that we're going to go through is going to cover 95% of what people will be doing, this is the way we're really going to be tuning more often than not. |
| 14:45 | Just while I allow our engine to reach normal operating temperatures, we're just going to have a look through the aspects that we have available here in our fuel film worksheet. |
| 14:58 | So we have right at the top here our mode, we can see that it's enabled. |
| 15:03 | What I'm actually going to do initially is disable it. |
| 15:07 | What we're going to do is just get our engine running shortly and we're going to see the effect of no transient enrichment being available. |
| 15:16 | So by disabling the fuel film model, that's what we're going to achieve here. |
| 15:21 | We have our secondary, and remember as I've already touched on, everything we're going to be doing here is based solely on our secondary injectors. |
| 15:28 | This would be primary if you are tuning an engine with only one set of injectors. |
| 15:35 | And really what we're going to be doing here is focusing solely, focusing our efforts solely on our secondary scale value. |
| 15:42 | And you can see at the moment, this is at the default value of 100%. |
| 15:46 | So this actually makes what is an incredibly complex model very very simple for us to tune and get really good results from as we'll see shortly. |
| 15:56 | And this is really the only parameter we're going to need to adjust. |
| 16:01 | I will however go through just a brief overview of the remaining parameters. |
| 16:07 | So we have our fuel film secondary main table. |
| 16:13 | So this is a table that helps define the volume of fuel as we move, in the fuel film as we move from one inlet manifold pressure point to another. |
| 16:24 | So we can see we've got axes here on our fuel film inlet manifold pressure table that range from 0-100 kPa. |
| 16:32 | Now if you are going to be using the simple method, it's really important that we start with default values for all of these parameters. |
| 16:41 | If you're tuning something that's already been tuned somewhere else, you may find that the tuner has messed around with some of these parameters and what that can do is make your life really difficult so for all of these parameters if you press the F1 key, what you're going to find is that the suitable default values will pop up and if they're different from the values in your table you can repopulate the table with those values. |
| 17:08 | OK so that's our main, our fuel film secondary main table and essentially what we're going to be doing when we are manipulating our scale value is we're going to be effectively lifting or reducing this entire table. |
| 17:25 | And what MoTeC have found is that while the fuel film main values will obviously differ from one engine to another dependent on all of those aspects that we've already touched on, what we tend to find is that the actual shape of the table will retain a reasonably similar shape from one engine to the next so in other words we can manipulate this entire table up and down using our scaling value and this is going to get us relatively good results in most instances. |
| 18:01 | Next we have our offset value and again all I'm doing here is taking our typical default value of 30 microlitres. |
| 18:09 | We have some trim parameters here and even with our simple method this is something we may still want to adjust and play with once we've got our basic fuel film model set up and working well so we can trim our fuel film model, how aggressively the fuel film model is working based on engine RPM and this is sort of accounting in one way for changes in intake air speed as we adjust our engine speed. |
| 18:38 | We also have an adjustment for temperature. |
| 18:42 | Again this is affecting the port temperature and as we looked at, that's going to affect how quickly the fuel will vaporise back off the fuel film. |
| 18:52 | Now again I've just skipped ahead but again F1 will give us the default values for any of these tables. |
| 18:59 | That's not necessarily to say that the default values are going to be perfect for your application, but it's always a good place to start with a known good set of numbers and then we can manipulate those, if you're starting with some unknown numbers it's quite possible you're going to have something in there that's really going to upset your tuning. |
| 19:19 | In particular with the temperature trim here, you can see that we're applying essentially a zero trim to this table when we're at normal operating temperature and we can see that from cold start temperatures we're adding additional enrichment and of course as well, as we get to higher temperatures, we're reducing the control of the fuel film model. |
| 19:43 | Now moving down we'll just skip past our contribution and we have some time based parameters here and again this is getting a little bit more advanced, we're going to look at the correct way of tuning these in the later webinar where we'll look at the in depth method but essentially what we're doing here is splitting the volume of fuel being added in, so what we're looking at is if we go from low manifold pressure to a higher manifold pressure, remember the volume of our fuel film will increase. |
| 20:13 | So if the ECU knows how much additional fuel it needs to add to build up that fuel film. |
| 20:18 | what it can also do, rather than just dumping all of that fuel in in one hit, it can actually portion that fuel out over time. |
| 20:27 | And that's done with these two parameters here, we have our fast part and we have our slow part. |
| 20:34 | So our fast part here, we can define how much of the fuel is added, straight away or in this case over our increased time constants. |
| 20:44 | So over a 10th of a second, 30% of our additional fuel volume is going to be added. |
| 20:49 | The remainder is going to be added in slightly more slowly and again we can adjust the time constants. |
| 20:57 | So as usual, I'm starting here with our base parameters, our base default values. |
| 21:02 | OK that's enough talking, let's actually get our engine running and remember at this point that our fuel film model is disabled and what we're going to look at here is on our time graph, just going to look at the exhaust lambda parameter. |
| 21:19 | So we're going to see what actually happens with our exhaust lambda when we make a change in throttle position so we'll just get ourselves running into 4th gear here and we're just going to go to just a touch over 2000 RPM for our example and hopefully what that's going to do is work its way down, I'll just give it a little bit of load for a second and we also, while I'm just allowing everything to reach equilibrium, we can see we have our manifold pressure here and we have our throttle position. |
| 21:51 | So as I've said, one of the key aspects with tuning our acceleration enrichment or our fuel model, fuel film model here is before we try and do this, we need to make sure that our volumetric efficiency table is correctly tuned first. |
| 22:08 | It's no point having, trying to adjust your fuel film parameters when your VE table is incorrectly tuned and we're trying to make up for lean areas in our volumetric efficiency table, it's just not going to work and you're going to end up chasing your tail so that's the number one task that we need to cover off, we need to make sure that our VE table is correctly tuned to start with. |
| 22:34 | OK so I've just come back down to 50 kPa here, you can see that's 19% throttle. |
| 22:41 | We've got a little bit of an error here, about 2% but I'm not going to make any adjustments to the VE table just now. |
| 22:48 | What I want to do is just make a quick throttle application and we're going to have a look at what happens to our fuelling. |
| 22:58 | OK so we've increased the throttle, now I'm going to also decrease the throttle. |
| 23:05 | Alright we'll just let that move across for a second and then we'll pause our time graph and we'll have a look at what we've got going on there. |
| 23:14 | OK so what we're going to do first of all is focus on this part here where we've got a lean hole in our fuelling. |
| 23:21 | So despite the fact, do as I say not as I do, my fuelling right at the start there isn't quite right but we're really looking here at the fundamentals of what's actually happened when we've gone through that throttle application so we've started at about 0.92 lambda, our target 0.9 and I've made a rapid throttle application so we've gone from in this case 19% throttle to 57% throttle and that's taken us from 50 kPa up to 95 kPa. |
| 23:56 | And what we've seen as a result of that throttle application, remember when we've gone from 50 kPa to 95 kPa, the result is that our fuel film will increase in volume. |
| 24:08 | So momentarily some of our fuel being delivered by the injectors is making up that additional fuel film and that's resulted in this lean area that we've got here. |
| 24:18 | Now if we sort of draw an approximate line through there, what we can see is that that actually quickly diminishes back and we end up back here at an equilibrium. |
| 24:29 | So at this point here, our fuel film has been built up to its new volume, whatever it has at 95 kPa and we're back to our equilibrium tuning at 95 kPa. |
| 24:43 | You can see we're still in steady state there, our fuelling is bang on where we wanted it to be. |
| 24:48 | Now let's look at the other aspect here, so at this particular point in our file, we've gone back down in this case to 12% throttle, 50 kPa so essentially back to where we came from, you can see this has resulted in our fuelling going excessively rich. |
| 25:05 | In this case we've gone as rich as 0.71, 0.72 lambda so much richer than our target of 0.9. |
| 25:14 | And again what we can see is that relatively quickly that excess rich mixture diminishes back to our target. |
| 25:24 | So this is the effect that we will see of that varying volume of fuel film as we manipulate our manifold pressure up and down if we've got no compensation for the fuel film so if we've got our fuel film model disabled or turned off. |
| 25:42 | Now obviously that's not ideal, this could end up with our engine feeling hesitant under acceleration or tip in. |
| 25:51 | While the rich area on deceleration or tip out is less of a concern from the way the engine feels, obviously we'd like to be able to maintain more accurate control over our fuel delivery than that. |
| 26:07 | That's obviously not good for emissions if you're interested in that and generally it's not great for fuel economy either. |
| 26:14 | So we're going to now go and enable our fuel film model so let's just jump in there and we'll go back to our mode and we're going to select enabled. |
| 26:26 | Now there's a couple of aspects that I want to cover off here before you go and make adjustments to your fuel film model. |
| 26:34 | First of all, as I've already touched on, I'm just going to reiterate again we want to make sure that our VE table is correctly tuned, we're not going to be trying to account for errors in our VE table with our fuel film model. |
| 26:48 | So that's our first point. |
| 26:49 | The second point is that we want to also disable our closed loop fuel control at the point we're going to be testing. |
| 26:59 | We don't want to be fighting the closed loop lambda control and have that affecting any actual error so we want a real indication of what's happening with the fuel delivery in the engine, we don't want to be masking that with closed loop lambda control. |
| 27:12 | So once we've turned that off, the other thing that is worth doing, if we just jump into our fuel mixture aim table, you can see I'm doing my testing here between 2000 and 3000 RPM. |
| 27:24 | What we want to do is choose a fixed lambda target as well and again this gives us a really stable target, we're not going to be chasing a moving target in terms of our mixture aim, we're not going to be chasing a moving target in terms of errors in our VE table and we're not going to be chasing a moving target based on our closed loop fuel control system. |
| 27:48 | So once we've done that, once we've got our bases set up, we've gone through and we've made sure that all of our parameters here match our default values. |
| 27:59 | That's, as I've said, a good place to start. |
| 28:01 | So now what we're going to be doing is looking at adjusting our secondary scale value. |
| 28:07 | So let's just get our engine running again, I'll just start our time graph, we're just going to go back into 4th gear and I'm going to again do all of my testing at about 2200, 2300 RPM and what I might do is just have a look at how close we are. |
| 28:24 | OK so our lambda's still a little bit leaner than my target so what I'll just do is jump across to our VE table for a second and we'll just get that particular area a little bit closer, just before we actually try making any adjustments. |
| 28:47 | Now all I'm doing here is making a really broad adjustment, I'm not trying to be super accurate here, this is not really a webinar about tuning the fuel delivery, all we're looking at here is just getting our VE table broadly dialled in at this particular point so that our testing is going to work. |
| 29:06 | OK so we've got that done now and what I'm doing to do is close my throttle back down to that same point we were at, around about 50 kPa, just coming back to that now, and I'm going to do exactly the same test, I'm going to increase the throttle opening and we're going to try and get up around 95 kPa and see what the effect on our lambda is with our scale set at 100 so let's do that now. |
| 29:33 | OK and I'll just do it one more time and then we'll have a look at our results. |
| 29:40 | OK I'll pause the graph and we'll have a look at that in a little bit more detail. |
| 29:46 | We'll just full screen that so we can really see what's going on. |
| 29:49 | Now obviously while our lambda is moving around a little bit, what we're interested in is looking at what happened in these locations here where I've accelerated, I've added throttle and also when I've backed out of the throttle. |
| 30:04 | Now what you can see, if you remember from our first example when we increased the throttle opening and we increased our manifold pressure, we saw that large lean spike and we ended up somewhere up around here and then that tapered away. |
| 30:20 | This time what we can see is we've got a very small lean spike here but what we actually end up with is our lambda dropping rich momentarily, almost initially after that hit of trottle. |
| 30:34 | So we drop down to 0.86 lambda, so we've actually gone too rich in this instance. |
| 30:41 | Now the other thing we want to look at here is our results when we tip back out of the throttle so when we reduce our throttle, remember in our first example, we ended up with our lambda dropping all the way down to 0.71 which is obviously excessively rich when we're targeting 0.90. |
| 31:02 | This time you can see that our lambda has still dropped rich but nowhere near what we had the first time. |
| 31:09 | Now I've done that particular test again just over here and we can see that it replicates the same results, we've ended up initially moving rich and we can see that we've still gone slightly rich on our tip out but nowhere near as rich as our first time. |
| 31:26 | So even with just simply the default parameters in our fuel film model here we've already got pretty good results. |
| 31:34 | And in real world terms, I would imagine that this is probably where a lot of tuners delving into the M1 for the very first time will probably leave it. |
| 31:43 | It's one of those situations where if you've got results that are workable, a lot of tuners will just leave it at that without delving in further to see if the situation can be improved. |
| 31:55 | That's what we're here to do though, we're here to see what our next steps would be. |
| 31:59 | So the idea is to enable the system and then do our initial test with our scale value at 100%, the default value. |
| 32:08 | Now when we're first seeing how the scale value affects our transient enrichment, what we want to do is make reasonably large changes to that value. |
| 32:19 | There's no point at this stage making small changes of perhaps 5 or 10%, what I like to do is make a change of perhaps 50% and see what that gives us and we want to go both ways. |
| 32:29 | We can try reducing our scale from 100 down to 50%. |
| 32:33 | Once we've done that, we're also going to try it at 150 and see what gives us the best results. |
| 32:40 | So let's just get our engine running again, we've changed our scale value down, we've halved it, we've gone to 50%. |
| 32:45 | So let's get our engine running back and we'll bring up our time graph. |
| 32:50 | And see what that gives us. |
| 32:54 | Right so we're just going to come back down to 50 kPa and we'll just, just because I am fussy I'm just going to go back in and make a couple of small changes here to my VE table. |
| 33:12 | Right so we're on our target now, we'll just full screen that. |
| 33:16 | So I'm just going to do exactly the same thing. |
| 33:18 | We're sitting now at 60 kPa, I'm just going to open the throttle sharply and we'll see what our results are. |
| 33:27 | And we'll just tip out of the throttle again and see what happens. |
| 33:33 | OK so that's the sort of results we've got there, we've actually gone probably backwards there with our value at 50%. |
| 33:42 | Let's just reduce that down and what I'm going to do is we'll try 150% and see what effect that has. |
| 33:51 | Just get ourselves back running stable again and we're going to, it's always valuable if we try and make these tests from approximately the same manifold absolute pressure. |
| 34:03 | So in this case I'm trying to go from somewhere around about 55 kPa through to around about 95 kPa. |
| 34:09 | So let's go and give it another stab of the throttle and see what we end up now with 150%. |
| 34:18 | OK and I'll just come back out of the throttle again. |
| 34:25 | OK so with our values set at 150%, you can see that we've got the effect here that we've got too much enrichment on our initial tip in. |
| 34:36 | You can see that we've gone to 0.81 lambda. |
| 34:40 | So we actually ended up in this instance with pretty good results around about 100%. |
| 34:47 | Once we've gone through and done our initial tests and got an idea of what direction we want to go, we can then start making finer adjustments to our scaling value until we've got a lambda trace that stays as close to our target as we can achieve. |
| 35:07 | Now there's a couple of things I want to talk about here in terms of what's realistic to achieve. |
| 35:13 | Now a lot of tuners who are new to this would expect that we should be able to achieve an absolute perfect flat line with our lambda trace. |
| 35:24 | Let's just pull that up again. |
| 35:27 | So we can see that here, this is where our acceleration enrichment event has occurred. |
| 35:31 | So a lot of tuners are going to beat themselves up trying to achieve a lambda plot that stays completely flat and right on our mixture aim through that transient enrichment event. |
| 35:44 | And in my own experience that's probably completely unrealistic. |
| 35:49 | I don't think I've ever tuned any engine on any ECU platform where I've ended up with absolutely no variation in my lambda as I've gone in and out of the throttle. |
| 36:00 | It's just not realistic so it's more important to understand what we should be looking for and what's realistic. |
| 36:09 | And at this point I'm going to just mention as well that while the exhaust lambda plot is important to help guide us with our transient enrichment tuning, there is actually a little bit more to it and it's much more important that the car feels crisp and responsive to the throttle rather than having a beautifully flat lambda plot that doesn't vary from our target as we move the throttle up and down. |
| 36:35 | So really that's the key point. |
| 36:37 | When we're driving around in the car or we've given it back to a customer, chances are they're not going to be looking at your datalogging or a lambda gauge when they're going through the gears and accelerating in and our of the throttle. |
| 36:48 | What they care about and all they care about is what the car feels like when they make rapid changes to the throttle position. |
| 36:56 | Does it respond crisply? Does it respond fast, is there any hesitation or any bogging? So this is really what we want to be doing and this is where it gets a little bit difficult, this is what we want to be looking for I should say. |
| 37:09 | And this is where it gets a little bit difficult because it's very hard to get that feel sometimes on a dyno, either a chassis dyno or an engine dyno. |
| 37:19 | Typically we don't have a lot of inertia on a dyno and we don't get that feel that we would get out on the road so one of my techniques if you like is I'll get my transient enrichment tuning dialled in close on the dyno and I'll get it to a point where the lambda is relatively under control and smooth and then I'll take it out on the road or the racetrack and I'll actually drive the car and see how it feels. |
| 37:50 | How it actually responds to those throttle inputs and I'm using those two aspects, I'm using both the lambda plot as well as the feel of the car to make my decisions on what the engine wants and really that's the key, we want to give the engine what it needs in order to respond cleanly. |
| 38:09 | Let's just jump back to our lambda plot though for a moment. |
| 38:14 | What I want to talk about is this little lean spike that we can see here. |
| 38:19 | I'll just zoom in a little bit and we can see that with our scale factor set at 150%, we've ended up excessively rich, we've gone down to 0.81 lambda. |
| 38:32 | This may be enough to make the engine feel a little doughy on throttle tip in. |
| 38:39 | Even with excessive amount of fuel, we can still see there has been a slight lean spike prior to our mixture dropping rich. |
| 38:51 | Now if you're chasing the lambda plot purely and you're not really taking any notice of anything else, this is going to be problematic because this suggests that the engine actually wants more fuel despite the fact that we can see that after that initial lean spike, it's still dropped really really rich. |
| 39:12 | So this puts you in a catch 22, it's really an impossible situation to fix. |
| 39:16 | Fixing that initial lean spike's going to require more fuel, all that's going to do is make the situation worse once we get past that initial hit. |
| 39:24 | So my point here is don't be afraid of seeing a small lean spike in your air/fuel ratio trace when you first punch the throttle. |
| 39:34 | It's relatively normal, I see this on just about any engine I tune. |
| 39:38 | But what we're looking for is the magnitude of that lean spike and again we're comparing that to how the engine feels in terms of responsiveness. |
| 39:47 | So in this case we've only gone 1% lean, we've gone from 0.90 to 0.91 so it's insignificant. |
| 39:56 | If on the other hand I saw this lean spike heading above lambda one, so perhaps we were moving 10 or more percent leaner, in that case it's probable that that may affect the operation of the engine and in that case I would tend to spend some more time trying to get my fuelling a little bit closer. |
| 40:17 | But it's going, for good results, what you're realistically likely to see, you're going to end up almost certainly with some small lean spike showing on your lambda plot when you're looking at some data like this. |
| 40:33 | Alright so I'm going to move into questions and answers very shortly. |
| 40:37 | If you do have anything you'd like me to explain in more detail or anything you'd like me to cover off that I haven't looked at, please ask those now in the chat box and Colin will transfer those through to me. |
| 40:48 | Just going to reiterate the process here, reiterate what we've talked about. |
| 40:53 | So remember that what we're really trying to account for is the volume of the fuel film and how that volume of fuel film changes as the manifold pressure changes. |
| 41:04 | And remember it's the manifold pressure that is the key parameter we're monitoring here, it's really nothing to do with throttle position. |
| 41:14 | The throttle position just happens to influence the manifold pressure but everything really is related to our manifold pressure. |
| 41:23 | So the key process here, the steps we'll go through in the tuning process. |
| 41:29 | First of all to ensure that our VE table is correctly tuned, we need that tuned within 1 or 2% accuracy so that we can get a good idea of what's going on. |
| 41:41 | Then we're going to make sure that all of our fuel film model parameters are set to our default values for a starting point and our scale is set to 100%. |
| 41:51 | From there, we want to make sure that our closed loop lambda control is disabled and it's always a good idea to set our mixture aim to one fixed value. |
| 42:03 | And from there what we're going to do is simply run the engine in steady state on the dyno and perform a variety of step tests with our throttle and what we want to do is simply adjust our scale parameter until we get the best compromise between the engine moving too rich or too lean with throttle tip in and then throttle tip out. |
| 42:25 | And again I recommend starting by making quite broad changes to the scaling. |
| 42:32 | Make changes of 50% so you can actually see the effect of that change, you can see which direction you need to move in order to get the best results. |
| 42:42 | Once you've seen the direction you need to go, then you can start making smaller changes and dialling that in and getting it perfected but initially when you're first starting, just make large changes so you can see the direction that you need to go. |
| 42:58 | One more thing I just want to discuss here as well that will affect your ability to get really good results with the fuel film model. |
| 43:10 | And this is something that I actually ran into with our Toyota 86 when I was tuning this. |
| 43:16 | So because in the MoTeC fuel film model, all of the fuel film parameters are based on manifold pressure, remember throttle position is completely ignored. |
| 43:27 | So the accuracy and the speed of response of your manifold pressure sensor is critical. |
| 43:34 | So it's quite common that when you make sharp changes to your throttle position, that you will end up with some slight lag or latency in the manifold pressure signal that the ECU sees actually tracking and following that. |
| 43:50 | Now MoTeC provide the ability to actually correct this with a manifold pressure estimate table, so what you can do there is fill that table out with the manifold pressure relative to throttle position under steady state conditions and then what happens is under transient conditions where you've made a really sharp throttle application, what you can do is use the manifold pressure estimate table momentarily and do a correction to our manifold pressure based off that manifold pressure estimate table. |
| 44:30 | So what it does is it's a lookup table that corrects the manifold pressure momentarily for sharp changes in throttle position. |
| 44:40 | And that's just going to help improve the speed of the manifold pressure signal and that's going to allow the fuel film model to do its job better. |
| 44:52 | Alright we'll jump into some questions now and we'll see what we've got. |
| 44:57 | TDE Champ's asked was 100% the magic number or could you get more picky between 100 and 150? Now in this particular instance, remember that I have just done a really broad setup on this particular engine so I could demonstrate it. |
| 45:15 | And obviously under normal conditions, I'm actually tuning using both secondary and primary injectors. |
| 45:22 | So in real world terms what I actually end up with is a scaling value of around about 45 from memory. |
| 45:32 | Now in the quick example I've done there, yes definitely there would be a better solution, somewhere between 100 and 150 that would have got me a tidier result. |
| 45:43 | Again just a really quick demonstration to show the sort of changes we want to make and the results that we'll see in our time graph from those changes. |
| 45:54 | BlackWRX has also mentioned charge cooling should be done before doing the fuel film setup as well. |
| 46:00 | Yeah absolutely, thank you for bringing that up. |
| 46:02 | So the charge cooling gain is one of the very first parameters that we need to adjust and if we haven't got this correct that's going to affect the accuracy of our tuning. |
| 46:16 | If you want to learn more about that parameter check out the webinar that we have in the archive on charge cooling gain, we go through the correct process of setting that up. |
| 46:27 | It is one of the very first aspects we need to tune because if we try tuning our charge cooling gain, once our VE table is tuned then we're going to find that if we make changes to our fuel mixture aim table, that the ECU will not correctly track those changes. |
| 46:46 | Nenad has asked, in which conditions do we need to look and tune the fuel film? OK so I think probably one of the aspects that's really important to understand is every time you see fuel film or every time I've said fuel film here, what you want to think is acceleration or transient enrichment. |
| 47:05 | So basically you're going to need transient enrichment on just about any engine you're tuning if you want crisp acceleration when you make large changes to the throttle position. |
| 47:19 | So it's something that we're going to be tuning in just about every application. |
| 47:23 | As I've said, MoTeC have just applied a more technically correct way of modelling what's going on in the M1 ECU. |
| 47:31 | Now the other thing I actually have overlooked that I'll just bring up based on your question there is that the effect of the fuel film and the effect on our air/fuel ratio during transience is going to be more noticeable, more prominent from low RPM and low throttle positions so what this means is that it's going to be most noticeable really from idle if we give the throttle a very sharp blip or from low RPM if we're operating with a very close to closed throttle, perhaps we're just sitting there cruising at low RPM and then we mash the throttle all the way to the floor, that's going to give a really dramatic change in the manifold pressure and it's also going to result in a dramatic change in the volume of our fuel film so this is when we're really going to notice it. |
| 48:24 | If on the other hand we were looking at an example where we're already driving under moderate load and high RPM, perhaps 5000 RPM and we're at 70 or 80% throttle and we go all the way to 100% throttle, this is going to result in a much less dramatic change in our manifold absolute pressure, likewise going to result in a much less dramatic change in the size of our fuel film. |
| 48:48 | So I guess if you take that into consideration, what we're going to see is that the need for a properly tuned fuel film model is probably more noticeable, prominent in a road application than perhaps a race application which is going to be constantly used at higher RPM. |
| 49:08 | So that's not to say that I wouldn't do it on a racecar but definitely it's going to require a little bit more time to get accurately set up in a road going application. |
| 49:22 | Pure Vision has asked, would this model be the same for naturally aspirated and forced induction setups? Yeah absolutely I mean the fact that you've got forced induction is just further changing the potential range of our manifold pressure variation, we get exactly the same scenario occurring in a forced induction application and in fact our Toyota 86 that we're demonstrating this here on is forced induction so yeah absolutely you still need a fuel film model, all of the same things are still happening inside the engine with a forced induction or a naturally aspirated engine. |
| 49:59 | Alright guys that's brought us to the end of our questions so hopefully that's given you some more insight into what I know can be a little bit of a scary topic for those just fresh into the M1 ECU. |
| 50:11 | Hopefully I've shown there that if you're only interested in looking at the basic, simple method of setting up the fuel film model, you can actually get relatively excellent results with a minimal amount of effort spent. |
| 50:26 | As usual, if you do have further questions, please ask those in the forum and I'll be happy to answer those there. |
| 50:32 | Thanks for joining us and I'll see you all next week. |


