| 00:00 |
- It's Andre from the High Performance Academy and welcome along to the next in our series of free tuning lessons.
|
| 00:06 |
Now in this lesson we're going to have a look at some of the advanced functionality that's available in the current crop of standalone engine management systems as well as some of the OE systems that we can reflash as well.
|
| 00:17 |
We'll get stuck straight in and we're going to have a look at closed loop knock control on the Motec M1 ECU fitted to our turbo Toyota 86.
|
| 00:27 |
So let's see how that all works.
|
| 00:29 |
We're going to get our engine running in fourth gear on our chassis dyno at around about 2000 RPM.
|
| 00:36 |
And we can see that we're currently sitting in this particular site of our ignition map.
|
| 00:42 |
So we're still sitting in vacuum.
|
| 00:44 |
And if I open the throttle further you can see that our cursor moves up the table and we can move into boost pressure.
|
| 00:52 |
What I'm going to do is I'm just going to highlight these two cells here in our ignition table.
|
| 00:57 |
Currently that's tuned correctly and safely.
|
| 01:00 |
What I'm going to do is just set both sites to 30 degrees.
|
| 01:04 |
Which I know in this case is going to result in some light detonation.
|
| 01:09 |
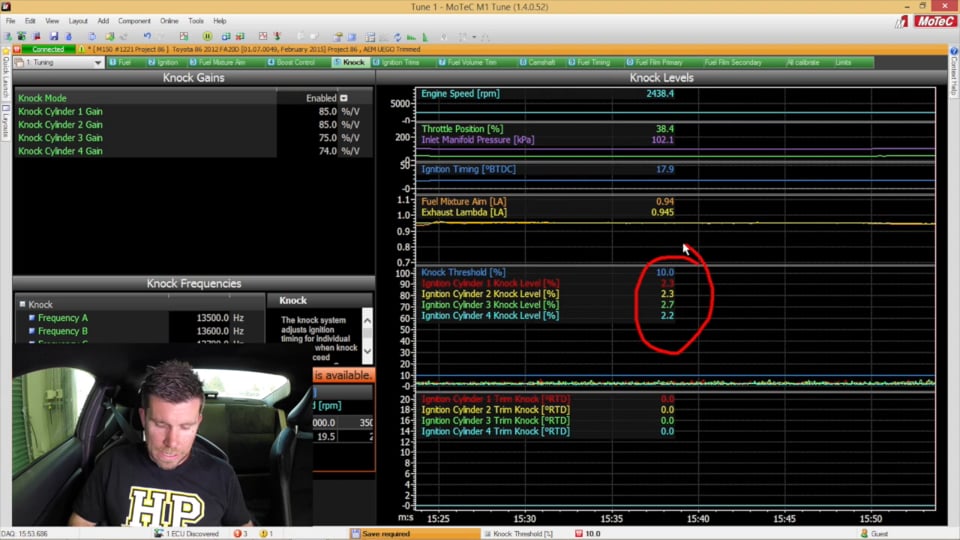
Now what we can do is we can move through to the knock worksheet which is going to show us the result of the knock sensor input.
|
| 01:18 |
Now that's being shown here and you can see both graphically and numerically, the input from the knock sensor.
|
| 01:25 |
We can see that we've got a blue line shown here, which is our current knock threshold.
|
| 01:30 |
So what this means is if the noise from the knock sensor exceeds our threshold the ECU will assume that the engine is knocking and then it can take some safety precautions and remove ignition timing from the cylinders that knock's occurring on to help prevent damage.
|
| 01:47 |
So let's see that happen now.
|
| 01:49 |
What I'm going to do is I"m going to open the throttle further until we move up into those two ignition zones which I've just set to 30 degrees and we'll see that that results in some knock.
|
| 02:02 |
OK so let's just pause the time graph and we'll talk about what we've got going on here.
|
| 02:07 |
So we can enlarge the time graph and the area we're interested in looking at is this area here.
|
| 02:13 |
And you can see that as I open the throttle, our ignition timing increases and we go all the way up to about 24 degrees of ignition advance.
|
| 02:22 |
And you can see as soon as I advance the timing there, we end up with the noise threshold from all four cylinders exceeding our blue line for our knock threshold.
|
| 02:33 |
So in this area here we're registering knock or detonation from all four cylinders.
|
| 02:39 |
Now below that you can see that the ECU is then applying some ignition retard to each of those cylinders to help control and eliminate that knock or detonation.
|
| 02:50 |
So this is a safety function that's available in a lot of aftermarket ECUs as well as a lot of the more modern OE ECUs that just provides a safety threshold in case for example you get bad batch of gas or you may push the engine outside of the parameters it was seeing when it was tuned.
|
| 03:09 |
Now I do want to add that relying on knock control is not a smart strategy for tuning our ignition table.
|
| 03:16 |
This is really a safety system that's there in case something does go wrong.
|
| 03:21 |
So we don't want to be constantly relying on the ECU to be retarding ignition timing in response to knock or detonation.
|
| 03:29 |
So now we've looked at knock control, the next strategy we're going to look at is our electronic boost control or closed loop electronic boost control.
|
| 03:37 |
Again this is reasonably common in most ECUs and it's a great way of getting really accurate, really stable boost and having a lot of control over how the boost is being delivered to the engine.
|
| 03:49 |
So let's do a run on our dyno now and we'll see what exactly we get and then we can talk about the results.
|
| 04:11 |
So that's our run complete there on the dyno and we ended up with 189.5 kilowatts at the back wheels.
|
| 04:18 |
You can see that the red line above our power graph is our boost pressure in kPa.
|
| 04:24 |
And you can see we've got a very very flat line for our boost control.
|
| 04:28 |
Let's have a look and see what that looks like inside our ECUs time graph data logger.
|
| 04:34 |
So this graph in our Motec M1 gives us a lot of information that's important for setting up the closed loop boost control.
|
| 04:40 |
And in particular we've got here our boost aim in kPa and the measured boost pressure.
|
| 04:47 |
And you can see that the result of that graph is we've got a boost pressure that very very closely matches our boost target.
|
| 04:54 |
Now the idea behind closed loop boost control is we can set an aim boost pressure or target boost pressure that we want the engine to achieve.
|
| 05:03 |
And the ECU can then make adjustments to the output to the boost control solenoid if we aren't quite at our target.
|
| 05:11 |
So if we've got too much boost the ECU can actually reduce the boost pressure and likewise if we haven't quite reached our target, the ECU can do some work in the background to increase the boost towards our target.
|
| 05:23 |
And the result of that is shown here with our boost control proportional derivative and integral gains.
|
| 05:30 |
And those all add up to what the ECU is providing to the boost control solenoid.
|
| 05:35 |
Now it's one thing to just apply a nice flat stable boost curve right through the rev range, and that's great.
|
| 05:42 |
The other thing that's important though is being able to control the way the boost pressure climbs relative to either RPM or relative to gear.
|
| 05:51 |
So in this particular table here we can set our boost targets dependent on what gear we're in.
|
| 05:57 |
Now that's really important if we've got a high powered two wheel drive car where in the lower gears, perhaps first and second gear, we may end up overpowering the car, or overpowering the track and resulting in wheel spin.
|
| 06:10 |
So we can reduce the boost pressure in those lower gears in order to match the amount of power that the engine's delivering to the amount of traction we've got.
|
| 06:19 |
The next function we're going to talk about is launch control.
|
| 06:21 |
And this is a really powerful way of getting fast and consistent launches from a standing start in any vehicle.
|
| 06:28 |
Now there are a range of ways that you can set up launch control but in our Toyota 86 what we're doing is basing an engine rev limiter off our front wheel speed.
|
| 06:38 |
So using this technique what we can do is control the amount of wheel spin that we'll allow to occur.
|
| 06:45 |
And what we find generally is from a standing start, we get the best acceleration and the best traction, with just a small controlled amount of wheel spin from the rear wheels.
|
| 06:55 |
So let's have a look in our Motec M1 ECU at how that set up looks for our Toyota 86.
|
| 07:01 |
So here we have our launch control table.
|
| 07:04 |
Now this launch control table is filled with our engine speed limits.
|
| 07:09 |
And on the horizontal axis up here we have our front wheel speed.
|
| 07:14 |
On the vertical axis we also have a range of settings that we can adjust on the fly.
|
| 07:19 |
So using a driver rotary switch we can adjust our launch control strategy based on whether or not the track is wet or dry.
|
| 07:27 |
So this means we don't have to hook up a laptop in order to adjust our launch control strategy and get the best results from a standing start.
|
| 07:35 |
Now it might make a little bit more sense if we look at this table graphically.
|
| 07:40 |
And you can see that as our ground speed increases, so does our rev limit.
|
| 07:45 |
And the aim with this particular set up is that at the top of first gear, the launch control rev limit, it's going to match our normal engine rev limiter.
|
| 07:55 |
And we can tune this table to adjust the amount of wheel spin that we're getting.
|
| 07:59 |
And based on the data logging and acceleration times we can tune the table to get the best possible results regardless of the track conditions.
|
| 08:08 |
The last function we're going to look at on our Toyota 86 is some of the protection strategies that we're employing using the Motec M1 ECU.
|
| 08:16 |
Now when you're driving your car on the road or race track there's a lot going on and it's really hard to pay attention to all of your gauges all of the time.
|
| 08:25 |
So why not let the ECU do all of that work for you? It's going to be able to do a better job and it's going to be able to do it a lot quicker than you could as a driver anyway.
|
| 08:34 |
So there's couple of things we'll have a look at here, the first is we're using the ECU to monitor our oil pressure.
|
| 08:40 |
And what we're going to do is use the ECU to bring in a safety strategy and reduce the engine's rev limit if the oil pressure drops for any particular reason.
|
| 08:50 |
Now a good example of that would be if we encounter oil surge while we're cornering hard on the racetrack.
|
| 08:56 |
So here's the setup we're using for that.
|
| 08:58 |
And we've got this table here of our minimum allowable oil pressure versus engine RPM.
|
| 09:06 |
So what this table means is that for example, at 4000 RPM if the oil pressure drops below 200 kPa, or two bar, 29 psi if you're working in the imperial system, it registers that as being too low and it will bring in a lower engine rev limiter to help protect the engine.
|
| 09:25 |
So when you're driving the car it will feel like the engine's simply being turned off.
|
| 09:30 |
And you can see on the right hand side, this is what our oil pressure protection strategy looks like graphically.
|
| 09:37 |
And the important part with this is our oil pressure actually increases with RPM.
|
| 09:41 |
So it's important to be able to set our minimum oil pressure relative to engine RPM.
|
| 09:47 |
Another safety strategy that we're using in the Motec M1 is to monitor our fuel pressure.
|
| 09:52 |
And you can see on this page here we have a minimum and maximum value set for our fuel pressure.
|
| 09:59 |
So if the fuel pressure drops, in this case below 250 kPa, what it's going to do is bring in an engine rev limit of 3000 RPM.
|
| 10:08 |
Now that's still going to allow us to drive the car, but if we're driving hard on the road or racetrack what it's going to do is alert us to the fact that something's not right and it's going to protect the engine against a potential lean air fuel ratio.
|
| 10:20 |
Which we already know may end up damaging our engine.
|
| 10:24 |
Now I've obviously only covered a few of the advanced functions here that are available.
|
| 10:30 |
Other functions might include anti lag, traction control, we've also got drive by wire throttle, and cam control amongst others.
|
| 10:40 |
The actual functionality you may have will depend a little bit on the engine you're running as well as the ECU you're using.
|
| 10:47 |
This hopefully has given you some insight into some of the functions that are available on moderns ECUs.
|
| 10:54 |
In our next lesson we're going to be looking at tuning a turbo charged rotary engine, and we're going to be talking about boost control, and turbo tuning.
|
| 11:03 |
That lesson will be in your email inbox shortly.
|
| 11:06 |
Thanks for watching, until next time, stay tuned.
|