032 | Tuning with AEM Infinity: An Introduction
Summary
In this webinar we will give you an introductory tour of the Infinity Tuner Software and look at how to approach tuning the AEM’s VE-based fuel model. For this webinar we will be using the AEM Infinity plug & play package for the Nissan 350Z.
Keep learning:
- Learn more about VE engine tuning in the EFI Tuning Fundamentals course.
Do you have questions about this webinar?
Ask them here: Questions about Tuning with AEM Infinity
| 00:00 | - Thank you for joining us for today's webinar and today's webinar we're going to be looking at the AEM Infinity ECU. |
| 00:10 | This is an ECU that on our side of the world here in New Zealand is not particularly common. |
| 00:18 | I'm not actually too sure why that is but it's definitely much more prominent and popular in the US market. |
| 00:26 | With the popularity of that ECU it was one that we wanted to get into our 350z so we could produce some course material around that, get familiar with the ECU because a lot of our North American clientele are familiar with that ECU and hence they want to see the tuning process carried out on the AEM Infinity. |
| 00:47 | So we've got the AEM Infinity plug and play kit for the 350z. |
| 00:52 | AEM have been pumping out quite a lot of new plug and play options for the Infinity platform over the last six to 12 months so for a lot of the more popular tuner vehicles the Infinity is available as a plug and play option which obviously makes the installation process much quicker and much easier. |
| 01:15 | So today we're not going to get too in depth or involved with the AEM Infinity, this is aimed as an introductory webinar just highlighting the way the AEM Infinity works and particularly the VE fuel model. |
| 01:32 | We'll have a look at some. of the options we've got available to us so that you're a little bit more familiar with the software and how it functions. |
| 01:42 | So what I'll do now is we'll just open up the AEM Infinity software. |
| 01:49 | And we're live with the car at the moment, the car's actually running on the dyno and the way AEM have laid out their software is we have available to us a whole range of different little tabs which we can use and for a particular part of our tuning. |
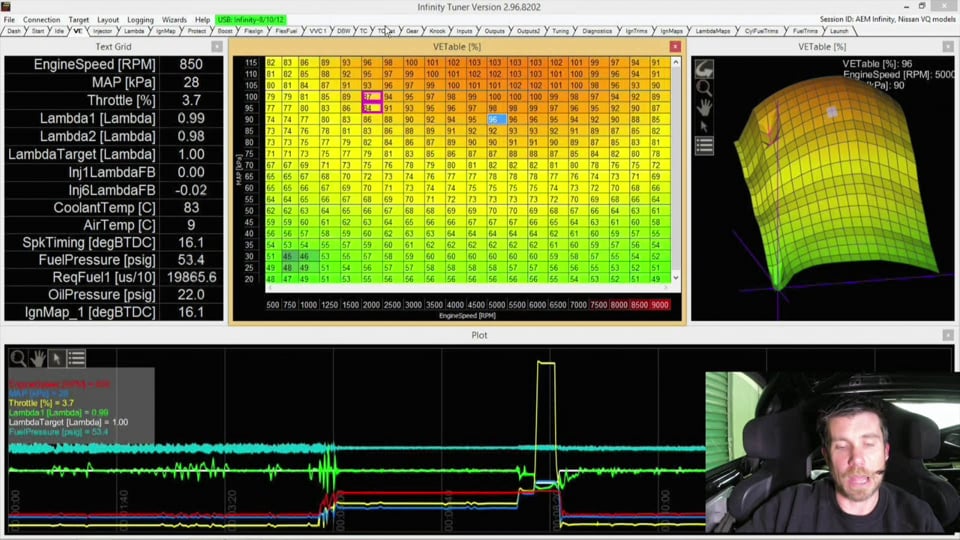
| 02:09 | So for example, this tab here is listed as VE and this is where we're going to do the bulk of our fuel tuning and we have the traditional VE table displayed both numerically here and we've got a graphical representation over to the right. hand side. |
| 02:28 | One of the functions with the AEM Infinity is it does offer live datalogging straight onto the PC while you're running which is also really helpful for speeding up and improving the tune and you can see that we've got the data logger running down the bottom. |
| 02:46 | Once we've stopped that data log we can then click on any point in the data log and that'll show us where abouts in the ECU mapping the Infinity was operating at that particular point. |
| 02:59 | Before we get into that though, let's take a step backwards and have a look at the basic setup and what I'll do is I'll just shut down the car for a moment and we'll look at the setup wizard. |
| 03:11 | Now this is one of the things that AEM do exceptionally well is they offer what they call a setup wizard to help with most of your basic setup, getting the engine up and running. |
| 03:25 | And the other thing with the Infinity which I find quite useful is you can make the Infinity as complex or as simple as you like. |
| 03:33 | And I know particularly for a lot of beginning tuners, it can be quite daunting when you're faced with a whole lot of the advanced functions and options which you may not strictly even be using at that point in time. |
| 03:45 | And that can really take your focus off the job at hand. |
| 03:49 | So as you can see here, what I've just done is I've closed down the advanced setup and we start with the basic setup which really is just the basic fundamentals of what we need to run the engine. |
| 04:02 | So let's look at that, for a start we have our engine displacement in litres. |
| 04:06 | So we've got a 3.5 litre engine and we have six cylinders. |
| 04:10 | So we can enter that, particularly for a VE or volumetric efficiency based fuel model, it's critical that the engine capacity is known by the ECU. |
| 04:21 | Just to take a step backwards for those who aren't familiar, when I talk about VE or volumetric efficiency based fuel modelling, what I'm talking about is the ECU is using the ideal gas law to calculate the mass of air entering the engine. |
| 04:38 | OK so when we talk about the volumetric efficiency of 100%, what that means is we're saying that the engine has displaced 3.5 litres, its own capacity, in air throughout a complete engine cycle. |
| 04:54 | Now with modern engines, we are seeing generally volumetric efficiency somewhere between about 90 and 105%, around the sort of the peak torque area, peak power I should say and that's what we'll see with the efficiency tables that we're filling in. |
| 05:13 | So for the whole system to work, it is critical for the ECU to know what the engine capacity is. |
| 05:22 | So particularly if you've got an engine that's had a stroker kit fitted to it or something like that, we do need to make sure that our engine displacement is correctly entered. |
| 05:32 | So we've got 3.5 litres here. |
| 05:35 | The other part of the VE fuel equation or fuel model that we will need to know, we'll look at that shortly, is we need to know the injector size. |
| 05:44 | So we'll get into that shortly. |
| 05:46 | So we have our engine cycle type, we can select four stroke or two stroke. |
| 05:51 | Obviously being that this is a plug and play ECU, designed specifically for the VQ35, all of this comes preconfigured and unless we've made any changes, we don't need to alter it. |
| 06:04 | We have our ignition type which in our case is sequential, we've got six individual coil on plug ignition coils and we can also enter the firing order. |
| 06:14 | Now we move down to the actual airflow calculation. |
| 06:17 | Now as you can see here, we've got VE selected and that is the mode that we will be looking at. |
| 06:24 | If I click on the drop down menu though, we do have the ability to use a zero to five volt mass airflow meter or a frequency based mass airflow meter if you'd prefer. |
| 06:34 | Generally when we're going to a standalone ECU, there's not often a really good reason so run a mass airflow meter. |
| 06:44 | There are some advantages with the mass airflow meter in so much as if they are accurately calibrated as they would be on a completely factory intake system, they are accurately telling the ECU the mass of air entering the engine and really that's what we're trying to do with the VE model, we're working backwards instead of measuring the mass of air entering the engine, we're calculating it. |
| 07:06 | So with a factory mass airflow meter properly calibrated, the ECU has got that data coming straight to it, telling it exactly the mass of air entering the engine. |
| 07:16 | Now if we know the mass of air entering the engine, we know our target airfuel ratio or lambda number and we know how much fuel the injectors can supply, it becomes quite easy for the ECU to calculate the injector pulse width in order to achieve our target air/fuel ratio. |
| 07:35 | So that's the basis of a mass airflow system. |
| 07:38 | if you've gone through our EFI Fundamentals course, you will also know though that the mass airflow meter does come with some pretty big downsides. |
| 07:48 | One of them is that quite often we will see the mass airflow meter offer some restriction to intake flow. |
| 07:56 | So it's actually going to reduce the airflow into the engine and hence alter or reduce the engine's volumetric efficiency, ultimately affecting power. |
| 08:06 | The other problem we have with the mass airflow meter is the calibration will have a range that it works across. |
| 08:13 | So obviously that'll work just fine for a factory engine however once we start seriously modifying the engine, perhaps increasing the boost, increasing the capacity, larger cams, anything that's going to get a lot more air flowing into that engine, and obviously making more power, that is our goal, getting more air into the engine, we can end up running off the edge of the calibration or measuring capability of that airflow meter. |
| 08:41 | So that's why in the aftermarket, unless there's a very good reason why, we will usually be using a manifold air pressure sensor for our load input and instead of measuring the airflow directly, we're going to be calculating it. |
| 08:57 | OK moving down, we can also select the axis for our spark load axis and our VE load axis. |
| 09:06 | In this case with a completely stock standard engine, we've got those set up to manifold air pressure for both axes. |
| 09:13 | So that takes care of our very basic setup for our engine. |
| 09:17 | If we move down to our tuning preferences, there's nothing really we need to do there. |
| 09:23 | We've got the ability to alter the cam and crank setup in terms of dialling in the, first of all selecting the trigger pattern that the ECU is expecting to see. |
| 09:38 | Again, being that this is a stock engine with a plug and play ECU, there's nothing for us to do here. |
| 09:43 | And we can also calibrate further down, we can calibrate the ignition timing so that the ignition timing we're seeing on the laptop is accurate with regards to what we're seeing at the engine, so the laptop and the timing light will match. |
| 09:58 | Now I mentioned that another part of the VE fuel model is making sure that the injector calibration is correct. |
| 10:04 | It is vital that the ECU, vital that the Infinity knows the size and characteristics of the fuel injectors fitted to the engine. |
| 10:15 | So that when it's targeting a specific air/fuel ratio or a specific lambda target, it knows what pulse width it needs to supply to the injectors to provide the correct mass of fuel into the engine. |
| 10:28 | So there's a couple of things that we've got set up here. |
| 10:31 | First of all, we can set up whether the primary fuel pressure regulator reference is referenced to manifold vacuum. |
| 10:39 | So will fluctuate with regard to manifold vacuum or to atmospheric pressure. |
| 10:45 | We can choose from a drop down list of injectors. |
| 10:49 | Now this is again one of the things I find really good with the Infinity, it makes it very easy to choose probably out of the majority of popular injectors on the market. |
| 11:00 | So for example if we wanted to fit a set of Fuel Injector Clinic 1050cc injectors, we can just click on that option and those will be configured in the ECU. |
| 11:14 | Again, obviously you can see here, we've got our Nissan stock 300cc VQ35 injectors selected there. |
| 11:27 | Unfortunately I have just come down with a cold so please bear with me, I'm doing my best to get through this webinar without dying on you all. |
| 11:35 | OK so we don't need to change anything there because we are using the stock injectors. |
| 11:40 | We've obviously got six of them and we have the ability here to select if we have a set of secondary injectors fitted. |
| 11:50 | This is another aspect that's important when we're talking about a VE based fuel model. |
| 11:53 | The ECU needs to understand what the stoichiometric air/fuel ratio is for the particular fuel that we're using. |
| 12:04 | Now why that's important is because the stoichiometric air/fuel ratio defines the correct ratio of fuel to air in order to achieve theoretical perfect combustion. |
| 12:16 | So to use up all of the available fuel and oxygen in the cylinder. |
| 12:19 | So that's a critical aspect, if the ECU is defining how much fuel to add, it obviously needs to know what that stoichiometric air/fuel ratio is. |
| 12:29 | So we can choose from gasoline, methanol, ethanol, E85 or flex fuel. |
| 12:36 | Now on the face of it that makes it reasonably easy for the common fuels that we are using, all of those are listed there. |
| 12:44 | However if you are using something unique or maybe you're using a blend of ethanol such as E30 or E50, it makes it a little bit trickier. |
| 12:52 | We can deal with custom stoichiometric air/fuel ratios by selecting flex fuel. |
| 12:59 | And in the flex fuel setup there is a table that defines the stoichiometric air/fuel ratio based on the ethanol content. |
| 13:08 | What we can do is kind of fudge that a little bit and just set our desired stoichometric air/fuel ratio across the entire table and that will take care of it. |
| 13:18 | Again, we're just on gasoline here so we can leave that configured. |
| 13:22 | Now we have the phasing of the injectors which defines when they will fire, so the firing order of the engine, also we have which bank the injector is fitted to which is important for the closed loop lambda feedback system. |
| 13:40 | On top of that, we've got some basic sensors which we can use to calibrate the sensors fitted to the engine, I'm not going to worry too much about that. |
| 13:48 | We can set up our drive by wire throttle body. |
| 13:51 | Again this is pre configured and we don't need to worry about that. |
| 13:55 | And I discussed briefly the ignition synchronisation which we can do here. |
| 14:00 | So in this screen what we can do is lock our ignition timing and then using a timing light we can define, we can adjust the offset so that the timing we see on the laptop is correct. |
| 14:13 | So that takes care of our basic setup and that's really all we should need to do to get our engine up and running. |
| 14:20 | What I'll do is I'll just start it now. |
| 14:23 | And we'll just go to some live data. |
| 14:28 | So we've got our engine running and this is the VE tab that I've got open right now and you can see it's giving us essentially all of the information we need to know, we've got our engine RPM, our manifold pressure, and our throttle position. |
| 14:46 | The lambda one and lambda two values are coming from a Bosch LSU 4.2 sensor that is wired directly into the Infinity. |
| 14:56 | Now the Infinity uses onboard lambda control, so you don't actually need an external wideband controller, it's internally controlling the lambda sensors. |
| 15:08 | And we've got our target lambda and then we've got closed loop feedback which has just kicked in here. |
| 15:15 | So we can see at the moment for injector one, which when it says injector one, what we're actually talking about is bank one versus bank two. |
| 15:22 | We have a 5% positive trim and on bank two we have a 2% positive. |
| 15:27 | And you can see now that that's brought the lambda vales in line with our target. |
| 15:33 | Now that is one area that's really quite unique with a VE based fuel model, if you're coming into a VE based tuning system like the Infinity and you're new to that particular type of tuning, we have a lambda target table which I'll show you here. |
| 15:52 | And it's really important to understand the interaction of that. |
| 15:55 | I know that even a lot of millisecond based fuel systems, ECUs, will include a lambda target table but the way it's used is quite different in a VE based fuel model. |
| 16:07 | So the workflow or tuning process for setting up an Infinity on the VE based fuel system is to start by defining the engine characteristics, we looked at that, our engine capacity, number of cylinders et cetera. |
| 16:22 | From there we also need to define the size of injector fitted to the engine. |
| 16:26 | And we need to define the type of fuel that the engine's running on. |
| 16:31 | So we've seen that, we've already set that up. |
| 16:33 | The next place we do need to go before we spend a lot of time doing our tuning though, is we need to go to our lambda target table. |
| 16:42 | Now this is what is telling the ECU what our commanded lambda or air/fuel ratio number is. |
| 16:50 | And we need to set this to the target air/fuel ratio or lambda that we actually want to see. |
| 16:55 | And you can see that I've basically already filled this in, we're targeting, up at 100 kPa, 0.90 lambda. |
| 17:05 | What I could do here is probably above about 6000 RPM I'll target a little bit richer, we'll go to 0.88 and 0.89 at So we can set that to whatever target lambda numbers we want. |
| 17:21 | And that's the first place to start. |
| 17:24 | If we set this up to the lambda targets we want and then we correctly tune the engine's volumetric efficiency table until we're actually achieving those lambda targets, what that means is that if we want to target a different lambda for whatever reason, we can actually just do that inside this lambda target table, so we don't actually need to adjust the VE table again, we can make changes to the lambda we want to engine to run at right here in this target table. |
| 17:58 | OK I'll just commit those modifications there to the map and we'll go back to the VE. |
| 18:03 | Right so, excuse me again, what I'll do is I'll just start our logging running, no I do not want to save, and we can start PC logging. |
| 18:15 | I find that the PC logging is a really powerful function to incorporate alongside what we've got on the dyno to help us quickly find where exactly in the map the engine was running and make changes accordingly. |
| 18:30 | One other thing I'll just mentioned here is if we're looking at this VE table here, we've obviously got the numeric values here and you can see that these are whole numbers which for a lot of people coming from other platforms, might be a little bit offputting. |
| 18:43 | Now just because it's only showing a whole number, the ECU in the background is actually still working in decimal points and if you do want to display that, what we can do is click on the graph and we can change the precision so I'll add one decimal place and all of a sudden we've got something that starts to look a little bit more like perhaps some of the other ECUs we may be more familiar with. |
| 19:11 | We've got exactly the same here on our ignition map, as it's displayed, we're only getting whole numbers but again if I right click, change our number format and change our precision to one decimal place we can see that that comes alive and again looks probably a little bit more how we'd expect. |
| 19:30 | Alright so what I'll do is I'll just get the engine running on the dyno and we'll look at some basic tuning on the AEM. |
| 19:38 | So we'll do a little bit of steady state tuning. |
| 19:42 | And we can then do a power run and we'll have a look at how everything responds. |
| 19:50 | So you can see as we move around the map, we're sitting at 2000 RPM now and as I increase the thottle, we've got a little cursor that tracks our progress. |
| 20:00 | Now with the closed loop lambda function, I haven't actually spent a lot of time tuning this engine yet on the Infinity, we are still reasonably fresh to it but it's probably a testament to the AEM base map that everything actually does end up reasonably close, even with the base map installed. |
| 20:22 | So when we're tuning, we're running in a zone here, what we're looking at is we can see our two lambda values here, so we're sitting at lambda one which was our target. |
| 20:33 | You can see also, our lambda target value, that comes straight from our table here, you can see where we're running at the moment. |
| 20:42 | And what we can do is we can make an assessment of how close our VE table is, based on what our O2 or lambda feedback's doing. |
| 20:52 | You can see at the moment the lambda feedback is doing essentially nothing, we're sitting with about 1% trim plus or minus and that's moving around a little bit. |
| 21:03 | Let's make a change though and just see what would happen. |
| 21:07 | Now there's a couple of ways we can make changes, as with most ECUs. |
| 21:11 | In the Infinity we can use the U and D keys to make whole number changes up or down, U for up or D for down so you can see I've just taken that value up to 72.3% in this zone here. |
| 21:27 | And consequently I've increased the volumetric efficiency table, the ECU is now demanding more fuel because it thinks more air is going into the engine. |
| 21:36 | What you can see is our lambda feedback if I just get back into that zone and run it in the middle, our lambda feedback, still a little bit above that zone, right our lambda feedback has now gone negative and we're sitting around about - 3 or - 4%. |
| 21:53 | If you're more used to making percentage changes, which if you've followed any of our courses, that's how I prefer to make changes, we can use the minus and plus keys, so minus will remove 1% so let's just go ahead and make a 4% change by pressing the minus key four times. |
| 22:11 | One, two, three, four and we should come back to very close to zero. |
| 22:18 | Yeah which we are, essentially sitting on 0% so we can use the plus and minus keys to make percentage changes to our VE table numbers. |
| 22:28 | Also if you're a little bit further out in the ballpark, what we can do is we can use shift and plus and shift and minus and that will make a 10% change instead of a 1% change. |
| 22:40 | So you can see there, I've just made that change at 60 kPa and I'll just get back down into that zone and we should be running quite a lot richer now. |
| 22:54 | We're sitting at about 6% so no real mysteries there for the way the AEM can be tuned, it's essentially the same as any VE based system, all we're doing when we're trying to tune the AEM is we're looking at our feedback from our lambda sensors. |
| 23:15 | Now those don't necessarily need to be onboard like we've got here either. |
| 23:20 | If you don't have onboard lambda hooked up to the AEM Infinity, you can obviously use the feedback from a separate standalone wideband meter or in the case of our dyno, we could do a power run on the dyno and then look at the lambda values that the dyno has logged during the run and then make any changes that we feel are necessary based on the datalog. |
| 23:45 | So what we'll do now is we'll just do a dyno run and I'll show you how we can use the live logging on screen to help us with our tuning. |
| 23:59 | And you'll get a bit of a better feel for exactly how the AEM works when we're doing some ramp runs. |
| 24:11 | Alright so we'll start the run now and we're going to go through to about 6500 RPM. |
| 24:15 | You can see at the moment we're sitting at wide open throttle at 1500, 1600 RPM on the dyno so we'll start the run. |
| 24:39 | Alright so we'll just let the dyno come back down to a stop and we haven't actually got the dyno screen connected to this webinar, we're really just focusing on what the AEM is doing internally so that run that we just did there was 157 kW at the wheels so I'll just stop the logging and we can log, we can zoom in and have a look at what's going on in our log there. |
| 25:16 | OK so from what we can do, is we can move around and as you can see, as we move around the datalog we can click on it and you can see that the cursor will follow the point in the datalog that we were accessing at that particular point in time. |
| 25:36 | And while we're in this mode, we can, the live data is stopped so all of the data that we can see displayed down the side here, as well as the data shown on the actual datalog itself, all of that data is what was happening at that particular point in the logged run. |
| 25:59 | So that's quite handy for being able to quickly zoom in and see exactly what our tune was doing, I'll just get us slightly closer, zoom in, for those of you with a poor connection, might be a little bit more difficult to see exactly what's going on so on this particular log, we were looking at engine speed, manifold pressure, throttle position, we've got lambda one as well as our lambda target and then we're also logging our fuel pressure at the same time. |
| 26:32 | So what we can do is we can go through and one of the things I have noticed and this has shown up probably unsurprisingly on the three ECUs we are running across our 350z, is we do, particularly at low RPM, we do actually see quite a discrepancy bank to bank in our lambda and that shows up at wide open throttle and you can see here that bank one, lambda one is showing 0.91 whereas lambda two's showing 0.84 so we've got around about a 7% bank to bank fluctuation which is quite significant. |
| 27:09 | Now that's probably, on a separate note as well, shows you why it can be quite misleading if you've got a V configuration engine and you're only looking at a single lambda in a collector where both exhausts come together. |
| 27:24 | It can be quite easy to have one bank of cylinders running richer or leaner than the other while your overall lambda may still read correct. |
| 27:34 | So using the AEM we can also obviously affect our bank to bank tuning. |
| 27:40 | I'm not going to get into that here, as I said at the start this is really an introduction so it's really only a cursory glance, a quick examination of the Infinity. |
| 27:51 | So what we can do though is one of the easiest ways of using the Infinity is to go through our log and look at each point in the log. |
| 28:01 | So if we come down to 2000 RPM, and we can see here we're accessing, we're around about 95 to 100 kPa, 96 kPa, so we'd be interpolating a little bit between the 95 and 100 kPa zones. |
| 28:16 | Air pressure here we're actually sitting at about I think 250 metres plus we've obviously got pretty poor weather with the snow so hence our barometric air pressure is a little low. |
| 28:28 | So what we've got here is bank two is right on target, 0.90 and bank one is a little bit leaner than we'd like so what we can do is just add a couple of percent to that point. |
| 28:41 | Then we can move through to the next point which is 2500. |
| 28:48 | And at this point we're bang on our target, 0.90, our target's 0.90 and we've got 0.90 from both banks so we don't need to make any changes there. |
| 28:58 | We come up to 3000 RPM. |
| 29:03 | OK now you can see this is where we're starting to get into our discrepancy, we've got our bank two running at 0.86 so we're about 4% rich on our right bank of cylinders. |
| 29:13 | Again I'm not going to get into bank to bank tuning in this particular example, I'm looking at the leanest bank which in this case is on our target so we're OK there. |
| 29:23 | And let's move through to 3500 RPM. |
| 29:29 | Now this is where we're seeing that discrepancy get even worse so we've got 0.83 versus 0.91 so again what I'm going to do is I'm going to add 1% to that, get our leanest bank where I'd like it to be. |
| 29:43 | And we'll move up to 4000 RPM. |
| 29:47 | So we can just hold down the cursor and slide along that datalog and all I'm doing at the same time is looking at our engine speed and when that gets to our next RPM site which is 4000, I know I'm on the money there. |
| 30:00 | So now our target, remember when I first made a change there to our target air/fuel ratio and I've targeted 0.89, so we're a couple of percent leaner than we'd like to be. |
| 30:15 | So I'll add a couple of percent into that particular zone there. |
| 30:19 | We'll just keep going through, at 4500 RPM we're targeting 0.89 and we are sitting at 0.91 on our leanest bank. |
| 30:31 | We can move through to 5000. |
| 30:36 | So now we're sitting at 0.87 so we've actually gone slightly richer than our target so we can pull a couple of percent back out of that. |
| 30:52 | And we're back right on our target, 0.89, 0.89. |
| 30:56 | At 6000. |
| 31:03 | We've got our lambda target now has gone back to, oh so what we're actually doing as well and this is a really good point to keep in mind, because of the restriction of the intake system here combined with the low barometric pressure, we've actually dropped all the way back down to 90 kPa. |
| 31:18 | So if we look at our lambda table, at 90 kPa, I wasn't expecting to be at wide open throttle at 6000 RPM and 90 so we're actually at 0.90 lambda. |
| 31:31 | So what I'll do is I'll just richen those up to 0.88 as well. |
| 31:36 | And we'll go back to our VE, so we were however still slightly richer so what we can do is we can highlight those cells and take a couple of percent out. |
| 31:48 | And we've got one more site to look at. |
| 31:51 | So we'll go up to 6500. |
| 31:57 | And we didn't actually quite get to 6500, we got to 6400 at the top of our run. |
| 32:02 | So we're 0.83 versus 0.90 so we're quite a lot richer there than what we want to be. |
| 32:08 | So what we'll do is we will take 5% out of that particular site there. |
| 32:14 | OK so you can see graphically I haven't done a particularly nice job of that but I'm not getting too wound up, I just wanted to show you quickly how we can use the AEM with the datalogging to help tune our VE table so we're going to do another run now and I'll just set that PC logging up to run again. |
| 32:35 | And we'll see if hopefully our lambda is a little bit closer to our target on this particular run. |
| 32:49 | OK so we're at wide open throttle and we can start our run. |
| 33:11 | OK we'll just stop that logging. |
| 33:15 | And I don't need to save it, now what we can do is have a look through here again on our live data. |
| 33:21 | And again what we're looking at is remember we were really only tuning based on lambda one, I was pretty well ignoring the fact that lambda two was reading richer. |
| 33:31 | And we can go through and see how our lambda's tracking. |
| 33:36 | We can see particularly now on that top end, we are tracking reasonably close to our lambda target. |
| 33:49 | There is a little bit of discrepancy here and there. |
| 33:53 | But the other thing I've also found with this particular car, and if I just cycle through, what you can see if you look at what's going on with the manifold pressure here, I'll just move through, you can see that we're actually getting quite a lot of fluctuation in our manifold pressure signal. |
| 34:14 | Now the AEM does give us the ability to filter the manifold pressure signal. |
| 34:20 | And this is a problem we've found with a few ECUs as well. |
| 34:23 | If we're looking at that manifold pressure signal in a very raw, unfiltered form, naturally it tends to bounce quite a lot and that's to do with the individual pulses from individual cylinders firing so we'll get quite a lot of noise on that channel. |
| 34:38 | Now really what we want to do is filter quite a lot of that noise out. |
| 34:41 | It's a fine line between getting a signal that's still usable and reacts quickly to sharp throttle changes but doesn't give us the noise that we're currently seeing. |
| 34:50 | Because the problem when we've got noise like this is it will affect where abouts the ECU is running. |
| 34:58 | What I'll do is I'll just commit those modifications. |
| 35:00 | Now if you look at the little purple cursor which shows where exactly the ECU is running, you can see that as I move through the datalog, it is bouncing up and down between the 90 and 100 kPa rows. |
| 35:12 | So we're moving up and down inside that fuel map and it makes it very difficult for the ECU to do an accurate job of defining exactly where it's running and that is one of the reasons we're seeing that discrepancy in the lambda that we've just noticed now. |
| 35:27 | So what we can do there, if I can go to our setup wizard and, basic sensors and our MAP sensor. |
| 35:40 | And if we move down we have a map smoothing function. |
| 35:45 | This is the smoothing or filtering that is applied to the sensor. |
| 35:50 | So at the moment we've got a smoothing factor of 30 so this is a number that's probably relatively non sensical, it's just a number between 0 and 100% that applies a filter to that particular signal. |
| 36:03 | And the other thing, speaking to the guys at AEM, the smoothing factor is also sort of not particularly linear so what you'll find is that between a value of about zero and 50, so as you can see at the moment, we're 30, we don't see much effect from that filtering. |
| 36:24 | As we go above, go higher in the filtering, or the smoothing factor, it becomes exponential, we get more and more smoothing so what I'll do is we will just increase that up to 75 and I'll close that down, I'll close that and we can just do one more run and I'll just see if that's given us a smoother result in our manifold pressure signal. |
| 37:01 | Now we'll be stopping fairly shortly so if you do have any questions, anything that's cropped up while I've been talking that you want me to explain in more detail, please feel free to put them in the comments box and I'll get to them as soon as I can. |
| 37:15 | Alright we're at full throttle now so we'll do another run and we'll particularly focus on how that manifold pressure signal is tracking. |
| 37:45 | OK so I watched the manifold pressure signal up here in the top right and through that run it was definitely much more stable. |
| 37:55 | As I move through here you can see that we're sitting approximately, jumping up and down about 1 kPa which would be quite acceptable. |
| 38:04 | Right in the top end where the RPM got a little bit higher, we can see that our fluctuations do get a little bit higher, we're getting about a 2 kPa bounce but that's much better than what we had before, we were going everywhere between about 90 kPa and 97 kPa. |
| 38:22 | If anything, I think I could probably increase that smoothing a little bit more. |
| 38:25 | However, the point. of the conversation over this smoothing was that it was affecting where the ECU was running in the VE table and you can see now if we look at our lambda one, we have a much smoother lambda value and it is tracking our target reasonably accurately right through the whole of that run. |
| 38:49 | Probably in the very top end here, we maybe could do with about another percent of fuel. |
| 38:56 | Now the other thing I'm going to show you just before I finish is the way that VE model works is it allows us as I said to change our target lambda without actually retuning the efficiency table. |
| 39:10 | Now I'll admit I haven't done a particularly thorough job there in that quick demonstration of tuning the VE table, it's really not a demonstration on a thorough tune of an engine, it's a case of this is the process we go through with the AEM Infinity. |
| 39:25 | However, what I will do right now is we'll just do one more run and I'm going to highlight all of the 90 to 100 kPa zones in our lambda target table and this time I'm going to target 0.82 lambda and we'll just go back to some live data, I'll start our logging again. |
| 39:49 | Now what that should give us, and it's not always going to be perfectly accurate, is what we should find now is that lambda one will track us, instead of what we had, which was around about 0.90 dropping to about 0.88, we should be sitting closer to that new target of 0.82. |
| 40:06 | So let's just do a run now and see how that works out. |
| 40:19 | OK so straight away you can see I'm now at full throttle, and you can see our lambda target's 0.82 and straight away both of our lambdas are sitting on 0.82. |
| 40:28 | One other thing that I haven't mentioned which I should, 'cause I'm not cheating here, is the closed loop feedback is set to be disabled above about 80 kPa so I'm not actually using the closed loop function to help improve the accuracy of the tuning. |
| 40:44 | Alright we'll do this run now and see how our lambda tracks. |
| 41:09 | Well it's always helpful when I'm doing a live demonstration if things work how I expect and fortunately that time they did so that's always nice when it reinforces what I'm trying to demonstrate. |
| 41:23 | So you can see again I've paused the log and if we cycle through, yes we did see some variations in our lambda through the run at occasional points in the RPM range but for the most part, we're now tracking at our new lambda target of 0.82, we're probably plus or minus about 0.01 in places. |
| 41:44 | So you can see that that's where that advantage from the VE tuning model comes in, I haven't made any changes to the efficiency table and it's really important to understand when you're talking about VE tuning, it's really important to understand what the VE table is. |
| 42:03 | This can catch people out who have come from a more traditional millisecond based or pulse width based fuel table where you're directly commanding a specific injector pulse width or a specific mass or fuel to be delivered. |
| 42:21 | What we need to understand about the VE table is what we're actually defining in that VE table is the amount of air that is entering the engine at each particular point in that efficiency table. |
| 42:34 | So it's nothing to do with fuel delivery, all we're doing is modelling the airflow into the engine and defining how much air is entering the engine at each point in the table. |
| 42:46 | Once we do that, if we've got that done accurately and the ECU also accurately knows the fuel delivery from the injectors, it can do the rest pretty well all by itself which is what we saw when I changed that target lambda. |
| 43:00 | The other thing, before we stop for questions that's important to realise with the Infinity is as with most ECUs that use a VE fuel model, air temperature correction is automatically taken into account inside the basic fuel model. |
| 43:16 | So we don't have a standalone or additional intake air temperature correction table, as we would with a lot of common ECUs that use a millisecond based fuel table. |
| 43:28 | Alright so that brings us to an end of our AEM VE fuel model introduction. |
| 43:36 | We will be having a lot more webinars up and coming based on our AEM Infinity platform. |
| 43:43 | There's a lot of features that I do want to highlight in the Infinity ECU that are really valuable and really useful. |
| 43:50 | So we'll look at all of those features in upcoming webinars and I'll explain how to set them up and how to go through and tune them. |
| 43:58 | For now we will have a look and I'll see if we've got any questions. |
| 44:03 | And we've got one here. |
| 44:06 | I've got a question that says how does the Infinity compare airflow model wise to the Elite or the Link G4? Do you feel one's better than another? Look it really, you've got to understand that no ECU manufacturer here is creating these things. |
| 44:24 | They're all using the same basic principle which is well known, well understood and there's nothing new, that basic principle is the ideal gas law. |
| 44:32 | Every ECU has its own slight take on things and in my experience so far with the Elite has been almost non existent, we have an Elite here which we will be getting some hands on time with very shortly so I'll be able to answer that question a little bit more thoroughly. |
| 44:49 | Between the likes of the MoTeC and the Link G4+, Vi-PEC i88 for example, what I find is that the Infinity's VE fuel model, if anything is actually slightly simpler. |
| 45:00 | Now this is a point that I've battled with in my own mind and with other tuners a number of times. |
| 45:08 | The problem is that it's very easy for ECU manufacturers to over complicate an ECU. |
| 45:15 | And take into account 100 different parameters that all serve to improve the accuracy in the end of the tune. |
| 45:24 | And I think that these ECU manufacturers are under a little bit of pressure from some tuners to add these features and the difficulty is, all the features we add in, the more features get added into the ECUs, the more features the tuner has to set up and has to tune. |
| 45:44 | And that makes the tuner's job more difficult, it takes more time, and there's also more room for error because there's more things to overlook and more things to get wrong. |
| 45:55 | Particularly when I look at the level of understanding or knowledge out there in the tuning industry, in general, and you guys are the exception because you're coming to us and trying to improve your level of knowledge so I applaud you for that, in general the level of knowledge in the wider tuning industry unfortunately isn't that great. |
| 46:12 | So as the ECUs get more complicated, the ability for the average tuner to do a great job is diminishing. |
| 46:20 | Now that's a big ramble and I do actually have a point so I'll get to it. |
| 46:24 | One thing that is immediately obvious to me with the Infinity is the fuel model doesn't include a charge cooling coefficient or charge cooling gain. |
| 46:36 | Both the MoTeC and the Link G4+ platforms with their modelled fuel equation, they do include that parameter. |
| 46:44 | And essentially it's there, we've got other webinars on tuning on both platforms, essentially it's there to account for the cooling effect on the intake charge of the fuel that is being injected. |
| 46:58 | Now the AEM doesn't include that. |
| 47:01 | Now the upshot of that is the AEM still does an exceptionally good job of tracking, as you just saw, when I command a change in my target lambda. |
| 47:10 | The reason that that charge cooling coefficient gain is added into the MoTeC and the Link G4+ platforms is to improve the accuracy of tracking a target lambda change. |
| 47:22 | And it does do that exceptionally well. |
| 47:25 | My point with this is we're starting to get into the 1% changes, the tiniest of little changes that produce iteratively smaller improvements in accuracy. |
| 47:34 | On the AEM, it's simple, it's quick and easy to tune and as you just saw, it does an exceptionally good job. |
| 47:42 | Does the Link or the MoTeC do a better job? Perhaps but again it's getting down into that nitty gritty of the tiniest smallest changes and the Infinity is an ECU that a competent tuner can quickly get their head around, get used to and produce great results on. |
| 48:01 | Right Ben, hopefully that answers your question there, I know it was a long winded approach to getting to the answer but it is something I feel strongly about and I just wanted to try and get that across. |
| 48:13 | Often the desire for more and more features is not actually as valuable as maybe we see it being. |
| 48:22 | OK Ben's asked a question, do you have to tune in the VE model or can you do a millsecond tune? OK well we don't have to use the VE tuning model, as we looked at in that basic setup, we do also have the ability to tune using a mass airflow meter. |
| 48:41 | So it's not strictly a millisecond based fuel model as we would traditionally call it and when I'm talking about using manifold air pressure still as a load input to the ECU so the MAF sensor input is defining the mass airflow into the engine anyway so it's not quite a millisecond based fuel model, we do have that option if you wish to use it. |
| 49:07 | If you want to use the manifold air pressure load axis, we'd want to get rid of our mass airflow meter, we do need to use the VE fuel model. |
| 49:17 | And in all honesty, as you've just seen, there's no real complexities to setting it up and tuning it and it does do a great job so no real reason why we wouldn't use that. |
| 49:27 | OK that's us for today, thank you all for joining us. |
| 49:30 | As usual, if you do have other questions that you'd like more clarity on, please feel free to ask them in the forum and I'll answer them there. |
| 49:39 | And as I say we will have more webinars coming to you in the coming weeks and months using the AEM Infinity platform to hopefully improve your familiarity with that product and highlight some of the more advanced features it does offer, thanks guys. |


