093 | Setting Up Flat Shift
Summary
Minimising the time spent changing gear is valuable for any performance car, and flat shifting has become a popular technique to allow full throttle shifting to be completed which can be particularly helpful on a turbocharged car to help keep your turbo spooled up between gears. In this webinar we will investigate flat shifting, find out how it works, and find out how we can incorporate it.
For this webinar we will be using our Nissan 350Z on the Link G4+ ECU using PCLink Engine Management software.
| 00:00 | - Hey it's Andre from the HIgh Performance Academy, welcome to this webinar where we're going to be talking about flat shifting and how to set up flat shifting on a Link G4+ ECU. |
| 00:12 | Now we're going to be looking at this in our Nissan 350z which is a naturally aspirated engine obviously, which begs the question a little bit, why would we need flat shifting in the first place? And I think this is a great place to start this discussion, with what flat shifting is and why exactly we'd need it. |
| 00:34 | So my definition of flat shifting, which is also referred to quite frequently as no lift to shift. |
| 00:42 | Is a combination where we are able to shift through the gears while remaining at wide open throttle. |
| 00:50 | Now the application we're looking at here is for a normal H pattern manual gearbox, not necessarily a proper dog engagement motorsport style of gearbox and certainly it doesn't need to be a sequential style gearbox. |
| 01:07 | So we're not talking here about full gear shift control or closed loop gear cut control, we'll be talking about that in a future webinar. |
| 01:19 | Here we're talking about a very simple switched system that allows us to shift at wide open throttle. |
| 01:26 | So what we need in order to do this obviously is some way for the ECU to first of all detect that the driver's requesting a shift and then because we're going to be staying at full throttle, we're going to need some way of the ECU controlling or maintaining engine RPM so it's not just going to sit on the engine rev limiter when we put our foot on the clutch. |
| 01:49 | We're going to be looking at how we can do that through the ECU shortly. |
| 01:53 | Back to the topic though of why we would need no lift to shift or flat shifting in the first place. |
| 02:01 | Now my personal opinion, although I know that plenty of people use flat shifting on naturally aspirated engines, is that really this lends itself predominantly, the biggest advantage is going to come from using flat shifting on turbocharged vehicles. |
| 02:17 | The gains or advantages in flat shifting become more prominent or more important as we start moving to larger turbochargers. |
| 02:28 | Now the reason for this is simple, if we're talking about a conventional gear shift where we back completely off the throttle, as we use the clutch. |
| 02:37 | What we're going to find is as we shut the throttle, the boosted air that's currently in the intake system is probably normally going to be vented out an air bypass or blow off valve and this is also going to allow the turbocharger to start losing a lot of turbo speed or momentum. |
| 02:55 | When we get back on the throttle then the turbocharger has to repressurise the entire intercooler, intake track and then start building up speed again in order to reach full boost. |
| 03:09 | So the bigger your turbocharger is relative to the size of your engine, the larger the lag you're going to find on a gearshift as the turbocharger takes time to build back up to full boost. |
| 03:23 | Now it's easiest to visualise this and let's do exactly that now. |
| 03:27 | What we've got here is a data log on my laptop, hopefully Ben can show that. |
| 03:32 | And we'll have a look first of all at what we get when we are using flat shifting. |
| 03:40 | So the three pieces of data that we've got here, on the top we've got our engine RPM in red, below that we have our throttle position shown in green and finally at the bottom we have our manifold pressure in blue. |
| 03:55 | Now the log file we're looking at's actually from an Evo 9 drag car we built many years ago which did hold the world record for a number of years for a Mitsubishi 4WD late model Evo. |
| 04:08 | So this particular log file we're looking at is the run where it actually set the world record. |
| 04:15 | As noted by my exclamation points and world record. |
| 04:19 | So this was an 8.34 at 169.7 mph run, let me just talk you through what's going on here. |
| 04:27 | So this particular section of the log file is where the car's staged and you can see that the driver is at full throttle so this is where the car's actually sitting stationary and the driver's gone to full throttle and we're using launch control here to build and maintain stable boost, in this case you can see that we're sitting somewhere around about 20 psi, 240 kPa of positive boost pressure. |
| 04:53 | At about this point here, the car is launched so the clutch is released and the car is actually launched and we have the car moving through the gears. |
| 05:04 | We've got 1st gear which actually equates to all of this here, then we've got 2nd gear, 3rd gear and finally we've got 4th gear in a 4 speed gearbox. |
| 05:19 | Now we can see that essentially right from the time that the driver leaves the start line, the driver is at wide open throttle the whole time. |
| 05:28 | Now the important point or what we're trying to look at here is what happens around a gear shift. |
| 05:33 | And this particular car is fitted with a Garrett GT4202 turbo which is a reasonably large sized turbocharger for a 2.2. litre 4 cylinder engine and if we look at the corresponding boost response as we go through the shift, we can see that just before the shift we're at just on 10,000 RPM and we're sitting at 350 kPa boost pressure. |
| 05:58 | On the shift, even though the driver's at wide open throttle, because there's an ignition cut that interrupts combustion the turbocharger's no longer being provided with that exhaust energy to keep it spooled so we still see the boost pressure drop off in this case to a minimum of 285 kPa. |
| 06:18 | And then we can see that the boost pressure quickly climbs back and actually exceeds. |
| 06:23 | We're also using, I'll just point out, gear dependent boost here so we see the boost pressure actually step up as we go down the track but in this instance if we look at our timeframe, we're back at 350 kPa at around about 2:20 in this log file and we, at our minimum boost pressure, we were at about 2:19.5 so we're looking at around about 4/10ths of a second for the turbocharger to regain full boost pressure using flat shifting. |
| 06:57 | So even though you're seeing the boost drop off, this is actually a pretty good result and it's really shown how good it is if we look at a bad run, so I'll just overlay a bad run here. |
| 07:09 | So the bad run's being shown in grey. |
| 07:14 | What we can see here is in this case the driver, for whatever reason has had to get right off the throttle, probably as a result of wheel spin and the car getting out of shape. |
| 07:23 | And the important point here is to look at what happens to the boost response when the driver has to get all the way off the throttle. |
| 07:32 | Now obviously this is quite a large lift so it's not indicative of what we'd expect on a gear shift, the driver's been off the throttle for about 2 or 3 10ths of a second here. |
| 07:44 | But what we see is that now the boost pressure drops all the way back down into vacuum, in this case we've dropped down to 28 kPa. |
| 07:55 | So we've dropped right off boot pressure, back into vacuum and that means that when we get back on the throttle, the turbocharger has to start building back boost and you can see that at the point where the driver gets back to full throttle here, we're at 7500 RPM and you can see that it takes a considerable amount of time for that turbocharger because it's so big and lazy, to get back onto full boost. |
| 08:21 | So hopefully this has been a bit of a graphic indication of why we want to use flat shifting and particularly on a turbocharged car, how powerful it can be allowing that throttle to stay wide open. |
| 08:36 | The boost pressure continues to pass through the engine, the boost pressure isn't vented through the blow off valve so the turbocharger doesn't lose as much inertia, doesn't lose as much speed and it's easier once that ignition event, the combustion is reestablished for the turbocharger to essentially pick up where it left off and continue feeding boost into the engine. |
| 08:57 | Alright so we'll just talk now, I've talked about turbocharged cars, I'll just talk briefly about naturally aspirated engines which is what we're going to demonstrate the process on today. |
| 09:06 | And my own personal preference is it's probably a bit of a coin toss as to whether this is really going to give you any potential advantage. |
| 09:17 | So particularly in a synchromesh factory style H pattern gearbox, the shift really is limited in how fast you can process it by the synchromesh box itself. |
| 09:32 | You can't shift a synchromesh box exceptionally quickly or you're going to end up doing damage to the synchros in the gearbox pretty quickly. |
| 09:41 | We've obviously got no boost pressure that we're trying to protect in a naturally aspirated engine so realistically the speed that it takes a good driver to back all the way off the throttle and get back onto the throttle is probably going to be no different to how long it takes to actually punch the clutch and pull a gear. |
| 10:01 | The only real reason that I can see to potentially advocate no lift shifting in a naturally aspirated car is you obviously get away from any potential problems with acceleration enrichment problems where the engine response may be affected by having to lift off the throttle and get back onto it. |
| 10:26 | Probably the reality though is more often than not, the potential advantages end up becoming sort of more of a mental aspect to the driver. |
| 10:36 | If you think you're getting an advantage from flat shifting, maybe it's one less thing you need to do, you can keep your foot pinned to the throttle for the entire run then so be it, all power to you. |
| 10:49 | We're going to look however regardless whether you think it's a good idea or not, at how we can go about setting this up. |
| 10:56 | So what I'll do is I'll just get our Nissan 350Z running and we'll just go online to the G4+ ECU. |
| 11:05 | Now there's two ways that we're going to look at setting this up on our 350Z. |
| 11:10 | We're going to look at using the Link G4+ gear shift control functionality. |
| 11:16 | Now this is a flexible function that is offered, that'll go through our flat shift function that we want to demonstrate here but it's also designed for more complex systems where we're looking at closed loop gear cut control for the likes of sequential gearbox, sequential dog engagement gearbox using a gear position sensor as well. |
| 11:45 | Again I'm not going to touch on that any further. |
| 11:48 | Let's start by the essentials of what we actually need to get our gear cut control functionality working and that's an input that will define when the driver's requesting a shift. |
| 12:02 | Now the most common way we're going to be doing this is through the use of a clutch switch. |
| 12:08 | With a synchromesh box, we still need to use the clutch to actually perform the shift anyway, it's certainly not going to be any faster if we're not using the clutch so it makes sense that we're going to use a switch connected to the clutch. |
| 12:22 | And if I just type in dig, this is going to bring up the digital inputs that are available on our, DI I should say, just going to bring up the digital inputs that are available. |
| 12:33 | And we can see that we have here DI6 is aligned to our clutch switch and this, if we click on it will give us the ability to look at all of the parameters for our clutch switch. |
| 12:48 | Now in this particular instance the 350Z clutch switch that we're using actually goes to 12V when your foot is on the clutch so particularly important here is we need to make sure that our pull up resistor is turned off, otherwise we're not going to be able to define whether the clutch is in the engaged or disengaged position. |
| 13:11 | Once we've got this set up, if we press the R or F12 key to bring up our run time values, and we click on the digital tab, we're going to be able to see all of our digital inputs over here on the right hand side. |
| 13:27 | In particular the one we're looking at obviously is our digital input 6 clutch switch and if I put my foot on the clutch we can see that that changes from active to off. |
| 13:38 | Now a really important aspect when we're setting up a clutch switch that's so often overlooked, and this goes for launch control as well as flat shifting, is ideally we want this clutch switch to actuate or switch right at the point where the clutch actually disengages. |
| 13:58 | Now what I mean by this is we want the point where the ECU receives its gear cut or gear change request signal to occur right at the point where the clutch disengages. |
| 14:10 | Now if we don't get this right, let's say for example that the clutch switch is right at the very bottom of the pedal travel which is actually pretty accurate for our 350Z example, and let's say that our clutch actually disengages around about 50 mm or 2 inches off the floor. |
| 14:29 | What we're going to find is even when we try to actuate a very fast shift, what we're going to find is we're at full throttle remember, we're staying flat on the throttle, so we're going to punch the clutch with our left foot and we're going to get to a situation where the clutch actually disengages just moments before the ECU receives the signal for the gear cut request. |
| 14:53 | What this is going to allow is the engine to flare before the gear cut request comes in. |
| 15:00 | And this can end up with the shift sort of flaring and it's pretty ugly and it can put undue stress on the clutch as well as the drivetrain so we really want to make sure that that's aligned. |
| 15:14 | Now that's obviously a best case scenario. |
| 15:16 | This is a great example of where we've got that wrong and hopefully with a little demonstration shortly I'll be able to show you what to look for in your log files because in the case of our 350Z, the point where the clutch disengages is actually slightly before the point where the clutch switch works so you'll be able to see that in action. |
| 15:39 | So we've ticked that off the list, we've got our clutch switch set up. |
| 15:43 | Now what we're going to do is have a look at, we'll actually start with a really simple way of doing this. |
| 15:50 | We're going to start by setting up a general purpose or GP limiter to perform this function. |
| 15:58 | So if we type in GP limit, we're going to find our GP RPM limits. |
| 16:08 | And we can see that I've already got GP RPM limit 1 set up and that's actually for an oil pressure surge control function which we've looked at in a previous webinar. |
| 16:19 | In this case what we're going to do is we're going to click on GP RPM limit 2 and we're going to turn this on. |
| 16:27 | Now when we turn it on, we can define this as either an ignition cut or a fuel cut, depending on our own preferences. |
| 16:35 | In this case I'm going to set this up as an ignition cut. |
| 16:39 | Now we do need to be a little bit careful when we're doing this as to which type of cut we use. |
| 16:46 | If you've gone through our boost control course, sorry if you've gone through our launch control course, you'll already know that I go on about this a little bit. |
| 16:54 | Ignition cut does need to be dealt with carefully, particularly on engines that have fragile, known fragile valve trains. |
| 17:03 | This can end up with unburnt fuel and air being passed through to the exhaust system and combusting there so this can end up having problems such as rockers being thrown off or hydraulic lifters being pumped up so we do need to be a little bit careful there. |
| 17:21 | Regardless in this situation I am going to use our ignition cut so this is what it's going to normally look like here, we'd normally by default have our advanced mode for our limiter set up, set to off and honestly in most instances, this is going to be absolutely perfectly fine. |
| 17:39 | If you do want to know more about how to use the advanced mode, then I'd suggest checking our our webinar in the archive on RPM limit configuration on the G4+ platform. |
| 17:54 | We have 2 functions here that we need to be wary of, one is a startup lock out and then another one is an activation delay. |
| 18:01 | So as their name implies, these will delay the functionality and we don't want that for this so we need to make sure that both our startup lockout and our activation delay are set to 0. |
| 18:14 | Start up lock out essentially will lock out this limiter for a defined amount of time after the engine first starts and activation delay will delay the activation of the limiter for a set amount of time after the parameters that define the limiter becoming active are true. |
| 18:31 | So as I've said, we need to set these to 0. |
| 18:34 | I'm just going to turn our advanced mode back to on here and I just want to talk about one aspect of our advanced mode that we may want to visit in this particular use of the GP limiter. |
| 18:47 | It's right down the bottom, you can see we have our exit decay rate. |
| 18:50 | And this defines how quickly the cut, be it ignition or fuel, will be removed after the limiter's no longer required. |
| 19:01 | Now by default you can see that's set to 5% per 20 ms which tends to be quite a slow reduction in our cut and what this is going to do particularly with flat shifting, it can delay the reintroduction of engine power slightly. |
| 19:18 | We're going to have a look and see how this works though so I'll leave it at 5% for the time being. |
| 19:27 | Alright now that we've got our GP RPM limit to function enabled, we're going to look at the actual table. |
| 19:34 | I've already pre configured this but let's have a look at how exactly I did this. |
| 19:38 | Normally these would be set up by default as a 3D table. |
| 19:43 | We can click X axis to set up the axes as we wish. |
| 19:48 | What I've done here is I've selected the Y axis as our digital input 6, so that remember is our clutch pedal. |
| 19:57 | Once we've done this, all we need to do is click on initialise axis and this is going to use the default axes settings for this particular input. |
| 20:06 | In this case simply 0 or 1, it's either on or it's off. |
| 20:10 | For my purposes here, I'm not going to use an X axis so I'm going to leave that set off. |
| 20:16 | So this is simply going to be a GP limiter that's always going to function. |
| 20:20 | Of course you could set the X axis up to suit your requirements, perhaps you could set it up to vehicle speed and make sure that this won't function when the car's sitting stationary. |
| 20:34 | OK so we've got that done now and, no I'm not going to interpolate values. |
| 20:38 | So we've got our axis set up and we've got our table set up. |
| 20:42 | Now what I'll do is I'll just put my foot on the clutch and we'll be able to actually see the ECU move between the 0 and 1 position. |
| 20:50 | So we can see in position 1, we've got a rev limiter of 3000 RPM, we can see in position 0 where we're off the clutch, we've got a rev limiter of 8000 RPM. |
| 21:01 | Now I'll also point out here, don't be scared of this 8000 RPM. |
| 21:05 | There's obviously the ability in the G4+ to have a range of different limiters. |
| 21:10 | We've got our main engine RPM limiter as well as our GP limiters. |
| 21:14 | The lowest of all of the available limits will be used so in this case our main engine rev limit is set to 6700 RPM, that is going to take precedence over this 8000 RPM that I've just entered. |
| 21:31 | So the question might be, why have I set it to 8000 RPM in the first place, why not just change it to 6700, make it the same as the main engine rev limiter? Of course yes you can choose to do this. |
| 21:42 | The problem I find which is often overlooked is in a situation we may get where we want to adjust our main engine rev limiter, if you don't remember at the time that you're making that adjustment, and normally that's going to be in the heat of a race meeting or something like that where you don't have a lot of time on your hands. |
| 22:02 | If you adjust your main engine rev limiter upwards to perhaps 6900 RPM, and you don't adjust your GP limits at the same time, that's going to mean that the GP limits will then take precedence. |
| 22:14 | So that's why I choose to set the limit well above my main engine rev limit. |
| 22:20 | OK so let's talk about this low rev limit. |
| 22:25 | So what this is going to do essentially is every time we punch the clutch, it's going to bring in an RPM limit at 3000 RPM. |
| 22:33 | Let's just test that now, if we look at our engine speed here, we're sitting at 800 RPM idle, I'll just bring the revs up, we can see that we're sitting at 3000 RPM, at the same time we can see that our GP limit 2 is on. |
| 22:50 | Now when we're setting up this type of flat shifting, we do need to be a little bit careful about how we're going to use it. |
| 22:58 | And the second option we'll look at shortly has some advantages here. |
| 23:03 | Ideally what we really want to do is set our rev limiter somewhere around about the engine speed that we're going to find when we change up a gear, what the engine speed settles at in the next gear. |
| 23:18 | So what I mean by this is let's say we shift from 3rd gear at 6500 RPM and we move into 4th gear, we find that the RPM drops to let's say 5200 RPM. |
| 23:28 | So we'd like to have our engine rev limiter set somewhere around about there so we're ready to go when we get into the next gear. |
| 23:35 | Of course this only really works if we're dedicated shifting from the engine rev limiter or very close to. |
| 23:43 | If we short shift for example from 5000 RPM, our revs may fall down to perhaps 4000 RPM in the next gear and this sort of setup isn't going to work so we do need to be aware of that. |
| 23:55 | So what I'm going to do now is we'll just do a quick test and we'll leave our rev limit set at 3000 RPM. |
| 24:04 | We'll just run through the gears on our dyno. |
| 24:08 | I'm not going to do this at full throttle but we'll just log this and we'll be able to see the effect. |
| 24:12 | So I've just got the engine running in 1st gear at the moment and what I'll do is we'll just start our dyno run and I'll just go through the gears and then we'll look at our data log afterwards so let's do that now. |
| 24:43 | OK not very comfortable but it proves the point hopefully. |
| 24:47 | Let's just come back down to idle now and we'll have a look at our logging. |
| 24:53 | And yeah this perfectly demonstrates what I was hoping it would which is always reassuring. |
| 24:59 | OK so what we've got here on our logged file, at the top we've got our engine speed, not really too worried there about our rev limit. |
| 25:09 | So we've got our engine speed shown in green, we've got our throttle position below it shown in blue, I'm logging the ignition cut which remember it's ignition cut we're using in blue below it. |
| 25:21 | And finally our clutch switch position. |
| 25:23 | Now there's a few pieces of information we want to take away from this. |
| 25:27 | Obviously it's not a very nice example here where we're doing it on a chassis dyno, be a little bit different if we're on the street where the inertia of the car rolling tends to smooth things out a little bit. |
| 25:39 | So we can see first of all, let's look at this particular shift here. |
| 25:45 | That's a horrible line that I've drawn there, let's try that again. |
| 25:49 | OK so we'll look at our first shift here and what we can see is we get up to, in this case about 5000 RPM and the yellow line down the bottom shows that I've punched the clutch. |
| 26:00 | Immediately we get a 100% ignition cut so that cuts our ignition power, simply because we're above our 3000 RPM GP limit 2. |
| 26:12 | We see that we've made the shift and I've got back off the clutch and as soon as I get back off the clutch, we can see that our cut is reintroduced, sorry our ignition is reintroduced but you can see the red line there that I've just drawn, it's introduced quite slowly and this is the point I wanted to make when we were talking, let's go back to our set up. |
| 26:37 | Our 5% per 20 ms, that's going to result in quite a slow reintroduction of our engine torque. |
| 26:45 | So the maximum we can set this to is 100%, that's going to remove our cut much faster. |
| 26:51 | It's going to end up with our cut sort of doing something like this and that's going to have quite a significant effect on the feel of the car, particularly in a drag race, it's going to end up making our car quicker as well. |
| 27:03 | This sort of setup, if we're not aware what's happening and why that's happening, will feel a little bit doughy and sort of sluggish to the driver when the car picks up in the next gear. |
| 27:14 | So that's one thing to keep in mind. |
| 27:15 | Of course there's a flipside to this as well, slowly reintroducing our engine torque is going to obviously be a little bit kinder on our transmission and if we're going to immediately reintroduce full engine torque, this is going to apply much more shock loading to the transmission. |
| 27:31 | So it's a catch 22 there and really you can only make the decision based on your strength of your drive train and how many broken parts you like to replace. |
| 27:40 | Now the other aspect that I was hoping this would demonstrate which is does, probably demonstrated best on our last shift out here on the right hand side, now you can see that particularly with the RPM, at the point where I touch, start, need to actually just zoom in a little bit so we can get a better idea of this. |
| 28:01 | So we're at 5500 RPM at this point and you can see around about this point in our log file, the RPM actually starts to increase. |
| 28:12 | We see the RPM increase all the way up to 6175 before we get to this position where we've got 100% ignition cut. |
| 28:21 | So essentially what we can see is our RPM is beginning to rise, even though we haven't got to this point where the ECU detects that the clutch switch is active. |
| 28:33 | And this is the point I was mentioning earlier where it's important to align the clutch switch actuation point with the point where the clutch actually disengages. |
| 28:44 | In this case, the clutch is disengaging slightly before we're actually contacting the clutch switch and this is allowing the RPM to flare which is what we're seeing here in our RPM trace. |
| 28:56 | The RPM's flaring before the ignition cut is brought in to control that RPM flare. |
| 29:03 | OK so that's our first technique that we're going to look at. |
| 29:07 | Now I'll just point out here, as usual we are going to have questions and answers at the end of this session so if you do have any questions you'd like me to cover, anything you'd like me to elaborate on, please ask those in the comments, Ben will transfer those through to me and I'll deal with those as best I can once we've finished with the rest of the lesson. |
| 29:28 | OK what I'm going to do now is we're going to disable our ignition cut, our GP RPM limit 2 and we're going to go through the process of setting up the gear shift control function. |
| 29:41 | So that can be found in the motorsport section of the drop down menus and if we click on that, we can see we have gear shift control, we'll click on that and we'll get started with setting this up. |
| 29:55 | So as I've mentioned, this particular function is not solely designed for our flat shifting example and this can be used with a microswitch style setup for gear selection and it can also be used with auto blip for downshift and full closed loop gear shift control using a gear position sensor. |
| 30:22 | We're obviously looking at a very simple system here so what we're going to do is select our start shift mode. |
| 30:29 | You can see that depending on the system that we're using, we have a range of options. |
| 30:34 | For our particular system, we're going to simply be using a digital input. |
| 30:41 | Now this again comes from our clutch switch so let's have a look at our setup here. |
| 30:47 | We've got first of all our start shift mode which we've just selected. |
| 30:51 | We've them got our end shift mode. |
| 30:55 | So this defines when the shift is determined to be complete and there's a couple of options that we have here. |
| 31:04 | If we look at our drop down menu for those options we have time, we have digital input, we have gear barrel position. |
| 31:11 | So the two that we can use here are either time, so this will affect us, give us a fixed time length cut which we can adjust so as soon as the digital input requests the shift, the ECU will simply cut the ignition or fuel for a pre determined amount of time. |
| 31:31 | Now that can be effective. |
| 31:35 | I find it needs to be treated a little bit carefully though because you can end up, if you're not very careful with the engine torque being reintroduced while you're still mid shift. |
| 31:46 | So in this instance I've selected digital input for the end shift mode and what this essentially means is now the shift request will occur while that digital input, our clutch switch in this case, is active. |
| 32:01 | So as long as our clutch is disengaged, the engine torque will be disrupted. |
| 32:07 | OK so let's have a look at the rest of the parameters. |
| 32:10 | First of all we have our up shift digital input request. |
| 32:13 | Again here we're just selecting the digital input that we've selected as our clutch switch. |
| 32:18 | In this case DI6. |
| 32:21 | Now in an H pattern gearbox, it's not really possible to properly determine the difference between an upshift and a downshift so in this case we want to set our downshift digital input to off, we're not using that input. |
| 32:37 | We have a range of lock outs that we can set which basically determine when a gearshift request can be processed so in this case we can set an RPM, a throttle position and a speed lockout that the car basically needs to be above before the gearshift request will be taken in. |
| 32:59 | In this case I've set all of these to 0, more realistically what I'd be inclined to do is set them so they're a little bit more realistic so perhaps somewhere where I'm above perhaps 30% throttle, maybe above 3000 or 4000 RPM and also perhaps above 20 km/h. |
| 33:18 | That's just going to make sure that a gear shift request isn't processed and nothing silly happens while I'm sort of sitting stationary or I'm just moving around at low speed. |
| 33:28 | We have the option for an end of gears lock out, again this isn't relevant for this particular type of setup, this is where we're using gear detection and we're actually saying if we request an upshift and we're already in top gear, then ignore that request. |
| 33:47 | We have our maximum shift time which is pretty self explanatory. |
| 33:51 | Regardless of our digital input or our timed input or whatever we're using, this is the maximum amount of time that the gear cut can occur for. |
| 34:01 | In this case I've set it to 1000 ms or 1 second, essentially this pretty much eliminates the ECU from getting stuck in a gear cut mode and will limit the gear cut time to 1 second. |
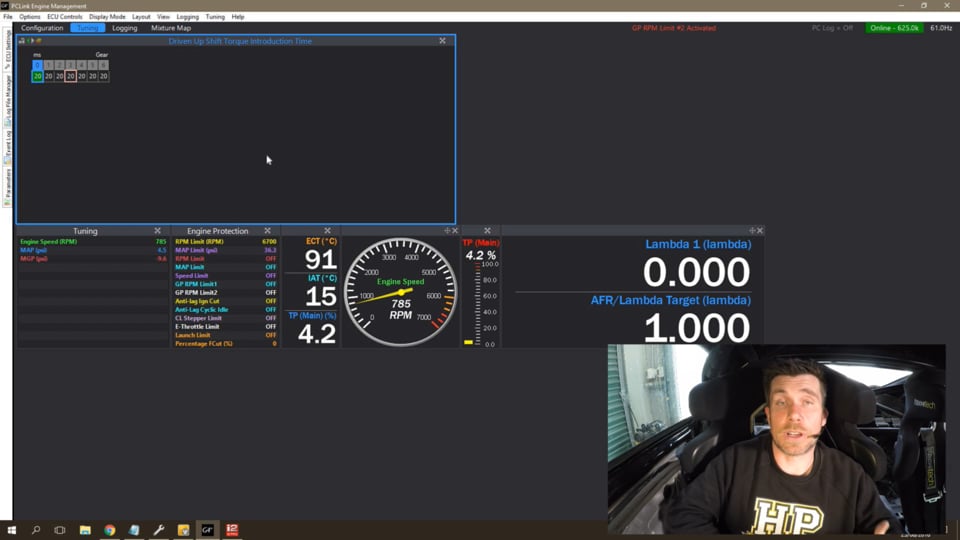
| 34:19 | Now the next parameter down is something that's worth talking about here is our start shift validation time. |
| 34:26 | So basically what this means is that the, all of the parameters that the ECU's looking at, that's look for the start of the shift request, have to be valid for this amount of time before this shift will be processed. |
| 34:41 | Now this is particularly important with our example here because again if we build a delay into here, particularly in the help file Link actually recommend a delay of 20 to 30 ms, particularly with our clutch switch, this is kind of going to exasperate the problem we looked at already with the engine RPM potentially flaring before the request is actually recognised by the ECU so I've set this at 4 ms which is our lower limit so this essentially means that it's going to be requested straight away. |
| 35:15 | Again not so relevant with our particular situation, we have a reactivation time out which basically means another shift request can't occur for this amount of time, this case 500 ms or half a second. |
| 35:30 | This will prevent, if you're using a microswitch or something like this, perhaps the microswitch bouncing and requesting multiple shifts straight after, one after the other. |
| 35:41 | Next we have our drive or overrun throttle position so this can be used to define whether the shift is requested under power, in this case it's called a driven upshift so basically this is our full throttle shift request. |
| 35:57 | Or if we're below this throttle position, the ECU can detect or decide that it's a downshift. |
| 36:04 | Now this can allow us to use the throttle blip functionality, I'm not going to be talking about that, in this particular example we're only looking at flat shifting so for this purpose, this particular parameter, doesn't really matter. |
| 36:19 | So now we've got our driven upshift parameters that we need to look at so we're going to go through those now. |
| 36:26 | First of all we have our driven upshift torque introduction time. |
| 36:31 | So this is how quickly the torque is reintroduced after the upshift. |
| 36:36 | It really is a repeat of what we looked at with how quickly the cut is removed after the shift is completed. |
| 36:45 | So what I've set here is a 20 ms reintroduction time which is going to reintroduce that engine torque relatively quickly. |
| 36:53 | We have our percentage cut so how much cut we need to apply in order for the shift to process. |
| 36:59 | In this case I'm asking for a 100% cut, I want a full cut for this to work. |
| 37:06 | We can also, with this particular function, unlike our GP limiters, we can ask for an upshift ignition trim as well as a fuel trim. |
| 37:15 | I've never personally used or seen the need for a fuel trim, however we can use the ignition trim to remove some timing through the shift and help again reduce the engine torque and smooth out the shift so this can help with our gear cut reliability, our drivetrain reliability. |
| 37:37 | So we've got this function set up now. |
| 37:40 | Let's again go through the gears on the dyno and we'll do a quick test and see how this works and again I'll log the results. |
| 37:49 | So let's do that now, I'll just get the engine running in 1st gear. |
| 37:55 | And we'll get rid of our last file. |
| 38:01 | Right we'll do our second run now. |
| 38:16 | So essentially everything works pretty much the same. |
| 38:20 | If we look at our log file just briefly, we can see we've got exactly the same function going on as when we looked at our GP limits, we've got our 100% fuel cut being applied, we've still obviously got small instances of that RPM flare because we haven't done anything with our clutch switch. |
| 38:41 | Now one of the differences I guess between the GP limit which is obviously a very basic way of setting up this function, and using the actual gear shift cut functionality in the G4+ is as I've mentioned, the GP limit where we've really got to define a certain RPM limit that the engine will hold while the shift is being completed, if we shift from the rev limiter or very close to it, that's going to hopefully work out well but if we short shift for example, then we may not be able to choose the correct or the optimal RPM limit for that particular shift point so it's a little bit compromised there. |
| 39:25 | The gear shift request, the gear shift cut functionality on the other hand basically as long as the parameters to define the start of shift are valid, the cut will occur regardless of what RPM we actually begin the shift from. |
| 39:41 | We also have that advantage as I mentioned of being able to trim the ignition timing to help soften the shift and that can be advantageous as well to help soften that shock loading back on the drivetrain. |
| 39:56 | Alright so we've got to the end of our webinar, if you do have any more questions, again please ask them and I'll get through to those in a second. |
| 40:04 | We'll just go back over the basics there of what we've looked at. |
| 40:07 | So first of all, predominantly I find this is a useful function for turbocharged cars over and above naturally aspirated. |
| 40:16 | It reduces that boost drop off on even a very fast gearshift and it also allows the turbocharger to reach full boost much faster when we reintroduce engine power. |
| 40:29 | We obviously need a switch or an input to tell the ECU that we're requesting the shift and traditionally this would most commonly come from a clutch switch. |
| 40:38 | We've talked about and we've also seen datalogged, why we need to make sure the clutch switch is actuating in the correct spot. |
| 40:51 | So we've seen what that looks like in our data if we've got that wrong so we need to make sure that that's set up correctly. |
| 40:58 | Lastly we've looked at the two ways of actually actuating the gearshift cut. |
| 41:05 | We've looked at setting up a really simple GP RPM limit and then we've gone through and looked at setting up the gear shift cut functionality in the G4+. |
| 41:18 | Generally I would prefer using the gear shift cut function. |
| 41:25 | It's there, it's designed around this sort of use and it does give you that extra advantage of a little bit more control over the ignition retard and if you desire, you can also add in your fuel trim as well. |
| 41:39 | Right we'll go through and have a look at some questions. |
| 41:43 | And we've only got 1 question there, 2 questions there at the moment. |
| 41:47 | First question from Barry G who's asked, what type of switches do you recommend, the car doesn't come with a clutch switch? Some switches can't take the pounding of race shifting. |
| 41:57 | Yeah look I've used in the past with really good results, a relatively simple and basic brake switch which is just a generic universal brake switch that you can probably buy from most auto parts stores. |
| 42:13 | And I think off the top of my head, it was an M12 thread so in particular I fitted these to a number of Mitsubishi Evos and we would take the clutch stop out which was an adjustable stop, that went through a captive nut in the clutch pedal assembly, redrill and tap this to M12 and then could simply thread the brake switch in place. |
| 42:40 | Those were pretty hardy, they were obviously designed as a brake switch for an automotive application and I've found them to work quite well. |
| 42:46 | I've also used in the past the slightly more fragile looking micro switch, just a generic micro switch that you can pick up from the likes of Jaycar. |
| 42:56 | Incredibly cheap, the key here is you do need to make sure that you're not, at full clutch travel you're not applying any mechanical load to the actual switch itself. |
| 43:09 | So you really want to only be actuating the switch, you don't want to be bending or damaging the switch with that pressure being applied to it. |
| 43:18 | So other than that, those are the 2 types I've used. |
| 43:21 | I've never had a failure from either of those particular types, I think one of the keys would be making sure your electrical connections are sound and also simply the way the switch is mounted so that the switch itself isn't getting that force being applied to it, it's only the switching mechanism that's being adjusted or have that load applied to it. |
| 43:45 | TDE Champ's asked, does anyone use these systems in time attack or GT Racing? Look I haven't really seen much advantage for circuit racing. |
| 43:57 | The problem that you have with circuit racing is because we're going to be upshifting, sorry I'm going to go back actually and say obviously with a turbocharged car, if we're looking at time attack or GT Racing, yes the same advantages in full throttle upshifting will be present but now let me go on to continue. |
| 44:18 | What we do need to be careful of with this sort of circuit racing as opposed to drag racing, we're also going to need to downshift and one of the key aspects of downshifting is we need to be able to blip the throttle, heel and toe on a downshift to match RPM so that when we downshift we've already matched the RPM to what we're going to end up with in the next gear. |
| 44:43 | If they're not set up with a TP lockout, throttle position lockout, the gear cut request will become active any time we're on the clutch and this will bring in a rev limiter or cut the ignition which prevents us from properly rev matching on a downshift. |
| 45:05 | So the gear cut function in the G4+, if we set this up correctly, we can get around that though so it's just important to understand the way we set it up and what implication that's going to have on the way the engine performs. |
| 45:25 | TDE Champ's asked, have you ever made use of a clutch pedal position sensor for this? No I've never used a position sensor, the data that you looked at from the drag car we tuned, we actually used a clutch position sensor, we put a clutch position sensor on that particular car but that was more for adjusting the clutch take up position so that we could really optimise the launch of the car and get the clutch taking up in exactly the right position. |
| 45:58 | Jimmy has asked, what about using a digital strain gauge or a load cell, would you be able to downshift and auto blip on an H pattern then? OK one of the problems, yes you can, for a start, you can use this particular sort of system with a strain gauge or a load cell. |
| 46:16 | One of the problems with an H pattern though is even with a strain gauge which can decide if we're pulling or pushing on the gear lever, in an H pattern box, it's not possible to accurately decide whether we're requesting an upshift or a downshift so the way the G4+ decides on that, the overrun we can define as an input via CAN so I'll clear that up for you but my strong suspicion on that one is no you can't. |
| 46:49 | Dave Creedman's asked, this is an old point of many argument with drag racers, what's your view of optimum shift RPM? Maximum horsepower or maximum torque? Yeah it's an age old question and I think hopefully Ben will be able to clear up in the comments, there should be an article written by Sasha Anis from On Point Dyno that's exceptionally powerful in clearing up the age old confusion over this exact debate in our technical archives section. |
| 47:26 | If that is up there Ben can hopefully put a link to that in the comments. |
| 47:30 | If it isn't up, hopefully we can get it up there really quickly. |
| 47:34 | So essentially I've always run the cars a little bit past peak horsepower and allowed them to fall back to somewhere around about sort of just before peak horsepower and that's essentially the argument in Sasha's article. |
| 47:52 | He explains it much much better than I'm going to be able to do at the end of an hour long webinar so I'd urge you to read that. |
| 48:02 | Slow Lane's asked, how is closed loop different? Will you be covering flat shift with sequential boxes? OK so closed loop, we're really talking there about needing a gear box position sensor and these are almost exclusive to sequential transmissions. |
| 48:20 | What we're doing there is looking, we basically want the cut to be as short as possible and really what we want to do is start reintroducing engine torque as soon as the next gear is properly selected. |
| 48:37 | Now particularly if we're talking about a dog engagement gearbox, if we reintroduce the engine power before the next gear is properly selected, we're going to be in danger of damaging the dog rings inside the gearbox which can be quite expensive. |
| 48:55 | If we on the other hand allow the cut to remain for too long, we're obviously hurting our potential for acceleration. |
| 49:03 | So a closed loop control system looks at the gear position and essentially what we define is the voltage from the gearbox position sensor for each of the gears, when each of the gears are deemed to be valid and the cut, once we move from one gear to the next, the cut will remain active until the next gear becomes valid so the cut is as short or as long as it needs to be to ensure that that next gear is properly selected before engine power is reengaged. |
| 49:35 | Now particularly, even with a really competent race driver, you're going to find that the time it takes for shift will vary from one gear to the next, can even vary dependant on gear box oil temperature or certain gears in the gearbox may take longer to engage than others and the closed loop system ensures that the cut is always exactly the right amount of time, this really goes along to ensure gear box reliability as well as the minimum amount of cut time applied as possible. |
| 50:09 | To answer your other question, yes we will be covering flat shift on sequential boxes, some of what we can do understandably is limited on what we have access to at the time so that's really going to define whether or not I can provide a theory based webinar or we'll actually be looking at something in real life. |
| 50:35 | Slow Lane's asked, if you measure it, can you use clutch pressure rather than a switch? Look in the G4+, I'll go back, technically I suppose yes you could do that. |
| 50:48 | Although I'm not entirely sure that the clutch pressure would align or correlate particularly well with the point at which the clutch becomes disengaged. |
| 50:59 | Certainly at this point, the logic inside the G4+ is not going to allow for a clutch pressure sensor for that functionality. |
| 51:09 | It's also probably getting a little bit trickier or more advanced than we really need to be. |
| 51:15 | In order to properly answer your question, I really need to look at clutch position versus clutch pressure to see what that correlation looks llike and whether the data is even useful to us at all. |
| 51:29 | Next Slow Lane's also asked, are OEM electronic throttles quick enough for auto blip? Yeah absolutely and that's really really common. |
| 51:38 | The Toyota 86 that we set up recently with a Hollinger paddle shifted 6 speed gearbox and a MoTeC M150, that uses the factory drive by wire throttle for the auto blip on downshift. |
| 51:54 | Now one aspect that you do need to be aware of though is these pneumatically actuated paddle shift box, again we're getting a little bit beyond the scope of what this webinar here was meant to talk about but I'll cover your question anyway. |
| 52:08 | Paddle shifted pneumatic gearboxes tend to shift very quickly regardless of whether we're shifting up or down. |
| 52:15 | And what we need to do on the downshift is disengage the higher gear and as the gearbox moves through the neutral position before it engages the lower gear, the throttle needs to blip and match the revs for what the RPM will be in the lower gear. |
| 52:34 | It leaves a very narrow window of time as well as movement inside the gearbox for this to be achieved. |
| 52:42 | And a little bit of a limitation, it's not really so much the drive by wire throttle control, as is the inertia of the engine or essentially how quickly we can rev the engine up. |
| 52:56 | And particularly with a normal production engine with a heavy flywheel and clutch assembly, even if you're sitting at 3000 RPM and you instantly mash your foot flat to the floor with a cable throttle, you're going to notice that there is some inherent lag or inertia with the engine physically being able to pick up revs so that's really the limiting factor over and above the drive by wire throttle itself. |
| 53:21 | When tuned correctly on an engine that is capable of achieving fast changes in RPM, it works exceptionally well. |
| 53:30 | Tommy's asked, do you know how the 370z factory rev match system works? Absolutely no idea Tommy, sorry I can't really elaborate on that more. |
| 53:41 | Dave Creedman has asked, possibility of using the negative and positive G sensor inputs in the Thunder with onboard G sensor for inputs to activate shift points up and down, an option to be explored? I mean absolutely anything's possible Dave and that may well be. |
| 53:57 | It really comes down to whether or not the guys at Link see the advantage in writing that logic into the functionality. |
| 54:08 | Whether or not that's seen I guess as an advantage to the larger market, I can't answer that for them unfortunately. |
| 54:18 | One thing you do need to be aware of though with the H pattern box, and this is really the limiting factor, is no matter what logic you're applying, it's probably still possible to end up in a weird set of circumstances where the stars align and you're upshifting and the ECU thinks you're downshifting or vice versa. |
| 54:38 | So it does need to be dealt with quite carefully. |
| 54:43 | Alright guys that brings us to the end of our webinar. |
| 54:46 | As usual if you do have further questions, please ask those in the webinars section of the forum and I'll be happy to answer them there. |
| 54:54 | As usual, if you're not following us on social media at the moment, please make sure you are. |
| 55:00 | We're on Facebook obviously as High Performance Academy, we're on Instagram as hpa101, Snapchat as High Performance Academy 101 and also if you haven't, check out our YouTube channel and subscribe to that, there's a huge amount of really interesting technical content on there and we've got interviews with some of the smartest car constructors and tuners from all around the world. |
| 55:28 | Alright guys, thanks for joining us and we'll see you all next week. |


